Have Issues With Sound Doctor? Use These Troubleshooting Guides To Fix Your Problem.
Ableton Live – Sound Doctor Troubleshooting Guide
First, make sure:
– The plugin is installed on your computer
– iLok License Manager is installed and up to date.
If both the above points are true…
A. Rescan Plugins – How to rescan plugins in Ableton Live
This issue can often be resolved by a full rescan of your DAW’s plugin folder.
To instruct your DAW to rescan its plugin folders, follow these steps:
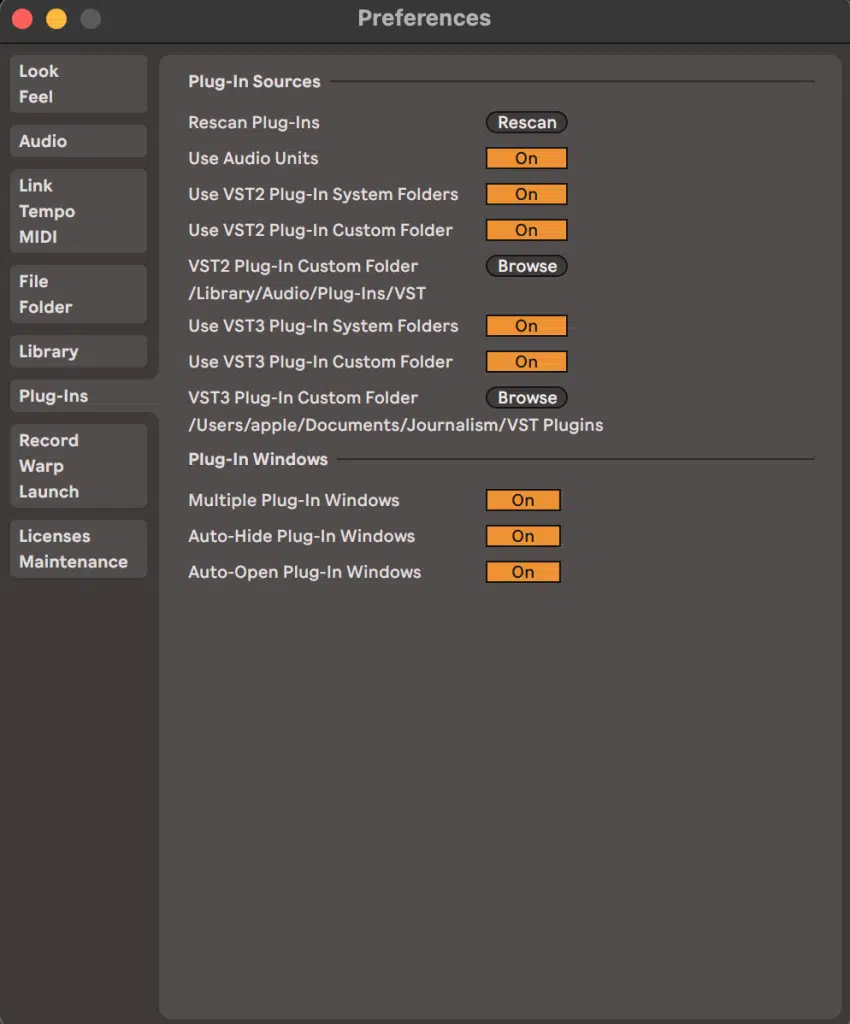
1. Open Live’s Preferences window. (Options > Preferences).
2. Navigate to the “Plug-Ins” tab in the preferences window.
3. At the top of the page, click the “Rescan” button. This will rescan your plugin folder. This will take
a few moments depending on how many plugins are rescanned.
4. If this doesn’t work, you should try a “Force Rescan”. This is a deeper form of rescanning that
examines every plugin in your folder.
a. To “Force Rescan” Simply hold Alt/Opt when clicking the Rescan button. This will take
longer than the above method.
5. Head back to the plugin browser and check Sound Doctor has been located.
B. Check DAW is configured to the plugin installation directory.
Sometimes the DAW might not be looking in the right place to find the plugin.
You need to make sure the installation directory is correctly specified in your DAW’s plugin folder
options.
If you are using custom plugin folders, both the DAW and Plugin need to be instructed to the same
location.
Search in your computer’s browser to find where you installed the plugin.
The default installation directories are:
Mac OS
/Library/Audio/Audio/Plugins/VST
WINDOWS
32bit VST = C:\Program Files (x86)\Vstplugins
64bit VST = C:\Program Files\Vstplugins
Ensure your DAW is looking in these folders, and the plugin is also installed here.
In Ableton Live, you can set the folder locations from the “Plug-Ins” tab of the preferences window.
Make sure the VST2/3 Plug-In Custom Folder setting is looking at the right place.
C. Re-install the plugin.
As a last attempt, you can try uninstalling and reinstalling the plugin:
1. Fully close your DAW.
2. Uninstall the Sound Doctor plugin.
3. Restart your computer.
4. Turn off any anti-virus/scanner.
5. Install the Sound Doctor Plugin.
6. Make sure the license is activated in the iLok License Manager.
7. Open your DAW.
8. Perform a full plugin folder rescan in your DAW.
FL Studio
FL Studio – Sound Doctor Troubleshooting Guide
First, make sure:
– The plugin is installed on your computer
– iLok License Manager is installed and up to date.
If both the above points are true…
A. Rescan Plugins – How to rescan plugins in FL Studio
This issue can often be resolved by a full rescan of your DAW’s plugin folder.
To instruct FL Studio to rescan its plugin folders, follow these steps:
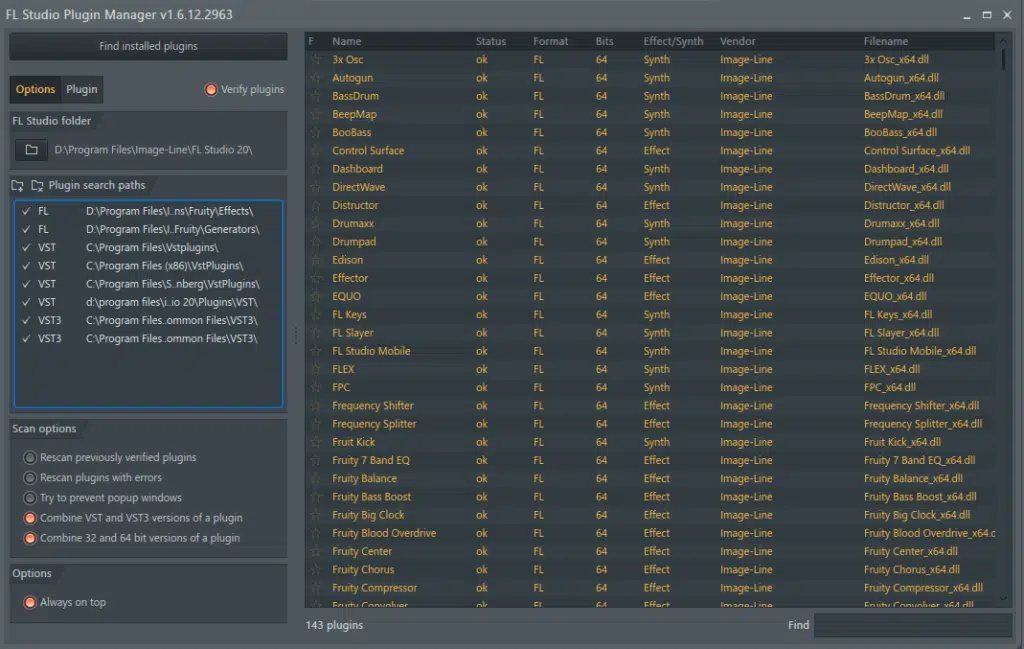
1. From the top menu, select “Options > Manage Plugins”
2. At the top left of the Plugin Manager Window, click the “Start Scan” Button
3. Now, wait for the scan to complete.
4. Search “Sound Doctor” in the bottom right search bar.
5. Sound Doctor should now appear in the list.
6. If not…
B. Check DAW is configured to the plugin installation directory.
Sometimes the DAW might not be looking in the right place to find the plugin. You need to make sure the installation directory is correctly specified in your DAW’s plugin folder
options.
If you are using custom plugin folders, both the DAW and Plugin need to be instructed to the same
location.
Search in your computer’s browser to find where you installed the plugin. The default installation directories are:
Mac OS
/Library/Audio/Audio/Plugins/VST
WINDOWS
32bit VST = C:\Program Files (x86)\Vstplugins
64bit VST = C:\Program Files\Vstplugins
Ensure your DAW is looking in these folders, and the plugin is also installed here. Look at the left of the plugin manager window. In the “Plugin Search Paths” section, make sure your plugin installation folder is included.
After adding your folder, make sure to click the “Start Scan” button again.
C. Re-install the plugin.
As a last attempt, you can try uninstalling and reinstalling the plugin:
1. Fully close your DAW.
2. Uninstall the Sound Doctor plugin.
3. Restart your computer.
4. Turn off any anti-virus/scanner.
5. Install the Sound Doctor Plugin.
6. Make sure the license is activated in the iLok License Manager.
7. Open your DAW.
8. Perform a full plugin folder rescan in your DAW.
Logic Pro
Logic Pro – Sound Doctor Troubleshooting Guide
First, make sure:
– The plugin is installed on your computer
– iLok License Manager is installed and up to date.
If both the above points are true, and Sound Doctor is still not showing…
A. Rescan Plugins – How to rescan plugins in Logic Pro
This issue can often be resolved by a full rescan of your DAW’s plugin folder.
To instruct Logic to re-validate plugins, follow these steps:
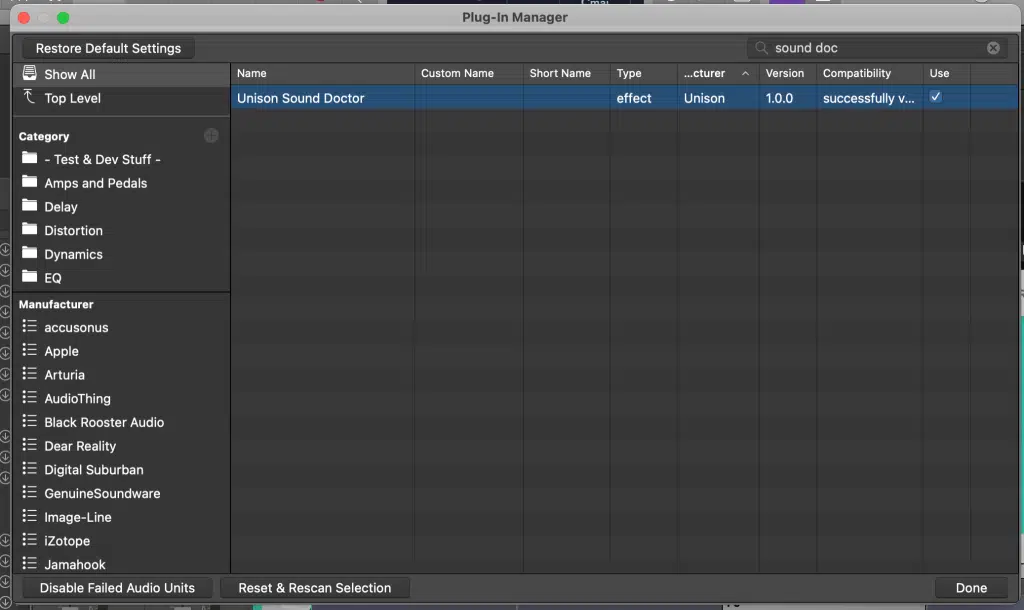
1. Open the Plug-in Manager from the top menu
a. Logic Pro > Preferences > Plug-in Manager…
2. Select Sound Doctor from the list
3. Click “Reset & Rescan Selection”
B. Check DAW is configured to the plugin installation directory.
Because Logic uses AU (Audio Unit) format, you don’t have the option of using a custom installation
directory.
If there is still a problem, check if the plugin is activated in the iLok License Manager.
C. Re-install the plugin.
As a last attempt, you can try uninstalling and reinstalling the plugin:
1. Fully close your DAW.
2. Uninstall the Sound Doctor plugin.
3. Restart your computer.
4. Turn off any anti-virus/scanner.
5. Install the Sound Doctor Plugin.
6. Make sure the license is activated in the iLok License Manager.
7. Open your DAW.
8. Perform a full plugin folder rescan in your DAW.
Pro Tools
Logic Pro – Sound Doctor Troubleshooting Guide
First, make sure:
– The plugin is installed on your computer
– iLok License Manager is installed and up to date.
If both the above points are true…
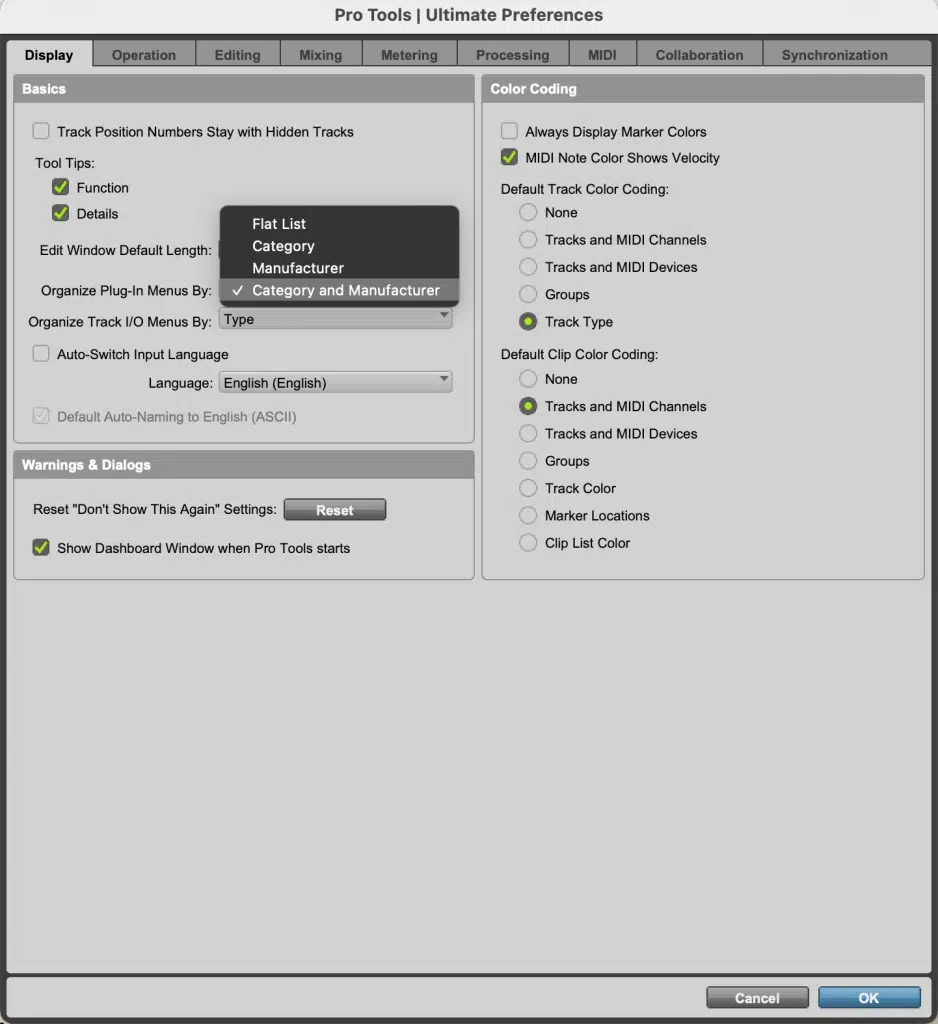
In Pro Tools, it helps to organize plugins by Category & Manufacturer. This way you can see if the DAW is
detecting plugins from Unison.
1. From the top menu, select “Setup > Preferences”
2. In the Preferences “Display” tab, under “Organize Plugin Menus By…” choose Category &
Manufacturer.
3. Now it should be easier to find Sound Doctor under the “Unison” section.
If this doesn’t help, the chances are either the plugin is installed in the wrong location, or Pro Tools is looking in the wrong place.
Delete the Pro Tools Prefs
In some cases, you will need to delete the “Pro Tools Prefs” file, and an additional “InstalledAAXPlugins”
file. Doing this forces Pro Tools to rescan the AAX Plugin Directory.
Note, this only works with Pro Tools 12 and above. For earlier versions refer to this Sweetwater Guide.
To do this…
Delete Pro Tools Prefs (MAC OS)
Close Pro Tools first.
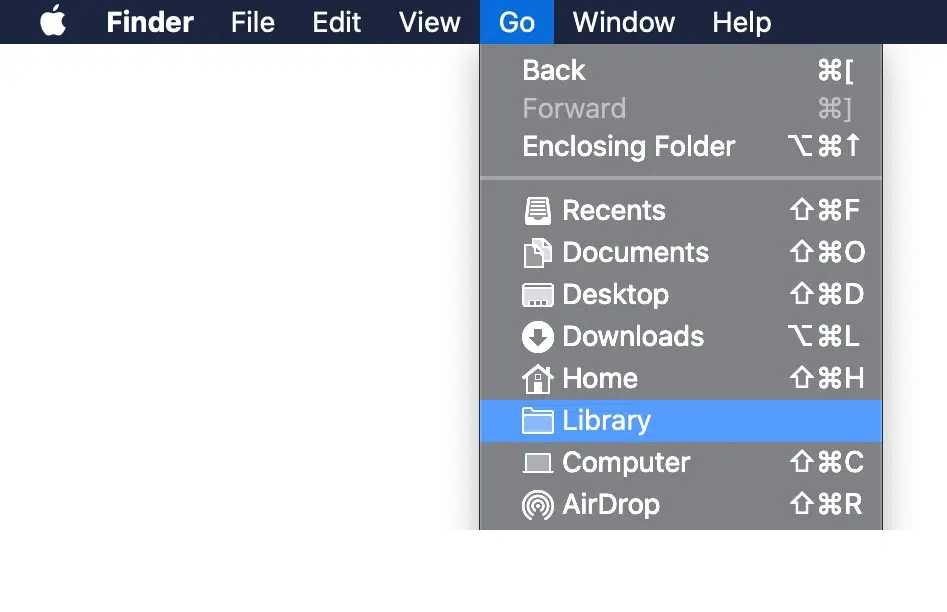
Open finder, then head to:
/Users/<your_username>/Library/Preferences/Avid/Pro Tools
To open the hidden Library folder, hold the “Option” key while hovering over the Go Menu in Finder to
reveal the selection.
Simply select and delete the following two files.
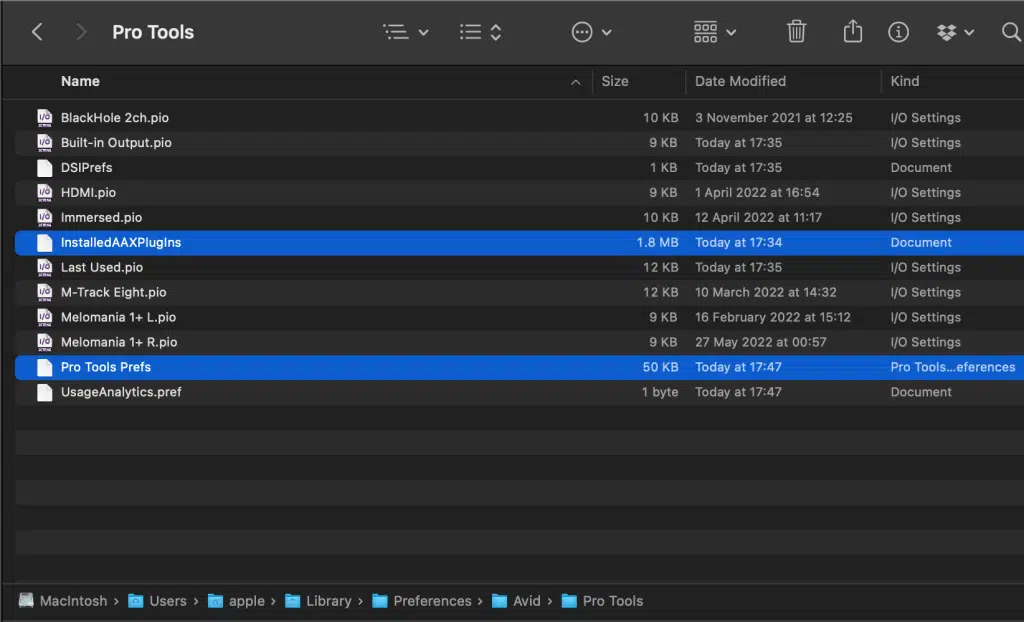
Now, when you reopen Pro Tools, it will re-scan your plugins.
Delete Pro Tools Prefs (WINDOWS)
Close Pro Tools.
Open the Windows file explorer, and go to:
C\:Users\<your_username>\AppData\Roaming\Avid\Pro Tools
– You need to make sure Show Hidden Folders is enabled. Simply search “Show hidden files” in the
start menu to reveal this option.
Select and delete the following two files.
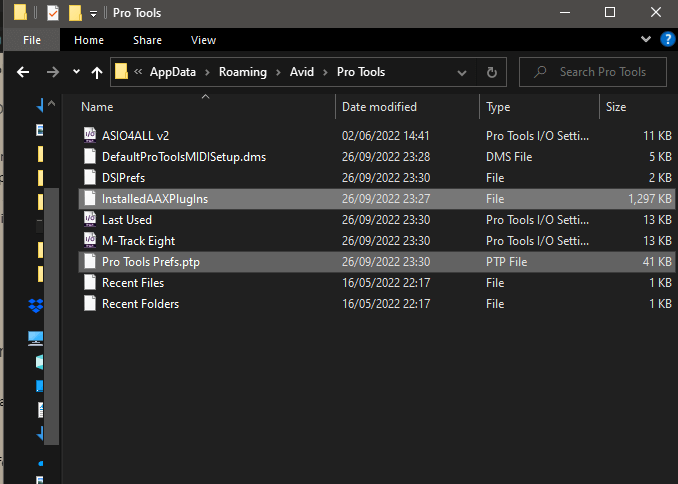
Now, when you reopen Pro Tools, it will re-scan your plugins.
B. Check DAW is configured to the plugin installation directory.
Because Pro Tools uses the AAX format, there should be no need to adjust any plugin folder directory.
C. Re-install the plugin.
As a last attempt, you can try uninstalling and reinstalling the plugin:
1. Fully close your DAW.
2. Uninstall the Sound Doctor plugin.
3. Restart your computer.
4. Turn off any anti-virus/scanner.
5. Install the Sound Doctor Plugin.
6. Make sure the license is activated in the iLok License Manager.
7. Open your DAW.
8. Perform a full plugin folder rescan in your DAW.
Cubase
Cubase Sound Doctor Troubleshooting Guide
First, make sure:
– The plugin is installed on your computer
– iLok License Manager is installed and up to date.
If both the above points are true…
A. Rescan Plugins – How to rescan plugins in Cubase
This issue can often be resolved by a full rescan of your DAW’s plugin folder.
To instruct your DAW to rescan its plugin folders, follow these steps:
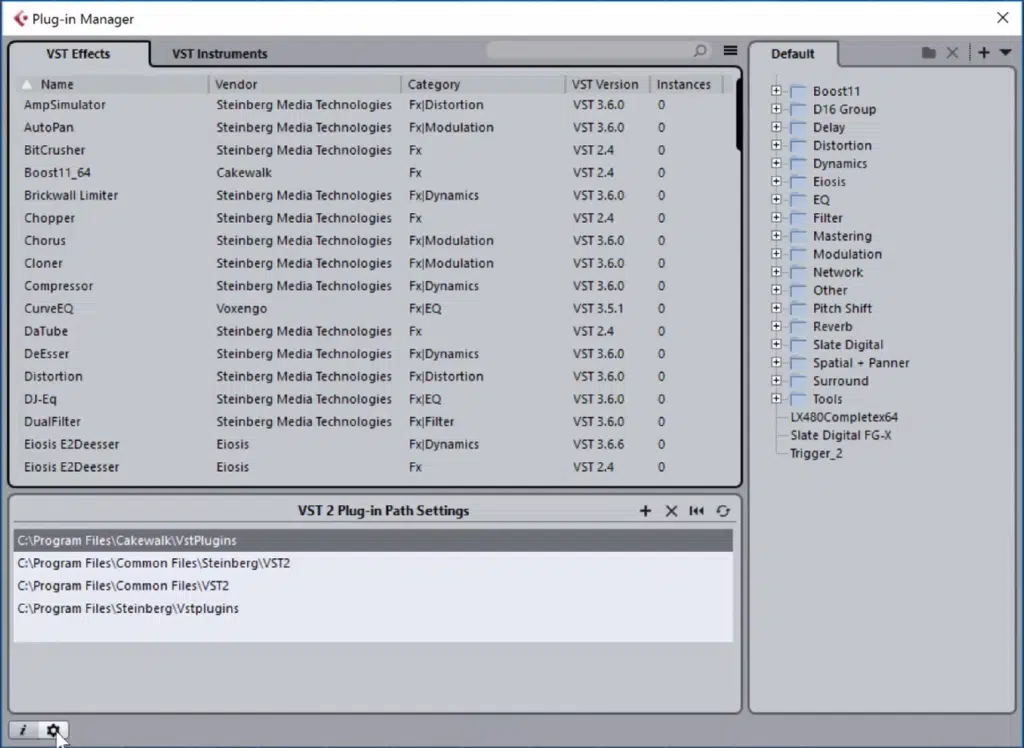
1. Open the Plugin Manager from the top menu
a. Devices > Plugin Manager
2. Click the cog icon in the bottom left of the window to open plugin settings.
3. Click the “+” add button, and add any unselected folders where Sound Doctor may be installed.
4. Click the circular arrow button (Rescan All) to start the rescan process.
5. Hopefully, Sound Doctor should now appear in the plugin list.
B. Check DAW is configured to the plugin installation directory.
Sometimes the DAW might not be looking in the right place to find the plugin.
You need to make sure the installation directory is correctly specified in your DAW’s plugin folder
options.
If you are using custom plugin folders, both the DAW and Plugin need to be instructed to the same
location.
Search in your computer’s browser to find where you installed the plugin. The default installation directories are:
Mac OS
/Library/Audio/Audio/Plugins/VST
WINDOWS
32bit VST = C:\Program Files (x86)\Vstplugins
64bit VST = C:\Program Files\Vstplugins
Ensure Cubase is looking in these folders, and the plugin is also installed here. You can add new folders to Cubase’s plugin search list via the steps above.
C. Re-install the plugin.
As a last attempt, you can try uninstalling and reinstalling the plugin:
1. Fully close your DAW.
2. Uninstall the Sound Doctor plugin.
3. Restart your computer.
4. Turn off any anti-virus/scanner.
5. Install the Sound Doctor Plugin.
6. Make sure the license is activated in the iLok License Manager.
7. Open your DAW.
8. Perform a full plugin folder rescan in your DAW.
Studio One
Studio One – Sound Doctor Troubleshooting Guide
First, make sure:
– The plugin is installed on your computer
– iLok License Manager is installed and up to date.
If both the above points are true…
A. Rescan Plugins – How to add paths and rescan plugins in Studio One
This issue can often be resolved by a full rescan of your DAW’s plugin folder.
To instruct Studio One to rescan its plugin folders, follow these steps:
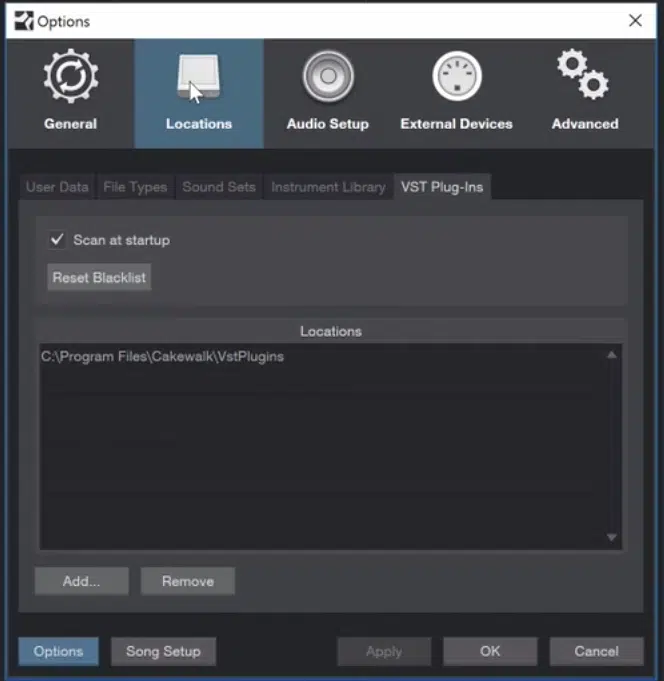
1. Open the Studio One VST Plugin Manager Window from the top menu
a. Options > Locations > VST Plugins.
2. From the window, click “Add” to add new folder paths to the list.
a. Make sure you add the folder where Sound Doctor is installed.
3. Also, click “Reset Blacklist” to refresh the system.
4. Click “Apply”, and Studio One should start scanning the added folders.
5. You may need to restart Studio One to rescan your folders.
6. No, Sound Doctor should appear in the plugin list.
If you are using custom plugin folders, both the DAW and Plugin need to be instructed to the same
location.
Search in your computer’s browser to find where you installed the plugin.
The default installation directories are:
Mac OS
/Library/Audio/Audio/Plugins/VST
WINDOWS
32bit VST = C:\Program Files (x86)\Vstplugins
64bit VST = C:\Program Files\Vstplugins
Ensure you add these folder paths to the Studio One Locations Menu.
C. Re-install the plugin.
As a last attempt, you can try uninstalling and reinstalling the plugin:
1. Fully close your DAW.
2. Uninstall the Sound Doctor plugin.
3. Restart your computer.
4. Turn off any anti-virus/scanner.
5. Install the Sound Doctor Plugin.
6. Make sure the license is activated in the iLok License Manager.
7. Open your DAW.
8. Perform a full plugin folder rescan in your DAW.
Reason Sound
Reason Sound Doctor Troubleshooting Guide
First, make sure:
– The plugin is installed on your computer
– iLok License Manager is installed and up to date.
If both the above points are true…
A. Rescan Plugins – How to rescan plugins in Reason
This issue can often be resolved by a full rescan of your DAW’s plugin folder.
To instruct Reason to rescan its plugin folders, follow these steps:
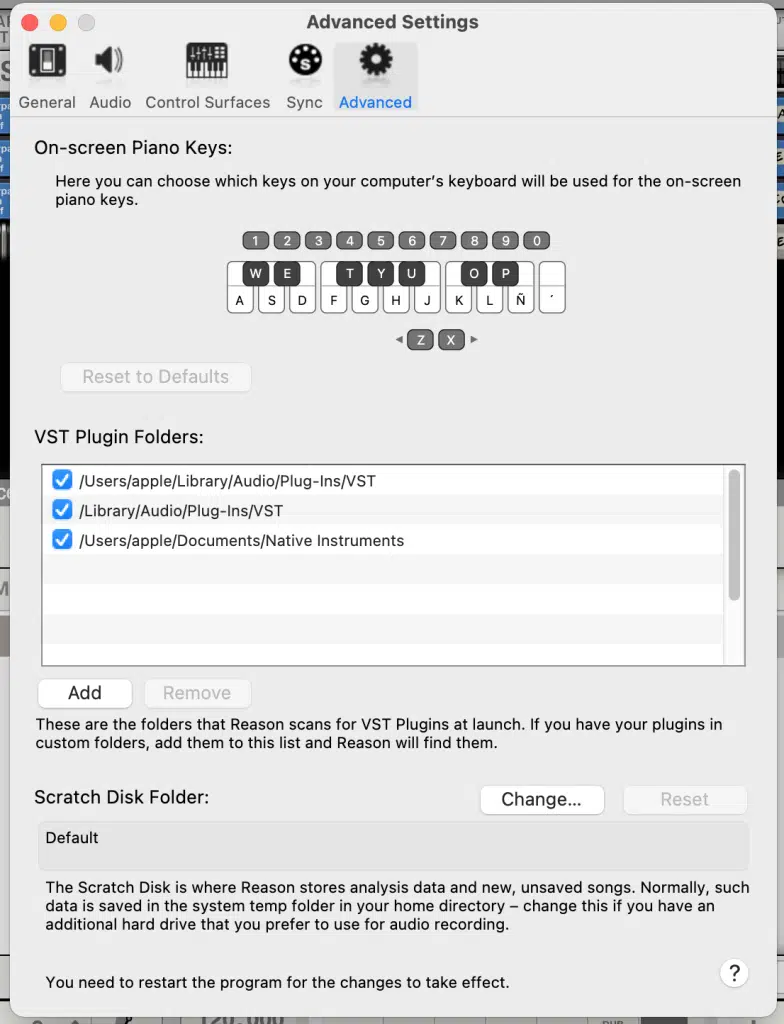
1. Open Reason’s preferences window from the top menu
a. Reason > Preferences
2. Select the Advanced Tab
3. Look at the “VST Plugin Folders” Section
4. Ensure the correct folders are added, if not…
a. Click “Add”
b. Then enter Sound Doctor’s installation path.
5. Then close and re-open Reason to trigger a rescan.
The default installation directories are:
Mac OS
/Library/Audio/Audio/Plugins/VST
WINDOWS
32bit VST = C:\Program Files (x86)\Vstplugins
64bit VST = C:\Program Files\Vstplugins
Ensure your DAW is looking in these folders, and the plugin is also installed here.
C. Re-install the plugin.
As a last attempt, you can try uninstalling and reinstalling the plugin:
1. Fully close your DAW.
2. Uninstall the Sound Doctor plugin.
3. Restart your computer.
4. Turn off any anti-virus/scanner.
5. Install the Sound Doctor Plugin.
6. Make sure the license is activated in the iLok License Manager.
7. Open your DAW.
8. Perform a full plugin folder rescan in your DAW.
Reaper
Reaper Sound Doctor Troubleshooting Guide
First, make sure:
– The plugin is installed on your computer
– iLok License Manager is installed and up to date.
If both the above points are true…
A. Rescan Plugins – How to rescan plugins in Reaper
This issue can often be resolved by a full rescan of your DAW’s plugin folder.
To instruct Reaper to rescan its plugin folders, follow these steps:
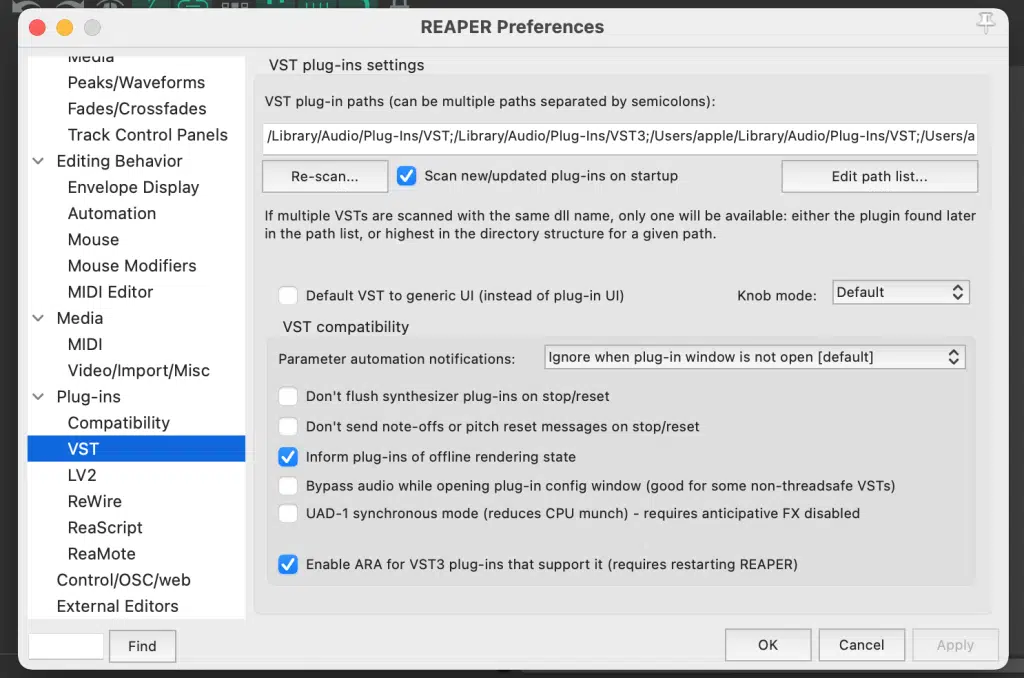
1. Open the Reaper Preferences Window from the top menu
a. Options > Preferences
2. Select the “VST” Page from the “Plugins” section on the left.
3. Add any missing folder paths under the “Edit Path List” button
4. Click “Re-scan…”
5. Hopefully, Sound Doctor will now appear in the plugin list.
If you are using custom plugin folders, both the DAW and Plugin need to be instructed to the same
location.
The default installation directories are:
Mac OS
/Library/Audio/Audio/Plugins/VST
WINDOWS
32bit VST = C:\Program Files (x86)\Vstplugins
64bit VST = C:\Program Files\Vstplugins
Ensure Reaper is looking in these folders, and the plugin is also installed here.
C. Re-install the plugin.
As a last attempt, you can try uninstalling and reinstalling the plugin:
1. Fully close your DAW.
2. Uninstall the Sound Doctor plugin.
3. Restart your computer.
4. Turn off any anti-virus/scanner.
5. Install the Sound Doctor Plugin.
6. Make sure the license is activated in the iLok License Manager.
7. Open your DAW.
8. Perform a full plugin folder rescan in your DAW.
Cakewalk Sonar
Cakewalk Sonar – Sound Doctor Troubleshooting Guide
First, make sure:
– The plugin is installed on your computer
– iLok License Manager is installed and up to date.
If both the above points are true…
A. Rescan Plugins – How to rescan plugins in Cakewalk Sonar
This issue can often be resolved by a full rescan of your DAW’s plugin folder. To instruct Cakewalk Sonar to rescan its plugin folders, follow these steps:
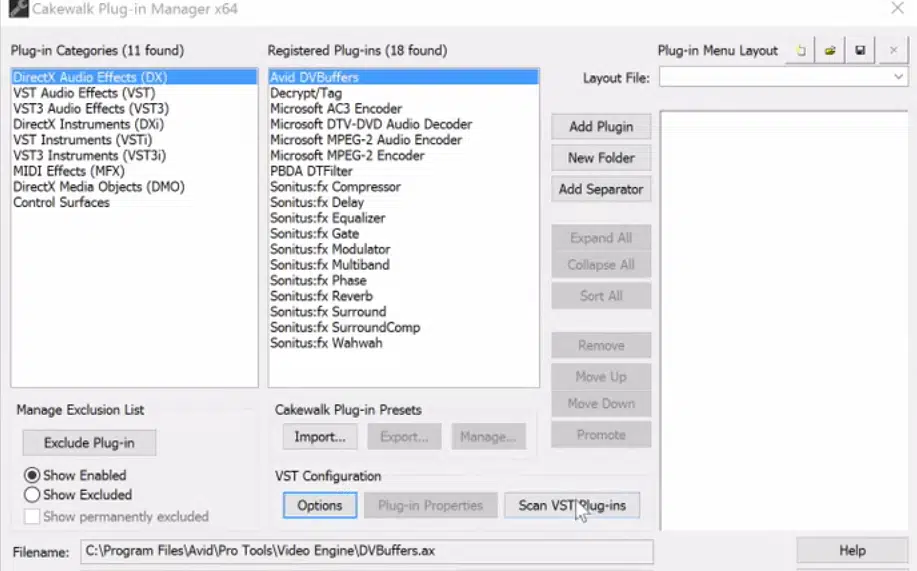
1. Open the Cakewalk Plugin Manager window from the top menu
a. Utilities > Plugin Manager
2. Look through the selected search directories, and make sure the Sound Doctor folder is located
there.
a. If not, click Options, Add.
b. Navigate to the directory.
c. Click Apply.
3. In the VST Configuration Section, click the “Scan ST Plug-ins” button.
B. Check DAW is configured to the plugin installation directory.
Sometimes the DAW might not be looking in the right place to find the plugin. You need to make sure the installation directory is correctly specified in your DAW’s plugin folder options.
If you are using custom plugin folders, both the DAW and Plugin need to be instructed to the same
location.
Search in your computer’s browser to find where you installed the plugin.
The default installation directories are:
Mac OS
/Library/Audio/Audio/Plugins/VST
WINDOWS
32bit VST = C:\Program Files (x86)\Vstplugins
64bit VST = C:\Program Files\Vstplugins
Ensure your DAW is looking in these folders, and the plugin is also installed here.
Make sure you add these folders to Cakewalk’s plugin folder list, as explained in the section above.
C. Re-install the plugin.
As a last attempt, you can try uninstalling and reinstalling the plugin:
1. Fully close your DAW.
2. Uninstall the Sound Doctor plugin.
3. Restart your computer.
4. Turn off any anti-virus/scanner.
5. Install the Sound Doctor Plugin.
6. Make sure the license is activated in the iLok License Manager.
7. Open your DAW.
8. Perform a full plugin folder rescan in your DAW.
Mixcraft
Mixcraft – Sound Doctor Troubleshooting Guide
First, make sure:
– The plugin is installed on your computer
– iLok License Manager is installed and up to date.
If both the above points are true…
A. Rescan Plugins – How to rescan plugins in Mixcraft
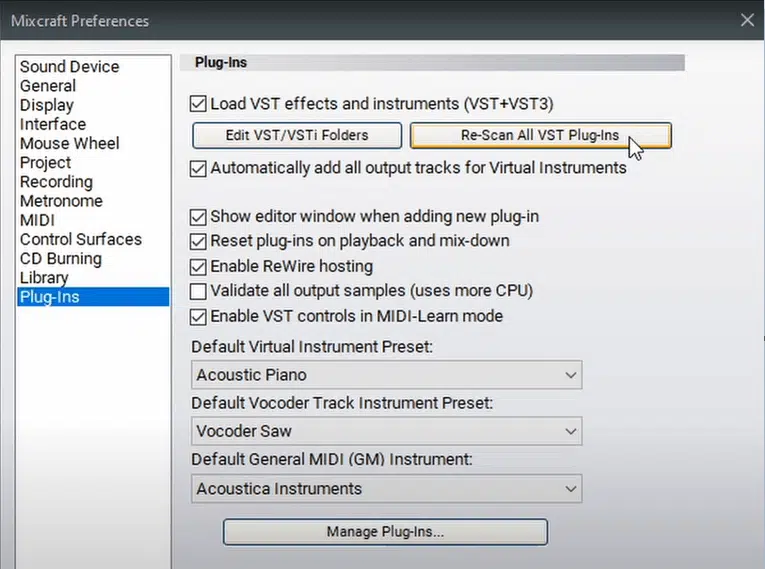
This issue can often be resolved by a full rescan of your DAW’s plugin folder. To instruct Mixcraft to rescan its plugin folders, follow these steps:
1. Open the Mixcraft Plugin Manager
a. File > Preferences
b. Select Plug-Ins from the left list.
2. Click “Edit VST Folders” to add any missing installation directories (explained in the next section)
a. Click Add, or “Auto Scan”
b. Locate the missing folders
c. Click OK
3. Click “Re-Scan All VST Plug-Ins”
B. Check DAW is configured to the plugin installation directory.
Sometimes the DAW might not be looking in the right place to find the plugin. You need to make sure the installation directory is correctly specified in your DAW’s plugin folder options.
If you are using custom plugin folders, both the DAW and Plugin need to be instructed to the same
location.
Search in your computer’s browser to find where you installed the plugin.
The default installation directories are:
Mac OS
/Library/Audio/Audio/Plugins/VST
WINDOWS
32bit VST = C:\Program Files (x86)\Vstplugins
64bit VST = C:\Program Files\Vstplugins
Ensure your DAW is looking in these folders, and the plugin is also installed here.
In FL Studio
Make sure the VST2/3 Plug-In Custom Folder setting is looking in the right place.
C. Re-install the plugin.
As a last attempt, you can try uninstalling and reinstalling the plugin:
1. Fully close your DAW.
2. Uninstall the Sound Doctor plugin.
3. Restart your computer.
4. Turn off any anti-virus/scanner.
5. Install the Sound Doctor Plugin.
6. Make sure the license is activated in the iLok License Manager.
7. Open your DAW.
8. Perform a full plugin folder rescan in your DAW.
Bitwig Studio
Bitwig Studio – Sound Doctor Troubleshooting Guide
First, make sure:
– The plugin is installed on your computer
– iLok License Manager is installed and up to date.
If both the above points are true…
A. Rescan Plugins – How to rescan plugins in Bitwig Studio
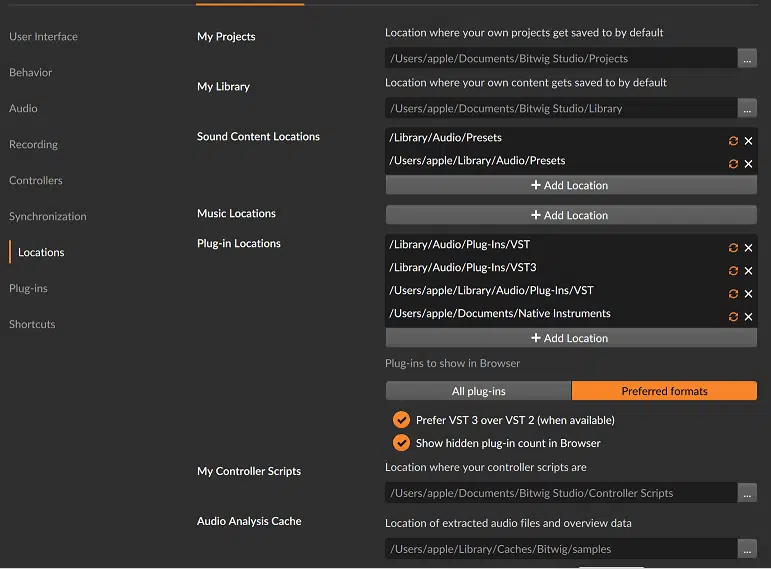
This issue can often be resolved by a full rescan of your DAW’s plugin folder. To instruct Bitwig Studio to rescan its plugin folders, follow these steps:
1. Open Bitwig’s Location Manager.
a. File > Settings > Locations.
2. Look at the “Plug-in Locations” section.
3. Make sure the Sound Doctor installation paths are included, if not…
a. Click “Add Location”
b. Navigate to Sound Doctor’s install path
c. Select the folder, and click “Open”
d. The path is now added.
4. Bitwig will automatically rescan its plugins folder after restarting.
B. Check DAW is configured to the plugin installation directory.
Sometimes the DAW might not be looking in the right place to find the plugin. You need to make sure the installation directory is correctly specified in your DAW’s plugin folder options.
If you are using custom plugin folders, both the DAW and Plugin need to be instructed to the same
location.
Search in your computer’s browser to find where you installed the plugin.
The default installation directories are:
Mac OS
/Library/Audio/Audio/Plugins/VST
WINDOWS
32bit VST = C:\Program Files (x86)\Vstplugins
64bit VST = C:\Program Files\Vstplugins
Ensure Bitwig Studio is looking in these folders, and the plugin is also installed here.
C. Re-install the plugin.
As a last attempt, you can try uninstalling and reinstalling the plugin:
1. Fully close your DAW.
2. Uninstall the Sound Doctor plugin.
3. Restart your computer.
4. Turn off any anti-virus/scanner.
5. Install the Sound Doctor Plugin.
6. Make sure the license is activated in the iLok License Manager.
7. Open your DAW.
8. Perform a full plugin folder rescan in your DAW.


...
...
You have no items in your cart.


