Reverse-engineering a preset, in my humble opinion, is one of the most fundamental and beneficial practices you can implement in order to speed up the explication/illumination of the ‘Sound Design’ process; because, truthfully, in regards to sound design, your ‘decipherable’ options are vastly limited… it’s either this, or traditional trial and error.
Granted, you unquestionably require ample time experimenting in order to achieve any kind of enduring success but, by properly acquiring how to expertly reverse-engineer presets, you can drastically enhance your skill level in this subject matter (it certainly helped me).
Although there is an obstinate, long-standing predilection (or, bias) that claims, when first starting out, nothing significant can be obtained/accomplished by effectuating this process, I wholeheartedly oppose that statement; granting it validity in only the VERY premature stages.
For example, if you aren’t capable of accurately distinguishing the difference between ‘knobs’ and ‘sections’ then, of course, you won’t procure too much utility/efficacy from this technique but, on the other hand, if you thoroughly (or even moderately) know your synth’s functions, there is MUCH to be desired.
There are various benefits to utilizing this method, such as: gaining an advantageous look into what makes a particular sound ‘tick,’ figuring out the exact results of any given parameter (once modulated a certain way) and it’s reaction in relation to all the other/conflicting information (tones/sounds), plus how sources (modulators) and other destinations (parameters) respond to each other.
Before we begin, you must understand/realize that ANY ‘patch’ you open can, in essence, be broken down into 4 different stages:
NOTE: This does NOT mean that any/every sound was created in these particular stages, or even consist of every single one but, purely for the sake of Reverse-Engineering presets, it helps substantially to view it as such.
Table of Contents
- WAVETABLES AND TIMBRE
- LET’S DO A LITTLE EXPERIMENT IN AN ATTEMPT TO BETTER UNDERSTAND ‘TIMBRE’:
- 1. Open up the preset of your choice.
- 2. Turn the sub-oscillator and noise-oscillator (if enabled) OFF. Also, turn off either oscillator A or oscillator B (so only one remains active); listen to that sound, and remember it’s characteristics.
- 3. Go to your wavetables and open up ‘Basic Shapes’. Now, listen to what that preset sounds like as a standard sine-wave.
- 4. Change the ‘WT Pos’ knob to a ‘saw wave,’ and scrupulously listen to how it affects the sound.
- REVERSE ENGINEERING PRESETS IN SERUM
- STEP 1: CHECK THE WAVETABLE; ASSESSING OUR OSCILLATORS
- A. Upon opening up a preset, the very first thing you’ll want to do is: look at ALL the ‘Oscillators In-Use’ (which includes the ‘Sub’ and ‘Noise’ Oscillators).
- B. After assessing the oscillators that are in-use, we’re now going to determine/examine which ‘wavetables’ are currently in-use, and if the ‘WT POS’ is being modulated or not; this will provide the overall timbre and foundation of our patch, as well as the sound it’s ultimately emanating.
- C. Turn each oscillator on and off; so we’re able to properly gauge/determine what each, individual oscillator is truly doing.
- D. After you have analyzed/assessed each oscillator’s wavetable, thoroughly examine any exclusive behaviors/character traits and its warp-mode (if enabled), along with any modulation (LFO’S and Envelopes) that is effecting the OSC (wavetable position, pitch, etc.) in order to adjudge what it’s purpose/function is, and in what capacity is it affecting the sound?
- STEP 2: VOICING
- STEP 3: ENVELOPES AND LFO’S
- A. Ask yourself: how many Envelopes and LFOs are currently in use? what are their precise shapes/settings? and which/how many parameters they’re actively affecting?
- B. Look at your first Envelope as, pertaining to Serum’s specific mechanisms, this is invariably the ‘main’ amplitude-Envelope. Then, figure out whether your preset is either in ‘One Shot’ mode, or if it’s being re-triggered.
- C. Next thing to ask yourself is: which distinct mode are these LFOs in?
- STEP 4: ASSESSING THE SUB AND NOISE OSCILLATORS
- A. Turn both the SUB and Noise oscillators on and off (to help accurately determine/gauge what distinct role, and how big of a role, each oscillator plays).
- B. Determine whether the SUB oscillator is authentically providing the sub-tone/layer, or if it’s being used as ‘THIRD’ oscillator.
- C. Check the parameters of the Noise oscillators; see if ‘one shot’ or ‘key tracking’ mode is enabled.
- STEP 5: ANALYZE THE FILTERS
- A. Thoroughly assess your ‘filter’ situation, and identify which specific oscillators are being sent through it.
- B. Assiduously assess the filter-type that’s currently being used, and what exactly it’s being used for. Also, be sure to assess the numbers (located next to each filter-type), as this stands for/identifies the overall intensity of the curve, and just how ‘drastic’ the filter’s effects truly are.
- THE FX MODULE
- A. In order to properly/accurately accomplish this task, you will need to turn ALL the active processors off (shown below), and proceed to analyze not only the processors in use, but the order in which they are placed as well. Also, determine whether or not modulation has been applied to any off your effects (and, if so, how much and to what parameter?). Then, ascertain/establish how exactly the processor is affecting the preset we’re analyzing.
- B. Next, listen to your sound, while simultaneously turning them off one-by-one (in order to meticulously hear what each individual effect is precisely doing), then audition it WITHOUT applying all the other, conflicting effects.
- THE ‘GLOBAL’ SECTION
- THE MODULATION MATRIX
- 1. How, exactly, is the modulation affecting my sound?
- 2. Are any ‘AUX’ sources being used?
- 3. Are there any parameters from the ‘global menu’ being modulated?
- A. Assess/determine how much modulation is truly occurring, and what it’s doing exactly.
- NOTE: Serum offers you various ‘scaling’ options to work with, which functions identically to the ‘velocity’ and ‘portamento’ curve scale-setting.
- B. Go to the slider labeled ‘OUTPUT,’ on the right-hand side of every modulation lane, and either:
- 1. Turn them all the way down one by one, while simultaneously/carefully listening to (or, deciphering) how each, individual slider effects the patch.
- 2. Turn them all the way down and listen to the patch. Then, reintroduce each one again (individually) in order to gauge how they effect the sound.
- RESAMPLING AND RENDERING ‘WARP’ MODE TO WAVETABLE
- 1. Load the desired table.
- 2. Turn the warp-mode of your choosing ON (for example, ‘quantize’).
- 3. Click on the ‘MENU’ button, and select ‘RENDER OSC A (OR) B WARP’ (located about mid-way through the drop-down menu’s options).
- 1. Open up a favorable preset, or one of your own (that’s completely finished), which utilizes only one oscillator; you could use a oscillator patch but, for comparisons sake and because it’s (presumably) your first time trying this, a 1-oscillator patch is best.
- 2. Go to the menu, and select ‘RESAMPLE TO OSC B’.
- 3. Turn Oscillator 1 off, and carefully/punctiliously listen to the results.
- 4. Apply the modulation that’s on OSC 1 and 2, and gauge what happens… (it may make the patch significantly greater/larger).
- HIDDEN MENUS, PRESETS, AND FUNCTIONALITY
- A. ‘Lock’ any particular/determined effect-chain we desire, which allows us to initialize the preset while simultaneously leaving a (desired) preset’s effect-chain in tact.
- B. Load up distinct instances of a chosen effect, by going to the ‘effect’ rack and clicking the arrow that’s located directly next to that particular effect’s name; allowing you to effectively save/recall individual effect-settings.
- C. Save and recall LFO-shapes at any point of your session, which is exceedingly constructive/valuable when working with not only standard modulation, but arps and ‘specialized’ curves (which may otherwise be extremely strenuous and enervating to replicate from memory) as well. Side note, Serum offers bounteous amounts of preset LFO-shapes, which can be accessed by clicking the ‘folder’ icon in the LFO section (right above the ‘Grid Size’)
- 1. ‘Lock’ the matrix.
- 2. Swap your preset.
- 3. Begin experimenting.
- BONUS
1. The ‘raw’ sound.
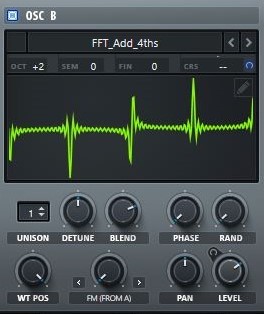
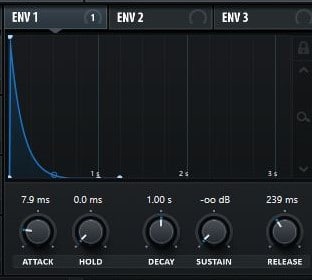
This stage consists of the ‘Amplitude’ Envelope (used to meticulously shape the sound of our Envelope, as a whole) and our Oscillators that are in use (which includes the ‘noise’ oscillator, which many people tend to overlook), along with their corresponding waves/wavetables and/or sample(s); let’s consider it a ‘block of ice’.
2. The ‘sculpting’ (filtering).
As stated above, we’re referring to these steps as a block of ice… so, since Stage 1 was the pristine/unblemished block of ice, this stage would be where we start chipping away at it; beginning to realize what, in fact, it has the potential to turn into.
NOTE: This stage consists of any/all ‘filters’ that were used on the sound itself (not including effects) and, if utilizing a synth such as Serum, their corresponding Envelopes.
3. Modulation
This is the stage where we begin to see defining characteristics in our ‘block of ice’.
Modulation is truly imperative when it comes to bestowing/providing your sound with ample life, sufficient movement, and successfully setting it apart from the simple patches (of which, are produced when you first initialize the patch).
NOTE: To achieve the most basic of super-saws… simply apply a low-pass filter to your ‘saw,’ add a generous amount of voices, incorporate a touch of ‘Unison,’ and call it a day. Although truthfully, if you want to create something that doesn’t sound like a stock synth ‘sampled’ preset from the early 2000’s were going to need to implement some form of modulation.
By implementing modulation, we aren’t only taking the sound to the next level by stylistically warping it (in ways that are continuously evolving, even without the intervention of any new/cutting-edge technology), but also desirably causing the synths to sound less… well, for a lack of better words, ‘synthy’.
We can lucratively use modulation in all sorts of various, beneficial ways, in order to make our sound appear more ‘natural’ or ‘realistic’; even going as far as ‘physical modeling’.
Before the ‘PC’ era, hardware synths did, in fact, have modulation-options, but they were exclusively available for a specific set of parameters, could only be applied a certain type of way, and varied from synth to synth. Also, a new modulation-option typically required a hardware upgrade which, at the time, cost at least a grand, and merely added another modulation-destination (and the like).
With the (judicious) development of modern computers and digital synthesizers, however, we now have access to such a wide variety of modulation-options, that the question is no longer “what can we possibly modulate?,” but instead, “what isn’t able to modulated?” (and the answer being ‘pretty much nothing,’ respectively). Plus, we’re also able to use whatever source we choose/desire to serve as the ‘modulating’ signal.
NOTE: Serum not only allows us modulate essentially any/every parameter, in any fashion we’d like (due to it’s versatile Envelopes and LFOs), but lets us modulate various parameters/functions with a wide-array of sources as well; venturing well beyond the scope of Envelopes and LFOs, by making the noise-oscillator a ‘modulation’ source.
4. Effects
This would be the stage where we finally get to experience what our block of ice ultimately transformed into, with all the polished details and desirable eccentricities ironed out/complete.
NOTE: Depending on your current patch, this can play a massive role, in regards to the preset at-hand, and can be used to/has the ability to accomplish substantially more than solely spicing it up, or giving it depth, space, or ambiance; as it contains dynamic-processors (compression) and EQs/filters.
Due to Serum’s extensive ‘FX’ section, we have the propitious ability to not only enhance our sound, deeming it ‘ready for production,’and work on/experiment with the ‘dynamics’ (with the assistance of an EQ and a Compressor, doubling as Multiband-Compressor, which is actually Xfer’s famous OTT Upwards Compressor) but, additionally, we can use it as an extremely serviceable ‘sound design’ tool; as it essentially contains any/every effect-type you could ever yearn for.
Although these effects may not contain all the ‘bells and whistles’ that a unit dedicated specifically to a particular effect may have, it does offer more than enough conducive options (such as being able to modulate any parameter you want) and sounds absolutely amazing; don’t feel like you need to (or are obligated to) utilize them all simultaneously, but you certainly can if it benefits your overall sound.
Being able to modulate any of Serum’s in-house effects alone carries the efficacious potential to manifest notably prestigious/preeminent results (that would otherwise be extremely arduous, or impossible to recreate using any other synth) WITHOUT being forced to ever leave it, or use external-processing.
NOTE: It’s supremely important, during the beginning stages of analyzing a preset, that you not only identify the contributing-effects (currently in use), but also determine how big of a part it plays and what, precisely, it’s active role is; this is why, when starting this process, I simply (habitually) turn each effect OFF (on the right-hand side), which immediately provides me with a crystal-clear percipience on exactly how much of any given preset is the actual synth itself (e.g., OSC, filters, modulation), and how much/which part of it can be attributed to the effects.
WAVETABLES AND TIMBRE
(Within this particular step, lies the true heart of your sound.)
– You have most likely heard the Wavetable being referred to as the main factor responsible for providing the overall timbre/sound (setting the stage for what’s to come) and, in sound design, a specific sound is not only as good as it’s source-wave, but also the Oscillator that’s generating it.
NOTE: Timbre (also known as ‘tone color’ or ‘tone quality’) is defined as the perceived ‘sound quality’ of a musical note, sound, or tone; distinguishing different/unique types of sound production (such as choir voices from a solo opera singer) and musical instruments (such as string, wind, and percussion instruments). In simple terms, timbre is what makes a particular musical sound have distinctive qualities, even when compared to sounds of the same caliber (pitch and loudness).
If you have ever used, or are thoroughly familiar with, the workings of standard/classic subtractive-synths (and their oscillators), than you’re undoubtedly aware that, when it comes to ‘starting’ wave-forms, you typically have only a few to choose from (give or take): Sine, Saw, Square, Pulse, a random ‘noise’ wave (if you’re lucky) and, contingent upon your specific/unique synth, some ‘specialized’ waves; it’s from these very wave-types that we can produce literally ANY sound (within the scope of that particular synth, of course).
Having said that, essentially any sound imaginable (not just within the scope of your synth) can be created from these ‘standard’ wave-types, in fact, mostly every sound you’ve heard emanated from any given modern-pop song (pre-2006) was generated from/produced by one.
When it comes to modern-electronic music, however, we must take things one step further by taking advantage of ‘uncommon,’ scarcely used wave-types, and by creating a series of waves that we can freely cycle through and morph between (in order to manifest original, previously undiscovered/unheard-of sounds). Truthfully, it’s the virtually limitless amount of wavetables we’re able to choose from (or even create, if desired) that gives ‘wavetable’ synths (Serum in particular) such a highly-esteemed/revered reputation in the Sound Design realm.
Aside from the fact that we can designate virtually any wave shape/type as the wave(s) we plan to have our oscillator generate it’s sound from, the main/predominant appeal to using a wavetable-synth is the fact that an actual wavetable consists of a series of waves (In serum, up to 256 to be exact) that we can compile, and then cycle/morph between in real-time (using modulation), which effectuates results achievable only by using wavetables.
To add to the complexity of our process, we can additionally utilize one of the many warp-modes to create exceptionally unique, unparalleled tones/timbres from the start by simply ‘bending’ our wavetables in ways that were previously considered (nearly) impossible.
LET’S DO A LITTLE EXPERIMENT IN AN ATTEMPT TO BETTER UNDERSTAND ‘TIMBRE’:
1. Open up the preset of your choice.
NOTE: I suggest you try this with both a preset of your choice AND an ‘initialized’ patch in order to effectively hear the effect produced when in it’s raw/original form, and when it’s played in context.
– Depending on the specific preset and what sound it ultimately relies on for it’s core, the results can range from dramatically different, to outright negligible; this is due to Serum’s sheer versatility and ability/capability to bend in essentially any direction you wish.
2. Turn the sub-oscillator and noise-oscillator (if enabled) OFF. Also, turn off either oscillator A or oscillator B (so only one remains active); listen to that sound, and remember it’s characteristics.
3. Go to your wavetables and open up ‘Basic Shapes’. Now, listen to what that preset sounds like as a standard sine-wave.
4. Change the ‘WT Pos’ knob to a ‘saw wave,’ and scrupulously listen to how it affects the sound.
NOTE: You will notice that, as the overall feel of the preset may remain the same, something irrefutably changes upon swapping out wave-types; this is, in fact, the ‘timbre’. It’s subtle changes like these that are deemed the ‘heart’ of a Wavetable Synthesizer, and which lay the foundation for virtually any/every sound we produce in Serum (or a similar WT Synth).
REVERSE ENGINEERING PRESETS IN SERUM
One thing that I personally recommend doing BEFORE attempting to begin this process is, go into the ‘Global’ tab and enable ‘Show Help Tooltips’. By doing this, you’ll then be able to successfully see/obtain any parameter’s function, simply by hovering over it; making it significantly easier when trying to analyze a specific/in-use ‘parameter,’ or accurately gauge what exactly is occurring within the ‘preset’ (and the effect of which it’s producing).
STEP 1: CHECK THE WAVETABLE; ASSESSING OUR OSCILLATORS
A. Upon opening up a preset, the very first thing you’ll want to do is: look at ALL the ‘Oscillators In-Use’ (which includes the ‘Sub’ and ‘Noise’ Oscillators).
Oftentimes, when reverse-engineering a preset, the Sub and Noise OSC’s are foolishly overlooked, which is a gigantic mistake/misstep, as they can be just as vitally important as OSC 1 and 2 (depending on the patch), in that they can be just as responsible for the sound being generated from a (given) preset.
NOTE: Be sure to turn these functions ON and OFF, as well as determine precisely what they sound like on their own/in isolation and the specific role they’re playing, in order to definitively decide whether you want to keep them active or not.
B. After assessing the oscillators that are in-use, we’re now going to determine/examine which ‘wavetables’ are currently in-use, and if the ‘WT POS’ is being modulated or not; this will provide the overall timbre and foundation of our patch, as well as the sound it’s ultimately emanating.
NOTE: Hundreds of thousands (and even millions) of sounds can be produced by employing basic wavetables… having said that, the main appeal of Serum is it’s auspicious ability/capability to use any wavetable we desire, along with the fact that we’re able to create original (or modify existing) wavetables and MORPH/CYCLE between the ‘TABLE’; utilizing modulation in a variation of beneficial, propitious ways.
C. Turn each oscillator on and off; so we’re able to properly gauge/determine what each, individual oscillator is truly doing.
Although it seems considerably obvious/blatant to decipher, upon further examination and depending on your specific patch, each oscillator could be doing awfully different things; basically, each distinct oscillator is a ‘layer,’ so we must meticulously assess precisely what each (unique) one is doing on it’s own, and in conjunction with other oscillators.
D. After you have analyzed/assessed each oscillator’s wavetable, thoroughly examine any exclusive behaviors/character traits and its warp-mode (if enabled), along with any modulation (LFO’S and Envelopes) that is effecting the OSC (wavetable position, pitch, etc.) in order to adjudge what it’s purpose/function is, and in what capacity is it affecting the sound?
FOR EXAMPLE: Although the patch (below) has 2 active oscillators, oscillator A’s volume is turned all the way DOWN.
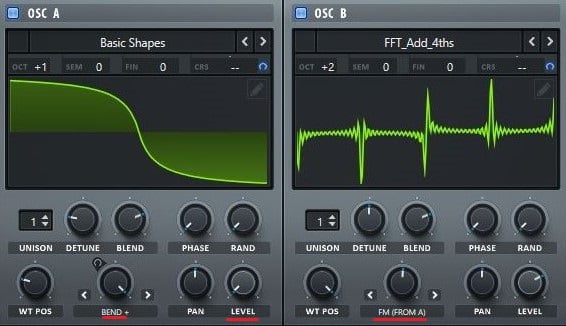
Even though it’s currently ‘in-use,’ the reason why we’re not currently able to hear any ‘output’ is because our oscillator (that is turned all the way down) is functioning strictly as ‘modulator’. If you look at OSC 2’s ‘warp mode,’ you will see that ‘FM (from A)’ is enabled, therefore we’re utilizing OSC A as our modulator (using FM-synthesis). Remember, accurately assessing the role each OSC plays is key when attempting to understand precisely how our specific preset was built.
When you turn OSC A off, you will hear a radical difference in sound and notice that a vast majority of the patch completely disappears (which is due to the fact that this preset is eminently dependent on the FM-synthesis that’s occurring). Even though we might not be able to hear OSC A’s output, it’s realistically working just as rigorously as if it were to be heard.
An exceptionally valuable secret to achieving desirable ‘tones,’ using the FM warp-modes, is to silence the modulating oscillator (or, turn it’s level way down) so that, even though it’s output can’t be heard, the full ‘FM effect’ is successfully achieved. If you have ever played around with FM synthesis, you’re certainly aware of the fact that generating these tones in a desirable/enviable fashion is an art in itself, and almost never transpires by accident or at random.
Notice how OSC A’s ‘octave’ is set to +1… this is so we can achieve a certain, specified tone out of the FM. By changing or altering the modulating tone’s pitch, we can produce a supremely different/diverse range of sounds, as they affect the pitch and tone of the ‘carrier’ (OSC B).
Additionally, notice how OSC A is also being warped using the ‘BEND +’ mode (originally made popular by Massive), which is actually bending our wave inward.
Another sincerely striking part of Serum is the option it offers us to modulate this parameter in various/numerous ways that can drastically alter not only our oscillator’s wave-shape, but can make a gigantic impact on the way OSC B ultimately gets modulated and how it sounds as well.
STEP 2: VOICING
The next step entails analyzing our ‘voicing’ section (which, in Serum, is located at the bottom right-hand corner).
A. During this process, we must ask ourselves a few questions: is this specific patch ‘MONO’ or ‘polyphonic’?
Is it programmed to ‘legato’? Is there any portamento ‘glide’ occurring and, if so, how exactly is it set up?
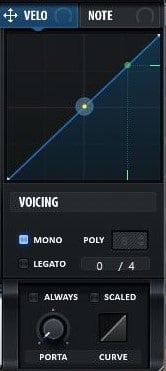
NOTE: The difference between Legato and Portamento is this… ‘Portamento’ adds a slight pitch-blend (either when triggering a note, or playing from note-to-note), whereas ‘Legato’ prevents an Envelope/LFO from re-triggering (if overlapping notes are being played). Using both in tandem can be vastly advantageous when wanting to play overlapping notes, without any re-triggering, providing a particularly desirable/enviable ‘glide’ effect; otherwise, using legato WITHOUT portamento will not produce a pitch bend/glide, and will ultimately force you to switch between notes without the (valuable) use of Envelopes and LFO’s re-triggering. So, to emphasize that crucial last sentence, you MUST enable ‘portamento’ for that truly classic, highly revered pitch-dive/rise/glide effect.
By enabling the ‘ALWAYS’ option for the portamento, it initiates a ‘portamento’ gliding-effect (regardless of whether you are ‘gliding’ from one note to the next), while the ‘scaled’ function is being determined by how far, precisely, ‘in-pitch’ the last note was compared to the previous one; this is absolutely ideal when covering a short glide, for short-intervals and a longer glide for larger, more spaced-out, intervals.
Be cognizant of the fact that leads and basses are typically/habitually ‘monophonic,’ with some portamento applied; this dictates the sound’s ‘playability,’ which is the way your preset is ultimately perceived, and how it moves through different pitches (on a note-to-note basis).
B. Next, we’re going to (scrupulously) analyze how many voices are contained within our patch, and if any ‘Unison’ is being utilized.
NOTE: If there is, in fact, Unison being implemented, we must scrutinize the TOP row of parameters (below the ‘wavetable’ display) and determine exactly how many voices of unison there are for each oscillator, how ‘detuned’ the voices are, what the blend is set to, and what the discrete settings for the ‘phase’ and ‘rand’ are.
STEP 3: ENVELOPES AND LFO’S
An ‘Envelope’ simply represents the varying level of a sound wave over time, and is broken down into four categories/areas (traditionally): Attack, Delay, Sustain, and Release.
‘LFO’ (Low-Frequency Oscillator/Oscillation) is an electronic signal, normally below 20Hz (so slow/low we cannot hear), which creates a rhythmic ‘pulse’ or ‘sweep’.

Envelopes and LFOs are, by far, the most crucial/pivotal part of the sound-design process to (comprehensively) understand and, until we properly effectuate them, the sound that our oscillator produces will be purely static; comprised of very little musical expression or tone. If you have ever utilized/experimented with a ‘modular’ synth, you undoubtedly know, first-hand, just how excruciatingly abhorrent the tone of an OSC can sound before we appropriately shape it and give it ample life/movement.
Filters are patently crucial when it comes to sculpting our sound’s harmonic content, as they determine (and shape) which frequencies will be heard, while our Envelopes/LFOs determine the shape of the sound and the context of which it’s heard in. We can additionally use them to map out and influence/regulate the distinct way in which the parameter of our choosing will be modulated (plus the way any other function in the synth will behave, essentially), as is the case with ‘Serum’ and other comparable synths.
NOTE: The specifications of what they control include, but are not limited to: the ‘pitch’ of any oscillator in Serum, the ‘Effect Rack,’ and essentially any parameter within the main synth-section (it also dictates how any given parameter will operate and function). Sure, we’re all used to the standard/basic Envelopes and LFOs that (virtually) any synth comes stocked with, but the true beauty of Serum lies in it’s unique ability to modulate anything and conform to how we specifically want our Envelopes/LFOs shaped (any shape imaginable, respectively).
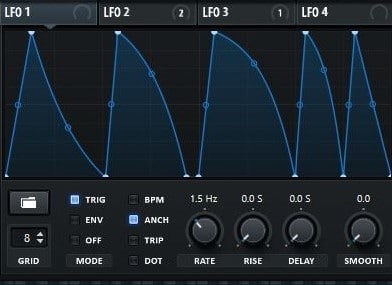
Taking it one step further, we’re also given total control over how the Envelopes/LFOs will behave, given the various parameters that the Envelope/LFO section has to offer; this is precisely why correctly determining which specific Envelopes/LFOs are being used, and how exactly they’re being used, is one of the most vital steps of this process.
A. Ask yourself: how many Envelopes and LFOs are currently in use? what are their precise shapes/settings? and which/how many parameters they’re actively affecting?
Serum makes this especially simple and painless for us, seeing as we’re not solely being told which Envelopes/LFOs are in use, but how many parameters they are linked/routed to as well (displayed below on top of the Envelope/LFO names, to the right).

B. Look at your first Envelope as, pertaining to Serum’s specific mechanisms, this is invariably the ‘main’ amplitude-Envelope. Then, figure out whether your preset is either in ‘One Shot’ mode, or if it’s being re-triggered.
The way to correctly/successfully determine this, is by taking a look at your ‘SUSTAIN’ knob, located on Envelope 1:
If the sustain is turned all the way DOWN, it means it’s a ‘one shot’ and, in that case, the component is most likely something along the lines of a ‘pluck’ or percussive-hit; the proper way in which you find out how long this sound/hit plays, is predominantly dictated by our ‘DECAY’ parameter.
If the sustain is ENABLED/TURNED UP, it means our sound will ‘sustain’ and play for however long the note is being held down; the volume is determined by the ‘SUSTAIN’ parameter’s level (this is how ‘leads’ and basses are normally set up).
C. Next thing to ask yourself is: which distinct mode are these LFOs in?
If they are operating in ‘envelope’ mode, the LFO will work similarly to an Envelope as it only plays once, and gets re-triggered upon triggering a note.
If they are set to ‘TRIG,’ the LFO will sustain/play only for as long as the note is being held down; re-triggering back to the beginning once a new/different note is triggered.
NOTE: If set to ‘OFF,’ it makes it so our LFO is ‘free-running’; meaning, the LFO will sustain for as long as the note is being held down and, once re-triggered again, picks up from where it left off, as opposed to starting from the beginning (as it regularly would when in ‘Envelope’ or ‘TRIG’ mode).
STEP 4: ASSESSING THE SUB AND NOISE OSCILLATORS
As I previously mentioned, the ‘SUB’ and ‘Noise’ oscillators can play a considerably substantial role in any given patch (depending on it’s unique functions and the role it’s playing), so you must rigorously/painstakingly assess these oscillators as, oftentimes, they can (realistically) play a much bigger role than you initially thought.
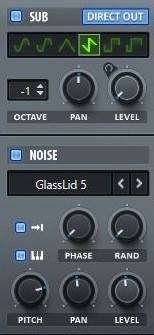
A. Turn both the SUB and Noise oscillators on and off (to help accurately determine/gauge what distinct role, and how big of a role, each oscillator plays).
Although they may appear relatively standard, Serum’s SUB and Noise oscillators can actually do/achieve much more than the ones contained within any typical synth, including the expedient ability to utilize our Noise oscillator as a ‘sampler’ (in order to incorporate tones and textures that the standard oscillator wouldn’t be able to).
B. Determine whether the SUB oscillator is authentically providing the sub-tone/layer, or if it’s being used as ‘THIRD’ oscillator.
Our SUB oscillator is, for the most part, used to provide a ‘clean’ bottom-end (doing so with the prodigious ‘DIRECT OUT’ function, comparable to Massive’s ‘BYPASS’ oscillator but with much more functionality), which enables us to send an unaffected signal directly to the ‘output; bypassing the ‘filters’ and FX Section.
NOTE: This can be supremely beneficial when working with a patch that contains ‘Heavy’ processing (like distortion), which would otherwise completely destroy the low-end.
Keep in mind that, even though it’s referred to as the ‘SUB’ oscillator, we can utilize it/have it function as a ‘third’ oscillator; taking the role of whatever we choose (essentially), as we’re successfully able to send any signal, that the sub-oscillator can generate, through it. This includes ‘high’ frequencies as well, so be sure to check/determine the role and octave-range of the SUB oscillator in order to obtain a full understanding of what, exactly, it’s doing. Additionally, if desired, you’re able to utilize both our SUB and Noise oscillators as ‘FM’ modulators.
C. Check the parameters of the Noise oscillators; see if ‘one shot’ or ‘key tracking’ mode is enabled.
This helps us to decipher what role the Noise OSC is fundamentally playing – determining if it’s being utilized to either add a ‘noise’ layer, or more as a sampler (by adding a sample that may change in pitch, contingent upon the specific note being played).
STEP 5: ANALYZE THE FILTERS
The ‘filter’ section is unequivocally essential to the success/failure of our overall sound; whereas we use Envelopes/LFOs to shape our sound (in terms of which synth-instrument type it will ultimately become, such as the lead, plucks, bass, and pads), the filter is used to shape/sculpt our sound’s harmonic content.
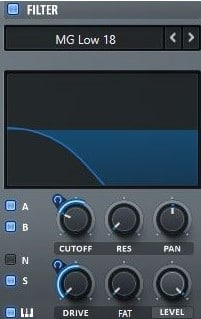
In regards to ‘subtractive’ synthesis, we’re all (presumably) aware of just how vital the filters are to…well, everything we create with it, but we also must be aware of the fact that filtering out all the unnecessary/superfluous frequencies, with a Wavetable-synth, is just as imperative. We unavoidably produce a significant amount of (unwanted) harmonic by-product during this process (due to all the warping and modulation that’s being enforced), and that’s precisely where filters come into play.
KEEP IN MIND: Simply because we’re using a filter DOES NOT necessarily mean it’s job is strictly to tame the sound!
Serum’s extensive/expansive arsenal of filters provide us with much more than merely a quick and effective way to lucratively tame your sound; possessing the capability to serve as a ‘creative’ effect, considering the immense variety of filter-types that we’re offered.
If you notice anything besides the ‘classic’ HP/LP/BP (or notch) filters being used, odds are it’s imparting something onto the sound (verses taking away); in this case, you’ll also see the filter that’s being used in the ‘FX’ section either ‘rolling off,’ or removing, extraneous/unsought frequencies. This will not, however, perpetually be the case and, pertinent to certain presets, both filters might be used simultaneously; it entirely depends on the preset currently being utilized.
A. Thoroughly assess your ‘filter’ situation, and identify which specific oscillators are being sent through it.
NOTE: Most of the time at least one of our oscillators are NOT being sent through the filter at all, which can be exceedingly confusing and frustrating; be sure to look at the bottom left-hand side of the filter in order to correctly/prosperously identify exactly which oscillators are being sent through (this includes your SUB and Noise).
Many people tend to overlook, or downplay, the complex/routing options of Serum’s filter; foolishly failing to realize that not every single oscillator must be routed through the filter before reaching our ‘OUTPUT’ stage.
KEEP IN MIND: Located within the confines of Serum’s ‘FX’ panel is an additional filter that contains all the same filter-types, and (almost) just as much functionality; if you notice that most of the oscillators are NOT being routed through the primary filter, they might have been sent through this filter instead.
B. Assiduously assess the filter-type that’s currently being used, and what exactly it’s being used for. Also, be sure to assess the numbers (located next to each filter-type), as this stands for/identifies the overall intensity of the curve, and just how ‘drastic’ the filter’s effects truly are.
Plainly, this number indicates the ‘slope’ of the curve and precisely how many dB’s per octave it’s attenuating; the higher the number, the more frequencies will be ‘cut’ (based on the cutoff). Conversely, when using a filter with a lower number, it allows for some frequencies that are below the cutoff to, in fact, pass through.
NOTE: You can reference/compare this to using an EQ with a steeper/sharper curve (as it holds the same principal); the sharper the curve, the more frequencies our EQ (or, filter) will remove, whereas a curve of lower value will allow more frequencies to pass through.
Using a higher value is ideal when craving to hear frequencies that are solely above the ‘set’ cutoff, and nothing else. Adversely, a lower value is ideal when wishing to achieve a more ‘natural’ sound (which requires the taming of certain frequencies, not necessarily their complete displacement/removal).
To adequately comprehend what I mean, let’s ‘initialize’ the Patch, load up a ‘LOW 6’ filter, and bring the ‘cutoff’ all the way DOWN (turn the knob to the left, as far as it can possibly go). Then, let’s play a note and listen to the results…
NOTE: Notice how our cutoff point is at 8Hz, yet some of the frequencies above 8Hz are still being allowed to pass through…
Next, let’s cycle through the other low-pass filters (12, 18, 24) while simultaneously listening to our sound, as being able to physical see what’s going on is always optimal.
See how the sharper slope affects the frequencies we hear?… that, alone, is the main/prime reason why we must apply and recognize the various filter-types/slopes that are based on the unique situation we’re dealing with at the time.
As I previously stated, if one of the filters located within the ‘NORMAL’ section are being utilized, odds are it’s playing a role that’s vastly similar to that of which a filter would play when serving within a standard subtractive-synth; don’t let that knowledge fool you into thinking that ‘normal’ results can be obtained with these filters, however, as that’s not habitually the case.
The ‘normal’ section consists of low-pass, high-pass, band-pass, peak, and notch filters. We are also endowed with numerous/various low-pass filters that have the prefix ‘MG,’ which simply indicates that the filter was modeled after the classic ‘Moog’ LP-filters (meaning, they emit a slightly ‘warmer,’ more natural, analog sound).
Filters within the ‘MULTI’ section consist of the same set of filters that are found in the ‘Normal’ section, except they have 2-3 filters in one; using one of these filters essentially means there are now potentially 3-4 (active) filters within Serum at that time. These filters are not only useful/convenient when it comes to taming frequencies, but also when wishing to add ‘resonant peaks’ (which can be modulated by an Envelope or LFO).
The ‘L/B/H’ filter is comprised of 3 separate filters in one: the low-pass, high-pass, and band-pass filters. Although, technically, you can utilize all 3 filters concurrently, we have an incorporated ‘MORPH’ knob/parameter, which allows us to morph each one; enabling us to blend any given filter-type with a conflicting one.
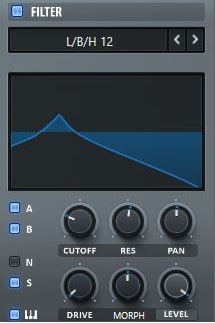
NOTE: Automating/modulating the ‘morph’ knob, while using these filters, can generate an appreciably enticing effect (when slowly moving between the 3 filters).
The ‘L/P/H’ is comprised of a low-pass, high-pass, and peak filter.
The ‘L/N/H’ is comprised of a low-pass, high-pass, and notch filter.
The ‘B/P/N’ is comprised of a band-pass, peak, and notch filter (an exceedingly interesting filter to morph between).
Using the ‘MORPH’ knob, and modulating it with one of these filters (with the same, or similar Envelope/LFO as the rest of the modulation), or one that can successfully/appropriately work in conjunction with it, is where these filters truly shine.
Finally, we’re going to turn our filter OFF; this allows us to accurately identify how much of this patch was ‘filter-dependent’ (in terms of it’s overall sonic-tonality).
Patches with ‘flanges’ and ‘phases,’ along with filters in the ‘MISC’ section, will most likely be ‘additive’ or filter-dependent (as they can affect/alter your sound in truly incredible ways). Again, this is something often overlooked/underappreciated but, in regards to creating and reverse-engineering sounds, is actually extremely important.
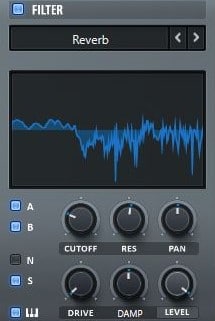
The Reverb filter is my personal favorite in the Misc. folder as it has so many uses! I urge you to experiment with this as well as the other filters in the Misc. Section.
NOTE: If, upon turning your filter off, you still hear filtering, but it’s not as harsh as you suspected it would be… it may be due to a filter or EQ being applied in the ‘effect’ rack.
THE FX MODULE
Welcome to the final layer of your preset (in terms of creation, not reverse engineering that is); this is where sound-designers and producers alike tend to go a tad overboard with the effects (whether or not it’s overkill is determined by personal opinions).
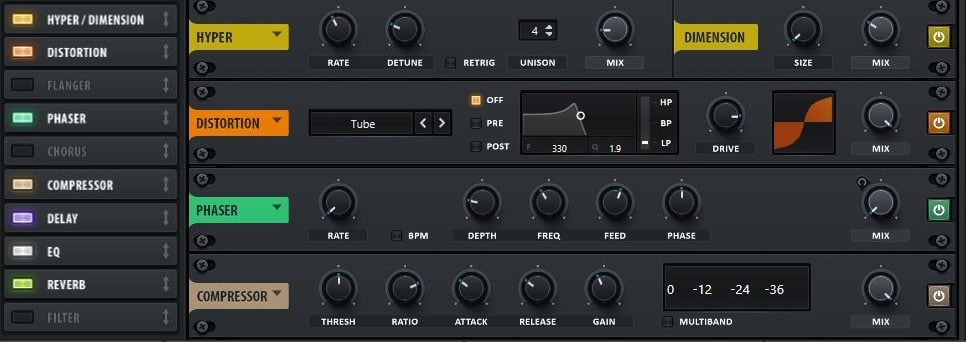
This section is used to ‘finish off’ the sound; utilizing the ‘FX’ section’s dynamic processors (such as compression and OTT), alongside EQ, and possibly some reverb and/or delay.
Oftentimes the FX section is just as vital as the filtering or modulation, because you will find that not only is the filter being continually utilized, but a considerable amount of modulation is being applied to various effects as well.
Contingent upon the specific/unique preset that’s currently being used, the FX section may veritably serve as the primary source for your synth (due to the wide, massive variety of effects and it’s advantageous ability to modulate virtually every parameter, of every effect within it).
All of these factors vary on a case-by-case basis, so thoroughly assessing this early on (in the process) and identifying precisely what the FX section is contributing to the sound is absolutely necessary/imperative; a vast majority of the time it will be doing various things, due to the post-processed ‘effect’ modulation and the ‘taming’ of the dynamics.
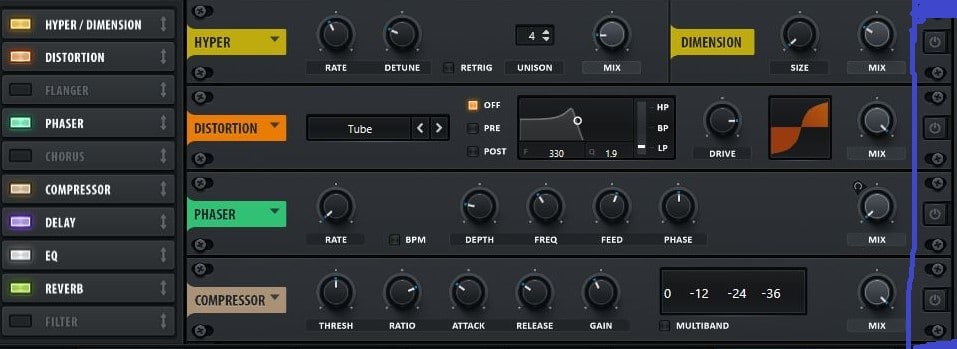
A. In order to properly/accurately accomplish this task, you will need to turn ALL the active processors off (shown below), and proceed to analyze not only the processors in use, but the order in which they are placed as well. Also, determine whether or not modulation has been applied to any off your effects (and, if so, how much and to what parameter?). Then, ascertain/establish how exactly the processor is affecting the preset we’re analyzing.
NOTE: DO NOT turn the effect off by using the ‘Enable’ button (next to the effect’s name), or you may inadvertently lose the order of which the chain was originally/desirably in… instead, use the ‘ON/OFF’ switch that’s located on the far right; this successfully turns the unit off, without removing it from the rack.
B. Next, listen to your sound, while simultaneously turning them off one-by-one (in order to meticulously hear what each individual effect is precisely doing), then audition it WITHOUT applying all the other, conflicting effects.
Unfortunately this is not an unfailingly exact science (especially when more than just a few effects are being used) so I suggest, when attempting to decipher how a particular effect affects the sound, that you have ALL the preset’s effects operative/active, then begin to methodically turn the effect (of which you want analyzed) on and off; giving you a crystal clear picture of how much of the preset is truly being shaped by the oscillator-filters and modulation, plus providing you with a supreme idea/approximation of just how ‘powerful’ your effect-section genuinely is (this method has continuously proven most efficacious in my experience).
Most major/renowned synths available on today’s market (if they include any internal effects at all) exclusively contain reverb, delay, and distortion (typically), whereas Serum is advantageously equipped with ‘dynamic’ processors (such as EQ and compression) as well; with tools such as these, which numerous sound-designers take advantage of, we’re able to make the preset essentially ‘perfect’ (in terms of mixing). You may be particularly surprised to gauge just how bland, boring, or ‘basic’ a preset is when the effects are disabled.
NOTE: Be sure to check for any modulation applied to the active effects, as it can play an integral/vital role in the complexity of your patch and the way in which it’s altered by the effects; EQs and filters are habitual ‘hot spots’ for modulation, so check for/identify any modulation within them, and how exactly it’s being modulated, by scrupulously examining the ‘modulating’ Envelope or LFO.
THE ‘GLOBAL’ SECTION
This tab is home to a wide variety of ‘minor’ adjustments/changes that contain the ability to affect the patch as a whole, but nowhere near as apparent as something like modulation would (the exact parameters can change based on the patch that is loaded).
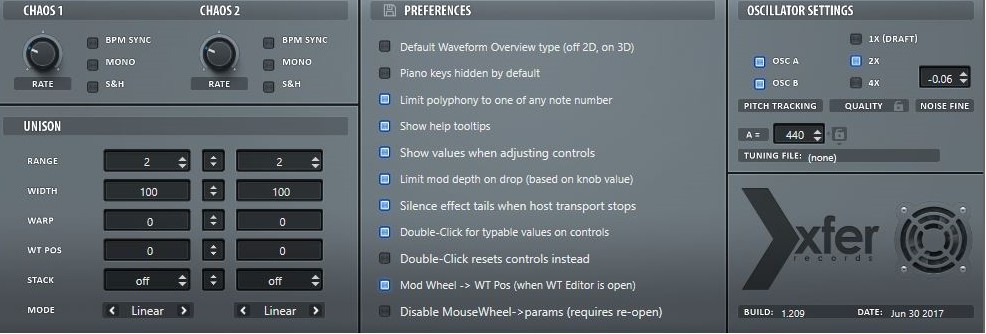
This includes, but is not limited to: the ‘advanced’ Unison parameters, which are comprised of certain features (e.g., Warp and Stack) that are unique to Serum, along with 2 extremely special ‘Chaos’ modulators; which generate a randomized/unpredictable modulation to whatever it’s applied on. Keep in mind that, for the most part, you will either have to apply it using the drop-down menu (right-clicking a destination), or from within the ‘Global’ tab.
You will also find, within this section, a few superlatively helpful things that you’re able to enable in order to make working in Serum significantly simpler (such as enabling the ‘tip box’ to show when it’s hovered over a specific parameter), along with the global ‘PREFERENCES’ and ‘OSCILLATOR SETTINGS’ for Serum (such as ‘tuning’ and ‘output’ quality).
REMEMBER: There are no rules within the sound design realm that are ‘set in stone,’ so make the time to experiment with aberrant methods that may seem ‘too crazy,’ because you never know… it might just turn out to be the next big thing or, even better, your little secret.
THE MODULATION MATRIX
(Although I have saved discussing the ‘matrix’ for last, don’t misconstrue/discredit it as being a lesser, or insignificant factor; I highly recommend you learn how to comprehensively read and fastidiously utilize it during all stages of the reverse engineering process)
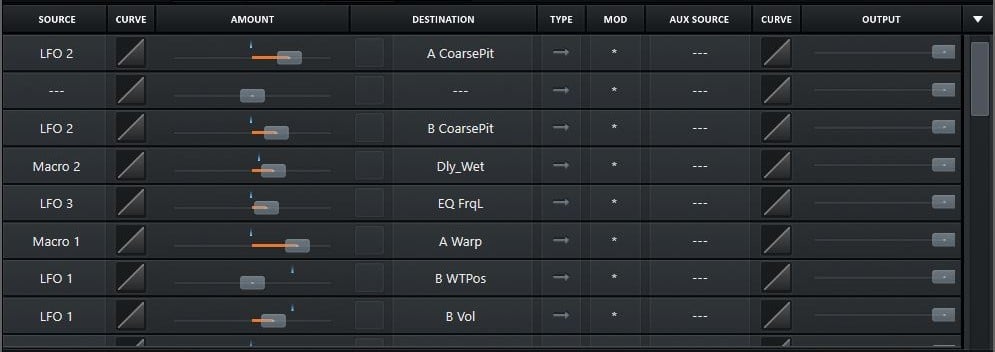
This is (traditionally) the first place I refer to when trying to fathom what precise/intricate process my patch entails, as it not only provides you with an elaborate, detailed run-down of each discrete modulation-process that’s occurring within your patch, but offers you the ability to control the modulation, swap modulation-sources and destinations, add new/additional modulation, or disable any current modulation within the preset as well (phenomenal, right?).
KEEP IN MIND: Some sources and destinations can solely be accessed through the ‘MOD’ Matrix. Also, they may appear seemingly strenuous to correctly identify by simple observation alone… this is when you should go into the Matrix itself, in order to take a look ‘under the hood,’ if you will, and see what’s genuinely going on; it should make the process substantially less daunting.
A few questions you should ask yourself when faced with this particular situation are:
1. How, exactly, is the modulation affecting my sound?
2. Are any ‘AUX’ sources being used?
These indicate the various sources you can use to control the depth/level of the modulation-set up your auxiliary is routed to.
For example, if your LFO ‘MOD’ consists of an aux-source that is a ‘macro,’ then the modulation’s depth is able to be controlled by that macro; hence, turning it on and off, and scaling it, when desired.
The reason for this question being… any modulation administered on this page must be done, set up, or routed using the Matrix; this is known as ‘back end,’ while using drag-and-drop to set up modulation is referred to as the ‘front end’.
A. Assess/determine how much modulation is truly occurring, and what it’s doing exactly.
NOTE: The quickest, easiest, most convenient/organized way is to simply look at MOD Matrix, as it provides you with an intricate run-down of all the modulation (sources/destinations that have been routed, and the connections that have been made).
You will notice that various, less complex patches only have a few occupied slots in the Matrix, while others may have seemingly endless amounts (equivalent to multiple pages worth); identifying exactly how many your patch has will give you a exceedingly good idea of just how complex (or, not complex) your it genuinely is.
On the left-hand side of the Matrix, you will see all the ‘SOURCES’; this indicates precisely what modulation is being used, what’s controlling it, and what it’s shape is.
On the right-hand side of the ‘AMOUNT SLIDER,’ right in the middle, are the ‘DESTINATIONS’; this indicates the parameter that is being modulated.
The ‘AMOUNT SLIDER’ indicates the depth of the modulation.
‘TYPE’ determines whether the modulation is ‘uni-polar’ or ‘bi-polar’ (in other words, whether the modulation is moving in either one direction or two); uni-polar is indicated by the arrow with only ONE point (left side), and bi-polar by the arrow containing 2 points.
NOTE: This is something that easily be changed/altered to fit any modulation-type you desire by holding CTRL (or ALT) and clicking on the modulation (which is located on the outer rim of the knob/parameter that’s being modulated). Plus, it could additionally be achieved in the Matrix itself.
The ‘CURVE’ determines the fashion in which the modulation will ultimately be scaled and is generally set to ‘default’ (linear), but in certain circumstances will be set to something different. For instance, if you would like the modulation to initially begin slowly, but speed up at some point, simply click on the designated spot and drag it down; making the curve dip down before reaching the top.
NOTE: Serum offers you various ‘scaling’ options to work with, which functions identically to the ‘velocity’ and ‘portamento’ curve scale-setting.
B. Go to the slider labeled ‘OUTPUT,’ on the right-hand side of every modulation lane, and either:
1. Turn them all the way down one by one, while simultaneously/carefully listening to (or, deciphering) how each, individual slider effects the patch.
Or
2. Turn them all the way down and listen to the patch. Then, reintroduce each one again (individually) in order to gauge how they effect the sound.
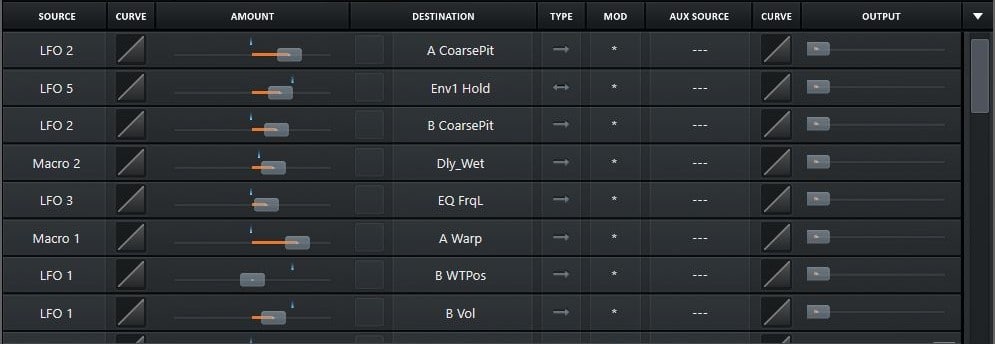
This effectually shows you how each instance of modulation effects the sound, and gives you the ability to hear how one, individual/specific ‘source’ sounds like when modulated by any given destination.
NOTE: I highly recommend/encourage that you procure a sufficient grasp on the modulation that is occurring in each patch; try swapping certain LFOs or Envelopes (sources) with opposing LFOs or Envelopes that contain a disparate curve and speed, plus diverse settings, to see just how great/little of an impact the modulation’s shape has.
Implementing and experimenting with these various suggestions/techniques will undoubtedly provide you with a much clearer picture on how modulation authentically functions… not exclusively within Serum, but in a general sense as well; the more time you spend in, and dedicate to learning about, this insightful section, the more you will learn the unique intricacies one of the most important/critical aspects of sound-design modulation (which will unquestionably benefit prove it’s value in absolutely no time).
When you begin to spend more time experimenting and getting intimately acquainted with this section, you will start to realize common themes (in terms of MOD-destinations/sources)… identifying and inspecting these trends, along with remembering/memorizing the modulation set-up that generates a preferable, desirable sound will go an exceptionally long way when attempting to create your very own patches; soon enough, you’ll be able to triumphantly program most of your modulation without ever leaving the matrix!
RESAMPLING AND RENDERING ‘WARP’ MODE TO WAVETABLE
Unlike most standard synths, which only consist of a drop-down menu (that may include access to the preferences), audio configuration, and some other miscellaneous system information, Serum contains numerous/supplemental options (of which, most people aren’t even aware of) that are supremely unconventional and useful.
Today I’ll be discussing the (extraordinary) wavetable ‘render’ and ‘re-sample’ options, within Serum, which make it possible to implement a unique wavetable without be obligated to create your own and, although they might be pleasantly simply to execute, contain highly advanced/extremely serviceable features; allowing (or, enabling) the victorious creation of a complex wavetable, from a single-cycle wave(table), without ever having to enter the Wavetable Editor (or any other foreign window)!
KEEP IN MIND: The following features were applied AFTER Serum’s initial release, so an update may be required in order to access these features.
We’re able to ‘render’ the warp-mode (that’s currently enabled on either OSC) to a wavetable; what this ultimately does is take the effect generated from the selected warp-mode, that your oscillator is currently utilizing, and bounces it to a 256-frame wavetable. Then, by modulating the wavetable ‘position,’ would function as if you were modulating the ‘warp’ knob from 0-100% (or, an entire cycle) over a bar’s length.
This can also be used to free the warp-mode up, in order to utilize yet another warp-mode on the designated/desired oscillator; the only downside being certain warp-functions, which rely on disparate modulators (such as FM, AM, and RM), cannot be rendered… but don’t fret, as we’re able to advantageously use one of these modes on our final bounce now (since it’s now free to perform any job we see fit). Be cognizant of the fact that this can successfully be done many times over (however many you deem sufficient) to create crazy/wacky, yet immensely complex, wavetables.
Additionally, this is a quick and painless way of achieving your own complex wavetable, from something as rudimentary as the default ‘saw,’ by simply turning the warp-mode (of our choosing) ON:
1. Load the desired table.
2. Turn the warp-mode of your choosing ON (for example, ‘quantize’).
NOTE: It doesn’t quite matter whether you dial up the warp-parameter or modulate it, as the render’s effects are based on the Warp knob going from 0-100%.
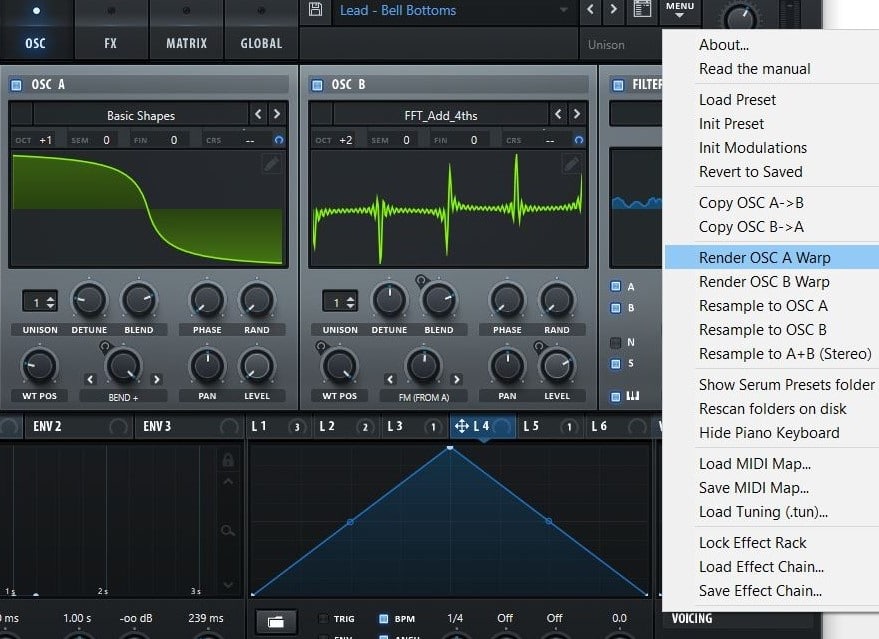
You now possess the ability to load up a one-cycle wave-form/table, and successfully make it complex without ever having to enter the Wavetable Editor (magnificent, right?).
NOTE: As I previously stated, this is substantially useful when applying multiple warp-stacks on top of one another.
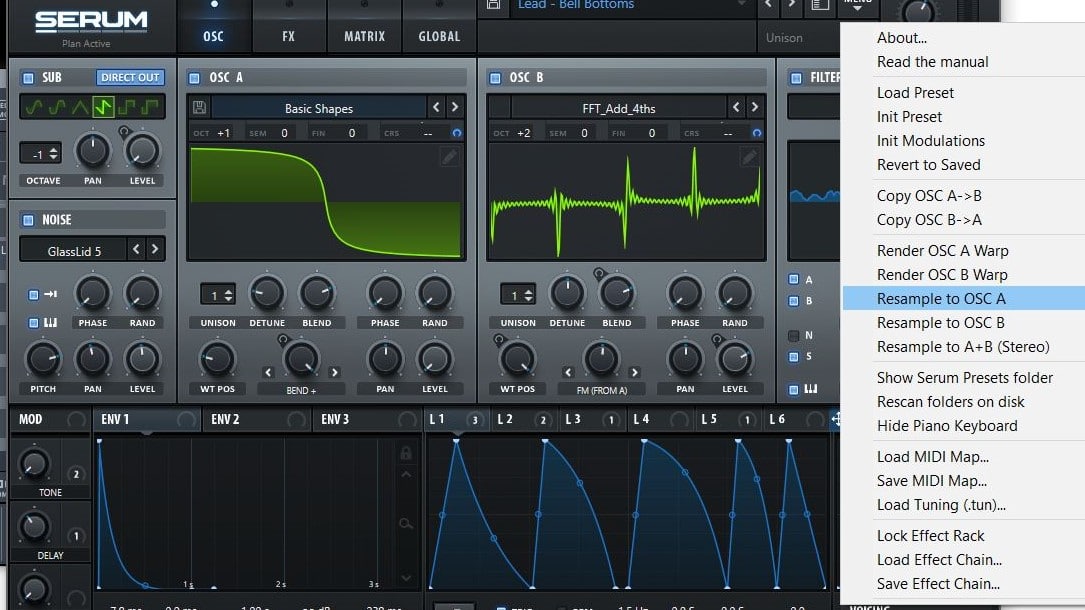
The next major (hidden/scarcely known) function that lies within Serum’s menu are the 3 ‘re-sampling’ processes. With them, we not only have the ability to re-sample the entire patch’s ‘output,’ including effects (converting it into a wavetable), by re-sampling to A or B (like the ‘render’ warp-function), but we’re also presented with a third option: re-sample to ‘A and B STEREO;’ which bounces the left AND right channels, independently, to oscillator A AND B.
What this literally (miraculously) does, is takes the entire OUTPUT of your patch (filters, Unison, modulation, plus all the effects) as it proceeds to play one note for one bar, captures it (renders it to RAM), and imports it as a wavetable; replacing the current table that’s in use.
If you don’t yet realize just how genuinely impressive/monumental this truly is, just try importing an audio clip as a wavetable… the rest speaks for itself; it’s just a gigantic hassle, especially if you don’t fluently understand the language. Even if you happen to surpass the ‘import’ options, if you’re not willing work with it in the wavetable editor, it most likely won’t suffice or live up to your expectations (except, of course, if it’s already a wavetable).
If you’re still skeptical about how useful/beneficial this process is, or don’t believe that the finished product’s wavetable is customarily ‘juicer’ than the original, let’s try it out for ourselves to determine validity:
1. Open up a favorable preset, or one of your own (that’s completely finished), which utilizes only one oscillator; you could use a oscillator patch but, for comparisons sake and because it’s (presumably) your first time trying this, a 1-oscillator patch is best.
Make sure all your LFO’s are set to sync in ‘BPM’ mode, as it renders only 1 bar at a time. At times, it even works out superior if your ‘main’ LFO (which is controlling the filter-cutoff, and conflicting destinations) is set to ‘ramp up,’ and the speed/time is set to one bar. You will find this oftentimes works out much better than having multiple oscillators within a single bar/your table, because that specific task tends to be to onerous for the table to handle/work with and unwanted fade-ins/outs can occur but, by performing this (superior) technique, however, it’s intensity rises slowly/gradually, which is an illustriously lucrative trait/feature for a wavetable to possess.
NOTE: If your table seems to be rather erratic/turbulent (in terms of modulation), you can alternatively try imparting the Envelope with a long Attack, essentially as if it were a ‘pad,’ for the render’s sake (which normally rectifies this particular problem); all alterations can be reversed/undone once you’ve satisfyingly re-sampled and created your wavetable.
3. Turn Oscillator 1 off, and carefully/punctiliously listen to the results.
Odds are, it’s an appreciably superior, more ‘complex’ version of the original table, and may have even proved to be completely diverse/unique from the original as well (in a felicitous sort of way); either way, there is just something special about the timbre that’s generated when using a wavetable that was created/based on the actual preset you’re currently utilizing (to a synthesizer, this would be equal to a vocal harmony).
4. Apply the modulation that’s on OSC 1 and 2, and gauge what happens… (it may make the patch significantly greater/larger).
NOTE: This may not serve as advantageous in every patches case but, if you continually and persistently experiment with method (using various tables), your inevitably bound to comprehend/see for yourself how genuinely epic this can be!
For those of you who are entirely, unreservedly comfortable (and expertly competent) with the Wavetable Editor’s apparatuses, you can take this step even further by customizing these rendered-wavetables; in my opinion (and personal experience), and in the eyes of the sound-design community, this is a colossal game-changer; revealing yet another prodigious layer of Serum’s seemingly limitless potential/capabilities.
As is true with any creation composed in Serum, any rendered or re-sampled wavetable, that you deem wholly adequate, can successfully be saved by simply clicking the ‘save’ icon (which appears on the left side of the wavetable’s name).
HIDDEN MENUS, PRESETS, AND FUNCTIONALITY
Another ostensibly hidden and, in my eyes, preeminent feature of Serum, is that it allows/enables you to not only save entire FX-chains (plus the ability to recall them at any time), but individual presets for each effect as well.
NOTE: In order to load or save entire effect-chains, simply go to Serum’s main drop-down menu, and select either ‘load effect chain’ or ‘save effect chain’ at the bottom of the menu (contingent upon which operation you wish to effectuate).
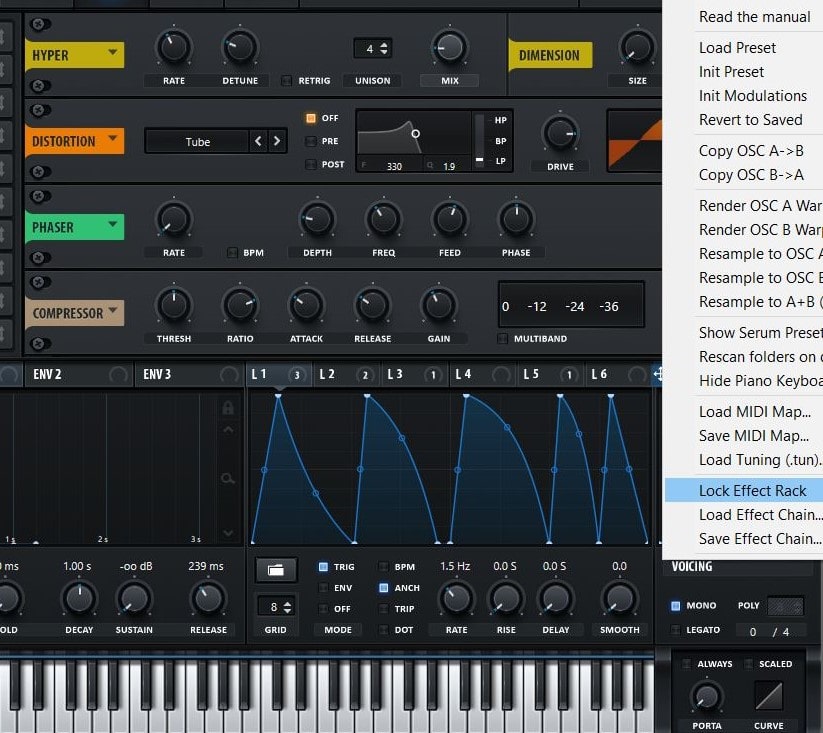
We’re also provided with the (propitious) option/ability to:
A. ‘Lock’ any particular/determined effect-chain we desire, which allows us to initialize the preset while simultaneously leaving a (desired) preset’s effect-chain in tact.
B. Load up distinct instances of a chosen effect, by going to the ‘effect’ rack and clicking the arrow that’s located directly next to that particular effect’s name; allowing you to effectively save/recall individual effect-settings.

Or
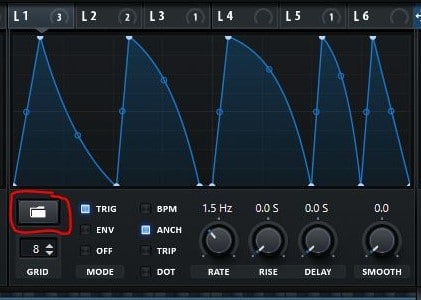
C. Save and recall LFO-shapes at any point of your session, which is exceedingly constructive/valuable when working with not only standard modulation, but arps and ‘specialized’ curves (which may otherwise be extremely strenuous and enervating to replicate from memory) as well. Side note, Serum offers bounteous amounts of preset LFO-shapes, which can be accessed by clicking the ‘folder’ icon in the LFO section (right above the ‘Grid Size’)
.
Residing within the Modulation Matrix (on the top right-hand corner, directly next to the ‘OUTPUT’ section) is yet another hidden gem/set of features. Here, we’re offered various options in which to sort our ‘modulation’ entries by either ‘source’ or ‘destination’; bestowing us with a substantially clearer picture of what’s actually occurring within the patch.
Furthermore, we’re equipped with one final option that is, truthfully, the reason why I’m even mentioning this menu… the highly revered (within the sound design realm) ‘Lock Matrix (preset change)’. What this does is ‘lock’ all modulation that’s currently assigned within the patch, and enables you to swap/cycle through alternate presets; leaving the original modulation intact.
Although you may not think of an immediate use for this (striking) feature, it will undoubtedly come in handy when you’re utterly in love with the modulation (of which you have set up on a specific patch), but would like/prefer to use alternative wavetables.
What’s even better/more convenient about this feature/process, is the fact it can achieve in three simple steps:
1. ‘Lock’ the matrix.
2. Swap your preset.
3. Begin experimenting.
NOTE: This is an ideal feature to take advantage of when experiencing producer’s block, as it’s customarily easier to break out of when equipped with a solid foundation for a patch, rather than being forced to start from scratch. Additionally, it provides you with a platform to create new patches (from existing patches), and an opportunity to experiment with fresh, new concepts.
One technique that I sincerely enjoy enacting, is finding a patch I’ve previously created (that is comprised of excessive modulation), locking the Matrix, and then initializing the patch. Then, I proceed to remove/add (the desired amount of) modulation, swap out wavetables, and even load up some supplemental ‘effect’ patches of my choosing (from previous presets).
This last ‘concealed’ menu is not necessarily hard to locate, but more so ignored, overlooked, or dismissed as irrelevant/insignificant; this being the ‘Mod Source’ menu, which can be accessed by right-clicking on any parameter with the capacity to be modulated.
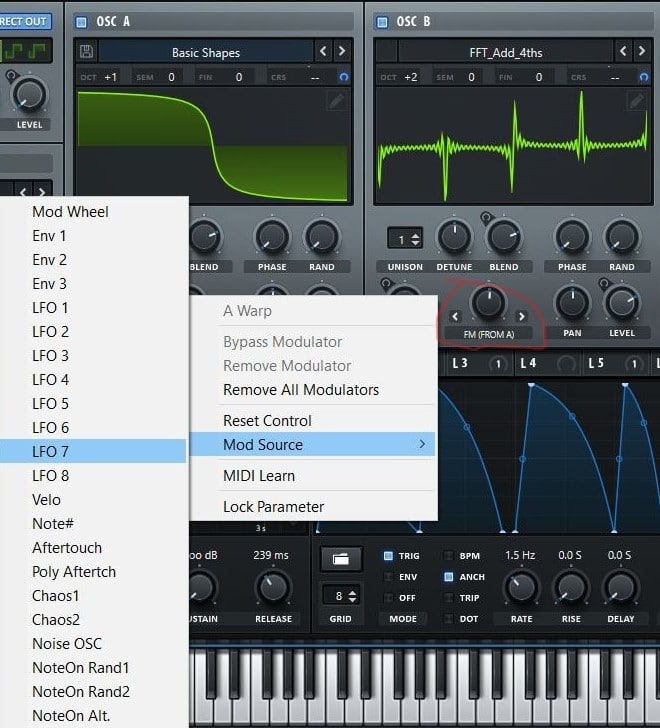
Although most of the options that this menu is comprised of can be applied/executed by simply ‘dragging and dropping,’ we’re also allocated additional ancillary options that, ordinarily, would only be accessible through the Matrix directly. So, for those of you that erroneously believed that you MUST go to the Matrix in order for the ‘warp’ function to be modulated by the noise OSC (for example), think again!
BONUS
Within Serum’s main menu (directly below the ‘initialize preset’), is the option to initialize modulations; proven to be exceedingly valuable during the reverse-engineering process. With this function, we can attempt to ‘memorize’ the modulation from a particular/desired patch, and recreate it (or maybe you’re completely in love with the foundation/core of a certain preset, and wish to produce your very own modulation set up in order to replicate/encompass it).
Try loading up your absolute favorite presets, and simply initialize the modulation… it may just become your new ‘go-to’ technique to draw inspiration from when you need it most!
Well, If you have come this far…congratulations! You now have a thorough understanding of all the various traits of ANY preset within Serum (be sure to get intimately familiar with them) as well as a concrete outline, that you can refer to any time you wish, which divulges how to properly/advantageously utilize the process of reverse-engineering virtually any patch within a wavetable and/or subtractive-style synthesizer.
Now you can begin building your very own ‘systematic’ process that fits your particular, unique work-style/personal taste best! I truly hope that this article has sparked the inspiration inside you that you needed, in order to take that first step towards learning how to expertly conquer this (highly beneficial) technique; now go and get creative!
(Do you have any techniques, tips, or tricks relating to this topic that weren’t mentioned in this article? Comment them below, as we would LOVE to hear them! Thanks in advance.)
2 comments
Leave a Reply
You must belogged in to post a comment.




 40 Chord
Progressions

Wow I can’t wait to get home and read this