Parallel Compression, also known as New York Compression, is a dynamic range compression technique used in sound recording and mixing. This technique is achieved by mixing an unprocessed ‘dry’ (or lightly compressed) signal with a heavily compressed version of the same signal.
Parallel Compression plays a vital role in how producers/engineers get their drums to hit so hard and how they’re able to convey a stronger, more apparent ‘character’ through effects like vocals and bass.
It’s a term that beginners (and even some veterans) constantly hear, but are extremely hesitant about learning, because they have the preconceived notion that it must be far too difficult to master if every pro in the industry is able to manipulate it so proficiently, making it seem like some sort of ‘dark ark’.
Well my friends… I’m here to tell you: that is simply a big, fat misconception. In fact, it’s quite the contrary.
Once you get over the initial apprehension of taming/conquering this beastly technique, you’ll quickly realize all that worrying was completely unnecessary, as it’s fairly painless to comprehend and only requires a few, easy steps to successfully accomplish.
Don’t get me wrong, even though it’s reasonably simple to execute, the impact it can produce is massive!
Back in the day, this technique was a serious hassle to set up, and entailed the engineer to literally record a duplicate of the intended track back onto tape (manually) in order to run it parallel to itself. While their options/methods were mundane at best, the innovation was most certainly not.
Truth is, if it wasn’t for those ingenious, time-consuming processes that were carried out back in the ‘analog’ era, we would never have been able to digitally replicate them today. Although nothing compares to the vintage physical equipment and hardware units, we now have the technology to express the same outcome, without setting up and running the signal through all the tubes and transistors that was once an obligation.
By creating a digital way to compress our music, we unfortunately encountered one fatal flaw… the outcome actually sounded ‘too perfect’ (believe it or not) due to the precise digital nature and lack of electrical hardware and wiring.
Well, as time passed and technology evolved, plugin-developers configured realistic ways to recreate these classic sounds and artifacts produced by really any vintage units and consoles by using groundbreaking techniques, such as ‘Schematics’ and ‘Hardware Mapping’ which would otherwise be impossible to duplicate with modern methods.
Even if you possessed all the fancy gear known to man, if you wanted a compressor applied to more than one track a time, it was absolutely necessary to add and have an additional hardware compressor handy. This reason alone may be responsible for why we still prefer to use vintage compressors (if available) over modern/digital compressors.
Today, I will be going over how to apply it to your drums, utilizing this effortless (yet supremely effective) technique. I will also discuss a few different Compressor types; how they’re able to emit the exact feel/characteristics you’re craving, and how they can work to your advantage.
NOTE: I will be covering some additional, more advanced methods you can apply to yield highly desirable results in part 2, but today is dedicated to the fundamentals.
So, without further delay, let’s get started…
Table of Contents
- DRUMS
- COMPRESSION AND PARALLEL PROCESSING
- 1. Take your drum loop (or Bus) and duplicate it.
- 2. Take the duplicated track or Bus, and throw on a compressor of your choice.
- 3. Set your ‘threshold’ to a relatively low ceiling. Anywhere from -8 to -12dB is around the range we are going for .
- 4. Set the ‘ratio’ rather high.
- 5. Set your ‘attack’ and ‘release’ time.
- 6. Blend the two signals together (making one hard-knocking drum track).
- ALTERNATE COMPRESSORS AND COMPRESSION TYPES
- 2 STAGE PARALLEL COMPRESSION
DRUMS
We’re all aware that drums are an integral part of a song’s overall feel/vibe and how crucial of a role they play in today’s music, regardless if they are acoustic or electronic. In the past, producers and engineers alike had to seek out an extraordinary drummer, find the right equipment PLUS find the perfect setting to record them in.
Thankfully, we don’t undergo that particular problem as often due to the overwhelming amount of drum samples we now have access to, which generally sound great when played back individually, or even in a sequence.
When it comes to a complete composition, however, getting them to STAND OUT and take center stage is usually a more strenuous ordeal than creating the track itself.
Why is that? Because drums have a tendency to get drowned out by the instrumentation they are designated to support. Once processed with compression (and other elements), they seemingly lose their original ‘oomph’ and, at times, kill the original Transients; significantly diminishing their intended presence.
Using Parallel Processing to prevent or rectify this problem is so popular that most modern compressors today (plus emulations and recreations of the classics) now provide a WET/DRY Mix level on the compressor itself.
If you own (or have access to) a compressor with a similar configuration, I HIGHLY encourage you to use it so you can skip a few steps. If not, you’ll have to capitalize on the standard techniques we’re discussing today.
NOTE: Either way, Parallel Compression is a process that requires you to compress the signal and manipulate it far more drastically than you normally would (I.e. squashing the hell out of your signal versus simply lowering the track’s overall ‘dynamic’ range or attempting to tame your song’s peaks).
By employing Parallel Compression, you now have the advantageous ability to manipulate your drums in various ways. For example, you can use a medium to long attack time to increase the overall ‘attack’ and ‘punch’ of the transients OR use a quick attack time (aka thinning out), which ultimately decreases the attack and softens the transient activity.
You’re also able to manipulate the ‘release’ and ‘sustain’, which can substantially alter the entire loop’s original traits or individual/designated drum parts of our choice, dependent upon how you set up the compression (release time).
NOTE: Results vary greatly dependent upon the compressor itself, and the compression type being used.
You then blend the original signal with the compressed signal, and now you truly possess the best of both worlds; the character of the compression and the original punch of the track (that compression did not have the opportunity to alter).
These are just a few of the many benefits of using Parallel Compression that standard compression alone could never achieve.
NOTE: There are many different ways to apply Parallel Compression, and I am fully confident that you’ll be able to master these concepts (regardless of skill level) as long as you have a basic understanding of Compression itself. However, I will NOT be going into every intricate detail regarding this topic, as there is an infinite supply of material online.
COMPRESSION AND PARALLEL PROCESSING
Compression is used for a variety of different, useful functions; the most common one being to decrease a sound source or a song’s overall dynamic range. Ultimately, this allows and enables us to make the sound louder and more even throughout the entire track WITHOUT increasing it’s peak amplitude; lowering the level of the ‘sound source’ whenever it breaches a predetermined point that we set using the threshold.
By compressing the peak (or loudest) signals, it then becomes possible to increase the overall gain (or volume) of a signal without exceeding the ‘dynamic limits’ of a reproduction device or medium; essentially functioning as an automatic volume control.
NOTE: Even when working with a live recording, you still must reduce the dynamic range so the listener will perceive it properly/accurately and can make sense of it in the digital realm. In other words, when the song is played back on a system, it should sound realistic, desirable, and pleasing to the human ear. We must make sure that the relationship in amplitude of the various signals are ‘convincing’ to the real world, and scaled naturally in relation to the original performance (especially if recording in a live setting).
When it comes to drums (and many other sources for that matter) you shouldn’t solely use compression as a dynamic aid, but also as a way to embody that unique character or presence, that would otherwise be exceptionally difficult to produce using any other method besides compression itself.
You can alter, manipulate, or control a compressor in all sorts of ways using the compressor’s standard settings. You can acquire more punch out of a kick, more snap out of a snare, or even extend the snare/kick’s sustain so that it ‘rings out’ thus increasing the overall presence of the drums (or whatever you chose to apply it to).
Adding effects such as compression inevitably compromises the sound/vibe in some form of fashion because, as a result of reducing the dynamic range (as it’s programmed to do), it inevitably squashes anything that breaches the threshold we set (or is predetermined).
True, you may yield the results you require in order for the meters not to peak, but you’re simultaneously altering the original signal, which can (at times) take away from the initial impact of your track.
By using Parallel Compression on the other hand, you now have the ability to leave the original signal totally uncompressed, while simultaneously compressing the hell out of the duplicate.
After you’ve sufficiently completed that process, proceed to blend those two signals together; running them in ‘parallel’ to one another. This allows you to achieve a noticeably more powerful signal than you regularly would, had you been using a standard compression alone.
Firstly, I will go over how to implement it in it’s quickest, least complicated form.
1. Take your drum loop (or Bus) and duplicate it.
If using a loop, you can simply duplicate the track.
If using individual samples on separate tracks, simply route those unique tracks to TWO different Busses/Aux Returns (as opposed to just one).
NOTE: EQ and similar processes are perfectly fine on the original loop/Bus, although I personally prefer to do my sculpting AFTER applying the Parallel Compression (and highly encourage you to do the same). Regardless, make sure there is absolutely zero compression applied, because in order to retain the drum’s initial, authentic characteristics, we MUST leave the original track uncompressed.
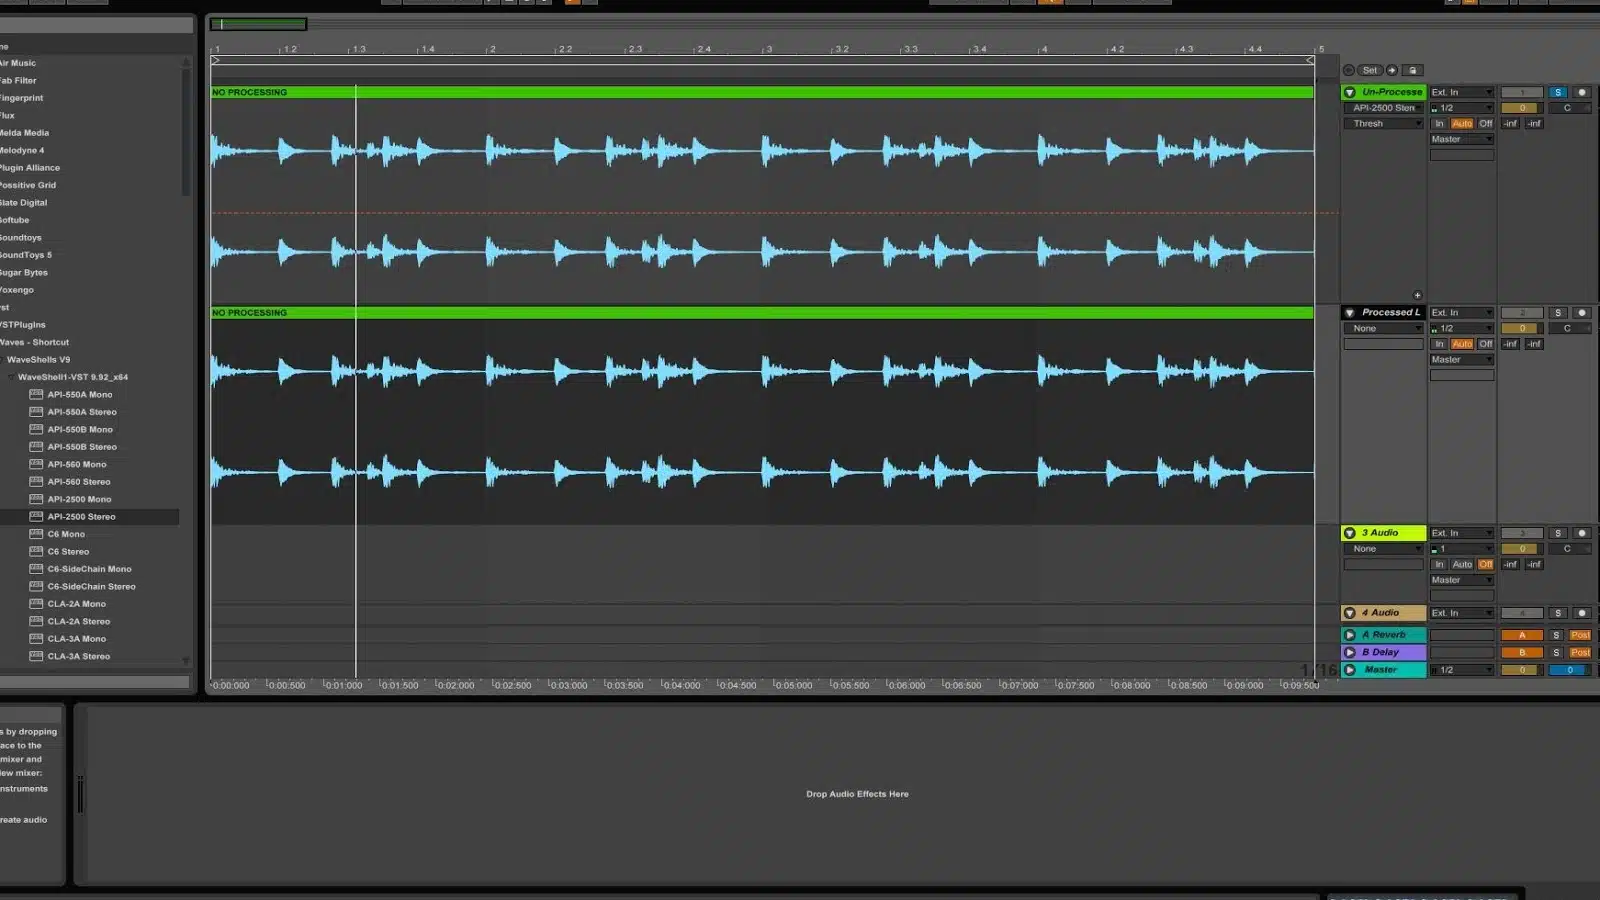
2. Take the duplicated track or Bus, and throw on a compressor of your choice.
For this specific task, I favor using Waves API 2500 or another VCA compressor; anything celebrated/recognized for it’s rapid attack times and smooth quality.
KEEP IN MIND: If you do NOT have comparable tools at your disposal, any compressor will suffice.
Don’t feel like you cant follow along just because you don’t own one of these emulations.
Although I’m an avid advocate of the classics, I will still go over a couple of different, frequently utilized compression/compressor types, and how to properly set them up; the concept of setting them up essentially stays the same, the names and layouts on the other hand, may slightly vary.
IMPORTANT NOTE: It’s extremely easy to get tricked when creating this duplicate because the drums instantly get louder. However… louder is NOT the same as stronger, fuller, or fatter! Keep that in mind when analyzing and A/B’ing.
For this reason alone, you’ll want to ‘Solo’ the duplicate track you’re applying the compression to so you can hear it in isolation. That way, you’ll accurately be able to hear what the compression is truly doing.
Normally, when utilizing compression, the end goal is to achieve a desirable sound (dynamically), while simultaneously making it sound ‘transparent’. If you improperly implement compression, it can cause numerous, unwanted results such as ‘pumping’ (not the good kind), squashing, and the like.
Today, we’re actually doing the complete opposite; aiming to OVER compress the signal.
3. Set your ‘threshold’ to a relatively low ceiling. Anywhere from -8 to -12dB is around the range we are going for .
This way, it compresses everything, not just it’s peaks.
Really clamp down on the signal and get those needles moving!
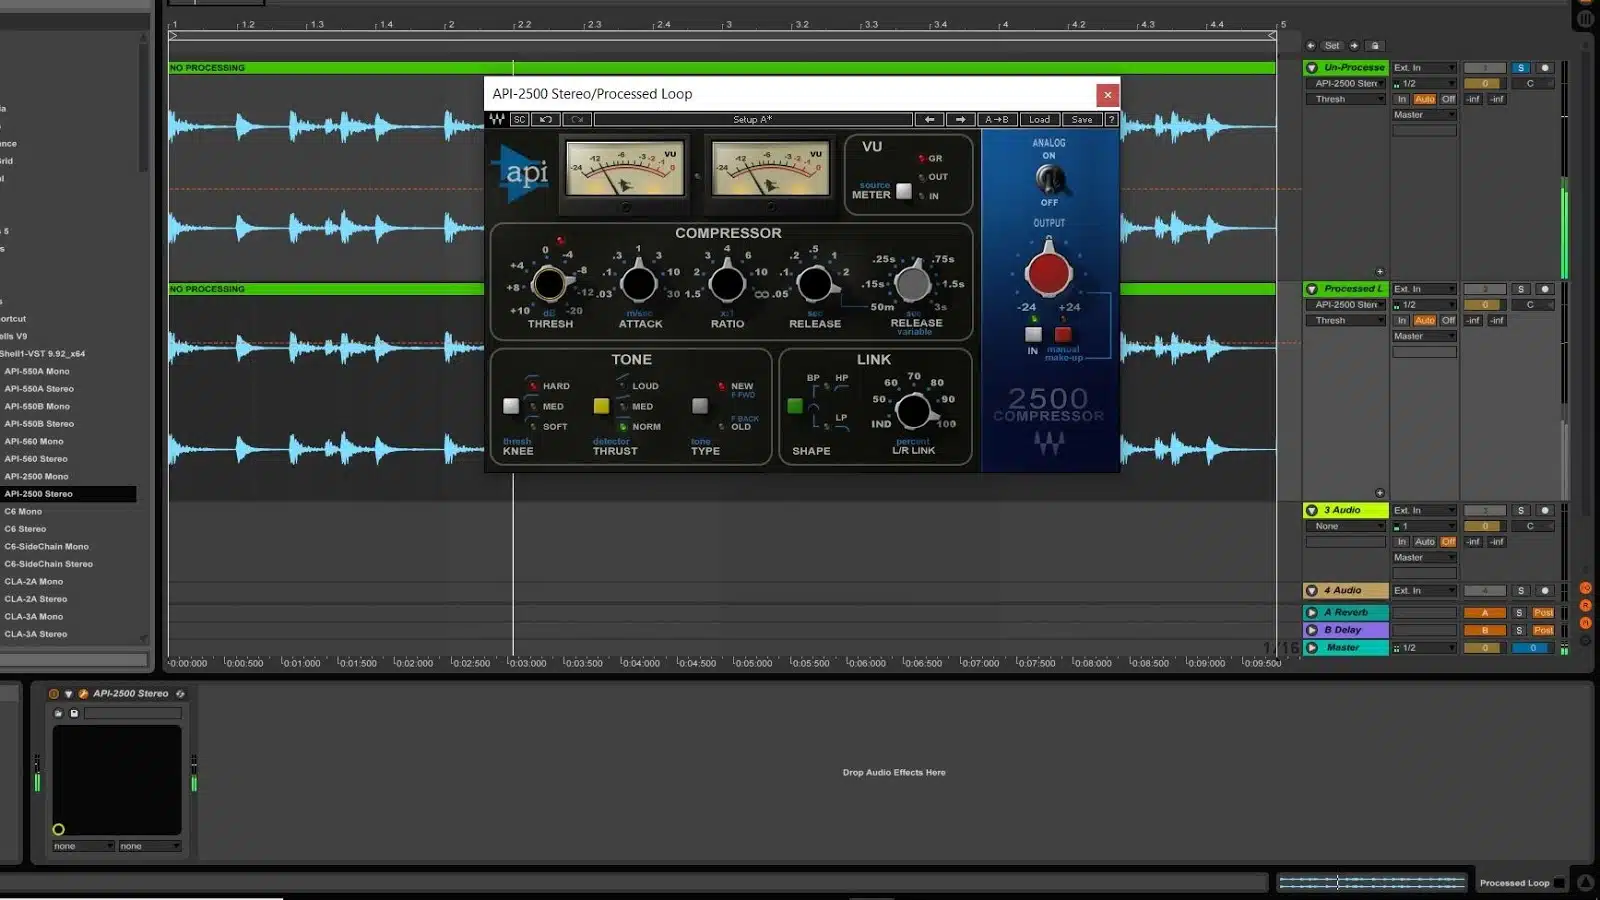
NOTE: In regards to this particular compressor (the API 2500), the higher you set the threshold knob, the lower the ceiling. Many compressors work this way so I advise you always look at the values you dial in very closely instead of just blindly turning the knob up or down. This rule applies to really any and every setting and unless you know your tools like the back of your hand, it’s always a good rule of thumb.
4. Set the ‘ratio’ rather high.
I like to set it at around 10:1 (technically, my most, considered ‘limiting’ territory). Realistically, if your threshold is low enough you won’t need the ratio to reside too high. With that said we are really trying to squash the signal so a very high ratio wont hurt in this case even if it seems, at first, a little overboard.
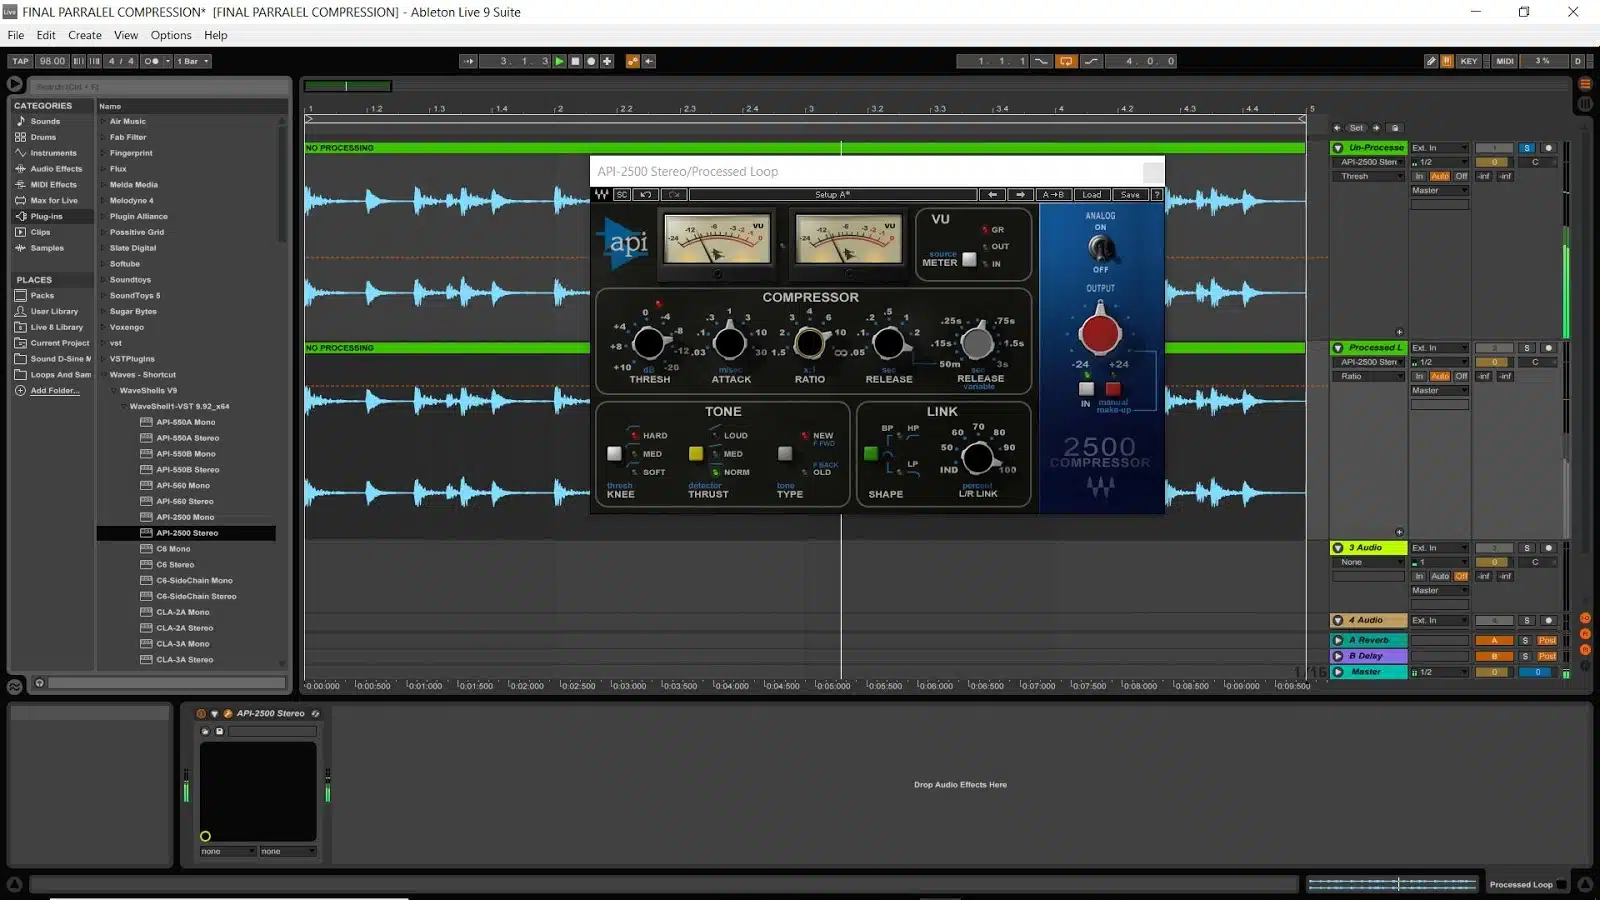
5. Set your ‘attack’ and ‘release’ time.
These are really the 2 most crucial parameters and the end result will rely highly on the way you configure them.
I have found that if you’re aiming to accentuate the kick/snare, use a medium attack (to retain and bypass some of the initial transients) and a short release time; leaving room for it to ‘breathe’, giving the compressor the opportunity to snap back before it reacts again.
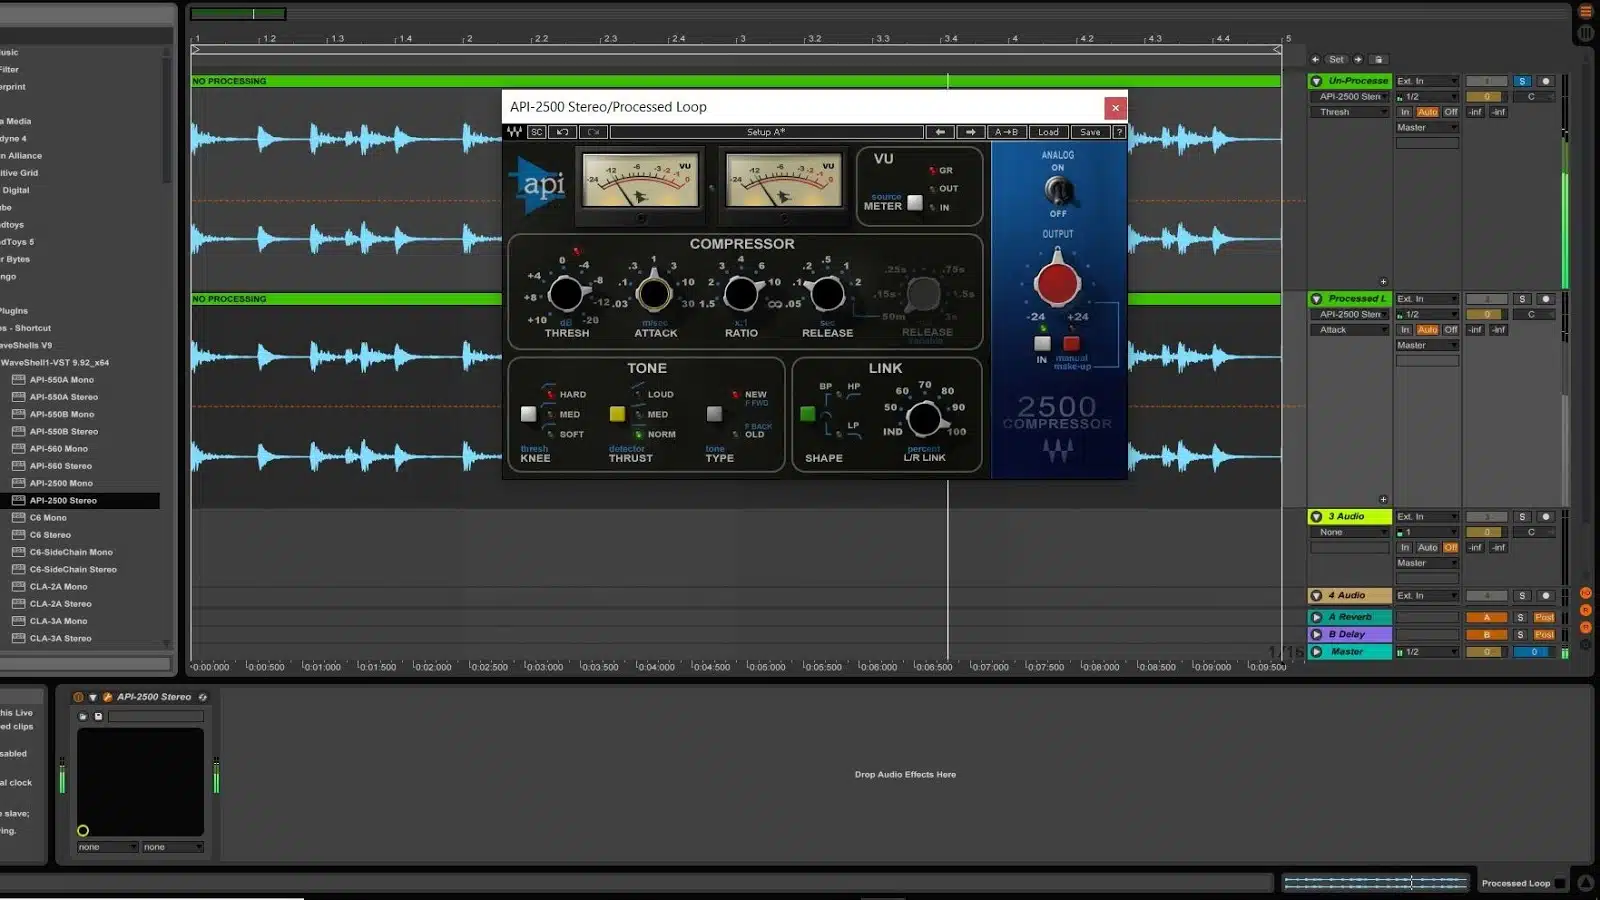
For a ‘smoother’ sound that affects the entire track evenly, go for a quick attack and long release. This will make it so the compression will NOT snap back (for the most part) and the signal will stay in a constant or almost constantly compressed state. Be sure to keep an eye on your ‘Gain reduction” meters/needles as they will really give you a good idea of how the compressor is working and reacting. You will notice it moving differently based on the attack and release time set. Use these meters as a guide but DO NOT let it become a determining factor when it comes to your final mixing decisions.
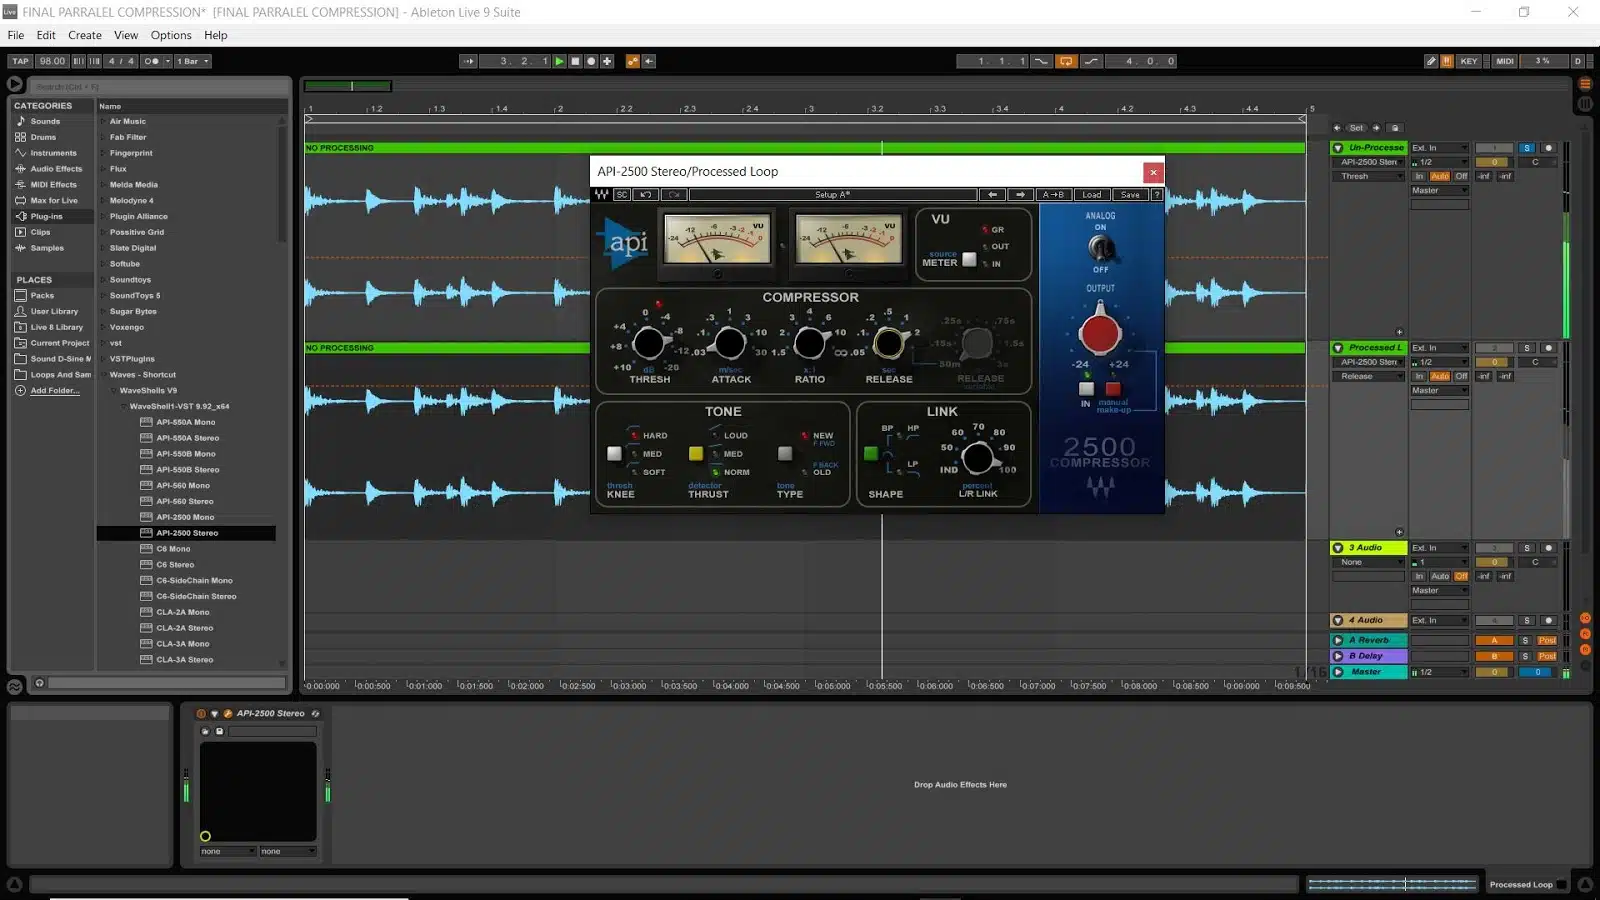
If you want the sound to really breathe and pump (with some movement and motion), go with a quick-medium attack and a quick-medium release.
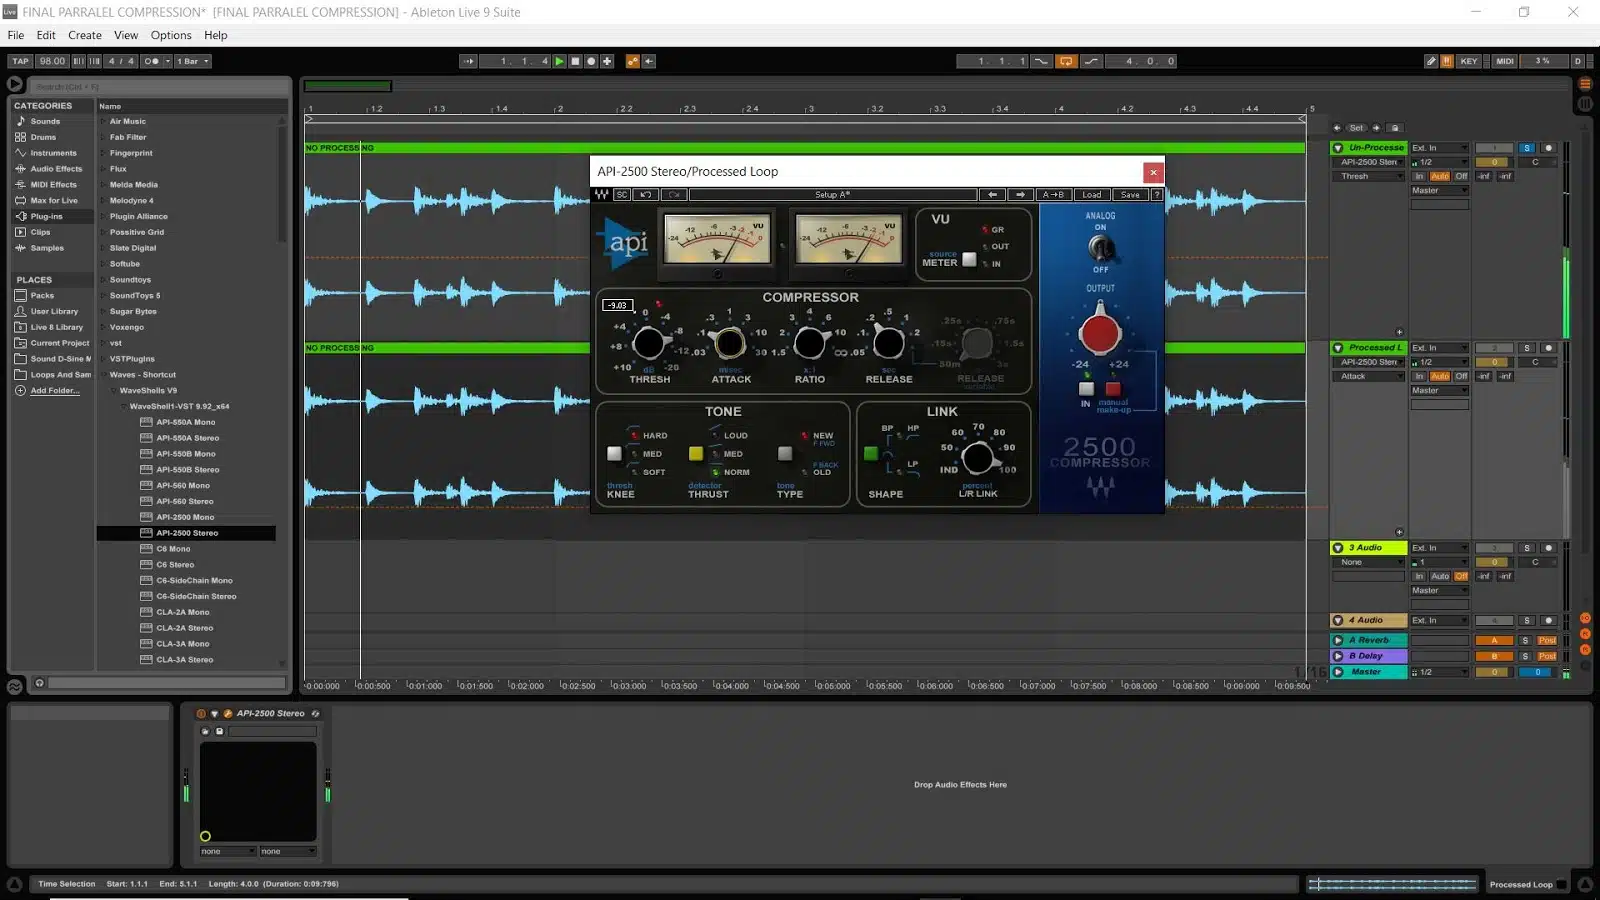
NOTE: The exact settings truly depend on your personal preferences and the specific track you’re working with, but after some parameter adjustments, you will undoubtedly discover ideal settings; some will allow your Hi-Hats to seriously shine, others will favor the kick/snare. Experiment for a while, choose what accommodates that unique track best, and use it!
6. Blend the two signals together (making one hard-knocking drum track).
Un-solo (if still in isolation) the compressed track and bring the ORIGINAL track’s volume down, while bringing the DUPLICATE (compressed) signal up.
NOTE: I like to add back in (with the compressed signal) however many dB’s I lowered the original track. This way, I don’t get tricked into believing that I effectively/sufficiently enhanced the drum track, when in reality I solely made it louder (not better). To reiterate and emphasize… this illusion can sometimes fool even the best of us, be cautious!
When compressing the signal, make sure it’s ‘output’ (post-compression) is the SAME level as it was previously to avoid confusion during this crucial step.
This way, once you’ve blended the two signals, you can toggle the compression on/off and the track’s volume will remain the same; you’ll also be able to hear the compressed AND uncompressed signals playing back at the same level (like I’ve done with all the examples).
When you play back all the tracks at the same level (including the original), it guarantees that what you’re hearing and detecting is accurate, not just due to the volume change; therein lies the power, magic, and beauty of Parallel Compression.
TIP: When experiencing difficulty determining whether or not you’re making actual strides or merely making things louder, either make a third copy of the original track OR route everything to a third Bus (again, no processing). Make the level of this third Bus/track the same level as the original signal AND the compressed signal. This will prevent you from being mislead, as volume is no longer a factor when it comes to decision making (e.g. which settings to apply). Toggle between the unprocessed and the processed track (at the same levels) to really see what the parallel compression added.
If you listen back very carefully, you may hear that the uncompressed signal sounds immensely dry.
When blending in the compressed signal, we not only beef up each distinct hit, but also smear the track’s ‘dead space’, making it sound extremely full and present; typically the result of having a medium attack and release time.
Depending on the type of compression having been applied, it can almost sound like we’ve completely replaced some of the samples with a different, more full-bodied hit (as if we manipulated it’s Envelope) so it now sustains and appears to be extended; behold yet again, the power of compression
ALTERNATE COMPRESSORS AND COMPRESSION TYPES
Another favorite of mine is the Waves CLA-76 Compressor/Limiter, although any similar model/style that utilizes an ‘optical compression’ method will suffice and produce similar results (the most famous and widely used being CLA-2A).
Using this compressor, or another similar optical modeled compressor, You’re able to create an ‘airy’ texture much clearer and ‘in your face” than the API.
Be advised: These particular types of Compressors use what is considered a ‘backwards formula’ in regards to the Attack and Release time. That ‘airy’ quality can be attained by using a long attack and fast or short release time; a ‘long’ attack being achieved by turning the attack knob all the way DOWN (from 1-3), and a ‘short’ release time being achieved by dialing the release knob all the way UP (closer to 7).
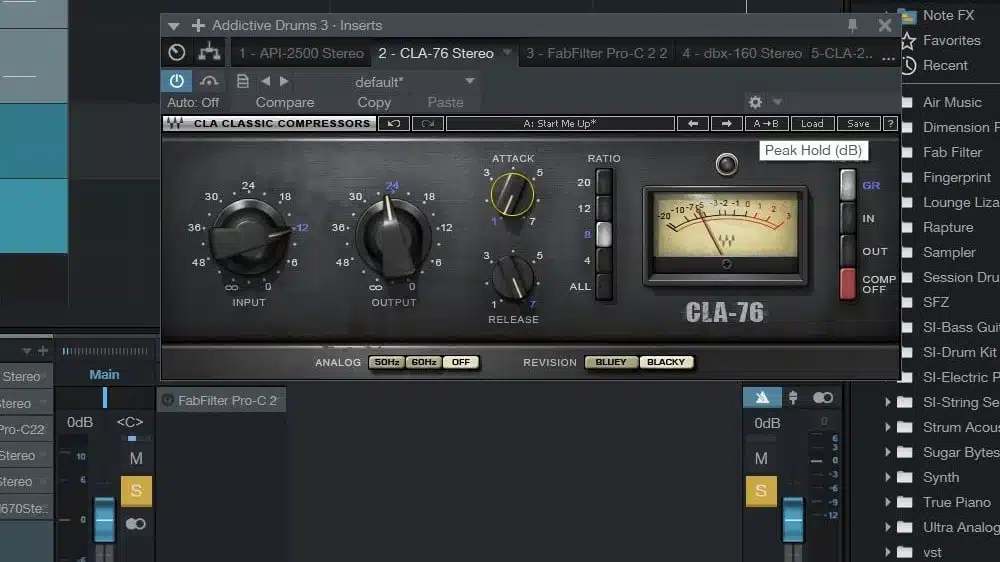
If you’re getting what seems/sounds like almost opposite results when using a Compressor with ‘analog’ roots, try flipping the values, you may suddenly find that the dial is going at the expected/desired rate, as it should.
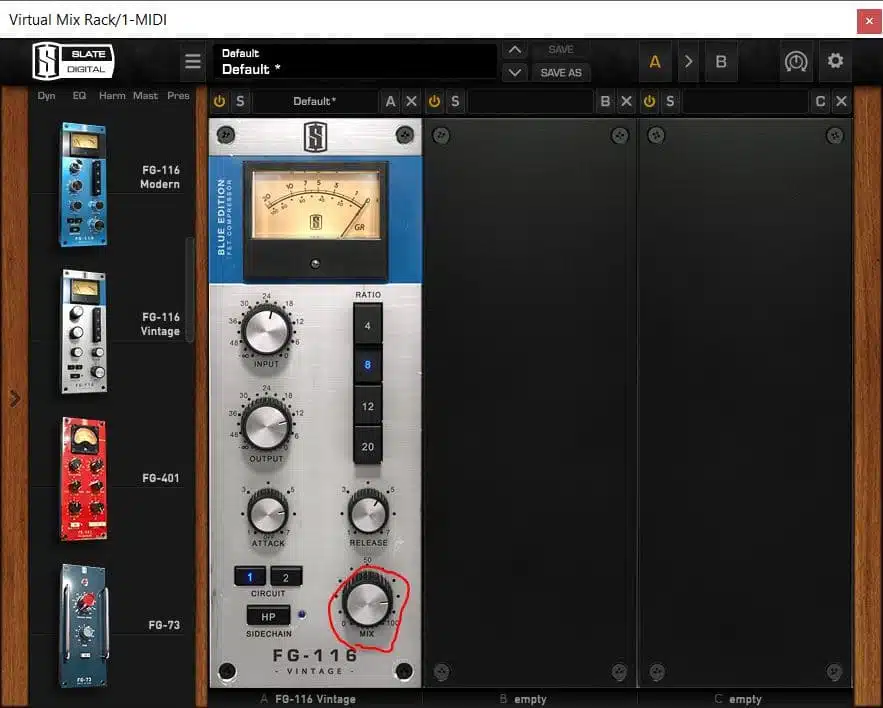
I used this example purposefully, to remind you to keep this backwards formula in mind when utilizing some vintage compressors (optical and FET are notorious configuration flip) and newer plugins that are built based off of the classics; my favorite being the units contained within Slate Digital’s VMR (Virtual Mix Rack).
The most desirable and modern feature that has been implemented into Slate’s line of compressors within the Virtual Mix Rack (and similar compressors) is the “Mix” knob, which enables you to easily utilize Parallel Processing without having to set up a duplicate or configure any extra routing. In my opinion, these types of compressors are not only some of the best on the market, but the most affordable as well; including an ‘Everything Bundle’, which gives you every single plugin that Slate makes for only $14.99.
Simply apply the desired settings and dial in the mix knob to taste.
 .
.
Some will argue that it’s not truly using Parallel Processing when in reality, it is. The only drawback would have to be that you don’t possess total control in regards to processing the signals separately/individually. Having said that, if you do NOT plan on applying any additional, unique processing to the original or compressed track, this method works just as efficiently as any other (and might even be your first choice in certain circumstances).
Some of these optical units don’t have a set ratio control as well, operating based solely on input (usually predetermined by the hardware unit it’s emulating), while others include a Compress/Limit switch that changes the Ratio from a compression mode to a Ratio of 10:1 (or higher); considered ‘limiting’. Some won’t even have an Attack or Release. (Slate’s FG-116 above is a FET compressor but still operates with “reverse’ or “backwards” attack and release settings)
NOTE: If you wish for a more compressed signal, simply crank up the ‘input’ while leaving the ‘output’ at the same (or desired) level; if you wish for a more normal/standard compression, it’s simply a matter of successfully achieving an ideal balance between the two. (the Compressor typically handles the rest).
Even though there aren’t any visible attack/release controls, the compression is still being custom tailored and manipulated based on the input, as it is ‘voltage dependent’ and generally changes based on the amplitude and various other factors based on the incoming signal as well as the compressor it’s emulating and its mode of action has a tendency to vary greatly.
Regardless of which parameters they come equipped with, optical units are ideal for this particular operation, as a heavily compressed sound is the ultimate goal here but still want to retain some clarity and transparency that is hard to find with purely digital compression.They also add a nice amount of subtle saturation that becomes more apparent the harder you push or ‘dive’ the input.
Now, if you’re really craving some heavily-processed action or feel like your track is too ‘clean’ or empty, take BOTH of these compression types and double compress that bad boy!
NOTE: You’re not going to use the same settings as you typically would when you’re using them individually. Experimentation is key when venturing into this territory; try flipping the order in which they are processed in, and try reversing the settings.
BE ADVISED: When using this certain method, it requires a lot less of the original signal to be blended back in. Try using between 15-20% MAX and proceed with caution, as it’s capable of becoming too much, very quickly.
Also try flipping the order you place these compressors as it can make a drastic different on the end result.
Sending Different Levels To The Compressed BUS
At times, after you have all your drum tracks/samples tracked out individually and they’ve been sent to a Bus/Aux Return, you may find that you want to emphasize specific hits (such as the Hi-Hats, Cymbals, and/or overheads).
In this case… I like to send more of the parts I am aiming to emphasize through the compressed Bus, which enables the Compressor to target the desired parts in question.
You even have the option to use Parallel Compression on ONLY chosen/designated factors, let’s say the kick and snare; this allows them to be emphasized, while the Hi-Hats, Cymbals, and Percussion take more of a back seat and/or vice versa.
It truly depends on the intended effect you’re searching for. Again, I highly encourage you to experiment and find what works best for you.
2 STAGE PARALLEL COMPRESSION
If you wish to take it one step further, you can set up a ‘2-Stage’ Parallel Compression. This is essentially the same as our prior set up, except this time we use THREE busses; one signal being compressed, the other being uncompressed. In the end, this is what your most likely going to end up doing just to add some “glue” to the drums.
Send both of those signals to a third Bus, add more compression on top of that Bus (using a Compressor that offers a WET/DRY feature), I prefer using my absolutely favorite Digital Compressor, the ‘PRO C2’ by Fab Filter, as it includes a wide range of functions (that we will cover in the next method) that makes it an ideal choice for Parallel Compression.
I would go with a low ratio from 1.5-2:1 but, depending on the track, you may want to go higher. If you do, I recommend not exceeding a Ratio of more than 4:1, and administer a medium Attack/Release time.
Finally, dial the ‘mix’ knob to your unique taste (if NOT using heavy compression settings, in most instances up to 50% is fine), and there you have it!
NOTE: If you do NOT possess the C2, or a similar compressor that contains this feature, no worries. Just try not to apply TOO much compression on anything more than the peaks.
This is not my go-to method, but it is an option that’s worth experimenting with if you feel like you’ve expertly mastered the previous techniques.
FINAL THOUGHTS
Although these methods are quite rudimentary, simple and easy to accomplish, the results that they end up producing are most certainly not and even though drums are essentially just a small (or not so small) piece of a much bigger puzzle, when it comes to the overall ‘impact’ of the track, they truly do most of the heavy lifting.
Having said that… when you’re in the initial process of making sure your drums convey that intended impact, nothing compares to Parallel Compression.
The effects of Compression are inarguably necessary, but the consequences associated with applying it can sometimes severely compromise vital factors of your track.
By using Parallel Compression, we can avoid losing the original punch, while concurrently reaping the rewards of what makes compression so much more than just an automated, volume-dependent leveler in the first place.
In Part Two, I will be discussing some more advanced methods and techniques that will make you feel even more confident about your drum tracks, even when comparing them to the professionals… so MAKE SURE to stay tuned!
I sincerely hope you enjoyed today’s blog post and (as always) I’m here anytime for any questions, concerns, suggestions, or comments you might have.
What’s your favorite compressor to use for this technique and why? We would love to hear what you think!
4 comments
Leave a Reply
You must belogged in to post a comment.


The Solid Mix Series and Vintage Compressors from Native Instruments are great and most of them offer a dry/wet option of some sort. They are enjoyable to use and comes with a lot of presets to start fast to then tweak its settings to your own liking.
P.S. The VC 2A from the Vintage series is absolutely incredible. Especially on vocals. I have no words to describe what it does but the result is just perfect to my ears.
I always felt it was a shame that NI did not spend their efforts on pushing effects the way they do synths although I think that may change with their new Mod Packs. A Very wholesome and fresh take on the classics imo.
Oh yeah, really any quality 2A emulation I have found to be exceptional at taming and coloring the vocals without it sounding too “compressed” while still getting the job done. Optical units are all about transparency while still adding that special “sparkle” we all love!
I really enjoy the features of Izotopes neutron 2 compressors. The help me get the right compression every time. Really enjoyed this post, thank you!