The main reason why the ‘low end’ is so crucially important when attempting to achieve a full sound is because, without the weight and foundation of palpable low frequencies, the listening experience can be characterized as unsatisfactory or insufficient (seemingly hollow/empty), as strong bass is oftentimes described as being FELT just as much as it is heard. In fact, it is commonly said that low enough frequencies are solely felt, and not actually heard at all.
Two of the most illustrious effects of ‘high-level,’ low frequency sound is what can be ‘felt’ more than heard (the sub range) as well as what we refer to as the ‘punch’. The sensation of chest vibration is reported over a broad range of low frequencies, although it appears significantly more pronounced in mid-bass frequencies (around 100+ Hz), as opposed to lower bass (below 60 Hz).
When managing your low end, remember this… whereas it’s habitually considered to be ONE factor, the low end is actually composed of VARIOUS contributing factors; the 2 prominent ones being the ‘kick’ and the ‘bass’. An inordinate amount of producers seem to think that the purposes/responsibilities of these 2 (highly distinctive) elements are synonymous when, in fact, they most certainly are NOT.
The bass is utilized as a song’s ‘foundation’ and is the driving/underlying force behind all harmonious elements.
Even though the patterns that constitute your bass line are known to change, it’s essence does NOT, and the tone that you’re familiar with (in regards to being paired with the track) typically stays consistent as well.
The kick, on the other hand, is designated as the driving/underlying force behind the percussive sequence; providing punch-leading, and driving the percussion.
Truthfully, the only commonality these two elements share (in regards to composition) is the frequency-range of which they occupy.
NOTE: Although the conjoined sum of these 2 components are known as the ‘low end,’ I highly suggest (when mixing and producing) that you dissociate them from each other; the kick and bass are 2 separate, yet equally critical, elements that contribute unique determinants that should NEVER be fighting for space.
Even when a kick or bass sound exemplary on their own, when combined, there’s always that unfortunate possibility they could produce a completely diverse/undesirable effect… this is why sound/sample selection is so vitally paramount.
Creating accurate space for each element routinely requires some meticulous sculpting, but choosing a kick and bass that clash from the start (e.g., share the same fundamental or occupy similar spaces) is NEVER in good practice; I sincerely advise avoiding that.
NOTE: The simplest way to do so is by utilizing a ‘spectrum analyzer’ in order to gain a veracious perspective of both individual elements, and the frequencies of which they occupy; that way, you’ll know the precise areas that need to be manipulated.
The process changes slightly when dealing with an 808 (that you wish to bind the kick to); it started with Hip-Hop, gradually branched out to all the other genres, and now, manufacturing a kick/bass hybrid is standard practice.
(I am NOT getting into the intricacies or various strategies involved with employing these methods, but rather, the various ways to get them sounding correct/satisfactory once you’ve successfully produced them).
In order for ‘punch’ to properly translate across all systems, the ‘transient spike’ must be greater than that of a tom drum or Hi-Hat, but with a shorter sustain/release phase that follows; making it TOO long will merely create a sustaining sound.
The ultimate goal is to program the ‘micro’ transient-spike to be long enough that it accurately hits you, but not too long where it becomes identified as something else; getting the ‘speaker cone’ to spike/punch you with the refraction (the upward thrust of the transient sound).
Table of Contents
- WHY IS THE LOW END SO DIFFICULT TO MASTER?
- SAMPLE/SOUND SELECTION
- HOW IS THIS DONE?
- EQ CLEANUP
- FREQUENCY SLOTTING
- WRAPPING IT UP WITH A FEW SOUND (OR SAMPLE) SELECTION TIPS/WORKAROUNDS
- DYNAMIC EQ
- SIDECHAIN COMPRESSION
- MULTIBAND COMPRESSION
- ‘DUCKING’ AND UTILIZING VOLUME-AUTOMATION TO CREATE THE SIDECHAIN EFFECT (If you do not have a side chain compressor)
- CREATING A POCKET
- TRANSIENT SHAPING
- 3 ‘MUST-DO’ TECHNIQUES
WHY IS THE LOW END SO DIFFICULT TO MASTER?
The main reason that the low end is exceedingly challenging to expertly master is because, as humans, our ability to hear frequencies is limited. Depending on how ‘good’ your hearing is, you may be able to hear frequencies as low as 20Hz, but that’s the absolute lowest we’re capable of adequately detecting; the older you get, the harder it is to perceive these low frequencies (same goes for the upper-end of the spectrum).
Additionally, FFT and modern/digital analysis methods have the same complications… the lower or higher the frequency, the harder it is for the system you’re playing it off of to recreate/reproduce (and for the room/your surroundings to absorb); this, being the reason why our low end can fluctuate greatly dependent upon the system it’s being played back on or the room/environment in which we’re listening to it. Aside from that, a vast majority of people are listening to music on their iphones, through standard earbuds, or a set of laptop speakers that don’t translate ANY low end whatsoever.
What’s even worse, is that a ton of speaker manufacturers have found deceptive ways to fake, or add back in, the missing bass. This can be extraordinary when listening as a fan or spectator, but detrimental when attempting to mix, reference, and make decisions based on the employed psychoacoustic effects (which vary, and may be proprietary contingent upon that specific manufacturer). This is why I highly encourage you to not only playback your mix on as many different systems as possible, but as many speaker-forms you have at your disposal as well.
Additionally, be cognizant of the fact that many of your devices may possess software/hardware that principally EQs the playback (combating the flaws of the system/overall sound and making it perform supreme), so don’t be fooled!
Turn all the ‘fancy’ features off, mix on speakers that have NOT been artificially enhanced, and get to intimately know your room, monitors, and headphones; this way, you’ll be fully aware of their shortcomings and can adjust accordingly (based on playback). Also, take advantage of analyzers, they allow you to see what you’re not able to hear, or your system can’t properly translate.
TIP: Play your track back on a cheap/crappy system so you’re able to hear/apprehend the worst-case scenario.
SAMPLE/SOUND SELECTION
Sound selection is irrefutably the basis of your entire song and, coming from a Sound design/Production standpoint, it’s mandatory that you fully comprehend how crucial it really is; if you’ve ever heard a particularly horrible instrumental rendition of a song (maybe in a karaoke bar), you’d undoubtedly understand why.
A composition can be absolutely destroyed by poor sample/instrument choices; in order to successfully mix the kick and bass WITHOUT being forced to employ various engineering techniques that will inevitably cause undesired results, it’s necessary that you initially choose the appropriate/compatible instruments (e.g., ones that don’t clash) as to avoid any future complications.
Conversely, the decisions you make are indeed genre-dependent. So, if you’re mixing an EDM track and generate some ‘pumping’ as a result of Side-Chain Compression, that’s not necessarily terrible and can actually be a good thing… but, when it occurs as a result of the intervention of bad choices/necessary adjustments, it ultimately ends up leading to unwarranted frustration and can compromise the overall mix.
If you’re working with a kick and a bass that seem to constantly be ‘fighting’ at any given moment, trying to establish a sense of peace is not only extremely daunting, but potentially disastrous as well, because it causes you to implement adjustments that affect (oftentimes, negatively) way more than solely the low end.
Having said/emphasized all of that, it’s not simply a matter of finding a kick and bass that sound harmonious and can co-exist without any issue, you must possess a pair that genuinely enhance each other as well.
HOW IS THIS DONE?
NEVER, EVER have both elements occupying the same space, as that’s where the major problems (such as phasing-related issues) begin to transpire.
Mentally Split up the low end into two separate reigns; assigning roles/a section of the low end for each element to occupy.
Make sure one is assigned to the very BOTTOM (below 100Hz), and the other to the low-mids (100-140Hz) which can extend into the mid-range.
For example: if you have a very ‘subby’ kick at 60Hz, make sure your bass line covers 90Hz and above; your kick being the ‘sub-energy’, and your bass the ‘punch’ (or vice versa).
When in the process of selecting sounds, I encourage having a Spectrum Analyzer on BOTH tracks; checking it’s fundamentals and the surrounding frequencies each unique element occupies.
An alternative method would be to use a Multi-Track Spectrum Analyzer (or an alternative that is capable of receiving a Side Chain input, such as Voxango’s SPAN) in order to attain a visual representation of what’s happening frequency-wise; most EQ’s also come equipped with an analyzer that is sufficient as well.
REMEMBER: A substantial amount of bass frequencies don’t sufficiently translate (if at all) on most systems, so even though mixing with your eyes is a notoriously eminent ‘no-no,’ the same cannot be said for hard-to-detect (or completely undetectable) frequencies.
When mixing a client/collaborator’s track, you may not have permission to swap samples/change roles. In that case, you’ll need to effectuate the following methods… but, again, if you DO have the ability to change out samples, I sincerely feel that it’s ALWAYS smart to do so; eliminating any unnecessary problems before they happen.
Swapping out a bass can cause a HUGE change, in regards to the overall vibe/feel of your track, but the same is not always true when referring to the kick; most of the time, when executed correctly, a kick-replacement can’t even be detected by the artist (and occasionally, even the producer).
If you’re experiencing major clashing… I suggest consulting with the creator (assuming it’s not you) and conveying the advantageous benefits of a minor sample change, it’s worth it.
If you’re searching for some insane low-end basses/808’s (containing the ideal amount of saturation) that are guaranteed to translate, even across laptop speakers, I encourage you to check out the Unison Bass Collection for Serum. Not only is it jam packed with ground-rattling 808/bass options, but also monster leads that compliment those basses and extraordinary ‘noise’ samples that can be utilized to layer your kicks with custom ‘clicks’ (as to successfully register in the higher frequencies), as well.
EQ CLEANUP
Even if you’ve demonstrated exquisite sound selection, you may still encounter some frequency ‘masking,’ for the simple fact that you’re dealing with ‘like’ frequencies within a single range. Although the fundamental of the kick and bass should NEVER be shared or identical, you’re bound to have some extra harmonics in the same range.
NOTE: Rectifying this issue can be executed in a fairly easy manor, by using your ears and eyes (in conjunction), EQ’ing the surrounding frequencies if necessary. Even though there is now an abundance of convenient/purposive tools that help to speed this process up, and possibly make it slightly more efficient (such as Neutron 2’s ‘masking’ function, by Izotope, shown below).
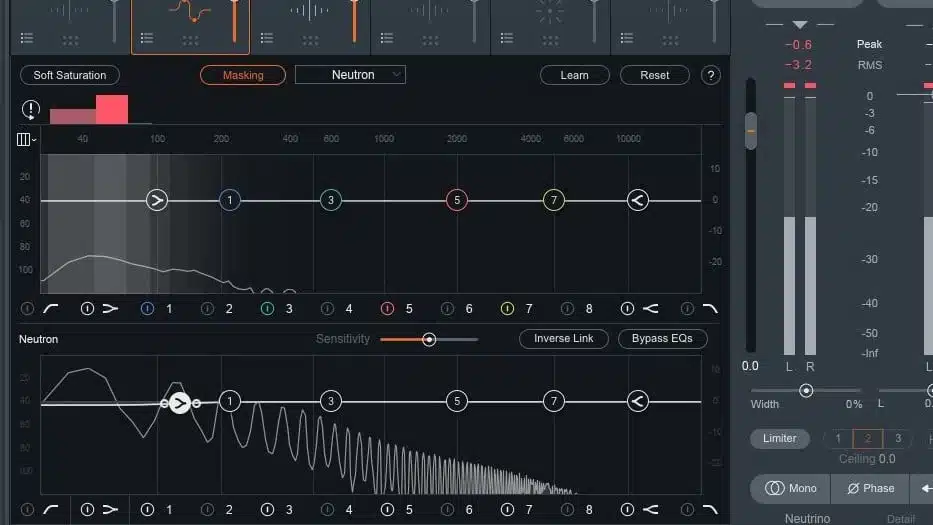
I still prefer to do this process on my own (visually and by ear) using an ‘analyzer;’this way, the decisions are not entirely determined by computerized-analysis methods.
If you do NOT have the option to swap samples, and are experiencing some heavy frequency-masking (due to factors such as the kick and bass residing essentially in the same spot), I suggest utilizing more ‘drastic’ methods, like Dynamic EQing or Side Chain compression (which I discuss later in this article), as to avoid cutting a consistent/permanent hole, in either your kick or bass, that doesn’t move with the track or get triggered by like-frequencies.
FREQUENCY SLOTTING
Frequency Slotting is when you isolate a ‘like’ frequency (from either a ‘like’ or conflicting signal) and remove it (carving a hole), providing the conflicting frequencies with sufficient room. Additionally, if both of your elements (kick and bass) each have different conflicting areas, you can do this to make a little room for both of them as well.
Mentally assign a specific frequency range to each individual instrument in order to provide adequate room for each individual element; the goal being to cut like-frequencies.
For example, cutting certain/designated frequencies from your bass, allowing more room for your kick (or the other way around). Cutting more than a couple dB’s, however, has the potential to compromise the integrity of either sound, so use an alternative method if this particular one doesn’t suffice.
NOTE: Generally, when attempting to ‘carve a hole’ in either of the elements so the other one can fit (or to prevent clashing), Dynamic EQs or Multiband Side-Chain Compressors are typically your best/safest bet.
Using anything other than a Dynamic EQ or Side Chain processor will inevitably cause static attenuation throughout the entire track; this can severely impact the integrity of your instrumentation, and is just plain gratuitous if you have access to Dynamic processors. With that said, if you’re experiencing small/minor clashing issues, make sure to use this technique to ameliorate the problem.
Now, you can achieve this by using either a visual aid or relying on your ear… I prefer both:
(I highly suggest that the EQ is placed BEFORE the compressor, this way the compressor is not affected by the frequencies we are cutting.)
1. Take a look at potentially problematic ranges (where the kick is hitting in relatively the same area as the bass); you can use either a dedicated analyzer, or an EQ with a visual representation if available. Generally, I like to tackle the bass first (in this specific situation), but it’s truly based on personal preference and the song at hand.
2. Apply the EQ to the element/instrument that you need to make room for, grab a band with a slightly narrow Q, and sweep UP around the conflicting area (to boost the ‘mask’).
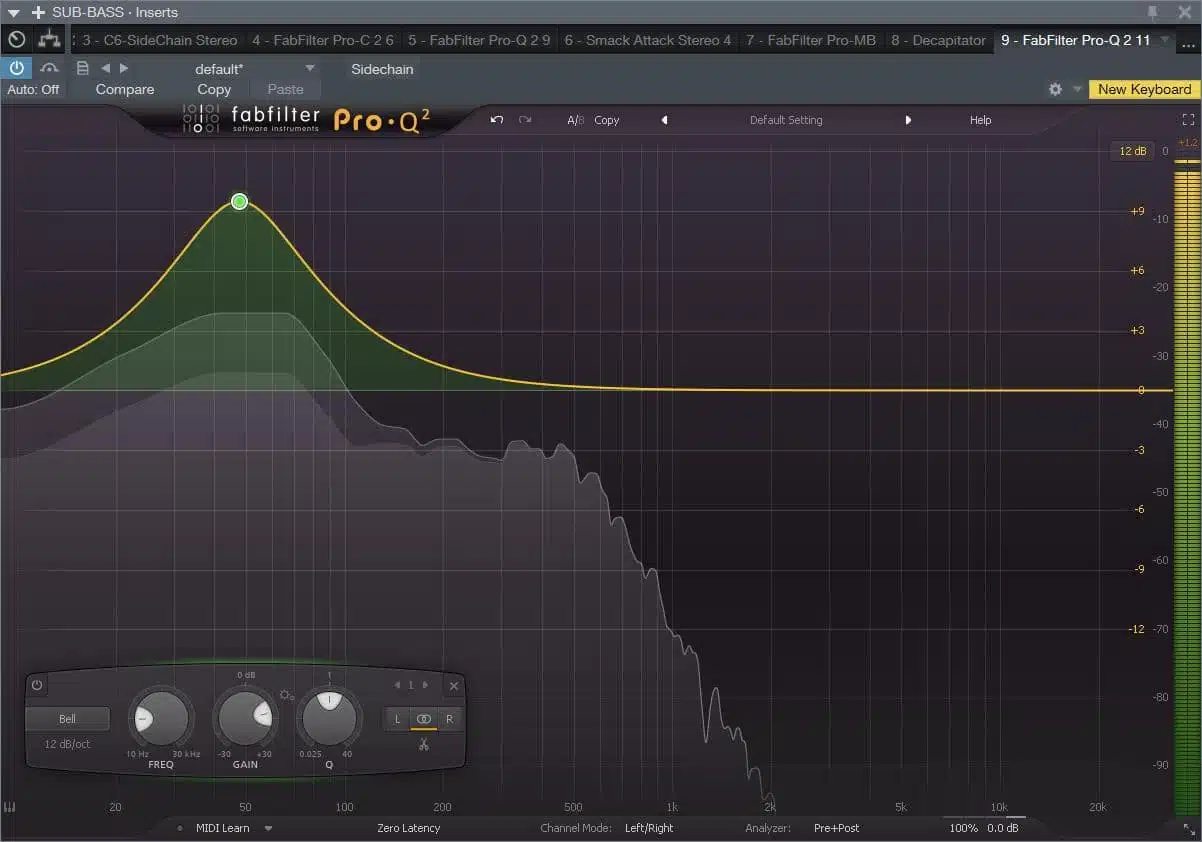
3. Find the spot where the other element become exceedingly harder to hear (or are masked).
NOTE: Make sure you are listening to both tracks simultaneously!
Do some experimenting with your ‘Q’ size (in designated areas), and really target those frequencies that are interfering with the other element. Some frequencies tend to cause more masking than others, so determine which specific frequencies they are and isolate them.
4. Now, slowly/intricately cut into that area until you begin to hear the other element ‘open up’ and stop once you can hear both tracks clearly.
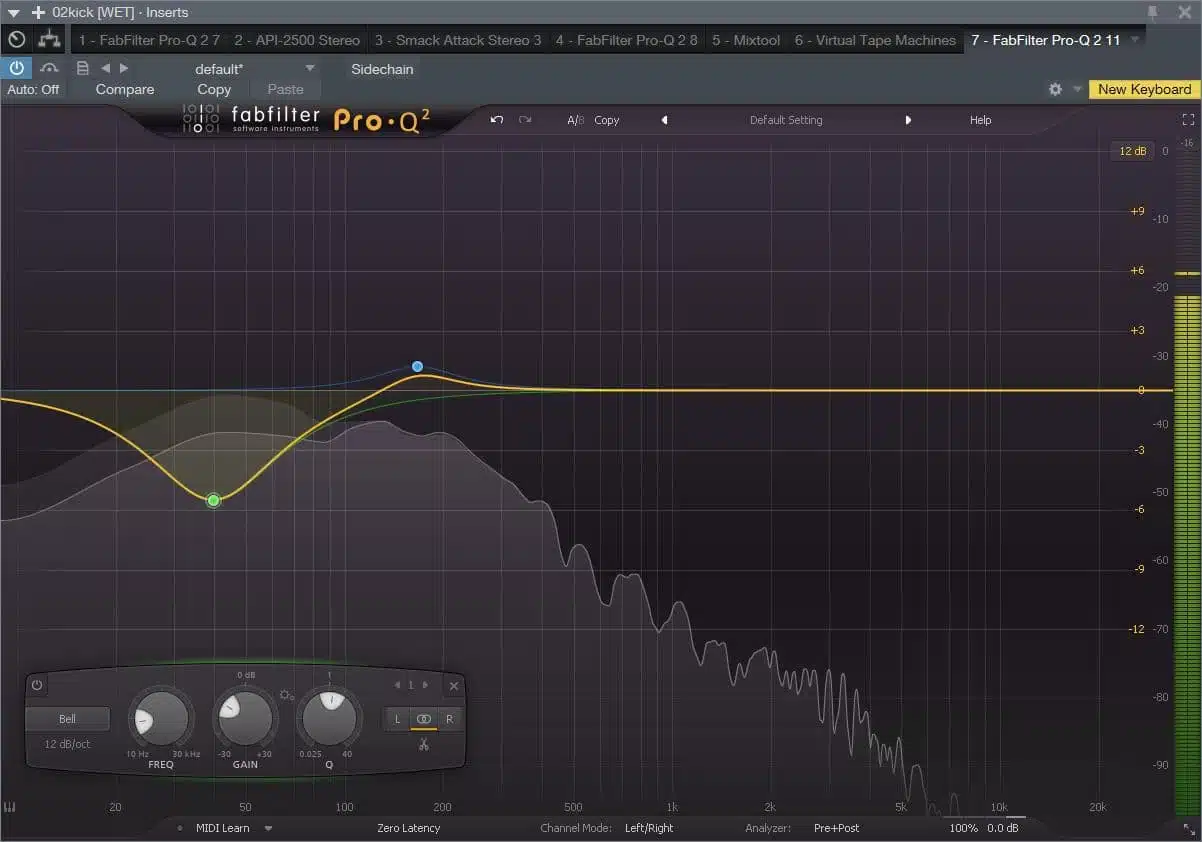
(Notice how i applied a small boost to where I wanted the kick accentuated, as to make processing slightly less complicated later on).
Try to cut as little as possible, and keep in mind that you may need to adjust/alter the Q; tighter, for a more pin-point accuracy and wider if wishing to cover a larger range of frequencies.
NOTE: Even the most diminutive of cuts can make a massive difference, and frequency masking is not as ‘cut and dry’ as it seems so, in this circumstance, a little can go a long way.
The key is to listen for what specific frequencies cause the most masking; bring UP the amplitude, and listen carefully for what is getting masked, as to prevent clashing/competing elements when at normal levels.
Some would say to apply this to the ‘least important’ element but, if we’re following my way of thinking, they are of EQUAL importance/significance. Having said that, to achieve the desired result, I propose that you apply it to whichever element requires the least amount of cutting.
If you feel that the cut you administered was too large, try doing it to the other element to see which yields the best results/outcome.
NOTE: This should be your process, regardless of which method you’re implementing, so don’t hesitate to apply a particular technique to one element and not the other.
There are so many rules/principles that can be broken (if executed correctly) because, if it sounds right…it most likely is. We’re ultimately aiming to strike a healthy balance, so if you’re not happy with the results, simply attempt it the reverse way… it may just work out much better for you. If you’re spending an endless amount of hours trying to make something work, but possess the option to swap samples/instruments, DO IT.
WRAPPING IT UP WITH A FEW SOUND (OR SAMPLE) SELECTION TIPS/WORKAROUNDS
Now that you’re blatantly aware of how crucial sound/sample selection is in regards to the overall integrity of your track and that it is, indeed, the first step to achieving a professional, clean low end (whereas, if you start with conflicting samples, you’re inevitably doomed). Here are a few supplemental tips and workarounds to further aid you in the process of reaching your desired/intended results.
If you have an exceptionally ‘powerful,’ low kick, choose a bass line that dominates around 100Hz (and above), or vice versa.
Make sure they BOTH play different roles, as to avoid clashing; one in the low-sub range, and the other in the upper-low range.
KEEP IN MIND: Switching/changing roles can be as rudimentary as an octave or note transposition; if you want your kick to play the ‘deep’ sub role, and your bass is currently occupying that range, try transposing it UP an octave (or even a Fourth or Fifth), it may just make the precise difference in frequencies that you so desperately needed.
Make sure your ‘fundamental’ does not clash either. ‘Tuning your kick’ does not necessary mean it needs to have the same fundamental frequency, it simply needs to be in key with the root note of your song/bass.
Also, when commencing the ‘composition’ phase, be cognizant of/consider the key of your bass line, and the frequencies it will ultimately dominate; assigning roles in this stage is habitually best, so if you have the opportunity to do so… I highly encourage that you do.
IMPORTANT NOTE: Be heedful/cautious of any Phasing that’s transpiring between your kick and bass! ‘Phase Cancellation’ is an entire topic in itself but, in short, phase is defined as how far along the cycle of a given waveform is and essentially can be visualized the sample start point. If a waveform’s cycle/period is not aligned properly with the corresponding track they will not be in phase with one another. If your kick and bass are hitting or playing at the same time, it may result in a variety of phasing issues or even full blown phase cancellation; causing certain frequencies to get washed out, and can even lead to one of the elements disappearing all together. This is when you would want to flip/invert its phase/polarity, reversing the wave’s phase so the 2 can be aligned.
An effortless way to avoid/prevent this is to make sure one element (either your kick or bass) is triggered at a slightly different time than the other element, usually by incorporating a ‘delay;’ differentiating them by a matter of milliseconds (or samples).
If you DO, however, want them to hit at the precise same time, I urge you to listen to them in SOLO so you’re able to accurately determine if one of the elements weaken (or even totally eliminates) the other; simply flip the ‘phase’ inside your DAW (occasionally referred to as ‘invert the polarity) on one of the elements and see if it makes a difference in impact.
NOTE: Even if you’re not experiencing Phase Cancellation, try ‘phase flipping’ anyway, as one of the samples might subsequently benefit from it (or, you might just conclude that you favor the results that it produces). Traditionally, I will always try flipping the phase of my kick first to ascertain what kind of significance/difference it’s capable of making; a simple/diminutive phase flip can do wonders for the overall impact of your track… try it out!
Phase Cancellation is unequivocally a dreaded phenomenon, but the felicitous thing is that you’re not required to fully understand it in order to successfully prevent it (as most dont, making it one of the all time most misunderstood fundamentals of audio); include a simple phase/polarity flip as part of your checklist EVERY SINGLE TIME (when searching for compatibility issues). I also suggest doing some further research on phase and its significance.
Like I previously stated, you always have the option to create a ‘pocket’ for your kick and bass to avoid this problem (without any trial and error), which I will be discussing later on in this article.
Be sure to either manipulate the ‘kick’ sample itself (by applying fades), or throwing it into a Sampler and tightening it’s sustain/release. Either way, it’s immensely important that your kick comes in and goes RIGHT out, as that’s the key when attempting to achieve that renowned ‘punchy’ sound.
Regardless of what you’ve been told… size DOES matter! Just as detrimental/important as the management of clashing frequencies, is the length of the kick itself; a kick drum with a LONG sustain will ultimately take away from the ‘punch’ just as much as clashing frequencies can.
NOTE: Believe it or not, the LONGER the sustain/release portion of your kick is, the WEAKER it will be perceived.
TIP: ALWAYS use a reference track when mixing so you’re able to accurately compare (and contrast) your low end to a different, professional mix that you want your end result to comparably/ultimately sound like. For too many years I actually thought this technique was pointless because I felt like i already knew how I wanted my final product to sound, or ‘I don’t need a reference track, that’ ridiculous,’ but the truth is… perception is a particularly tricky/deceptive thing (especially when analyzing your own work), and even though you might THINK you don’t require something to compare your work too, you should seriously consider trying it out, you might quickly change your mind.
DYNAMIC EQ
Frankly, the main issue with ‘standard’ EQ’s is that they’re not very intelligent; when using one, we’re forced to administer ‘static’ cuts and boosts (meaning, it doesn’t change based on any one variable).
A ‘dynamic’ EQ, on the other hand, administers cuts and boosts based on the specific threshold you set, and reacts/functions based on how you program it to… It works and behaves almost like a Multiband Compressor, except it uses EQ instead of Compression, and you don’t need an external source to trigger it (although some do allow sidechain-input).
For example, you can design it so whenever the bass hits 100Hz, at a certain level (venturing above the threshold), you can set the EQ to kick in and dispense a ‘cut’ in that specific range; when the bass plays at any point below the threshold, no EQ will be applied.
NOTE: Currently, the most popular/beloved Dynamic EQ can be found within Ozone, and is virtually as simple as a standard EQ but, for all intensive purposes (including availability), I will be using one of the supreme FREE Dynamic EQs on the market, NOVA.
1. Open it up and select the ‘band’ you want to effect.
2. Pull the band DOWN a couple dBs so you’re able to accurately see/ascertain the frequency range you’ll be effecting; dial in the Q (bandwidth), the ‘gain,’ and the frequency.
3. Set your threshold and Ratio (keeping in mind that the LOWER you set your ratio, the MORE attenuation gets applied once it crosses the threshold, as a compressor would).
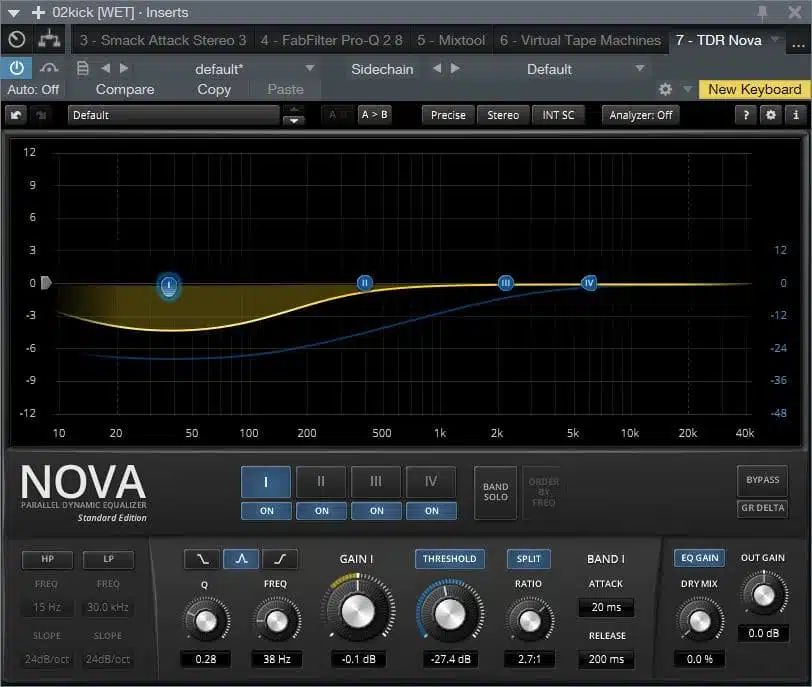
There you have it… it’s as simple as that!
REMEMBER: A variety of different/unique Dynamic EQs are readily available and easily accessible on the market (including an exceptional, FREE one called NOVA that can be downloaded at: http://www.tokyodawn.net/tdr-nova/), and are all relatively intelligible. The thing about NOVA that sets it apart from (most) other dynamic EQs is the fact that you’re offered a ‘Dry Mix’ parameter, which enables you to blend the original signal with the processed signal (hence it’s title, ‘Parallel’ Dynamic EQ); this feature alone should entice you to check it out.
I sincerely urge you to get intimately acquainted with this effect as it proves to be extraordinarily beneficial, and keep it in your arsenal as an exciting new alternative to Sidechain Compression.
SIDECHAIN COMPRESSION
Essentially, ‘side chaining’ (as we know it) is when we utilize an external signal to trigger a processor to work/kick in on an existing signal. Traditionally, when administering Compression to our kick and bass, we apply the Compressor to the bass, and side-chain the kick; causing the compressor to kick in, compress, and clamp down on the bass every single time the kick hits.
NOTE: Depending on the specific genre of your song/track, this may serve best as your primary choice, as the ‘pumping’ caused by the Side Chain Compression could be exactly what you need (predominantly in Electronic or Hip-Hop genres, respectively).
Routinely, I don’t prefer to use this particular method unless I have tried the previously covered options first but oftentimes, when you possess absolutely no creative control (or are simply in love with the samples), you’ll have to revert back to this option.
If you’re inclined to have your bass line ‘pump,’ a standard Side Chain Compressor will suffice just fine. However, if you want the effect to be more subtle (and only ‘duck’ the part of the bass where the kick’s frequencies reside), a Multiband Sidechain Compressor will be your most prudent choice.
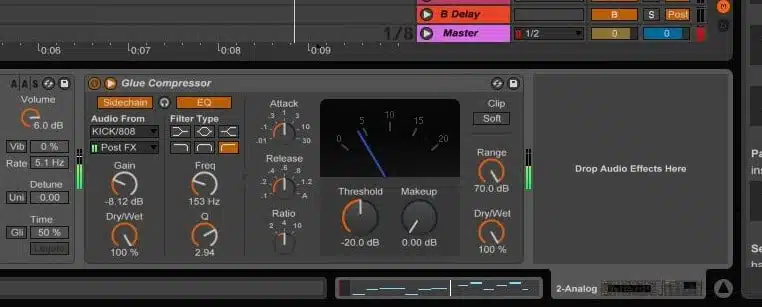
(For the ‘standard’ Sidechain Compression, we are going to use Ableton’s stock ‘Glue Compressor’)
1. Place a Glue Compressor on your bass.
2. Click the ‘Sidechain Toggle’ button to display the sidechaining options (it’s the tiny triangular button in the upper left hand corner).
3. Enable/click the ‘Sidechain’ button.
4. (optional, dependent upon the kick you’re currently using) Enable/click the ‘EQ’ button, select the ‘high-pass’ filter type, then set the frequency to 150Hz; this causes the compressor to only react to the kick’s frequencies that reach above 150Hz (resulting in a ‘punchier’ form of Sidechain Compression).
5. Reduce your ratio to 4:1 (for moderate sidechain compression) or 10:1 (for aggressive sidechain compression).
6. Reduce your threshold until the compression meter reaches around 5dB of gain-reduction; this will ‘duck’ the sub out of the way each time the kick hits. If you’ve properly set all the settings, your compression should look like the following image (and be hitting 5dB of gain-reduction each time the kick hits, of course):
7. Adjust your ‘attack’ and ‘release’ time until you feel your kick start to smoothly transition into your bass.
MULTIBAND COMPRESSION
Multiband Compression requires essentially the same process, and works fundamentally the same way, except we’re able to target a specific frequency (the range where our kick resides); generating a significantly more subtle/focused form of compression, and functioning more as a corrective tool than an overall effect.
By utilizing Multiband Compression, we’re able to scrupulously determine the frequency range of our kick and allows the ‘low-frequency’ compression to solely focus on frequency of which the kick/bass currently occupy.
NOTE: Contingent upon which Compressor your using, you may be able to zone in and target the intended range with more pinpoint accuracy but, even if you can only compress the low-band as a whole, it’s still considerably less obvious/apparent than using standard compression.
Again, I personally prefer to use this method simply because the results are ‘cleaner’ but, if you do NOT own (or have access to) a Multiband Compressor, the previous method will work just fine.
Let’s consider a hypothetical (but highly probable) situation for a moment, replicate/diagnose an extremely common issue that’s associated with it (which typically arises, more often than not), and discuss how to successfully rectify the problem.
Even though we are using the bass as our ‘sub-energy’ and the kick as our ‘punch,’ since a typical unfiltered sub-bass is ‘wide’ and ‘boomy,’ the range in which it occupies/affects goes WAY beyond the fundamental (shown below).
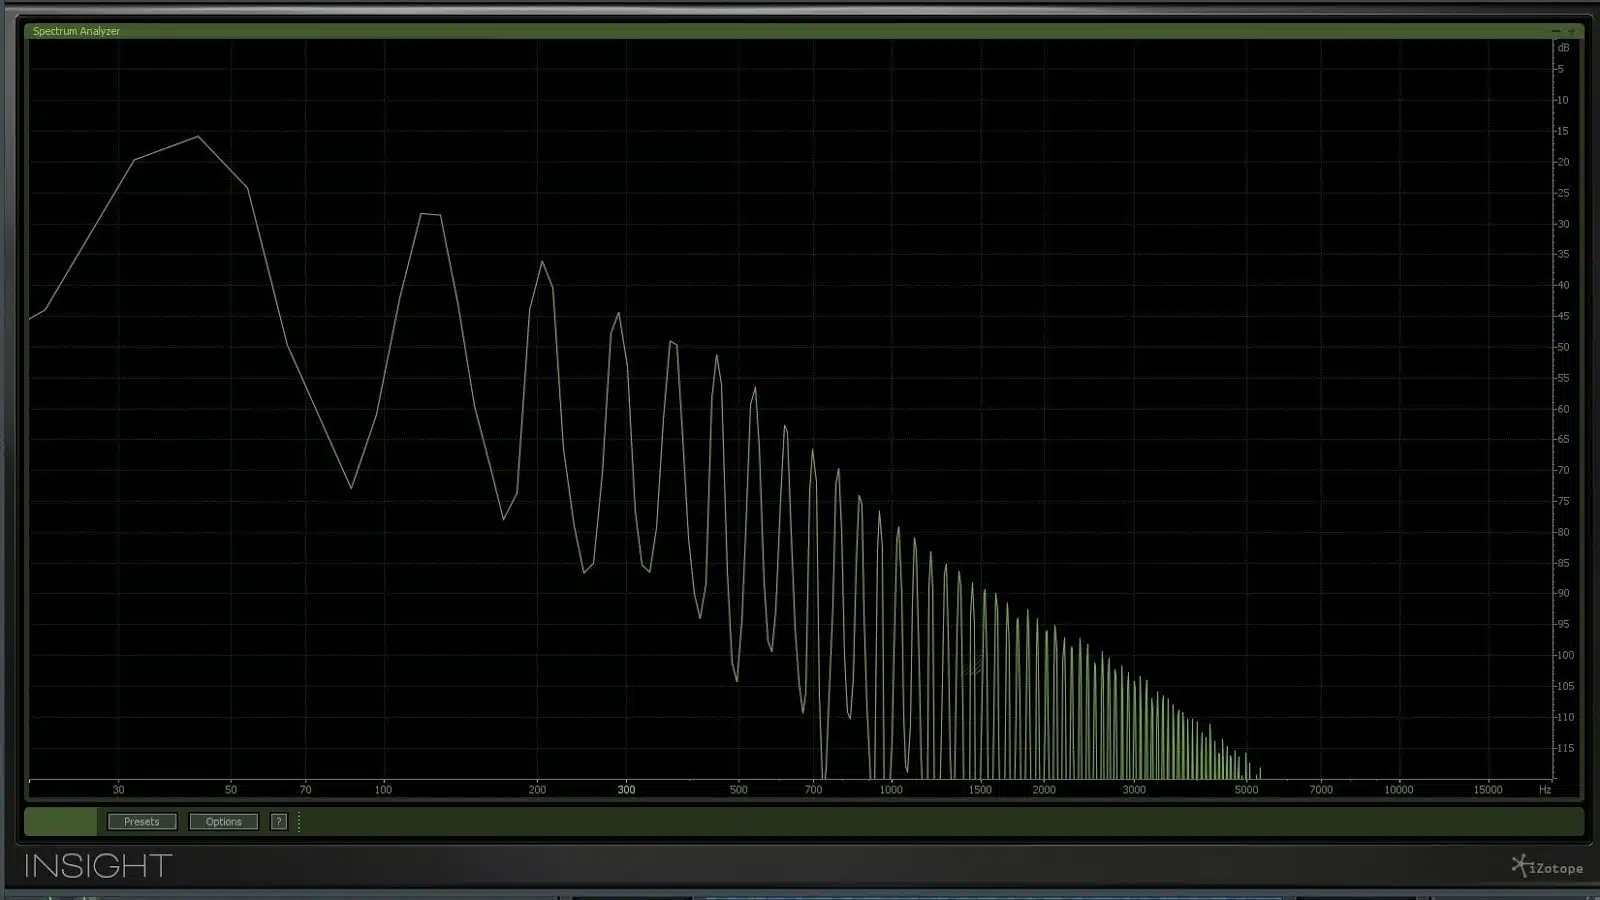
Notice how, for this particular bass, the saturation/distortion (plus various other synth/effect processing) causes multiples of our fundamental to be made. Depending on the processing and the initial signal you’re working with, your signal won’t always look this ‘perfect’… leave it to the Unison Bass Collection to keep my OCD in check; if you’re looking for elements that can be easily be manipulated/molded to fit easily within your mix, this is surely the collection to check out.
So, what do we do in this case? Well… this is where Multiband Sidechain Compression springs into action/comes in handy.
Although we’re focusing on what is considered to be one ‘band,’ we ultimately want to obtain pinpoint control/accuracy of where the kick lies so, when it hits, we can ‘duck’ it away, and when it’s not in the picture any longer, it will be left completely intact (or possibly with a minuscule boost).
NOTE: For this example, I am using Fab Filter’s ‘Pro MB’. Keep in mind that a vast majority of Compressors work similarly to this one, so these steps should apply regardless of the device you’re using.
1. Route your kick to the bass-track or Multiband Compressor; the exact way that your DAW handles sidechains is entirely dependent upon it’s creator/developer.
2. Open up the ‘Expert’ tab on the right side of the bands menu, and enable the sidechain; make sure to click ‘Ext,’ so it adequately receives the external sidechain.
3. Click on the area that you’re intending/need to target (for this particular track, my kick’s fundamental is right around 130hZ).
4. Place the ‘range’ anywhere from -5dB to -10dB; if you’ve properly administered ‘gain-staging,’ this should certainly be enough but may vary greatly from track to track.
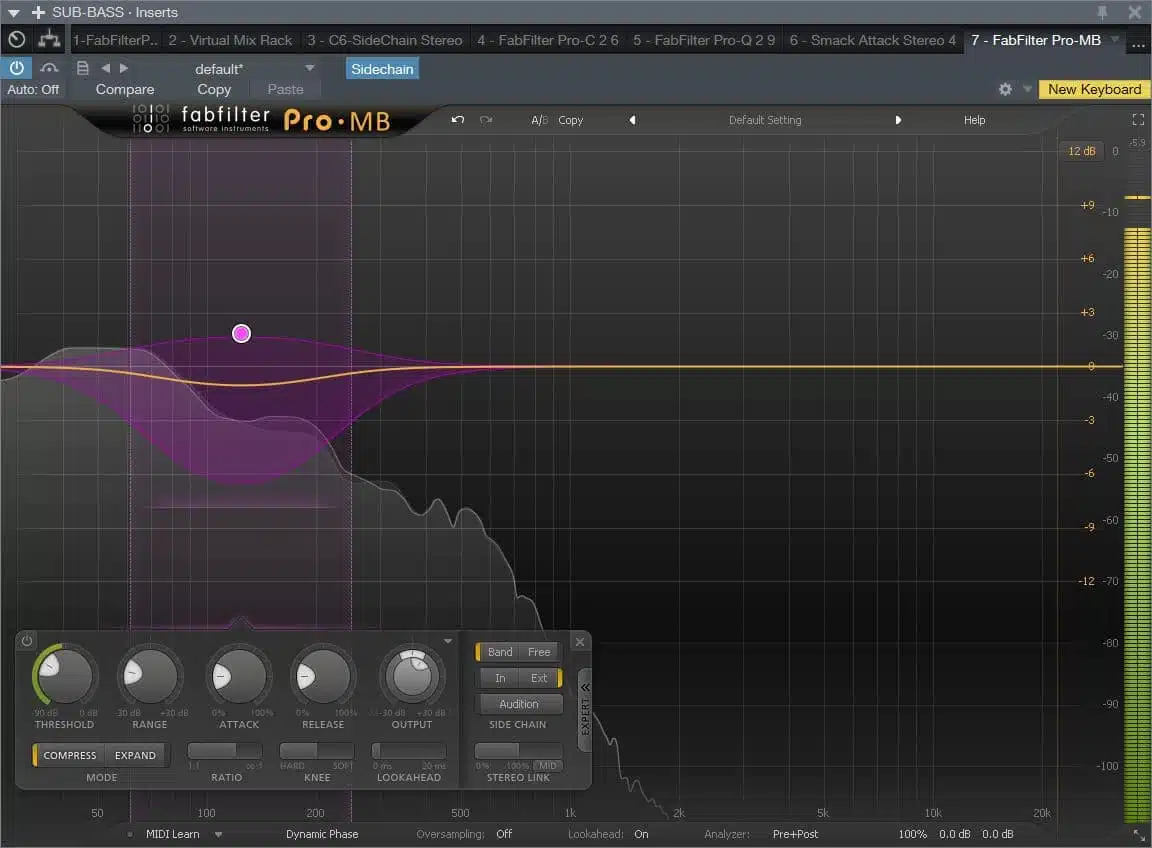
5. Adjust the threshold’s Attack and Release to taste, and you’re good to go!
‘DUCKING’ AND UTILIZING VOLUME-AUTOMATION TO CREATE THE SIDECHAIN EFFECT (If you do not have a side chain compressor)
When ‘ducking,’ the level of one audio signal is reduced by the presence of another signal; this fundamentally produces a very similar effect to that of a Sidechain Compressor, and achieves the same outcome/results (just executed in a disparate fashion); targeting a specific range of frequencies, as opposed to the entire signal.
NOTE: There is a vast abundance of ‘Duckers’ available on the market today (even in the form of Multiband) such as, CableGuy’s ‘Volume Shaper’ and the formidable ‘SideChain ReAction’ by Reasonistas (which is one of my absolute favorite Reason rack extensions).
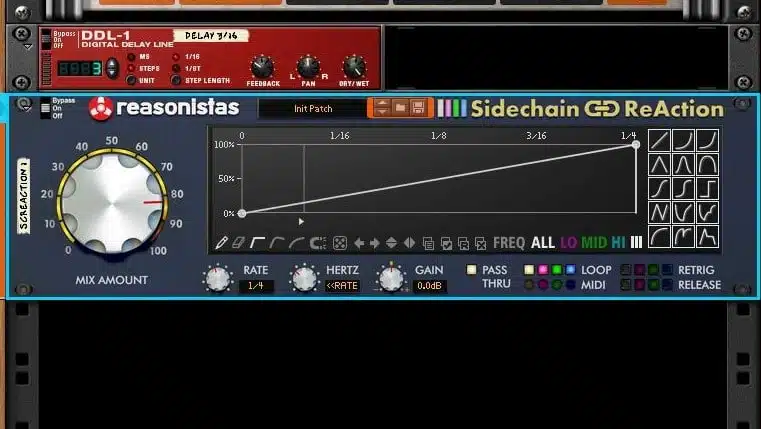
Duckers such as these essentially just create a ‘volume automation’ that can be triggered by either the presence of another signal (sidechain) or, depending on the specific plugin at hand, time/step intervals (e.g., 4:4, 2:4, 1:4).
These tools are undoubtedly effective and innovative but, realistically, you can get the job done without them. Below, I show you how to implement this utilizing some simple automation:
1. Create an ‘automation’ lane for your basses’ volume (the way in which your DAW handles/processes automation may vay).
I recommend creating a lane for the basses’ ‘volume’ fader so the automation is applied POST-plugin(s), as opposed to automating the basses’ ‘input’ gain.
2. Create a ‘ducking’ Envelope every time the kick hits (the exact curve you need varies based on your kick).
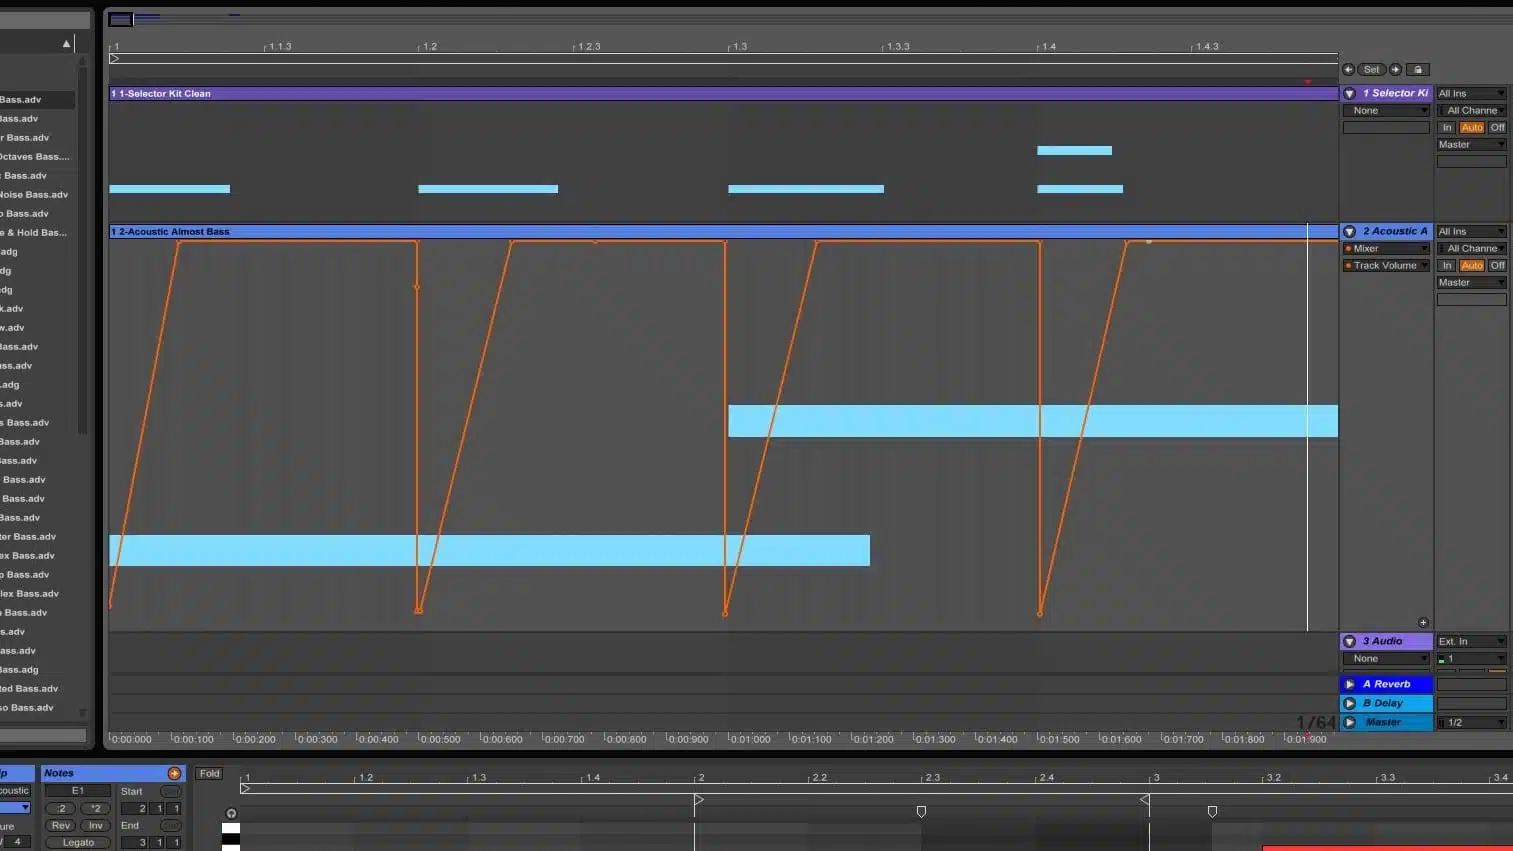
I suggest experimenting, and trying to mimic the effect of a compressor (if that’s the effect you’re currently aiming to achieve). Also, be cognizant of the fact that the ‘shape’ you make your curve can drastically change the effect of the sidechain. Having said that, the standard/typical dip looks similar to an upside down triangle (shown below), the more ‘curved’ and less rigid you make it, the more it will sound like a compressor; if craving the ‘dramatic’ pumping effect, the shape displayed below will suffice.
KEEP IN MIND: You may not want to completely duck the bass (causing it to go momentarily silent), but it really depends on what exactly you’re aiming for; get creative and see what works best for your particular track.
CREATING A POCKET
This step is key (regardless of the technique you choose to use for mixing the kick and bass), and is absolutely imperative when dealing with a kick/808 combo.
As I previously stated… you do NOT want your kick and bass line to hit at the exact same moment for numerous reasons, the most common repercussion being ‘phasing,’ which I’ve already intricately explained in the above section (in regards to how you can efficiently and effectively identify/rectify this issue, or any ‘cancellation’ that might occur).
Aside from phasing, the real reason that we want to sculpt the kick and bass to create a pocket for the kick to sit in is (primarily) for the purpose of making things cohesive. Although you should always look at the kick and bass as 2 separate, unique element whilst in the mixing stage, the overall goal is for the listener to identify them as one in the same.
NOTE: If you do NOT create a sufficient pocket for the kick to reside in, it’s going to sound as if you added these 2 elements separately and ultimately, without doing so, you’ll never achieve a ‘seamless’ low end.
The process of creating a pocket is relatively straightforward and, although the actual steps may vary slightly (depending on the DAW/plugin(s) you’re using), the principles stay the same. There are countless amounts of methods you can utilize to accomplish this, but I’ve found (for this subject especially) that simplicity is your safest bet.
KEEP IN MIND: Depending on/regulated by your instrumentation, the specific pocket you’re going to create will vary and, at times, you may not even need to create a pocket at all (especially if your kick and bass are not hitting at the same time).
If, however, your bass line is an 808, combining the the kick and 808 (making them one) is absolutely necessary; so, for this example, that’s the exact scenario we’re going to replicate. Also, I will be using FL Studio because of it’s built-in Sampler/Envelope (that I can utilize to manipulate our samples WITHOUT an external Sampler). For those of you who are using a DAW that does NOT offer this function, you’ll need to use either an external Sampler or Envelope in order to accomplish this.
MAJOR TIP: It may not be completely necessary to alter/shape every individual kick, only the conflicting samples. For instance, you may have an ENTIRE section where there is an absence of bass (solely kick)… in this situation, you may want the kick to be in it’s ‘full’ form (as it’s currently the support), that way you won’t need to use the kick that we previously manipulated (in order to work in conjunction with the bass) on it’s own.
Remember… just because you’ve applied a group of effects (as to compliment a particular part of the track) it does NOT mean that it should remain that way throughout the entire song/mix; this is the reason why ‘automation’ is such an advantageous/preferable tool in today’s music/mixing.
The more you effectuate thinking like this, the more depth/substance your overall mix will exude, so please do not feel obligated to always keep things the same (throughout the entire track) if you deem it unnecessary; only implement these tricks when they NEED to be, and ignore them (in certain sections) when they don’t.
KEEP IN MIND: If you’re utilizing a DAW that does NOT include/offer an Envelope functionality (such as FL Studio), I recommend doing the following steps in a Sampler; bouncing it out/saving it, and replacing the old kick with a new one. You can also replace only the kicks that are conflicting with the bass, keeping the original/fuller kick in the sections where the bass is NOT playing.
You’ll need to create a pocket in the 808 for the kick to comfortably reside in. This can be done in any sampler, but for this example I am going to be using FL’s built-in sampler (inside the channel wrapper).
1. Go to the ‘Envelope’ settings (in the wrapper) and enable the envelope. Increase the Attack slightly to fit; making the 808 come in smoother, and it’s Attack not as sharp (especially if it’s particularly ‘punchy’).
Make sure to add a ‘concave’ curve to the Attack; allowing the 808 to maintain/uphold it’s unique energy.
The ‘depth’ of the Attack curve/parameter depends on the kick; the goal being to make sufficient room for the kick (that way, you won’t have to worry too much about ‘clashing’ later on).
2. Pertaining to the ‘Release’ time, you can either leave it alone, decrease it, increase it, or put it on ‘hold’ (depending on your personal preference, what you’re aiming to achieve, and the overall vibe of your track). If you are receiving ‘build up’ towards the end of the 808, I suggest you lower the Release parameter.
Your 808 Envelope should look something like this:
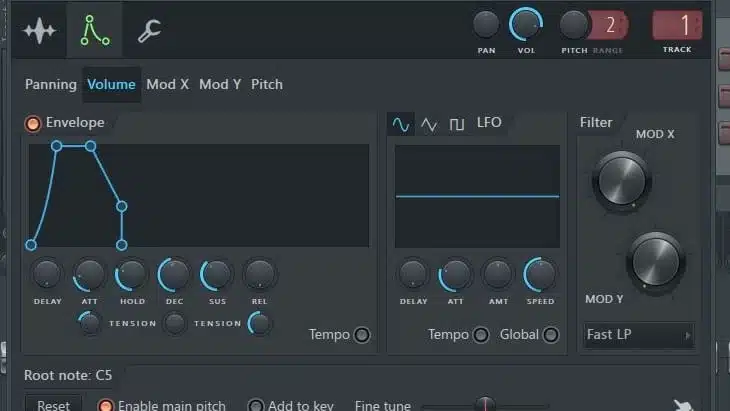
NOTE: Increasing the ‘hold’ is optional, but if you choose to do so, the 808 will stop when the note is no longer being held down and will sustain for as long as you hold the note.
When setting up an Envelope for the kick, bring the Attack all the way DOWN. This way, the kick still retains it’s initial/original transients.
When utilizing a longer kick, you’ll want to LOWER the Hold, Sustain, and Release parameters (essentially) all the way down.
The Decay is what ultimately determines/controls the length of the kick, so that is the parameter we’re really going to want to manipulate/focus on.
The main goal here is to get the kick to suitably fit within the pocket we’ve just created:
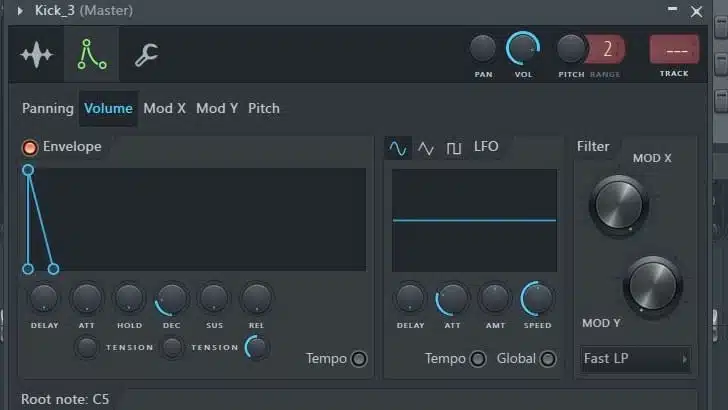
NOTE: You want a considerably short Decay for your kick so it’s able to properly fit within the pocket and blend cohesively with the 808; allowing your 808 to ‘fill the pant’s.
3. Smooth out your curves with ‘tension’ (so they’re not completely straight).
The key to this process is to make sure the kick plays until the 808 FULLY comes in, but not much longer after.
The longer the kick, the less impact it will have. A shorter kick creates a bigger punch.
TIP: One major advantage of using/creating 808’s and kicks directly from a synthesizer (such as Serum), is that you can completely skip loading your samples into a Sampler, as you hold total control over your Envelope.
The Unison Bass Collection for Serum contains incredible ready-made low end elements that you have the ability to fully manipulate (within Serum); doing things this way is how the biggest, most popular producers achieve that ‘professional’ edge.
NOTE: Admittedly, there is nothing actually wrong with loading into a Sampler, and manipulating/controlling things that way, but why not use a synthesizer? I mean, you ultimately have complete control over every single aspect of that particular element, and can fully customize any setting to fit your needs…what could be wrong with that?
TRANSIENT SHAPING
Essentially, what a ‘Transient Shaper’ does is exactly what the name implies… it shapes transients; altering the Envelope (based on transient activity) as opposed to the Envelope of a sample (as a whole), like you would commonly find in a Sampler.
Oftentimes using a Transient Shaper instead of a Sampler/Envelope is not only necessary, but can actually turn out to be the supreme choice (especially if you’re NOT working with 808’s); the benefits being much more dynamic, as it adjusts the Envelope based on Input and transient activity.
For those of you who haven’t gotten this far in your production journey, a Transient is a high amplitude, short-duration sound at the BEGINNING of a waveform. I’m positive that a vast majority of you have utilized a Transient Shaper/Designer to enhance your drum’s transients, but it can also be used to perform the opposite function, and is extremely useful when attempting to tame the ‘release’ portion of your signal as well.
At times, you might find that Envelope-shaping is not obligatory, or even slight overkill (like when you’re not using a kick/808 combo, for example), but for these specific instances, Transient Shaping is ideal.
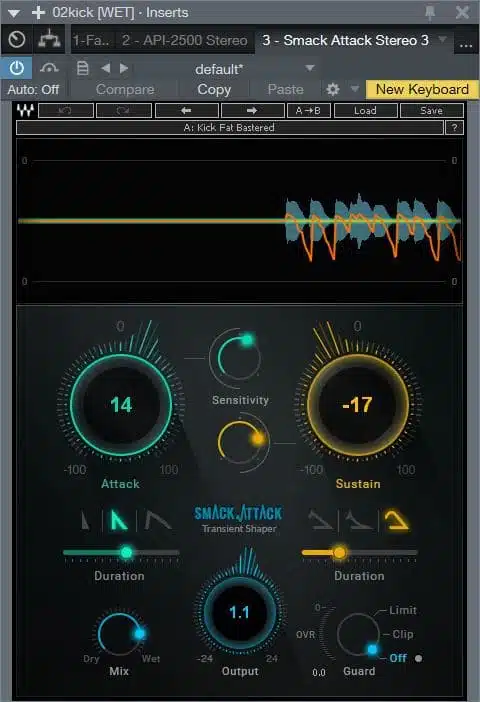
CONFLICTING ATTACKS
Sometimes the ‘attack’ of your kick and bass may be conflicting; in these circumstances, I usually prefer to keep the kick’s transient in tact, and perform some subtle shaping on your bass (or vice versa). All you need to do is open up the Transient Shaper (on the desired track) and bring the ‘attack’ parameter DOWN slightly.
KEEP IN MIND: Lowering the attack TOO much will inevitably create audible ‘artifacts’ (and, at times, certain forms of distortion)… so use this technique in moderation; a little can go a LONG way!
CONFLICTING RELEASE
Most of the time, when you have your kick and bass playing distinct/autonomous roles, the ‘release’ portion of the kick can cause a loss in power so, in essence, the shorter the kick, the more power it contains; making it shorter is the key to achieving optimum ‘punch’.
NOTE: Although I personally recommend/advise that you shape the release portion with a Sampler or Envelope Shaper, you could alternately use the ‘release’ parameter to lower the sustain-release portion of the kick (again, use in moderation/proceed with caution).
Sometimes (in addition to affecting the kick) the sustain/release portion of your bass could end up causing some nasty ‘build up’ during it’s sustain/release portion; although this is typically the job of faulty, or improper Compression, that’s not always the case.
In this instance, I prefer to use a Transient Shaper (rather than an Envelope), and LOWER the ‘release’ parameter of said Shaper. Envelopes are extremely useful/beneficial, don’t get me wrong, but when using something other than a Sample (as you normally would), creating a proper Envelope for each note is exceedingly time-consuming (to say the least); dedicate some time to experiment/play around with this and see what it can do for your track… you may be pleasantly surprised by the results.
3 ‘MUST-DO’ TECHNIQUES
(in addition to the previously mentioned methods)
1. Make sure your low end is MONO.
One MAJOR reason that your low end tends to sound noticeably more messy, blurry, and uncontrolled when being played through a system/monitor other than the one you originally mixed on, is MONO-compatibility issues.
NOTE: While it’s unequivocally important to make sure every element in your mix is MONO-compatible, I suggest you invariably make your bass fully MONO; even when you’re inclined to make your bass/bass elements ‘stereo,’ I HIGHLY advise against it (especially when just starting out) because, pertaining to the low end, making sure ALL elements are MONO is key!
If you’ve ever read any of my previous articles, you are undoubtedly aware of the fact that I am an adamant/unrelenting advocate for mixing in MONO; my reasoning behind this being… if you’re able to make it sound good/satisfactory in MONO, odds are, it will only sound better in stereo.
Sure, you might have applied some heavy saturation on your bass and would like those upper harmonics to be in Stereo, which is perfectly fine, but the low end (as a whole) should consistently be MONO.
A considerably easy way to accomplish this is by grabbing a Multiband Stereo Imager, and utilizing it on your master track to ‘collapse’ everything below 120Hz to MONO (obviously, this number is not set in stone and differs depending on your particular/unique song, but it’s always an educated choice to make everything in the low end MONO).
If you do NOT have access to a Multiband Stereo Imager, the solution is quite simple… make your kick and bass tracks MONO; the way you do this will vary from DAW to DAW but, rest assured, you do possess the ability to accomplish this WITHOUT the need of extra plugins.
If you happen to be a Mid-Side ‘master,’ then by all means, disregard my prior statements… but for the rest of you (who aren’t so knowledgeable/seasoned in these various mid/side techniques), the smarter option would be to collapse the entire low end to MONO; eliminating the need to worry about the possible problems that stereo signals can manifest (the most common issue being unwanted ‘phasing,’ which oftentimes goes unnoticed by the untrained ear).
Phasing is an absolutely dreadful occurrence, and has the potential to totally ruin your mix, so don’t risk these types of complications by insisting your bass should be in stereo… truth is, stereo is seriously overrated, and the more elements you have in stereo (that don’t need to be), the cloudier and messier your mix will inevitably be.
REMEMBER: MONO is your friend, and not every single element in a mix can (or should) be stereo; designate the desired tracks for stereo width, and keep the others narrow (even if it’s not fully MONO, find a happy medium)… I guarantee that it will pay off!
2. Cut everything that resides below the level of human hearing
As I previously stated, as humans, we’re not capable of sufficiently hearing very high/very low frequencies; the lower or higher you venture, the farther you stray from that sector/range, which ultimately results in a falsification/misrepresentation of sound.
With that said, what I typically to do with my bass elements is cut EVERYTHING below 20; although this can successfully be achieved during the ‘mastering’ stage, I prefer to tackle the issue head-on.
Additionally (depending on the specific kick), I tend to cut everything below the ‘fundamental,’ and add a small resonance boost to where I did so; this method is known as the ‘Voice of Angels,’ and can also be applied to your bass or 808 as well.
NOTE: Make sure to be cautious of just how much of a resonant boost you apply, catering to the specific track at hand. If you already have a boost on another EQ, I would NOT utilize the resonant point; simply make a cut below the fundamental.
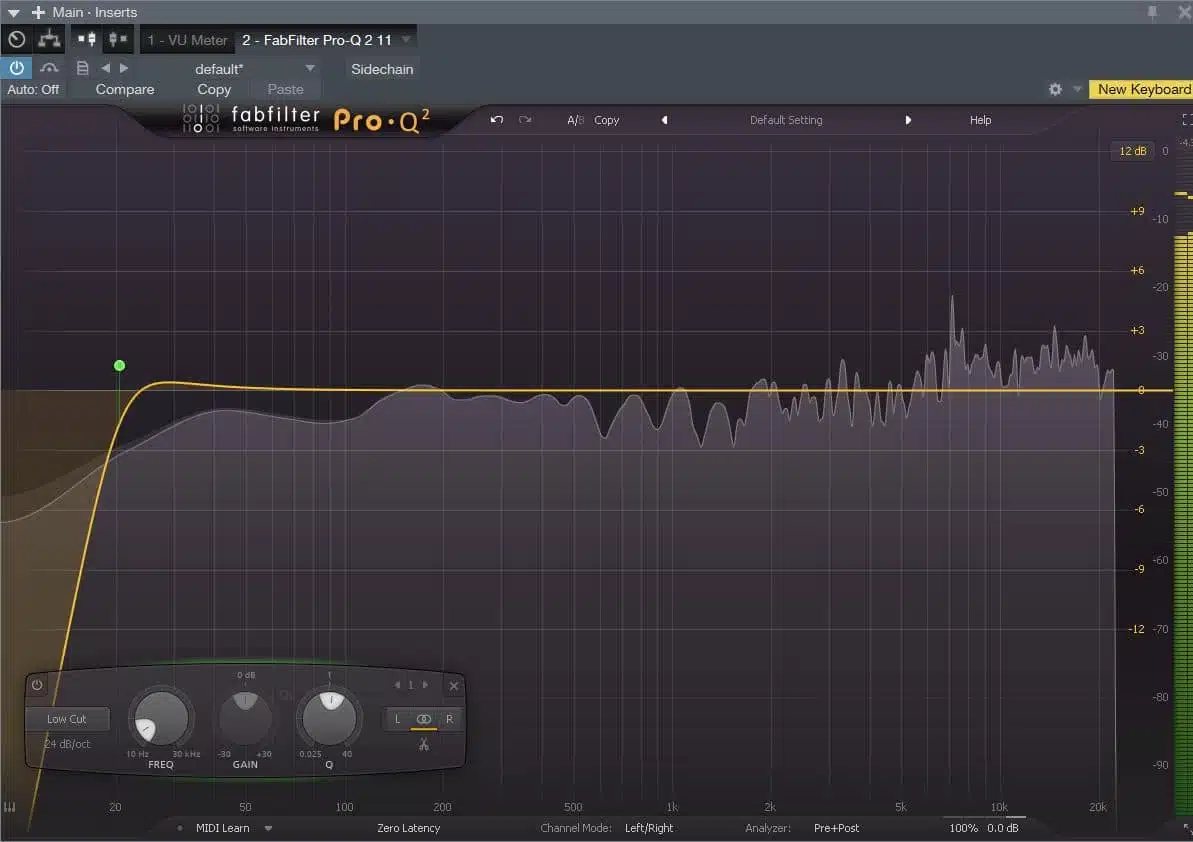
3. Bus your kick and bass to a Tape Machine.
I don’t generally process the kick and bass together (although you can, and many pros do) however, in certain circumstances, applying some saturation in order to ‘glue’ them together can be extremely beneficial; I prefer to use a tape machine for this, as it’s subtly can truly enhance the overall low end, and make it sound unified.
NOTE: Saturation and distortion can be applied as separate processes, but there’s just something about bussing and processing them together that makes them appear to be more unified; keep in mind that the more distortion/saturation you add, the more it will subtract (or, take away) from the low end.
By sending the kick/bass to a BUS and using a tape machine, it not only enables harmonic-enhancements, but adds a form of very subtle compression as well, and although we’ve seemingly used more than enough compression, the results you can achieve from a tape machine are exceptionally unique/inimitable… so I highly encourage you to do some experimentation.
TIP: I wholeheartedly suggest you go check out the Unison Bass Collection for an exceptional set of bass and 808 presets for Serum! The particularly great part about these sounds is that they’re already extremely defined (meaning, not much EQ is required to make things sit correctly).
LAST WORDS
Even though the low end is (irrefutably) a difficult beast to tame, the results of being expertly knowledgeable in the subject is beyond beneficial (and truthfully, necessary); however, successfully creating/producing a ‘flawless’ low end requires a lot of dedicated time and practice. Mastering low end is certainly not something that will manifest over night, but the good thing is, the longer you work with it, the better (and more creative) you get at it; it’s not only about learning the techniques but actually figuring out how to apply them.
Although mixing is a whole science in itself, make no mistake, there’s no exact formula behind it. Have you ever wondered why the world’s top engineers are seemingly over 60 (respectively)? It’s simply because they’ve had more experience dealing with trial and error; creating their own, slightly-tweaked approaches to the techniques we constantly hear.
So, the best advice I could possibly give to you is simply to experiment, play around with your sounds and processes, and dedicate the time to venture outside of your comfort zone (that’s the best way to unlock your true creative genius).
The methods provided within this lesson should be viewed as mere guidelines, and the way you implement/manipulate them will refine over time. Start with training your ear as much as possible, and the good music will soon follow!
Got any low-end tricks and/or tips of your own?… we would LOVE to hear your strategies!


Leave a Reply
You must belogged in to post a comment.