Writer’s (or in this case, Producer’s) block: that dreaded ‘creative-slowdown’ every creator has undoubtedly suffered from; comprising the disastrous potential to completely drive you temporarily insane, if not resolved, but… how on earth do we go about doing so?
Attaining potent productivity is something that, as producers/creators, we relentlessly strive for but, unfortunately, even when we’re wholeheartedly motivated or our strict deadlines looming, sometime writer’s block seemingly cannot be avoided, or eradicated; technically being characterized as a ‘psychosomatic’ disorder, but nowhere near ‘easy’ to overcome.
I myself, have been in a permanent state of writer’s block my entire life and is something that I was never able to successfully conquer, until I ascertained (and implemented) certain key strategies/methods, which successively changed my entire outlook about this nasty occurrence.
Truth is, I had wasted numerous years of my life foolishly waiting for inspiration to magically strike or reappear, not believing that I could actually manifest, or aid in producing, my own; bringing my overall productivity to a massive halt, and resulting in an endless amount of immense, debilitating frustration (which, retrospectively, could have easily been avoided).
It’s true that you can’t force inspiration, per se, but there are certainly things you can do to help move the process along. I have found some of the following methods to be so efficacious, that my writer’s block rarely returns and, when it does, I simply utilize one, and it quickly/efficiently resolves the problem.
Oftentimes, producer’s block comes in the form of an unfinished 2-4 bar loop that, despite your unrelenting efforts, you just can’t seem to transform into a complete song…but why? Well, it’s predominantly due to a lack of inspiration (or, a ‘creative block’). So, today, I will divulge the extremely helpful and beneficial strategies that I personally utilize in order to defeat the beat-block, and triumphantly complete my song/track.
It might have taken roughly 15 excruciating years to accomplish, but I am exceedingly proud to be able to say that (aside from a few isolated incidences) I can successfully rectify this problem if it ever pops up; no longer viewing it as a fatal phenomenon, but rather, an annoying speed bump that I can smoothly ride over, in order to keep moving toward my final destination.
So, without further adieu, let’s get started…
Table of Contents
- QUICK, EASY, AND CREATIVE MUSICAL STRATEGIES
- 1. Explore new preset/sample library-options
- 2. Experiment with ‘loops’
- 2A. Sending Your Loop Through A Pitch Corrector/Vocoder
- 2B. Pitch plugins
- 3. Try out a different DAW to spark some creative ideas.
- 4. Introduce some new instruments, synths, and samplers.
- 5. Effect plugins
- 5. Learn Theory
- 6. Creating A Song From Your Unfinished Session, Using A Subtractive-Arrangement Method
- 7. Creating Chords With Serum
- 8. Reverse-Engineering Chords, Using Any Major or Minor Scale.
- 9. Creating A Melody Using A Scale and Your Chord Progression
- EXPANDING AND STYLIZING EXISTING PROGRESSIONS
- Create EDM, House & Neo Soul Chord Stabs By Flattening The 7th
- Create R&B Chords By Strumming
- Create R&B Chords with Delayed Notes
- Trap Chord Tension
- Pop Progressions
- Guitar Arp Plucking
- Rock Songwriting/Power Chords On a Virtual Guitar Plugin
- 10 BONUS TIPS TO HELP GET YOU INSPIRED
- 1. Read some inspiring quotes to get you fired up ( because inspiration is the best inspiration for inspiration, am I right?).
- 2. Write a list of exactly what you’re currently struggling with (or why you think you’re experiencing writer’s block in general); sometimes it helps to visually see these things to conquer them, or get ideas/inspired.
- 3. Take a 10 minute walk every hour-hour 1/2.
- 4. Eliminate all extra distractions.
- 5. Work on something else (anything else really), it doesn’t even have to be music-related; sometimes the best way to conquer a block, is actually to completely ignore it.
- 6. Break out of your comfort zone.
- 7. Listen to your favorite music.
- 8. Acquire an alternative perspective.
- 9. Get caffeinated!
- 10. Do something that frightens you.
QUICK, EASY, AND CREATIVE MUSICAL STRATEGIES
1. Explore new preset/sample library-options
By neglecting or forgetting to explore new preset/sample libraries for whatever reason, you’re essentially limiting yourself and your creative potential (not to mention, it distracts you from the ‘producer-block’ predicament your currently in).
When you’re introduced to new unfamiliar or intriguing sounds and patterns, it can instantly inspire/invigorate you and stimulate creative activity. Consistently listening to the same presets/sample packs over and over again doesn’t allow the chance for fresh new ideas to strike, so venturing outside the norm is always a smart choice.
Oftentimes, especially when dealing with ‘complex’ synths (such as Serum), you will discover various presets which already feel like complete loops or songs (whether it’s a lead, pad, or ambient texture), that can present an immediate/golden opportunity for you to contrive a masterpiece and conquer the rut you’re in!
NOTE: Many of the extraordinary presets hidden within the Unison Chillout Collection for Serum Vol. 1 contain sounds like this. Don’t procrastinate checking this pack out (like I did)…you’ll undoubtedly end up kicking yourself later.
2. Experiment with ‘loops’
I have found that one of the main things that makes a producer standout or unique is not necessarily their ‘compositional’ skills, but rather, the innovative/imaginative way in which they chop and process the loops themselves.
You would be thoroughly surprised by how much of an impact creative processing tricks can make; it’s so influential and impactful that, at times, it actually alters the entire feel/vibe of your track (in a good way).
The downside to using loops is that you can’t accurately gauge exactly how many producers before you have utilized the exact same one… so why not eliminate that possibility altogether by implementing your personal touch? Plus, by experimenting and having fun with your loops, you might be more inclined to make use of them in the future.
NOTE: I encourage you to start referring to loops as a starting point or template, that you can build off of/around. Oftentimes I’ll use a loop as solely a starting point; building around it, and then completely taking it out.
The exact way in which you implement a loop is entirely up to you but, I highly advise against incorporating one at face value, as that’s hardly original or intriguing; the following are a few creative processes that you can apply to your loops in order to make them genuinely yours.
2A. Sending Your Loop Through A Pitch Corrector/Vocoder
If you’re not totally familiar with the extent of what a ‘Vocoder’ is capable of, you might be pleasantly surprised with how sufficiently/competently they’re able to process variables other than solely vocals (although, throwing a vocal loop into one is, of course, a valid option to help get a new track kick-started).
NOTE: I divulge precisely how this process is properly executed in my article, titled ‘’The Gold Chain’ – The Definitive Guide To Achieving Modern Trap, found here: https://unison.audio/the-gold-chain/
Try placing a loop (of any kind) into a Vocoder, and you will instantly recognize a well-known, highly revered industry ‘secret’ in action, that you thought you’d never have access to.
Although a Vocoder is customarily used to synthesize a vocal/vocals, you can also send various instruments through one as well, which yields incredible results (drums seem to do exceptionally well).
No one Vocoder in particular reins supreme when it comes to achieving the best results (especially due to the fact that each loop is unique and won’t be effected in the same form or fashion every single time), but some will unequivocally produce preferable results, so experiment with multiple Vocoders and decide which one suitably works with the specific loop at hand.
NOTE: The Vocoder that I personally deem superior for a task like this is Izotope’s ‘VocalSynth’. This is due to the fact that it contains many vocoder-emulations (of which you can advantageously configure simultaneously) and doesn’t force you to ‘input’ notes in order for the Vocoder to output audio (as almost any alternative Vocoder on the market today would).
KEEP IN MIND: At times, an entire loop may seemingly sound phenomenal through a Vocoder, but it could actually be perceived as ‘too much’ if your loop is anything more than a simple melody or drum sequence.
In this case, I would suggest isolating certain/designated elements (with EQ, or a similar process), and then sending that signal through the Vocoder; units like these tend to function at the highest possible capacity when applied to single elements/instruments, as opposed to something more substantial (such as an entire composition).
The Unison Artist Series – Matroda Samples sounded particularly exceptional after being sent through a vocoder, and I urge you to test this out for yourself.
2B. Pitch plugins
Another thing I love to do is have Melodyne (or a similar program) analyze a loop, extract the ‘pitch’ information from said loop, and build a new song from that.
Samples are NOT cheating if you’re willing to think outside of the box, implement something new/original, and put your own unique spin on it; besides, your competitor certainly isn’t concerned with what is considered ‘forbidden’ or ‘fraudulent,’ and will use these techniques to their advantage in a heartbeat… so why shouldn’t you? Don’t allow your stubbornness or close-mindedness to prevent you from excelling/transcending.
NOTE: If you don’t currently own, or have access to, Melodyne (or the like), your DAW will most likely offer an ‘Audio-to-MIDI’ conversion option and, although it may not be as precisely accurate, surely gets the job done. Also, sending instruments through Auto-Tune (or similar pitch-correction software) can generate truly unique/astonishing modulation, so I sincerely encourage you to experiment!
3. Try out a different DAW to spark some creative ideas.
Some people would claim that using a dissimilar/disparate DAW than the one you normally use can help to encourage or spark some new creative ideas, which I principally agree with; except, in order for this to effectually work (in the greatest possible capacity), I deem it totally and completely necessary to be fully competent/proficient in how the DAW you’re intending to use works… otherwise, your illiteracy with it’s interface alone, can prevent you from being able to get creative in the first place.
NOTE: Personally, I use 2 separate, autonomous DAWs for production purposes, but if I happened to be not so eminently familiar with one in particular, I would solely produce in the one I was accustomed to, and dedicate the appropriate amount of time to master every feature/function of the DAW in which I’m not so conversant BEFORE attempting to obtain inspiration from it.
4. Introduce some new instruments, synths, and samplers.
I feel like this strategy reigns supreme over the aforementioned option, as it immensely helped me to not only break out of writer’s block, but also impelled me to learn how to take synths and generate my very own, unique sounds with them from scratch (which has since benefited me greatly, and essentially led me to work in the field i’m in today, Sound Design)
Try learning how to play that prodigious new ‘Kontakt’ plugin, or how to construct your own ‘wavetables’ within Serum; it doesn’t only distract you from the fact that you’re currently ‘blocked,’ but also enhances/broadens your skill-set, as you proceed to acquire previously unknown information and techniques (ultimately making you a superior producer).
NOTE: Alternatively, you could venture under the hood of an existing plugin and delve into it’s features that, at first, seemed too advanced/daunting to pursue. Go online and watch some videos on the Synth/Sampler of your choice because, odds are, it far exceeds the limited purposes in which you utilize it for.
5. Effect plugins
Throwing a preexisting melody into an effect sequencer such as Sugar Byte’s ‘Looperator,’ Gross Beat (image-line), or Illform’s ‘Glitch 2’ (‘Glitch’ 1 is also incredibly sufficing and available for FREE), can do absolute wonders for your track, and make them far more superior than they ever were (or you ever imagined they could be).
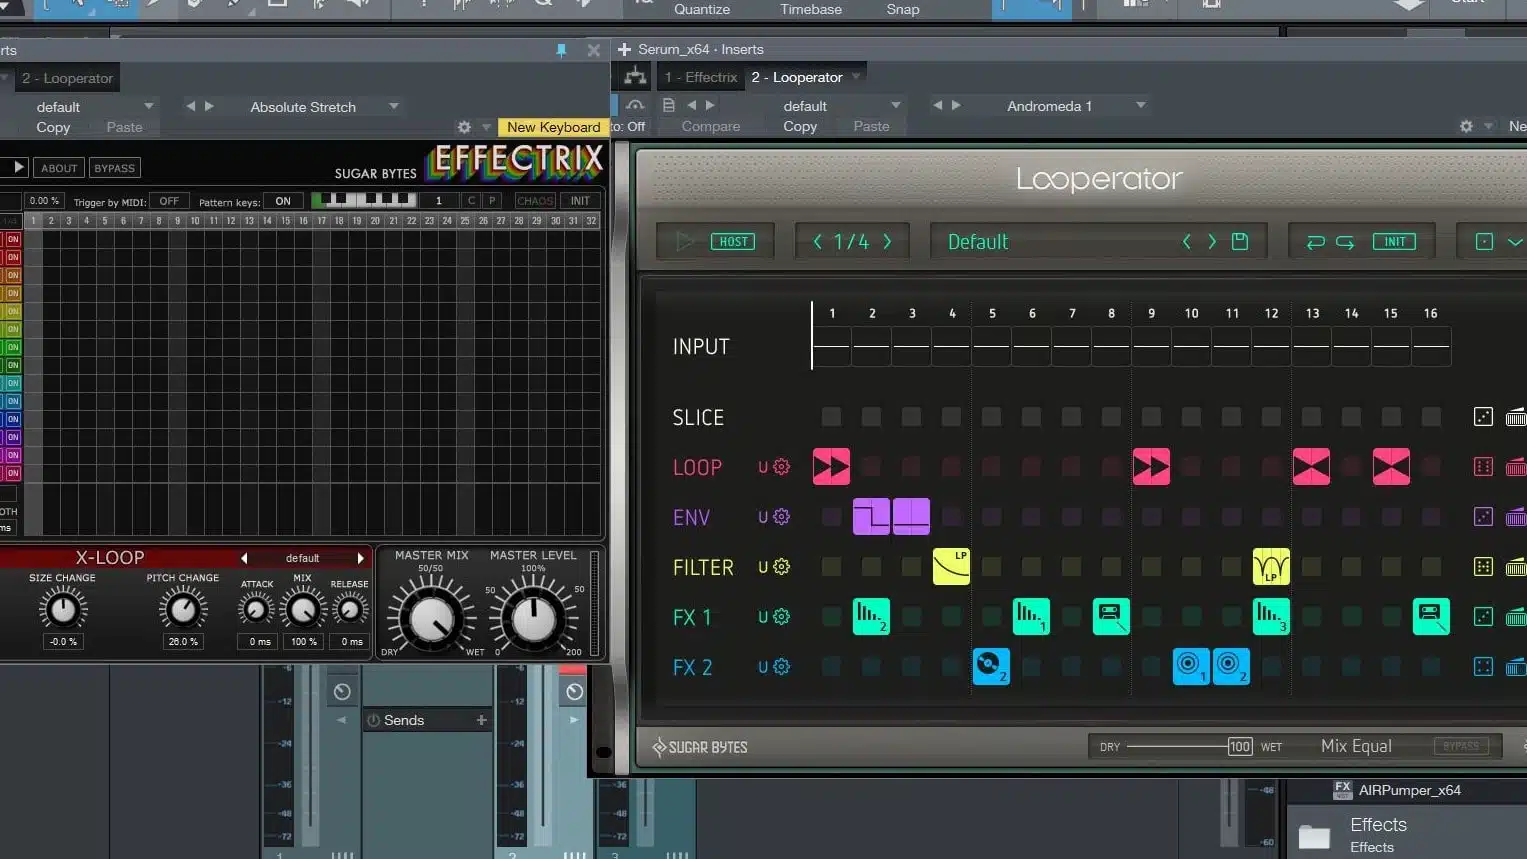
Although a vast majority of producers like to display them on their Master BUS (which can, every so often, undoubtedly benefit certain sections), I have found that the true potential/real secret of these processors lie in their ability to exceedingly enhance a crucial/designated element within your track.
NOTE: I normally tend/like to take an element like strings, and experiment with sending them through Looperator; it ultimately produces wild, unparalleled effects that, otherwise, would have never been uncovered.
A common misconception that I encounter quite often, is that it requires expert manipulation or endless experience to achieve supreme results when, in actuality, It’s merely a simple trick like this.
Oftentimes we fail to realize that, even though creative-inspiration is indisputably helpful when attempting to make music, a LOT of what we do today (as modern/electronic producers) is, in fact, technical; a good amount of creativity can branch from the DAW/plugin itself.
Allow that small spark to light a flame under you when you’re suffering from a block… remember, it’s NOT cheating simply because you’re astutely and brilliantly harnessing available resources and building off them/manipulating them to your liking.
5. Learn Theory
By scrupulously learning how to play the piano, you’re essentially unlocking the secret of how to play virtually any computer instrument ever created (with a few exceptions, of course).
Start with the basics, initially, as to not instantaneously overwhelm yourself; odds are, the results you compose and feelings you endure while attempting to learn, will galvanize you to the extent of creating a whole new project (making you completely forget you were experiencing writer’s block altogether).
Learning Theory (and techniques associated with it) can seriously benefit your music’s quality, and your productivity rate, as the basic intervals/progressions found within are the foundation of the most frequently heard, highly regarded music of today; once you intimately know them, assembling a song will inevitably come much easier to you.
When I look back, taking the initiative (and time) to thoroughly assimilate scales was irrefutably one of the smartest decisions I could have ever made, in regards to the integrity and quality of my production process; it’s the established foundation of every song ever created, and learning even the basic principles can massively improve/enhance your overall output.
If there’s a piano within arm’s reach, and you decide you want to create a beautiful masterpiece, randomly plugging in any of the 12 notes typically does not result in a musically ‘sound’ or felicitous final product. The same, however, cannot be said for picking a scale, removing the extraneous/redundant notes within that scale, and plugging in any of the 7 (desired) notes that constitute the ‘Diatonic Scale’.
The fact of the matter is, by eliminating the 5 notes NOT in any given scale, we can essentially plug-in any note we choose (within the scale), which may responsively enable our progression to start sounding like an actual song.
By selecting a specific/designated ‘scale,’ we can then begin to plug in various notes that sound sufficient or desirable when played in succession, which holds the potential to generate an exceptional melody.
We can then take that melody, and create a ‘chord progression’ from it; easily completing 2/3 of our initial composition. All that’s left after that, in order to transform it into a full song, is the drums… and there you have it.
NOTE: Since this particular article is about vanquishing writer’s block, I am solely going to divulge how to successfully conjure up a song by creating a chord progression/melody from a blank canvas (or, ‘session’), how to pick the proper scale, and, if you already possess an existing chord progression at your immediate disposal, how to expand it in order to form an entire/completed song; leaving the intricacies thereafter up to you.
If you’re not yet closely acquainted with the basic principles of Theory, I highly suggest you check out our recent Theory article https://unison.audio/theory-essentials/, as it intricately/meticulously breaks down chords to their simplest possible form, and will certainly make the following methods seem significantly easier/clearer.
6. Creating A Song From Your Unfinished Session, Using A Subtractive-Arrangement Method
Sometimes we can break the 4-8 bar sequence. When we have a full or complete loop, we’re able to meticulously integrate additional elements into the loop (if needed or desired), and then, implement a ‘subtractive’ arrangement to construct an entire song; this plainly means, you take away (or, subtract) most of the elements, and arrange it so they slowly build/get introduced over time.
Appoint your current loop as the hook, and slowly begin introducing the elements in 4-8 bar increments. Once you effectuate this ‘arrangement’ mindstate, you’ll shortly realize that you were equipped with a whole arsenal of potential songs all along… so now, take advantage of it!
NOTE: Most modern songs of today are built off of a 4-8 bar composition, and usually rely on the arrangement itself to compose a full song; keep that in mind while in the midst of producing, and don’t give yourself a hard time for not being able to progress/excel past this state. Remember, it’s not cheating if the entire industry has excepted, adopted, and thrived off it.
Besides bouncing the individual elements from your unfinished projects (as to utilize them as loops later), I also suggest that you bounce a file of the complete loops as well, so you can leisurely cycle through them later, without being obligated to open up each distinct project again. By doing this, you not only save an abundance of precious time, but you’ve simultaneously created a folder that contains all your ‘potential’ tracks, which you can conveniently explore when you’re suffering from a block (or, simply when you feel inspired/creative).
7. Creating Chords With Serum
Sometimes, you’ll find that even though you possess the quintessential preset, you just can’t seem to formulate a satisfactory progression… for this unfortunate predicament in particular, I have devised the following strategy:
1. Load up a Preset that contains 3 ‘oscillators’.
NOTE: Several presets that are ideal for this specific situation can be found within The Unison Unique Collection for Serum, and can be found here: https://unison.audio/unison-unique-collection-vol-1
2. Bring all the individual oscillators to an equivalent octave; this is completely optional, but normally yields the best results.
if your cultivated in the ‘Theory’ realm, I’m sure you’re beginning to visualize the advantageous possibilities.
3. Leave the ‘sub-osc’ semitone at 0, bring OSC 1’s semitone to 5, and OSC 2’s semitone to 7.
After a few volume adjustments, We’ve just successfully contrived our Major chord.
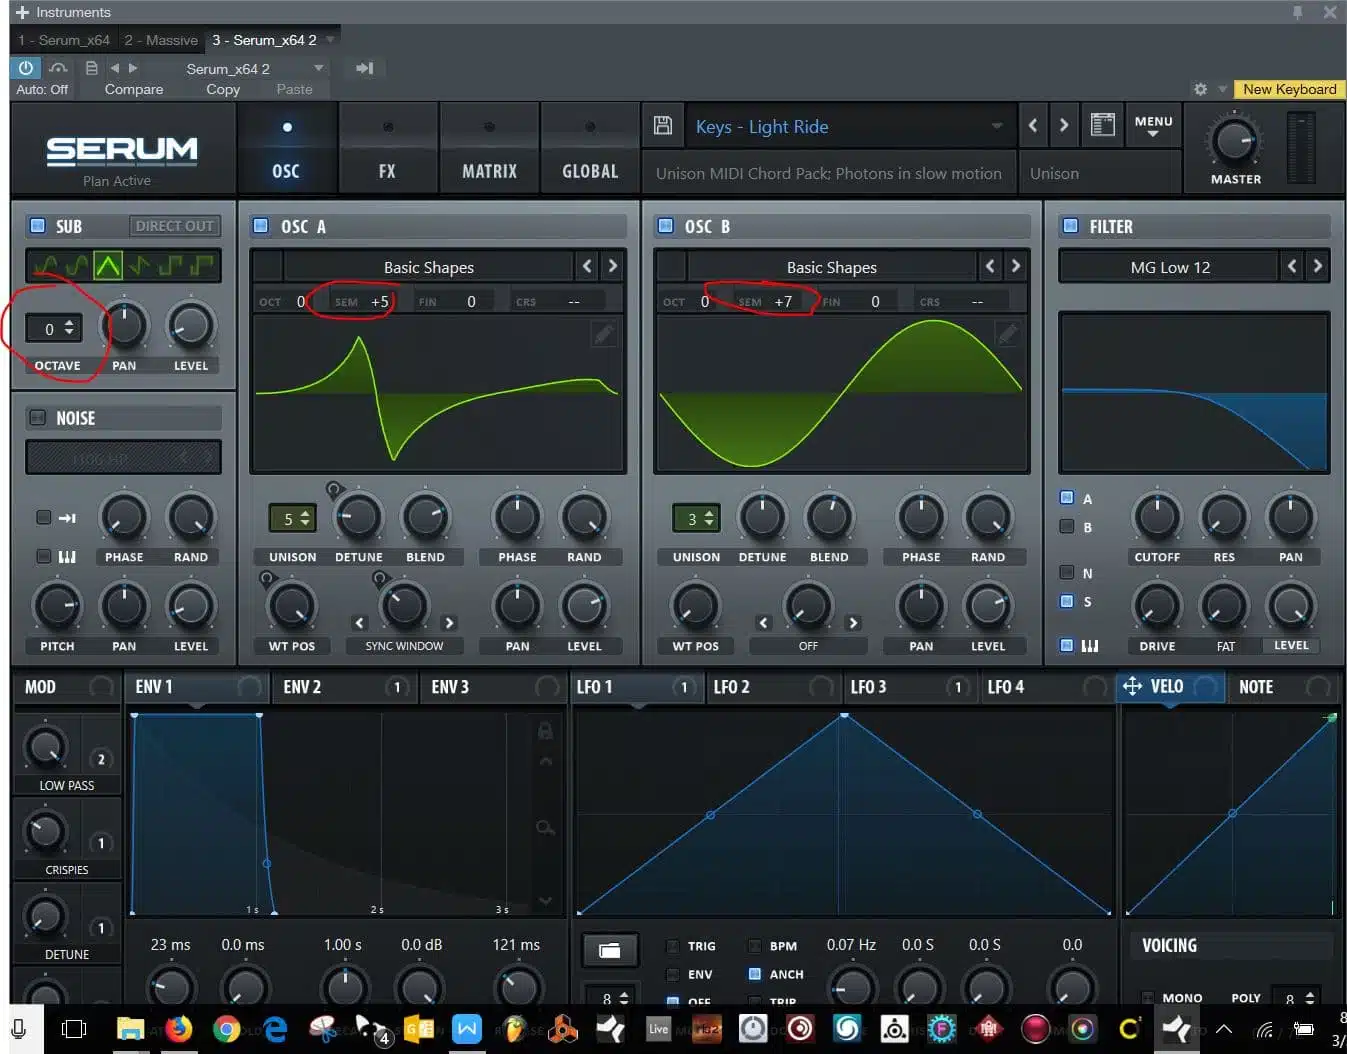
4. Open up a duplicate of the existing preset.
5. Repeat step 3; except this time, make OSC 2’s semitone value 4 (as opposed to 5); generating our Minor chord.
6. Now, start experimenting with the notes, and build a progression; it may just manifest the creativity you so foolishly thought was irrevocably lost.
8. Reverse-Engineering Chords, Using Any Major or Minor Scale.
You’re able to victoriously build an entire progression simply by utilizing the Major or Minor scale, and mapping out a string of notes that sound good together.
1. Map out the scale you would like your song to be in.
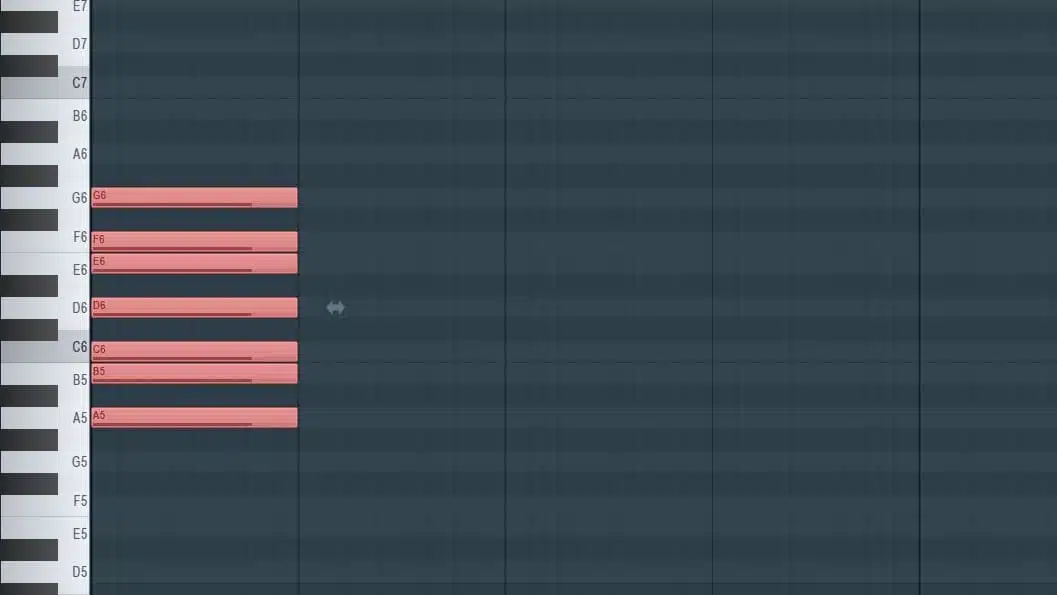
Decide exactly how you want your progression to be played; it can either be 4 chords played over 4 bars (each one bar long) or, you could choose to extend those chords, making them 2 bars each (over an 8-bar period of time).
NOTE: You could additionally create an 8-bar progression, containing 8 chords but, for the sake of simplicity, let’s stick with 4 chords (each being 1 bar in length).
2. Map out a series of 4 notes that sound especially good/copacetic together
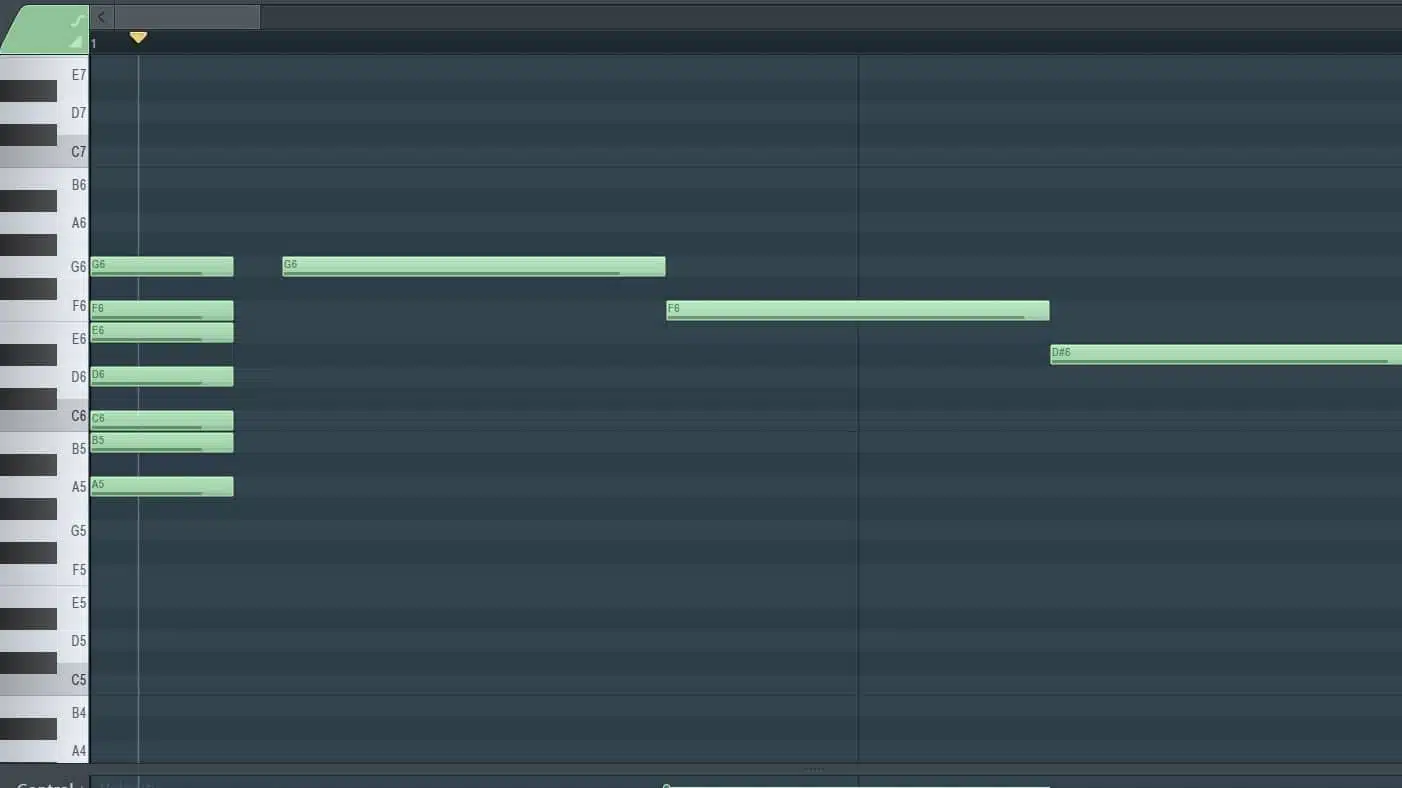
This can either be the top OR bottom note of your chord but again, for simplicity’s sake, we will make it our top note.
NOTE: You could alternatively begin with a melody of which you expertly know the scale, and utilize that to build your chords; simply take the first note of each individual bar (in that melody) and use that as your chord’s structure.
3. Skip every OTHER note in the scale going down/descending (starting from the top), to successfully complete/cipher the ‘backwards’ chord-progression.
NOTE: The highlighted notes on the right-hand side constitute the chord.
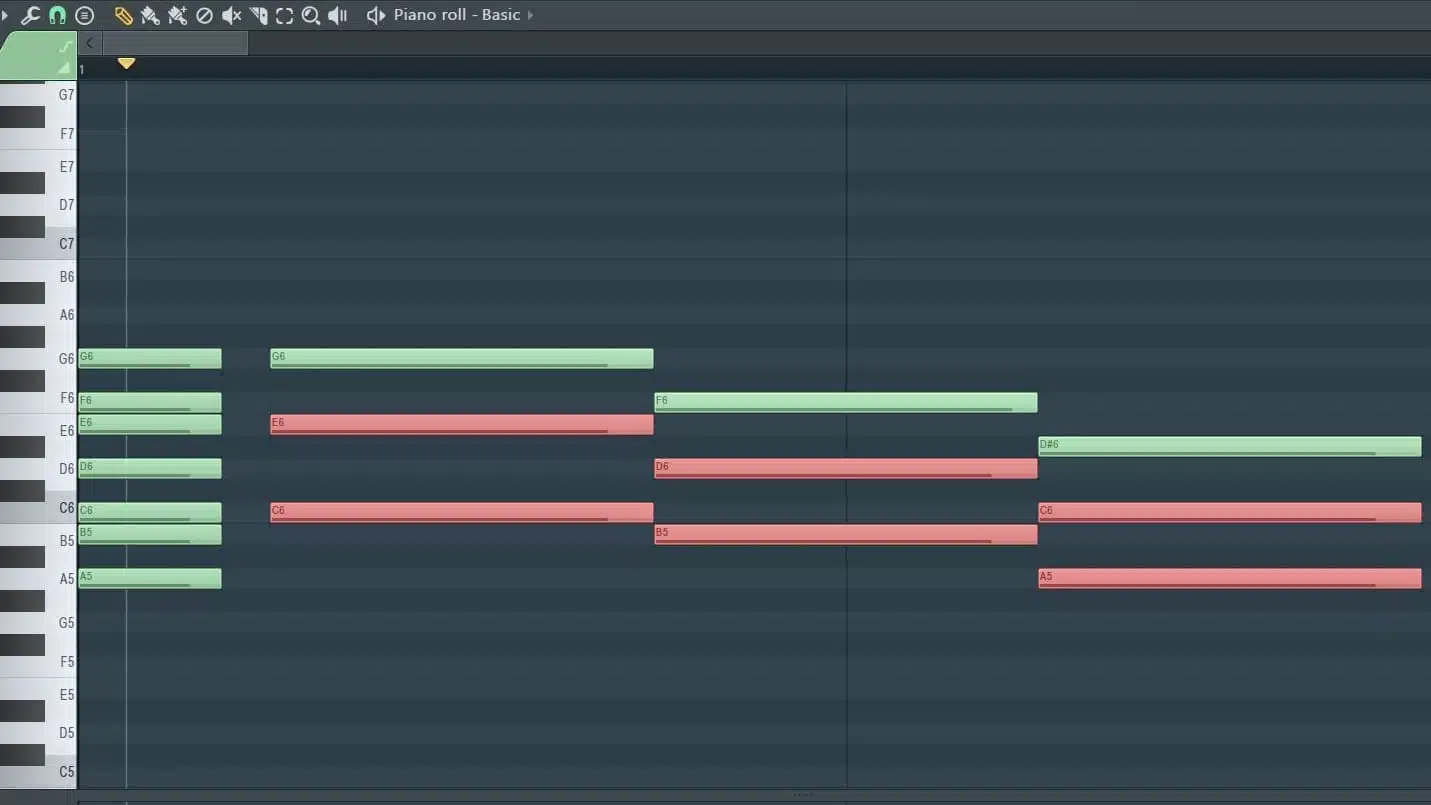
To produce more ‘lush’ chords, simply use more notes in the scale. This typically entails plugging in the notes above the completed chord triad (to make them ‘extended’ chords), but you can also supplement additional notes below it, to change the chord completely.
Like everything else pertaining to music/production, experimentation is the perpetual key to making things sound as superlative as possible but, traditionally, utilizing a technique like this will unfailingly work if all you need is a starting point.
BONUS: An even simpler method would be to implement the first 2 steps (mentioned above), and meticulously incorporate preexisting chords from resources such as, Unison MIDI Chord Pack; as not only does it possess virtually every common chord-type imaginable, but offers documentation that will give you a full rundown/understanding of chord progressions as well (it also explains how to properly use the Roman Numeral Chord System).
Map out your scale and desired series of notes; since we’re not reverse engineering the chords, we will take the notes we previously set up, and use them to determine our chord type.
Now we simply bring in the desired Major/Minor chord from our selected notes, and eureka, we now have our progression (which constitutes the entire foundation of your song, mind you).
NOTE: We are going to be taking advantage of this technique, in order to create the most common pop-progressions, later on in this article.
9. Creating A Melody Using A Scale and Your Chord Progression
Now that the hard part is out of the way, the melody essentially makes itself; you’re assuredly familiar with the notes that adequately work in the song/scale, so start plugging away to your heart’s content.
You can either memorize these notes and play them manually or, after you’ve mapped out the scale, plug them in; experiment with motifs/patterns to figure out which notes sound best in succession. Let your ear ultimately guide you, as it is the best indicator of what sounds good and what doesn’t.
NOTE: A motif is characterized as a short succession of notes that produce a single impression; a brief melodic or rhythmic formula, out of which, longer passages are developed. Melodies ordinarily contain the same motif/pattern being executed throughout the entire song, just containing conflicting notes.
Create a desirable/captivating motif that suitably fits the song, start meticulously (or, randomly) swapping out notes, and it shouldn’t take too long after that for you to discover something spectacular; the ultimate goal here is to break the block and, when you’re creating/experimenting, you’re inherently doing just that.
Don’t limit yourself to the predetermined notes in a given progression/scale… figure out what ‘color’ tone(s) correspond with the unique composition, as there are always a few notes that reside outside of the scale that end up sounding great.
EXPANDING AND STYLIZING EXISTING PROGRESSIONS
Although it’s common that, when suffering from writer’s block, you may not even be able to squeeze out a sufficient loop, I can guarantee you currently possess endless amounts of unfinished songs (which can easily be transformed into complete ones) that are either epic loops, or merely incomplete projects; what I suggest you do is: open up one of these partial pieces, and proceed to implement the following methods:
1. Creating A Song From Your Chord Progression
(if you have access to a chord progression, you can undoubtedly, quickly concoct a whole song from it)
1. Utilize your chord progression as either the verse, or hook; if you would like it to be the hook, raise it UP an octave, and layer it with additional instruments.
If your progression is currently 4 bars, make it 8, and use that for the verse.
Additionally, create a version for the intro that is only 2 bars long, so you’re able to play one right after the other.
NOTE: The end-goal here is to have the progression approximately an octave (or two) HIGHER for the hook, and the verse in a LOWER octave.
2. From here, we can employ various chord-building methods in order to provide it with a sense of individuality/uniqueness.
Try inverting certain notes, adding lower octaves, or expanding the chords themselves (the possibilities are unreservedly endless, do some experimenting).
3. To create a bridge… RAISE your chord progression 7 semitones (so it now plays a fifth of the current/original progression).
You could also try raising your chord progression by a ‘3rd’, which raises the entire progression 5 semitones. Depending on the specific song and scale, it may even be better suited as the bridge.
NOTE: Again, if you’re searching for full, pre-assembled progressions, the Unison MIDI Chord Pack is the ultimate toolbox for this (and other chord-related needs).
2. Collapsing and Inverting Chords
This is an absolutely brilliant (and, very commonly used) technique that will unequivocally add an enthralling and, at times, mysterious layer to your progression; the overall effect can be subtle, but tends to exude a dissonant vibe.
It may not sound ideal in every circumstance but, when it does, it genuinely stands out and makes a colossal difference (even if it’s on a subliminal level and you don’t quite consciously notice).
NOTE: This technique typically works best with big/substantial chords, like a Minor 9th or Minor 11th.
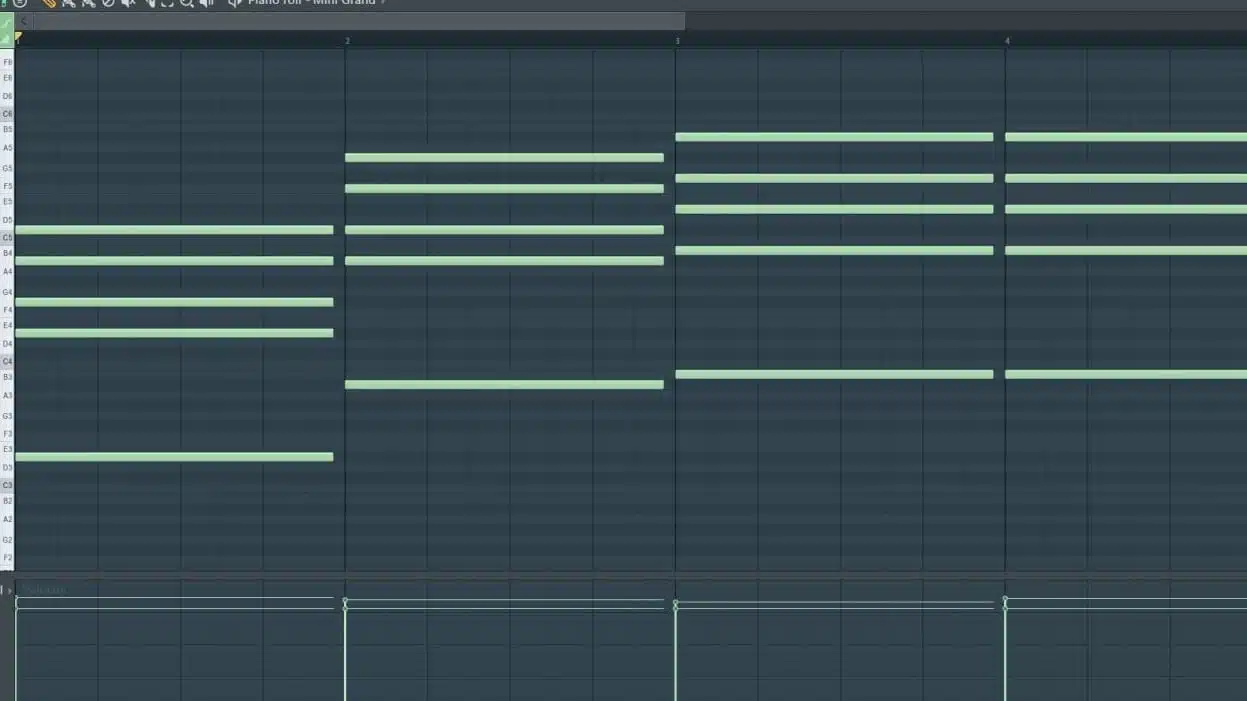
(before I collapsed/inverted any notes).
For example, let’s take a 9th chord; the top note is in a different octave than all the other notes.
Take the top note and invert it DOWN an octave, so all the notes are now in the same octave range; these are referred to as ‘clustered’ chords.
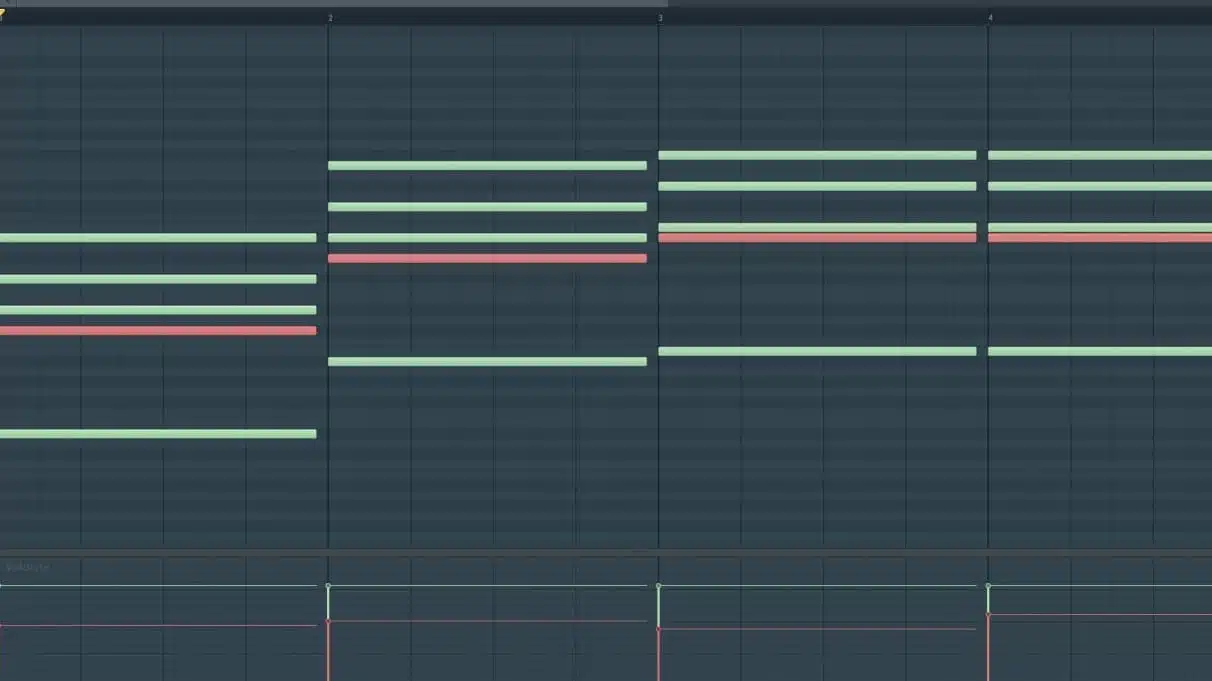
You can continue collapsing all the upper notes (if using 9th and 11th chords).
NOTE: There is a limit to how far you can take this, so try to find an ideal middle ground and don’t go overboard; as always, subtly is key.
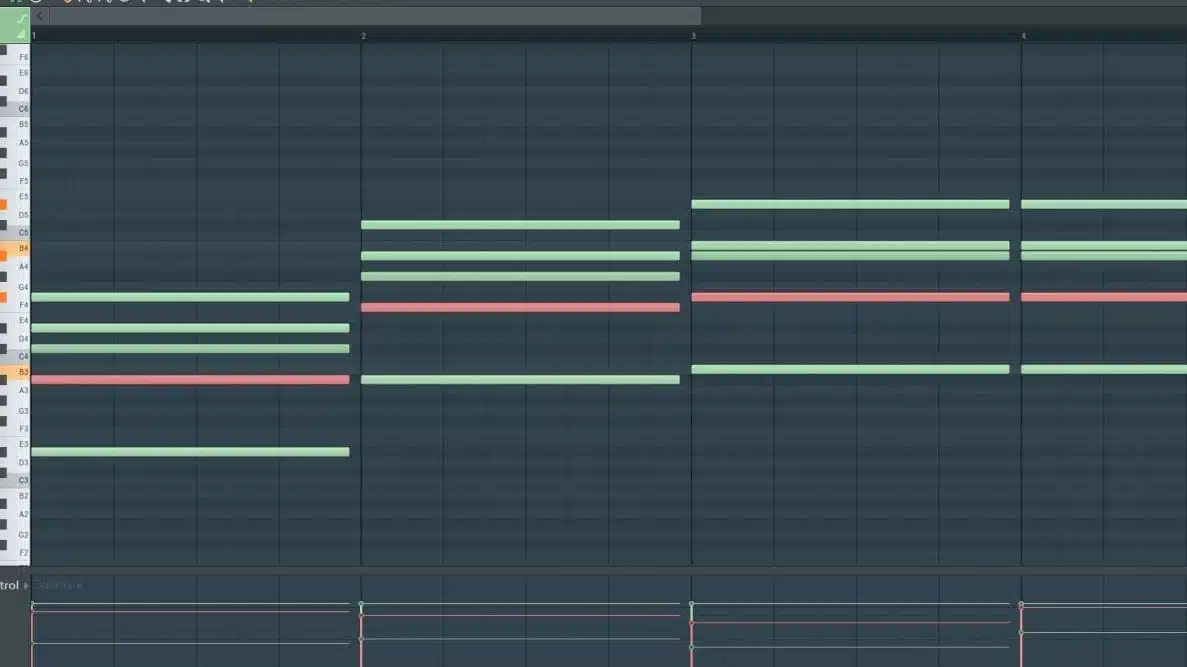
(2 notes, collapsed/inverted)
The bigger the chord, the more options you’ll have (in regards to what specific note(s) to pull down), so experiment with them individually to see what sounds the most desirable.
Don’t feel obligated/pressured to keep these notes in the same octave range as the rest of the chords; bringing it up/down a few octaves could give it some ‘weight’ or ‘clarity’ that, at times, a busy progression is lacking/desperately needs.
Velocity plays a HUGE role in being able to successfully pull this off; the collapsed notes may not sound good unless they are played at a lower level than the rest of the notes.
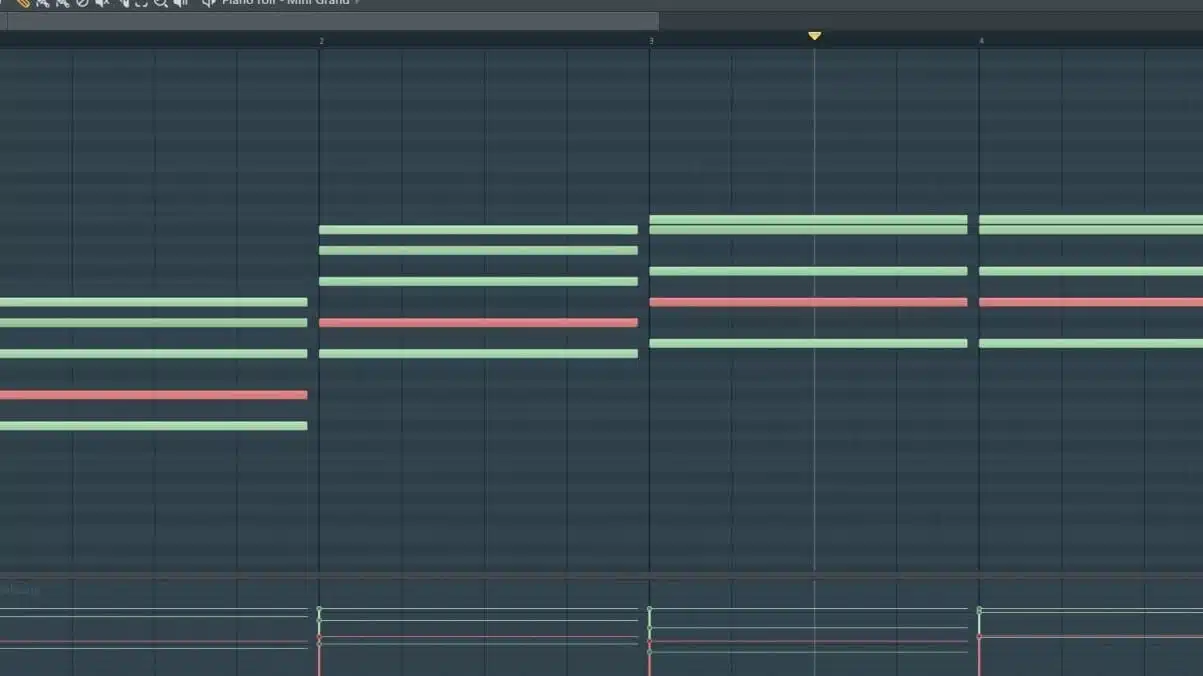
(3 notes, collapsed/inverted)
NOTE: It’s not always necessary to collapse a note for every single chord in the progression if you did it to one. Oftentimes, one unique chord could sound great with a few inverted notes, while the other sounds much better without any; get creative and, remember, it it sounds good… it most likely is.
3. Splitting Chords
‘Splitting’ chords is the process of taking a basic progression, adding 2 extra/additional octaves of the bass note, then playing the top of the chord (the triad) and the bottom of the chord (bass notes) SEPARATELY (otherwise known as the triad and the bass notes).
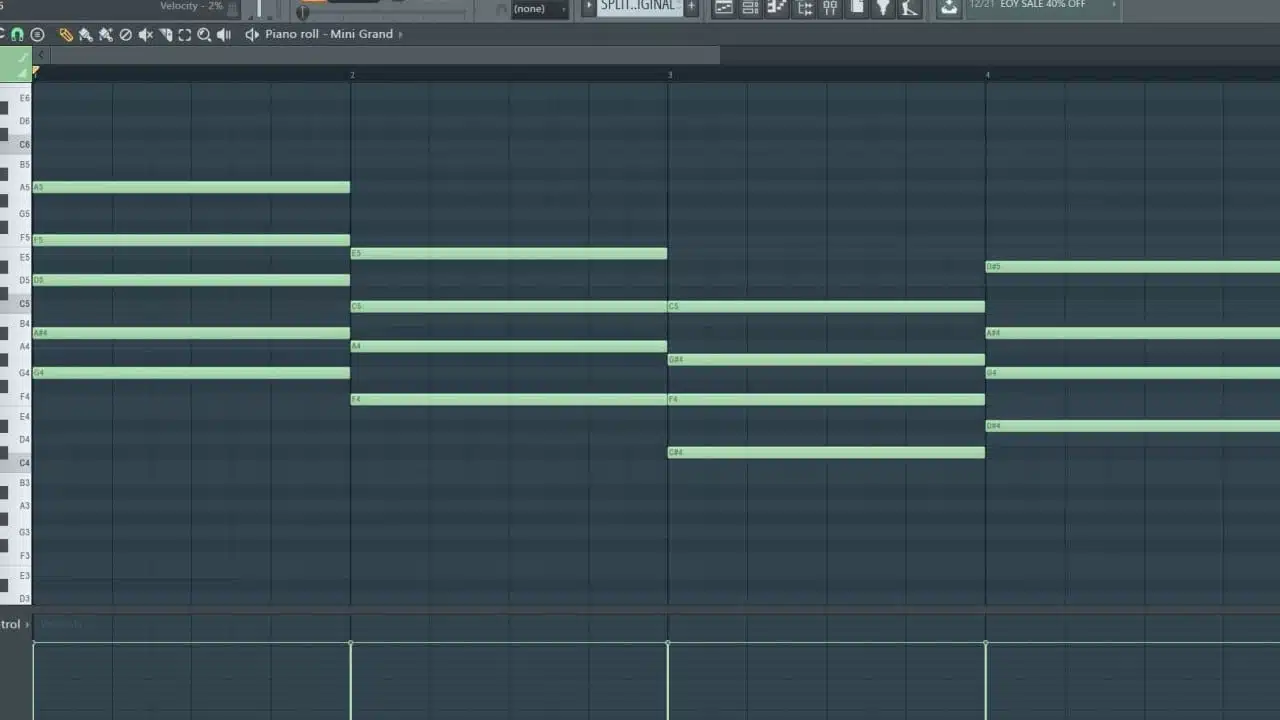
(Before split)
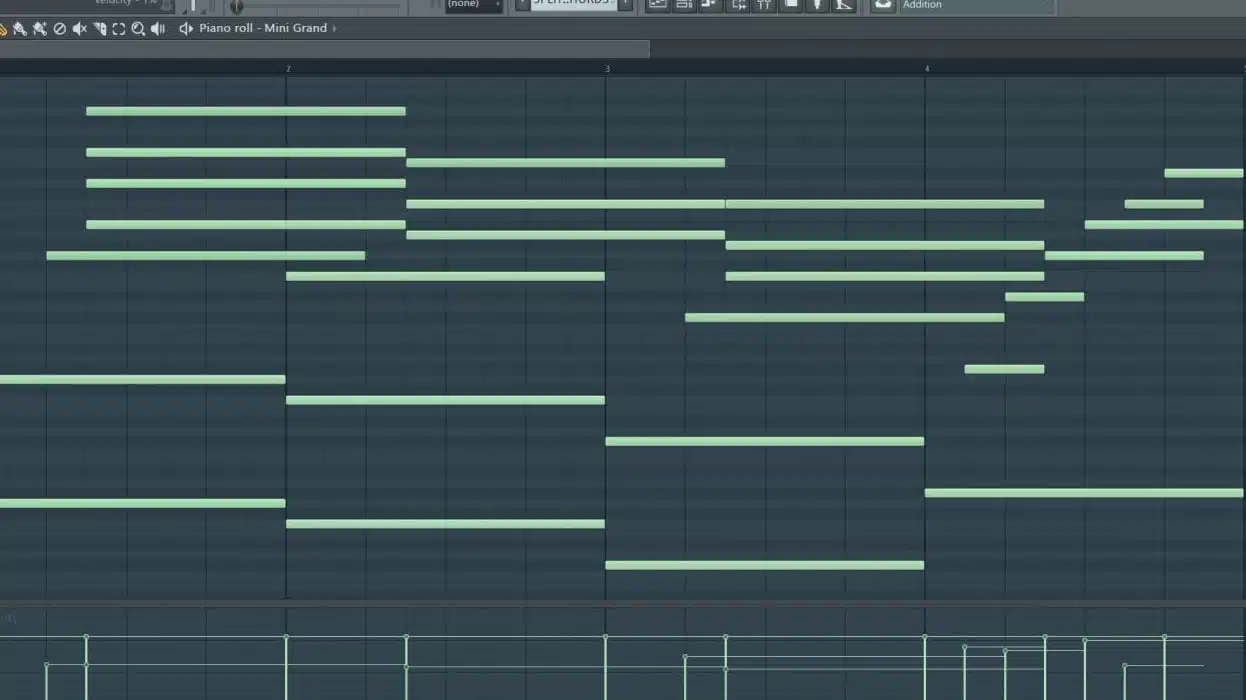
(After split)
This method is widely utilized throughout numerous genres, and does a superb job at taking a boring, standard, or basic progression and transforming it into a full-length song that is epic enough to be featured on the big screen.
Note how I “strummed” the last chord in the progression instead of splitting it (as I did at the start of the progression).
You can additionally use this technique to produce a converse, darker, ‘West Coast/Dre-like’ outcome by using the ‘Sustain’ pedal/effect (making the keys longer), and involves playing the bass notes at different times/intervals.. The formula is: you play the bass notes, followed by the Triad (in the original pitch), then one octave higher, and finally, back down to the original.
You can additionally include ‘color’ tones (that play with the triad notes or bass notes), which change/switch-off during each individual stab.
Create EDM, House & Neo Soul Chord Stabs By Flattening The 7th
(The Major and Minor 7TH, 9TH, AND 11TH chords are customarily used in this particular technique).
For this specific technique, you’re actually going to rhythmically play the chords in the pattern of your choosing (as shown below):
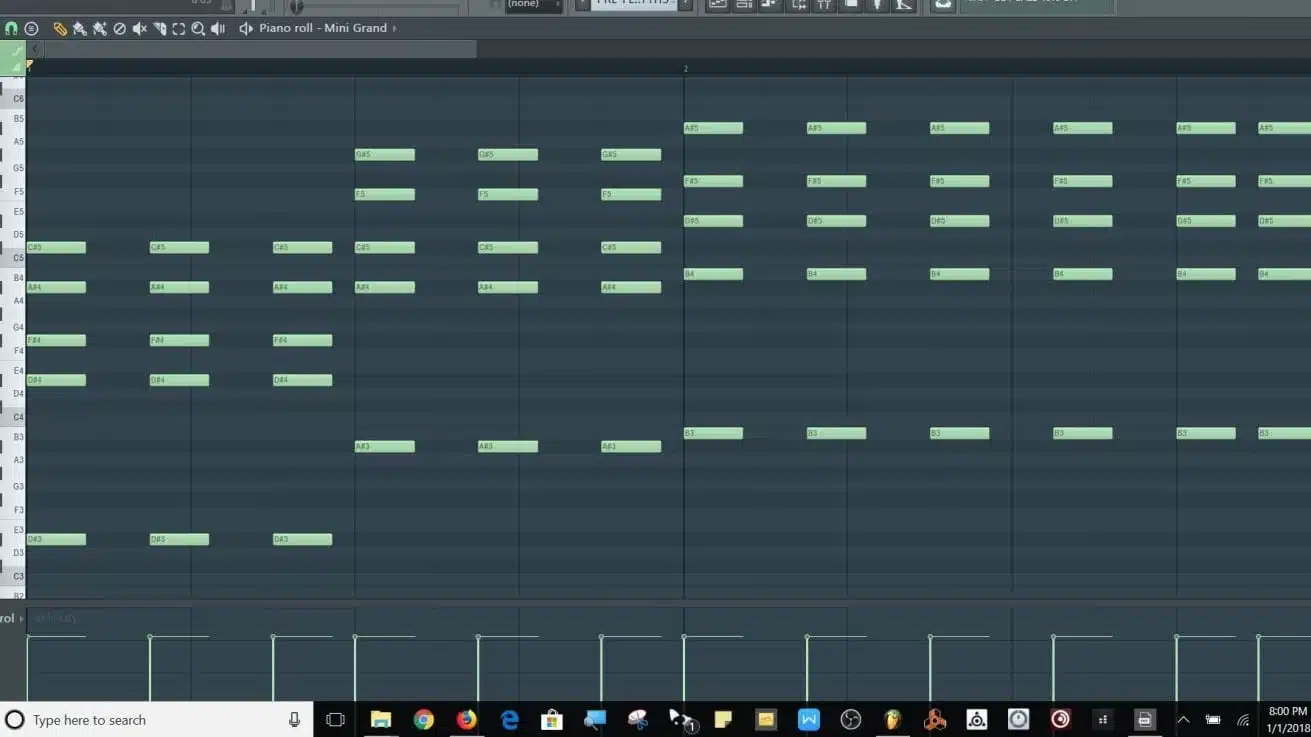
NOTE: ‘Flattening’ simply means bringing a chosen note DOWN a semitone, to create a dissonant vibe and add tension.
This is heard primarily in the ‘electronic’ genres, but can essentially be introduced anywhere (in any genre), to create an interesting/unique feel.
When you ‘flatten the 7th ,; all you’re doing is taking the 7th note in your chord progression, and moving it down a half-step.
NOTE: At times it will conversely sound good to RAISE the note a semitone, making the 7th Sharp; it all really depends on the progression at hand, so I urge you to experiment each time.
The ‘7th’ note is: the TOP note on a Major or Minor 7th chord, the SECOND note (from the top) in a 9th chord, and the THIRD note (from the top) in a Major or Minor 11th chord.
This process should be implemented at the ‘stab’ located RIGHT BEFORE the chord change, as a transition; shown above.
Neo Soul & Progressive House chords are normally not held down (sustained), but instead, are stabbed rhythmically/repeatedly, and eventually change.
It may not sound phenomenal right off the bat, so I sincerely urge you to play around with your sounds and reserve this method solely for the chord(s) you think it sounds best on.
NOTE: It’s always a smart idea to add contrast, if possible, by including some variation (like long or short chords)
KEEP IN MIND: Not every single stab should be flattened, it unquestionably will not produce the best results; I prefer to flatten the LAST stab before switching to another chord, just to incorporate some extra flavor and tension. Sometimes flattening the first stab can also sound great, but it truly depends on the progression itself; always remember to trust your ear.
Also, try your absolute hardest not to over do it! Most of the time, flattening one or 2 notes every few bars is enough. Like everything else in music… subtlety is key!
NOTE: On occasion, it actually turns out to be the MIDDLE note in the progression that needs flattening; this is frequently overlooked, use it to your advantage!
These chords are extremely intriguing to the subconscious mind. They harness a sense of familiarity, yet they’re not TOO familiar (as they’re not heard as often as some other, more basic/simple chords), which seriously peaks it’s interest. In the end, it may even consider this ‘new’ sound to be more pleasing/desirable.
Create R&B Chords By Strumming
(Major 7th and Minor 7th chords are customarily used in this specific genre).
This is a very popular method, especially in the R&B genre. What you do is ‘strum’ the notes (think guitar), instead of simply playing all the notes of the chord simultaneously.
You can begin strumming from either top to bottom OR bottom to top; I recommend alternating throughout the song, it’s a great way to add variation.
NOTE: When strumming chords, try to incorporate guitars and electric pianos, as they usually end up sounding absolutely spectacular (a RHODES typically works/sounds the best).
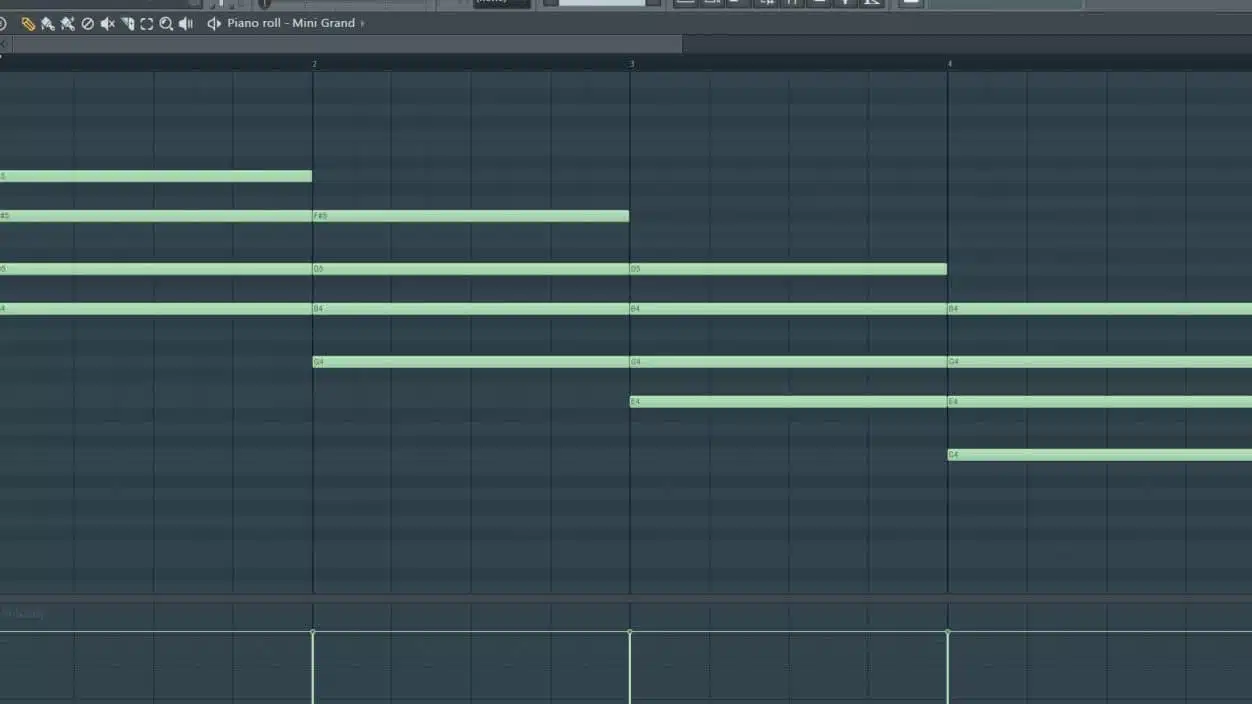
(Before Strum)
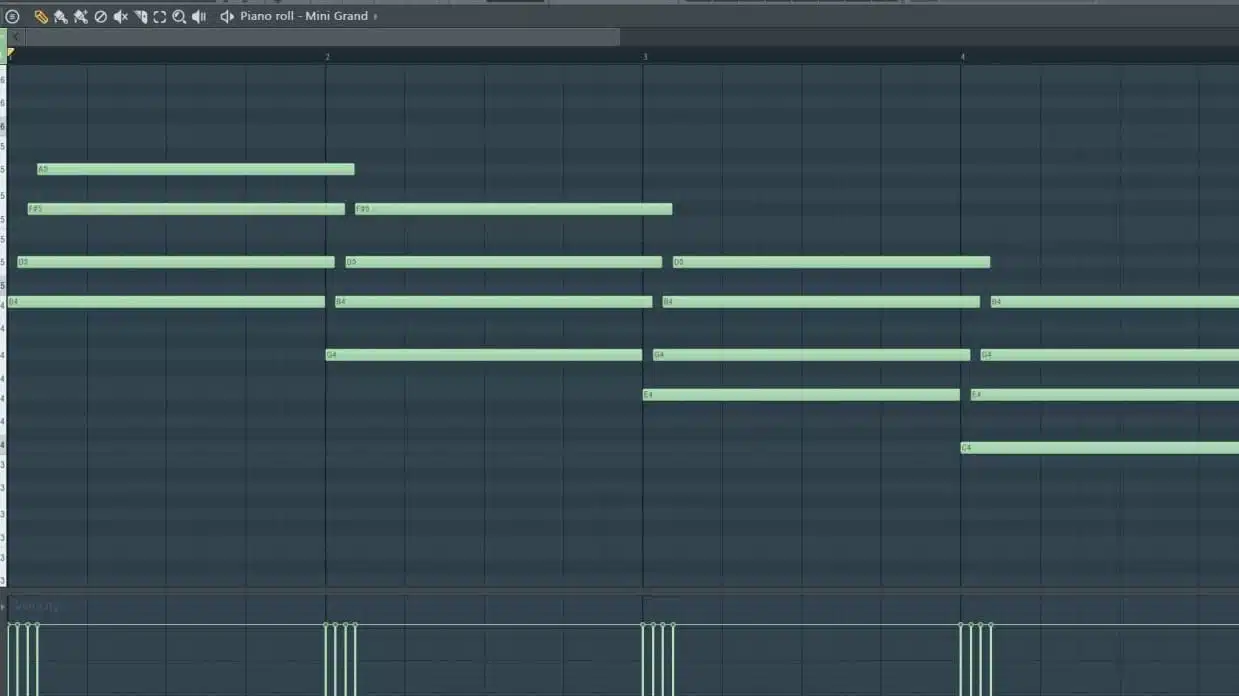
(After strum; once I manually offset the notes by turning ‘snap to grid’ OFF)
Randomly having the note’s timing ‘offset’ is excellent for natural chords but, for this particular technique, a ‘linear’ approach is ideal (again, in order from top to bottom or vice versa).
This can be done from within your piano roll, or by plucking/rolling the notes of the chord by hand (on your MIDI keyboard).
Make sure to apply the appropriate alterations to the velocity of your notes (so a more ‘realistic’ sound is integrated), or make certain notes SOFTER so every element cohesively matches the mood of your track.
NOTE: Velocity is vitally important in the overall process of creating chord progressions, and having a constant/identical velocity for all the notes will ultimately result in an undesirable, computerized sound.
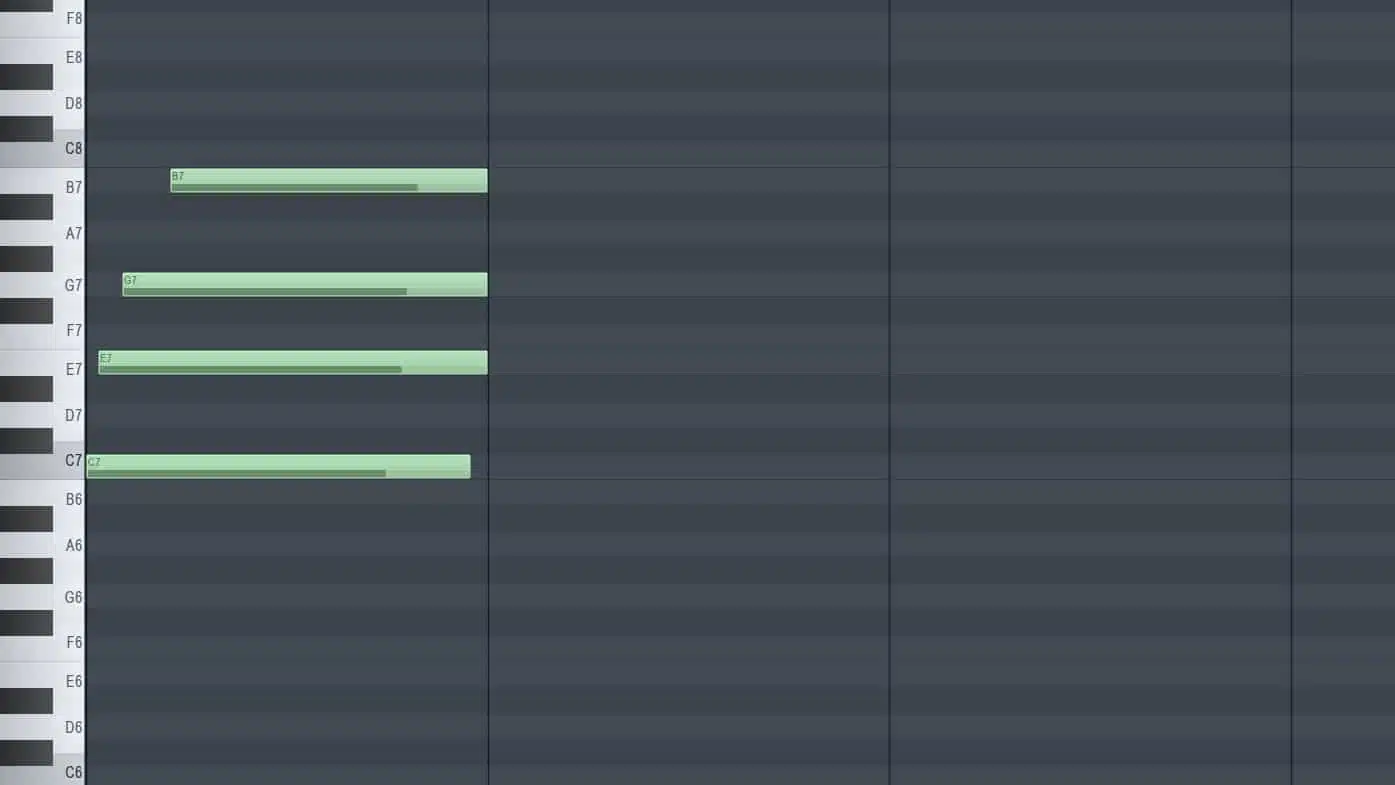
These strums can be rather quick (as they are above) or drawn out (as shown below):
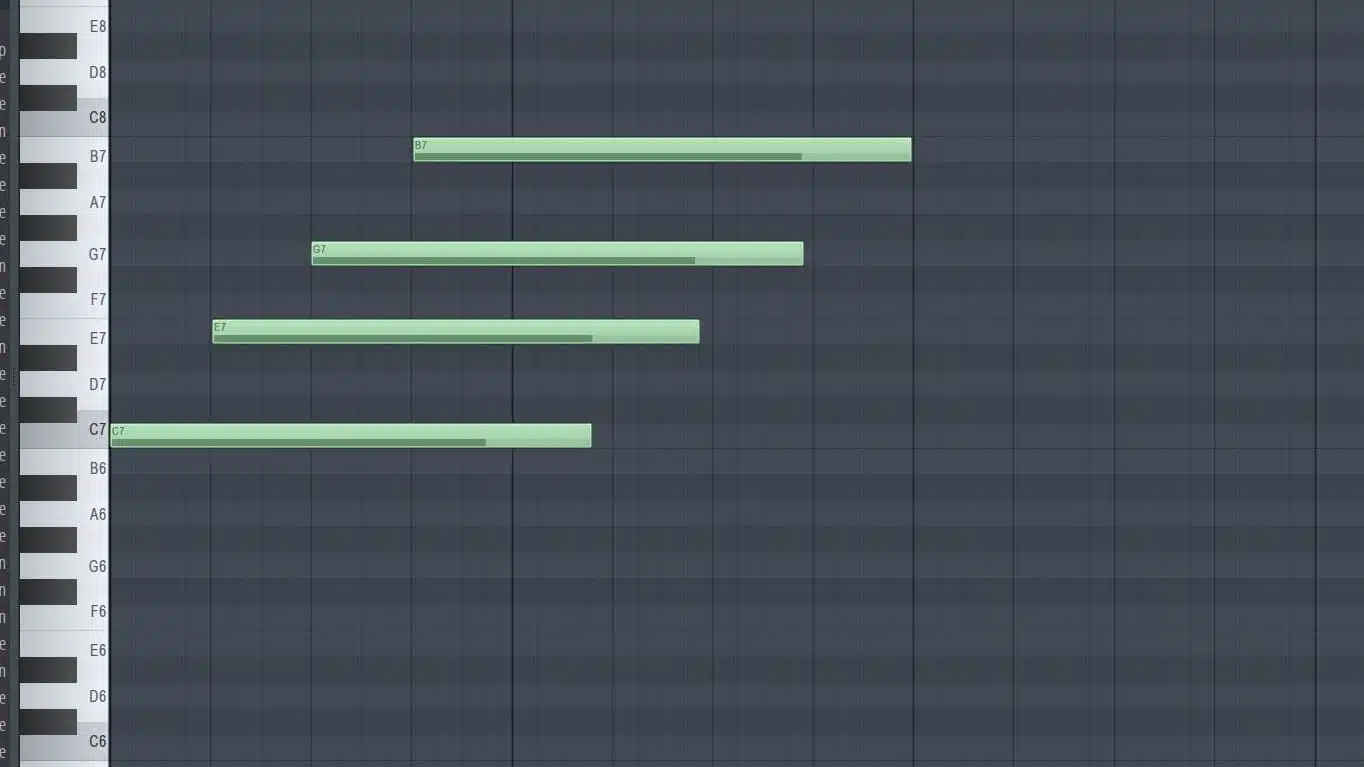
You can even take it to the extreme, shown below:
Create R&B Chords with Delayed Notes
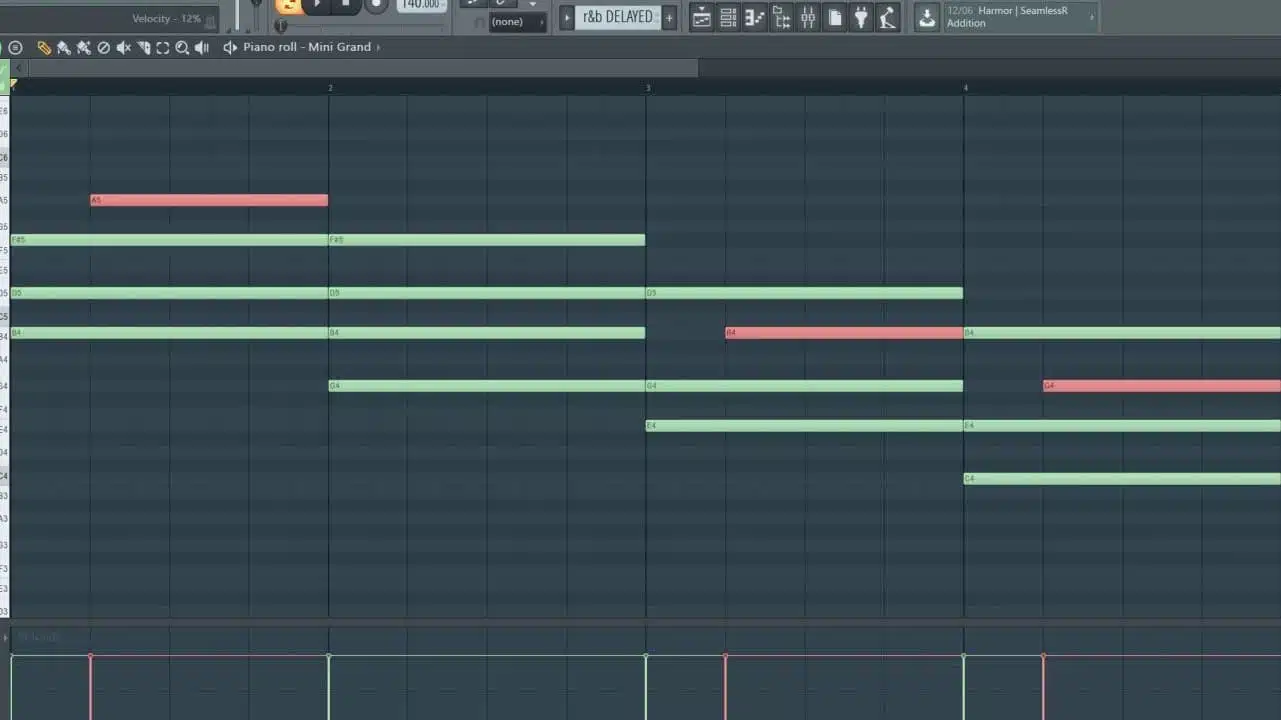
For this technique… we play the chord as we regularly/normally would, except this time, we intentionally DELAY playing a note (or two) by a few seconds.
NOTE: The amount of time you wait depends on the current tempo of your track (your musical instincts should kick in and help guide you through this process).
A Minor 7th is a good chord of which to utilize this delay.
The 5th or 3rd are good notes to delay.
When using a 3-note chord (triad), the 3rd (the chord’s top note) usually sounds best delayed:
NOTE: Try combining this technique with strumming for fantastic/desirable results.
Trap Chord Tension
Trap-progressions are essentially all about/revolve around tension.
NOTE: Tension is anticipation that music creates/exudes (in a listener’s mind) for relaxation or release; helping your audience to intimately connect to your song.
Trap progressions generally consist of a ‘Triad’ with a flattened 5th (usually on the 2nd and/or 4th chord in the progression), along with an extra octave of the bass note added; this is very similar to ‘flattening the 7th‘ except, for this particular style, we are flattening the TOP note in our 3-note chord triad.
When played rhythmically, the chord change customarily occurs on the fourth stab; this change/alteration typically entails the same bass notes, and the top note is either brought up or down to the next/closest note in the scale (or you could flatten it by bringing it up or down a half-step).
For the last chord (at the end of the progression), it’s acceptable to change the chord completely.
For a more ‘epic’ feel, try adding an additional bass-note octave, but make sure to hold it down for the ENTIRE progression.
NOTE: The following methods can also be created with the ‘Reverse-Engineering’ chords (using any Major or Minor scales) so, if having difficulties deciphering these codes, refer back to that technique.
Pop Progressions
(Keep in mind, these codes are not at all related to the ‘Roman Numeral-system’ that are normally associated with chords, and the following numbers in these specific codes are referred to as ‘scale degrees’. More can be found on this topic at: https://unison.audio/theory-essentials/)
The most common, frequently used/heard pop chord is: 1-4-5-1.
1. Pick a scale to be considered your starting point/root note.
To create your chords, skip every other note in the scale; do that for every bar or two, depending on how long you want each individual chord in the progression.
2. Determine what your scale’s ‘4th’ is, and generate a chord from that.
3. Determine what your scale’s ‘5th’ is, and generate a chord from that as well.
4. To resolve the chord progression, venture back to the first chord.
From there, you can invert notes or implement any method you like, in order to spice it up and personalize it to your taste.
There you have it, you’ve just successfully constructed/originated a progression with virtually perfect resolution!
NOTE: Two alternative, extremely popular pop-chord progressions are: 1-5-6-4 and 1-5-4-5. Use the same steps (above) to determine your scale’s degrees, and create chords using the aforementioned methods, explained earlier in this article.
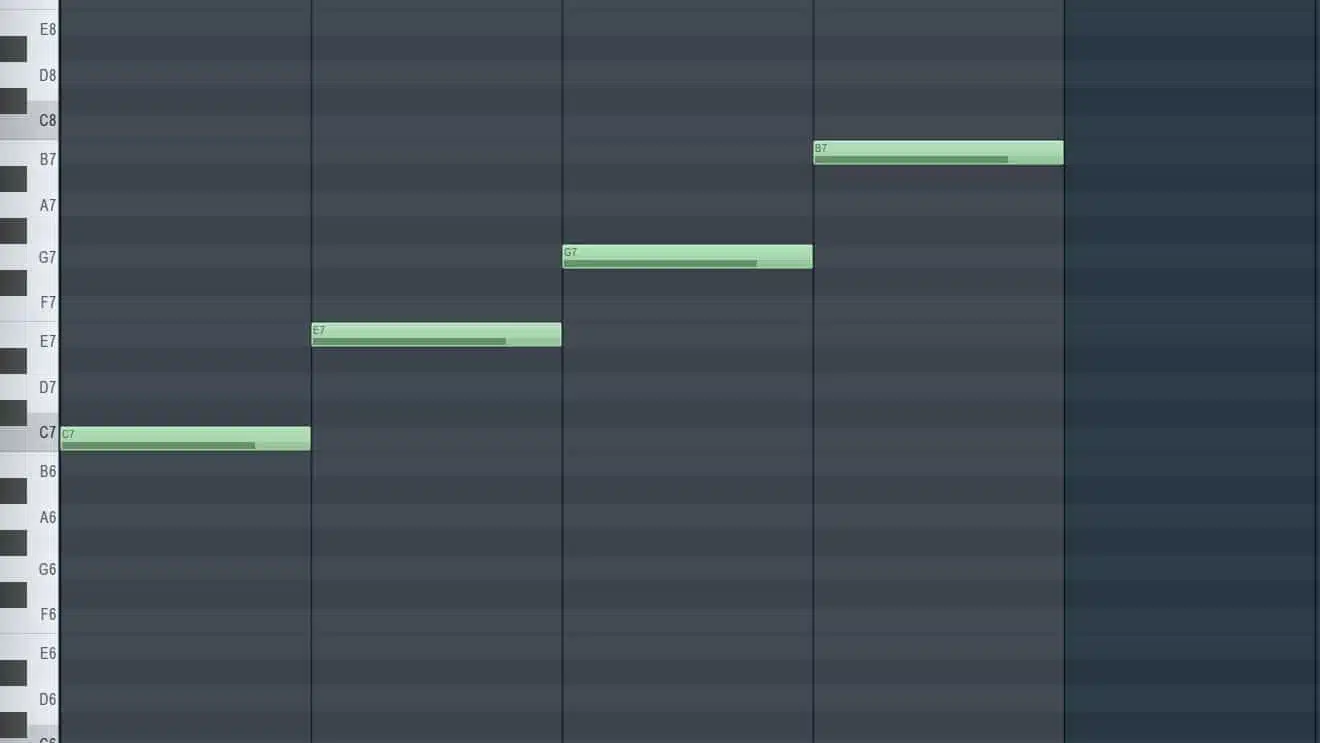
Guitar Arp Plucking
(An Arpeggio, or ‘Arp,’ describes the notes of a chord played in succession; either ascending or descending)
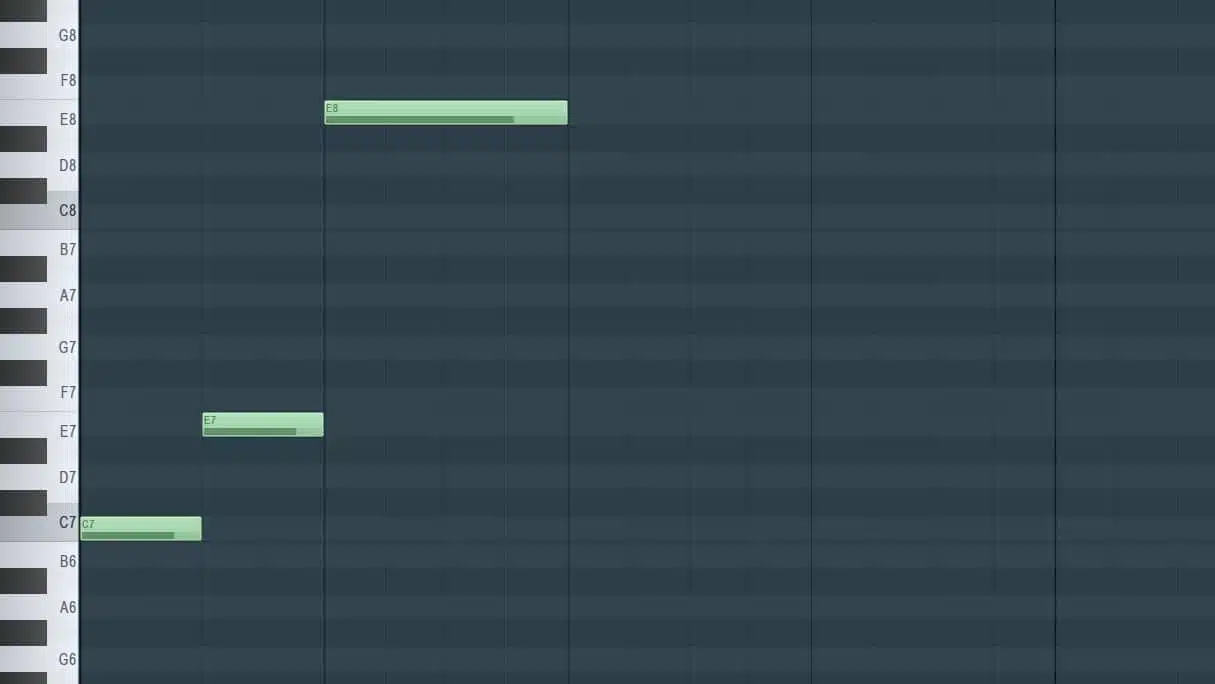
Pop-guitar formula: 1st note in scale, that scale’s 3rd and, finally, the 3rd played one octave higher:
1. Map out a scale, and pick a designated note.
2. Locate that note’s 3rd.
3. Play the previous note (the 3rd), one octave UP, like this:
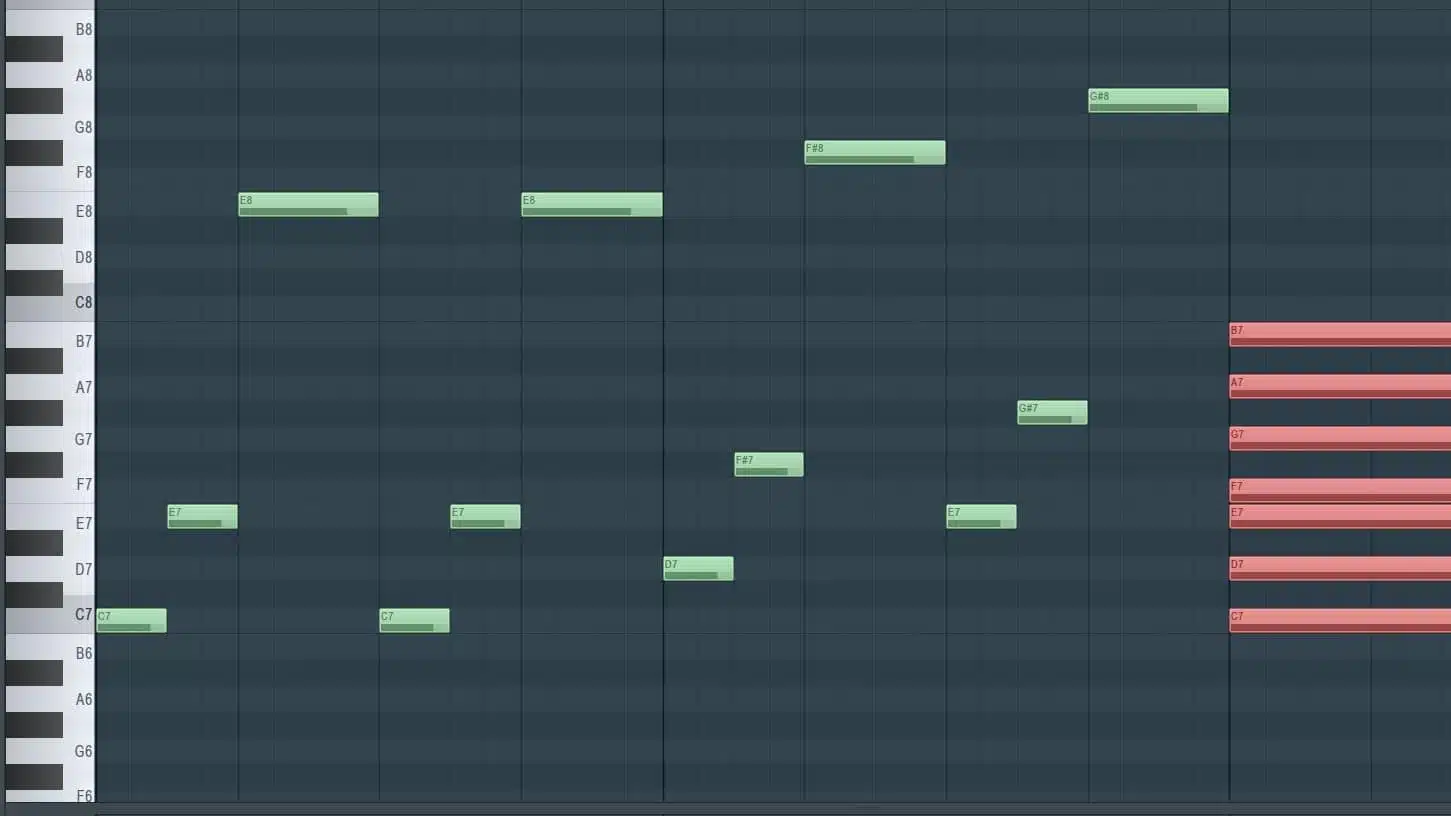
Here, the same process is done. Simply map out one sequence and you can copy the same information to any note in the scale:
Rock Songwriting/Power Chords On a Virtual Guitar Plugin
When playing chords on an electric guitar, you’re essentially playing ‘power chords,’ which are two separate notes: the chosen note (any note you pick to start at) and that note’s 5th (shown below):
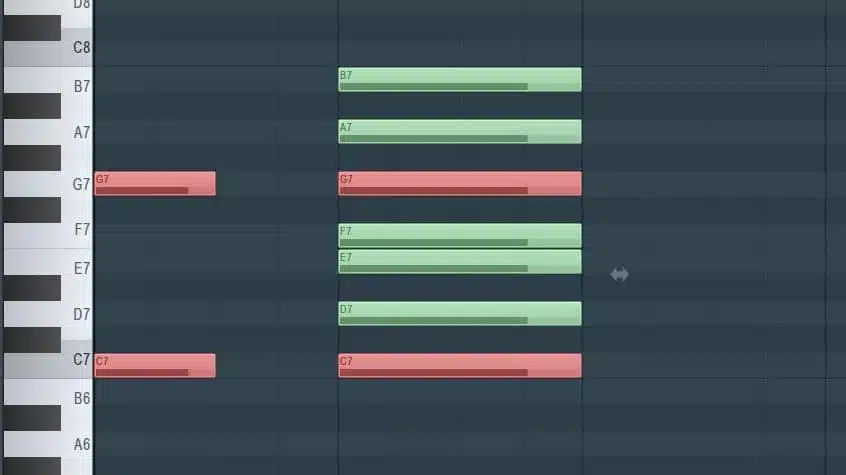
Seriously, it’s that simple.
One of the reasons why Guitars are notoriously bad virtual instruments, is because we fail to play them in the fashion they supposed to be played (we tend to play them more like a piano); try playing a chord-triad and omitting the middle note, you’ll find that your chords sound substantially more authentic.
10 BONUS TIPS TO HELP GET YOU INSPIRED
1. Read some inspiring quotes to get you fired up ( because inspiration is the best inspiration for inspiration, am I right?).
2. Write a list of exactly what you’re currently struggling with (or why you think you’re experiencing writer’s block in general); sometimes it helps to visually see these things to conquer them, or get ideas/inspired.
3. Take a 10 minute walk every hour-hour 1/2.
I know it sounds slightly lame or, worse even, a ‘waste’ of precious time… but taking a simple 10 minute walk every hour-hour 1/2 gives your brain (and ears) a well-deserved, much needed chance to rest and get rejuvenated; plus, the change of scenery can sometimes spark an idea or solve a problem. Physical movement has been shown to have an extremely positive effect on creative thinking, so don’t knock it ‘til you try it.
4. Eliminate all extra distractions.
Close all your other browsers, turn your phone off, go to a desolate location (because, let’s face it, wives and kids are great, but they can be extremely detrimental to your productivity when you’re already blocked/frustrated… don’t worry about offending anybody if that’s what you need on order to focus).
6. Break out of your comfort zone.
You can’t continuously have the same routine or implement the same techniques, and expect different results to just manifest (I think that’s basically the definition of insanity…); try new things, introduce new instruments, use a new DAW, try new methods, experiment with a new genre, etc.
7. Listen to your favorite music.
You always have the option to bask in the creativity of others… use it! Your favorite artist/producer has been appointed that title for a reason, so try listening to them for some encouragement and inspiration.
8. Acquire an alternative perspective.
Oftentimes, when stuck in a ‘blocked’ state, it’s exceedingly beneficial to ask another producer/friend what they think you’re unfinished track needs, or their opinion about why you’re stuck in the first place (in other words, tell them what you’re currently struggling with, and see if they have any suggestions or solutions); even if you don’t follow their advice, it might inadvertently spark a creative fire.
9. Get caffeinated!
As producers, you’re most likely drinking coffee all day (as am I), but if you’re not, try having a cup; within a few minutes you should start feeling that revered ‘buzz,’ that could undoubtedly help you forget about your block.
10. Do something that frightens you.
Adrenaline is always a great creative-motivator, so go do something that scares you or gets your blood pumping.
There you have it… a few of my personal favorite (and most effective) ways to successfully conquer writer’s block; I sincerely hope you acquired some techniques and methods to implement the next time you’re experiencing/suffering from this debilitating occurrence. Remember, writer’s block doesn’t have to be your downfall, you can easily beat it by simply getting creative and trying new, stimulating approaches.
Do you have any interesting, helpful, or unique strategies of getting through (or totally defeating) writer’s block? We would love to hear them… describe your personal tips, tricks, or methods below!
1 comment
Leave a Reply
You must belogged in to post a comment.


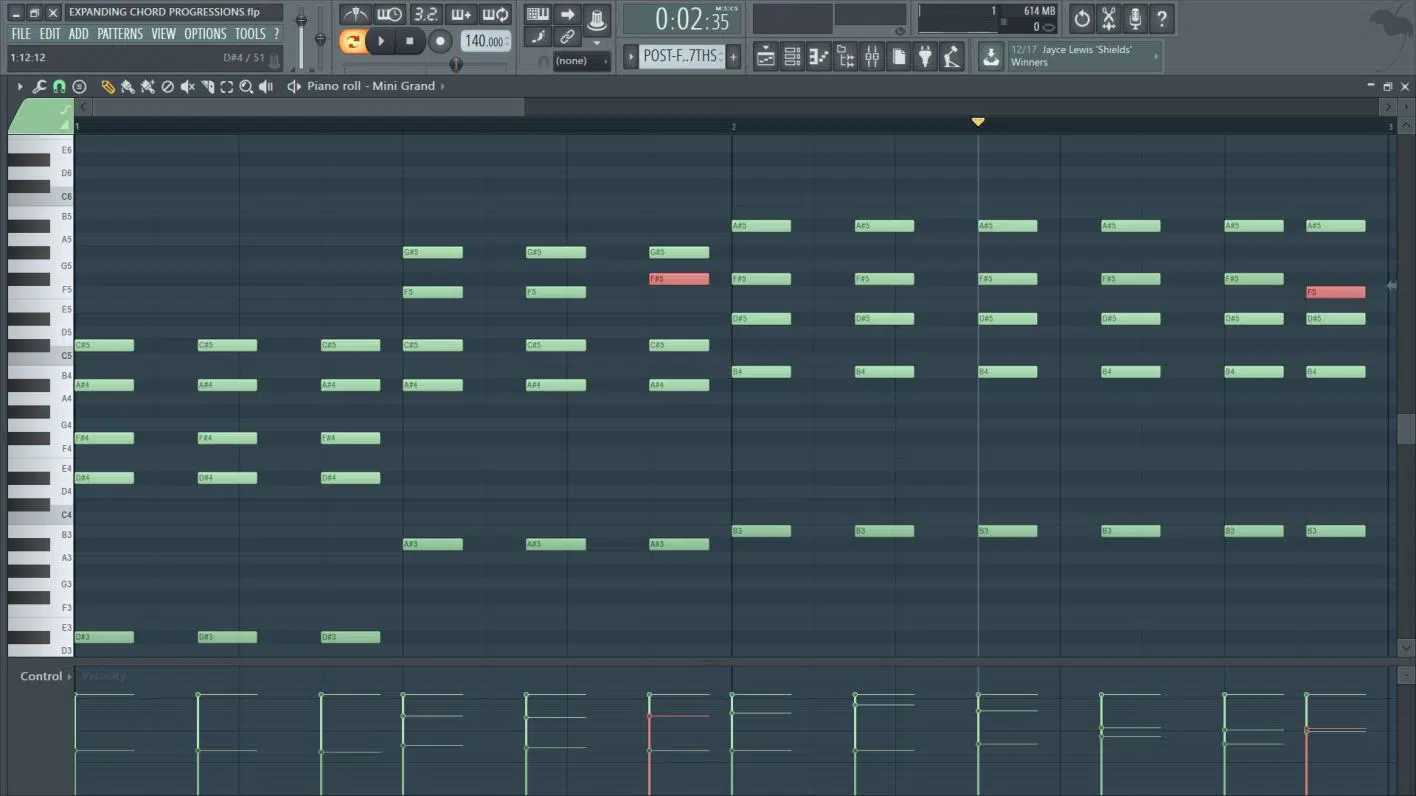


Thanks for great break down on the chords.