Way before the prodigious advent of modern DAWs, and all the technological strides we’ve made (specifically in regards to Samplers, Synthesizers, Effect Processors, and Digital Signal Processors), being considered ‘unique’ was customarily determined by your innate compositional skills, and the creative ways in which you utilized the basic tools that were found in a studio and dominated your genre.
Sure, there were isolated occasions when an inimitably rare instrument or processor was introduced into a chart-topping song, and ended up making history but, for the average producer, that seldom transpired.
Today, however, it’s an immensely different story, as we now have the advantageous benefit of living in the ‘digital’ era; not only having access to new (and vastly improved) sampled instruments, synths, processors, etc., but also having the ability to combine/merge these auspicious units as well, which produces significantly desirable and innovative sounds/effects.
Plus, once you’ve acquired a basic knowledge of these tools, you can even create your very own racks and configurations within your DAW, which ultimately provides you with endless ways in which to manipulate/take advantage of any standard generator or processing tool. So, considering all of these advancements, naturally the potential to be ‘unique,’ or to ‘stand out,’ is at an all-time high, and the opportunities are growing at an exponential rate.
With that said, this exceedingly over-saturated music domain is so competitive/repetitive for one main reason (respectively): A vast majority of modern producers never channel their own creativity, instead, they insist on being carbon-copies of the musical geniuses who came before them, by emulating the same exact (prohibitively unoriginal) formulas that have been exploited countless times; in my opinion, with all the profitable tools we have available at our immediate disposal, there is absolutely no reason/excuse for this to be happening as frequently anymore.
I used to wholeheartedly believe that talent or ‘uniqueness’ was solely contingent upon the specific individual at hand, and you either had it, or didn’t… since this is clearly no longer the case, initially finding your distinct/defining sound can be as rudimentary as deciding which particular direction you wish to take your music, and simply building off that.
Even if you’ve been at it for 10+ years, that doesn’t necessarily mean you’ve successfully established your ‘defining’ sound (one that noticeably differentiates you from other like-producers); personally, I didn’t feel like I truly found myself as a producer until I ventured into the sound design realm and acquired FULL creative control over the sounds of which my songs are comprised.
As I previously stated, being unique or distinctive use to rely heavily on your compositional skills; meaning, your understanding of Theory had to be at the maximum capacity. Today’s requirements, however, are significantly/appreciably diverse.
Whereas learning Theory and generating original/stimulating progressions, melodies, and song structures will forever remain beneficial (for numerous reasons), ‘uniqueness’ today is more associated with/determined by creative processes, invigorating effects, and innovative sound-design techniques (of which, we can apply to existing compositions/arrangements).
While getting creative, thinking outside of the box, and implementing new, enthralling techniques or effects can undoubtedly enhance your song’s overall presentation/quality, venturing TOO far outside of your area of expertise (in other words, what you’re predominantly used to) can be extremely risky, as you may not end up producing the intended results you’re aiming for; this is why I profoundly suggest that you primarily stick to what you’re familiar/comfortable with, and focus on what you can effectuate AFTER the sequencing is complete.
For example, ‘drops’ are indisputably vital to the general integrity of an electronic song, and swapping them out for a different type of ‘breakdown’ can inevitably lead to major disappointments or a sense of emptiness, but creating and implementing your very own style to the drop can certainly deem you unique without compromising the foundation of the song.
Taking a particularly boring or insipid melody and turning it into a masterpiece is fairly simple, when the proper sound design tricks are applied, so the next time you feel like your track is exceedingly lackluster and simply cannot be salvaged…you should seriously reconsider; try implementing some of the following techniques instead, as they can completely save/revive your track, and transform it into a reformed treasure.
Today I’ll be discussing various, extremely helpful/beneficial post-production processes, and how to uniquely implement them to make your songs stand out (in other words, not well-known, or commonly used variations).
So, without further ado, let’s get started…
Table of Contents
- COMPOSITION
- CREATE A MELODY WITH AN ETHNIC SCALE
- EXPERIMENT WITH DIVERGENT TIME-SIGNATURES
- 440Hz VS 432Hz
- SOUND SELECTION
- USE UNKNOWN/UNPOPULAR PLUGINS
- CUSTOMIZING YOUR SYNTH’S
- EXPERIMENT WITH THE LFO’S
- EXPERIMENT WITH DIVERSE FILTER-TYPES
- POST-PROCESSING AND RE-SAMPLING SYNTHS
- RE-SAMPLING IN SERUM
- 1. Draw out a MIDI for every 2-3 notes, each being spaced about a half bar-bar apart from each other; do so for two whole octaves. This gives us more material to work with/chop up and, the closer we position each note from one another, the less we will have to transpose the pitch to each key later.
- 2. Add engrossing, stimulating ‘warping’ Envelopes, modulation, and automation in order to ‘bend’ the track in any way that you can/see fit.
- 3. Add filters, EQs, and distortion (we could even turn it into a drop or riser, if so desired by transposing/modulating the pitch up).
- 4. Chop up multiple versions of the warped sample (have them glitch, repeat, and talk to each other); this is essentially how your favorite producers take their synth(s) to new/exciting levels during the drop.
- LAYERING/STACKING SYNTHS
- STACKING YOUR DRUMS
- USING FOLEY SAMPLES TO ADD A UNIQUE FLAVOR TO YOUR DRUMS
- LAYERING PERCUSSION WITH FOLEY
- AUTOMATION
- PITCH-SHIFTING DELAY
- 1. Route your desired track to a designated delay send/aux return and throw a pitch plugin (of your choice) AFTER the delay.
- 2. Set your ‘delay rate’ to be something that has enough space, not only for the modulation to be heard, but also ‘synced,’ so it sounds musical (like an extension of the melody).
- 3. Automate the pitch (or formant) during the delay ‘tail’, having the pitch change for every cycle of the delays feedback. We can have it going up in pitch, down or both!
- RING- MODULATING YOUR REVERB IN ABLETON’S RACK, WITH AUTO-PAN
- REVERSE-REVERB WITH FOLEY SAMPLES
- 1. Grab the track that you wish to utilize this effect with.
- 2. Load the track into your DAW with absolutely NO effects.
- 3. Alter the settings on the reverb to have a substantially long decay time, and a big size.
- 4. Bounce the reverb send.
- 5. Reserve the reverb track you’ve bounced; it should be considerably long.
- 6. Take it one step further and automate the pitch up or down to create a lead into your drop or even create a riser from the results.
- 7. Automating the volume during the reverse reverb’s climax, or having it go down to 0 (muting it) momentarily can add a very hollywood/horror-movie style effect (frequently found in upcoming trailers/previews).
- 8. Now that we have ‘up-sweeps,’ we can take these same reversed samples, reverse them again and, finally, bounce them… and we now magically have impacts!
- 9. We can then take it one step further by using the various ‘warping’ modes to morph it into something bigger, longer and amazingly different!
- UTILIZING WHITE NOISE, AND AUTOMATING EQ
- 1. Open up your desired synth, of which you’re able to successfully play white noise WITHOUT any additional tones/oscillators, and have it play 4 choice notes over a 4-bar period (each being 1 bar in length).
- 2. Open your designated EQ, and load up a band-pass filter.
- 3. Play around with the band; place it in diverse/conflicting areas of the spectrum, incorporating ‘resonant peaks’ in the process. By now, you should start being able to hear the potential that’s manifesting.
- 4. Make your ‘Q’ exceedingly narrow and, over an extended period of time, steadily sweep from left to right; when getting closer to the right side, start opening up the Q-size slowly. Now, proceed to automate the volume during the assigned period of time, and you now have the basis of your VERY OWN, homemade riser! (essentially painless, right?).
- 5. Rhythmically automate the volume (like a gate), and feel free to go wild.
- 6. Start experimenting with ‘brown’ and ‘pink’ noise, as it’s overall effect will be somewhat similar as white noise, just a tad different, so take the time to get acquainted with them.
COMPOSITION
Although I said I wasn’t going to intricately discuss the subject of ‘composition’ (which I’m not), I find it important to at least mention it for all the Theory gurus out there.
If you’ happen to be an avid learner of traditional Theory, then utilizing alternative scales (other than the Major and Minor scales), tunings, and time signatures can substantially improve/enhance your track’s distinctiveness.
As we have analyzed in previous lessons/articles, almost every single modern-day song on the radio was created with either the Major or Minor scale as it’s foundation; so, naturally, taking advantage of the not-so frequently utilized scales can provide you with a propitious leg up on the competition.
For example, creating an interlude or bridge in an alternative scale such as ‘Arabic,’ not only indicates that there will be some unique, ethnic-sounding elements/characteristics within that particular track, but can immediately peak your listener’s interest as well, as it’s not everyday (or even that often) that they encounter new and exciting scale variations.
NOTE: Whereas experimenting with alternative scales to add that extra, defining factor is certainly encouraged, make sure it’s not so unconventional/unorthodox, to the point where it starts sounding fatuous or vapid, because that can (and assuredly will) drive your listeners away.
There are numerous (seemingly endless) scales, most of which truthfully have no place in modern-western music, but spicing up a designated section by utilizing one of these ‘discordant’ scales has the auspicious potential to blow a few minds.
I guarantee that you’ll be genuinely surprised by how much something as diminutive as a simple scale-change can completely alter/revamp the entire feel of a song.
CREATE A MELODY WITH AN ETHNIC SCALE
One thing I absolutely love to do is to create a melody with an ethnic scale, then ‘sampling’ it into a song (utilizing either the Major or Minor scale).
If you are already expertly versed in the art of building songs from scales, I suggest you map out a desired scale, and begin experimenting with various melodies.
NOTE: If you’re not so well-versed, or need a quick refresher course on the proper way(s) in which to successfully accomplish this, I discuss (in-depth) how to do so in my previous ‘Theory’ article, found here: https://unison.audio/theory-essentials/; I highly encourage you to check it out prior to trying this method if you feel like you’re not comfortable/familiar with, or masterfully knowledgeable in, this particular subject.
Although generating an entire song from an ethnic scale might not necessarily coincide with your creative vision, generating a melody in one of these disparate scales, and then sampling it, can add an inimitable/superlative flavor that, otherwise, would have never be achieved (if you hadn’t implemented this unique technique).
When you bounce, and then sample, the melody into a song using a Major/Minor scale, you’re essentially staying (somewhat) traditional whilst, simultaneously, procuring an ‘ethnic’ vibe, that could ultimately become the foundation of your entire song.
NOTE: Be sure to compose the rest/remainder of your song in a scale that is sufficiently/ideally compatible with the scale of which you created your melody or are sampling from. Keep in mind that a few ‘off’ notes (referred to as ‘color tones’) are perfectly fine, as it can surely add a unique vibe to your track (if executed properly, of course).
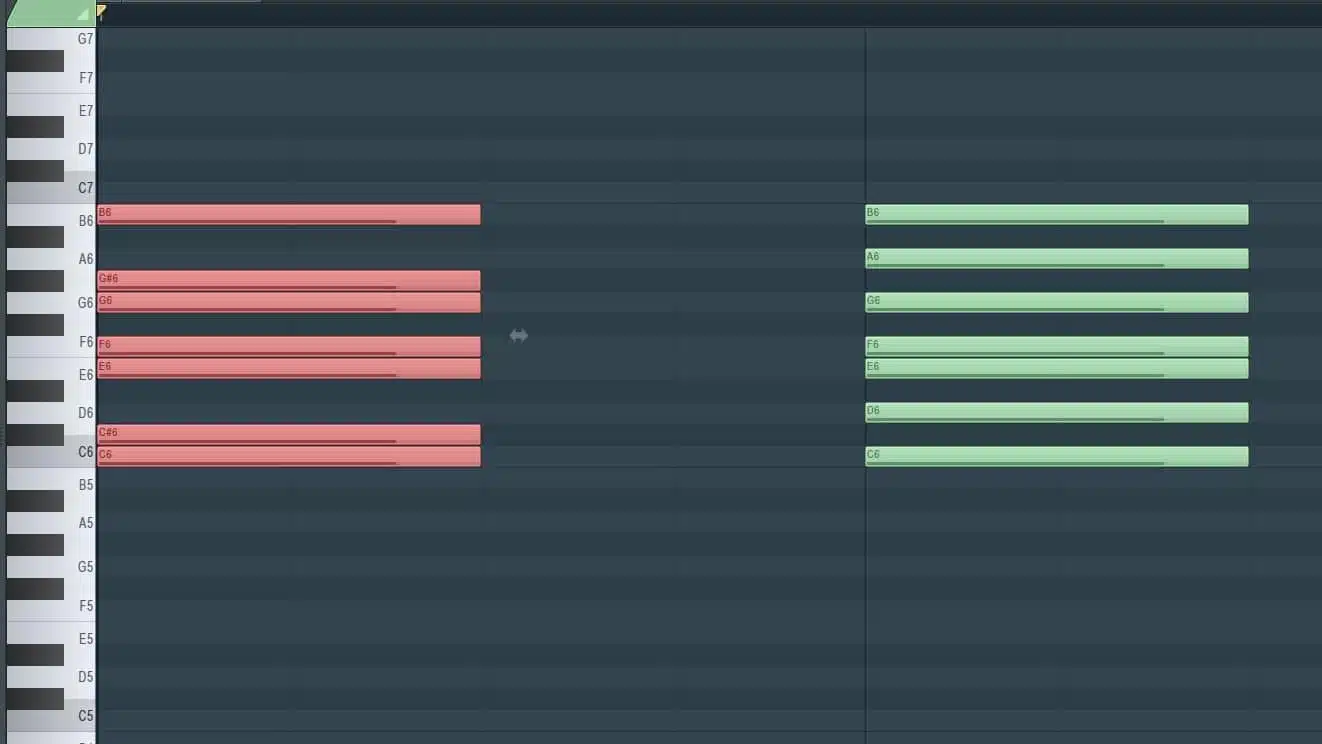
On the left: the Arabic scale.
On the right: the Major scale.
Notice that, other than 2 isolated notes, they are all compatible, and note that these 2 extra/incompatible notes are what imparts that ‘ethnic’ (Arabic) feel to your track, so be sure to include those as well (respectively).
EXPERIMENT WITH DIVERGENT TIME-SIGNATURES
The ‘time signature’ of a song is generally expressed as a fraction: the denominator defining the beat (as a division of a whole note), and the numerator determining the number of beats per bar.
Although this particular subject may emanate an intimidating or formidable vibe at first, many DAWs offer the convenient option to change/alter Time Signatures throughout the entire track (at designated, desired intervals), and can add an exceptionally enticing flavor to your track that your listeners are sure to respond positively to (if executed properly, of course).
Start basic: try composing your verses in 4/4, and switch to 3/4 for the hook.
NOTE: Initially, I found that an exceedingly simple, yet supremely effective way to get familiarized with this subject is to turn on your ‘Metronome,’ start listening to it’s beats (in conjunction with the correlating time-information), and determine how many bars/beats have actually been counted; this way, you’ll get extremely accustomed to the proper way in which to implement/execute Time Signatures relevantly painlessly.
Once you’re sufficiently/satisfactorily familiar with how Time Signatures function, try making a track with them; from there, it’s only a (short) matter of time until you’re able to successfully infuse it into a song for an unexpected, unique, and desirable switch-up.
440Hz VS 432Hz
Although a vast majority of modern songs are created in 440Hz, some distinct songs are still created in 432Hz. Tesla initially divulged it, Einstein emphatically agreed, and science inevitably proved it true: everything (including our own bodies) are comprised of energy that is vibrating at discrete frequencies.
That being said, it seems only fair/natural to ponder whether or not frequencies directly affect us, am i right? Well, it would appear that this is unequivocally true and, whereas some people would contend that alternate-tunings is a conspiracy in itself, I candidly and wholeheartedly disagree.
Realistically, when music first got introduced, it’s prolific teachings/the people practicing it were spread across multitudinous contents/provinces and, substantially due to the 10-year boat rides across the Atlantic (plus variations in instrument types/materials and the language barrier itself), a few hertz manifestly got lost in translation; but the argument still remains whether or not this diminutive change makes an actual difference.
Well, let’s further examine this… when the energy is traveled through a medium (such as water or sand), each individual frequency responds slightly dissimilar/variant, and the exiguous changes can be detected by the subconscious-mind so, in my humble opinion, it can certainly make a difference.
Some people prefer songs that are tuned in 432Hz, in opposed to 440Hz, without even being fully aware of the reason why (I personally believe it’s plainly because we hear it less), so I suggest you at least attempt composing in 432Hz, if nothing else, to ascertain a definitive answer to this question for yourself.
Now, I’m sure your next question will be, how is this properly executed? Well, in actuality, it can be achieved in a number of ways, but here are the 2 most common:
1. Go into the ‘Advanced Tuning’ section of your DAW, and change ALL your synthesizers and samplers from 440Hz to 432Hz BEFORE you start your session..
NOTE: Certain devices may not offer this option so, if not, your best bet would be to open up a ‘tuning’ plugin (such as Ableton’s Tuner), set it’s ‘reference pitch’ to 432Hz, and manually tune your devices by utilizing it’s ‘Fine Tuning’ or ‘Cents Offset’ (typically by -32 CENTS).
This is the quintessential method to use if you know beforehand that you want your song to be in 432Hz from the start.
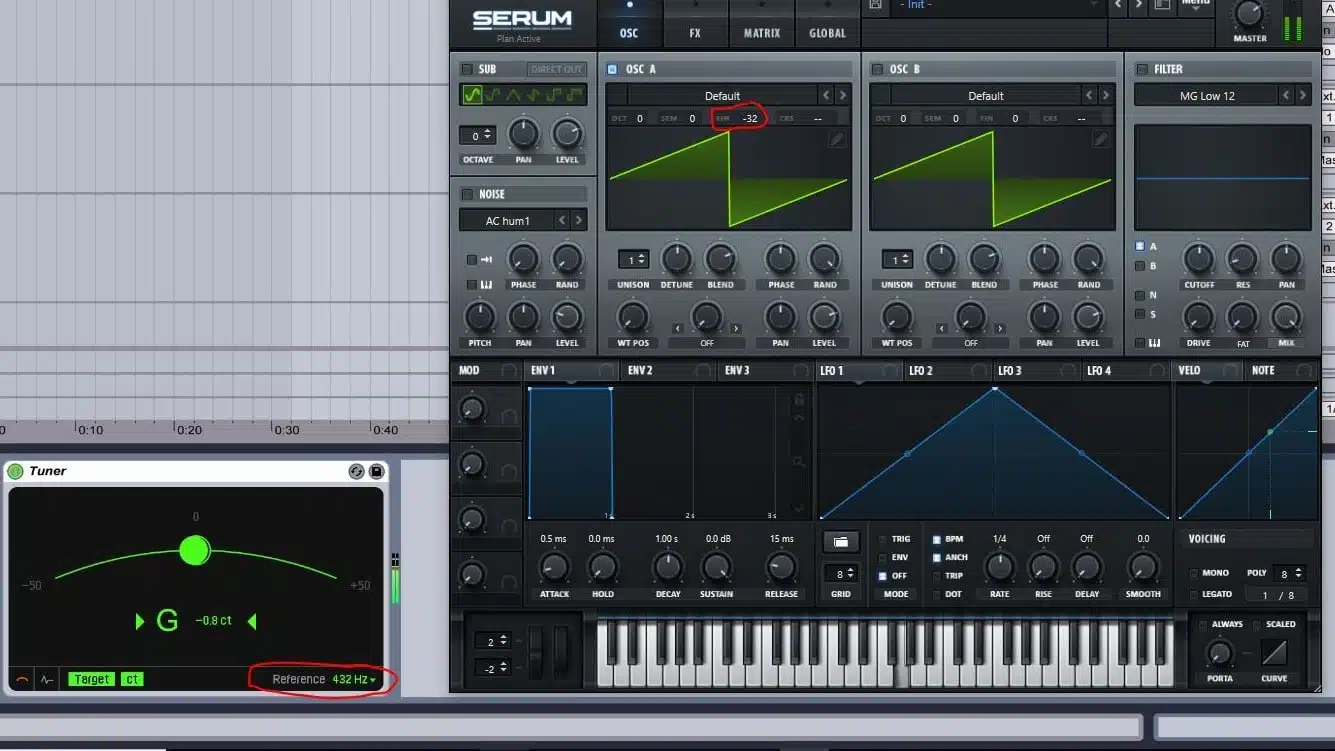
2. Complete your entire track, bounce it, and ‘offset’ it’s tuning from 440Hz to 432Hz.
Again, you always have the option of setting/altering the master project’s (or file’s) pitch to -32 CENTS, but I prefer to use a program like Audacity (or the like) because I deem the overall results supreme and exceedingly more ‘natural’; even though it’s essentially accomplishing/generating the same outcome, it’s slightly more felicitous for the task at hand.
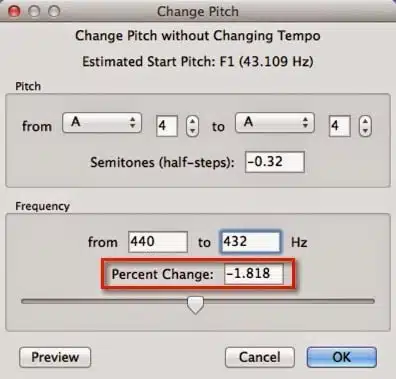
Audacity
NOTE: I have been told that an upcoming update of Live 10 will offer a ‘master-tuning’ section that will allow/enable you to change the master pitch as a whole.
So, in the grand scheme of things, the ‘minuscule’ dissimilarity can make a substantial difference (and lasting impression) so, keep that in mind as a viable option, as it just could provide the unique factor you’re desperately searching for.
SOUND SELECTION
Sound selection is essentially the variable that could either enable your song to stand out, or provoke it to drown in the abysmal mediocrity that’s currently flooding Soundcloud’s servers (this being the exact reason why I previously stated that sound design ultimately led me to finding/defining myself as a producer).
NOTE: If you’re not exactly cultivated in the subject of Sound Design, don’t panic, as sound design is not an obligatory requirement for good sound selection.
The key to truly conquering this particular section of the production process (in my opinion) is not to allow it to interfere with the song’s creative construction/properties. I tend to create the composition with preferred presets (so I have a reference point), then go back in and perform an entire workup; changing and perfecting each individual element within the track.
We must begin to, not only think outside the box, but also start utilizing tools, presets, samples, and devices that DO NOT come stocked within the DAWs/plugins we currently own or habitually use; don’t misconstrue my sentiments… there’s absolutely nothing wrong with the stocked-sounds that we are used to or intimately know, it’s just that, by solely using them, you’re ultimately limiting your creative genius and running the risk of sounding similar to other producers (since they’re utilizing the same exact stocked presets as you are).
An intricate part of the sound-selection process is not only finding extraordinary sounds that suitably fit within your track, but finding rarely used, unaccustomed sounds that can add a sense of novelty, originality, and uniqueness; what was once considered an astounding lead two years ago, might be completely depleted/exhausted as of today, so it’s crucial that you find new sounds in order to stay ahead of the curve.
USE UNKNOWN/UNPOPULAR PLUGINS
Never underestimate an unknown/unpopular sample library, plugin, or sound pack solely because you’ve never heard of it before, that may just mean they don’t possess the huge ‘promo’ budget that the ‘big wigs’ have. Numerous people that I associate with aren’t even willing to demo my favorite new synth or sample library, for the simple (incredibly ignorant) fact that they’ve never heard of it, or don’t know anybody else who uses it… it’s insane!
Too many producers are fixated on the same old, extremely overused libraries and instruments, so your audience will undoubtedly react appreciably (not to mentioned exceedingly intrigued) when they hear you using new, refreshing sounds; find your secret weapon (synth or sampler), learn it backwards and forwards, and blow people’s minds with your exciting, innovative choices.
NOTE: Don’t buy expansions directly from the developer that created the synth, as those are the ones everyone is using and, normally, if a preset is unbelievably cheap, the product usually is too (so invest wisely). Since most of us don’t have the innate luxury of buying the newest, most expensive premium-presets every few months (once you felt like you’ve used the old one to it’s maximum capacity), so make sure to emphatically personalize the ones you do invest in; tweak those presets to your heart’s content, put your own spin/touches on them, and make them your very own.
Personally, I was a diehard fan of Unison’s presets way before I wrote for this site… it’s actually what landed me the job in the first place. Many of the presets contained within The Unison Unique Collection For Serum are not only exceptionally original/unique, but they also leave ample room for you to experiment and cater to your personal taste.
Start viewing these presets as templates to expand upon, in order to customize your track and generate truly authentic, superbly unconventional sounds/effects (e.g., by turning leads into pads, pads into effects, effects into drums, etc.).
Here are a few creative techniques/tips to implement in order to make presets, within Serum, entirely/unequivocally yours:
KEEP IN MIND: The better your initial ‘patch,’ the better your results will assuredly be.
CUSTOMIZING YOUR SYNTH’S
SWAPPING/SWITCHING OUT WAVETABLES
Like any/every other Wavetable Synth, our current patch relies heavily on 4 primary, predominant factors:
1. The Wavetable (our OSCILLATOR).
2. The Modulation (Envelopes and LFO’s).
3. Filter(s).
4. Effects.
Wavetables are wholly responsible for the ‘timbre’ (tone color/quality) of our sound and, if you’ve ever used a ‘subtractive’ synth before, you’re certainly aware of the fact that, by simply manipulating the ‘wave shape,’ you’re able to effortlessly generate vastly divergent, original, groundbreaking results.
NOTE: Every frame in the wavetable is essentially the ‘wave shape’ that the oscillator is producing and, by manipulating these frames in real time, we can successfully achieve advanced/evolved results that are solely produced by a wavetable synthesizer.
The truly astonishing (and consequently, inspiring) part about Wavetable Synths is, when utilizing/experimenting with them, they offer a virtually endless amount of ‘waves’ to base our OSC/Waveform off of; try taking your favorite preexisting preset(s) and methodically swapping out the Wavetables, you’re bound to be pleasantly surprised by how much of a difference it can make.
Take it one step further, if desired, and create your very own wavetables, from scratch, within Serum’s Wavetable Editor (or by sampling audio).
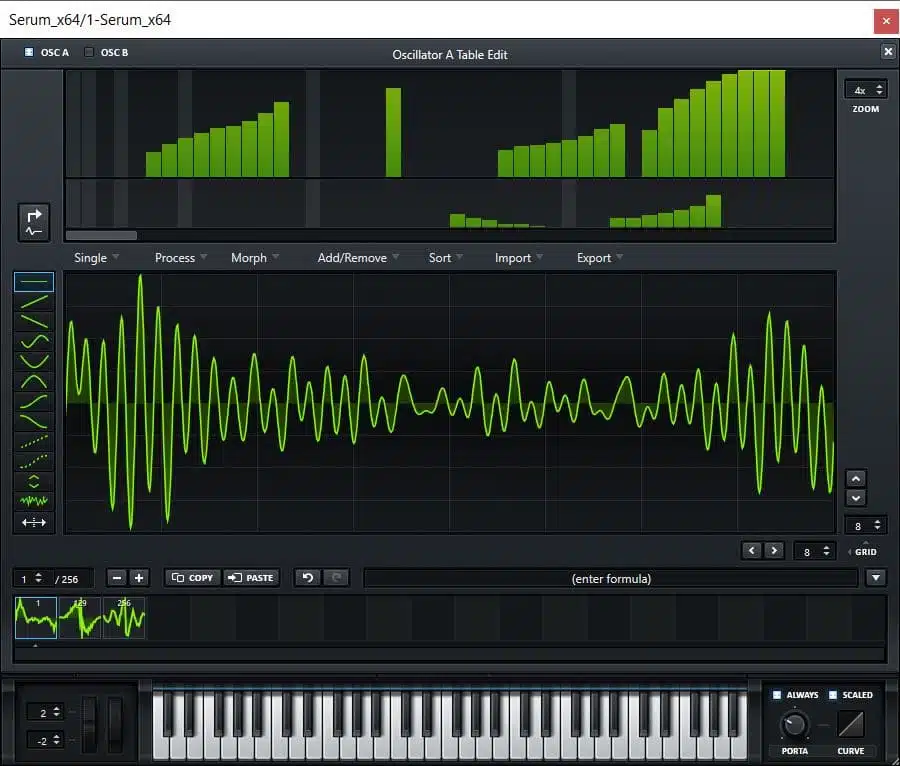
Serum’s Wavetable Editor
EXPERIMENT WITH THE LFO’S
(LFO stands for low-frequency oscillation, and is an electronic signal (so low that we can not hear it, typically below 20Hz,) which creates a rhythmic ‘pulse,’ or sweep, oftentimes used to modulate synthesizers and delay ‘lines’ (and additional audio equipment) in order to produce desirable effects/results).
When you experiment with LFO’s, it can lead to phenomenal, rhythmic results that, when executed correctly, will discernibly exude an aesthetically pleasing feel/vibe; you can modulate the OSC-level, Filter Cutoff, and the pitch.
Below, I’ve created an ‘Arp,’ using one of our LFO’s, and sent it to the ‘pitch’ (in order to control semitone values based on the grid and the corresponding position); too many foolishly assume/think that Serum has absolutely no arp, and that’s clearly not the case. It’s a hidden gem that is pretty easy to use once you get a feel for it.
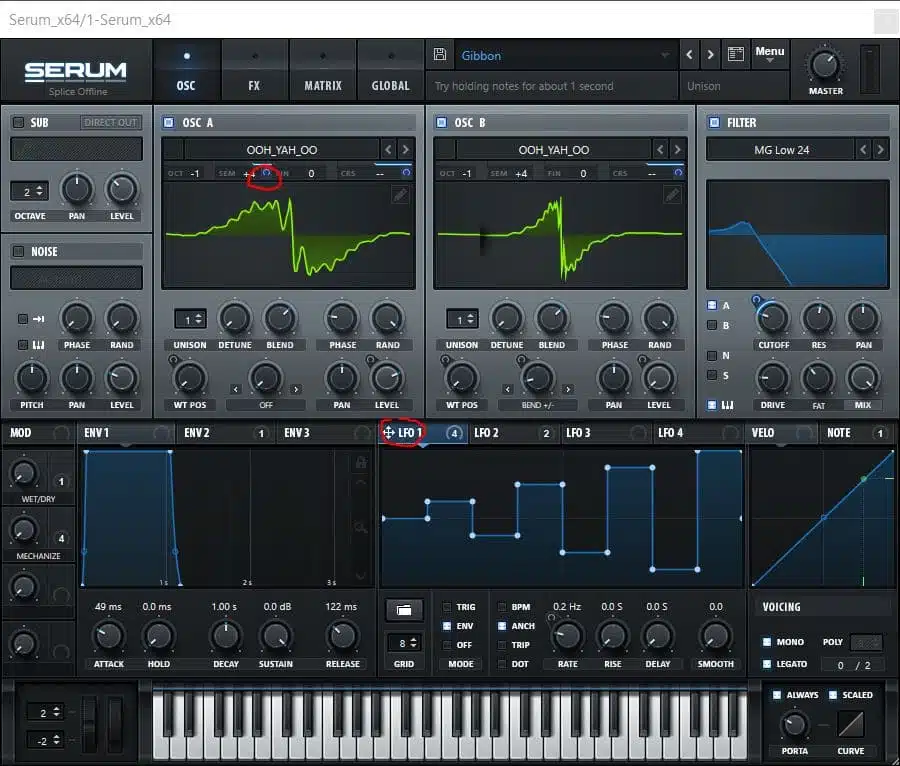
Simply Modulate the semitone valued by +12 along with changing your grid size to 12. Now Every box within the grid represents 1 semitone vertically with time being represented horizontally.
EXPERIMENT WITH DIVERSE FILTER-TYPES
When you experiment with diverse filter-types (which Serum is stocked full of), it can vastly broaden the scope of your sound, and can achieve results that aren’t possible by simply modulating oscillators alone.
One of Serum’s supreme strengths is it’s ‘filter’ section; we actually possess two separate filters, and the one in the ‘FX’ section is just as capable as Serum’s main filter, as it contains virtually the same parameters and filter-types.
TIP: Place your filter first in the FX chain (shown below) to procure some serious dual-filter action, or place it last to tame the frequencies produced by the FX rack itself.
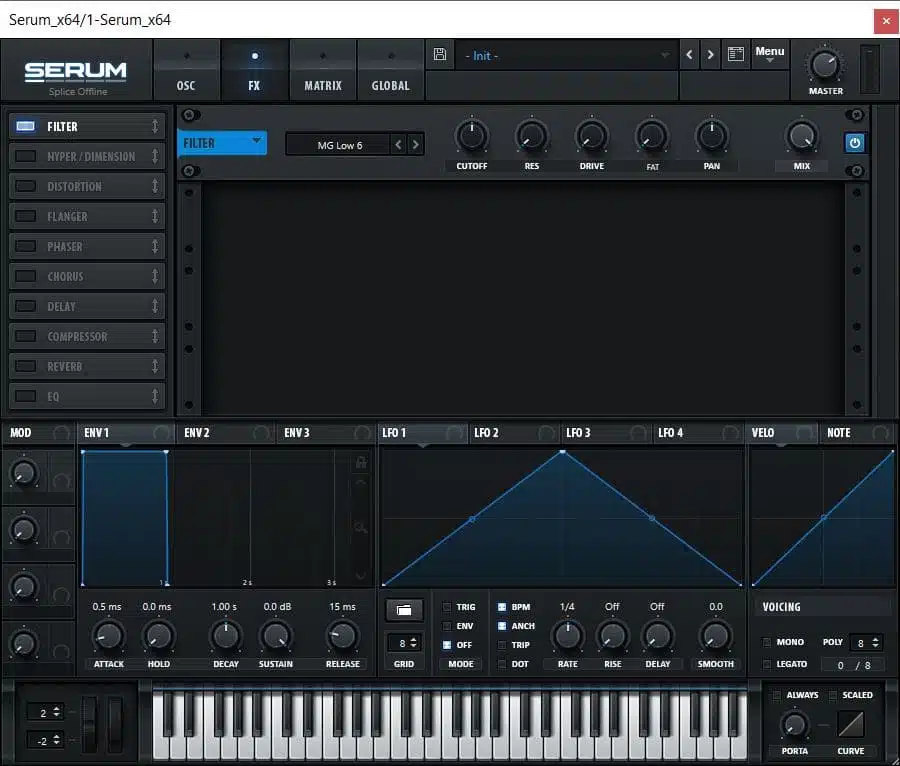
Turn your pluck into a string with the reverb filter and your super saw into a chor with the formant filter. Blend the 2 using both of serums on board filters for some crazy unique results.
POST-PROCESSING AND RE-SAMPLING SYNTHS
Post-processing is, plainly, any effect or Processor that is placed AFTER your synth/sample and, by implementing your own (as opposed to heavily relying on Serum FX), you possess significantly more freedom and control in which to freely express your creative talent/capabilities.
TIP: To make your life significantly easier, pick your favorite/preferred ‘high quality’ effect-processor for every individual effect-type, and get intimately familiarized with each one (which makes an enormous difference in the overall quality of your tracks); then you can begin to experiment with and incorporate alternative devices, which all possess their very own, distinctive properties/subtleties that can enable aberrant (yet, extremely captivating/alluring) sounds and effects.
Now, let’s take it one step further… for those of you who are particularly passionate about sound design (and all it’s encompassing qualities) are aware that, when creating a monster-growl or a sick lead/bass, we’re (traditionally) limited to only 1 or 2 like-LFO/Envelope in which to modulate it.
When in that certain situation, simply take that modulation pattern and, utilizing that same exact pattern, create an automation clip. Then, modulate parameters on external processors as ‘automation,’ and you’ll surely find the results to be EPIC.
Try implementing this technique to a few of your reverb’s numerous parameters (of which you added POST-production), and you’ll soon discover some strikingly mind-blowing results.
RE-SAMPLING IN SERUM
By re-sampling, you’re able to lucratively stretch, chop, and overall process/manipulate your track in a completely diverse/profitable fashion.
NOTE: Re-sampling can be prosperously achieved/accomplished by utilizing Ableton’s vastly convenient, extremely resourceful ‘Re-sample’ mode, or simply by bouncing the desired MIDI data to an ‘audio file’ so we can dive into the possibilities of Ableton’s many ‘Warp Modes’.
1. Draw out a MIDI for every 2-3 notes, each being spaced about a half bar-bar apart from each other; do so for two whole octaves. This gives us more material to work with/chop up and, the closer we position each note from one another, the less we will have to transpose the pitch to each key later.
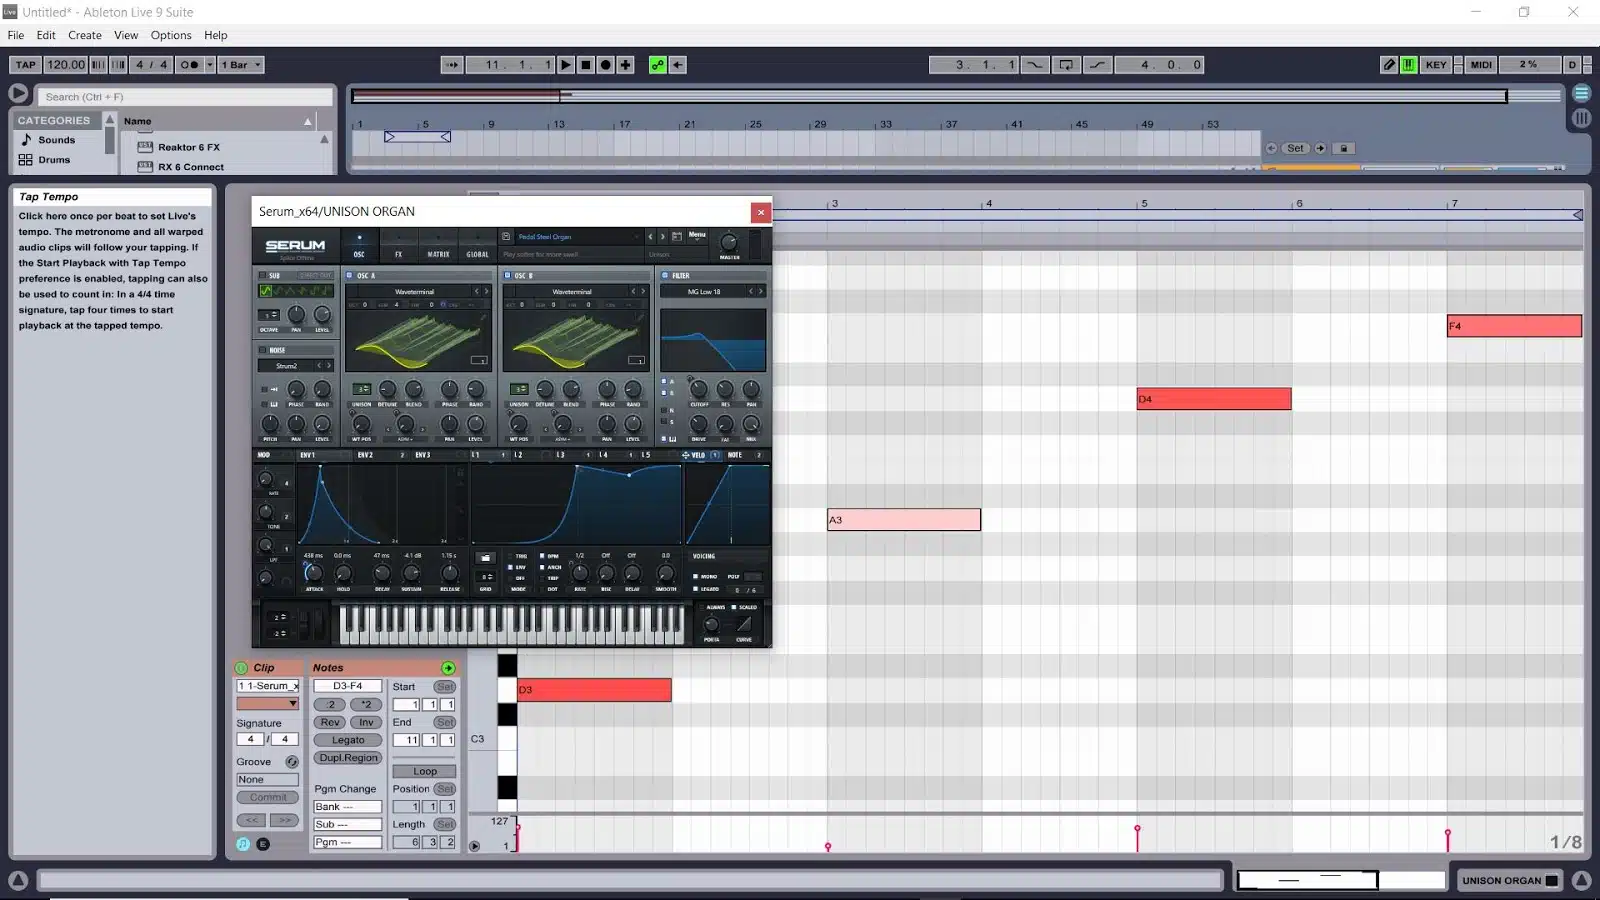
NOTE: Once the track has been successfully bounced, try playing around/getting intimately acclimated with the diverse stretch/warp modes found within Ableton and, by using the ‘Complex Pro’ algorithm, you can proficiently alter and manipulate it’s formants.
2. Add engrossing, stimulating ‘warping’ Envelopes, modulation, and automation in order to ‘bend’ the track in any way that you can/see fit.
You can take it to the extreme by stretching one of the samples to the absolute limit, throwing on some reverb, bouncing that specific clip, reversing it and then stretching it out AGAIN; making it even longer/bigger than before.
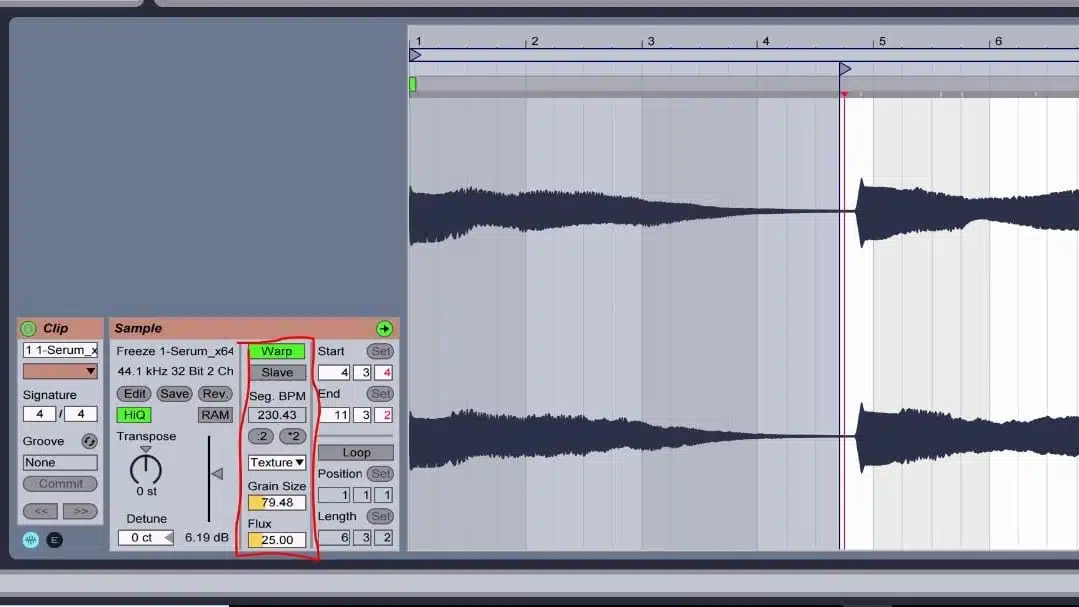
3. Add filters, EQs, and distortion (we could even turn it into a drop or riser, if so desired by transposing/modulating the pitch up).
NOTE: Aside from ‘Complex Pro,’ the additional algorithms have much to offer as well (especially when attempting to make your sound virtually unrecognizable, yet still hoping to retain the same/preferred tone); you can also make it seemingly appear as if your sound was processed with a Granular Synth in ‘grain mode,’ if carried out correctly..
The fun only begins with the initial pitch/time ‘warp’ setup and the multitudinous amount of things you can do with the Envelopes that reside within each individual warp-mode, is genuinely inconceivable (in the very best of ways).
These Envelopes are fundamentally ‘key,’ in regards to procuring the absolute supreme results from ‘warping’ so, if you haven’t previously explored the Envelopes and many parameters they can be assigned to, I highly encourage you to do so ASAP; it not only broadens your horizons and enhances your skill levels, but contributes to your overall growth as a musician/producer as well. I like working with the ‘Transpose’ Envelope most, as I can always seem to create effects of all kinds, even from the most basic of Serum’s stock-sounds..
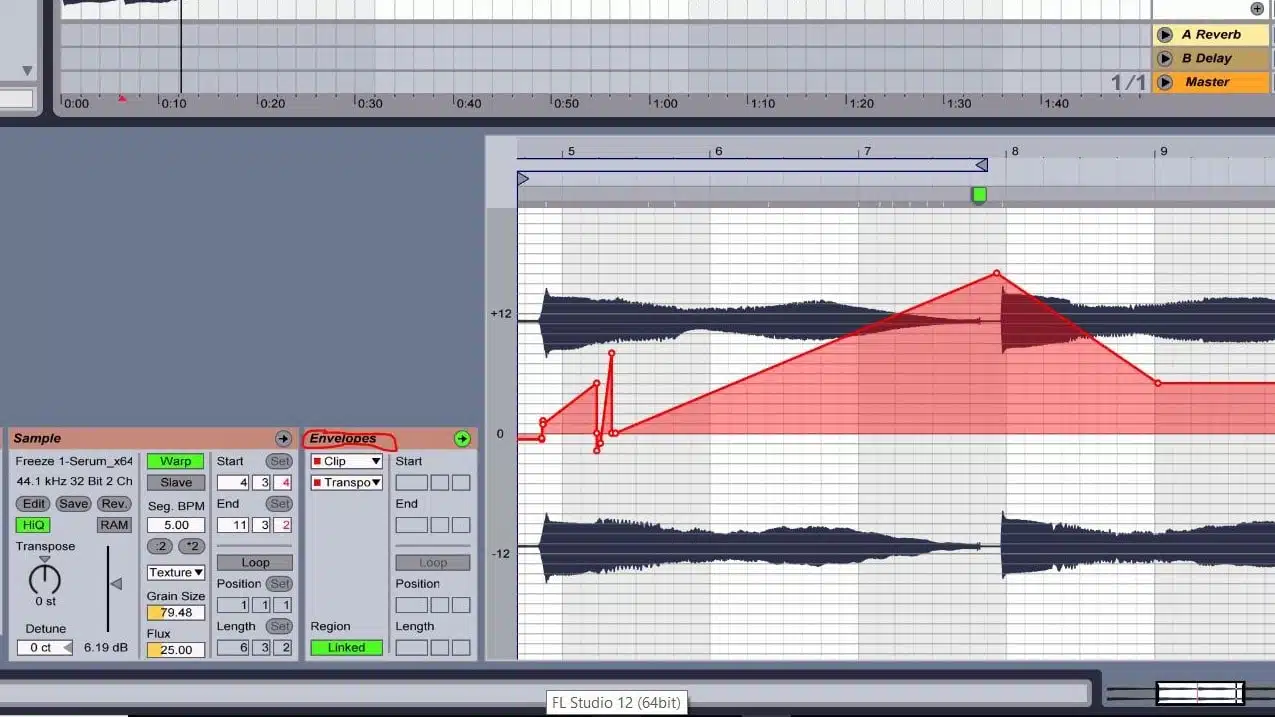
4. Chop up multiple versions of the warped sample (have them glitch, repeat, and talk to each other); this is essentially how your favorite producers take their synth(s) to new/exciting levels during the drop.
Ever wondered how they successfully achieved those nasty chops, bends and warps that you just weren’t able to decipher/figure out… re-sampling, my friend, that’s how!
Although it may seem like a step backwards, the reality of it is, the sound design aspect only starts with the synth and, if synthesizers typically/customarily intimidate or overwhelm you, I highly suggest that you start intricately mastering this craft as re-sampling, editing, sequencing, configuring transposing, and correctly utilizing/implementing post-processing sound design techniques with audio files is an art in itself.
LAYERING/STACKING SYNTHS
By layering/stacking synths, you’re able to successfully procure results that you wouldn’t normally expect to achieve with the standard ‘copy and paste’ of MIDI-data; while you certainly could obtain the same results by copying, and then pasting MIDI-data onto multiple synths, there’s just something about the intimate, punctilious process of stacking the synths yourself that always gets the blood flowing, the creative juices running and, inevitably, makes you experience a deeper connection with your song in the end.
Most people have an innate tendency to layer ‘like’ or ‘similar’ synths to those of which they regularly stack in conjunction of one another, whereas I, prefer to the do the complete opposite (hence the ‘uniqueness’ factor).
What I routinely end up doing is layering quick FX-stabs, with designated plucks and/or leads; true, they don’t normally sound cohesive when hybridized, but with the application of a few rudimentary volume and filter adjustments, you can unquestionably manifest an exceedingly smooth, coherent soundscape.
HELPFUL TIP: The sounds (hidden gems, honestly) that can be found within The Unison Unique Collection include an exceptionally exquisite set of instruments, synthesized ‘samples’ and FX that, when I heard for the very first time, I instantly said to myself ‘layer material’ (among various other thoughts and ideas, naturally). The fact that a collection like this is distributed as Serum presets, verses regular samples, provides you with the advantageous benefit of having complete and total control over them; add an additional OSC to make it a ‘lead,’ or add an additional two Oscillators to make it a pad…the possibilities are truly endless!
Initially, when attempting to effectuate stacking elements (of any kind), we must first ask ourselves, what is this distinct sample/layer inherently lacking? Moreover, what exactly is this element able to realistically handle if it’s already substantially full (frequency-wise)?
Well, honestly, this is a relatively difficult question to answer, as it’s predominantly contingent upon your personal experience and understanding of sound design (In it’s entirety). However, in the beginning of my musical journey, I discovered/ascertained that it’s much easier to reach a conclusion to this answer when you’re taking advantage of a ‘Spectrum Analyzer’ (by opening it up on your DAW), as to accurately/scrupulously gauge the range of frequencies in which that element contains.
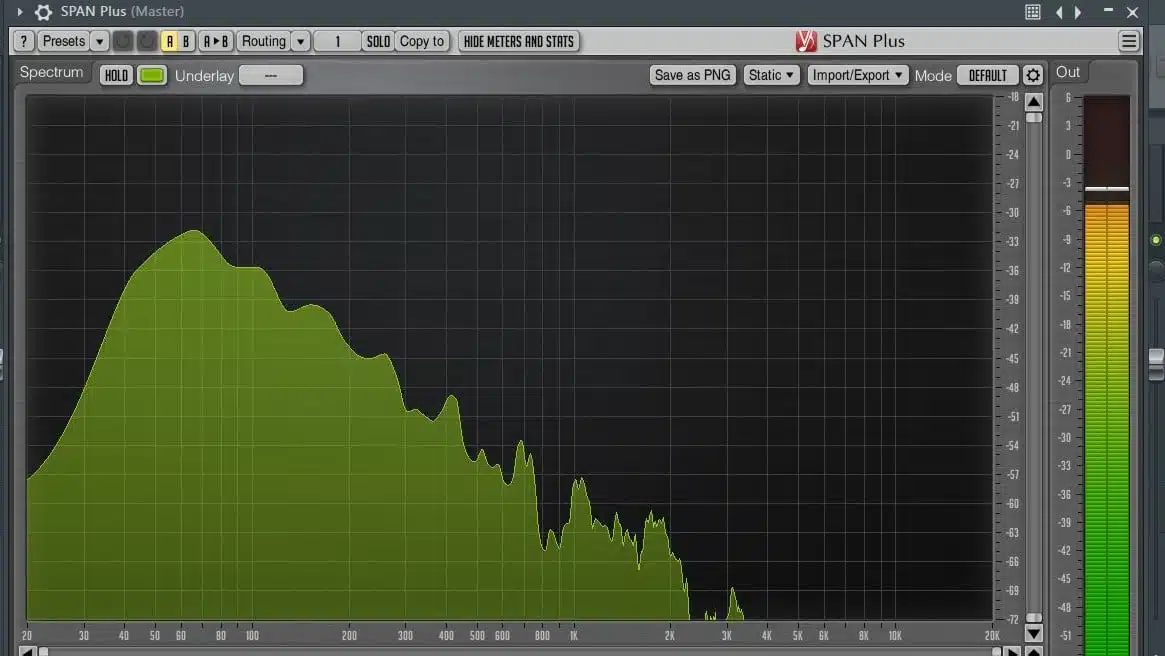
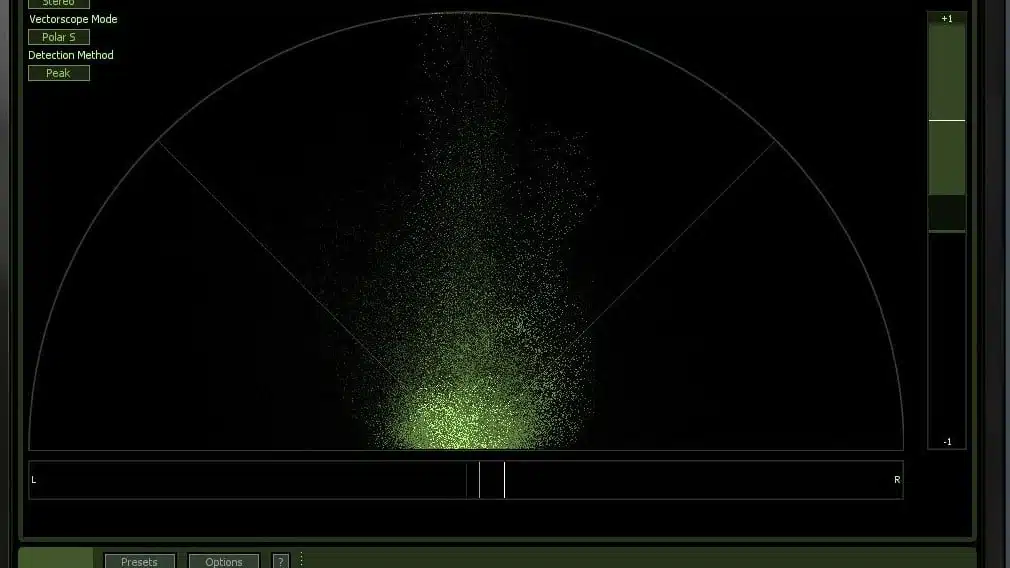
Also, whenever possible, try to have a readily available, already opened Stereo-Imager (principally, in the form of a ‘Vectorscope’) in order to see/adjudge it’s precise Stereo Image; voraciously determining it’s width within the ‘stereo’ field as shown below.
Since things can (unfortunately) go awry fairly quickly when attempting to stack elements (especially drums and synths), the key to preventing any complications is to unfailingly/invariably check for ‘phasing’ issues, which are critically detrimental when they slip by undetected or untreated, by flipping or inverting it’s ‘Phase,’ or ‘Polarity’ to see if it sounds supreme with one of the drum’s phases manipulated in this manner; if it does, in fact, sound better with the inversion, then the 2 elements were evidently causing phasing-issues.
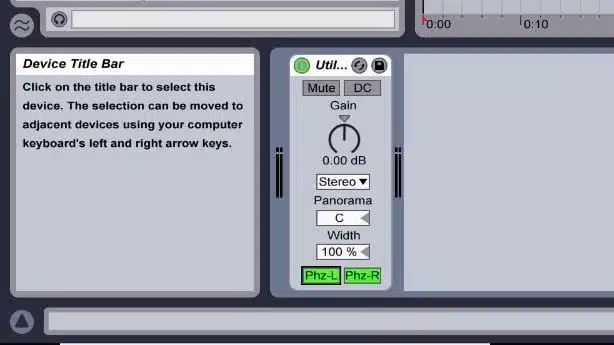
NOTE: Both the ‘Phz-L’ and ‘Phz-R’ must be enabled in order for a full ‘phase-flip’ of both left and right channels (if in stereo) to occur.
Even if absolutely no phasing issues are occurring, the layers may actually sound better with one of it’s phases flipped anyway, this is why I highly suggest you use a ‘Phase Correlation Meter’ whilst in the process of building your drums, as well as when you’re mixing.
As I’m sure you’ve gathered by how overly precautionary I’m being (or already know from personal experience), phasing issues are not always so easy to detect/pinpoint and, although these meters are not ‘fool proof,’ per se, neither are our ears so, utilizing both tools concurrently, is the key to achieving optimum results.

CoreReLation Phase Analyzer by Reasonistas (Rack extension for Reason) not only detects phase issues and gives us a glimpse of the stereo field but also allows us to widen/narrow the image.
STACKING YOUR DRUMS
Stacking your drums, as opposed to choosing a ‘fat’ drum-hit from the start, traditionally produces superior, unique, compelling results and, although Ableton’s Drum Rack is undoubtedly a sensational device, I prefer to manually stack my drums on individual tracks/channels (separately); that way, I am bestowed with the full flexibility to process each discrete one (catering to my personal taste/intentions) WITHOUT the compulsory, inconvenient, inexpedient hassle of being forced to allocate manual routing/maneuvering in order to do so.
NOTE: I will NOT be discussing/explaining the basics of stacking drums because, even if it’s a valid, ‘professional’ tip, I can guarantee that it won’t translate in the unique/original way in which you intended and desired it to on it’s own, as this method is widely used (ever since Akia made it one of the major ‘stand-out’ features of the iconic MPC Series).
If you don’t happen to produce/sample your own drums (from scratch), odds are you’ve previously used a drum-sample that was layered (in some capacity), and didn’t even realize it, due to the fact that it wasn’t executed in a unique/unconventional way that made the effect blatantly stand out and capture your attention; which is the exact reason why we’re going to discuss layering/stacking your drums with a ‘Foley’ sample in order to incorporate unique properties and effects that are sure to leave a long-lasting impression on your listeners/audience, as well as, a concept you might be familiar with, but never really thought about implementing: stacking percussion.
Foley samples are something you may have encountered/stumbled upon in a sample pack every now and again, but never really found a place for (or even thought about creating a place for) within your own track (in my humble opinion, the primary reason that you’ve probably never implemented them in your music before is simply due to the fact that you’ve never successfully figured out how to utilize/decipher them correctly).
Foley effects are characterized as recordings of everyday objects, processes, tasks, etc. (essentially, anything that generates/exudes a sound) and, before they became used for musical-purposes, could be found throughout the cinema/animation domains; most commonly found in…. oh, I don’t know, how about every single cartoon, TV/radio show, movie, and video game EVER created! (unless, of course, it was a silent film, or before all the technological advancements were applied to broadcasting).
When you advantageously, methodically, and (most importantly) creatively incorporate Foley samples in desired places throughout your track, such as (but certainly not limited to) your drop, breakdown, or drums/percussion, it can offer a unique spin on an otherwise overlooked or unexploited musical sector (which, let’s face it, is getting increasingly harder to procure in the constantly growing, obnoxiously oversaturated market in which we find ourselves competing for the title).
KEEP IN MIND: This effect can, in essence, successfully work anywhere that it’s appropriately implemented, so I highly encourage you to take some time to experiment, as you never know what hidden gems are waiting for you, just on the other side of your creativity. Plus, if you possess a natural proclivity for field-recording, or have a substantial interest in the sound design processes of film, animation, gaming, or the like, you can even take it as far as creating your very own Foley samples!
USING FOLEY SAMPLES TO ADD A UNIQUE FLAVOR TO YOUR DRUMS
Foley samples can be introduced into your music in numerous/disparate ways, but the two variations that I feel reign supreme and, in my opinion, have proven to be the most practical are: utilize them as either ‘hits’ or ‘sweeps’ (and, in certain circumstances, both).
1. Hits – These would be used as, or in the place of, a kick, snare, certain Hi-Hats, or certain kicks (along with various other percussive possibilities).
2. Sweeps – These would be what I consider a ‘transitional’ percussive element; replacing a shaker, cymbal, chimes, etc., and is used in order to wrap things up, or ‘transition’ us into a lead/percussive element (such as our snare).
NOTE: If you possess multiple Foley samples at your disposal, and are utilizing a sweep to lead into the snare, you can use a few comparable sweeps but, make sure not to use completely identical/indistinguishable ones, as you want to keep the subconscious-mind occupied, intrigued, and invested in your song (as always, get creative with this!).
You might not necessarily want to tune your Foley samples to a certain note but, rather, the relative-frequency. It should have a tone/octave range that generally matches/coincides with the range of your track itself. Remember, all of this is achieved through trial and error, and the ways in which you can incorporate this into your productions is virtually endless so, get creative and inventive; the benefits are valuable beyond words.
The samples that you’ve assigned as ‘hits,’ can be utilized as a layer for any drum part you see fit and, when executed correctly, you’ll also discover that adding a unique or unexpected Foley to your lead-snare can seriously turn some heads and blow some minds.
I sometimes like to aggrandize my track by administering a ‘coin’ on every OTHER snare, or substituting a kick with a ‘shovel,’ in determinate, desired places. Naturally, the more ‘outside of the box’ your mentality and configurations are, the grander the shock-value will inevitably be, so try to get as creative as possible with your decisions, implementations, and arrangements (with all of the contributing factors, really), and you’re sure to attain superlative/preeminent results!
NOTE: When layering a ‘key’ element with a Foley sample, it’s not difficult to excessively overdo, or overindulge in the process, to the point where it could get corny, hackneyed, or (subsequently) dilapidated fairly quickly. If you feel like you’ve chosen the appropriate/ideal sample, and it’s still seemingly muddled or unbecoming, chances are that you’re introducing it too often; try applying it ONLY to the wrap-up section, and if you still maintain that it’s too overwhelming or irrepressible, it’s presumably the wrong sample altogether.
An alternative reason could be that it’s too loud/overpowering within the song or, more likely, too loud in relation to the element(s) of which it’s layered with. Try making it significantly less prominent or, depending on your level of discontentment, have it take a back seat entirely; depending on the innate nature of the Foley sample you’re currently using, subtly may just generate the prestigious results you’re looking for so, remember, bigger is not (always) necessarily better.
LAYERING PERCUSSION WITH FOLEY
Essentially, when layering a Foley sample with a percussive-element, it provides it with the necessary provisions required in order to function/serve as the lead or ‘main’ element; taking the place of an heterogeneous/disparate element, such as the drums.
Oftentimes, you’ll think you’ve found the ideal Foley sample of which to layer with a snare but, upon attempting to apply it, dismally discover that it just doesn’t work/fit (either due to it’s harmonic content, or a struggle for dominance). Well, you may be surprised to find out that, when you wish to utilize a Foley sample as, let’s say, a ‘snare,’ layering it with one may honestly/realistically be the very last thing it needs; I’ve found that, when wishing to use a Foley sample as a snare, the best type of sample to layer it with is actually a 1-hit shaker (or maybe even a tom-tom drum).
When determining whether or not a Foley sample is an appropriate/valid replacement, check to see if it resides (relatively) within the same area, frequency-wise, as what you’re attempting to replace; whereas, you certainly don’t want a low-end sample to replace your snare (it’s truly quite the contrary).
NOTE: When looking to replace or layer the kick, however, something that resides mostly in the low-end may serve as an efficacious candidate, and suffice rather suitably.
Another vitally important factor to consider is whether or not the Sample length/time is relatively tantamount to it’s replacement/layer; being a tad shorter is perfectly acceptable and, in some circumstances, preferred/favored (typically when using it for the hit’s transient activity) but, having your sample too LONG, especially pertaining to drums and percussion, can cause major issues with the fluidity/eloquence of your ‘groove,’ and may single-handedly be responsible for the reason why your Foley layers aren’t living up to your expectations.
Ultimately, when integrating ‘Foley’ in your music, it’s all about creating and maintaining an ideal/quintessential balance (as to not ‘overwhelm’ your track). Remember, this should be a subtle enhancement, which sounds and functions similar to the element of which you’re replacing it with, NOT a blatantly obvious substitute that sticks out like a sore-thumb, and draws unwanted attention to itself.
When I find myself in the mood to formulate custom drum/percussion samples, one thing I thoroughly enjoy doing is, meticulously layering Foley with percussion in order to create an entire new drum hit; this can be achieved by layering a Foley (that’s getting ‘crushed’) with a tambourine, in order to construct a snare.
You can additionally try using an actual Foley ‘punch,’ along with a pitched-down tom-tom or percussive ‘bleep,’ in order to produce a kick OR taking a short metal-spring Foley sample, and layering it with a ‘chime,’ in order to create a Hi-Hat.
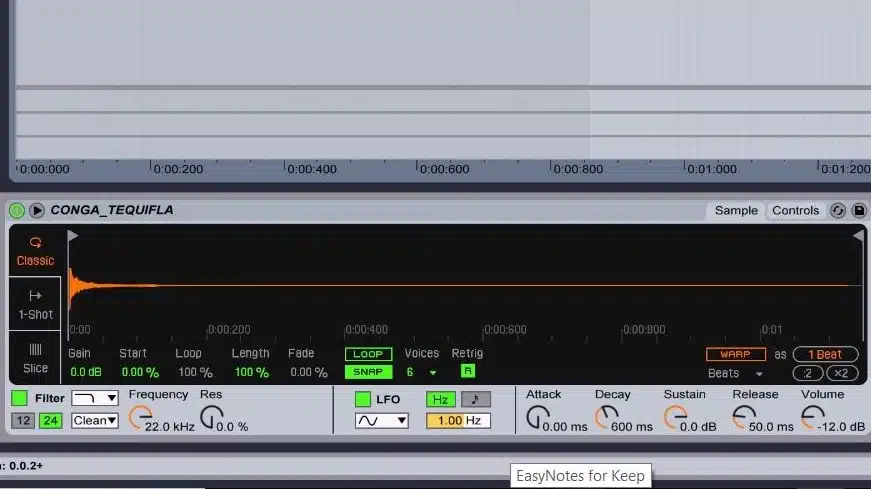
KEEP IN MIND: The more creative you get, the better it is; in other words, don’t feel constrained by your sample’s creative capacity/dexterity, as you can always creatively exceed it’s limitations. If you hear a Foley sample that you feel can be sampled again or ‘re-sampled,’ simply throw it into a sampler, isolate the initial transient, and make it the foundation of your kick/snare (using the aforementioned techniques).
 A
A
Foley sample loaded up in simpler for further sampling and manipulation to make it “playable” and in tune with our corresponding midi notes.
AUTOMATION
Although ‘automation’ (indubitably) contains a broad range of countless, auspicious uses/functions, many producers still utilize it at face value alone (as solely a ‘level control’), whereas I prefer to look at it like this… AUTOMATION = MODULATION.
In various situations, you’re able to use automation to ‘modulate’ parameters within your DAW (with synths and/or virtually any plugin imaginable) and, although it’s not the same as an integrated modulation matrix, we’re able to implement it with processors that embody absolutely NO built-in modulation capabilities.
NOTE: Think of it as a free-running ‘LFO’ within a modular synth, as you can similarly draw out an LFO: in any shape, at any rate, at any point in the track (yielding fundamentally the same effect/results).
Automating a parameter can generate completely different, eminently superior effects than those produced without some sort of modulation; the results of modulating/automating a parameter can do absolute wonders for the uniqueness/distinctiveness of your track so, play around with the seemingly endless ways in which to incorporate it, and you’re bound to strike gold.
Today we’re divulging how to automate parameters within your effect-processor to manifest exclusive effects that, otherwise, you never would have ascertained. For numerous years, even when deeply engrossed in sound design, I felt dreadfully restrained by and limited to the tools, or modulation matrix, within my synth.
I’ve since realized that, unless strictly making presets for a specific synthesizer, this type of thinking isn’t only ludicrous, but immensely detrimental to the overall production-process; subsequently, I devised these tricks (to combine with your standard processors) that enable you to break out of the ‘norm,’ or restrictions you thought you were confined to and, additionally, some automation to get your creative juices flowing…
PITCH-SHIFTING DELAY
Reverb and Delay are revered as the most essential/basic effects around yet, when you administer a unique twist to either one, the effects have the potential to be absolutely mind-blowing. Many producers throw pitch-shifters, of all variations, on their effect-send/BUS, but still find themselves severely struggling to achieve the sound they were so desperately hoping for… well, the answer to solving that problem is easy – automation!
By administering some simple automation, we can accomplish those awe-inspiring effects that we’ve forever admired and, although it can take countless years to ‘perfect,’ the fundamentals/initial steps are fairly straightforward and easily comprehensible; I can promise you, if it’s something frequently heard, it’s not too hard to set up.
Firstly, we are going to apply a Pitch Shifter to our delay ‘send,’ and automate it’s value, to concoct some truly prodigious results.
NOTE: Some high-end delays have pitch-controls built in, so you won’t need to use an external pitch shifter (although that’s typically not the case).
1. Route your desired track to a designated delay send/aux return and throw a pitch plugin (of your choice) AFTER the delay.
Keep in mind that this is a specialized effect and you will (most likely) not want it applied to ALL of your delayed tracks, so you may not want to set this up on the main delay send… but for this particular tutorial (and simplicity’s sake), that’s what I’ll be doing.
You can alternatively print your desired track with the delay already applied, leaving you with only the need to add the pitch-automation.
For this distinctive task, I prefer to use Soundtoy’s ‘Little Alter Boy’ because of it’s propitious ability to transpose the pitch and formants simultaneously (or separate, if desired).
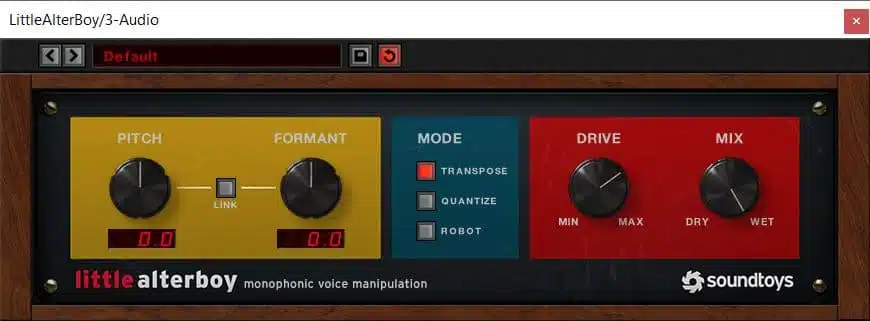
2. Set your ‘delay rate’ to be something that has enough space, not only for the modulation to be heard, but also ‘synced,’ so it sounds musical (like an extension of the melody).
3. Automate the pitch (or formant) during the delay ‘tail’, having the pitch change for every cycle of the delays feedback. We can have it going up in pitch, down or both!
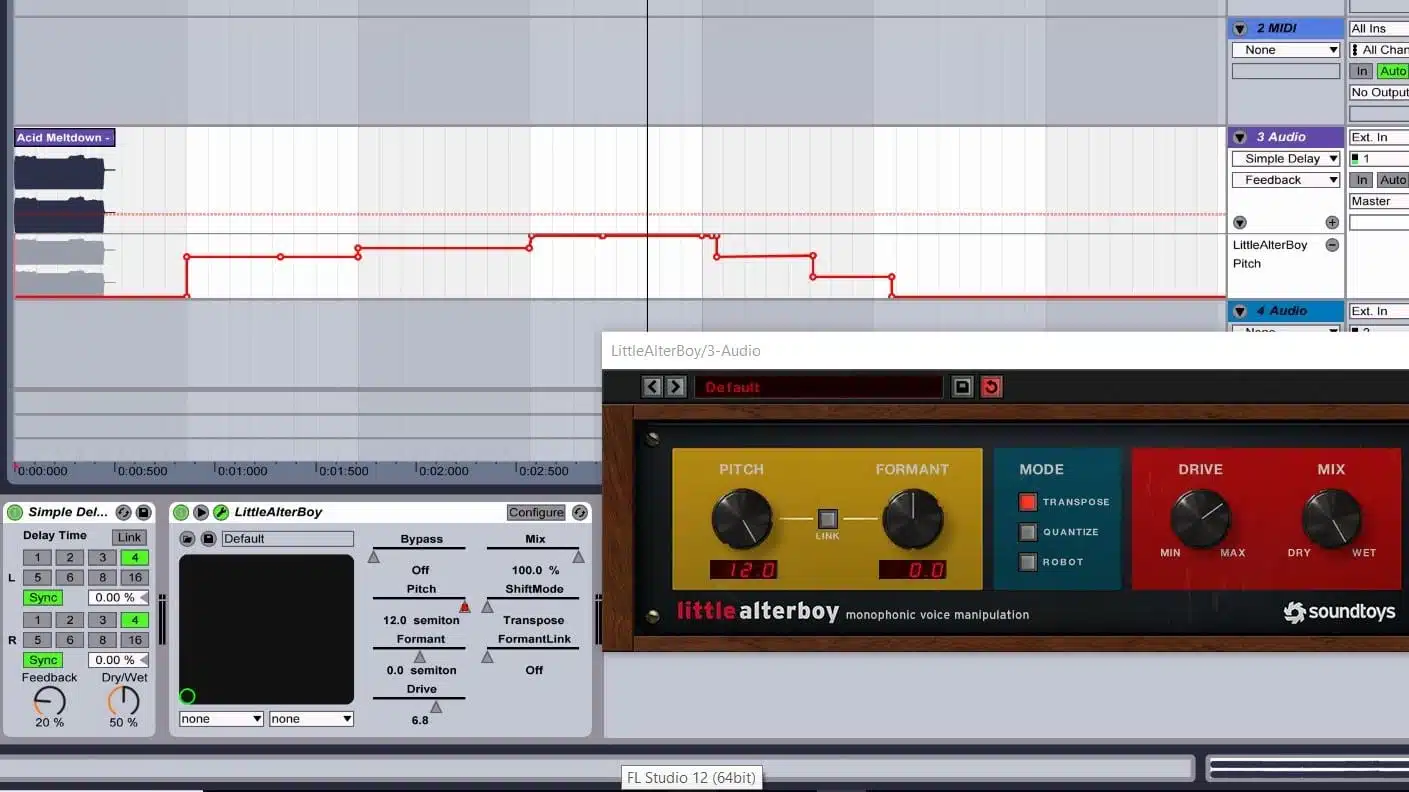
NOTE: You’ll want to turn on ‘snap to grid’ mode in order to make sure this pitch-modulation is timed cohesively with the song at hand (as our delay typically is).
I have discerned that the pitch ultimately sounds best when synced to the ‘rate’ of the ¼ delay-time/feedback.
EXAMPLE: If the pitch is set to 1/4, I would have the pitch either ascending or descending, in designated intervals (that are determined by the scale of which our song is in), for every ‘feedback cycle’ that the delay produces (in layman’s terms, every time the delay repeats). If you’re working in the Minor scale, it’s always safe to transpose/automate your pitch by the following intervals: 3 semitones, 7 semitones, and 12 semitones; if you’re working in the Major scale, it would be: 4 semitones, 7 semitones, 12 semitones (of course, this may vary depending on the specific song and the style/vibe you’re wishing to achieve).
If you start referring to this modulation as an extension of your melody (as a melodic sequence), the results are guaranteed to be nothing short of breathtaking; vocals is where this particular effect truly shines so, if you need a starting point, they’re ideal.
I wholeheartedly encourage you experiment with automating certain/distinct parameters within the delay itself, such as the time/beat division-parameter, as it can produce a much-desired, highly intriguing ‘pitch bend’ (which is predominantly produced by using tape-delays).
NOTE: Not every single delay can produce this effect but, when working conjointly with a tape or analog-style delay, it usually gets the job done.
By automating/modulating the delay time UP, you’ll typically receive/effectuate a record-sped-up type of effect and, by automating/modulating the delay time DOWN, you’ll get a more record-slowed-down type of effect; even though it can be subtle, the effect that’s produced can ultimately add a sense of uniqueness (which is the overall goal).
One last creative thing I occasionally like doing to some of my delay sends, is to throw a multi-FX plugin on top of it (Glitch, Effectrix, or Looperator are all supreme candidates); if you don’t particularly favor using these types of units, or simply prefer the traditional/easier way, try automating a delay to add some ‘rhythmic motion’ to your effect-sends.
Although automating reverb isn’t necessarily considered to be ‘unique,’ per se, implementing these types of techniques is certainly the veritable first step to procuring uniqueness; from there, you can build, experiment, and hopefully contrive something original/never heard before.
RING- MODULATING YOUR REVERB IN ABLETON’S RACK, WITH AUTO-PAN
I’m going to be utilizing Ableton’s stock-devices in order to automate the reverb-tail of my lead, and then apply LFO-modulation (in the form of Auto-Pan) for a very distinctive, unconventional spin on the classic ‘now you see me, now you don’t’ reverb.
1. Place a reverb on the desired track,
2. Open up an ‘audio’ effect rack, and merge it with the reverb,
3. Create an additional audio effect chain within the rack.
NOTE: The idea behind this is to have one ‘dry’ signal, and the other signal being fully affected by the reverb.
4. Set the reverb to 100% WET (controlling it’s signal from within the rack).
5. Administer ‘auto-pan’ onto the chain that contains the reverb, turn the ‘phase’ parameter all the way down, and adjust the other settings to taste; you can use any similar LFO-administering plugin of your choice (such as LFO Tool, and many of the ‘Cable Guys’ proprietary-plugins).
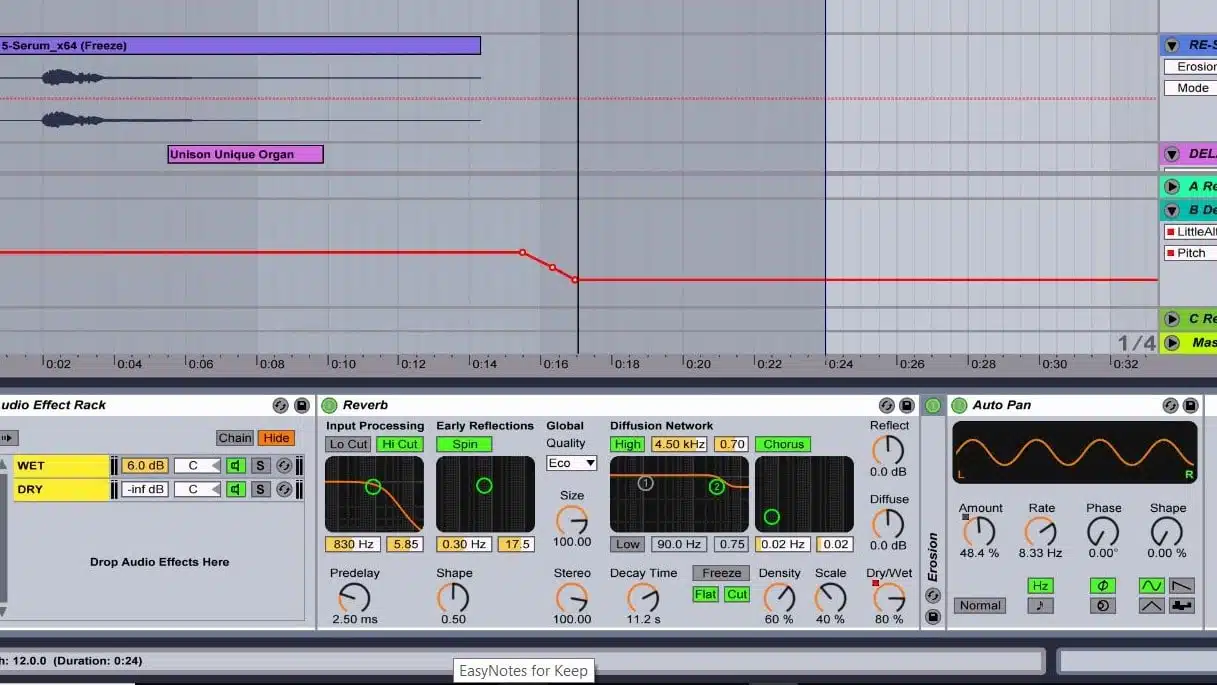
NOTE: Normally the auto-pan swirls the sound from left to right but, when you turn the ‘phase’ parameter down, it acts synonymous to a ring modulator.
6. Modulate the ‘rate’ (and, from the results, you’re able to create various, unique effects).
NOTE: At this point, we could technically leave it how it is and be done with it (as it’s undoubtedly unique enough by now) but, I prefer to kick it up a notch/take it one step further, by automating the reverbs ‘tail’.
7. By automating the tail, it enables the ‘modulated reverb’ to function almost as a ‘tap’ delay and exude an echo-like effect.
Personally, I prefer having my sequence play with the standard processing/reverb, as it habitually has, and wait until the very end of the sequence/synth section to have it kick in (almost instantaneously after the note finishes), whereas some producers would rather have the effect begin about a half-whole beat after it completes,
After you’ve established where exactly to place your effect, crank up the WET/DRY level from 0 to 100%, and listen to the astounding results it produces…magical!
8. Automate the decay time.
Don’t confine/limit yourself (and your creative genius) by strictly automating the WET/DRY knob… try automating the decay time, as well, with the same curve; bring it down whilst simultaneously turning the WET/DRY up.
Experimenting with ‘modulating’ parameters such as these, can have a colossally positive/influential impact,on your track’s overall integrity.
REVERSE-REVERB WITH FOLEY SAMPLES
We can advantageously use our Foley samples to institute more intricate sweeps and impacts; keep in mind that certain samples will undoubtedly work/function better than others but, in reality, when you employ even a little creative-processing, you can achieve desirable results regardless of what specific tools you’re using.
NOTE: If your tail is long enough/sufficient you can use the tail from the previous trick to create this effect.
1. Grab the track that you wish to utilize this effect with.
You can use 2 separate samples: 1 for the ‘reverse,’ and 1 that comes in after.
KEEP IN MIND: Things usually blend better/smoother when using the same track.
I decided to bounce some of the amazing sounds from The Unison Unique Collection, found here: https://unison.audio/product/unison-unique-collection-vol-1/
2. Load the track into your DAW with absolutely NO effects.
Set up a ‘reverb aux send’ to route your track to; make sure it’s on 100% wet (as it always should be when using ‘sends’).
3. Alter the settings on the reverb to have a substantially long decay time, and a big size.
I always prefer to turn the diffusion and early reflections up, as it adds a little spice to the track when playing in reverse.
NOTE: The settings are critically vital in determining how this effect is carried out, so I wholeheartedly urge you to experiment and find the best fit.
4. Bounce the reverb send.
5. Reserve the reverb track you’ve bounced; it should be considerably long.
All you have to do now is line up the track (that you want to follow the reverse reverb), at the end of the reverb track, and you have your effect!
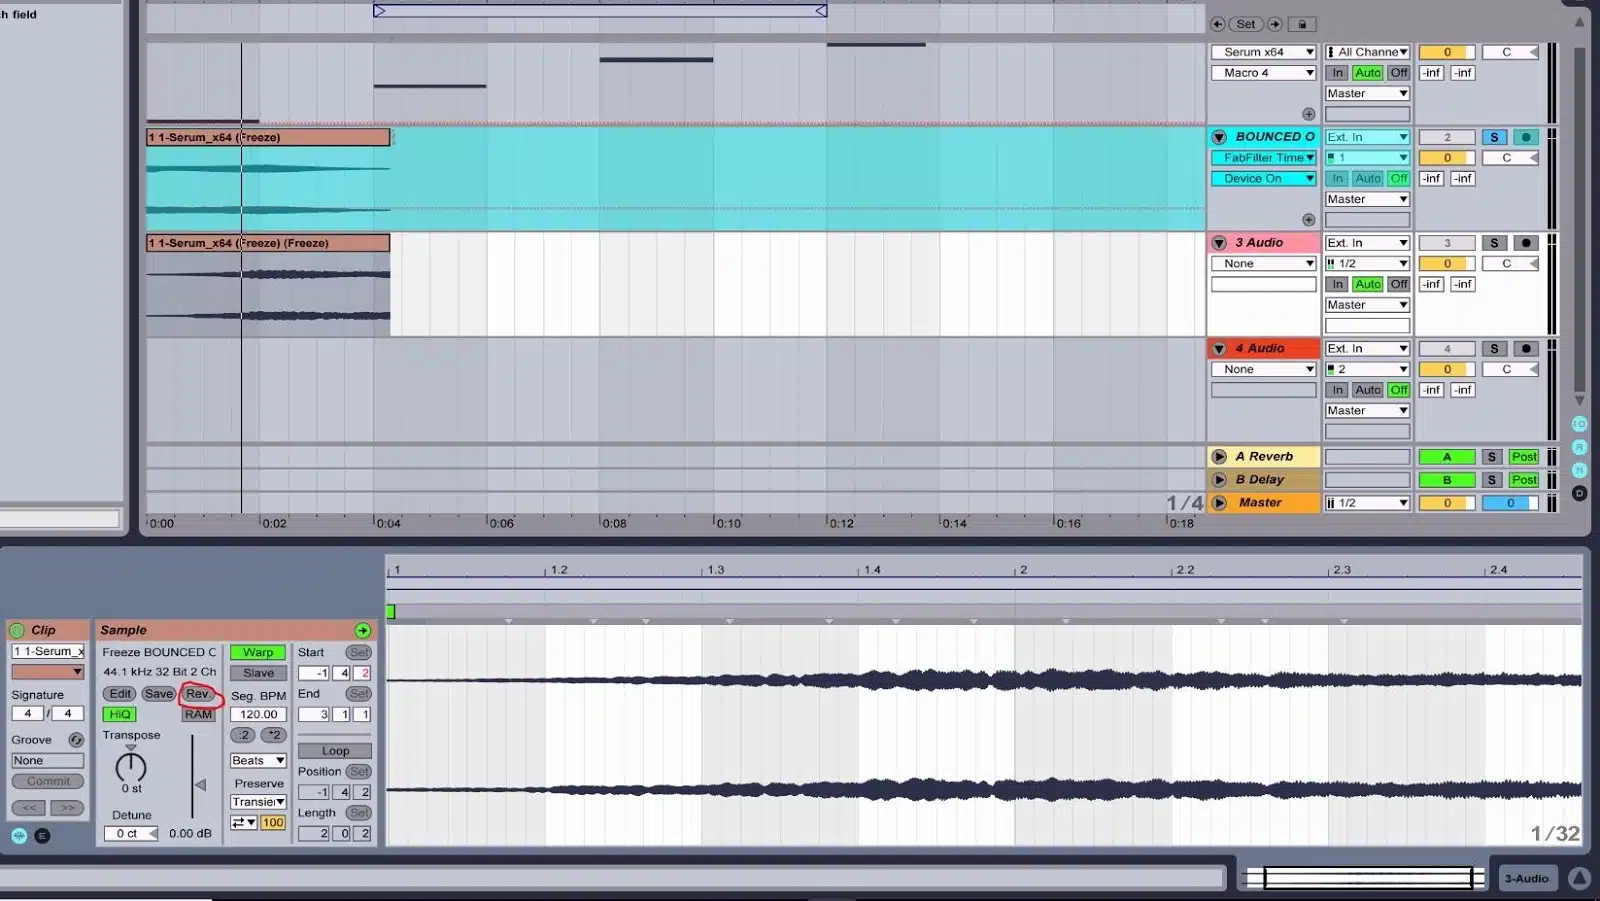
6. Take it one step further and automate the pitch up or down to create a lead into your drop or even create a riser from the results.
7. Automating the volume during the reverse reverb’s climax, or having it go down to 0 (muting it) momentarily can add a very hollywood/horror-movie style effect (frequently found in upcoming trailers/previews).
Turn this volume-induced glitch into a rhythmic sequence, and you will have something that’s hard to find elsewhere, at least in the realm of music.
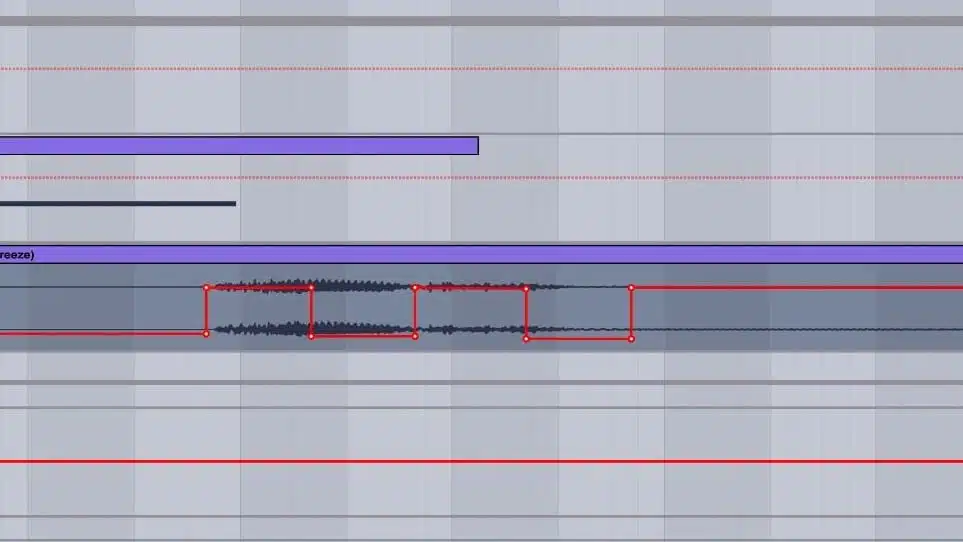
As I said before, think of automation as just another form of modulation. Apply it rhythmically to all sorts of parameters. The results may surprise you.
8. Now that we have ‘up-sweeps,’ we can take these same reversed samples, reverse them again and, finally, bounce them… and we now magically have impacts!
9. We can then take it one step further by using the various ‘warping’ modes to morph it into something bigger, longer and amazingly different!
UTILIZING WHITE NOISE, AND AUTOMATING EQ
In my early days of production (and even slightly when I first ventured into the sound design realm) I unequivocally/foolishly doubted the power and impact of white noise; I mean, with all the endless hours spent mixing, and money spent on constructing a room void of all background interference or A/C blowing, why the hell would I want to add random noise to anything… wouldn’t that just destroy and degrade the sound?
Well, the truth is, white noise is considered to be one of the grandest, preeminent, illustrious innovations of synthesis, due to it’s innate versatility; taking on the shape of any effect you desire. This is possible because white noise itself, represents every single frequency in the spectrum (at a low dB level that is).
Although we always have the choice to utilize white noise in it’s original/primitive form (very short bursts that we can use to synthesize our drums/transient attack), the true magic of it inevitably uncovers itself when you begin shaping sounds with it, by subtracting most of it’s frequencies, which enables it to respond in various different ways; when we implement this unique technique, we’re able to successfully create, not only risers, but transients, sweeps, whistling, and can even ‘pitch’ the noise (sculpting it in all sorts of imaginative/innovative ways, creatively using EQ to do so).
Let’s get your blood pumping and juices flowing by conducting a little experiment, shall we…
1. Open up your desired synth, of which you’re able to successfully play white noise WITHOUT any additional tones/oscillators, and have it play 4 choice notes over a 4-bar period (each being 1 bar in length).
2. Open your designated EQ, and load up a band-pass filter.
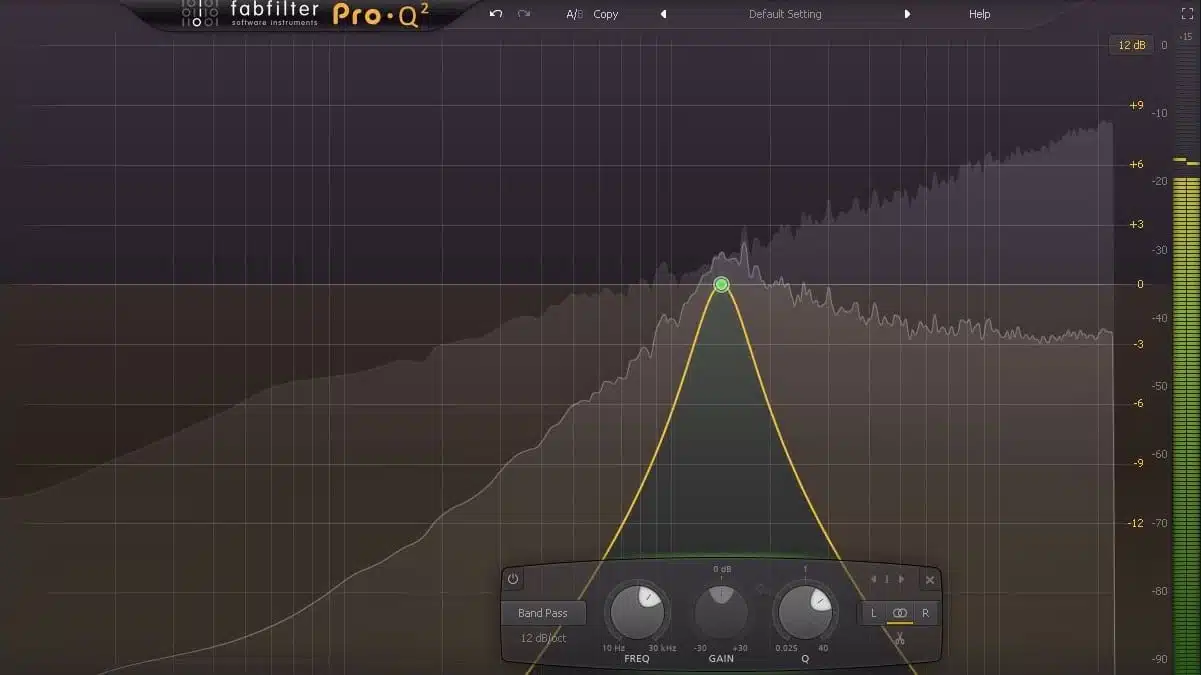
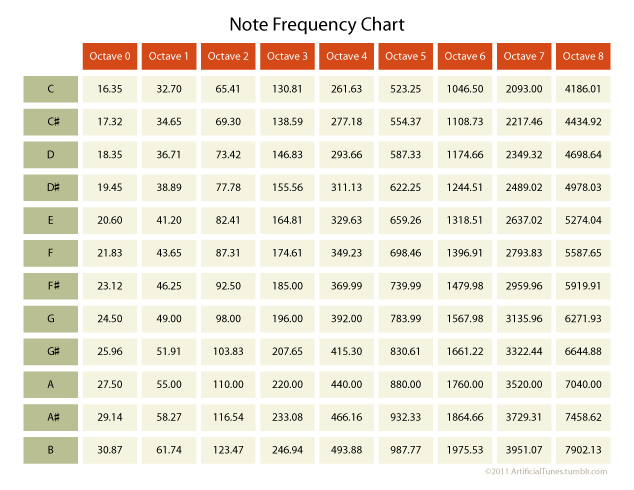
NOTE: You will immediately acquire a taste of/feel for what it sounds like when we sculpt white noise with filters and EQ. Every note has a predetermined frequency as seen in the chart below. Use this guide to create your own tones and pitches using simple white noise and an EQ,
3. Play around with the band; place it in diverse/conflicting areas of the spectrum, incorporating ‘resonant peaks’ in the process. By now, you should start being able to hear the potential that’s manifesting.
The secret to creating effects with white noise is automating, not only the band-pass section itself, but the other parameters located within the EQ (such as it’s ‘Q’ size) as well, in conjunction with the gain/volume; layering an effect like this with a riser can add a unique flavor that, otherwise, you would have never achieved/accomplished.
4. Make your ‘Q’ exceedingly narrow and, over an extended period of time, steadily sweep from left to right; when getting closer to the right side, start opening up the Q-size slowly. Now, proceed to automate the volume during the assigned period of time, and you now have the basis of your VERY OWN, homemade riser! (essentially painless, right?).
5. Rhythmically automate the volume (like a gate), and feel free to go wild.
The exceptionally remarkable tones and textures you’ll end up producing may just pleasantly shock and surprise you; never underestimate the true power of white noise (or any noise for that matter).
6. Start experimenting with ‘brown’ and ‘pink’ noise, as it’s overall effect will be somewhat similar as white noise, just a tad different, so take the time to get acquainted with them.
Although we’re automating the EQ (so it sufficiently compliments the white noise), doing so can inadvertently lead to a wide-range of effects that you wouldn’t normally expect from a simple EQ (e.g., Phasers, Flangers, Comb-like filters) but, in actuality, anything that a filter can aid in producing, an EQ can perform the same function as well (plus much, much more).
Start looking at your EQ as the quintessential universal-filter; the possibilities are truly endless, and you’re only confined by the limits you set yourself. The more complex the EQ is (in terms of features), the more you will be able to accomplish.
Experiment with automating exaggerated-EQ movements, on any of your sounds, in order to provide them with a sense of ‘movement,’ and incorporate profound tonality change(s).
NOTE: If you want to take this a step further, ‘record out’ your EQ-movements in your EQ’s ‘mid/side’ mode to add stereo-interest with your EQ automation as well; this may not always work out flawlessly, and should always be used in moderation (like most things pertaining to producing).
Well… there you have it! Those are some of my absolute favorite, relatively simple to implement, awe-inspiring techniques in which to make your music substantially more unique/distinctive. However, your authentic creative-capabilities truly lie within yourself, and are ultimately determined/defined by your willingness to experiment and try new techniques/methods.
Once again the Unison Unique Collection is out and is really full of wide range of unique and twistedly beautiful sounds, check it out at: https://unison.audio/product/unison-unique-collection-vol-1/ ; you wont be disappointed!
With the exceedingly high influx of producers/creators and ever-evolving technological aspect of music it is, and always will be, a constant battle between the ‘unique’ and the ‘copycats’…. Where will you stand?


Leave a Reply
You must belogged in to post a comment.