Equalization (EQ) is the most powerful mixing processor you have at your disposal but, if used incorrectly, it can also be the most dangerous.
With great power comes great responsibility as they say, so being educated is the first step to becoming an EQ master…
Table of Contents
- WHAT IS EQ?
- EQ PARAMETERS
- ELEMENTS AND BAND-TYPES
- EQ: COMMON PRACTICES
- EQ’ING YOUR LOW-END
- THE PITFALLS OF EQ
- EAR FATIGUE IS VERY REAL
- EQ TIP #1: ONE SIZE DOES NOT FIT ALL
- EQ TIP #2: SOMEONE CALL THE PARAMETRICS
- EQ TIP #3: IT’S TIME TO SPLIT UP
- EQ TIP #4: IT’S ALL ABOUT ANALOG
- EQ TIP #5: THERE’S SO MUCH TO ‘GAIN’
- EQ TIP #6: POLAR OPPOSITES
- MIX TIP #7: dBOUBLE UP
- EQ TIP #8: IT’S NOT A PHASE… OR MAYBE IT IS
- EXPERT MODE: ON
- FINAL THOUGHTS
WHAT IS EQ?
When you use EQ, you take a range of frequencies, and with the use of a band either:
- Boost/Raise (Additive EQ), or
- Cut/Attenuate (Subtractive EQ) its amplitude.
In its most basic form, it’s is a fancy volume control for frequencies. This may seem like such a small factor, but it can change EVERYTHING.
When you change any part of a signal, it can have a huge effect not only on the sound itself but your listener’s perception as well.
This includes: subtle (or not so subtle) corrections or enhancements, splitting up, removing, and/or isolating certain areas of a sound’s frequency, creative effects, filter modulation and so much more.
You could even use a Dynamic EQ to replace a multiband (or standard) compressor. The possibilities are truly endless.
ON THE DOWNSIDE it can unintentionally suck the life out of a signal, or throw off the overall gain-to-frequency ratio. So, you have to be very careful.
Luckily, you came to the right place to learn everything you’ll need to know. Taking existing sounds-sources and samples, and transforming them into something completely unpredictable never gets old… so let’s get into it!
EQ PARAMETERS
EQ has 3 primary parameters:
1. GAIN (Amplitude): controls how much of the defined frequency is added or removed.
- Turning the gain up 一 increases the amount of gain added to the frequencies within the given band.
- Turning the gain down 一 removes more of that specific frequency.
2. (CENTER) FREQUENCY: The ‘cutoff’ frequency that is most affected. This value can be any frequency within your EQ’s range, even beyond the human range of hearing. Visually, this is the center point (dot); used to adjust the band’s frequency value.
3. BANDWIDTH (usually labeled ‘Q’ or Resonance): The range of frequencies surrounding the center frequency. This includes the frequencies within that band as well. The bandwidth/Q adjusts the width of that selected band, which determines how wide or narrow to boost/cut frequencies.
- High values 一 indicate a very narrow band.
- Low values 一 are wider/broader.
High values are also used to accentuate the center (and surrounding) frequencies when using HP/LP and Shelf filters. This is known as adding resonance, or a ‘resonant peak.’
ELEMENTS AND BAND-TYPES
95% of any EQ you use within your DAW (parametric EQ) has 3 main types of bands:
- BELL:
This band-type gets its name from its appearance which is shaped like, you guessed it, a bell. It allows you to Boost (increase amplitude) or Cut (decrease amplitude) the defined part of the frequency spectrum; with full control over the range (bandwidth/Q) that it covers.
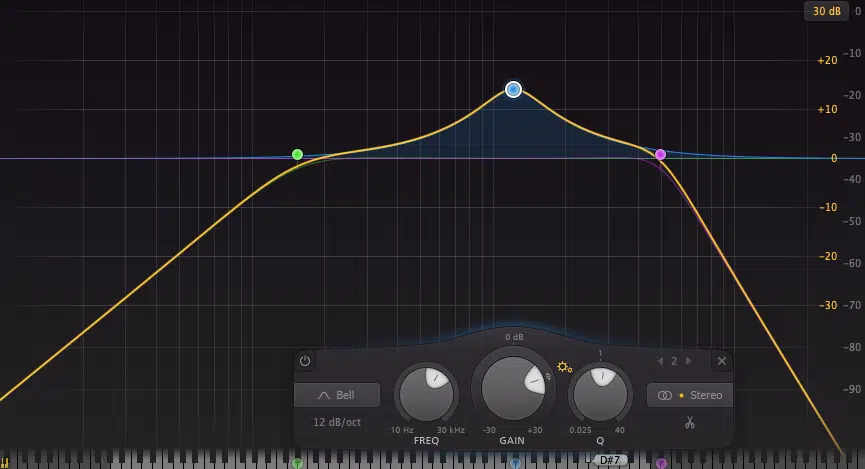
- This is the type/shape you will be using when applying adjustments throughout the entire frequency range. It is the most flexible band type.
When you hear “cut some of the mud out of the mid-range” or “boost a few dB at 6K,” it’s referring to (and achieved by) the use of a bell.
- HIGH AND LOW-PASS (HIGH/LOW CUT) FILTER:
These curves are used to completely remove a set of frequencies either below, or above the cutoff point.
- HIGH-PASS FILTER 一 used to reduce and remove the frequencies below the cutoff point (the lower frequencies), allowing the frequencies above the cutoff to pass through.
- LOW-PASS FILTER 一 used to reduce and remove the frequencies above the cutoff point (the higher frequencies), allowing the frequencies below the cutoff to pass through.
How much reduction exactly, is determined by the curve’s dB-per-octave setting (slope). This is adjustable on digital EQs, and fixed to 1 or 2 Values on classic hardware, or analog-modeled EQs.
Standard (fixed) values usually come in the 12dB and 24dB varieties.
3. HIGH/LOW-SHELF FILTERS:
Unlike the ‘pass’ filters above, shelf filters allow you to boost, as well as attenuate frequencies above and below the (frequency) cutoff points, but in a less drastic way.
Shelf filters are great for making general changes to a sound’s signal. They produce very natural-sounding results and apply a consistent, simple amount of gain-boost or attenuation to the high/low-end.
High-shelf filters do not completely cut out frequencies, but rather gradually raise/reduce frequencies based on how much gain-alteration is applied.
- HIGH-SHELF FILTER 一 boosts or cuts frequencies above a set cut-off, by a defined amount. Use this filter when you want things to sound brighter, or duller within the top-end without cutting the frequencies out altogether.
- LOW-SHELF FILTER 一 boosts or cuts frequencies below the frequency cutoff.
Attenuate with this filter when you want things to sound less bass-heavy.
Boost with this filter when you want it more bass-heavy… in moderation, of course.
When using an EQ’s band to add or remove a group of frequencies, the units are measured by decibels (dB) per octave.
EQ: COMMON PRACTICES
As you know, EQ is used to adjust the volume of one frequency (or a range of frequencies) for corrective or enhancement purposes.
The most common application is on individual elements so they work well together… Hence the birth of the term ‘mixing.’
You will also use it on a more [macro] level — to mix together groups of tracks or busses with other groups of tracks or busses — as well. This includes drums, percussion, and melodic elements of a mix.
When you EQ individual signals/tracks that make up these busses or sub-mixes, it gets rid of any clashing and provides extra fluidity as well.
Clashing is when multiple frequencies mask or cancel each other out because they occupy the same space.
Finally, it’s applied onto the Master Bus (or session). This is where you can make your final touches in order to balance out your mix as a whole; adding very subtle dips and boosts where needed.
It’s during this process that vintage/hardware EQs truly shine. They beautifully ‘sweeten’ and polish your mix as a whole.
EQ’ING YOUR LOW-END
The low-end is a very sensitive, delicate zone. Instinct will probably tell you to boost the hell out of it, but you have to fight that urge!
- Anything below 20-30Hz you should typically cut out using a high-pass filter, with a gentle slope.
- Make a small dip in the 250Hz-500Hz range (to prevent low-mid frequency buildup).
- Boost its surrounding areas when necessary.
Depending on the signal, a drastic high-pass ‘cutoff’ value may be needed.
Make sure you do not remove too many of the sub-bass frequencies (around 35-55Hz). Without them, the bass will only be heard, not felt.
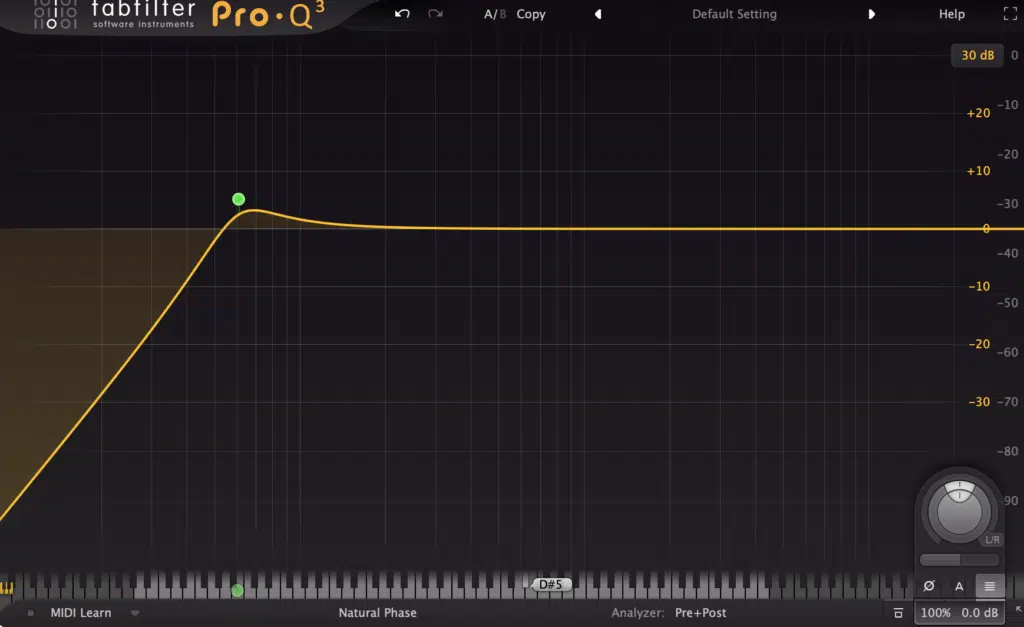
Perfecting the low end is about taming frequencies so they don’t build up on bass-heavy systems or decimate the signal. The most common playback speakers can’t handle it.
Remember: a deep, ’bumpin’ low-end is about controlling the necessary frequencies so the ‘true’ low end can shine through.
THE PITFALLS OF EQ
The phrase ‘louder is better’ is your worst nightmare, and just one (of many) reasons EQ-ing in isolation is a terrible idea.
Boosting all components of your track simply because they sound dope in solo is super destructive. In reality, you’re just hurting all the surrounding elements in the process, not just the track itself. This is referred to as the ‘EQ trap.’
- When in doubt, remember these four words: never mix in isolation!
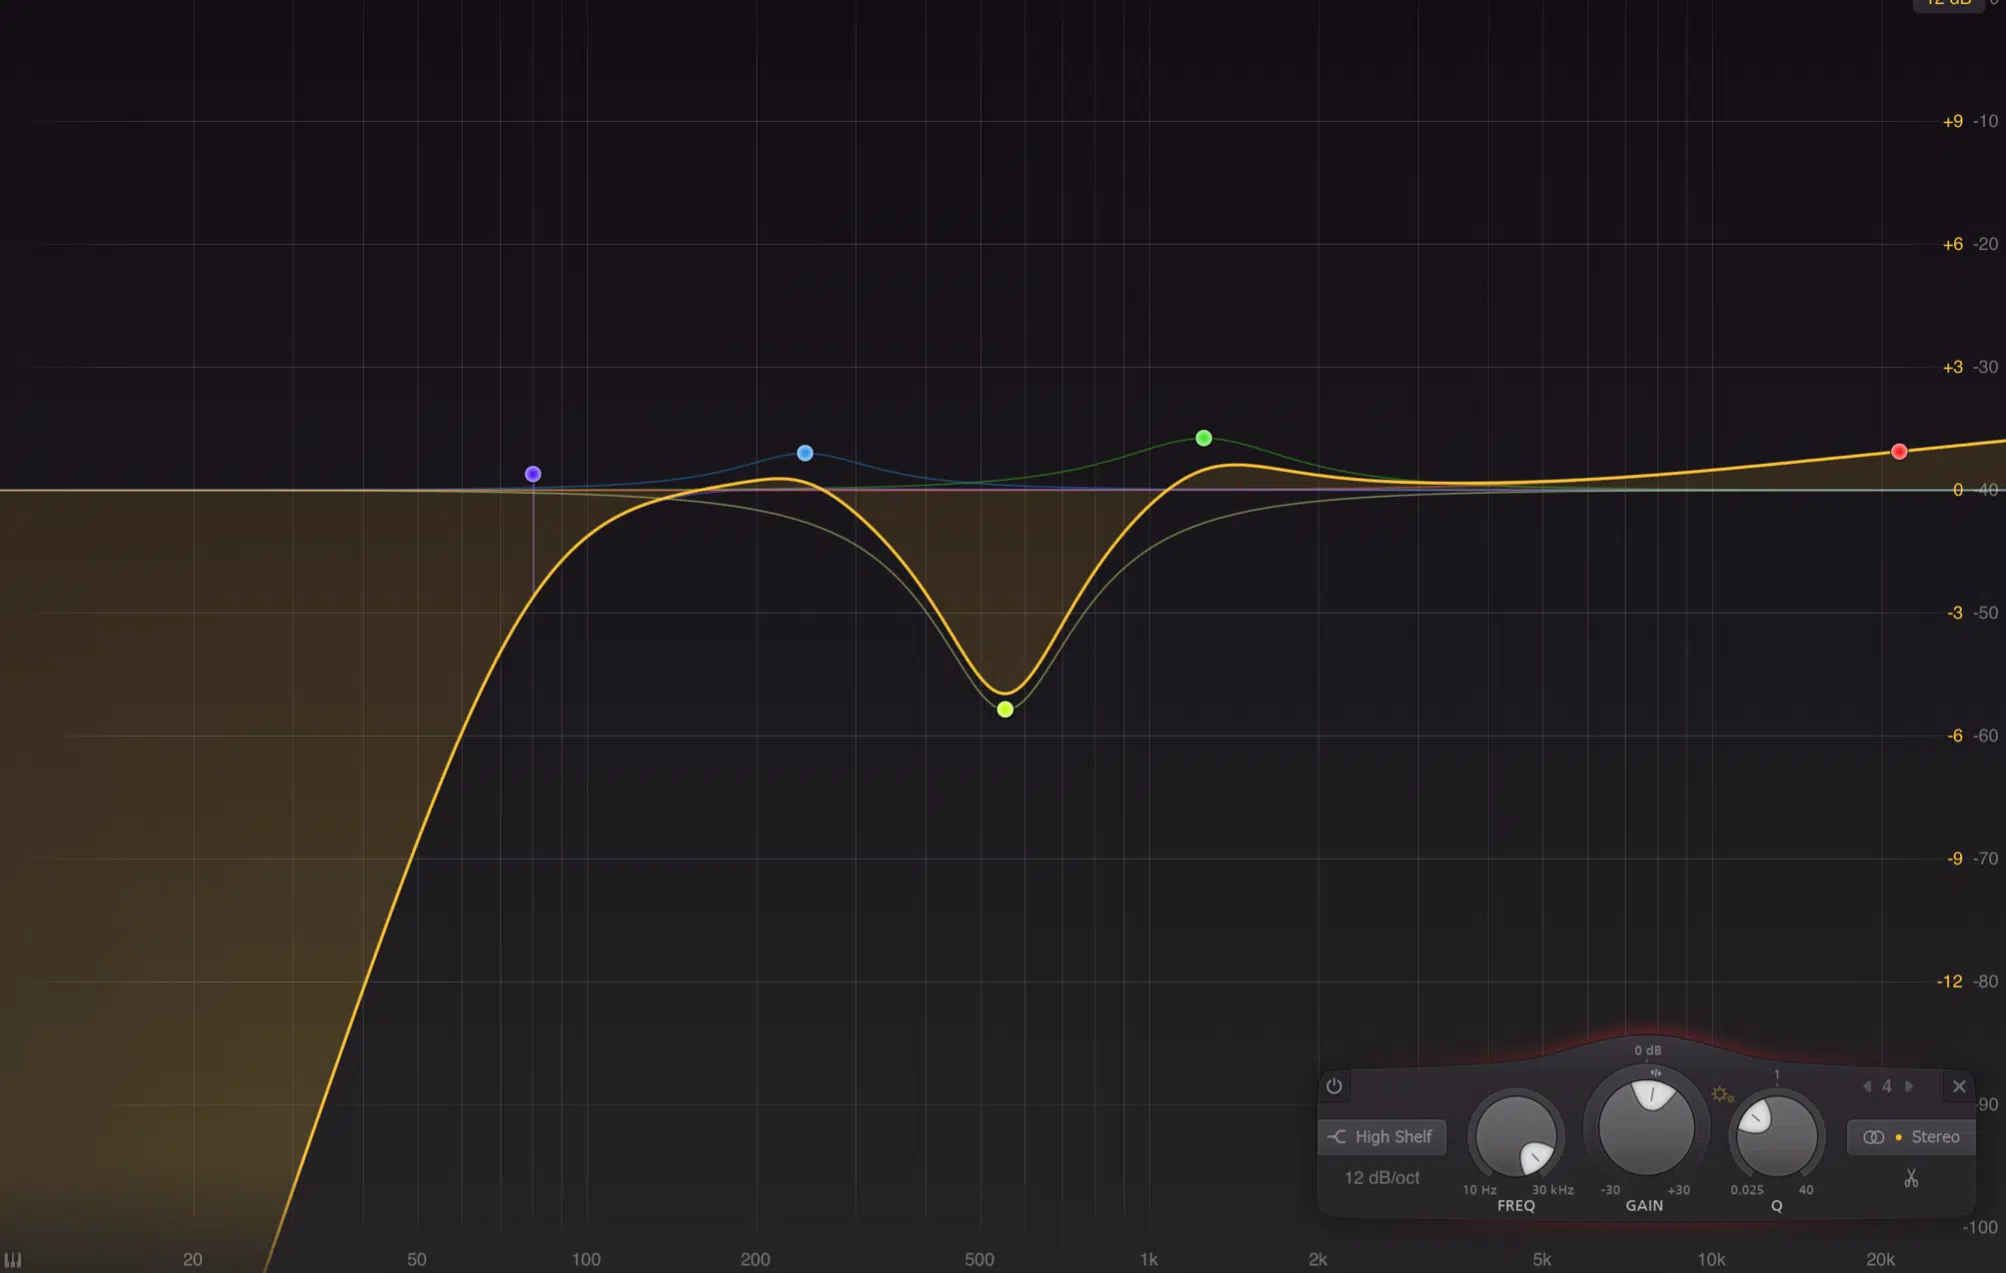
Sometimes a major cut requires a supplemental boost to retain its character.
EAR FATIGUE IS VERY REAL
Although this may sound obvious, I feel the need to say it anyway. Too many times I’ve seen a mix completely destroyed by people thinking they can’t be affected by ‘Fatigued Ear Syndrome.’
Ear fatigue occurs when you’re listening to audio and/or mixing for more than 45 (consecutive) minutes without a break, especially on headphones.
Your ears become tolerant to the upper-frequency range, and you start to lose sensitivity. This completely alters and distorts your perception of it.
Have you ever gone to bed thinking you had the best mix in the world, only to wake up the next morning with a seriously different opinion? 一 This is why you take breaks!
While over-boosting at any frequency level can hurt your ears, the most sensitive is around the 3K mark. Using any additive EQ in that area will end up hurting the ear.
This must always be taken into consideration when applying subtractive EQ as well, to ensure your listener’s ears don’t fatigue quickly.
If you apply the tips above, and it still sounds harsh to the ear the next day, the 3K zone is usually the culprit. Look there first. Odds are, you didn’t take a break when you were supposed to and your ears were desensitized.
If the problem doesn’t lie there, it’s the top end. Sometimes you just need to scale things down a bit (or a lot).
Never reply when you’re mad, never make promises when you’re happy, and never think a mix is done until you listen back the next day… even if you took sufficient breaks.
EQ TIP #1: ONE SIZE DOES NOT FIT ALL
Certain elements demand some sort of high-pass filtering, such as live recordings, there’s no denying that. However, it’s never wise to apply them just because you think you’re ‘supposed to.’
- There are no happy accidents with EQ. One wrong move can jeopardize everything.
Let’s say you put a steep high-pass filter on all the tracks at 60Hz. Your entire mix will then be devoid of any sub-bass frequencies; the desirable ones that can be felt more than heard.
- Unless you’re absolutely sure something needs to be excluded from the top or low-end: don’t cut it!
When applying a high-pass filter, do not set it to a ‘default’ frequency. Also, make the cutoff as low as possible.
Just because things don’t necessarily sound bad, overdoing it will make things sound fake or unnatural. This is bad for any signal you deal with, especially synthesized ones.
EQ TIP #2: SOMEONE CALL THE PARAMETRICS
When it comes to mixing and producing, you should always use a Parametric EQ. You’ll be able to easily manipulate the parameters in real-time, as they are either partially, or fully adjustable.
When it comes to making your mix fluid, this is the best option by far for both Additive and Subtractive EQ.
- With a Parametric EQ 一 you have control over any frequency within a specific range or the entire spectrum. You can control the bandwidth (or, ‘Q’) of each individual filter/band.
- As opposed to Graphic EQ 一 which only offers gain-control over a fixed set of frequencies and Q.
If you detect ANY unwanted or problematic (resonance) frequencies, the Bandwidth control (‘Q’ or ‘Resonance’) can fix that with unmatched precision. You’ll be able to remove some, or all of the noise as you see fit.
When you use these types of extreme bandwidth/Q settings, be aware of phase issues, as they will be your main concern.
- The higher the values, the higher risk of phase issues.
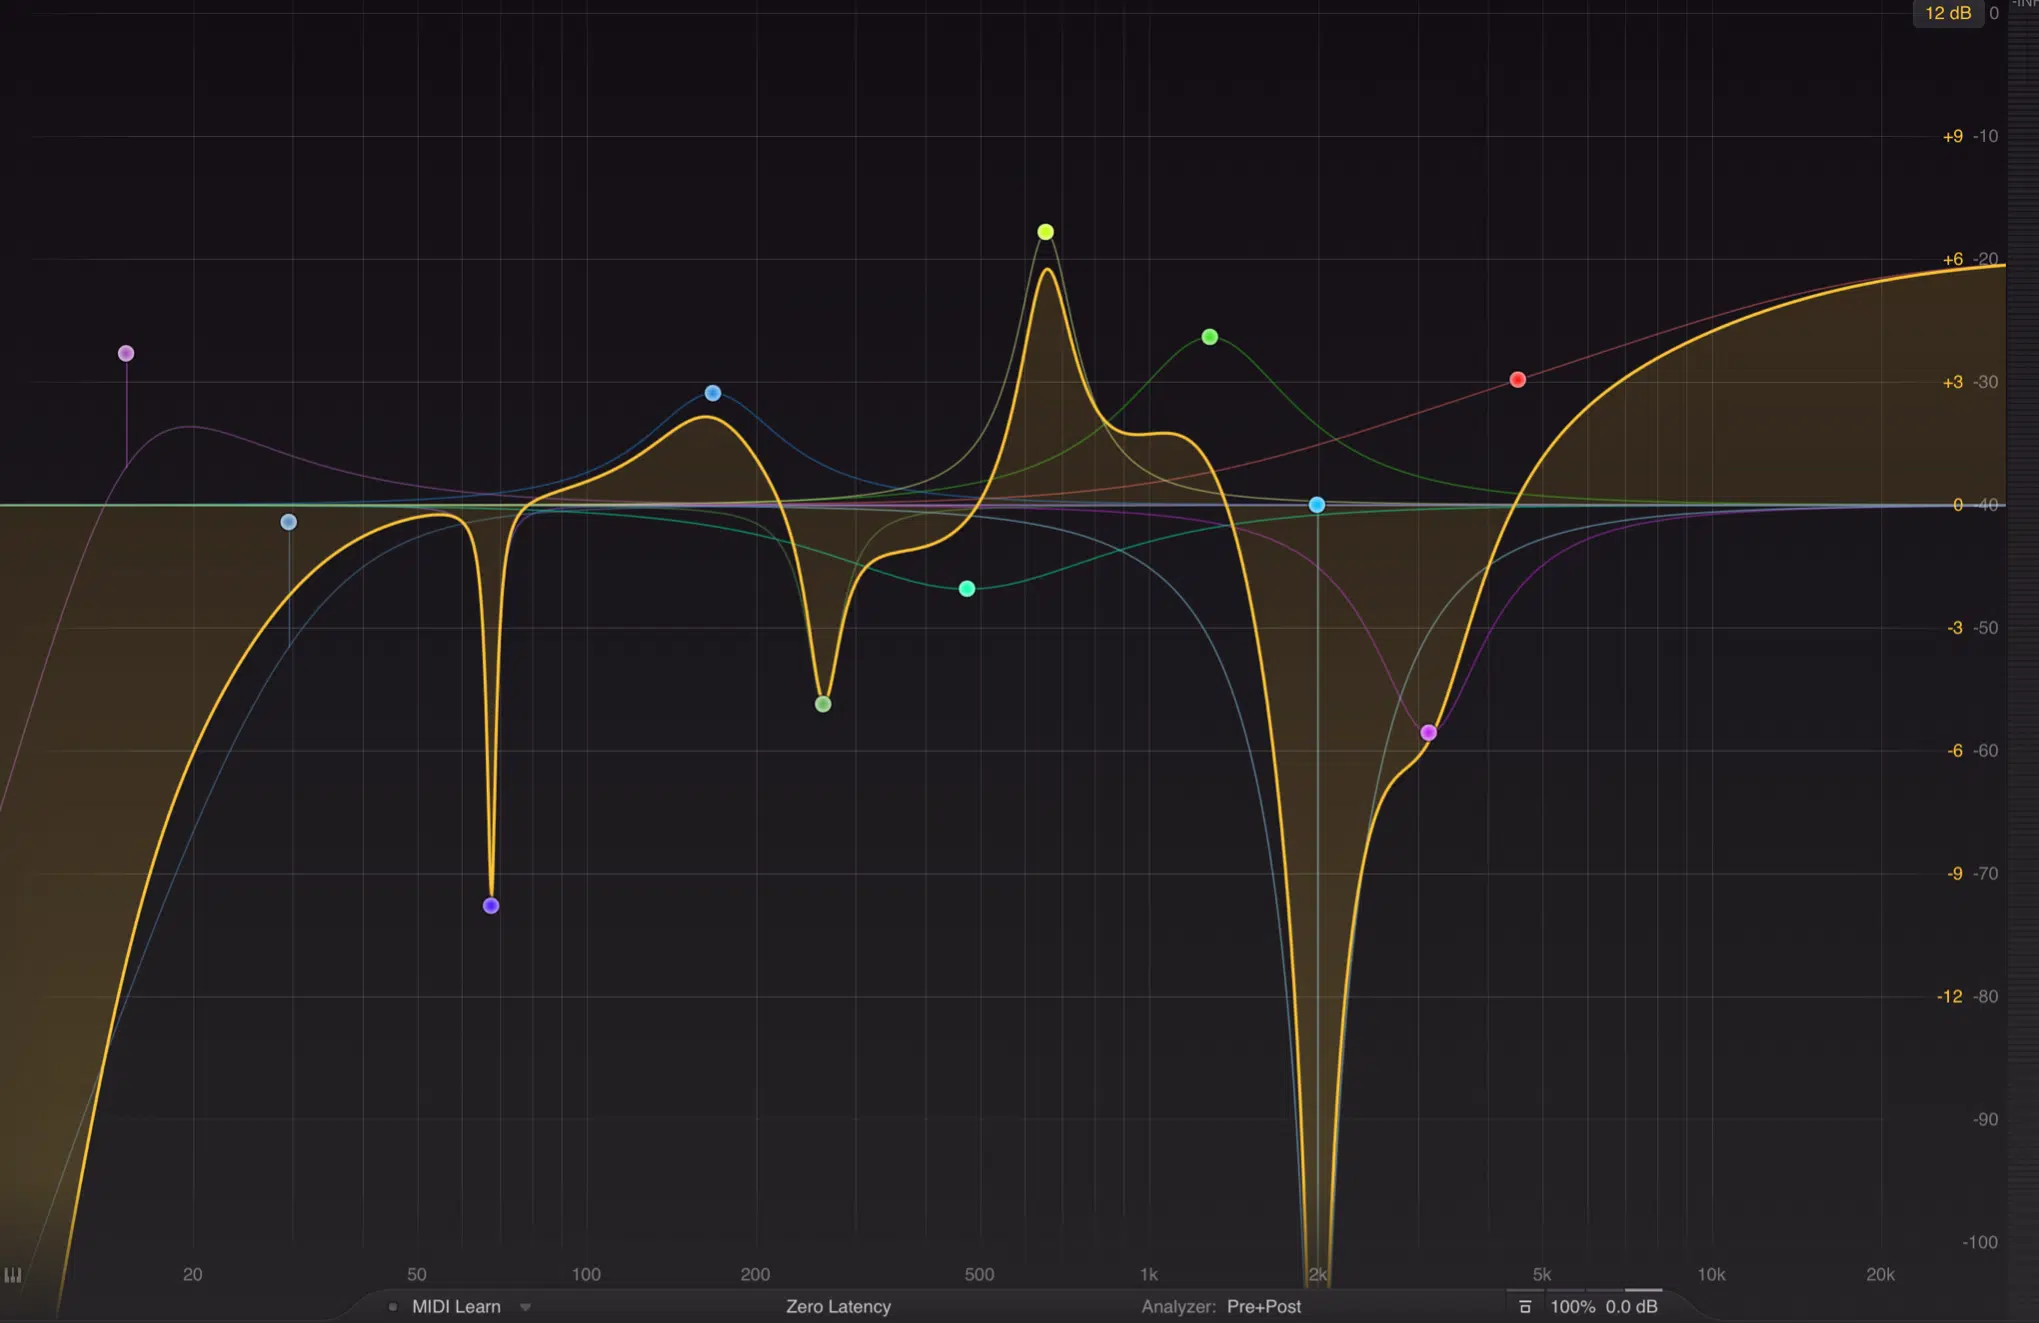
Parametric EQs are the most flexible EQ types. Always watch the Phase.
EQ TIP #3: IT’S TIME TO SPLIT UP
The use of processors on the Master and Bus tracks must be subtle, so splitting up the EQs on your Master (or sub-mix) Busses is super beneficial.
STEP 1 一 Place yourSubtractive EQ before all other processors. Administer cuts where needed.
STEP 2 一 Apply the desired compression (very lightly; 1.5 ratio max when used on the Master or Sub-Mix Bus) and/or all additional processors and additive processing. This includes saturation, and all other ‘modulation’ effects, such as flangers or a chorus.
STEP 3 一 Enable your Additive EQ, and boost where you see fit. Be careful not to overdo it. This sends the signal through the processors, with all the problematic and unwanted frequencies already removed; making it super clean.
- Instead of making your boosts right away, you’re waiting until post-processing in order to only boost the processed signal without overdriving the compressor or other processors.
This results in a more enhanced, sweeter tone than the one produced if you didn’t split up your EQ. This is the ideal (additive) situation in which to grab an analog plugin or vintage EQ.
EQ TIP #4: IT’S ALL ABOUT ANALOG
Phase issues are to be avoided at all costs…
However, when it comes to classic analog/hardware (and their plugin counterparts), it’s a completely different story. In fact, its unique use of phase is actually what makes Analog EQs so coveted.
So, next time you want to add a little something extra to a signal: swap a standard EQ-curve out for an analog-modeled one. It might be just what you need.
- Start looking at analog EQs as additive-effect processors. They are ideal for additional harmonic saturation and warmth, without the listener even knowing it’s there!
NOTE: Certain hardware models, such as the Pultec and SSL’s line of EQs, are replicated more than others. They offer something special in terms of sonic characteristics.

Analog EQs ‘color’ the sound in a way digital EQs cannot.
If you want to practice your new EQ skills, the perfect presets are FREE, and right at your fingertips in the Unison Serum Essentials and Unison Omnisphere Essentials.
These professional-quality presets are fully synthesized, so it’s not about correction, it’s about enhancement and manipulation.
EQ TIP #5: THERE’S SO MUCH TO ‘GAIN’
Since you’re going to be applying cuts and boosts to various frequencies, the gain is going to be affected, sometimes radically.
This may work in your favor for very subtle adjustments.
However, if you have already gain-staged your mix properly (which you always should), you’ll need to keep your track’s ‘gains’ at (relatively) the same level throughout the entire course of your mix.
- Use the EQ’s ‘Output Level’ (or, ‘Output Gain’) for proper gain-compensation, and to ensure a balanced mix.
- Use the EQ’s ‘Input Level’ when you need to feed any more, or any less of the signal through the EQ before it gets processed.
DO NOT confuse the Output and Input sliders/knobs. That could cause an absolute disaster!
Just because you are altering the gain of a specific frequency range, it doesn’t mean you want the signal’s level (as a whole) to change.
EQ TIP #6: POLAR OPPOSITES
EQs are notorious for causing some level of phase ‘smearing’…
Thankfully, there’s a ‘Polarity’ switch that can be used to flip a signal’s polarity when it becomes out of phase. Or, to ensure that it has, or hasn’t.
- Flipping Polarity 一 the rotation of a signal’s positive/negative state, so it varies from its original position.
- Shifting Phase 一 nudging the position of a signal in time.
To help you picture this, think about putting batteries into a remote incorrectly. You need to flip them around in order for the remote to work properly.
If your signal is in-phase before the EQ is applied, and then suddenly becomes ‘out-of-phase,’ simply flip its polarity so it’s back in phase again. Super simple, but extremely beneficial.
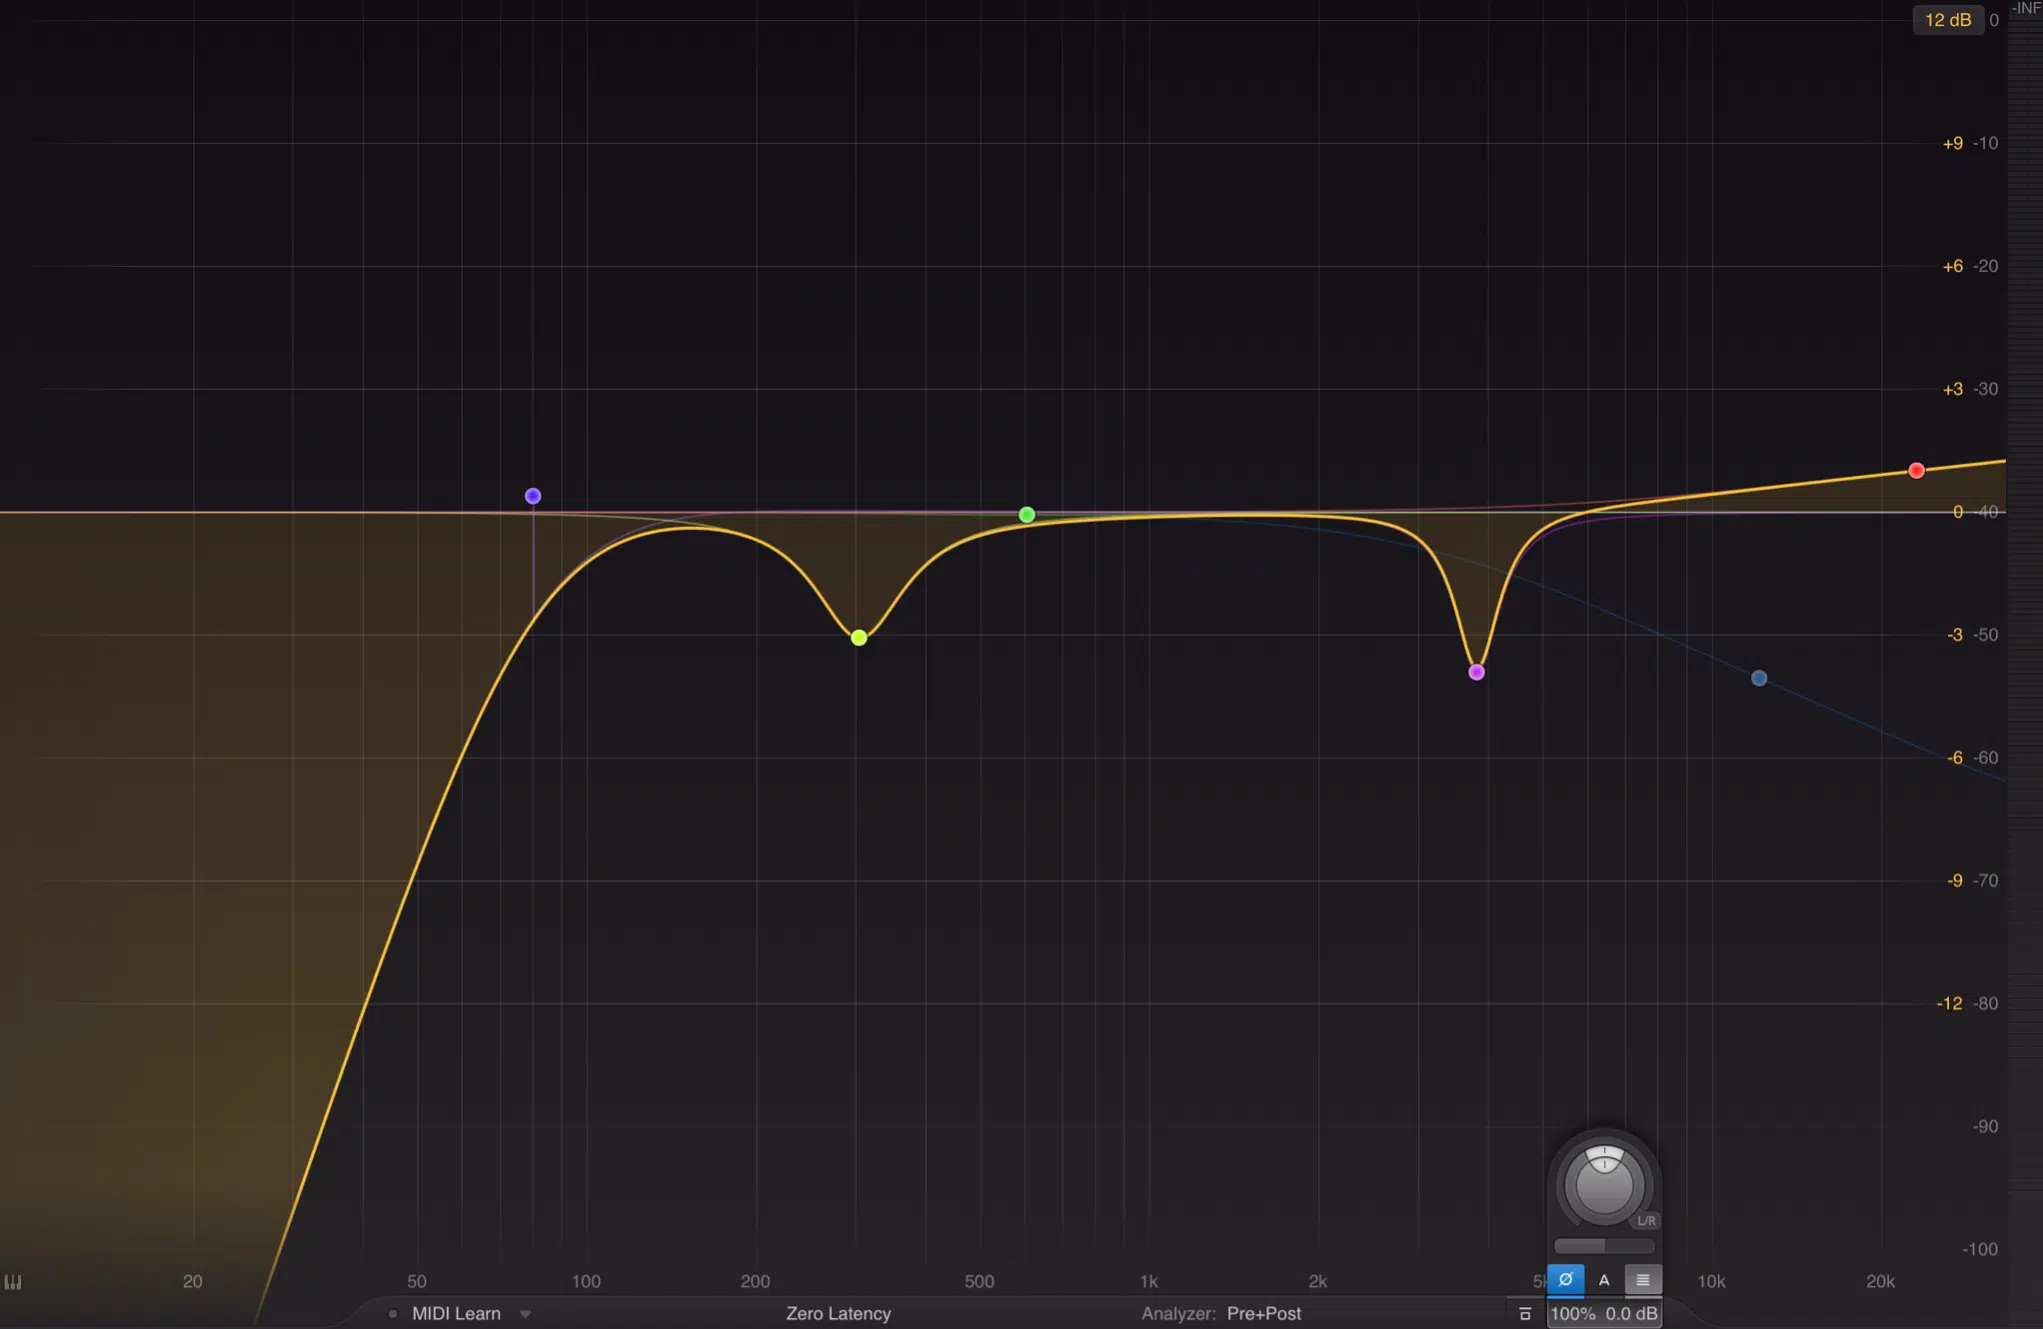
The phase is flipped within the EQ.
NOTE: If you’re not completely sure whether or not the EQ is throwing your signal out of phase: play it back and flip the polarity continuously to determine if a rotation should be applied.
One key thing to take into consideration is Volume. If you notice one has dropped by any degree when you flip the phase back and forth (even by a small amount) that’s the out-of-phase one.
MIX TIP #7: dBOUBLE UP
When you increase or decrease any frequency by a defined octave: it’s simply doubled up, or divided in half.
For example, in western-tuning middle A is always 440Hz:
- The A note above it resides at 880Hz, as it doubled from the original placement.
- The C note below it resides at 220Hz, as it is divided in half from the original placement.
Now, let’s say your band’s dB-per-octave value is 12dB…
The band’s cutoff point (its ‘frequency value’) will be affected by multiples of 12dB-per-octave in either direction continuously; 12, 24, 36, etc.
If the HP cutoff-point is located at 1kHz, then the frequencies at, and below it will be attenuated by multiples of 12 dB each time:
- 1kHz – attenuated by 12dB
- 500Hz – attenuated by 24dB
- 250Hz – attenuated by 36dB (and so on)
You’re given the various dB-per-octave slope options for each band. Your choice will depend on how much gain-change you want to apply to the signal.
- Higher values affect the gain more.
- Lower values are more gentle on the gain. Referred to as the slope’s ‘steepness.’
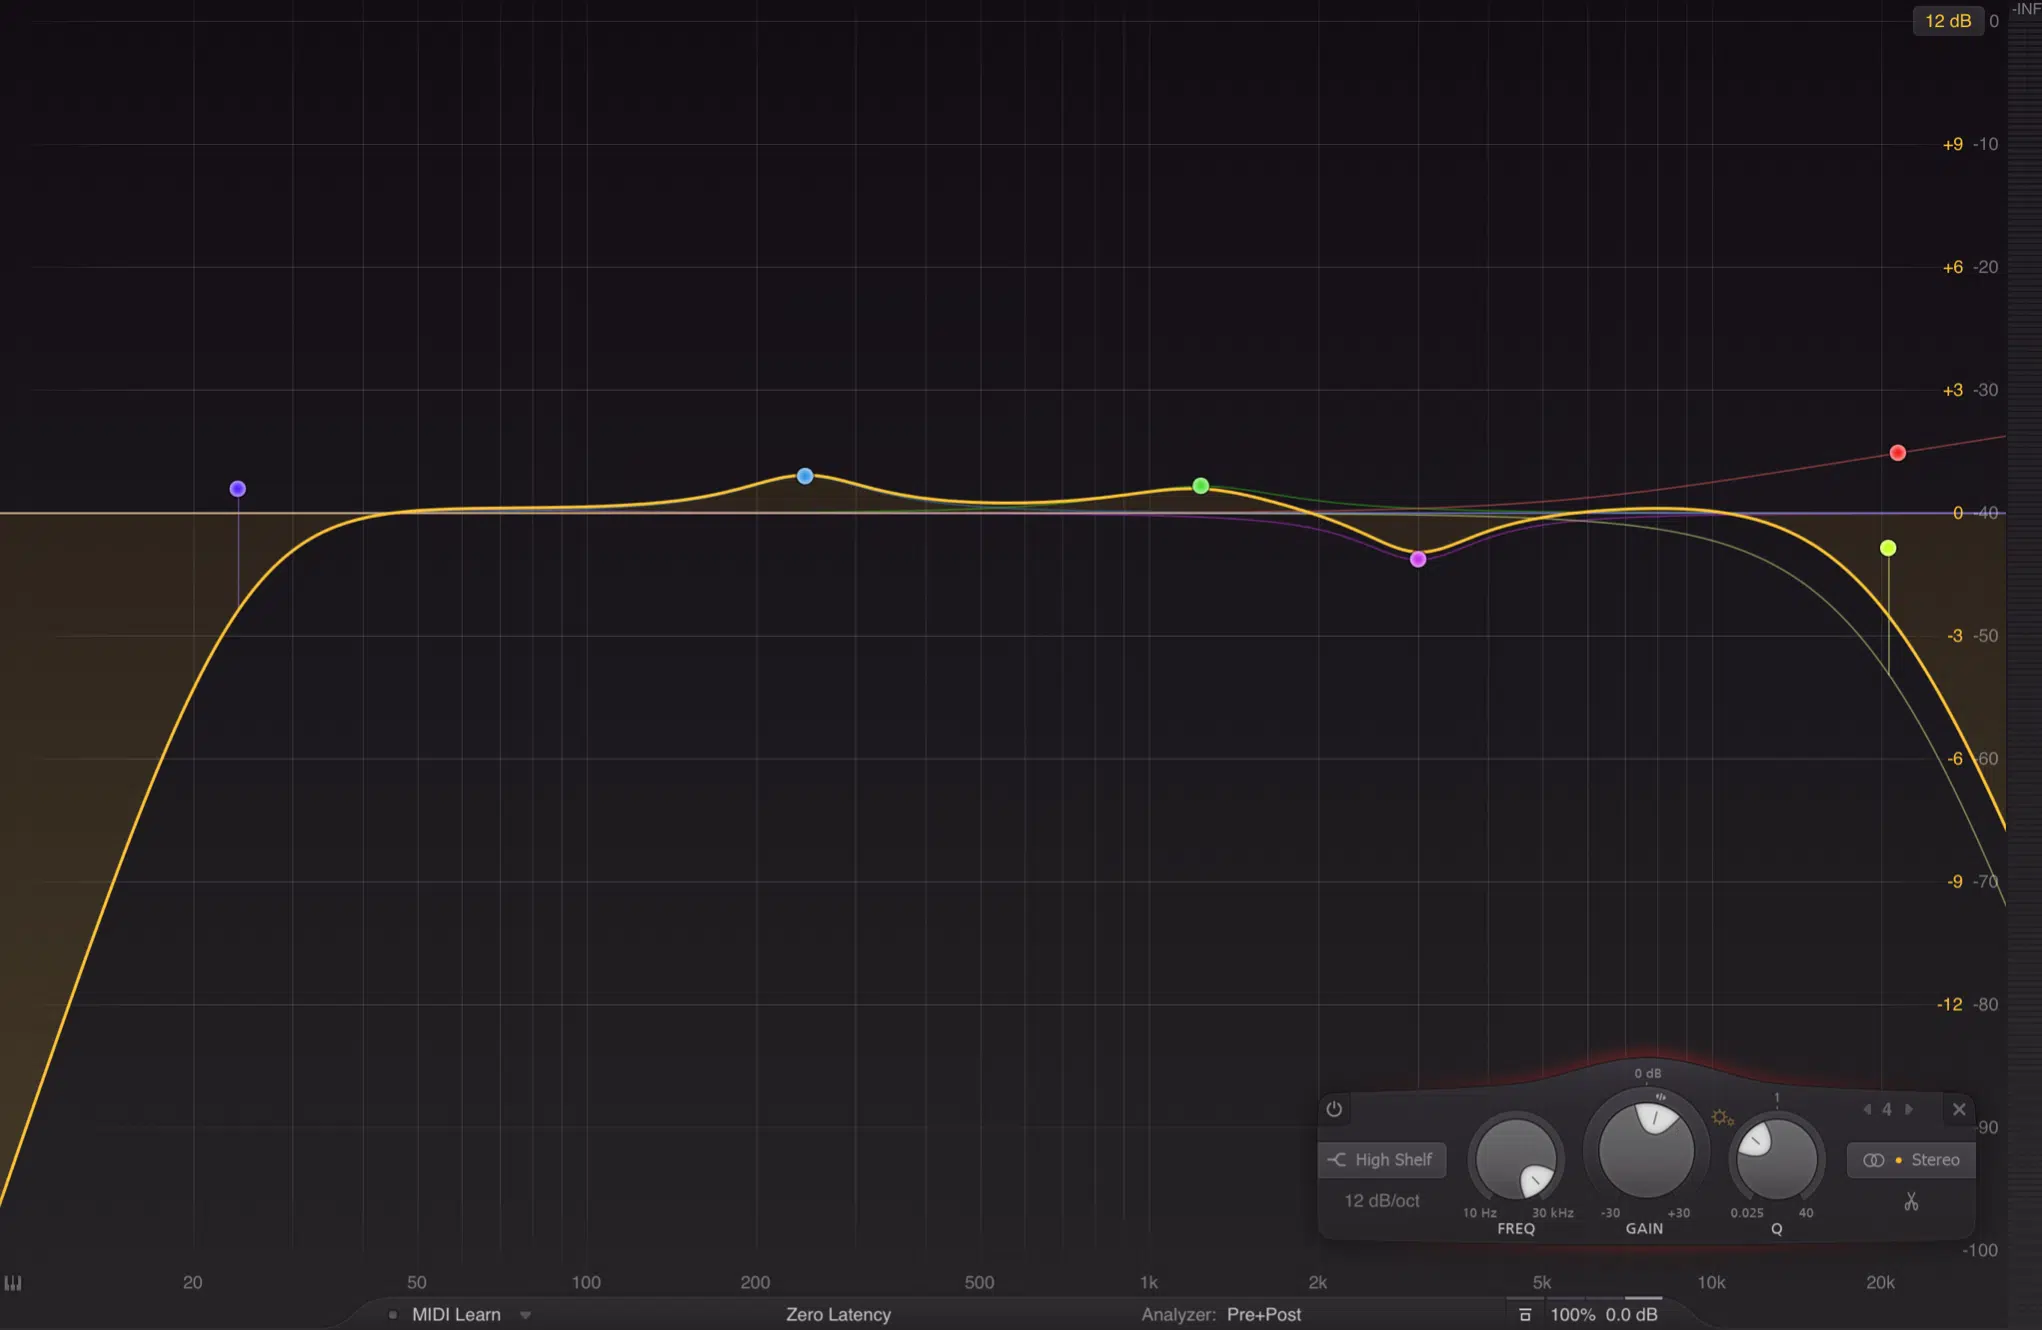
Your Master track EQ should ALWAYS look like this.
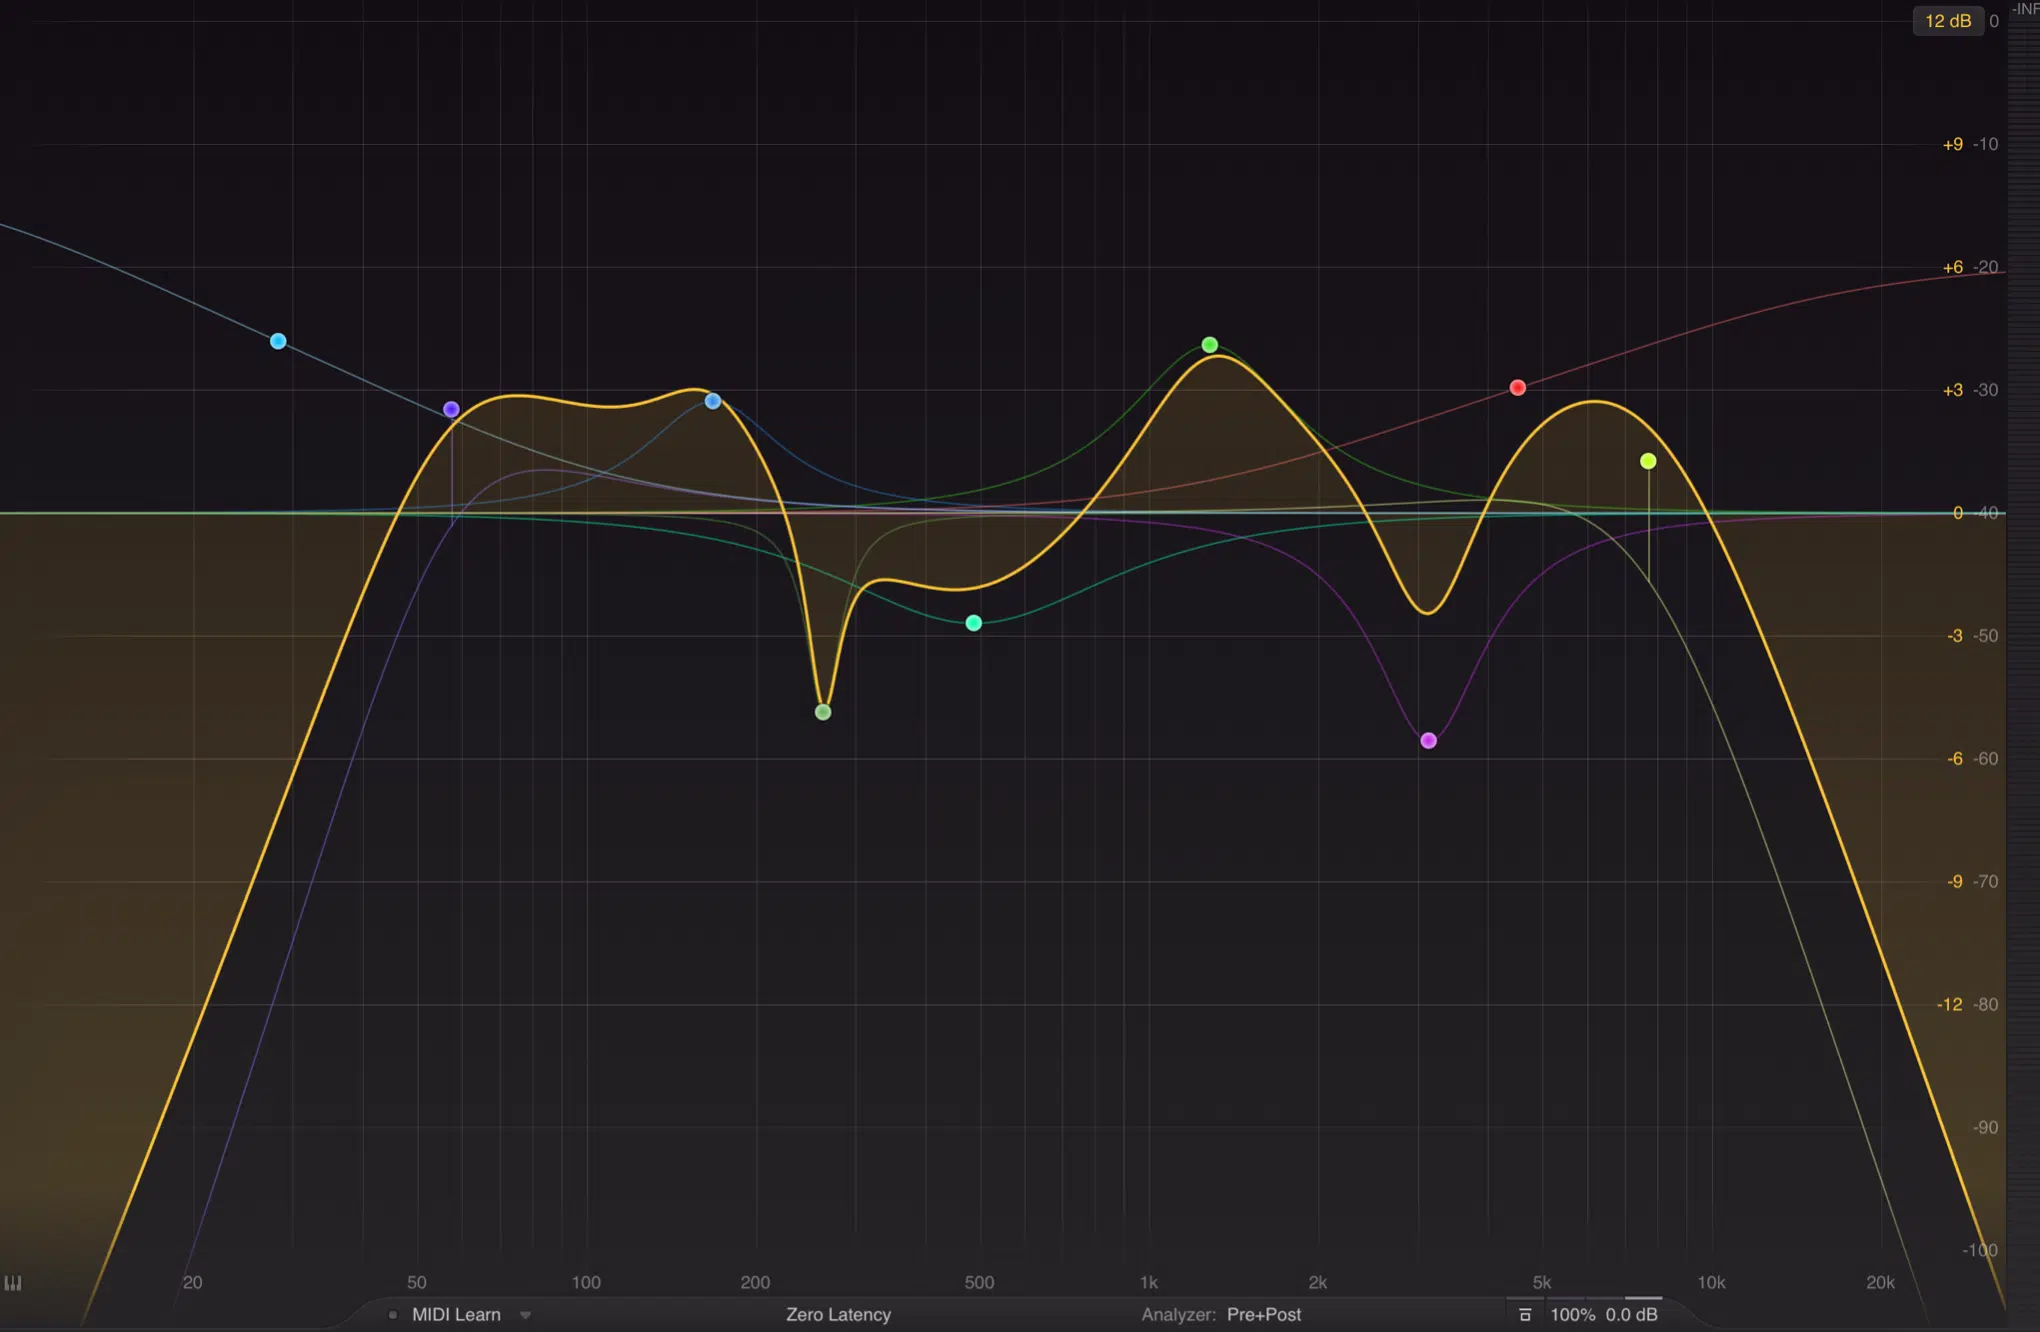
Your Master track should NEVER look like this.
PRO TIP: When applying a Linear Phase EQ on the Master, or when signals become out-of-phase due to EQ, it alters the phase differently; to a lesser degree than standard (minimum-phase) EQs.
This may already be an available processing option/mode, like FabFilter products offer, or presented as a separate EQ entirely.
The downside to this method is above-average latency (even values greater than a second) and high CPU.
Most of the time, your standard (minimum-phase) EQ is the way to go.
EQ TIP #8: IT’S NOT A PHASE… OR MAYBE IT IS
The likelihood (and severity) of phase issues usually depends on:
(A) – The amount of gain alteration that’s affecting the signal.
(B) – How drastic your settings are.
The sharper and steeper the adjustments (between the curves and their respective ‘Q’ values), the more phase shifts and inconsistencies will occur.
The human auditory system at its best perceives frequencies roughly between 20 Hz (lowest pitch) and 20 kHz (highest pitch).
Those that fall below 50-60 Hz (sub-bass frequencies) can’t really be heard but rather felt… and usually not even that.
EXPERT MODE: ON
- Dynamic EQ 一 a Multiband compressor that, opposed to only offering gain-reduction in ‘ratio’ values, allows you to boost or cut any frequency dynamically (in ‘dB’ values) once it surpasses the set threshold.
This also serves as an Upward/Downward Expander and can replace a multitude of processors within your chain once you’ve mastered the technique.
Most of them offer sidechain functionality. When it comes to side-chaining the kick with the bass, for example, you can achieve the ‘pumping’ you desire with pinpoint accuracy.
- It’s more accurate than traditional multiband compression and responds in a much tighter, quicker fashion.
Dynamic EQ is the more natural-sounding option. It can serve as a Transparent De-Esser, as well as a harsh-resonant reducer.
There are also Spectral Shapers and processors available, which include a combo of Dynamic EQ and Saturation of some sort.
FINAL THOUGHTS
EQ can cause more harm than good if used incorrectly or prematurely, so remember: practice, patience, and persistence are your best friends.
Have fun and take your time learning it, as there’s no better teacher than experience… Once you do, you will have the sickest-sounding mixes around!
Get your FREE Unison Artist Series Essentials pack for EQ’d samples that will fit perfectly within your mix, and will have it sounding super professional.
While you’re there, make sure to grab the FREE Unison Essential Drum Loops for exclusive 808s, drums, one-shots, and loops that you can easily load, so you can move on to the next stage of your workflow without worry.
Until next time…
1 comment
Comments are closed.


