Sound Design itself is a complex, never-ending topic. While it can be extremely intricate, more often than not, slow and steady wins the race.
Instead of spending hours trying to create the dopest one-shot, we’re breaking down the top ways to not only build a foundational backdrop, but how to do it holding down just one note as well.
You’ll be able to create songs like you never imagined.
After all, today, it’s more about catchy vibes than catchy melodies, and ‘atmosphere’ is everything.
By creating music that can be played anywhere, in any situation, it’s more likely to be played everywhere… and isn’t that always the ultimate goal?
That’s where Soundscapes come in.
Table of Contents
WHAT ARE SOUNDSCAPES?
Soundscapes are used to create the overall atmosphere of the musical story being told.
By nature, they describe a broad range of elements (like background noises, sound effects, etc.), but they all usually have three things in common:
- Envelope structure 一 medium-to-long Attack and Decay, mid-level Sustain, long Release.
This is not set in stone, but the goal of your soundscape is to encapsulate your listeners. Therefore, adding a pluck or percussive patch to enhance the attack would be counterproductive.
It takes away from the overall impact of the actual percussion (which plays a very important role).
- They contain a wide range of frequencies 一 if not the entire frequency spectrum.
- Typically have a very wide Stereo Image 一 responsible for a big part of the depth they have and impart on a track/scene.
Sometimes you will only want your soundscape to serve as a transitional-element, or play a relatively minor part (as a backdrop for an existing chord progression for example).
If that’s the plan, make sure to throw #1 (above) out the window and stick to allowing the soundscape to only encompass the frequency range you want, or it requires.
It doesn’t need to take center stage and be the defining characteristic of your track, but today we’re going over some of the ways it can be.
So, let’s dive in…
#1: ONE-NOTE WONDERS
For this technique, you’re going to:
- Use multiple synths.
- Select presets that span over the entire frequency spectrum (or the range you want your soundscapes to occupy), which you will layer.
This way, they can be played simultaneously and controlled/manipulated like any regular synth patch, without the need to carefully select samples.
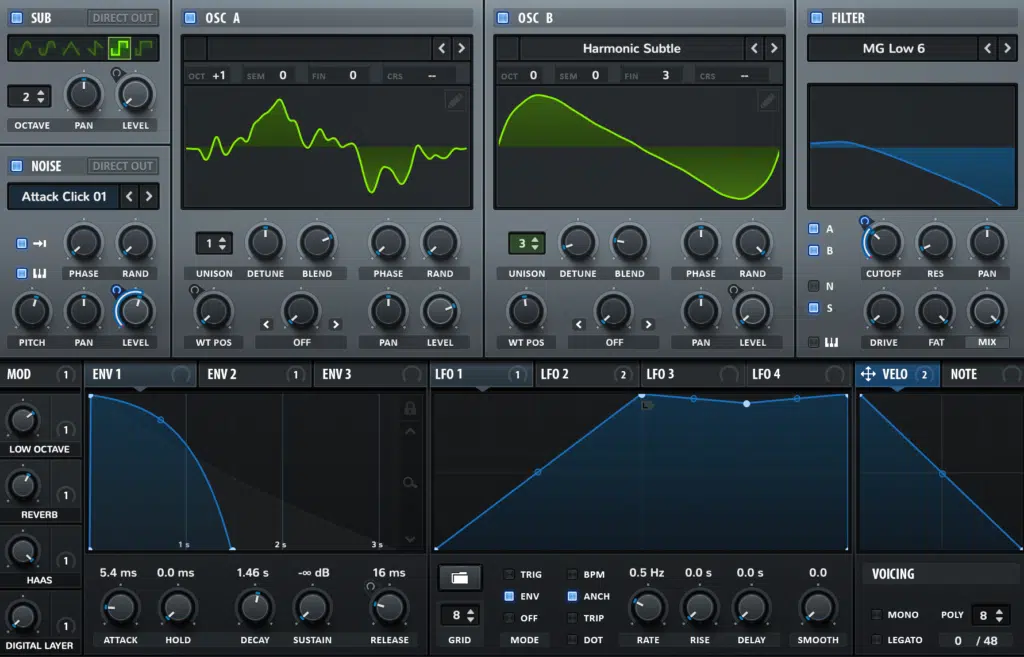
THE 3 SECTIONS/PRESETS TO USE:
- A bass (low-end, with the very bottom filtered; below 120Hz).
- A lead (to occupy the mid-range; filter out the rest).
- A pad/synth patch (filtered to occupy the top end).
From there, simply refine and sculpt each one’s frequency content so it meshes well with the others.
This can be done through the use of an EQ and filtering, combined with setting each synth’s Octave value so it’s spaced apart from the other synths; nipping the majority of clashing issues in the bud.
It will also ensure that your patch is a wide, broad soundscape, not just a layered sound.
#2: GENERATING CHORDS FROM ONE NOTE
This technique is applied just like the 1-note wonders, except you’ll be using just 1 multi-oscillator synth.
Serum is the perfect choice for this. You’ll have 2 main oscillators with the addition of the sampler and sub-osc, which gives you the ability to create 4-note chords (like a 7th).
Instead of restricting your synth to play only a major or minor chord, you can use make macro-adjustments intermittently 一 either in real-time or after the fact.
This is accomplished using Automation or your controller, with MIDI CC Data.
STEP 1 一 Select your osc./noise wavetables and sample sources. To keep things simple, use the default saw wave and Serum’s Warp and macro-functions to manipulate it further; in real-time, or later on.
STEP 2 一 Make sure to use a viable sample for the noise oscillator. One that will sound good pitched-up throughout the entire octave range, and blends relatively well with the other oscillators.
TO DO SO, EITHER:
(A): Load up a sample of a single-cycle wave so it behaves like a standard oscillator.
(B): Load up a sample of a synth containing minimal processing (that won’t also require separate processing) to blend in with the original wave.
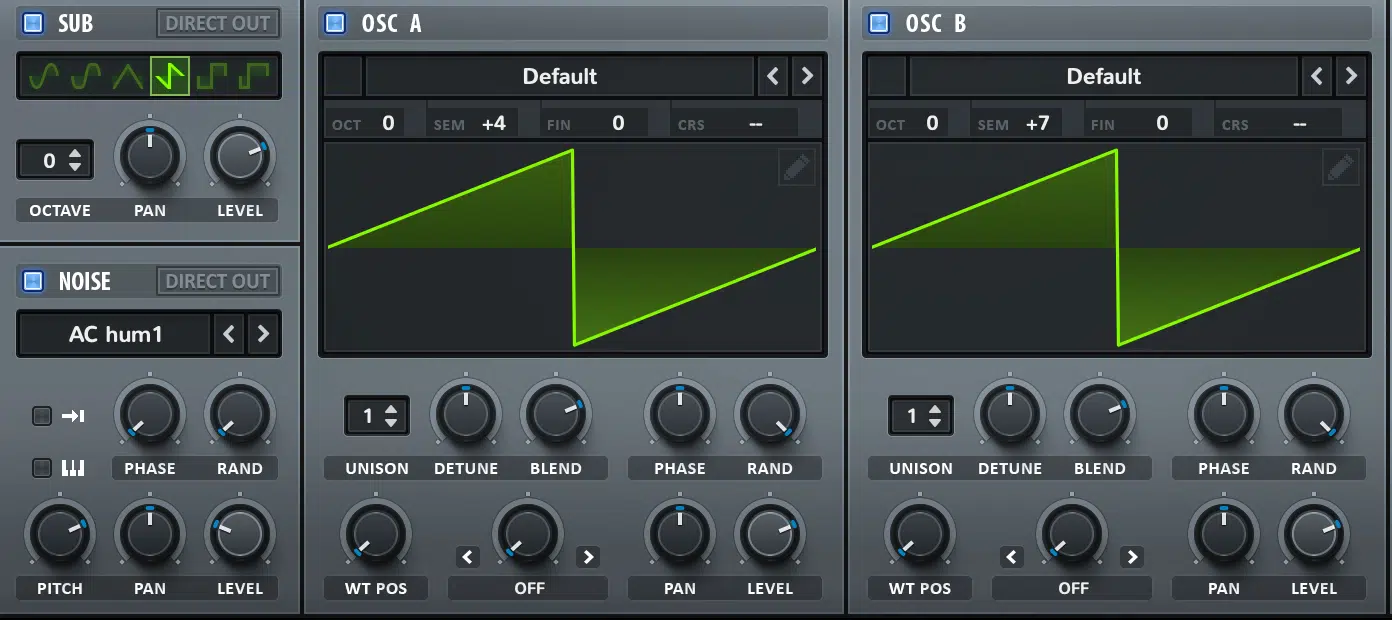
PITCH VALUES:
» OSCILLATOR 1: 4 semitones
» OSCILLATOR 2: 7 semitones
» SUB. OSCILLATOR: default/0 semitone
» NOISE OSCILLATOR: a sample pitched at +10 semitones (Major 7th) or +11 semitones (Minor 7th).
How much you pitch the sample depends on which chord you’d like Serum to generate in its default state.
STEP 3 一 Program your macros, to serve as a major/minor chord switch. Remember, a Minor chord is 10 semitones away from the root, and a Minor chord is 11 semitones away from the root.
WHEN THE MACRO IS AT 100%: Oscillator 1 drops to a semitone-value of +3 and the Noise Oscillator drops to a value of +10.
This works as a switch, that will drop each value for the noise osc./sampler and oscillator 1 by one semitone 一 any value above/below 50% will trigger the switch.
In Serum, this equates to routing Macro 1 to Osc. 1’s semitone parameter, at a value of -6. The Macro is routed to the Noise Oscillator’s Pitch, with Pitch Tracking enabled.
All you’ll need to do is input -1st as ‘st’ can always be used in Serum to convert and set any modulation values on pitch-related destinations into semitone values.
This is accomplished through the routing matrix and it automatically does the math for us… gotta love Serum!
NOTE: This setup can be reversed if you want a Minor chord to be its default, and a Major chord with Macro 1 at 100%.
Even without any manipulation, filtering, or processing, you’re already almost where you want to be, as you can successfully create massive chord progressions at this point (like you were playing a simple melody).
STEP 4 一 From here, it’s just a matter of enhancement and refinement, which will transform your basic, simple patch into something unique and mystifying.
This can be achieved in a multitude of ways, but Serum makes it easy and effective, with little effort, as it gives you extremely flexible routing options.
THE IDEAL MODULATION DESTINATIONS:
- » Filters
- » Envelopes
- » Wavetable Warp Modes
- » Effects
If you don’t have access to a decent 3-oscillator synth, use the sample layering technique to group multiple synths/instruments, so they can be played simultaneously.
THE ONLY DIFFERENCES ARE:
(A): Instead of choosing/layering different patches on each synth, simply choose a 1-oscillator synth patch
(B): Duplicate it for as many notes as you’d like the chord to contain
(C): Change the semitone value (refer to the values above) for each layer so, when combined, they make up a full chord
#3: ATMOSPHERIC BACKTRACK STACK (SAMPLE-LAYERING)
When it comes to this particular technique, the steps are as follows:
STEP 1 一 Select samples that mesh well together, without any (or, too much) alteration of Frequency Content (EQ).
In order to create a massive atmospheric backdrop through the use of Samples and Samplers, you must select ones that, when layered, are compromised of the entire frequency range.
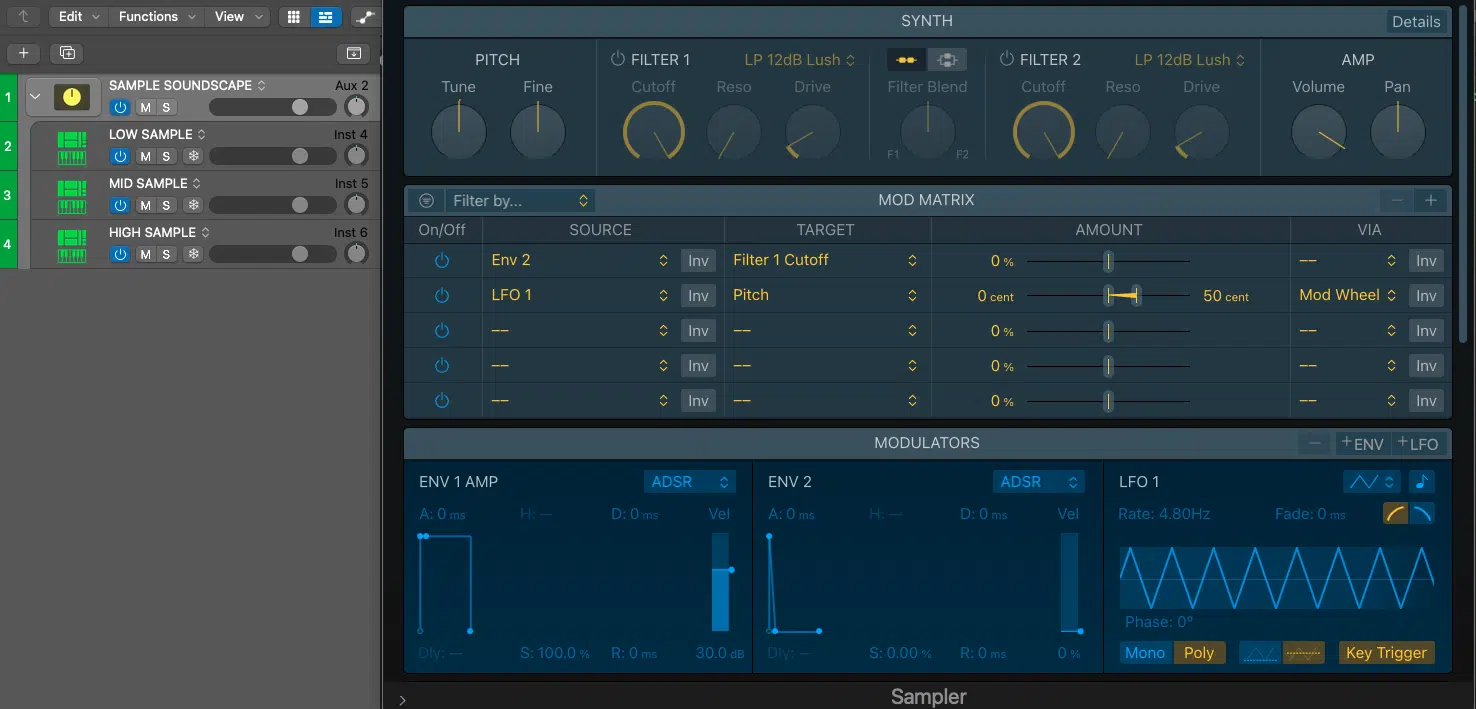
STEP 2 一 Select 3 samples, each 1 comprised of a different frequency range (low, mid, and high) so when they’re combined, the entire frequency spectrum is covered, for the most part.
Since your track is bound to have other elements, particularly its own, separate low-end instrument, look for a sample in the low range. Just make sure to keep anything below, or around 120Hz excluded for now.
So, in this scenario, consider ‘low-end’ to be in the range of 120-500Hz.
THE EASIEST WAY TO COVER THE ENTIRE RANGE:
» For low-end: sample.
» For mid-range: lead, or other synth-element.
» For top-end: a pad or string patch.
Once you’ve selected your samples, play them together to analyze if any EQ or additional processing is required in order to make everything gel.
Using a Spectrum Analyzer to account for any possible phase cancellations (or issues) is a great technique 一 keep an eye on the volume. Start with just 1 layer in Solo and, one by one, begin to stack them.
YOU HAVE PHASING ISSUES IF:
(A) You see any change in frequency content (unwanted reduction in a certain area).
(B) The Volume actually dips as you layer the samples, or when you turn their levels up.
Every so often, in order to fix this problem, it only requires a simple flip-of-phase (or, the reverse of polarity) of the troublesome sample.
The safest way is to use Filters or an EQ to remove the frequency content of the sample you don’t need/want (such as the top end of a bass sample) and isolate what you do, to ensure there’s no major overlapping of frequencies.
STEP 3 一 Load up all your samples and apply any needed processing to the sampler itself.
To produce an overall cleaner effect apply as much processing as possible ahead of time, bounce the results, and load those new, already processed samples into the Sampler.
If you’d like to play this soundscape 一 it’s time for the Sampler.
YOU HAVE THREE OPTIONS:
- Use a basic sampler that allows 1 sample to load at a time, open up 3 different instances of it, load the samplers, and group them so they can be played as 1 instrument/sampler.
- Use a multi-timbral sampler that allows you to load and process each sample both individually and as a whole.
- Merge and bounce these 3 samples together, processed and all. This is the ideal option if you don’t require individual control over each layer.
KEEP IN MIND: You can also mix and match; swapping a layer with a synth patch that works well (or better) than the one you modified.
The best place to look for, and take advantage of soundscape-ready presets is the FREE Unison Omnisphere Essentials pack.
If you have time, I recommend that you go all out with layering for ultimate flexibility. Plus, it allows you to edit, process, and swap any of these samples after the fact.
If frequency layering is either too much for you, or if your track is already filled to capacity: take a series of similarly-themed, yet different samples and slowly intercross them 一 fading them in and out slowly 一 in a series.
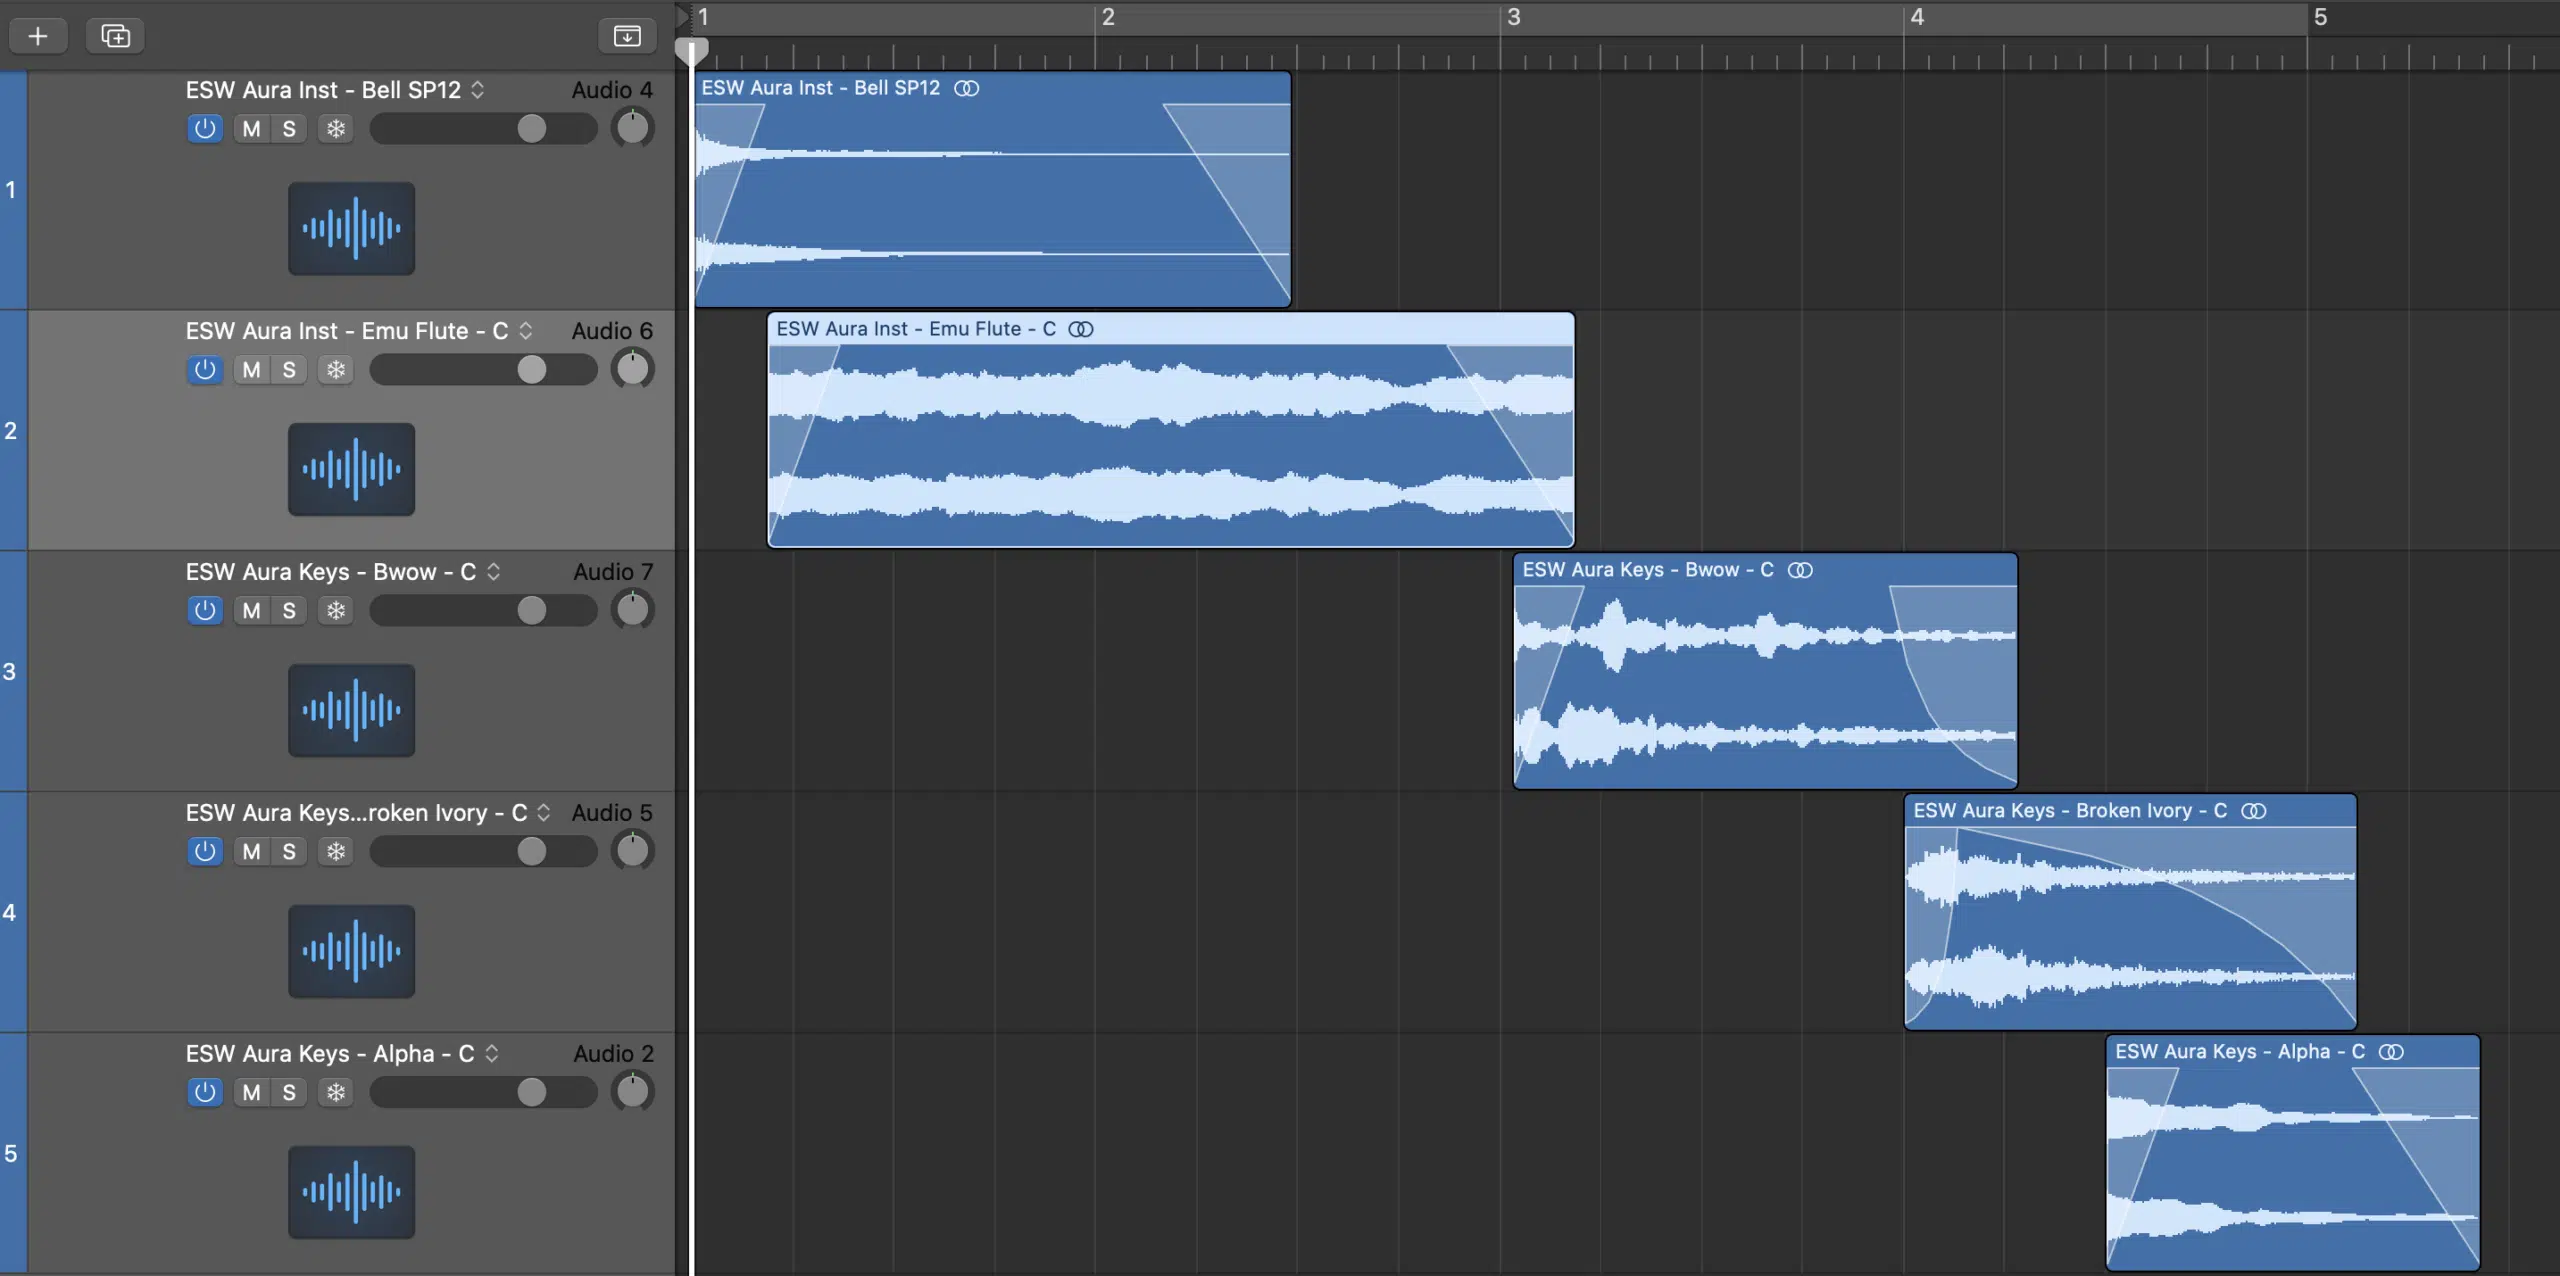
This is something you frequently hear on TV and movies because it’s routinely done by the audio editors when they need a quick filler (or when the music guy is gone for the day).
If it’s easy enough for the unmusical mind to comprehend without any problems, your musical mind certainly can, so don’t overthink it.
#4: NOISE AND FILTERS
I’m sure you’re familiar with the fact that white noise (and the like) have a wide range of creative applications… Well, there’s no better way to demonstrate its potential than this technique right here!
The great thing about white noise is that it can really be anything you want it to be, and it’s comprised of the entire frequency range.
Unlike the previous technique, you can even alter the range it’s occupying over time.
This is, believe it or not, even more beneficial than it sounds, as it offers you the additional flexibility of pushing it out of the way, or changing its frequency whenever you (or your engineer) need it to be within the mix.
Trust me, you hear it more often than you might think.
STEP 1 一 Grab any synth (or noise sample) you’d like, and have it either sustain or loop continuously/indefinitely.
STEP 2 一 Isolate a small frequency range and add some resonance with a filter. By doing this, you’re able to give a (previously random) combination of the entire frequency range (white noise) its very own pitch and tonal quality.
STEP 3 一 Open up an EQ and use a band-pass-notch filter to apply it to any range.
Alternatively, you could use a Resonant Filter to add a slightly different, unique character. However, it’s easier to get a handle on this technique through the use of an EQ (at first).
STEP 4 一 Narrow the ‘Q’ size/resonance so it occupies a narrow range and/or adds a little ‘bump’ at the cutoff. The tighter the width/higher the resonance, the sharper and more defined your new generated patch will sound. This is an artifact (introduced by EQs) known as ‘ringing.’
Usually, this is a bad thing, but in this case, you can use it to your advantage. However, it can get a little out of hand, so when first setting this parameter, keep the speakers on the lower side.
If you’d rather physically play this generated noise (as you would an instrument) 一 simply route the MIDI Note CC Number to the Filter cutoff, so every time you play a note, it will jump by the set interval; following the keyboard.
Shown below, on the FabFilter Pro-Q 3, you can see how each individual note is set to the frequency it occupies. It will do the math for you!
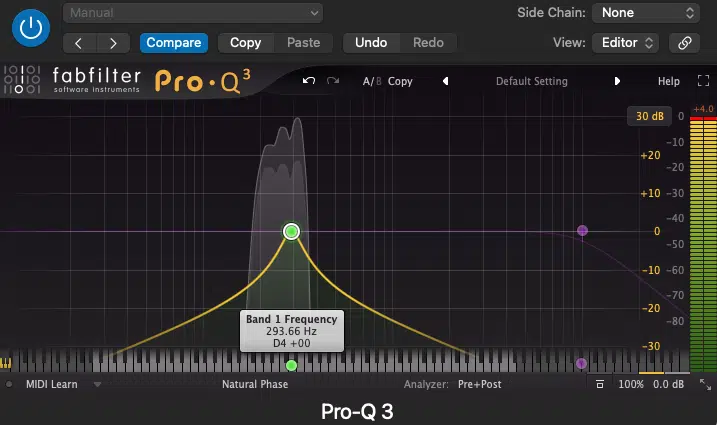
This will almost always be an option in a synth or sampler, but it can manually be inputted directly into your DAW (with some careful routing) as well.
STEP 5 一 Take that band and automate it as you see fit. This will induce sweeps, swooshes, risers, soundscapes, or the like.
THE KEYS ARE:
» The speed at which you automate the EQ.
» The contour (filter curve) and shape (rhythmically speaking).
» The color of noise you use.
An easy way to keep this in check is to ensure your speeds are always in divisions that match the current tempo of your track. Unless you’d rather be free-running, as that’s a whole vibe in and of itself.
Plus, of course, the processing, which is key when it comes to turning this pitched, effect-type thing into an actual soundscape!
#5: REVERB, DELAY & FX
When you’re short on ideas, or just want to experiment, reverb and delay (in extreme amounts) can produce a soundscape out of virtually anything.
For this technique, you’re going to blur and smear the track’s frequency content.
This will generate a sound source with the timbre and sonic color of the original but in a completely different form and fashion.
The idea here is to use extreme amounts of processing 一 mainly reverb, along with some delay, saturation, spectral and granular processing 一 whenever possible.
This will intrigue your listeners and make them wonder what exactly it is they’re hearing.
STEP 1 一 Throw a reverb on your soundscape (as a whole).
STEP 2 一 Start flipping through the presets, with the Mix level at or around 100% WET (to start). You’ll know when you’ve reached the ideal preset because it will most likely stop you dead in your tracks.
STEP 3 一 Apply a delay. Settings don’t need to be as extreme.
STEP 4 一 Follow that up with some saturation and modulation-based FX 一 such as a Phaser, Flanger, or Chorus.
STEP 5 一 Alternate the order of the processors in the chain for a wide range of different results and variations.
If this is done properly, you may forget what the original even sounded like.
NOTE: Whereas this technique can create some amazing sounds, it can also cause a major mess, as things can get out of control quickly.
Just keep in mind that the end goal is not to process the hell out of it to the point of no return, but rather help it reach its full potential (and beyond).
I know, as producers, we have a perfection complex (the ‘Producer Curse’ as some call it)… but you cannot let that hinder you. Know when to hold ‘em and when to fold ‘em.
#6: STEREO IMAGING
One key component when it comes to any mix is the Stereo Image.
But, when dealing with soundscapes, the real key is to encompass the entire frequency range, so if your Stereo Image is not up to par, you’ll end up falling short.
Granted, you could always alter the stereo image of your final soundscape (as a whole), but that’s not going to provide you with the effect you truly want, at least when played back in Stereo.
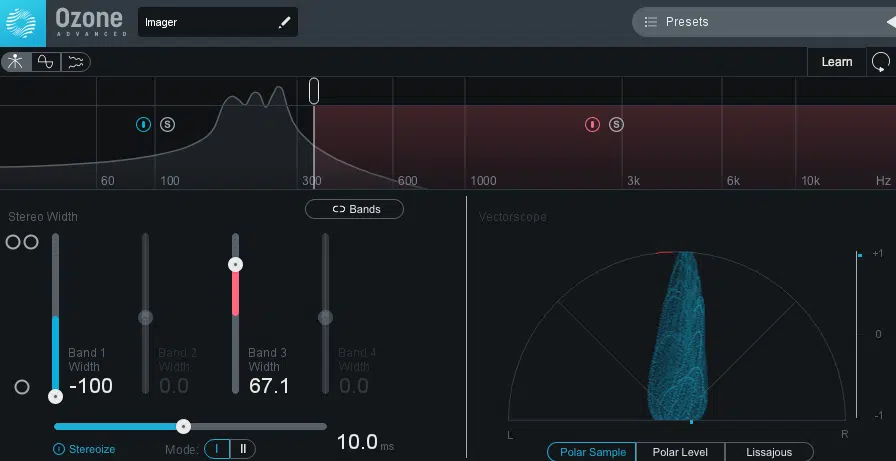
So, what you’ll need to do, is:
- Adjust the stereo image of each layer individually using a stereo imager.
- Analyze and designate a specific space within the stereo field for each element.
- Keep the low-end MONO.
- For the mid-range frequency layer, it sounds best when you retain (or add) some slight form of width, in very low amounts.
- Follow that up with an extremely wide top-end.
This doesn’t only encapsulate your listeners, but elicits a (desirable) physical response as well, as the sound will give the illusion it’s literally surrounding them.
It basically turns a musical experience into a cinematic one.
Panning is the second element of the stereo image and is also very important. Don’t hesitate to pan the mid- or high-range frequencies to the sides. This can be done in either subtle or extreme amounts.
If you really want some movement: use Automation or a Panning-modulation plugin to continuously float and swap sides between the stereo image.
This can open up the soundscape to additional possibilities, elements, and depth.
SUCH AS:
» Creating 2 separate instances of each layer
» Detuning the pitch by a handful of cents
» Panning each version 100% right or left.
With such subtle complexities, you’re bound to raise the bar from vibe, to full-blown spiritual experience, such as Tchami does when he’s performing.
For even more stereo-depth and movement, try automating the width of the stereo image itself.
This can, however, be a total nightmare in terms of phase, but it’s something to consider when you feel like getting wild and adventurous.
Just remember to always test your mix in mono. Getting these stereo tracks to not translate in a negative way is a tricky task. Keep the modulation on the stereo width itself to a minimum.
BONUS #1
Another dope way of creating soundscapes is doing everything above 一 but, this time, either play, load, or bounce your samples and soundscapes in reverse.
Let’s be honest, everything sounds cooler in reverse, including sounds that have already been processed.
STEP 1 一 Load up a sample.
STEP 2 一 Reverse it.
Now, short of processing, you’ve already got your track layed out in front of you!
BONUS #2
Sometimes, the individual sounds you selected to make up each layer, won’t blend or mesh properly unless you get extreme and pull out the big guns in order to isolate what you want and eliminate the rest.
This is done every time, to a certain extent, as it’s always a necessary task. However, in this case, if your standard methods aren’t cutting it, just start chopping to eliminate even the possibility of phase issues.
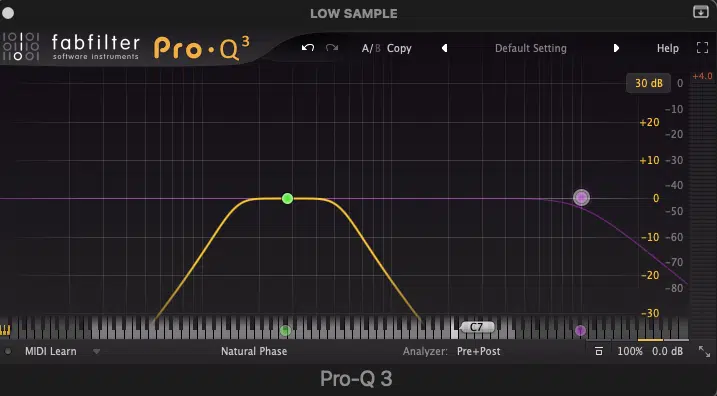
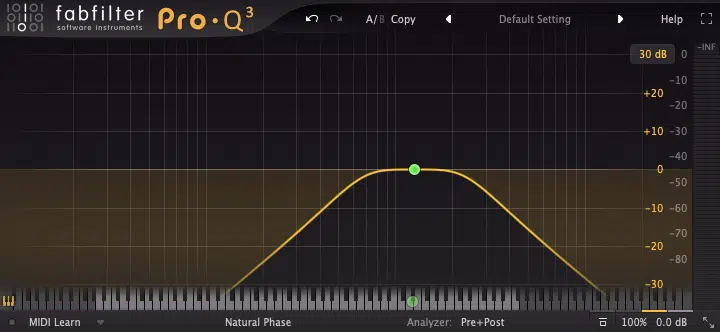
You’re going to accomplish this through the use of 3 EQ’s to isolate each layer’s harmonic content, using a series of steep bandpass filters:
» The first EQ removes everything above and below 150-500Hz:
» The 2nd EQ removes everything above and below 550-2500kHz:
» The final EQ removes everything below 3K:
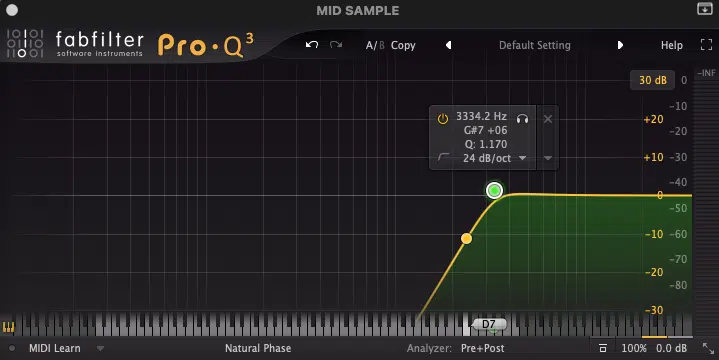
Note how a buffer zone was intentionally left, to ensure the filters and frequencies don’t overlap. Use a steep dB/octave to ensure enough reduction of the surrounding frequencies
IF YOU’RE STILL HAVING PHASE ISSUES:
You may need to create a little more space between each band, in order to avoid unwanted phase and frequency responses.
A Linear Phase EQ is your best bet in accomplishing this because it has fewer phase alterations than standard EQs. However, when done correctly, any minimum phase EQ can work.
Alternatively, you could use an LP Filter for the high end so you don’t have to limit or cut anything above 3K.
It will also add a little top-end boost (known as ‘Air’) to make it sound even more aggressive, in a good way. The top-end will always be the safest range to manipulate in this fashion.
FINAL THOUGHTS
As a producer, the music you make revolves around the sound design selection, and if done right, you can use it to create soundscapes that become the cornerstone of your sessions.
There are only 12 notes in a scale, and a finite amount of frequencies that we, as humans, can actually hear… but when it comes to atmospheric timbres, the sky is the limit!
To begin your soundscaping journey, start with presets from our Unison Serum Essentials pack and Unison Essential Omnisphere pack, which contain the cleanest, most polished, and professional presets around.
Don’t think you have to stop there… try taking it a step further by altering these presets and bouncing them to create your very own samples to layer, reverse, and process yourself, using everything you’ve learned today.
Until next time…


