Some musical trends come and go, but there’s one element that we can all agree is not going anywhere: 808s.
People might think of 808s as just 1 thing, but the great thing about 808 is it’s much ‘deeper’ than you might think.
Table of Contents
- WHAT IS AN 808 BASS DRUM?
- 1. SYNTHESIZING YOUR 808 FROM SCRATCH
- FOR PITCH DIVES & GLIDES:
- SHAPING YOUR 808
- #2: BASS-AND-KICK HYBRID
- COMBINE YOUR KICK & 808 INTO ONE BASS ELEMENT:
- #3: SATURATED FAT ON THE RISE
- 808/KICK HACK [PURE LOW-END]
- #4: DRUM ROLL, PLEASE…
- #5: FAKE THE BASS
- BONUS TIP:
- #6: PARALLEL PROCESSING
- #7: AUTOMATING LIVE PITCH-DIVES (MOD WHEEL)
- #8: BEGINNER & EXPERT TIP (BONUS 2-in-1):
- FINAL THOUGHTS
WHAT IS AN 808 BASS DRUM?
When the 808 drum machine was first introduced in 1980, it actually failed commercially and was considered a toy that just made ‘robotic’ sounds.
After building 10,000+ units, the 808 was discontinued because its semiconductors became absolutely impossible to restock.
However, over the course of the 80s, it slowly built a huge fan base: underground musicians. It quickly became the cornerstone of electronic, dance, and hip-hop genres alike; playing an influential role in defining them.
The 808 eventually became featured in more hit records than any other drum machine and has had a long-lasting influence on producers and listeners alike.
It was the very first drum machine that allowed the programming of a percussion track (from start to finish) complete with breaks and rolls.
Users were able to program up to 32 patterns using the step-sequencer, chain up to 768 measures, and place ‘accents’ on individual beats.
But what made it truly stand out was the sounds it produced weren’t modeled after real percussion or acoustic drums, but rather emitted a more advanced, futuristic (synthesized- or circuit-generated) sound.
- Plus, of course, the ‘booming’ bass drum we all know and love today.
I guarantee you have used the 808’s non-low-end elements in your work MANY times. Most modern synthesized drums, particularly ones found in hip-hop, were all spawned from drums found in the 808 drum machine in one way or another.
Putting history aside 一 let’s dive into what an 808 actually is, how an 808 is built, and the most important part: how to make them go crazy!
1. SYNTHESIZING YOUR 808 FROM SCRATCH
Every 808 you have ever heard started out the same: a pitch-modulated sine wave (shown below).
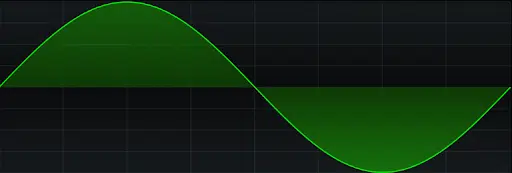
- The basis of your 808 can be synthesized in less than 20 seconds:
STEP 1 一 Initialize (reset) your synth, and only enable 1 oscillator.
STEP 2 一 Bring its pitch down 2-3 octaves and select a sine wave.
STEP 3 一 Make sure your Amplitude Envelope’s attack, decay, and release are as low as they can possibly go (for now), with the sustain all the way up.
STEP 4 一 Go to an unassigned envelope that can be used for modulation and bring the ADSR parameters all the way down.
Some synths (like Serum) allow you to customize your LFOs by making them whatever shape you want. Those are ideal for this task in particular. However, anything that can serve as an extremely short modulation source will do.
STEP 5 一 Bring the decay up slightly; a few hundred milliseconds tops.
STEP 6 一 If it’s not already routed, route that envelope to the oscillator/device’s main pitch. This will be labeled: ‘Master,’ ‘Octave’ or ‘Coarse,’ depending on the synth.
STEP 7 一 Adjust both the modulation amount ‘value’ and envelope’s parameters until you hear what you like.
If you want the 808 to keep playing after you’ve released a note, simply bring the Release up.
Just like that, you’ve successfully added the quick pitch-dive attack, similar to that of a kick drum! You may have even connected the dots that this same method can be used to synthesize your own kicks… but we’ll get to that later.
FOR PITCH DIVES & GLIDES:
Enable ‘MONO’ and ‘Legato,’ along with ‘Portamento.’ This remains the same regardless of the 808. The difference is:
- LEGATO 一 slides from the note you first play to the next note you hit. Envelopes are not retriggered, as they would if legato was disabled in MONO mode.
- PORTAMENTO 一 implements a pitch-glide/slide that can uniformly go from one note to the next, or that can be scaled by the length between the two notes being played.
Think of Legato as more of a ‘playing’ style, whereas Portamento is similar to an effect.
Essentially Porta = Poly-Legato but with a longer glide/slide time range, which can often be scaled based on the distance between the last note triggered and the new one.
Legato is usually monophonic only, while portamento is most often polyphonic. If you want to play in ‘POLY’ and still glide when a new note is triggered, enable ‘PORTA’ (portamento).

Each note must overlap for the effect to take place properly.
SHAPING YOUR 808
All 808s are generally built on the same foundation… but as a producer in the modern world, you need to push the limits and put your own spin on them, every. single. time.
Once your standard 808 is in its rightful place, decide what role it should play, which should be one of the following three:
- A main bassline
- Secondary bass element
- Extended kick drum
This will shape your 808’s Envelope, and determine how you set things up.
FOR A GENERAL BASS (main or secondary):
- Attack: Soft, not short (if you plan on layering it with a kick)
- Decay: None, if sustain is all the way up and you don’t want the envelope (it’s volume/level) changing over time.
- Sustain: Relatively high, if not set to MAX value.
- Release: Medium-to-long if you want the 808 to remain to play long after the note has been released. Short-to-none if you want the bass to immediately stop upon ‘NOTE OFF’ (the note being released).
FOR A KICK-DRUM OR PLUCK-LIKE BASS:
- Attack: Sharp and quick (typically)
- Decay: Depends on how you want it to play out. Decide whether it’s a quick or long ‘punch’ that you want. Determines the duration.
- Sustain: None
- Release: Very low (if any) depending on whether you want the kick to immediately stop once the note is released, or to trigger like a one-shot; regardless if the note is depressed or not.
If the sustain is set to anything but its MAX value, the decay will determine how long it takes to reach its final resting volume. This can be random or set in isolation.
It’s best to match your envelope time-values with the tempo (roughly). This is done by converting the tempo and a time division into a rough time value.

On the left: the 808’s main, and most common envelope. On the right: the pitch-modulation envelope.
NOTE: There are many free music calculator apps and sites that convert note values into time values based on any given tempo. This is also helpful when dealing with any effect- and time-based parameters (like reverb and compression) as well.
Once you’ve chosen its purpose, selected your sine wave, and designed the envelope structure, it’s time for the fun part: making it your own!
#2: BASS-AND-KICK HYBRID
Most people would describe an 808 as just a basic bass, but oftentimes an 808 is used in conjunction with a kick.
It’s important to know that only a portion of the kick is included when designing an 808/kick hybrid from the ground up. It becomes an extension of the original 808 itself, minus any heavy manipulation.
- Impact 一 the initial ‘hit’ when the sound reaches the speaker cone outward for the very first time.
- Punch 一 the portion right after the impact; part of the ‘decay’ phase, and beyond.
Some producers figure they can layer any kick on top of their 808 bassline and call it a day.
However, when 2 low-end elements combine randomly it leaves you with even less low-end than each element had on its own.
This is because when elements containing the same or similar frequencies combine, they tend to clash and subtract from each other due to frequency masking and the dreaded complications of phase cancellation.
- PHASE CANCELLATION 一 Occurs when two signals of the same frequency are ‘out of phase’ with each other due to being played at the same exact frequency, at the same exact time. This causes the wave’s cycles to align, resulting in a reduction (or complete cancellation) of the overall level of the combined signal.
- FREQUENCY MASKING 一 Is similar, except it does not solely rely on phase, so it’s harder to pinpoint. Unfortunately, flipping the phase/polarity won’t cut it.
You can avoid this from happening by side-chaining the kick to the bass so it dips out of the way when the kick is triggered, but that’s too basic.
Plus, why would you want to work with multiple tracks and samples? Try turning this hybrid instrument into one sample instead.
COMBINE YOUR KICK & 808 INTO ONE BASS ELEMENT:
STEP 1 一 Select your kick and 808. I suggest using either a sample or (preferably) a synth so you can manipulate the 808 and kick themselves, not just the envelope.
STEP 2 一 Import the kick, and determine its length and shape. To do this, alter the envelope so its punch hits the way you like and decays at a suitable rate.
NOTE: You will almost always want the kick’s ‘attack and decay’ stage to be relatively quick, snappy, and punchy.
This is because the ‘weight’ of the kick-drum is presented during the ‘decay’ stage, and since the weight is now being provided by the 808 instead, the kicks are there simply for impact. You want them in and out, that’s it.
- You also want the lowest attack and release value possible without any clips and/or pops occurring.
STEP 3 一 Take the 808 and shape its envelope so the attack (or delay) time is roughly equivalent to the kick’s delay stage. It helps to use a synth that allows you to shape the envelope curves, both linearly and exponentially. So, while one fades out the other fades in, and the curvature can be optimized so everything will blend seamlessly.
Fine-tune these values by going back and forth a few times. Experiment until you are satisfied with the result.
STEP 4 一 Apply corrective processing on each track (such as EQ) so the 2 elements blend together, and to avoid any possible clashing. You can use non-additive techniques (such as Compression) if it helps as well.
REMINDER: Don’t apply any harmonic-processing quite yet, unless you only want 1 element to have saturation and not the other.
STEP 5 一 Combine your 2 tracks into 1 bus, so you can add the final layer of processing. This is for things like additive and harmonic processors.
STEP 6 一 Apply bus-processing as you normally would, just make sure to set ‘light’ settings on all processors.
STEP 7 一 This last step can be done one of two ways:
- Print/bounce before adding any additive-processing first, so there’s 1 sample you can apply post-processing to later.
- Apply the additive processing onto the BUS before bouncing it.
- Processing after you bounce 一 useful because you’ll have a template to refer back to and use in future sessions.
- Processing before you bounce 一 provides you with a kick/808 hybrid that you can drag into any session and forget about. The only issue is, it’s always the exact same.
#3: SATURATED FAT ON THE RISE
A sine wave contains only 1 harmonic: the fundamental.
Applying extra harmonics to that pure sine wave is how you’ll get your 808 to translate across all speaker types. Since you will be programming the 808 to occupy the low-end, no harmonic content will be able to translate across or get reproduced by the speakers.
- Applying saturation, distortion, or even a form of bit-reduction is essential!
Ironically, the tool used for assisting with low-end translation ends up subtracting from the low-end at the same time; the trade-off of the century.
But remember everything in moderation, it’s all about balance. The great thing about audio is that you never have to compromise, you just need to find creative workarounds.
808/KICK HACK [PURE LOW-END]
After it’s triggered, the saturation will be automated to ‘rise’ and stay present during the sustain phase.
The easiest way to accomplish this is by using a synth or sampler that allows you to modulate the ‘distortions’ output level. If need be, automation works as well.
STEP 1 一 Take the 808 you previously created (or use the same concept) and find the ‘distortion’ effect within your synth.
STEP 2 一 Take an envelope, and make it a ‘ramp-up.’ This is done by bringing the decay, sustain, and release down. Then, slowly raise the sustain until it reaches the maximum level you want it to sustain at.
- If you don’t have an extra envelope an LFO with a very slow ramp-up can be used instead.
- If your synth has no effect-facilities at all simply throw one in the chain. Create a midi/automation clip (depending on your DAW) and make it the length/duration of 1 bar. This can be stretched as needed.
Use it to automate the entire track by making the automation clips’ length identical to the 808s.
STEP 3 一 Apply some heavy distortion, saturation, or bit-reduction.
STEP 4 一 Set all the parameters how you like, even if it’s very extreme.
STEP 5 一 Route that ramp-up envelope to the plugin’s WET/DRY control (sometimes labeled ‘MIX’).
Make sure when you play, that the attack of your distortion’s Mod-Envelope is set up so when you first trigger the 808, it’s pure, with no distortion.
You want the distortion to creep up almost immediately after the kick has completed its decay phase. If there’s no decay at all, once the initial attack is completed and the speaker has had time to recover.
This can be done by either setting a long attack time [that’s equal to the length of your kick, at least] or, if your device is equipped with a ‘delay’ parameter for the modulators, you can use it to replace the attack with a ramp-up LFO, or the like.
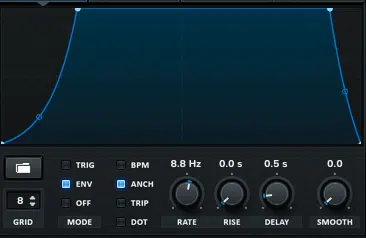
The Envelope’s ‘delay’ parameter is set to half a second. Once the mod envelope’s attack portion completes, the distortion will instantly rise.
- Save the preset to use as a template for another session. All you’d have to do is change the time values to match the tempo and, if you were using synced values, you won’t even need to do that!
- If you don’t have a synth with a ‘delay’ parameter belonging to the modulator, the same concept can be applied manually, using automation.
- If you have the same (or similar) 808-pattern throughout your session, simply copy and paste your automation clip, making adjustments as needed.
Start looking at automation and modulation as one and the same as the pros do. They are fully interchangeable in any DAW, using any plug-in or program.
#4: DRUM ROLL, PLEASE…
In addition to slide-dives, one of the dopest 808 tricks in terms of shock value is rolls or stutters.
The 808 will retrigger quicker than humanly possible, typically with a time-division value of 1/16th- 1/64th. Then, it repeats before completion, producing that punch that hits you right in the chest.
STEP 1 一 Go into the MIDI clip, take the last note of the 4th or 8th bar, and select it.
STEP 2 一 Set the ‘SNAP/GRID’ value high… Let’s say 1/16th.
FROM HERE, YOU HAVE TWO OPTIONS:
- Enable your ‘slice’ tool and start ‘splitting’ the note in a rhythmic or semi-rhythmic fashion, if you know when and where you want each re-trigger to be.
- Take that note and apply your DAW’s ‘Split’ or ‘Chop’ function. This will automatically have the MIDI retrigger uniformly, based on the snap-division value you select across the entire length/duration of the selected note.
The benefit of doing this manually with a slicing tool is the fact that your re-triggers can be customized and less predictable. In other words, you’re not just applying splits with the same value throughout the entire note.
STEP 3 一 Experiment with different time-division-splits on the same note, and create your own (rhythmic) retrigger patterns.
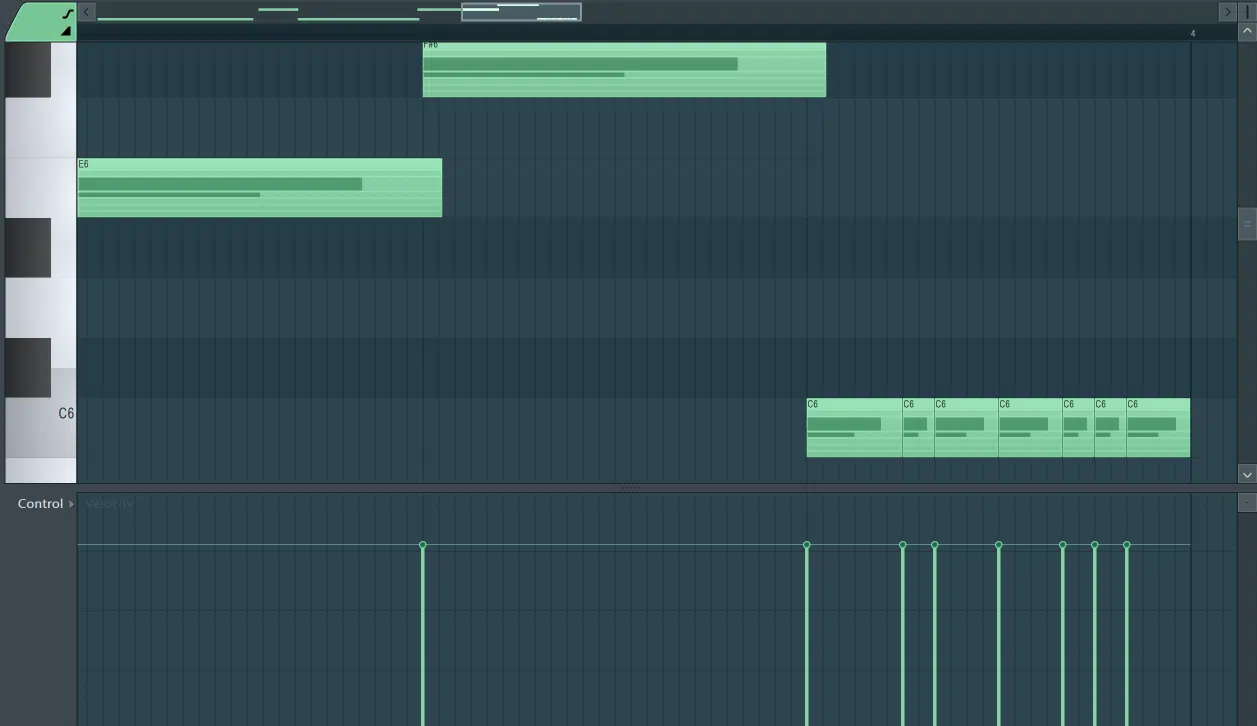
Above is a ‘roll’ carried out using just 1 note, splitting the selected noted based on the specified grid value.
NOTE: You may need to change your 808’s Envelope (mainly the attack and release) so it’s quick enough to respond to the re-trigger without any unwanted artifacts and confirms you’re playing in monophonic mode.
Do this by bringing the envelope values down (particularly the release time) as much as possible, almost to their minimum. If no mono-mode is available, bring the Poly ‘voice count’ down to 1.
This method also applies to kick drums as well as hi-hat rolls, of course.
BONUS TIP: You don’t need to sample a marching band to get a drum roll. Instead, try doing this with a snare to create an authentic marching drum-roll: simply slice and adjust the velocity accordingly!
#5: FAKE THE BASS
Creators tend to throw on so much saturation that the actual bass element has almost no bass going for it… ironic, right?
- Adding saturation doesn’t increase the amount of low-end, it only increases the perception of it.
That’s where EQ comes in. More specifically, Resonant Filtering. This will help add back, or ‘super impose’ that low-end you’re lacking.
Only use this method when working with samples (or sample libraries) where the bass is completely removed, due to the extreme amount of harmonic processing.
- Make sure to use your eyes as well as your ears. Visual feedback is not just for show so let’s get you familiar with it, as it will prove to be a worthy adversary down the line:
STEP 1 一 Open your Parametric EQ (one with Spectral Analysis) and determine the fundamental frequency.
NOTE: It’s difficult to apply this technique after you’ve programmed your 808 because the pitch will be constantly changing. It’s best to print/bounce the 808 you’re using before you attempt to program, alter, and manipulate.
STEP 2 一 Apply a relatively steep (at least 24dB/octave) high-pass filter so it ‘hugs’ the 808’s fundamental frequency (shown below).
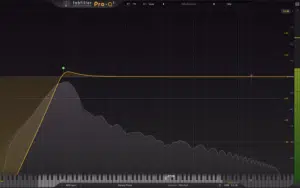
It’s not custom (or advisable) to high-pass your low-end elements to the point where all the sub-bass frequencies get cut out. But, in this case, it’s perfectly fine, considering there are little to none anyway.
STEP 3 一 Take that high-pass filter and increase its resonance. This creates what’s known as a ‘Resonant Peak.’ You will instantly hear/find that low-end you were no doubt searching for.
This is how you ‘fake the bass,’ respectively. It provides bass frequencies that vary from true sub-bass frequencies. They have their own unique characteristics and will make your sample ‘bump’ in the process.
REMEMBER: The goal here is not to blow your speakers out, but rather replace the low-end that was lost during processing, or the sample didn’t have to begin with; stay light on the settings, and don’t apply too much resonance.
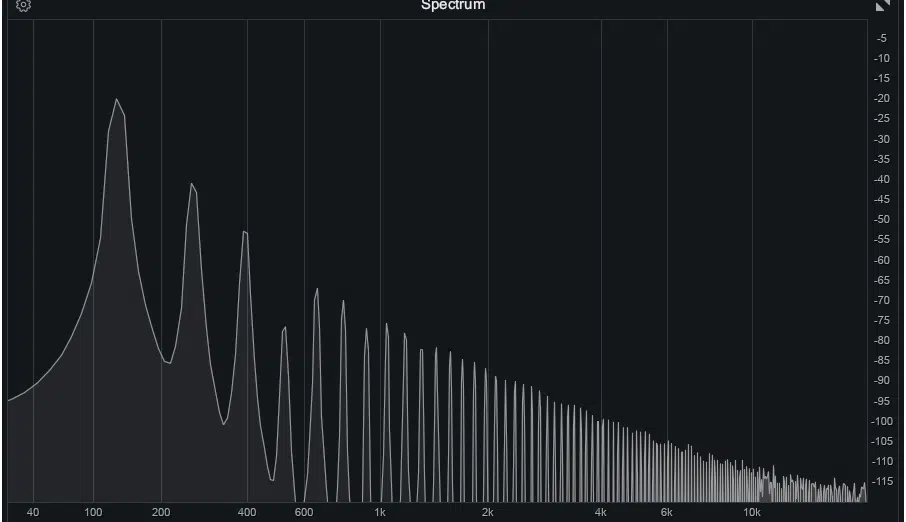
The unprocessed 808.
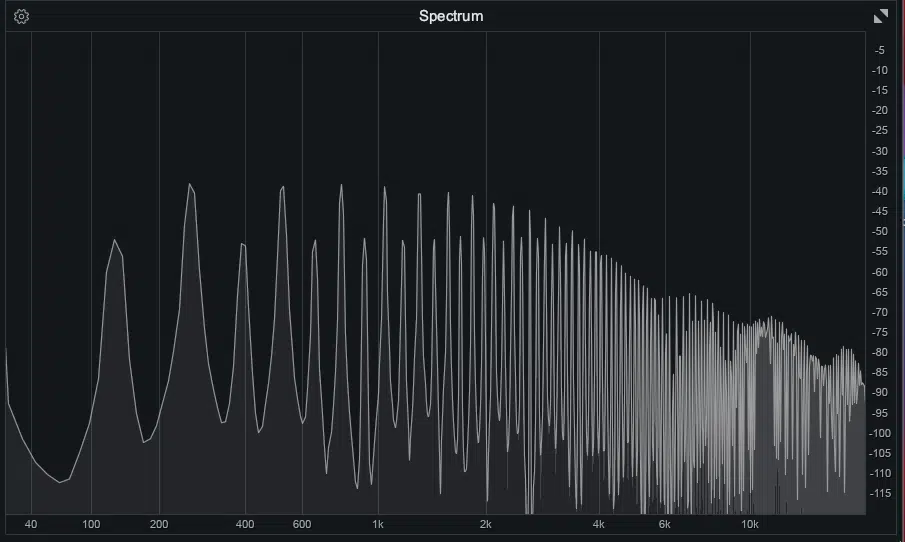
The same 808, just with heavy distortion.
BONUS TIP:
If you’re still not getting the results you want, it’s probably because there were no sub-bass frequencies to accentuate in the first place. To solve this, you’re going to use resonance (again) to add a massive amount of low end, while using a higher frequency:
STEP 1 一 Open your EQ, grab a band using a bell shape, and sweep the low-end for a frequency that stands out. This is usually located on the lower end of the spectrum.
- TO SWEEP: Take a band with a relatively narrow Q and apply a massive boost, while moving the band around the desired frequency. This will make it possible for you to isolate and accentuate certain areas of the spectrum. This is key when trying to identify problem frequencies.
STEP 2 一 Once found, place your band within that area to essentially ‘hug’ it as we did before, except this time with a bell-shaped curve
STEP 3 一 Turn the resonance up considerably (shown below). The higher up, the more bass, but also the higher chance of blowing your system.
STEP 4 一 Experiment with that value, the boost-value, and the steepness of the curve.
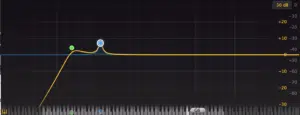
- Be extremely careful when using resonance to ‘fake the bass’ especially with this method in particular. It’s highly sensitive, so only a very small amount of Gain should be applied.
- Make sure to play back your mix across as many different mediums as possible, such as car speakers, headphones, phones, earbuds, standard stereos, etc. Implement necessary adjustments from there.
While something may bump on headphones, it might blow your car speakers out, or vice versa.
Most samples you find online are created by amateurs, but to get professional-quality samples that are pre-processed to perfection, go download the FREE Unison Artist Series Essentials pack.
All you have to do is throw it in your session and keep on moving!
#6: PARALLEL PROCESSING
Whether you’re using parallel processing in conjunction with compression, harmonic saturation/distortion, EQ, a creative effect, or even all of the above, the concept remains the same:
- Take 2 identical signal
- Process only 1 with extreme settings
- Then, blend the super-processed track with the original, and voila!
Due to phase issues (and the like), it’s standard practice to use a synth, or sampler to print/bounce the 808 in Audio form.
STEP 1 一 Take your 808 track (or any track you’d wish to apply this to) and duplicate it.
STEP 2 一 Add some extreme saturation to the duplicate 808 track.
Some prefer to leave the original track completely ‘dry’ in order to process the hell out of the duplicate. Others (such as myself) prefer to apply any processing necessary in order to make the original 808 sound good without incorporating additive-effect processors.
- Either way, the duplicate should be processed with extreme settings. All processors applied to the super-processed duplicate should be set to 100% WET.
STEP 3 一 Bring the duplicate’s volume all the way down.
STEP 4 一 Slowly bring the volume back up, until you hear those upper-harmonics adding ‘grit’ to your once super clean 808.
IF THERE IS STILL CLASHING IN THE LOW-END:
Either make the distortion settings more extreme, to the point where it sucks the low-end out and all you hear is saturation. Or, take an EQ and put a steep high-pass filter anywhere 800Hz – 3kHz.
Now you should definitely hear that high-end ‘sizzle’. You’ve basically created two very different layers, which complement one another perfectly.
If you fully EQ’d the low-end of the duplicate, the frequencies of either signal won’t overlap. This eliminates any clashing or phase-inconsistencies before they occur.
At this point, you can slam the hell out of it (if you choose) using an analog-modeled compressor.
Simply look at the compressor’s Gain Reduction (GR) meter, and add back the average amount of what was lost. The effects of parallel processing are truly magical!
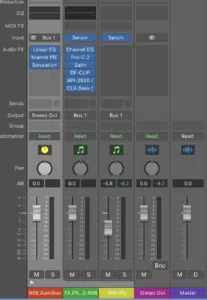
(Right to left): the unprocessed original, the super-processed duplicate track, and the sum of the 2; treated with its own form of light bus-processing.
#7: AUTOMATING LIVE PITCH-DIVES (MOD WHEEL)
Sure, programming pitch-dives is pretty simple…
However, if you let the MOD wheel handle that function, you can do it in real-time and have full control over the contour/speed of your dives. All while triggering or holding down (sustaining) just one note!
- The thing to always remember when programming an 808: It’s a bassline and relies heavily on the scale’s root note, octave jumps, fourths, and sometimes fifths.
Knowing that you can manipulate the value of your Pitch Bend Wheel for super quick 808 compositions. Just keep in mind you only have 2 values to bend, so get creative:
STEP 1 一 Load up an 808 into your favorite Synth and Sampler.
STEP 2 一 Go to the pitch wheel’s bend range and input one of the following combinations:
- If you want the bassline to be built on perfect 4ths: either make the bend range +5 and/or -3.
- For perfect 5ths: +7 and/or -5. When working with perfect 4ths & 5ths, these values remain the same regardless of the scale.
STEP 3 一 Take your root note and input the rhythm/pattern on the grid where you want the 808 to trigger. Record, or input this using only the root note.
STEP 4 一 Do a second pass of recording just to lay down the MOD wheel’s automation, or simply draw it in. Once you get the hang of it, you can do steps #3 and #4 simultaneously.
- Now you’ve produced that beloved 808 glide!
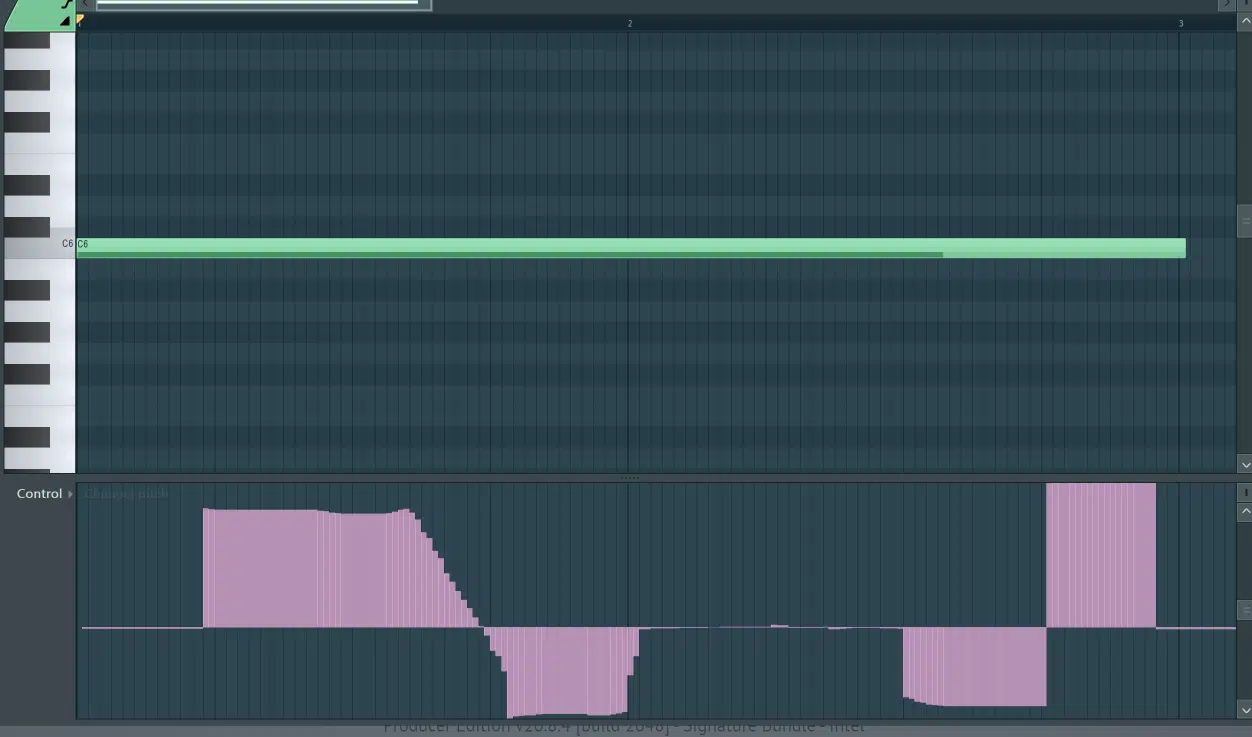
You see one note is filled in for the entire span of 4 bars, but the pitch-bend data below clearly tells a different story.
If you want the pitch to go up to, let’s say, a 5th (7 semitones) versus a 4th (+5 semitones) as you originally input for the bend range, it’s easy. Simply go inside your plugin/synth/sampler and change the bend value.
Remember: just because you’ve changed the bend-value, the automation remains the same. All note intervals apply, so get creative and input any chord interval for seemingly one-note melodies.
#8: BEGINNER & EXPERT TIP (BONUS 2-in-1):
- BEGINNER: One of the hardest things to master in production when it comes to 808s is that it can be extremely difficult to decide the proper pitch. It’s easy to stay in key when composing melodies and chord progressions, but the low-end can get super tricky…
Select all the notes and transpose them up an octave or 2 (or even 3). Apply this before, during, or after processing your 808s, dealer’s choice.
It won’t only save you time, frustration, and embarrassment, but it will make you more confident about your note-selection for the future as well.
Just don’t forget to bring it back down when you’re finished… talk about embarrassment.
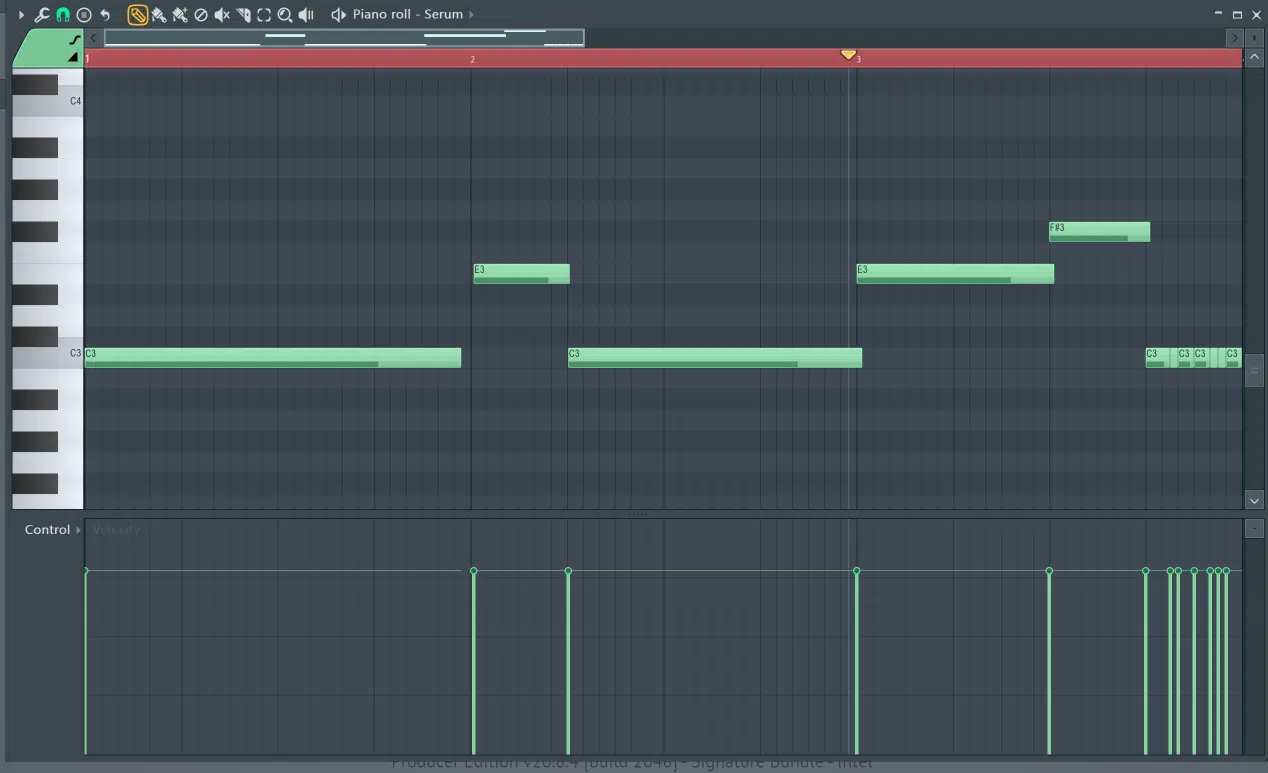
Always transpose your 808 to double-check that your work is in key. The low-end could fool anyone.
- EXPERT: This one may be quick, but it has a lasting effect. You’re going to combine a little bit of everything we just discussed, to synthesize your very own 808/kick sine wave from scratch. You will now be entering the exciting realm of Sound Design.
For this technique, you will need a synth with more than 1 oscillator. No need to use more than 2, for now.
STEP 1 一 Use the first oscillator to create a kick. Synthesized just like the 808, just with a short decay, zero sustain, a different shape, and Envelope, and the pitch modulation varies in depth.
STEP 2 一 Create the 808 with your second oscillator.
STEP 3 一 Apply the kick/808 hybrid technique (above) to combine and shape the 2 together.
The great part about using 1 synth, opposed to hybridizing 2 separate samples, is the flexibility and coherency. You’ll have ultimate control over any sonic element you wish to explore.
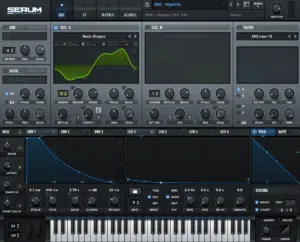
- The untold secret of production and audio engineering is: ‘professional’ methods are simply extensions (or combinations) of easy, well-known techniques.
The trick is not mastering complicated techniques, but rather the simple ones. This way, you can build anything imaginable.
FINAL THOUGHTS
Most instruments can find their place within a certain genre… the 808 created an entire genre of its own. Saying it’s in a league of its own is a massive understatement.
Being so prestigious and renowned, the 808 isn’t even considered classic (even though it is), as it stays super relevant throughout the decades.
No element touches your listener quite like that rattling familiarity of an 808. But remember, a lot has to do with the fact that its impact is felt, even when it’s unable to be heard.
Never rule out those frequencies you can’t hear, they are extremely valuable. Without them, you’re taking the bass out of the 808, and nobody wants that, ever.
Don’t waste any time programming MIDI if making an 808 of your own is the goal.
Instead, grab the FREE Unison Essential MIDI Drum Kit, which includes MIDI files that can be dragged and dropped within your session, for professional-sounding MIDI grooves.
You’ll be able to easily lay down your track’s foundation, so you can give your 808 the attention it deserves! Programming 808s can be intimidating, not to mention super frustrating, why make it harder than it has to be?
Gotta ‘slide.’
Until next time…


