Table of Contents
- WHAT IS MIDI?
- MIDI FUNCTIONS
- MODULATION-LIKE ELEMENTS
- MIDI CC [Continuous Control]
- MPE (MIDI 2.0)
- MIDI = PIANO ROLL
- EXPERIMENT
- CREATING DEFAULT MIDI TEMPLATES FOR DRUM PATTERNS
- MIDI CHANNELS
- DUPLICATE & ADD VARIATION
- USE MIDI TO TRIGGER YOUR DRUM & ONE-SHOT SAMPLES
- SPLIT YOUR DRUM ELEMENTS UP
- QUANTIZATION
- TRIGGERING EXTERNAL SYNTHS & SOUND SOURCES
- CHORDS: MINOR/MAJOR
- TIME TO START BUILDING
- BUILDING YOUR PROGRESSION:
- KEEP IN MIND
- THE CHORD PROGRESSION WRITES THE MELODY
- HACK
- DO IT IN REVERSE
- FINAL THOUGHTS
MIDI: the soundless connector of sounds.
It was originally created so instruments (synthesizers in particular) could communicate with each other, and be controlled by instruments from other manufacturers.
The creative possibilities of MIDI technology forever changed the world of production.
Think of MIDI as the conductor of your personal orchestra. You can tell each instrument what, how, and when to play. Master MIDI, and you master how to make pro-level music!
Let’s dive in…
WHAT IS MIDI?
MIDI [Musical Instrument Digital Interface] is simply a way to connect devices (that make and control sound) through MIDI messages. This way, they can successfully communicate with each other.
Want to extend a note? Want to shorten all the whole notes to quarter notes?… Well, with MIDI, it’s as simple as dragging & dropping, or inputting a few simple values.
You can build complex compositions with zero theory or notation skills. Being able to instantly preview (hear) what note-manipulation sounds like in real-time is unmatched.
MIDI FUNCTIONS
The MIDI protocol has multiple layers and functions, most of which you probably haven’t even taken advantage of yet. The four main elements when inputting MIDI-note data (recording and composition) are:
- PITCH 一 Determines the value of the note you play. This ranges from 0-127, as with most of MIDI’s functions.
- VELOCITY 一 Determines the force of the note being played; mimicking the strength/softness of our natural playing.
Velocity is also used to determine or trigger certain velocity-sensitive parameters, modulations, and samples. This is done through the use of velocity zones, mainly for sampling acoustic instruments. Commonly known as multi-sampling.
- TIME 一 Centered around beats (time-division values) or ‘ticks.’ Each message in a MIDI file has a delta time, which tells you how many ‘ticks’ have passed since the last message.
Each beat, regardless of tempo and time signature, will contain 960 ticks. This is because MIDI ‘time’ is elastic. Meaning, there is no standard on how long a beat should be, or what the tempo is. It changes constantly.
- DURATION 一 How long a note is held down, or ‘sustained.’
Time and Duration are two parameters that tend to be ignored, but they are key for note-data manipulation. Do not overlook them.
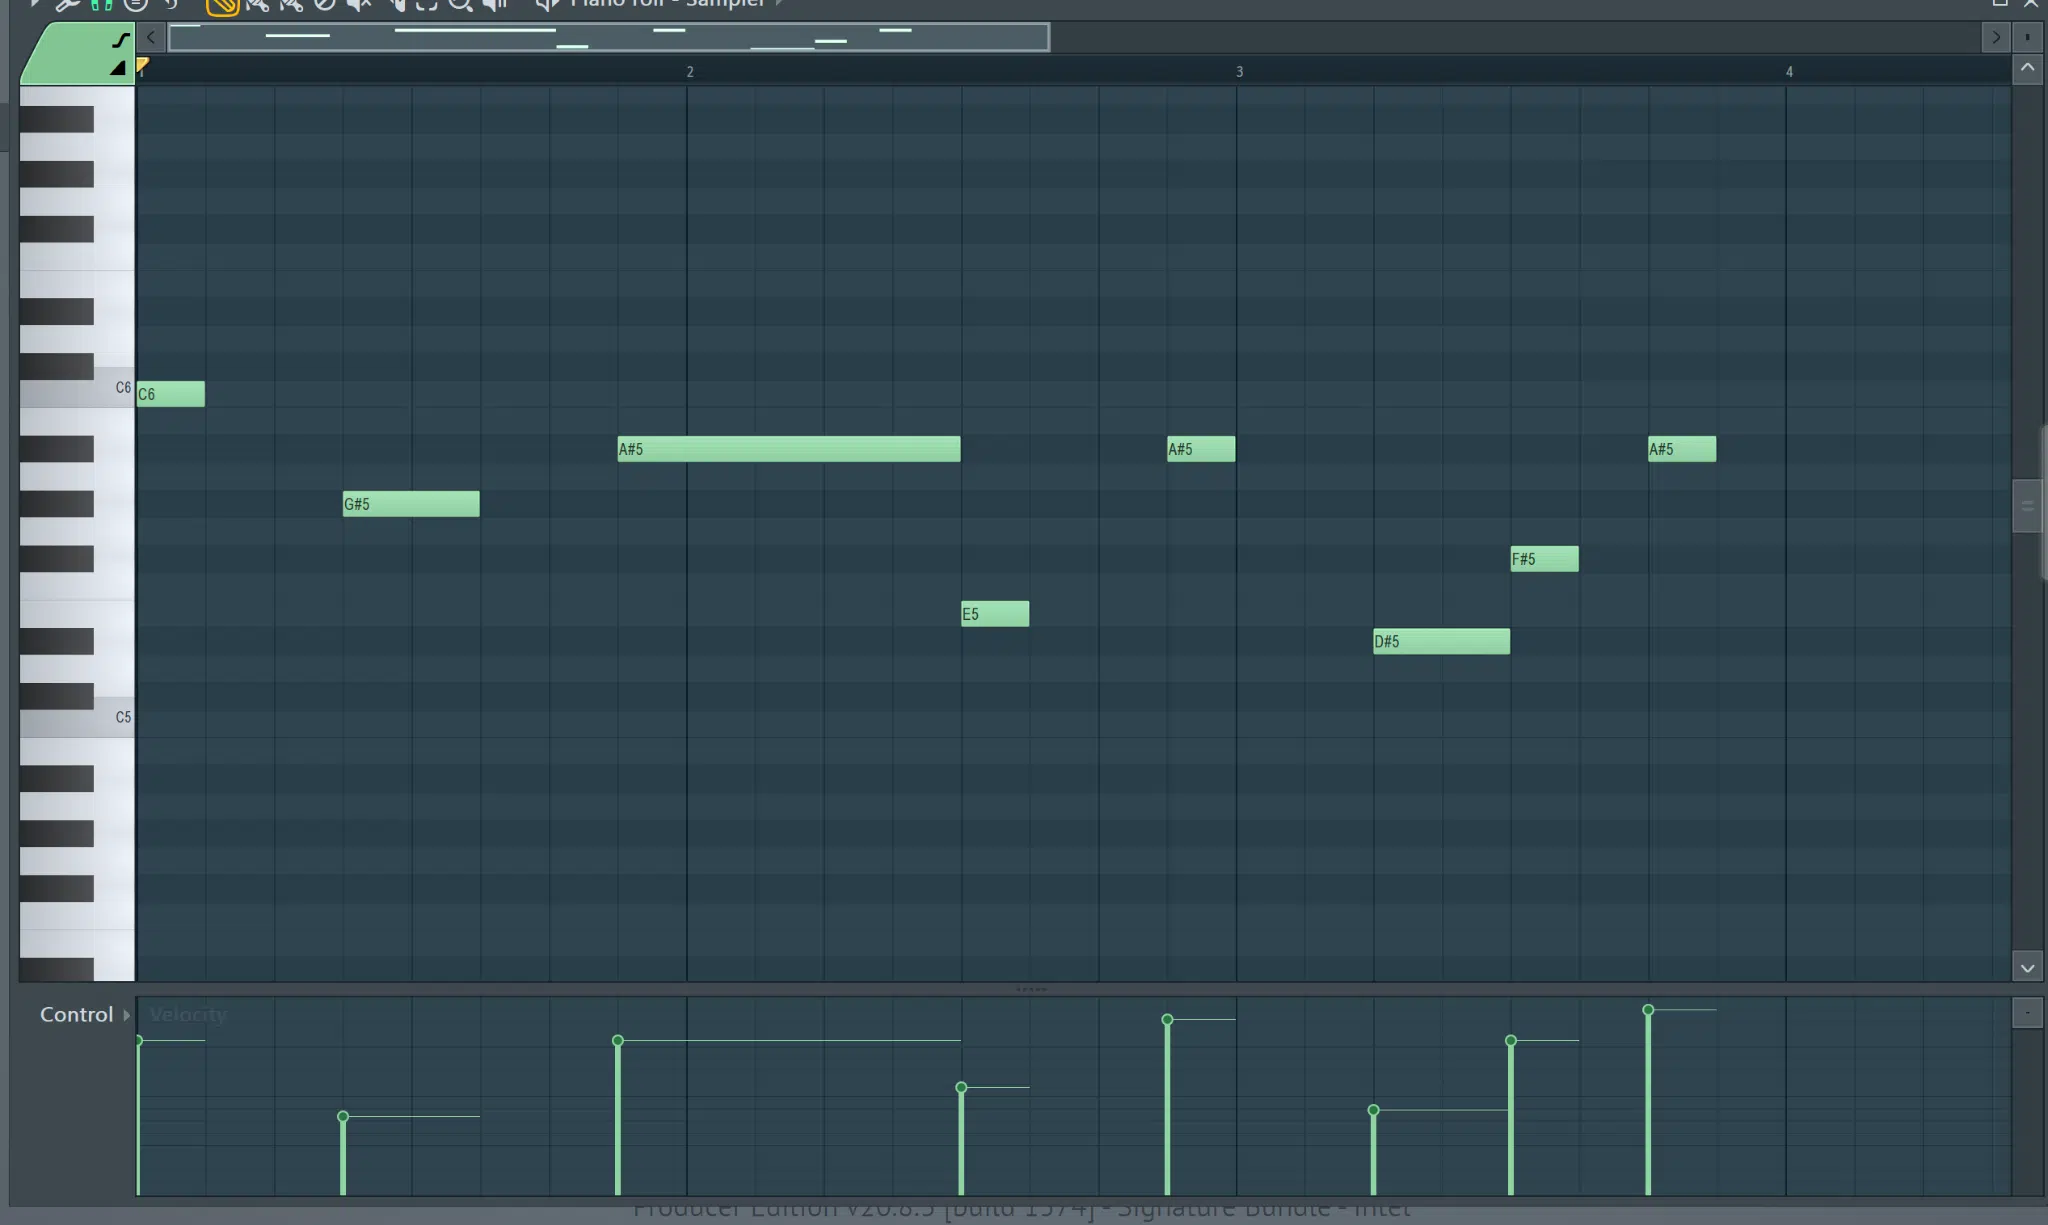
The notes are positioned vertically as they go across the timeline. Below that, you see each note’s data, including velocity.
MODULATION-LIKE ELEMENTS
These can be applied to either all of your active notes globally (standard MIDI) or on a note-by-note basis [MPE].
These include:
- AFTERTOUCH 一 Detects the pressure you apply to the keyboard after a key has been struck, and while it’s being held down (sustained). Typically routed to control: vibrato, volume, and any other destination that will accept it as a MOD Source. Your controller must support AfterTouch to use this function.
- EXPRESSION [The MOD Wheel] 一 This allows you to route any control, to any available destination; most commonly the MOD Wheel. It can add expressions to, or modulate elements of any synth/plugin/sound source it’s assigned to.
Similar to all MIDI data, it transmits continuous controller messages (CCs). These relay the ‘movements’ of the wheel, as well as knobs, sliders, pedals, etc. You can also use it to record Automation. This will give your tracks that extra ‘natural’ or creative feel.
- PITCH [Bend] WHEEL 一 Raises, lowers, or ‘bends’ the pitch of notes that are currently active. It transmits a MIDI pitch-bend message, which produces a change in pitch in response to the movement of a wheel/lever. You determine the ‘bend’ value.
All of this data can be recorded in real-time and forgotten about… but the true magic happens when you change things up after the fact. You can add multiple elements that wouldn’t otherwise be possible.
With MIDI, you can simply fix all your mistakes once you’ve finished recording/inputting the data.
MIDI CC [Continuous Control]
MIDI CC is a message capable of transmitting a range of values, usually 0-127. Typically used for things like controlling volume, pan, mod wheel, and data-slider positions. As well as any other ‘variable’ parameters.
This is the only type of data that MIDI transmits, aside from ‘NOTE ON/OFF’ and their respective values.
Depending on your setup, the MIDI CCs may already be pre-assigned. If not, they can be adjusted to handle any parameter within the instrument, plugin, or DAW you’re using.
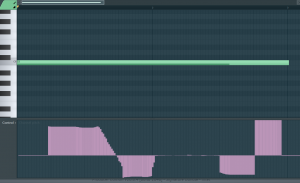
The data is assigned to the specific plugin to which your MIDI clip is linked.
You may have knobs on your MIDI controller, synthesizer, or sequencer, and these are all controlled by MIDI CC messages.
Some DAWs, such as Studio One and Ableton, let you combine multiple parameters within your chain. This creates custom ‘macros,’ which gives you control over as many parameters as you’d like using just 1 knob/control.
MPE (MIDI 2.0)
MPE [MIDI Polyphonic Expression] is a method of using MIDI that enables multidimensional controllers (MPCs) to control the various parameters of each individual note.
Such as pitch-bend, vibrato, timbre, and volume, along with any other parameter you’d like or is specified by the manufacturer.
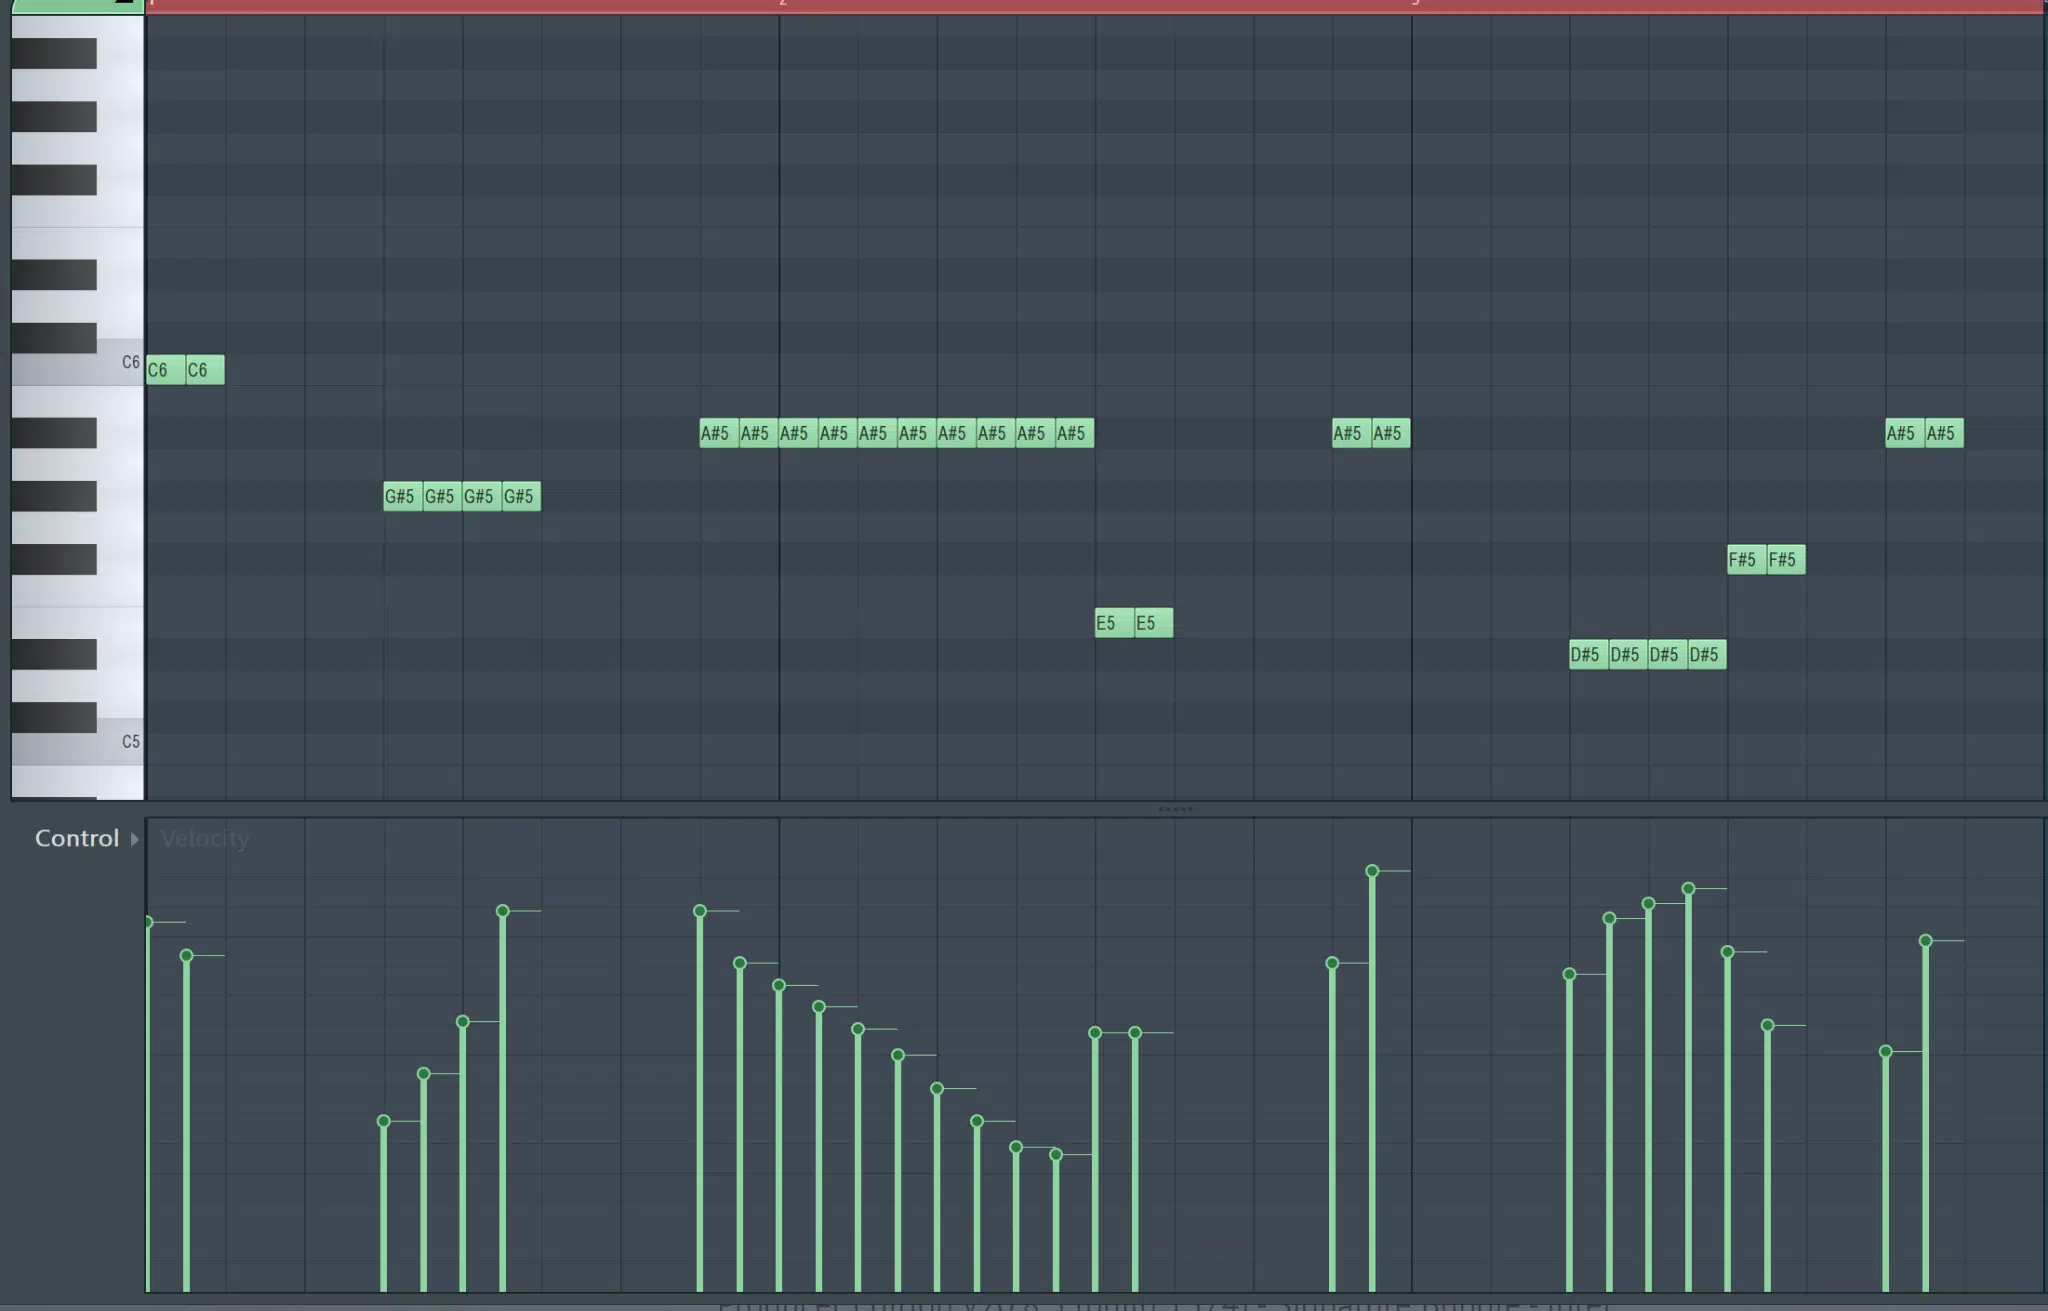
Velocity doesn’t have just one value, it continuously changes.
The first form of per-note data was introduced in the 80’s onboard the legendary Yamaha CS-80 hardware synth and is known as Polyphonic Aftertouch.
Until recently, this method was rarely supported, or even acknowledged by most DAWs and plugins. With MIDI 2.0, a new generation of polyphonic MIDI control was born, and a new set of polyphonic-expressions emerged.
This is often referred to as 5D Touch [or ‘Expression’]. It gives you power over each individual note’s parameters. Including slide, glide, poly aftertouch, note-off velocity (release), and overall note-on velocity.
Unfortunately, MPE has been slow to catch on, so the majority of DAW manufacturers have still chosen to exclude it. However, it’s becoming more and more popular, so it shouldn’t be long until it’s supported by all major DAWs.
- If you’re going to attempt this process, you will need a compatible DAW and controller.
If you don’t have an MPE-compatible controller, you can input all of the polyphonic-expression data manually. This is done with the use of a DAW and plugin that accepts it.
MIDI = PIANO ROLL
Anytime you electronically transmit a note or input value(s) into a controller, synth/digital instrument, or sequencer, it is carried out using MIDI.
Being a modern-day producer, your main compositional concern should be the Piano Roll [aka ‘The Grid’]. In the digital world, the piano roll is equivalent to sheet music.
However, instead of writing the notes, you play (or plug) them in.
- Even if you have no knowledge of Music Theory, you too can be a composer.
Remember, the MIDI you input makes no sound at all. When inputting it into the piano roll, consider it a ‘placeholder’ for any instrument; routed anywhere, to play or control anything.
The piano roll is the ultimate tool for learning and mastering Theory and Composition, regardless of experience. It’s awesome for brushing up on your skills as well.
- All 128 notes are laid out vertically for you, and you can experiment at will.
You could even click the notes on your virtual keyboard to preview/play them like you would a real piano. You’ll get to see and hear the result as you go, in real-time.
The grid is separated (horizontally) and spaced out based on your session’s time signature and the piano roll’s grid size.
When you want to see the ‘velocity’ value of a certain note (or any other MIDI data), it is either displayed numerically or by color-coded notes.
You can customize how, where, and when this info is displayed in pretty much every major DAW.
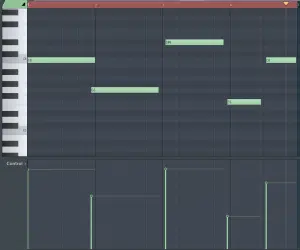
Velocity is at the Default position, as the notes were entered manually. Humanization was implemented after.
EXPERIMENT
Load up your favorite song’s sheet music into a compatible DAW (such as Logic or Studio One) or sheet-notation software, and convert/export it as MIDI.
You can now see what it looks like when displayed on the piano roll while playing back and manipulating the note-data as you see fit. Try it in reverse to see what the notation of your piano roll’s current composition looks like, in the form of sheet music.
- If you want to learn how to read music, this is a perfect way!
You can also use 1 MIDI clip (or, ‘piano-roll clip’) to trigger as many different instruments as you want. This can be done at the same time, or you can swap the trigger-destination entirely.
It allows you to turn any existing composition into something new and unique, simply by replacing the instruments, samples, and sound sources.
- It is the ultimate hack to generate layered instruments from just 1 MIDI clip.
For example, you can take your dope trap beat and turn it into an orchestral piece, simply by copying and pasting your existing session’s MIDI data into a default orchestral template.
Some people use building blocks with pre-assigned MIDI data (such as those found within the FREE Unison Essential Famous MIDI Chord Progressions), some people compose and build as they go, and others have a different approach entirely.
Regardless of your process, the following tips can be applied, and will give you insight on how to enhance your workflow.
CREATING DEFAULT MIDI TEMPLATES FOR DRUM PATTERNS
While all songs are unique in terms of structure, patterns, notes, and durations, it’s safe to say that the drums are always somewhat consistent.
Not to say your drums themselves shouldn’t vary… but honestly, how often are your kick, snare, and hi-hat patterns really that different?
Obviously the tempo changes, but the amazing thing about MIDI is its data stretches with it. Even in real-time or during intermittent tempo shifts!
So, by generating a handful of default kick, snare, and hi-hat patterns, you are already finished with the percussive foundation of your track. All you have to do now is add the finishing touches if you’d like.
Then, you can get cracking on everything else that does change on a song-by-song basis; once you select your samples, of course.
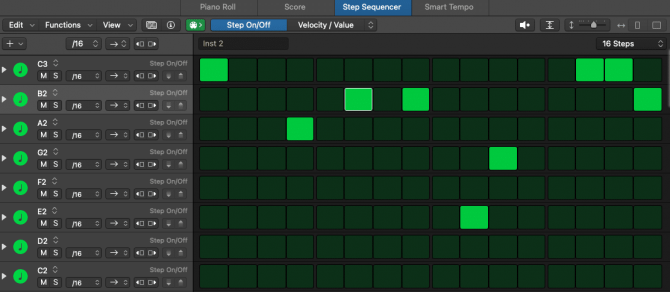
The note data hasn’t changed, yet is displayed in the form of a traditional step-sequencer.
MIDI CHANNELS
MIDI channels have many purposes: some essential, some hacks. They are basically the equivalent of audio channels, just with the use of MIDI instead.
You can assign any plugin, external instrument, synth, and/or sound source within your session to individual MIDI channels. This way, you’re able to route 1 MIDI controller to multiple instruments or plugins, in order to ‘control’ them.
There are also plugins with Multi-Channel MIDI inputs that allow you to route individual elements to their own MIDI Output channels. Typically found in ‘specialized’ drum plugins, such as Battery or multitimbral instruments and samplers (like Kontakt).
It is super useful for those sessions where you don’t want to start and stop a million times when switching between elements (loop recording). Also for live performances.
On the flip side, you can use multiple MIDI controllers to control different instruments. You won’t even have to go into your DAW to select/enable them!
Either way, you will be able to record any track on the fly, without having to do anything but change the channel on your controller.
DUPLICATE & ADD VARIATION
With MIDI, you can take any 4-bar loop and turn it into an 8-bar melodic phrase. You can then take that and transform it into a 16-bar melodic verse, which technically never repeats. All with a few simple mouse-clicks.
This will give your listeners the security of repetition, while also pleasantly surprising them with an unexpected switch up; which could even be different for each verse if you see fit.
STEP 1 一 Take your 4-bar loop, duplicate the notes or MIDI clips, and combine them to create an 8-bar loop. You can even start off with a 2-bar loop if that’s all you have available.
STEP 2 一 Go into your piano roll and take the last note of either the 4th, or 8th bar, and change it to something that sounds right to you. The easiest way to do this is by bringing it up or down either an octave, a 5th (up 7 semitones, down 5), or a 4th (up 5 semitones, down 3) from the original note.
STEP 3 一 Duplicate that 8-bar loop, and combine them to form a 16-bar melody.
STEP 4 一 Repeat the process, but this time switch up the notes you used. This can be as simple as reversing the order they are triggered, or the octave in which they are played.
STEP 5 一 From there, you can randomly change a note every now and then so it sounds good. Or, simply swap the order of a couple of notes throughout the verse.
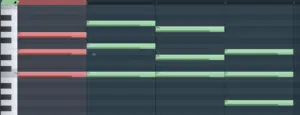
The C Major chord (left) & 3 of the possible variations; using the same notes, just in a different order.
- To make it foolproof, determine the scale of the song. This way, plugging in notes is just a matter of multiple choice.
- If that doesn’t work out, check out the notes that were already used in the melody. They will automatically fit within the song’s current scale. From there, it’s just a process of elimination.
For the next verse, you can apply this process again. Except, this time, duplicate your 16-bar clip and do the same type of thing; just using different note values.
Even if you this last part, you have now successfully produced a 16-bar melodic phrase!
Any other producer would’ve kept that simple 4-bar loop repeating, so you’re ahead of the game now. Creating unique variations doesn’t have to be hard with MIDI at your disposal.
BONUS FOR THE CHORUS: If you really want to make things easy, take your favorite 8-bar variation and transpose the entire melody up by an octave (+12 semitones) or a fifth (+7 semitones).
USE MIDI TO TRIGGER YOUR DRUM & ONE-SHOT SAMPLES
I know you’re guilty of dragging a drum sample into your DAW, just to copy and paste it throughout the session over and over again… stop this!
It has way more drawbacks than advantages, not to mention the flexibility you lose by not using a sampler; triggered using MIDI.
Having your drums as audio samples on the grid makes it impossible to accomplish certain tasks.
Including: changing the tempo (and its structure) or replacing the sample globally without difficulties and pointless rearrangements for every minor change.
That’s why you should never drag a drum sample (or any sample) throughout the session if it’s going to be used continuously.
- Load it up into a sampler first.
The default settings on your sampler shouldn’t need to be touched as long as you’re satisfied with your original sample choice… but don’t let that stop you either.
Copying and pasting individual samples over and over within an arrangement can get messy. However, by using MIDI clips as opposed to audio samples, you can change any sample and/or its properties.
It will update without you having to replace each individual copy.
By loading your sample into a sampler, you’re essentially turning that sample into a MIDI-enabled plugin instrument. This allows you to reap the benefits of MIDI, which are (but are not limited to):
- Time Stretching your sample’s tempo and/or duration
- Changing the pitch
- Changing the envelope
- Changing sonic characteristics of the sample itself
- Determining when and how it’s triggered
- Incorporating any kind of MIDI FX plugin to trigger and manipulate ‘input’ MIDI-data
- Processing the sample before loading it into the sampler, saving CPU space
You can use any of the sampler’s built-in functions and effects, and that’s only the start.
Just because you’re using audio samples, doesn’t mean you have to be limited by your sample’s original characteristics… MIDI will always be just a click (or workaround) away.
SPLIT YOUR DRUM ELEMENTS UP
Each drum element needs its very own set of mixing processors and parameters. When your drums are all combined, it makes mixing them unnecessarily difficult.
- What you should always be doing is designating each drum element to its own MIDI clip and track.
At times, even its very own instance of the plugin itself.
Once each individual drum element is mixed, combine the signals. Creating a custom Drum BUS, to sum up, and process things as a whole.
This way, you can still edit your individual drum tracks as if they were all being triggered by one MIDI clip. There’s usually even an option to view and edit all the MIDI in 1 piano roll simultaneously.
QUANTIZATION
There are two main elements that make something sound natural: Timing and Velocity.
- TIMING 一 When you quantize your MIDI it will automatically make things sound very robotic. If that’s not what you’re going for, you must model human imperfections, known as Humanization.
A common misconception about MIDI is that it’s bound to have limitations when it comes to this capability. That’s not true at all.
If done correctly, it has been proven to sound indistinguishable from live recordings.
TO DO THIS:
- Unlock the grid (by disabling ‘SNAP’) so you’re able to move the notes freely.
- Zoom in until 1 note takes up roughly the entire screen, and nudge the notes off-grid individually; both forward and backward ever so slightly. I’m talking fractions of a beat.
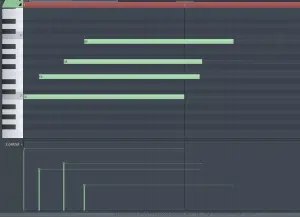
Drag each note forward on the timeline to create unique ‘strums’ with your chord. Get creative.
It should not be 100% aligned with the grid 一 Approximately 90 ticks is a good starting point.
This is to add that ‘realism’ factor you’d get when performing live but without the possibility of being off-beat by a crazy (or embarrassing) amount of time.
DAWs and sequencers typically offer some sort of ‘groove’ functionality to apply to existing notes, this method can also be done manually.
PRO TIP: Groove is not just one thing. Swing and Shuffle are actually 2 different forms of ‘timing’ manipulation. They each shift notes off the grid very differently.
≫ Swing: gives the notation a more laid-back vibe.
≫ Shuffle: sounds more rushed and ‘skippy.’
Usually applied subtly, but applying extreme amounts has its benefits as well. These alterations are not applied randomly, and will not subtract from any computerization. It can, at times, even make it sound more robotic, so tread lightly.
If timing-randomization is what you’re looking for: either implement it by hand (using the above method) or use a DAW that’s equipped with a MIDI-humanization feature, such as Studio One.
- VELOCITY 一 When musicians play live, they never play or repeat a note with exactly the same velocity twice, even when they intend to. Same with their timing. It may sound identical, but I assure you it’s not.
So, you took your robotic MIDI clip and shifted the note’s timing, but it still sounds unnatural… The solution is simple: change the velocity of each note.
Carefully choose ‘accents’ you’d like to include (if any). Also, decide how much you want to offset one note’s velocity from the other. Accents are key in music.
An accent is a momentary emphasis on a particular rhythmic or melodic detail. In this case, velocity.
Once you’ve done that, go into the velocity of each note, and change it slightly. Velocity values range from 0-127.
Even if you have 4 identical notes, changing each one by a value of 5 (or less than 10) is the key to getting that super natural sound.
Just be sure you offset each note by different amounts.
TRIGGERING EXTERNAL SYNTHS & SOUND SOURCES
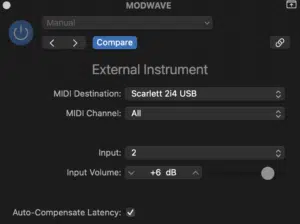
When using external instruments and synths, it’s customary to record the audio directly into the session. While this is perfectly valid, the fact of the matter is, doing things this way rids you of any MIDI benefits.
Meaning, if you wanted to change a note, the playing style, quantize, change the external-device preset or parameter, or even simply shift it off the grid, you wouldn’t be able to.
You’re forced to record the external sound source’s output itself. Then cross your fingers, and pray it syncs up.
Instead: use MIDI clips to trigger your external sound sources until you’re satisfied and ready to bounce.
You can treat all of your external synths, instruments, samples, and sound sources of any kind as if they were plugins. Otherwise, the advantages of post-midi and sound design edits are out the window, and nobody wants that.
CHORDS: MINOR/MAJOR
Oftentimes ‘Theory’ can be an intimidating subject, especially if you haven’t spent the time getting familiar with it… but it doesn’t have to be.
In reality, our ears are simply picking up (for instance) a melody, and instead of our brains deciphering one note from the other, it is just picking up the distance between them.
For example, ‘Happy Birthday’ does not start on a particular note. It can begin on any note and still sound the exact same every time. This is because the relationship between notes never changes.
If you take your favorite melody, change the key, and transpose it, it will be easily recognizable as the same melody. As long as the notes are still the same distance apart, of course.
This not only applies to melodies but chords as well.
Think about playing a major, or minor chord on your keyboard: If you’re playing a C-major, but want to play E-major instead, you don’t change the position of your fingers in relation to the keys.
- You simply move them (proportionally) either up or down the keyboard.
Remember, regardless of the key, the formula of a minor and major chord always remains the same.
TIME TO START BUILDING
STEP 1 一 Take 1 MIDI clip and designate it to be a placeholder. Make sure the notes within the scale that you want to use are selected. Each note will be on top of the other so it’s a small clip, no longer than a bar.
STEP 2 一 Insert or create another MIDI clip, designated for a melody. Begin with any note that’s filled in. This will be your root (bottom) note.
STEP 3 一 Starting at the root note (0), go up to key #4 and fill in #7.
- You have just successfully created your first major chord!
Now, do the same thing for a minor chord (as opposed to a major). The formula is slightly different from the major chord as the middle note is transposed down 1 semitone, not up. So it’s 0, 3, 7.
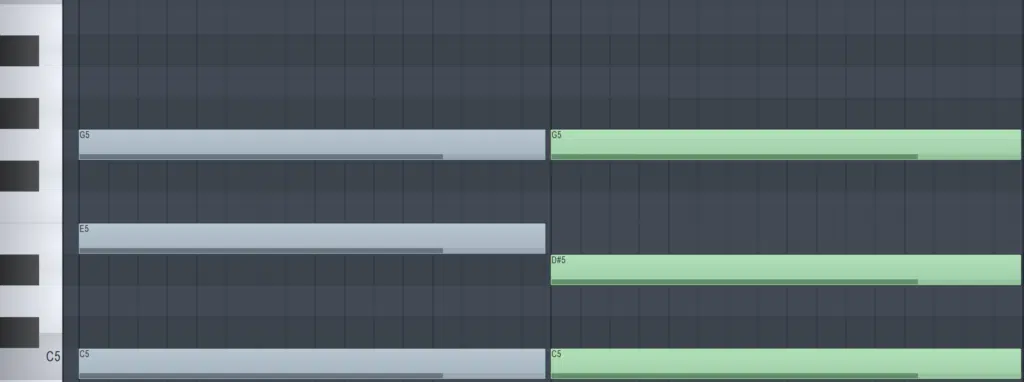
C Major (left); C Minor (right).
This is the structure and foundation for any standard major and minor chords, regardless of the scale/key. Values (the distance between notes) will never change.
BUILDING YOUR PROGRESSION:
STEP 1 一 Take the root note/chord and have it occupy Bar 1.
STEP 2 一 For Bar 2, 3, and 4, input a note for each. Make sure it is one that sounds good on its own, as a simple melody.
STEP 3 一 Once your top-line melody is complete, take each note and test both its associated minor, and major chords.
Swap them, experiment with them, and even add notes to extend your chords or create more advanced chord progressions, such as Major/Minor 11, etc.
KEEP IN MIND
- Music is all about tension and resolve. So, if you start on a major chord, then end on a major chord. This way you’ll have a good resolution.
- Chord inversions are when you take 1 (or multiple) notes in a chord, and either transpose a note or two, reverse the order of your notes within a chord, and/or change the root note. This allows you to experiment with different chords within the key, comprised of the same notes within the current chord.
It’s a foolproof method of adding unique variations and creating alternative forms of what is, essentially, the same chord and/or progression.
Just another example of how interchangeable music is once you grasp the basic concepts of Theory.
THE CHORD PROGRESSION WRITES THE MELODY
Where should you go from here? Well, this is where you let the chords guide you:
STEP 1 一 Have the MIDI clip and chord progression clearly displayed (or readily available) for quick reference. These will ultimately serve as your compass.
Enable your DAW’s ‘Ghost’ function (or the like) so you’re able to see exactly which notes are filled in. You won’t have the ability to change them, as they’re serving as placeholders.
STEP 2 一 Start inputting notes that belong in the scale and sound right in succession. Along with the progression playing in the backdrop.
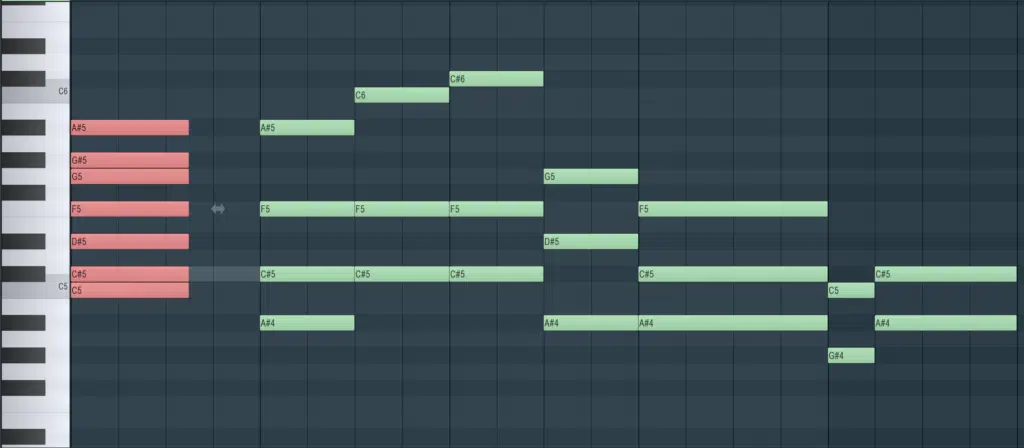
- Make sure to program your melody in a higher octave, so you can easily differentiate the melody from the chord progression.
Envision the rhythm or pattern of the melody. It’s good to take advantage of inspiration when it strikes, so input whatever you have in your head before you lose it.
- Plug-in the rhythm of the melody as it makes the following step even easier. Sometimes it’s best to start the melody off using a note that’s in the first chord other than the root note.
STEP 3 一 Experiment and get creative. Starting with, and ending on notes contained within the chord progression will keep things fluid.
However, the real magic happens when you include notes within the scale, but not within the progression. Odds are, there will only be a few.
HACK
Experiment with every possible combination of your chord.
Move just 1 note: either the middle note of a major or minor chord. What sounds like such a little step, can impact things in a major way, no pun intended. It can change the entire style/feel of your piece.
Don’t forget to try rearranging your progression’s chords for a variation, or just to switch it up.
DO IT IN REVERSE
Download the aforementioned MIDI Melody Pack and follow the same process. Except, this time, you’re going to start with a melody, not a progression:
STEP 1 一 Take a clip, fill out all the notes contained in the melody, and look for a scale that contains all the same notes as your melody (if you don’t know the scale already).
STEP 2 一 Start each chord with a note that’s within your melody.
For example: if bar 1 is ‘A,’ try using an A-minor or -major. Bar 2 is ‘D,’ so try a D-minor or -major.
This won’t work for every chord, but I guarantee this concept can apply to ANY melody if you take the time to test, experiment, and configure. If the ‘D’ chord doesn’t work well with the melody after the ‘A’ chord, simply change the order of the chord’s notes:
STEP 3 一 Invert the root note of your D chord up one octave, so it turns into an ‘F’ chord. It will still be in key because the notes have not changed!
Just be sure to test between major and minor for additional variations you might love.
You don’t have to transpose the root note so it becomes the top note of the chord. You could shift the last note down in order to become the root note.
Other times the middle note sounds best transposed up/down an octave. It will change the chord’s ‘feel’ entirely, yet it will remain within the boundaries of your initial vibe. It’s all about experimentation.
FINAL THOUGHTS
There’s no mastering production without mastering MIDI… good news is, it’s really not that hard!
MIDI can be super simple or super complicated. It can be your teacher, or you can teach it. The possibilities are truly endless.
Just get comfortable with it, and watch how quickly you build complex compositions like it’s nothing, even with zero experience.
To get the best building blocks in the business, check out the FREE Unison Essential Advanced MIDI Chord Progressions pack.
You can use these 24 unique MIDI chord progressions as ready-made templates to expand upon, or instantly plug and play into your own music.
They are the best way to make your music stand out.
Until next time…


