VST plugins are one of the most powerful tools you can add to your music production/sound design workflow.
They can completely transform your sound, enhance your tracks with sick effects, and unlock new creative possibilities.
Plus, they have the ability to expand your audio library, give you access to cutting-edge virtual instruments, and help you seriously elevate your mixes.
And today, we’re breaking down how to add plugins to Ableton Live step by step.
So, for all you Ableton users out there, we’re covering everything you need to know, like:
- How to install plugins & running the plugin installer ✓
- Setting up your custom VST folders ✓
- Scanning for new plugins in Ableton ✓
- Using VST plugins in your projects ✓
- Saving presets and managing plugin settings ✓
- Troubleshooting plugin issues ✓
- Common files and folders (like system folders) ✓
- Updating and removing plugins ✓
- Pro tips for tweaking your setup
- Much more about how to add plugins to Ableton
After reading this article, you’ll know how to add plugins to Ableton Live from start to finish, with pro tips scattered throughout.
This way, you can quickly install new plugins, organize your VST folders for a smooth workflow, and make sure your setup is running without a hitch.
Plus, with a fully customized plugin setup, you’ll never have to worry about missing common files or installation problems again.
Instead, you can focus on doing what you love: knocking out killer beats and taking your production/sound design skills to the next level.
So, let’s dive in…
Table of Contents
- What are VST Plugins? Quick Recap
- How to Add Plugins to Ableton Live: Breaking it Down
- Step 1: Downloading and Installing VST Plugins
- Step 2: Setting Up VST Plugin Folders in Ableton Live
- Step 3: Scanning for New Plugins
- Step 4: Adding VST Plugins to Your Projects
- Step 5: Troubleshooting Plugin Issues
- How to Add Plugins to Ableton: Final Thoughts
What are VST Plugins? Quick Recap

VST plugins (Virtual Studio Technology) are essential if you’re looking to add more creativity to your music production setup in Ableton Live.
These plugins let you incorporate everything from virtual instruments and synths to effects like reverb, delay, and EQ into your projects.
There are two main VST versions:
- VST2 plugins 一 Which have been around for a while and are still used a lot because of their wide compatibility with older systems and DAWs.
- VST3 plugins (newer) 一 Which offer better features like sidechain support, more efficient CPU usage, and overall improved performance.
Both VST2 and VST3 plug-ins are fully supported in Ableton Live, so you don’t have to worry about compatibility issues between the two.
One important thing to consider when downloading new VSTs is whether you need the 32-bit or 64-bit VST version, depending on your operating system.
If you’re using a 64-bit system, make sure you’re installing 64-bit VST plugins for better performance and stability, as 32-bit plugins might not work as well.
Or, may not be supported in newer versions of Ableton Live at all.
Understanding how to properly install VST plugins and choosing the right version will save you a lot of headaches down the road.
Side note, if you’re looking for the absolute best VST plugins in the game, including chord identifiers, we’ve got you covered.
How to Add Plugins to Ableton Live: Breaking it Down
Now that you understand the basics of VST plugins, let’s walk through how to add plugins to Ableton Live step by step. From downloading and setting up plugins to organizing them all in custom folders, we’ve got you covered with everything you need to know. So, launch Live and let’s get into it, starting with how to install plugins.
Step 1: Downloading and Installing VST Plugins

When you’re ready to add new VST plugins to Ableton Live, the first step is to download and install plugins from trusted sources.
Make sure you choose the correct version for your system, whether 32-bit or 64-bit like we talked about before.
Once the plugin file is downloaded, the next key step is to run the plugin installer and select the proper install folder.
For Windows users, it’s important to check that the plugin installs into the C Program Files or C Program Files (x86) directory.
While this works fine for most, if you have a specific custom VST folder for better organization, now’s the time to direct the installer there.
For Mac OS, plugins (both VST and AU) should be installed in the Library Audio Plug-Ins folder.
If the installer gives you the option to select or review where the DLL files (or equivalent components) are being placed, make sure they’re going in the right system folder.
Remember, plugins without their DLL files won’t work correctly in Ableton Live, so be careful about installation paths and file locations.
After installation, verify that the VST version is correct by checking the installed files in the selected VST folder to avoid future compatibility issues and so Ableton can easily detect it when you scan for new plugins.
Step 2: Setting Up VST Plugin Folders in Ableton Live
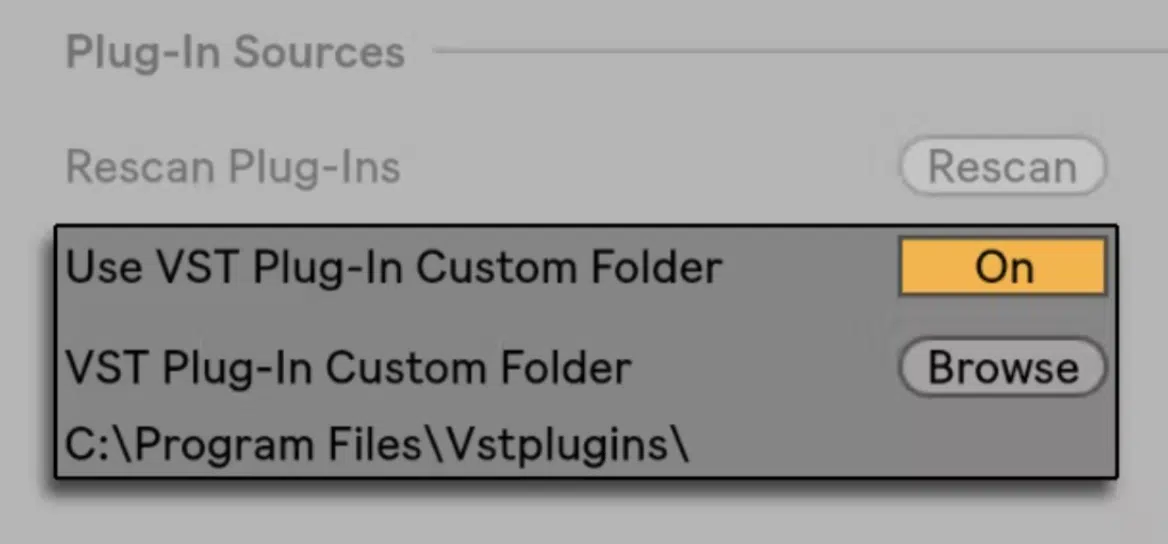
Once your VST plugin is installed, it’s time to set up the correct VST folder in Ableton Live, so you’re going to:
- Open Ableton Live
- Go to preferences
- Click on the “Plugins” tab
In the Preferences window, you’ll see an option to add a plug-in custom folder for your VST plugins, which you’ll certainly be doing all day long.
This is where you’ll point Ableton to the correct folder (like C Program Files or Library Audio Plug-Ins).
Make sure that both VST2 and VST3 are enabled so you can use either format.
If you have a lot of plug-ins, definitely create a custom VST folder for better organization, especially if you’re working with multiple plugins across different projects.
You can also separate plug-ins by free VST/paid VST variations to keep track of your collection 一 dealer’s choice.
We’ll be covering everything about custom folders in the following section.
-
Pro Tip: Customizing Your VST Plugin Folders
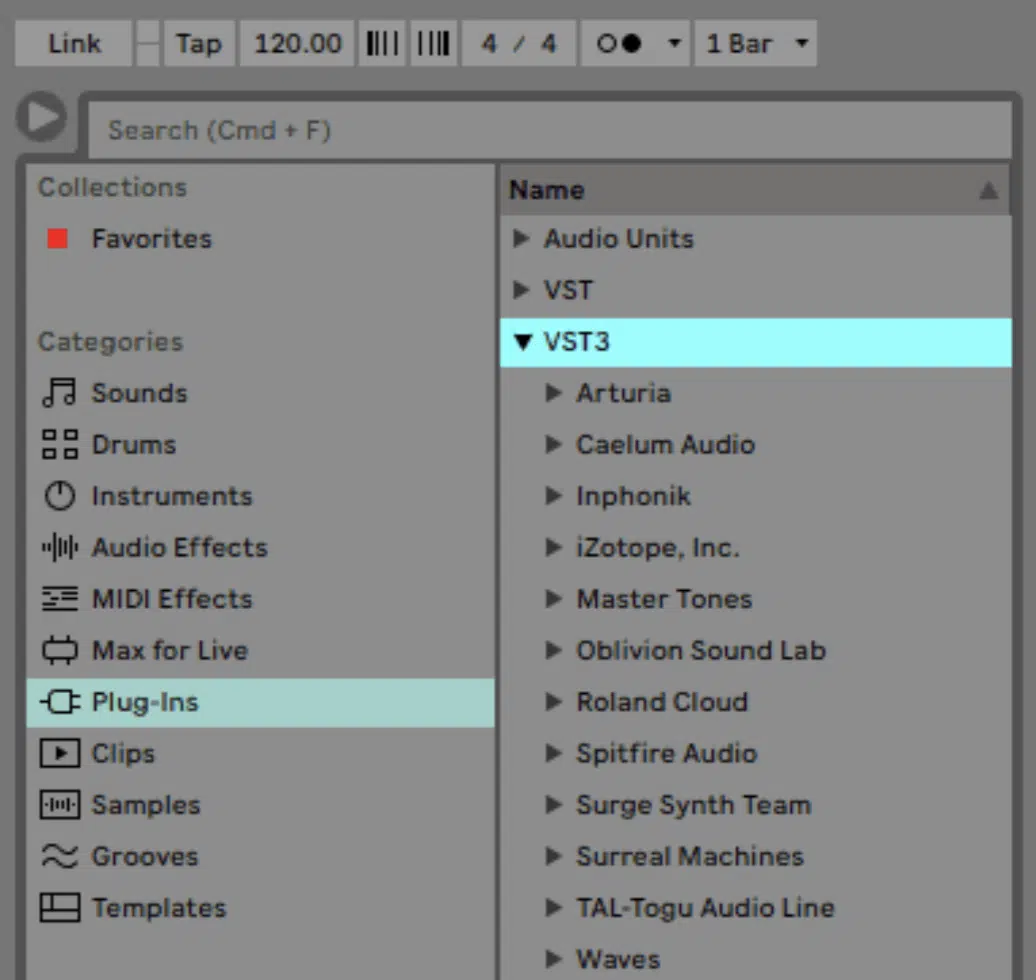
To avoid confusion and keep your workflow smooth, it’s best to create a custom VST folder for all your VST plugins.
Instead of using the default installation paths, manually create a plug-in custom folder inside C Program Files on Windows or in the Library Audio Plug-Ins on Mac OS.
This allows you to have better control over where your VST plugins are stored, and it makes it easier to manage your growing collection (and it grows fast, trust me).
To streamline your workflow you can name subfolders based on plugin types when you’re setting up the VST folder, such as:
- Effects
- Software Synthesizer Favs
- Instruments
- Etc.
Make sure to point Ableton Live to your newly created custom VST folder in the Preferences window by selecting the appropriate VST folder location under the “Plugins” tab.
This will make sure that all your VST2 and VST3 plug-ins are scanned properly and appear in the Ableton Live plugin folders.
Creating a dedicated plug-in custom folder also minimizes issues like misplaced DLL files or system errors.
Keeping things organized in your custom VST folder means you’ll never waste time searching for misplaced plug-ins and helps avoid crashes due to incorrect installation paths.
I mean, you always want a stable experience, am I right?
Step 3: Scanning for New Plugins
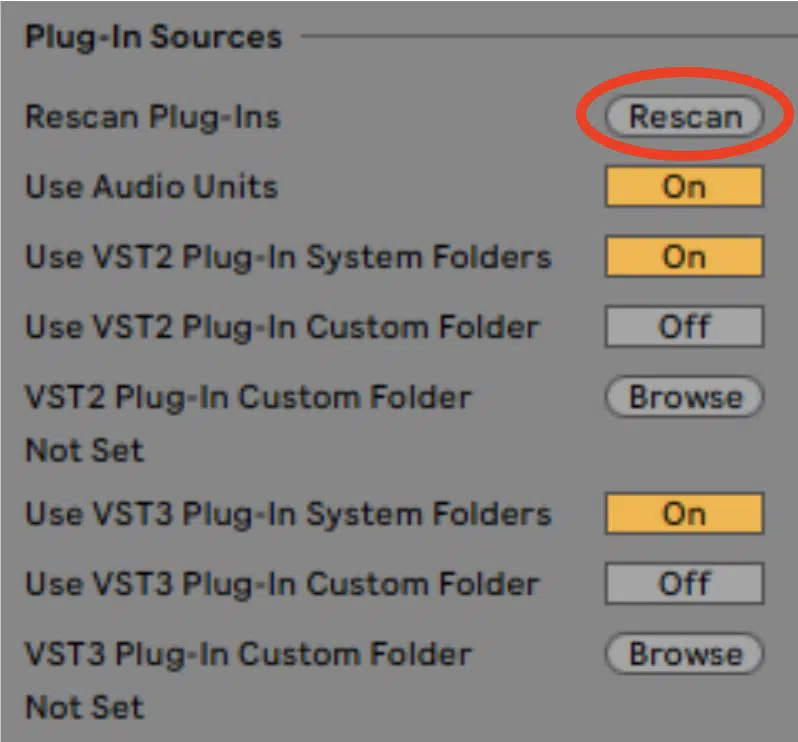
After setting up your VST folder, it’s time to scan for the new plugins in Ableton Live.
Simply navigate back to the Preferences window under the “Plugins” tab, and click the button that says “Rescan.”
This will make Ableton Live search your system for all the VST plugins you’ve installed.
NOTE: Again, please double-check that you’ve installed the correct version of the plugin (whether 32-bit or 64-bit), otherwise it’ll be a disaster.
If the plugin doesn’t appear after scanning, make sure that your installation path is correct, and that the DLL file is in the right location as we discussed.
If needed, just try reinstalling the plugin and scanning again 一 easy peasy.
NOTE: Looking for all the Ableton shortcuts or best Ableton stock plugins? Look no further, because we broke it all down.
Step 4: Adding VST Plugins to Your Projects
Now that you’ve set up and scanned your VST plugins in Ableton Live, it’s time to start using them in your projects. Here’s how to easily integrate your plugins and start making music like a pro, learning exactly how to add plugins to Ableton Live in a way that boosts your workflow and creativity.
-
Using VST Plugins in Your Sessions
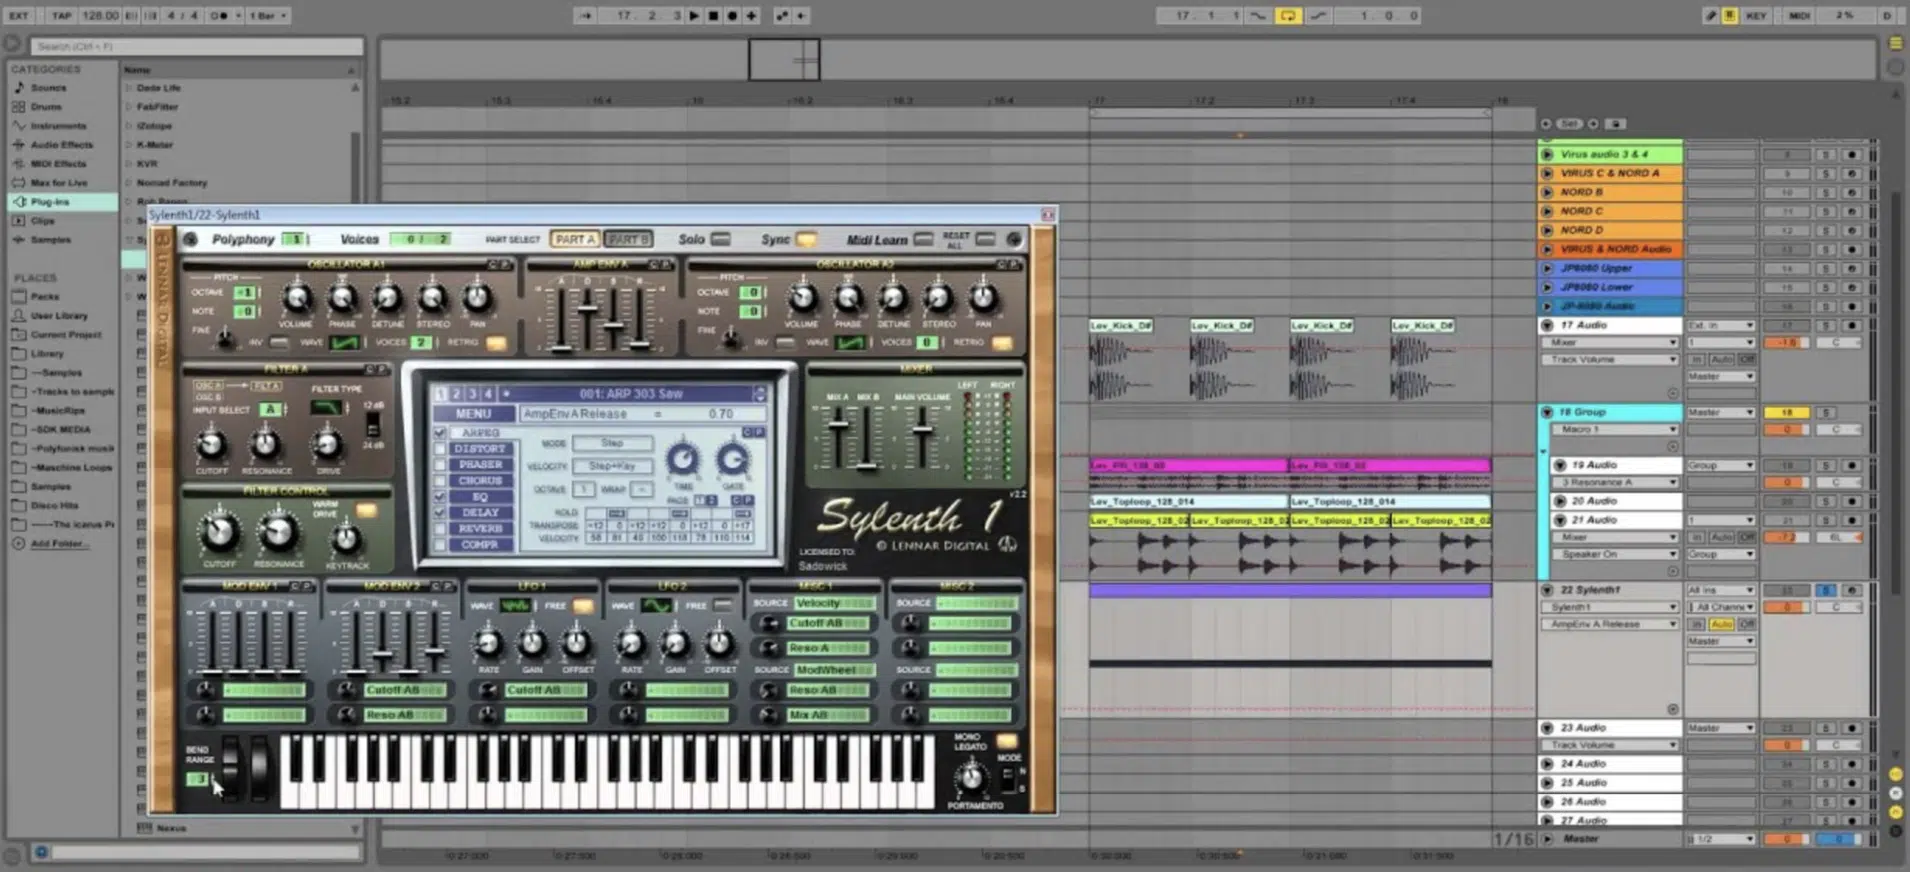
Once you’ve scanned for your VST plugins, open the Ableton Live Browser on the left-hand side of the screen and scroll down to the “Plugins” section.
Here, you’ll see a list of all the VST2 and VST3 plug-ins that you’ve installed.
For example, if you’ve installed a popular synthesizer plugin like Serum or a free effects plugin, you can now drag it directly onto a track (audio/MIDI track) in your session.
Pro Tip: Always label your tracks after adding a VST plugin… This will keep your session organized, especially when you’re working with multiple plug-ins.
For example, if you’ve added a reverb plugin, label the track “Reverb” so that you can easily locate it later (it’s a little thing that makes a huge difference).
You can also adjust the plugin’s parameters directly from the plugin window or save specific settings as presets to use later in different sessions before uploading to any streaming site.
-
Saving Presets and Managing Plugin Settings

After tweaking your VST plugin to get the perfect sound, you can save your adjustments as a preset for future use.
In Ableton Live, simply double click on the VST plugin header in the device window, then choose “Save Preset” to keep your settings.
This feature is especially useful for effects plugins like compressors or EQs where you’ll have different settings for vocals, drums, or synths.
For example, you might create a custom preset for your favorite delay plugin, like a ping-pong delay with specific feedback and timing settings.
Storing your presets in a custom VST folder within Ableton Live can also fast-track your workflow and make sure you have easy access to frequently used sounds.
Remember to organize your presets with names that indicate their purpose, like “Vocal Chain Preset” or “Drum Reverb.”
Step 5: Troubleshooting Plugin Issues

Even though Ableton Live is known for its stability, issues can sometimes arise when using VST plugins, that’s a fact.
The most common problem occurs when Ableton Live can’t find the DLL files for a plugin…
If this happens, it’s as easy as double-checking that the plugin’s DLL file is in the correct VST folder (for the hundredth time, typically C Program Files or Library Audio Plug-Ins).
Sometimes, the VST version you’ve installed may not be compatible with your operating system, but it’s a quick fix, no worries.
For instance, if you’ve installed a 32-bit VST plugin on a 64-bit system, Ableton Live may not recognize it 一 to fix this, reinstall the correct version of the plugin and rescan it.
NOTE: Always sure all your plugins are up-to-date, as older plugins might crash or cause issues with newer Ableton Live versions.
Also, make sure to keep a backup of your most important plugins and presets to avoid losing your settings during troubleshooting.
How to Add Plugins to Ableton: Final Thoughts
Learning how to add plugins to Ableton Live opens up endless creative opportunities.
Whether you’re installing new effects or virtual instruments, mastering this process will seriously enhance your production and save you massive time.
And now, after this article, you know exactly how to add plugins to Ableton Live without any hassle, from managing your VST folders to making sure everything works smoothly.
It will help you avoid any installation issues and gain access to everything super quickly, easily, and efficiently.
Since we talked about plugins so much, if you want access to the BEST VST Plugins in the game, you’ve got to check these out.
Their Mangler plugin combines distortion and compression for maximum impact, while Drum Monkey is a cutting-edge AI drum loop generator.
Bass Dragon helps you create killer basslines in seconds, and Sound Doctor offers instant, pro-level FX chains.
These plugins can seriously enhance your creativity and make your production workflow faster and more effective (dominating the competition).
Plus, with these tips, you’ll never struggle with how to add plugins to Ableton Live again.
Whether you’re fine-tuning effects or experimenting with new sounds, this knowledge ensures you can focus on your true passion 一 making great music!
Until next time…


Leave a Reply
You must belogged in to post a comment.