Serum presets can dramatically shape your sound, bring new life to your tracks, and inspire endless creativity.
As well as being versatile and flexible, they are an essential tool to help express your unique musical vision.
So, as a music producer, it’s important to know all about how to install Serum presets properly in order to unlock the full potential of this powerful synthesizer.
Plus, the knowledge can help elevate your production skills to new heights.
In today’s article, we’ll break down:
- How to install Serum presets ✓
- Unzipping and locating downloaded presets ✓
- Navigating to the Serum presets folder ✓
- Organizing and creating custom folders for presets ✓
- Adding new presets to Serum ✓
- Handling custom wavetables and additional files ✓
- Making Serum recognize new presets ✓
- Fine-tuning and personalizing presets ✓
- Expanding your sound library with diverse presets ✓
- Troubleshooting common installation issues ✓
By the end of this article, you’ll have a solid understanding of how to install Serum presets so you can seamlessly integrate new sounds into your projects.
You’ll be equipped with the knowledge to not only add new presets but also to organize and customize them like a professional.
This will ensure your Serum library is as efficient and inspiring as your tracks demand.
So, let’s dive in…
Table of Contents
How To Install Serum Presets: Breaking it Down
Serum, a staple in digital music production, offers vast creative potential through its presets. Understanding how to install Serum presets efficiently can revolutionize your sound design process. So, let’s break down how to install Serum presets (step-by-step) to ensure you make the most out of your Serum experience.
-
Step 1: Unzipping and Locating Your Downloaded Presets
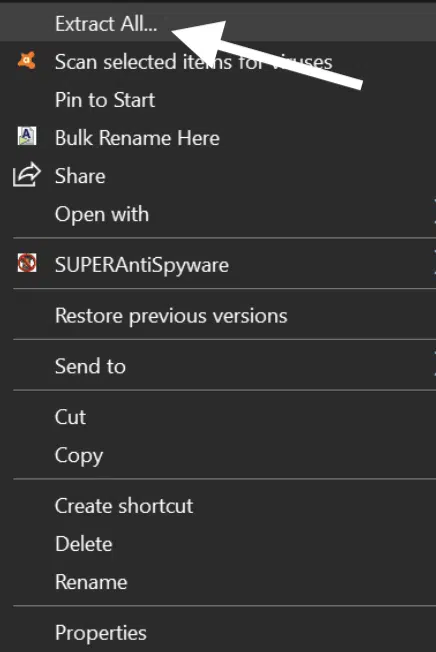
After downloading new Serum presets, you’ll often find them in compressed files.
- If you’re a Windows user 一 Right-click and select ‘Extract All’ to unzip these files.
- If you’re a Mac user 一 Simply double-click the downloaded file, and it will unzip automatically.
Remember, correctly unzipping these files is crucial to successfully installing Serum presets.
Once unzipped, it’s time to locate these Serum presets.
On Windows, you’ll typically find them in the ‘Downloads’ folder, unless specified otherwise. Mac users, check your ‘Downloads’ folder too.
It’s important to know where these files are as you’ll need to access them for the next steps in installing your Serum presets.
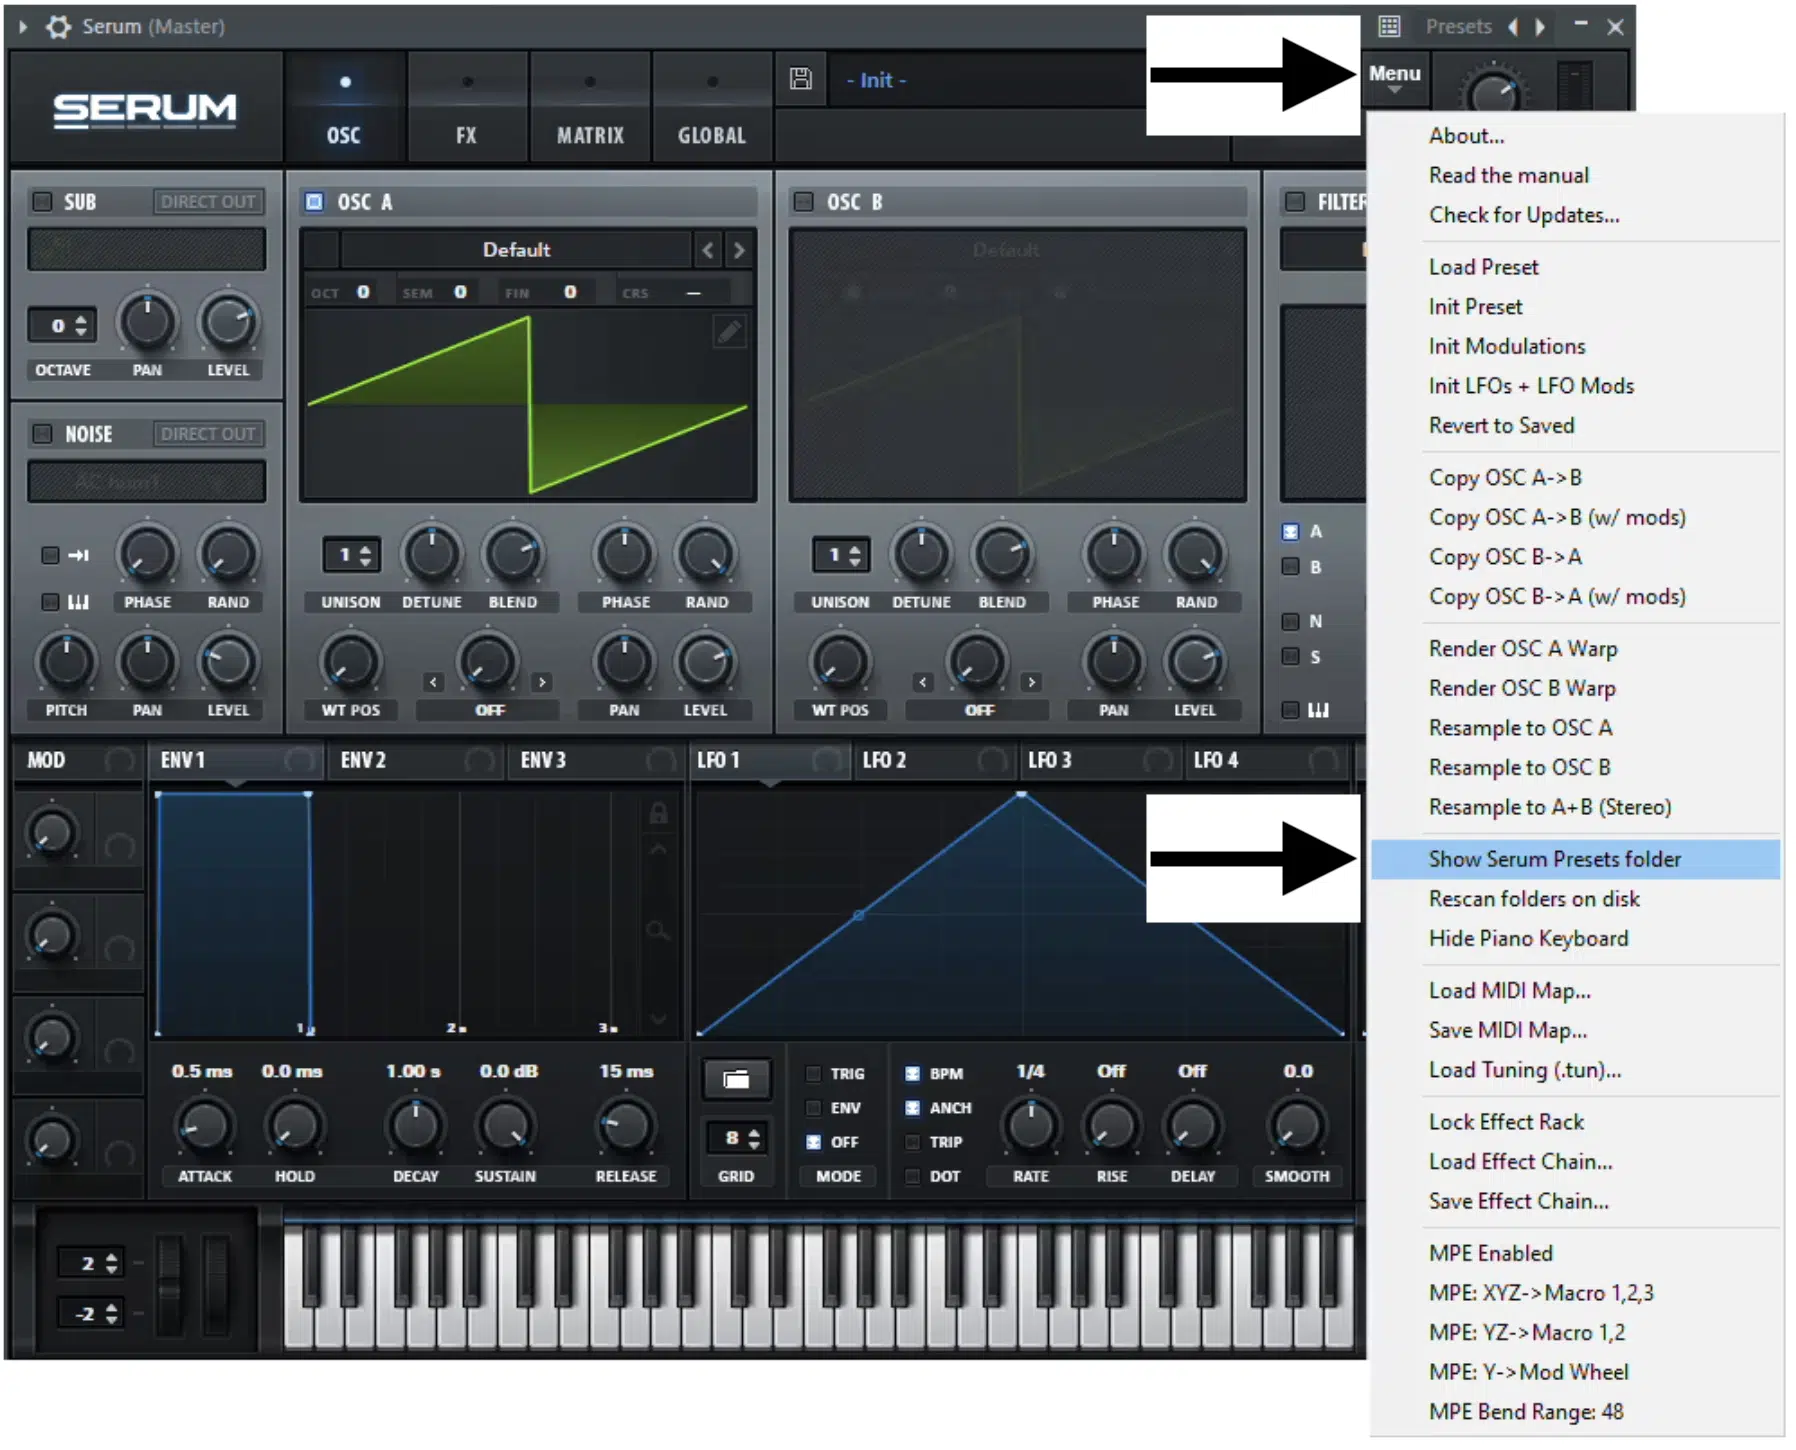
To install Serum presets, finding the Serum presets folder is key:
- Open your DAW
- Launch Serum
- Click on the ‘Menu’
- Then, select ‘Show Serum Presets Folder’
This simple action of pressing the Show Serum Presets Folder reveals the location of your Serum presets folder, a critical step in installing new presets to get back to making unique music.
The default location of the Show Serum presets folder varies between Windows & Mac.
NOTE: It’s under ‘Documents’ on Windows and in the ‘Library/Audio’ section on Mac.
Knowing this path is essential for both adding new presets and organizing your existing Serum presets.
-
Step 3: Organizing Your Serum Presets (+ Creating Custom Folders)
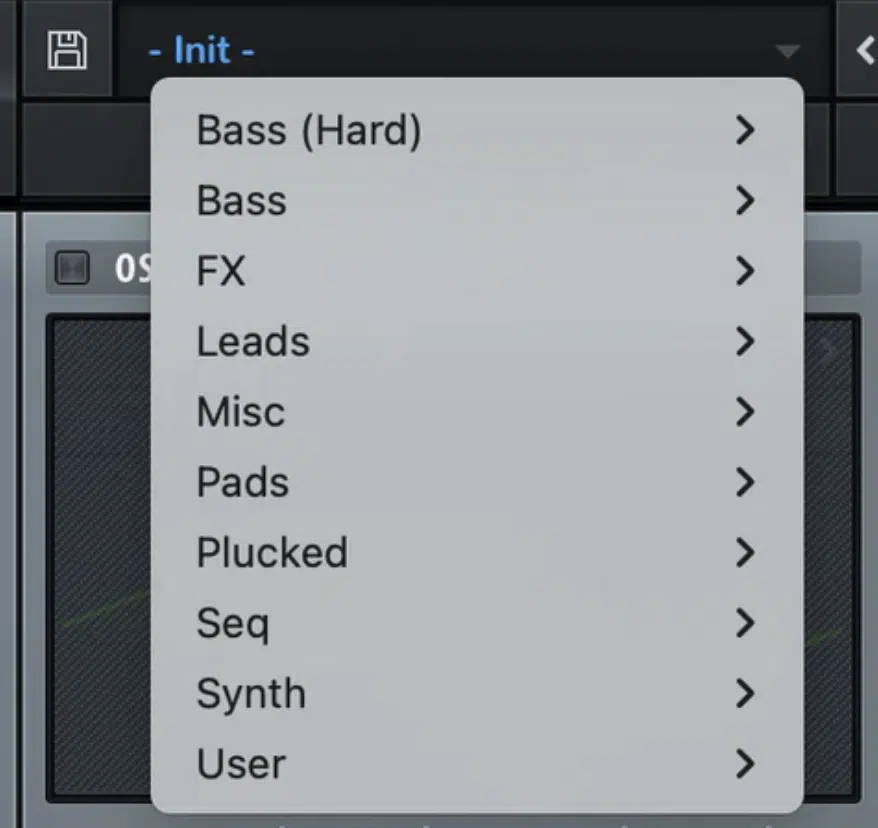
Before you install Serum presets, consider organizing them.
In the Serum presets folder (presets section), make sure to create custom folders for different types of presets.
This organization will make finding the right sound much easier during production.
Always label these folders clearly, I can’t emphasize this enough, for example:
Organizing presets in the Serum presets folder not only simplifies sound selection but also streamlines your workflow.
You could also create a ‘Favorites’ or ‘User’ folder for presets you modify or create 一 keeping your original presets folder (and any new folder) uncluttered.
Remember, a well-organized Serum presets folder saves time and enhances creativity.
As you add more presets over time, this organization will pay off, allowing you to focus more on music creation and less on searching for premium sounds.
-
Step 4: Adding New Presets to Serum

To install Serum presets, simply drag and drop the unzipped preset files into the Serum presets folder.
Ensure that these are .fxp files, as this is the format Serum recognizes. Placing these files in the correct folder is crucial for Serum to access them.
After adding new presets to the Serum presets folder, it’s time to launch Serum in your DAW (digital audio workstation).
This action refreshes Serum, making it aware of the newly added presets.
Now, these new presets should be visible and ready to use in Serum’s preset browser (‘Init’).
Handling Custom Wavetables and Other Additional Files
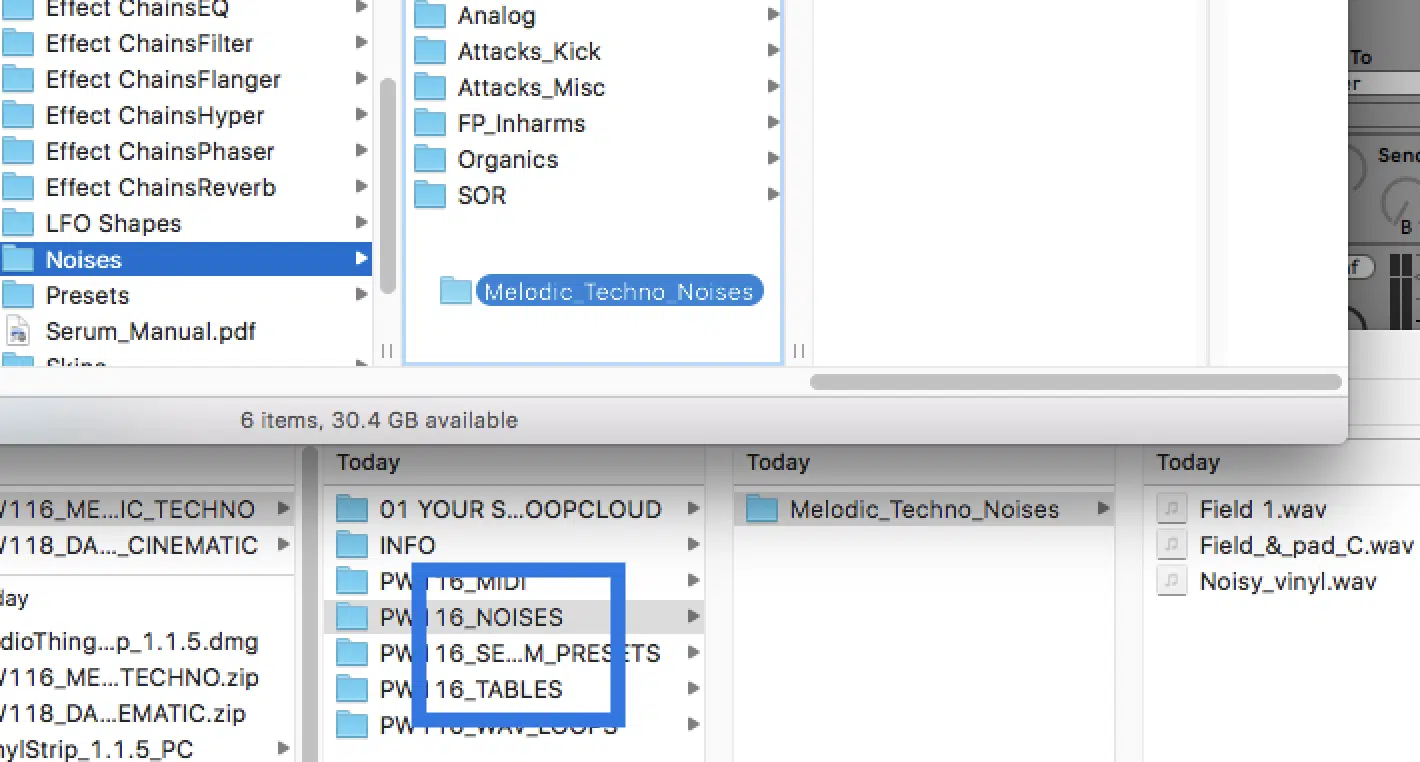
Some Serum preset packs come with custom wavetables or additional files.
To install these, locate the ‘Tables’ folder or ‘Noises’ folder within Serum’s main directory.
Dragging and dropping these files into their respective folders is just as important as adding the presets themselves.
Custom wavetables enhance Serum’s sound design capabilities.
NOTE: After adding them, you might need to rescan folders in Serum to ensure they are recognized.
This process is similar to adding new presets 一 keeping your Serum library comprehensive and up-to-date.
-
Pro Tip: Making Serum Recognize New Presets
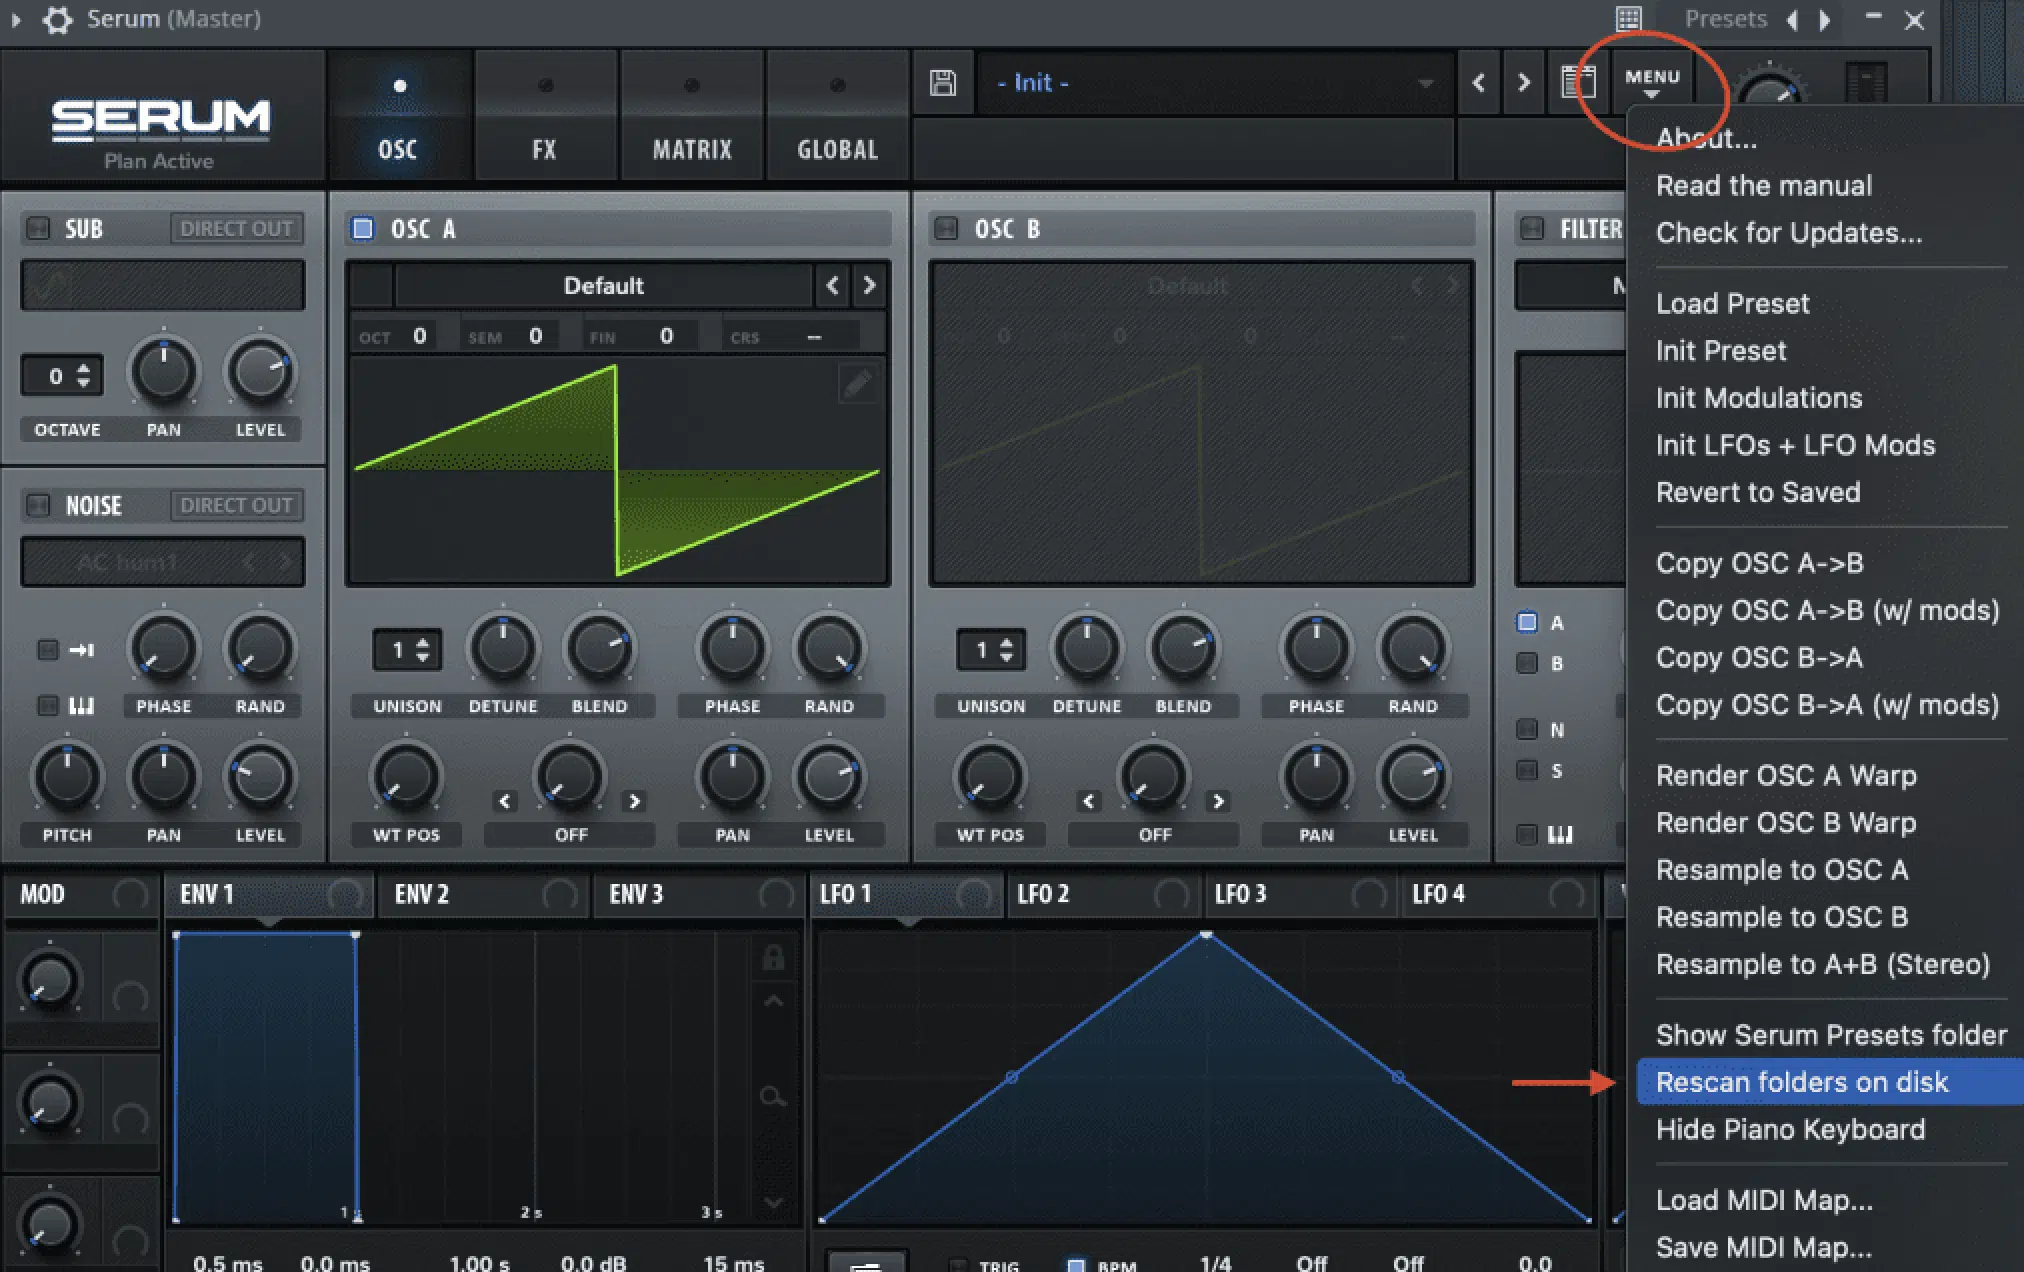
Once you’ve installed your new presets, ensure Serum recognizes them by rescanning folders.
In Serum, go back to the ‘Menu’ and select ‘Rescan Folders on Disk’.
Selecting ‘Rescan Folders on Disk’ is crucial for Serum to update its library with the newly installed presets.
Rescanning folders in Serum is a simple yet essential step in the installation process.
It updates the Serum database, ensuring all your newly installed presets and custom wavetables are readily available for use in your next project.
Remember, the options within the menu button are primarily what you’ll need to master.
Fine-Tuning Your Serum Experience After You Install Presets

After installing Serum presets, experiment with them.
Adjusting parameters and combining different presets can lead to unique sounds, tailor-made for your music.
This personal touch is what sets your sound apart in the competitive world of digital music production.
Remember, presets are starting points… feel free to tweak them to your liking.
Modifying presets not only helps in creating a signature sound but also aids in understanding Serum’s vast capabilities.
Continuously expanding your Serum presets library is vital for staying fresh/innovative.
Also, regularly seek out new preset packs, which can inspire new ideas and add diversity to your tracks.
NOTE
Exploring different genres through various Xfer Serum preset packs can broaden your musical horizons and help you discover new possibilities.
Whether it’s for bass-heavy tracks, ethereal pads, or sharp leads, expanding your library with diverse Serum presets keeps your productions sounding current and unique.
Bonus: Unison Serum Essentials (Free)

Whether you’re a Serum enthusiast or just learning how to install Serum presets, you’ll want to start with the most professional and polished sounds available…
That’s where the (free) Unison Serum Essentials pack comes in.
This invaluable pack offers a comprehensive collection of premium quality presets, designed to elevate your music production to a professional level instantly.
Plus, they’re modeled off of the top tracks across popular genres, so there are options for all styles.
With a variety of sounds, each Serum preset in this pack was created to be exceptional and versatile, including:
Each preset comes fully loaded with macros and flexible parameters, allowing for extensive customization and personalization.
This means that, while the presets are professional-grade right out of the box, they can also be tweaked to match your unique creative vision.
You’ll be hard-pressed to find FREE Serum presets with this quality and effectiveness.
By incorporating these presets, you’re not just installing sounds 一 you’re unlocking endless creative possibilities and inspiration.
Download the Unison Serum Essentials Now
How To Install Serum Presets: Final Thoughts
Mastering how to install Serum presets is an essential skill if you’re going to be creating masterpieces in Serum.
With the steps and tips we covered today, you’ll be able to seamlessly integrate new and exciting sounds into your Serum library in minutes.
Remember, the key to making the most out of Serum lies in not just adding presets but in organizing, customizing, and continually expanding your sound palette.
With resources like the Unison Serum Essentials pack (free), you have access to a wealth of professional-grade sounds that can take your music production to the next level.
So, go ahead, experiment with these sounds, and watch as your tracks transform with the rich, dynamic, and professional textures that Serum presets can offer.
Until next time…


Leave a Reply
You must belogged in to post a comment.