Parametric EQ has the ability to precisely shape frequencies, control gain, and adjust bandwidth for each band in your mix.
Plus, it can help you clean up problematic areas, enhance key elements, and add creative effects to make your mix stand out.
As producers, knowing all about parametric EQ is super important because it gives you the precision and flexibility to knock out professional-quality mixes in any genre.
That’s why we’re breaking down everything you need to know, like:
- How parametric EQ works ✓
- Key functions/features/parameters ✓
- The role of frequency bands and how to adjust them ✓
- Why gain control is key to shaping your mix ✓
- Understanding Q factor and bandwidth ✓
- Techniques for identifying & fixing problem frequencies ✓
- Subtractive EQ & additive EQ (+ shelving filters) ✓
- Boosting techniques to enhance elements ✓
- Using parametric EQ for any desired effect ✓
- Automating EQ for phaser/flanger effects ✓
- Much more about what parametric EQ offers ✓
After this article, you’ll know everything about parametric EQ and how to use it like a pro.
This way, you can easily sculpt your mixes, clean up muddiness, and add clarity to your sound on an unparalleled level.
As well as successfully boost, cut, and automate frequencies like a professional 一 giving you total control over every element in your mix.
So, let’s dive in…
Table of Contents
Parametric EQ: Explained
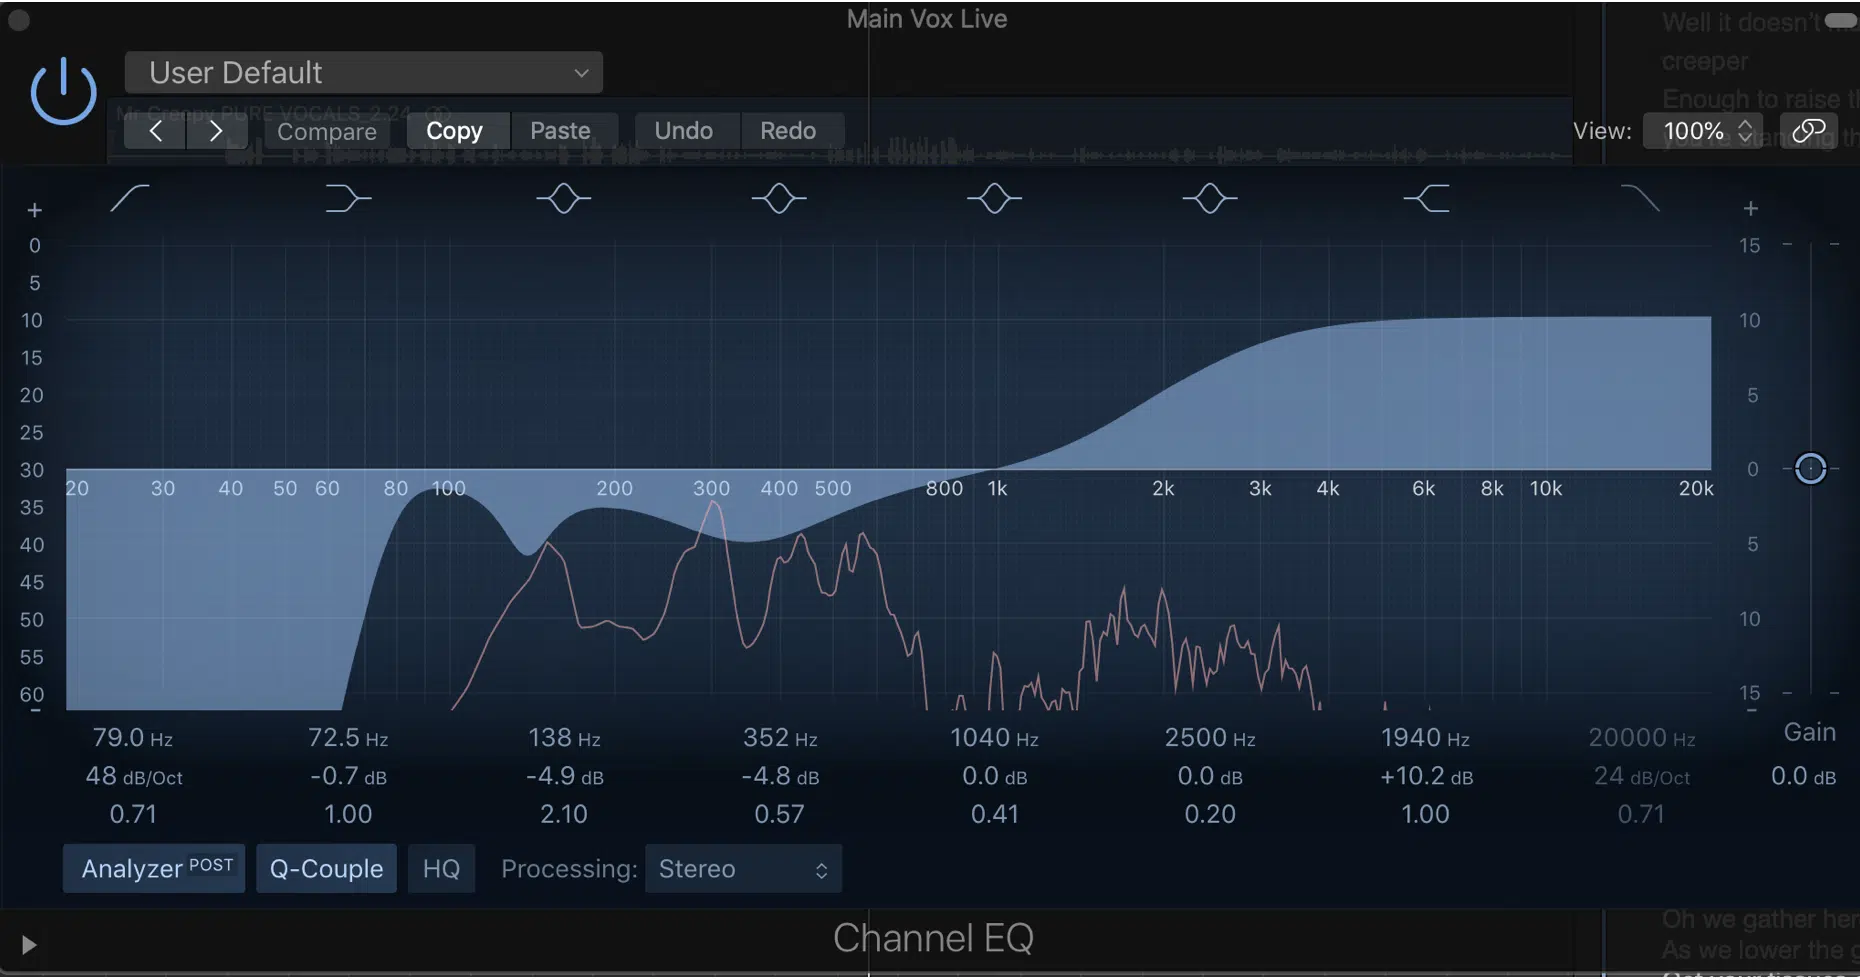
Parametric EQ stands for parametric equalizer and is a flexible, fully adjustable EQ that allows you to precisely control the frequency, gain, and Q factor of each EQ band.
Unlike a graphic EQ, which has a set number of fixed bands and frequencies, parametric EQ lets you target specific frequencies across the entire frequency spectrum.
This means you can choose any frequency (whether it’s 120 Hz to reduce muddiness in a kick drum or 5 kHz to add clarity to a vocal) and fine-tune it with pinpoint accuracy.
This flexibility gives you the ability to solve mixing problems and enhance audio quality in a way that other types of EQs simply can’t match.
Key Features of a Parametric EQ
Understanding how to control the frequency, gain, and Q factor is essential for using a parametric EQ (parametric equalizer) like a boss. These features give you the ability to boost or cut individual frequencies (low/high frequencies) and shape your mix with precision. So let’s get into it.
-
Frequency Bands and Their Flexibility
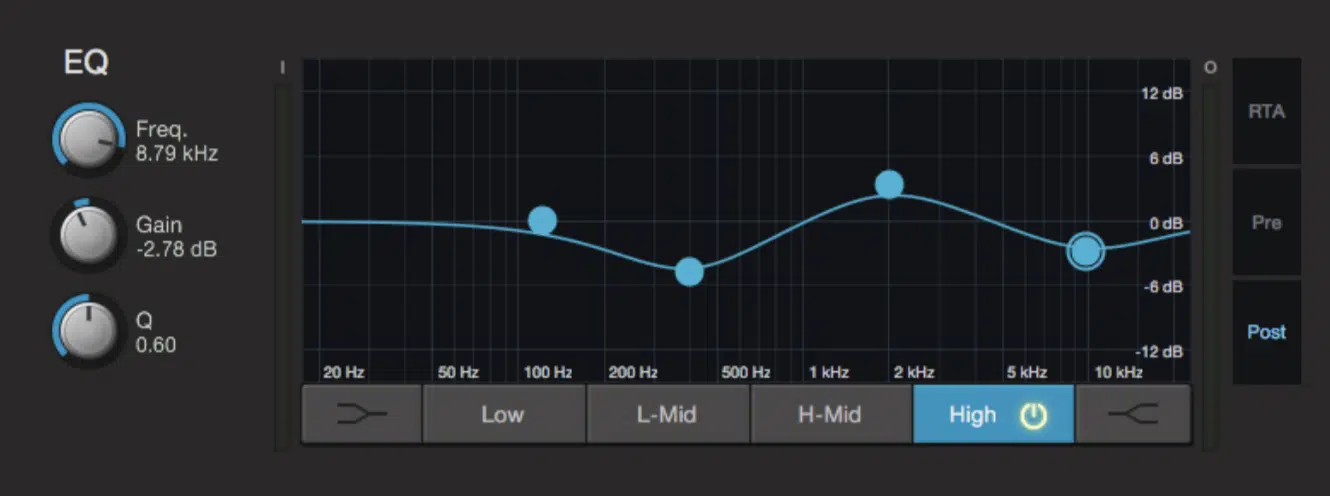
Each frequency band in a parametric EQ allows you to target specific frequencies and adjust them with razor-sharp precision.
For example, if you need to reduce the low-end rumble in a bass guitar track, you can focus on a center frequency around 80 Hz using a narrow bandwidth to clean up the unwanted noise.
All without impacting other parts of the track, which is key.
Parametric EQs typically provide 3-7 bands 一 giving you the flexibility to address multiple issues across the frequency spectrum.
Unlike graphic EQs, which have set frequency bands, parametric EQs allow you to move each band to any frequency between 20 Hz and 20 kHz.
This makes it ideal for pinpoint adjustments.
The ability to move frequency bands freely across the spectrum is especially useful when mixing instruments like vocals, where you might want to boost 2-4 kHz to give the vocal more presence or cut around 300 Hz to remove muddiness.
This kind of flexibility makes parametric EQ indispensable in both the mixing and mastering stages, so don’t overlook it.
-
Gain Control and Its Importance
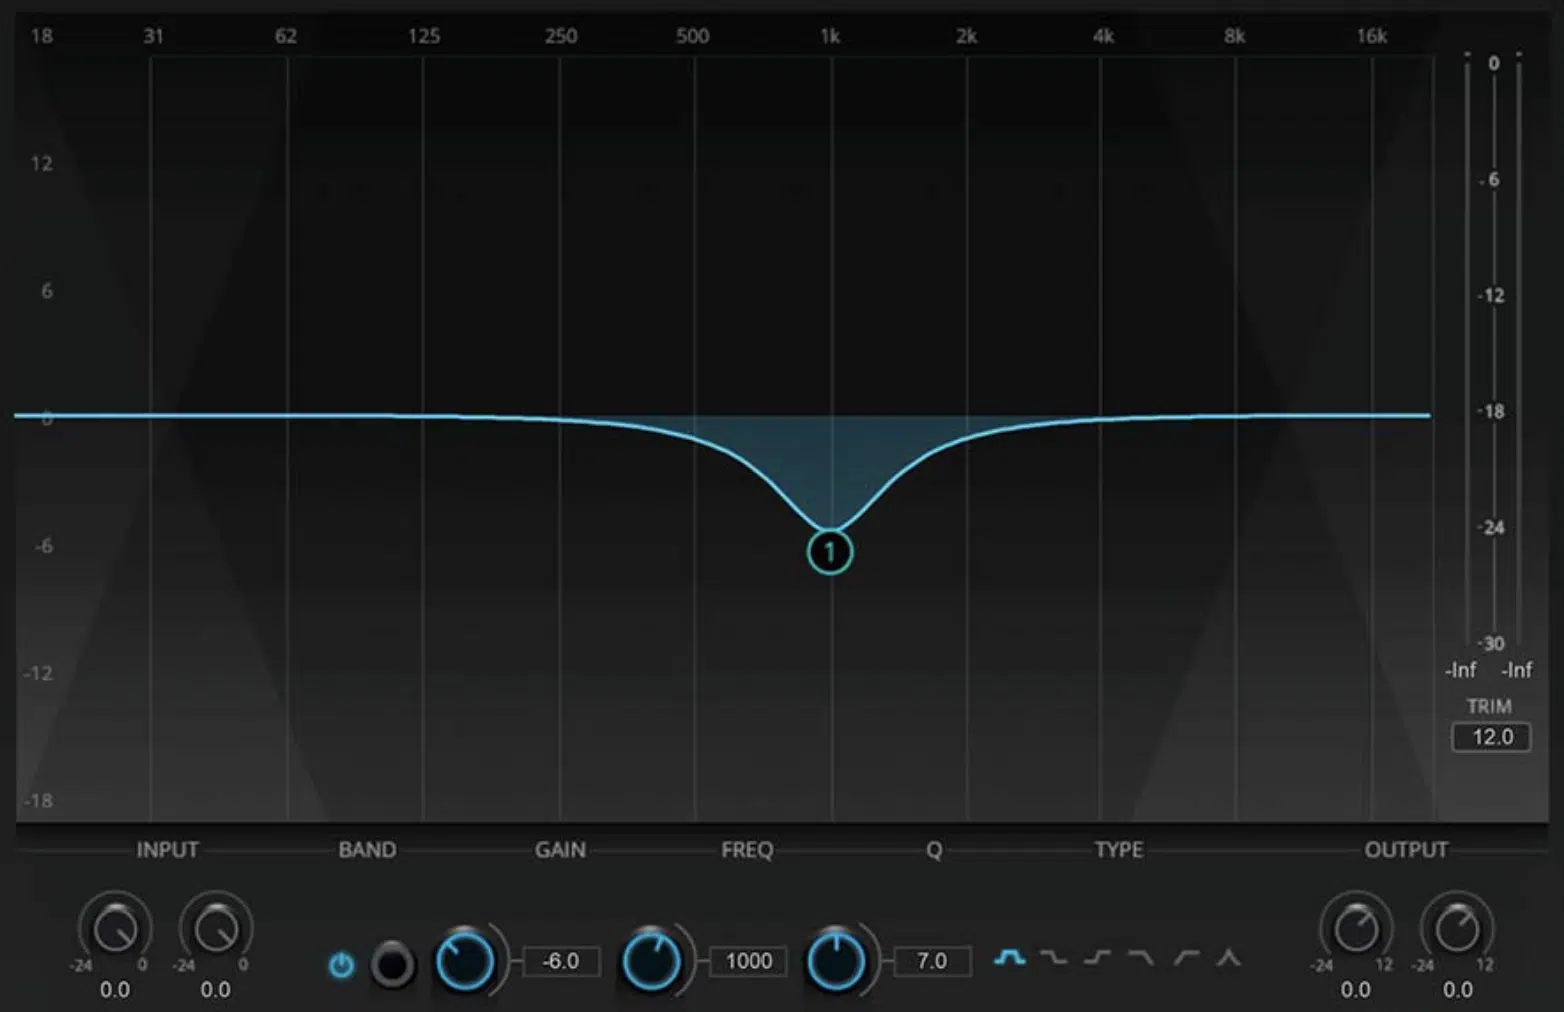
You can see here that the EQ is set to cut 1 kHz by 6dB
Gain control in a parametric EQ refers to how much you boost or cut a specific frequency, for example, let’s say you’re mixing a snare drum and you want it to punch through the mix…
You might boost the gain by 3-4 dB at 2.5 kHz to emphasize the snare’s attack 一 making it stand out without overwhelming other elements in the mix.
However, boosting frequencies should always be done carefully.
NOTE: A general rule is to avoid boosting more than 6 dB at any frequency, as this can introduce harshness or pesky resonances, especially in the high-mids.
On the flip side, cutting gain can be just as powerful.
Reducing 4-5 dB around 200 Hz in a bass-heavy track can remove unwanted muddiness and tighten up the low-end which can make a world of difference.
When used correctly, gain control allows you to fine-tune individual elements within your mix so each instrument occupies its own space (that’s the goal).
-
Q Factor and Bandwidth Control
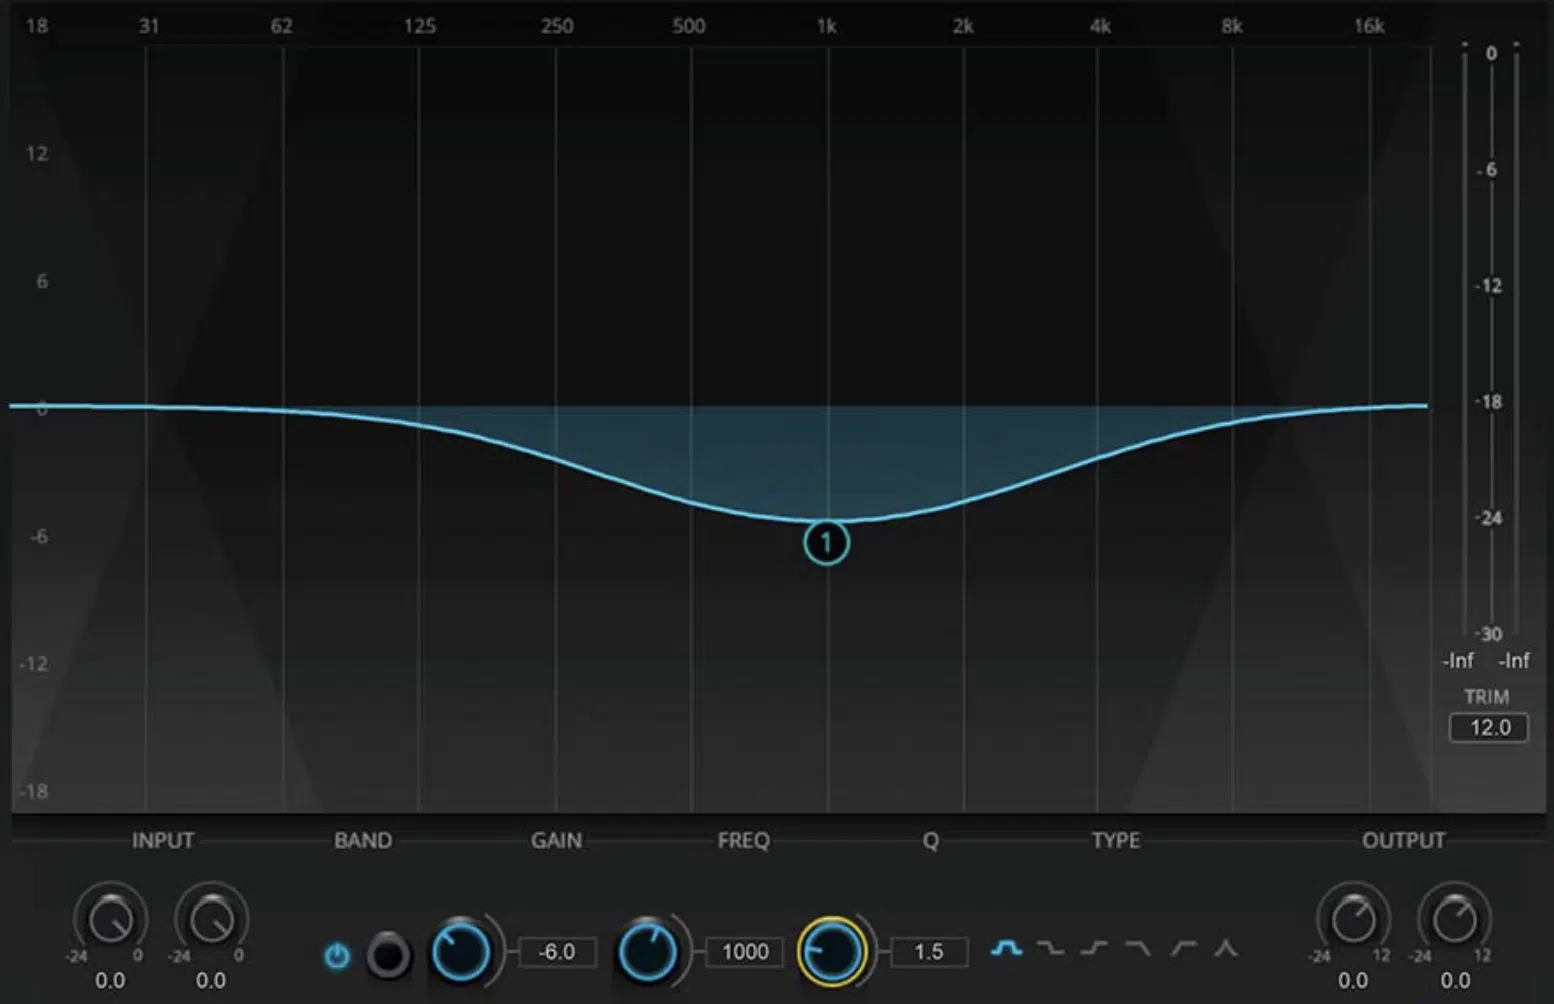
I’m sure you’ve heard the term Q factor a bunch of times..
If you’re unsure what exactly it is, the Q factor controls the bandwidth of the EQ adjustment, determining how wide or narrow the fixed frequency range is.
A higher Q factor (like 10) results in a narrow bandwidth, which is super useful for making surgical cuts or boosts like an expert.
For example, if you’re dealing with a resonant frequency in a vocal track, using a high Q factor (quality factor) and cutting 2-3 dB around 7 kHz will isolate the specific frequency that’s the problem without affecting the rest of the vocal.
On the other hand, a lower Q factor (like 1-2) creates a wide bandwidth.
This makes it ideal for broader tonal adjustments, such as boosting 6-10 dB around 100 Hz to add warmth to a vocal or acoustic guitar.
NOTE: Use a narrow Q when removing the problematic range of frequencies and a wider Q for gentle tonal shaping 一 it’s ideal.
Understanding the Q factor’s role is essential for achieving precise, epic results in your mix, especially when balancing multiple elements in a very dense arrangement.
How to Use a Parametric EQ
Using a parametric EQ is all about knowing how to target specific frequencies and make precise adjustments to enhance or fix your mix as we talked about. So, let’s take a look at some pro techniques to help you achieve greatness in this area and become a better producer/audio engineer all around.
-
Identifying Problem Frequencies
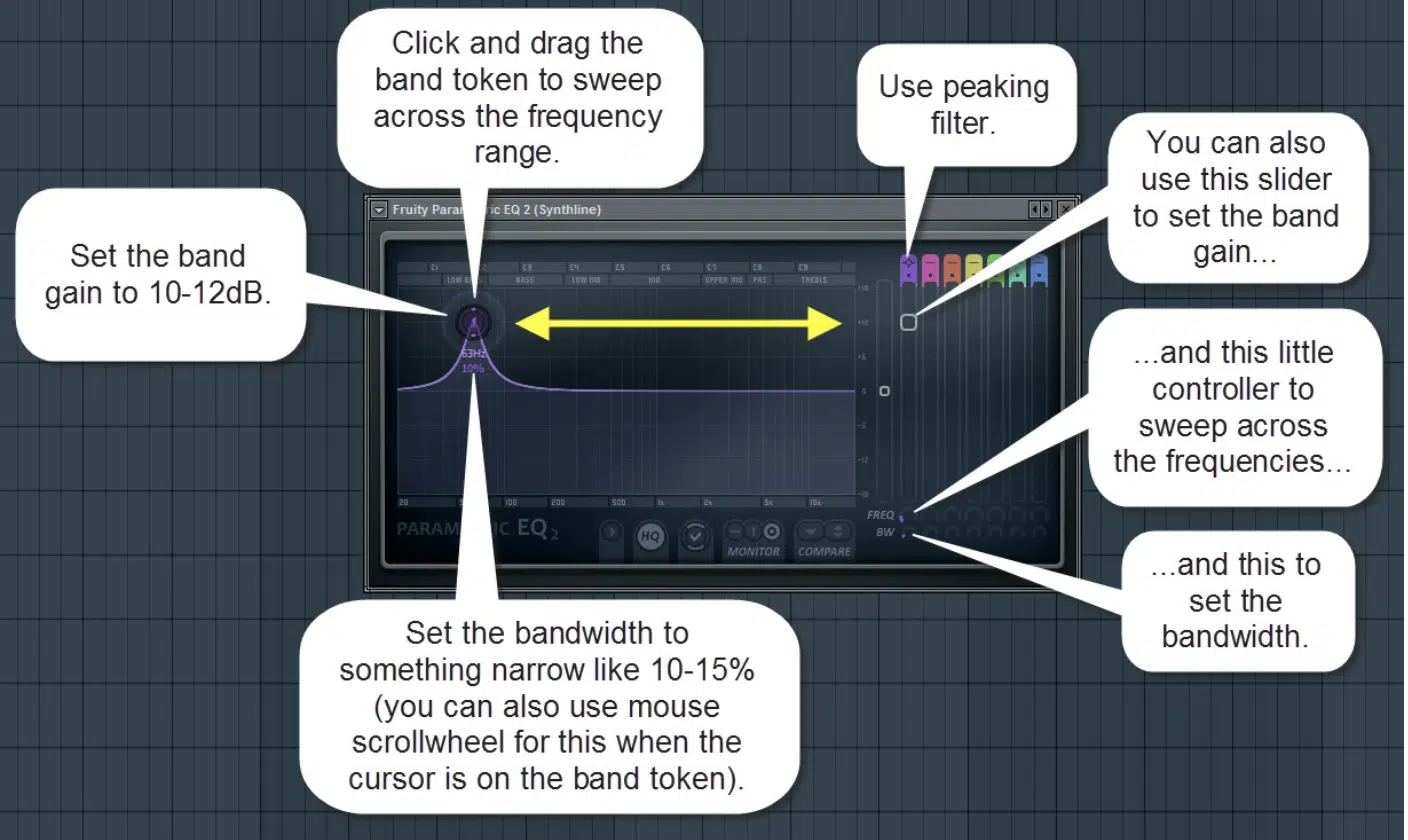
The first step in using a parametric EQ is identifying problem frequencies in your mix (yes, I’m going to say it a million times because it should be drilled in your head).
One of the easiest ways to do this is by using a technique called “frequency sweeping.”
Start by simply selecting a narrow Q factor (around 8-10) and apply a gain boost of 6-10 dB on an EQ band.
Slowly sweep the center frequency across the frequency spectrum 一 listening for harsh or muddy frequencies that jump out in the mix.
For example, in a vocal track, you might find unwanted harshness around 3-4 kHz or muddiness around 300-400 Hz after you sweep the center frequency.
Once you scope out the problem frequency, switch the gain from boost to cut, reducing it by 2-4 dB with a narrow Q to eliminate the issue without affecting other frequencies.
It’s essential for cleaning up a mix without losing the overall tone and balance of your instruments/parameters.
-
Enhancing and Shaping Sounds
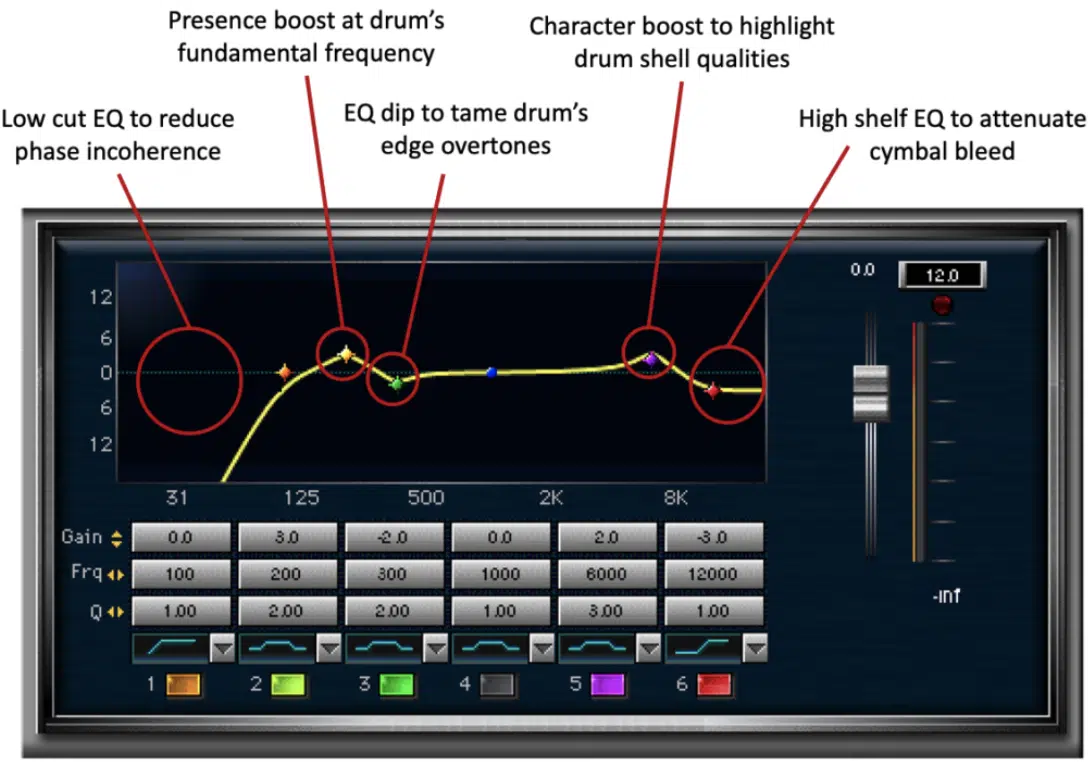
While cutting problem frequencies is key, boosting can enhance and shape sounds, giving life to specific elements in your mix.
For example, to make a vocal sound brighter and more present, you can apply a boost of 2-3 dB around 5-8 kHz using a wide Q factor (around 1.5-2).
It adds air and clarity without making the vocal too harsh and undesirable.
On the same note, to add warmth to a bass guitar or kick drum, try boosting 80-120 Hz by 3-5 dB with a wide Q factor, which will fatten the low end while keeping it controlled.
When enhancing sounds, it’s important not to overdo the boost…
Usually staying within a 2-4 dB range is enough to achieve an obvious difference without creating any unwanted resonances.
NOTE: As a rule of thumb, always check your changes in context with the entire mix to ensure your adjustments help the sound stand out without any clashing.
Common Parametric EQ Techniques
To get the most out of parametric EQ, there are old-school (but super effective) techniques that can be applied during the mixing process. So, let’s wrap things up by breaking some of them down. This way you can get to boosting and cutting like a boss.
-
Subtractive EQ Techniques
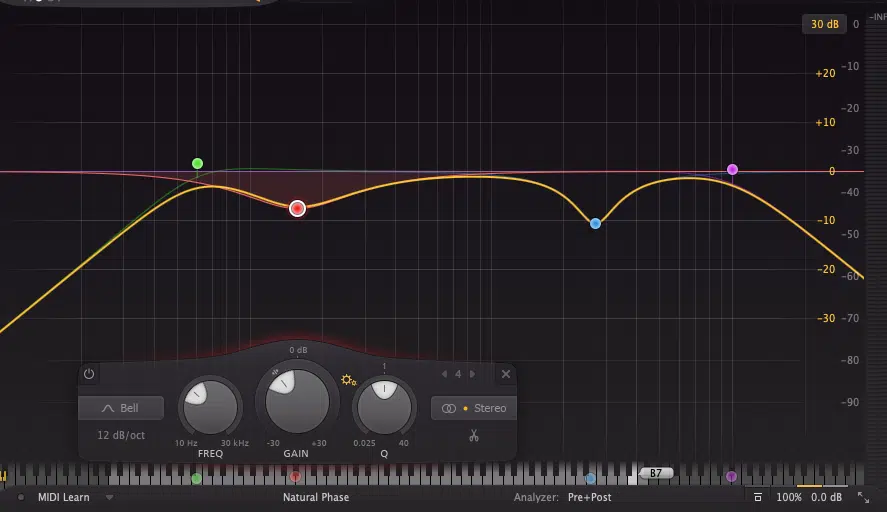
Subtractive EQ is a core technique when it comes to parametric equalizing 一 focusing on cutting unwanted frequencies to clean up a mix.
For example, if you’re mixing drums and the kick drum feels too “boomy,” you can use a narrow Q factor (around 6-8) and cut 3-6 dB around 200-300 Hz.
This is often where excessive low-mid build-up occurs so it’ll remove the muddiness without affecting the power of the kick’s low-end.
Another great example is dealing with vocal recordings that have unwanted room resonance that you just can’t stand.
You can cut 2-4 dB around 400-600 Hz using a medium Q to reduce the boxy, hollow sound from the vocal while maintaining its clarity.
Subtractive EQ helps maintain transparency in your mix so it sounds natural without adding unnecessary coloration, which can ruin things completely.
Always start with subtractive EQ before boosting to create space for the essential elements in your mix.
-
Additive EQ (Boosting Techniques)
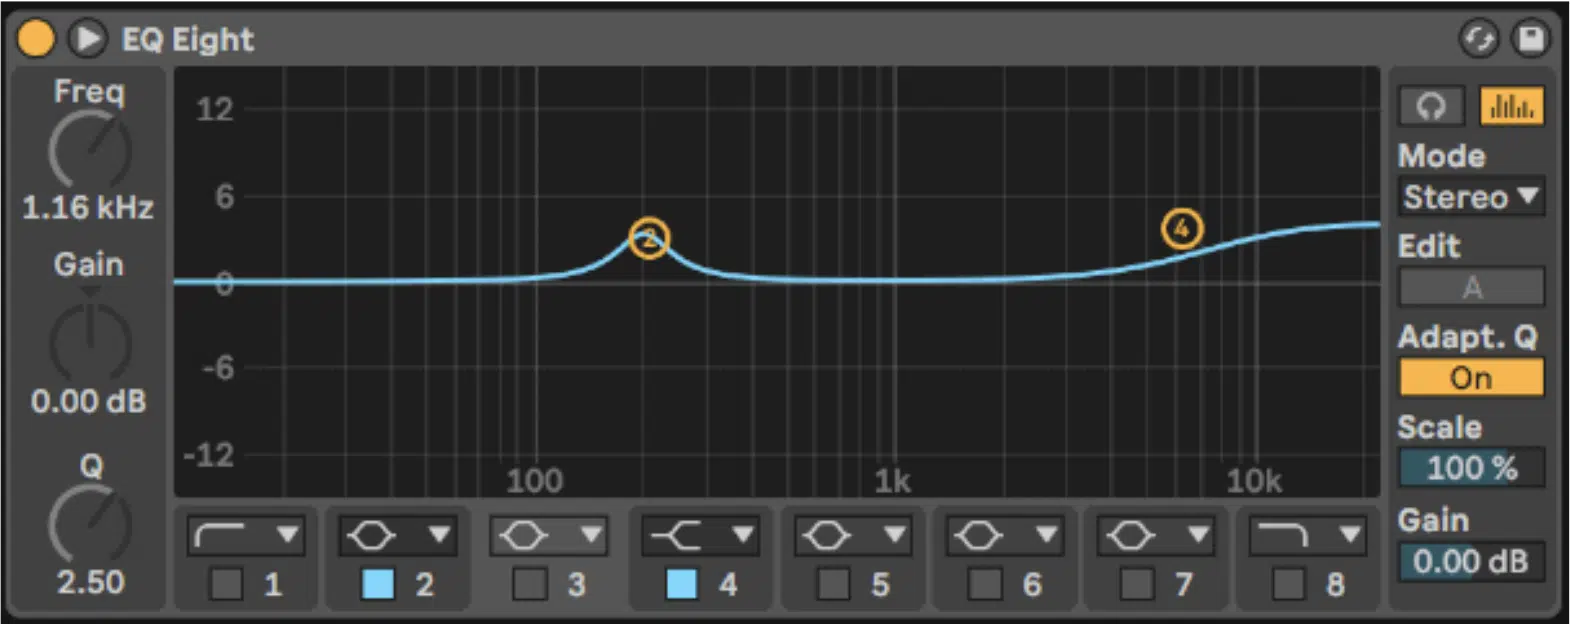
When it comes to additive EQ (boosting), subtlety is key, no two ways about it.
For example, boosting 2-4 dB around 8-10 kHz on a lead vocal can add brightness and air, but too much can introduce sibilance and harshness.
So, remember to always use a wide Q factor (around 1-2) for smoother results.
A useful boosting tip for drums is to add a slight boost around 5 kHz on the snare drum to give it more attack and presence in the mix.
Just remember to keep the boost between 2-3 dB to avoid overpowering other elements like the cymbals or hi-hats, which sounds super amateur.
NOTE: For bass-heavy instruments, you can boost around 60-100 Hz by 3-4 dB to give them more weight in the mix, but keep an eye on how this affects the low-end balance across your entire mix.
Boosting should always be done in moderation to avoid introducing unwanted noise or phase issues, especially when using narrow bandwidths.
-
Pro Tip
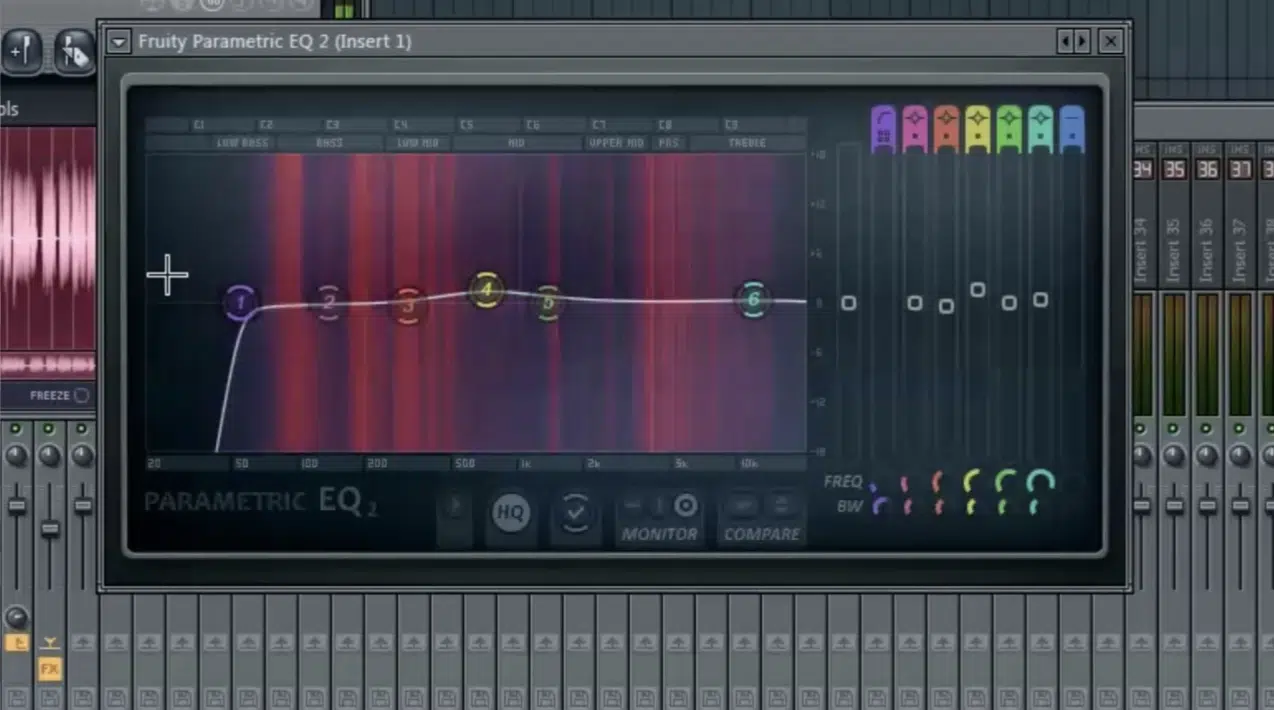
Parametric EQ in FL
Parametric equalizers aren’t just for fixing problems… They can also create super unique effects in your mix.
For example, you can use a high-pass filter on a vocal or instrument to cut everything below 150 Hz, giving the sound a thinner, lo-fi character.
It’s great for breakdowns or intros that need a little edge.
Or, you can use a low-pass filter to cut everything above a certain frequency, like 10 kHz, which can give instruments or vocals a darker, more subdued tone.
This is perfect when you’re creating vintage or lo-fi effects.
-
Bonus: Parametric EQ vs Graphic EQ

Graphic EQ (left). Parametric EQ (right).
While parametric equalizers offers precision and flexibility, graphic EQs are simpler but less customizable, so there’s pros and cons here, like everything else, it depends on your overall goal.
A graphic EQ uses a set of fixed bands, usually 31 bands for 1/3 octave adjustments 一 making it faster to adjust general tonal balance.
However, with a graphic EQ, you’re limited to the preset frequency bands.
A parametric equalizer, on the other hand, allows you to choose specific frequencies and adjust the Q factor and gain control for each individual one.
This is why fully parametric EQ is preferred for detailed audio signal work, while graphic equalizers are more often used for broader adjustments with fewer bands.
This could be like live sound or on car stereo systems, where speed and ease of use take the number one spot over flexibility.
Parametric EQ: Final Thoughts
Parametric EQ, as you now know, can really transform your mixes by offering precise control over frequency adjustments.
Plus, it allows you to shape sounds, remove unwanted frequencies, and create unique effects that give your tracks their own character.
By using the tips, tricks, and techniques we’ve discussed today, you’ll be able to clean up muddiness, enhance clarity, and knock out mixes that sound crazy professional.
And, as a special bonus, you’ve got to check out these highly-renowned 3 Free Project Files from Unison, it’s a must.
They break down how to make a beat, from start to finish, including all the effects you can think of 一 parametric EQ being one of them, of course.
These files will show you professional-quality mixing techniques in Ableton, FL Studio, and Logic Pro, and you’ll learn how to use parametric EQ and effects just like a pro.
It’s an invaluable way to see how everything works together and enhance your own workflow (it’s like the ultimate cheat sheet).
Remember, mastering parametric EQ will give you the skills needed to take your mixes to the next level.
With practice and creativity, your tracks will stand out with clarity and precision.
Until next time…


Leave a Reply
You must belogged in to post a comment.