Mastering is the final stage of your production process, and it’s super important that it doesn’t get overlooked, that’s a fact.
And, if you’ve ever felt like your track didn’t hit as hard as commercial releases, it’s probably because your mastering wasn’t on point.
And since AI (artificial intelligence) is taking over so many areas of music production, I thought it’d be super beneficial to talk about the best AI mastering plugins in the game.
With them, you’ll be able to speed up your workflow, dial in clean stereo width, and finish your entire album without second-guessing every parameter.
Plus, make sure your mix translates across devices, your volume is consistent, and your track doesn’t sound flat when compared your favorite reference track.
All the following AI mastering plugins have key features/functions, like:
- The best AI that took many years to perfect ✓
- Built-in dynamic EQ ✓
- AI-powered tonal balancing ✓
- Automatic loudness targets ✓
- Intelligent compressors ✓
- Genre-specific presets/samples ✓
- Multi-style mastering flavors ✓
- Real-time metering ✓
- Intensity controls/functionality ✓
- Limiting, saturation, and stereo spread ✓
- Other features/mastering tools ✓
With these legendary AI mastering plugins, you’ll be able to dial in release-ready masters and run clean analysis across your session.
As well as hit professional loudness targets without burning out.
Plus, you’ll be able to successfully control your tonal balance, reduce masking, and push the overall level like a boss.
This way, you never have to worry about time-consuming bounces or hiring someone who doesn’t get your sound ever again.
And stay tuned until the end, because I included some advanced tips and techniques to help you bring your masters to the next level.
Table of Contents
Breaking Down The Best AI Mastering Plugins
Now let’s get into the fun stuff: the very best AI mastering plugins. Each one brings something different to the table, whether it’s the precision, speed, or creative flexibility. So, if you’re looking to enhance your workflow and knock out better results/masters all day, these are the AI mastering plugins that can help you get it done.
Unison Sound Doctor

If you’re deep in the mastering process and things still feel like they’re missing that extra edge, Sound Doctor is absolute magic.
It’s one of those AI mastering plugins that can bring life back into your final mix without spending hours tweaking or worrying if it’s getting things wrong.
What makes it stand out is how it uses AI (artificial intelligence) to build full multi-effect chains specifically tweaked to your track’s input audio.
Inside, you’ve got access to over 40 built-in FX formulas, and each one is designed to hit different mastering goals like:
- Widening your stereo field
- Boosting saturation for warmth
- Adding subtle tonal shifts using AI-adjusted EQ curves
For example, if you’re working on a song that feels too flat or mid-heavy, you can generate a chain that applies a harmonic boost around 8kHz while cutting excess low-end around 120Hz.
Now you don’t even have to dial those frequencies manually (amazing, right?).
Another standout feature is the Intensity knob, which lets you scale how aggressive the effects hit your track.
This is perfect if you want to dial back some compression or push more power into the output 一 whatever makes senses for your unique master.
You’ll also get AI-determined balancing across your overall level, stereo enhancement tools that push your sound out wider without phasing.
And, macro-style controls to lock in your workflow and speed things up.
Whether you’re finalizing a free single or tightening an entire album, Sound Doctor helps you knock out clean, modern-sounding masters all day.
So, if your goal is to achieve pro-sounding results quickly (without compromising on detail), this is one of the most effective AI mastering plugins you’ll find right now.
iZotope Ozone 11
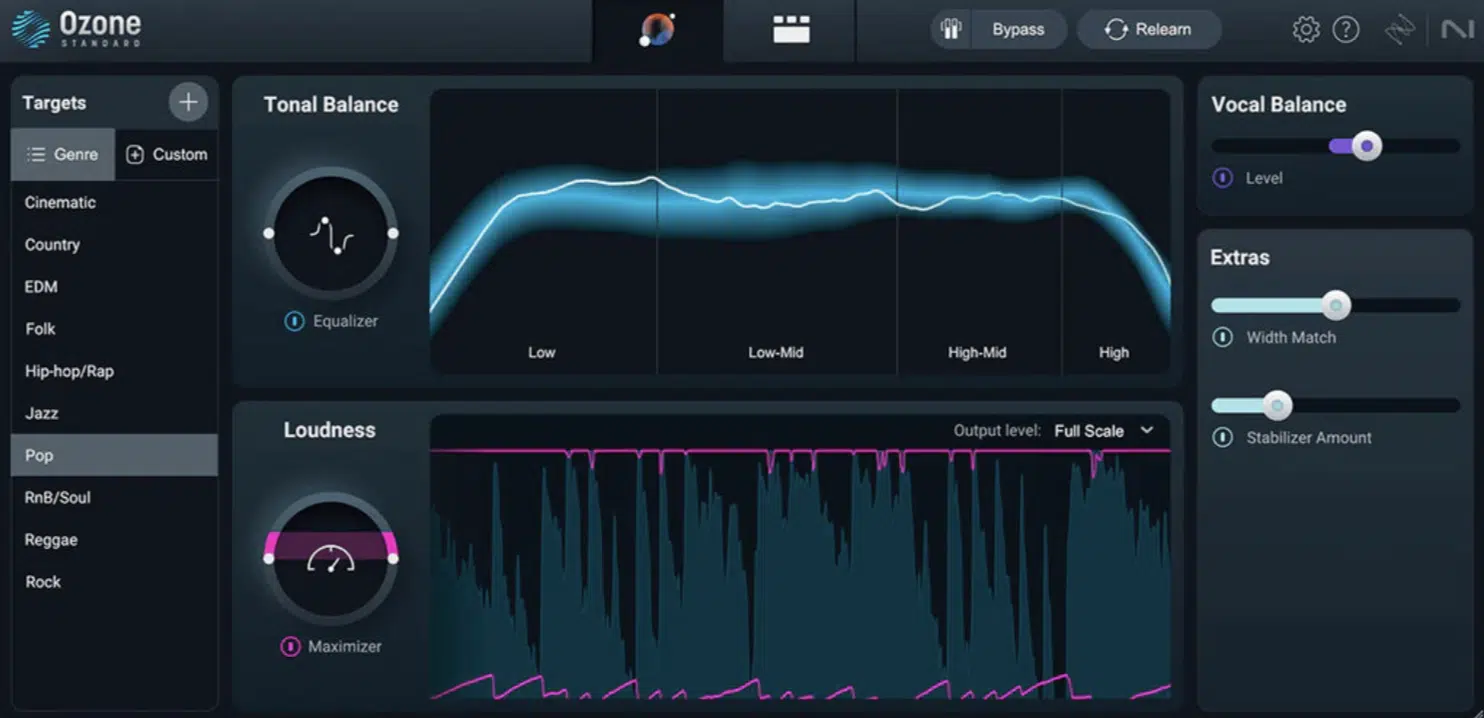
When it comes to AI mastering plugins that offer full-on control with deep customization, iZotope Ozone 11 still sits at the top of the game.
The second you load your track, the Master Assistant kicks in and analyzes your audio so it knows all about the:
- Dynamic range
- Loudness targets
- Tonal balance
Once it’s done, you’ll have a full mastering chain in seconds.
From there, you get access to 11 modules 一 including Dynamic EQ, Vintage Compressor, Imager, Maximizer, and the brand new Clarity module.
It uses AI to bring up detail in dull or cluttered mixes by enhancing microdynamics between transients and sustained elements.
Let’s say your reference track is something from one of your favorite producers…
You can import it directly and let Ozone’s EQ Match function replicate its spectral shape across more than 8,000 frequency bands.
This is nuts when you’re aiming to achieve that same kind of mix translation.
And if you’re finishing an entire album, you can use Ozone’s Master Rebalance module to push the vocals or bass forward in specific songs, without affecting the rest of the track (super helpful when one bounce is hitting harder than another).
Then you have the Maximizer, which gives you a ton of control over loudness, with IRC IV & IRC LL algorithms that let you push volume while keeping transients clean.
Combine that with its built-in limiter, saturation curves, and stereo width enhancement, and you’re covered for literally any mastering situation.
Side note, Ozone supports Windows and Mac, and it works perfectly as both a standalone app and a DAW-integrated plugin, just saying.
So, no matter what your workflow looks like, it’s going to fit in flawlessly.
With its detailed analysis, genre-targeted presets, and flexible controls, this is one of the most professional-level AI mastering plugins ever made.
It’s a go-to if you’re serious about your music production suite being complete, period.
LANDR Mastering Plugin Pro
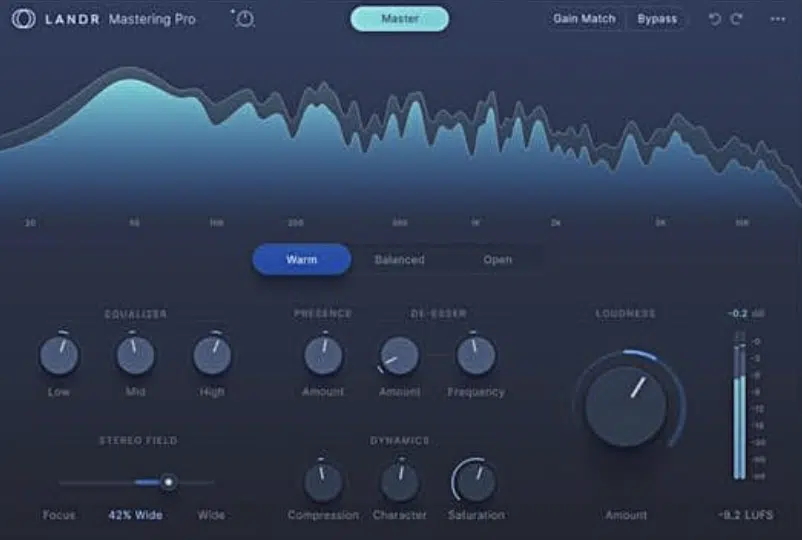
If speed and results are your priority, the LANDR Mastering Plugin Pro is another one of those super impressive AI mastering plugins.
Unlike their original online service, the LANDR mastering plugin lets you process in real-time directly inside your DAW.
This way, you can skip the extra file exports and annoying bounce steps that usually kill your momentum and make you frustrated.
As soon as you drop in your track, it uses AI-trained algorithms based on thousands of professionally mastered releases to build a custom mastering chain, so it can:
- Balance your EQ
- Set compression curves
- Tighten stereo width
- Optimize loudness all in one pass
You’ve got five core controls included in the LANDR mastering plugin: Loudness, Bass, Treble, Stereo width, and Intensity.
So, if your mix is sounding too muddy, you can push the Treble control while dialing back saturation using the Intensity slider for a cleaner release.
Plus, it gives you auto-adjusting input gain, genre-specific presets, and one-click A/B testing against your reference track.
This makes adjusting your mastering process a whole lot smoother when you’re jumping between ideas or playing around with different ideas.
Also, if you’re laying down multiple versions of a song or wrapping up an entire album, the LANDR mastering plugin cuts your workflow time in half and keeps your focus.
Whether you’re finalizing a major release, trying to achieve broadcast-quality volume, or just looking for better results with fewer steps, the LANDR mastering plugin is sick.
Overall, it’s just one of those AI mastering tools that just gets it done, fast.
Focusrite FAST Bundle (The Ultimate Music Production Suite)
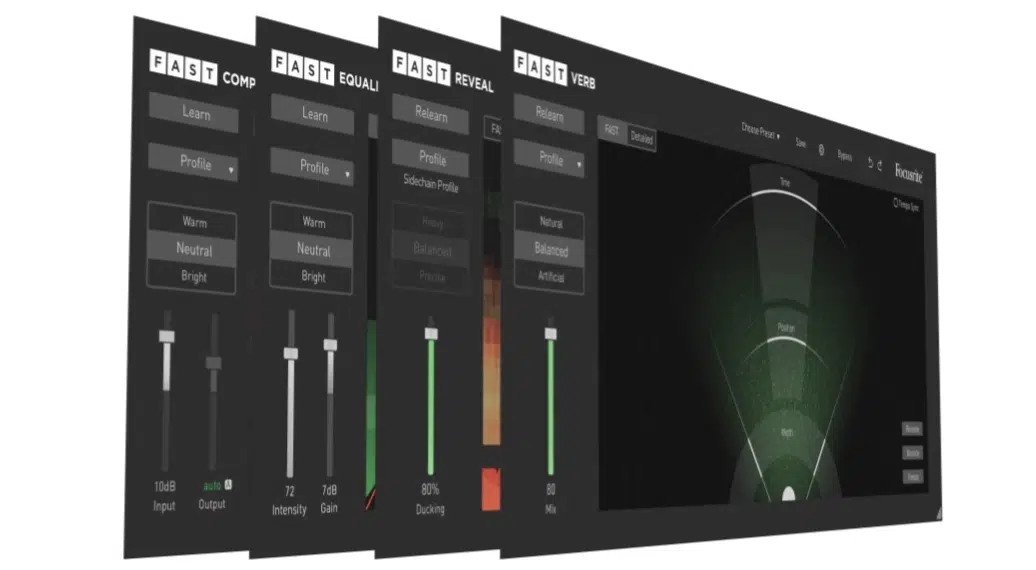
The Focusrite FAST Bundle might look simple at first, but under the hood, this suite of AI mastering plugins gives you everything you need to knock out clean, modern masters.
What makes this bundle unique is how it includes five separate plugins:
- FAST Equaliser
- FAST Compressor
- FAST Limiter
- FAST Verb
- FAST Reveal
Yes, all powered by artificial intelligence to respond in real-time to your track’s input.
Each plugin has two views 一 FAST View, which gives you AI-recommended settings based on genre and tonal balance, and Detailed View, where you can go in and manually fine-tune every parameter.
Everything from attack and release on the compressor, to frequency cuts, reverb decay, and loudness shaping can be tweaked right here.
For example, FAST Limiter automatically adapts to your track’s dynamics, adjusting the threshold and ceiling to lock in the overall level.
While making sure that the loudest transients don’t get squashed too harshly, of course.
You also get AI-powered masking detection in FAST Reveal, which helps balance your mix by pushing competing sounds apart.
This could be like nudging your vocal forward without needing to manually automate EQ dips in your instruments, that kind of thing.
Together, they all form a mini music production suite that works across the mastering process, especially if you want consistency without having to rebuild your chain from scratch every single time.
Whether you’re a new beat-maker needing suggestions or a seasoned producer wanting to adjust things your way, this plugin bundle is everything.
It gives you both control and creativity in the same space, and fits easily into any workflow on both Windows and Mac, which is great as well.
SSG Audio Optimus
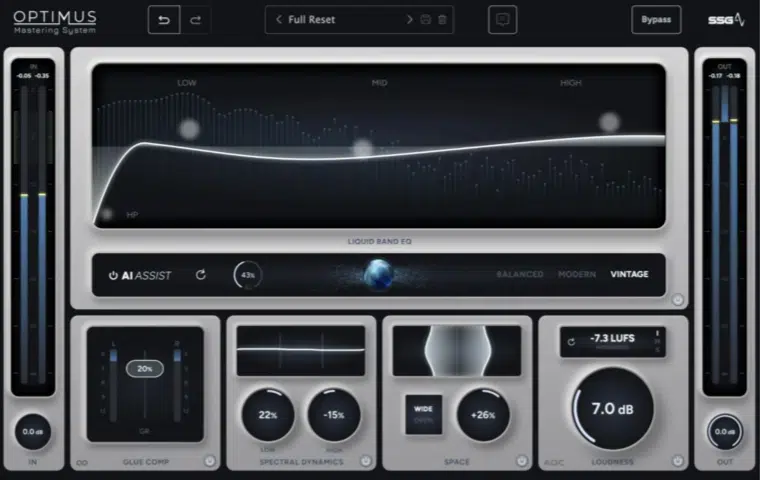
If you’re looking for an intelligent AI mastering plugin that adapts to your sound instead of just slapping on generic presets, SSG Audio Optimus is your golden ticket.
As soon as you load in your track, Optimus kicks off a deep analysis, using over 27 million data points gathered from:
- Streaming masters
- Radio-ready releases
- Even Grammy-winning engineers’ sessions
That helps it build a unique mastering chain for your audio, using things like Liquid Band EQ for smooth frequency shaping and AI-balanced compression.
As well as curves and stereo enhancements that push width without distorting the center or messing anything up in general.
What I find super cool about it is the Flavor Selection Panel, which gives you a set of creative profiles like “Warm,” “Crisp,” “Aggressive,” or “Balanced.”
Each applies a slightly different blend of EQ, transient shaping, limiter behavior, and tonal color to perfection.
So, if you’ve got a song that’s already heavy on the low end, switching to “Crisp” might pull back some of the bass while enhancing high-mids between 2kHz–6kHz.
It keeps the mix detailed and modern without getting harsh.
Optimus also supports reference track loading 一 letting you A/B your release against commercial-level masters to make sure you’re not missing anything important.
Whether you’re dropping a free demo or prepping a pro-level album mastering session, this plugin is built to achieve that polished finish without overcomplicating the process.
Sonible smart:comp 2
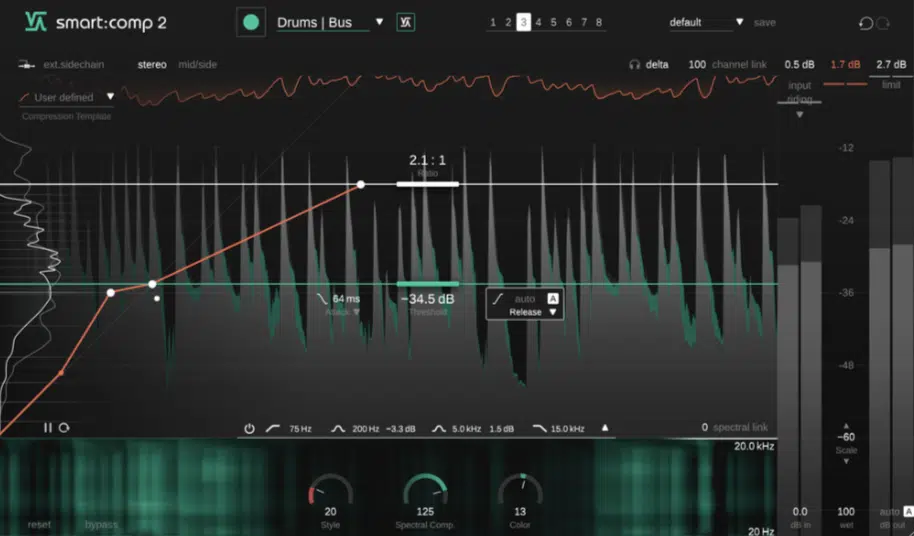
Now if you want pinpoint control during the mastering process, especially when it comes to dynamics, Sonible smart:comp 2 is the AI compressor plugin for you.
Instead of just squashing your track like a basic compressor, smart:comp 2 uses a spectral compression engine with over 2,000 frequency bands.
Meaning, it only compresses where it needs to, which helps to keep your mix clean and your sound on point all day.
You start by choosing a target profile or loading your own reference track, and from there the plugin scans your input 一 learning where your dynamics are off and adjusting attack, release, ratio, and gain accordingly.
You also get visual dynamic mapping that shows you exactly what’s being affected, plus a Smart:Adapt feature that evolves the settings as your track plays.
It’s perfect for songs with big shifts in volume or instrumentation.
For example, if your song has a super mellow intro that builds into a hard-hitting chorus, smart:comp 2 won’t over-compress the soft parts…
It’ll adapt in real time and keep the final mastering punchy and balanced.
And because it includes fine-tuned controls for sidechain, stereo linking, reverb shaping, and saturation, this plugin isn’t just smart 一 it’s insanely flexible.
So, if you’re looking for AI mastering plugins that let you dial in pro-level loudness, movement, and glue without killing your dynamics, you got it right here.
Advanced Techniques/Tips for Using AI Mastering Plugins
Now that you’ve got the full rundown of these AI mastering plugins, there’s still a few extra moves you can make to level up your workflow and get even better results. So, let’s dig into a few advanced techniques that’ll help you push your audio further, stay in control, and let AI actually work for you.
Tweak Presets Instead of Using Artificial Intelligence Blindly
Presets are helpful, but they’re not always perfect…
So, after loading your favorite AI mastering plugin, try tweaking the preset by adjusting the limiter ceiling, pushing saturation levels slightly past the default.
Or, playing with stereo width around 70–80% instead of 100% to keep your mix tight.
These small changes let you maintain your signature sound while still letting the plugin speed up your entire process.
For example, you could start with a preset like “Clean & Wide” in LANDR or “Warm Analog” in Ozone, and then tweak the input gain by ±2dB depending on how hot your track was mixed.
In some cases, turning off automatic loudness normalization gives you more control if you’re aiming for higher RMS or LUFS targets.
Even something like moving the EQ tilt by 1.5dB can completely shift the tone in a good way, so definitely keep that in mind.
Bounce Multiple Versions With Slight Adjustments
One of the best parts of using AI mastering plugins is how fast you can generate multiple versions of your track.
For example, you can bounce one with a heavier bass and another with a lower overall level, then use your ears or a reference track to decide which feels closer to your target.
It’s a smart way to test changes in loudness, EQ balance, and vibe without wasting time on endless manual tweaks.
Try setting the Limiter Ceiling to -1dB on one version, then -0.3dB on another, and listen to how the extra headroom changes the perceived clarity.
You can also use the FAST Limiter or SSG Optimus to toggle between “Aggressive” and “Balanced” flavors, which drastically shift how hard the compression hits.
Just don’t be afraid to A/B 4–5 different versions because what sounds great on your studio monitors might clip on headphones.
Use Parallel Mastering for Dynamic Contrast
Instead of flattening your entire song, try routing your mastered track through a parallel channel using lighter compression and reverb, then blend it back in for added depth.
This lets you retain your dynamic transients while enhancing the perceived volume, especially on tracks with acoustic instruments or vocals.
With AI mastering, it’s all about keeping natural movement without sacrificing punch.
Try to set your parallel chain’s compressor to a lower ratio like 2:1 with a 20ms attack and 100ms release to let transients breathe while still gluing everything together.
Then, add a slight saturation boost at 3kHz on the parallel channel using Sound Doctor or Ozone’s Exciter module, and dial in just 15–20% of the mix back in.
The final result adds power and dimension without killing the energy of your original file.
Automate Final Touches Using Other Mastering Tools
If your plugin doesn’t support automation natively, use other tools in your DAW to gradually adjust limiter, saturation, or stereo width throughout your track’s release.
For example, a 1.5dB EQ boost at 16kHz in the final chorus can add that subtle “lift” most listeners never notice 一 but definitely hear.
This type of adjusting creates professional-level finishing touches that help your audio stand out on any streaming platform.
Another example is automating reverb tails to grow longer in the bridge using FAST Verb, which can make a build-up feel more open before the final drop.
You can also use your DAW’s volume envelope to automate a 0.8dB increase in the last hook for extra emotional impact, which works well with tracks meant for release on platforms like Spotify or Apple Music.
These micro-changes may sound small, but they certainly add that final polish that separates amateur masters from show-stopping ones.
Always Compare Against a High-Quality Reference Track (Especially When Album Mastering)
And last but not least, I have to just throw this one out there because it’s very important.
So, before locking in your final mastering chain, drag in a reference track that reflects the tone, loudness, and vibe you’re aiming to achieve.
Load it into your AI mastering plugin’s referencing section (like in Ozone or LANDR), and pay attention to how your volume, stereo width, and frequency balance stack up.
Using a solid reference track keeps your process focused, your ears calibrated, and your final release locked into a professional sound that translates across all platforms.
Try using Ozone’s Reference Match EQ to copy the tonal profile and compare your track’s loudness in LUFS against your reference.
I suggest you aim for about -14 LUFS if you’re targeting streaming services.
You can also solo mid/side bands during playback to compare stereo width details or bypass your limiter entirely to A/B the raw dynamics.
Having at least two references (one modern, one vintage) can help you adjust for missing frequencies, saturation, or clarity that you didn’t hear the first time through.
Final Thoughts

Mastering might be the final step, but it’s also one of the most important.
And now, with the right AI mastering plugins, there’s no excuse to release anything that doesn’t hit the mark.
Remember, these AI mastering plugins don’t just speed up your workflow.
They can help you stay creative, in control, and zoned in on the music instead of getting stuck in technical details and losing that fire/focus.
Whether you’re mastering one track or an entire album 一 letting AI mastering plugins handle the heavy lifting lets you keep your energy where it matters most.
And when your sound matches the pros, your confidence will follow, I promise.
So, don’t hold back 一 dial it in, push the process, and give every release the finish it deserves because it will help you get the recognition you want.
Until next time…


Leave a Reply
You must belogged in to post a comment.