You’ve been through it before: you desperately want to distort the hell out of something, but can’t exactly figure out how it’s done.
You turn your Saturation plugin all the way up, and it inevitably hurts your ears.
You turn it all the way down in an attempt to find that happy medium, and it’s not nearly enough…
Well, the secret lies in the following (super rare) distortion technique!
You’re going to be creating a designated Distortion/Saturation Send, and then processing it with Dynamic Processors (EQs, Compressors, etc.).
Today we’re going over how to push distortion/saturation to the absolute limit, by sending it to an AUX Send/Return and utilizing two separate layers of EQ.
So, let’s dive in…
Table of Contents
WHAT IS DISTORTION?
Distortion, in the technical sense, refers to the alteration of an audio signals’ waveform from its original state.
But, as producers, it means something much more specific.
The most common, and original form of distortion is called Clipping.
Clipping occurs when the signal level exceeds the MAX that a system can handle (aka the Distortion Threshold).
You’ll recognize this point as 0dB.
When this happens, the tops of the waveform(s) get chopped off.
Back in the day, all distortion was considered unwanted, and sometimes it remains so.
However, that’s not the case today, as we’ll soon prove.
In production, when you want to intentionally distort a signal, you’re ‘exciting’ it.
This essentially means that you’re adding to, or enhancing the signals’ current harmonic content.
This used to be applied by simply overdriving the signal past 0dB, or the level that given system clips at (it varied from processor to processor).
A much softer form of distortion is almost always present when using analog equipment, known as harmonic non-linearities.
It’s the main factor behind why running your signal through an analog processor is so desirable.
This is almost never perceived as the distortion you’re going to apply to a signal.
So, today we’ll be covering a much more noticeable, intentional form of distortion.
There are two basic types of digital distortion:
- Distortion resulting from a signal overloading a digital circuit, which sounds harsh and unpleasant.
- An overdrive effect that’s generated by an analog or digital algorithm.
4 Common types of distortion include:
- Harmonic distortion
- Intermodulation distortion
- Phase distortion and cancellation
- Bit-depth distortion (known as Bit-Crushing)
All of which can vary greatly depending on certain variables.
Keep in mind distortion is everywhere and engrained in every form of processing, even the cleanest forms of digital processing.
Knowing about distortion can enhance your tracks, mixes, and overall musical appeal.
3 IMPORTANT THINGS TO BE AWARE OF
- The terms Saturation and Distortion are used interchangeably in today’s audio world.
So… when do you use one, as opposed to the other?
The answer to that question is not so simple, as there are really no concrete guidelines or clearly defined differences.
Professionals typically refer to saturation as the type of harmonic excitement added.
Whether it be intentionally or when adding subtle amounts of distortion to aid in enhancing the harmonic content of a signal.
Distortion is usually synonymous with purposely overdriving the signal by a more noticeable amount.
For example, when making a low-frequency sine wave translate across the rest of the frequency spectrum (similar to a saw or square wave).
Or, when purposely trying to ‘dirty’ something up, like a vocal, or when overdriving an electric guitar.
- This distortion technique is usually applied in a very methodical way (as opposed to randomly) such as adding only even or odd harmonics.
This will, ultimately, produce a different and unique sound to the resulting signal.
For example, adding a massive amount of distortion to a pure sine wave can transform it into another type.
- Applying an algorithm that adds both even & odd harmonics will make it more like a saw wave.
- Applying an algorithm that adds only odd harmonics, will make it closer to a square wave.
- The major issue when applying distortion, particularly in noticeable or massive amounts, is the risks/consequences that come along with it.
Below, you can see a sine wave (with only 1 harmonic) in its pure state, with distortion applied.
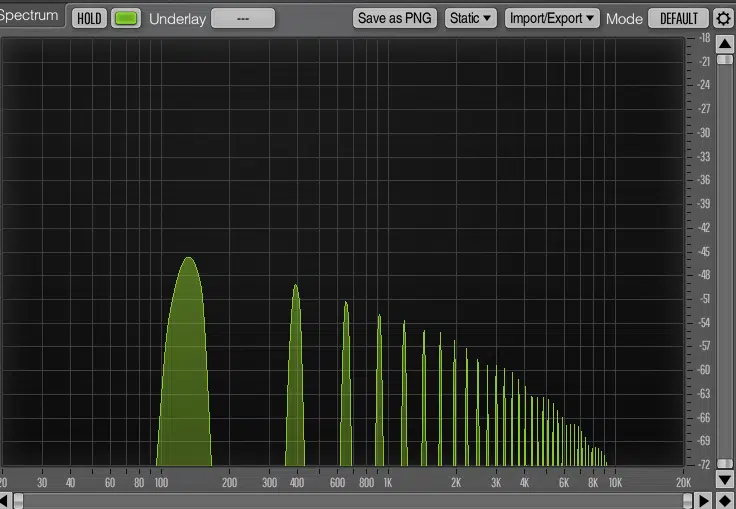
The main 2 are a reduction of low-end frequencies and the inevitable harshness of the top-end.
Meaning, the existing harshness of the higher frequencies (in the signal) will be accentuated.
Thankfully, the following technique will not only help you avoid this problem but eliminate the possibility of it occurring altogether!
GETTING STARTED
Just like in synthesis, when using EQ you have both ‘subtractive’ and ‘additive’ processing methods:
- Additive EQ 一 when you administer boosts.
- Subtractive EQ 一 when you administer cuts.
When adding something like distortion to your track, what you’re essentially doing is adding extra harmonics to the entire signal that’s being fed.
When, in reality, you’ll typically want only specific portions of that signal to be affected.
Additionally, if you wanted to add/include extreme amounts of distortion, you must sculpt it before and after processing, in order for it not to be a messy ear sore.
Like any other technique in production, the exact levels of this effect and the way you want it to be perceived will depend on:
- The signal itself
- The intended (perceived) vibe/feel
- Your unique track
- The specific genre you’re working with
Regardless of the determined parameters you use, apply the following concept and you’ll be on your way to achieving a professional-level distortion/saturation effect!
Let’s dive in…
AUX SENDS
Oftentimes when working with vocals, you don’t want to distort the entire range of frequencies, but rather solely the upper-mids (and higher frequencies).
On the other hand, when working with an 808, you will want to distort the entire signal.
Having said that, throwing anything other than extremely low levels of saturation on elements such as 808 and bass, will actually end up removing the low sub/bass frequencies altogether.
This is not what you want to happen, as it’s super counterproductive. Ironic, huh?
In order to prevent this from happening, you should always send the signal to a designated saturation AUX Send.
As an alternative, you could simply duplicate the track, then process them both (parallel to one another) with the ‘distortion’ set to 100% WET.
The same applies when routing it to an AUX Send.
Either method is valid and is fully based on preference.
SUBTRACTIVE EQ
Next, for the Subtractive EQ, you’re going to place an EQ before the Saturation plugin.
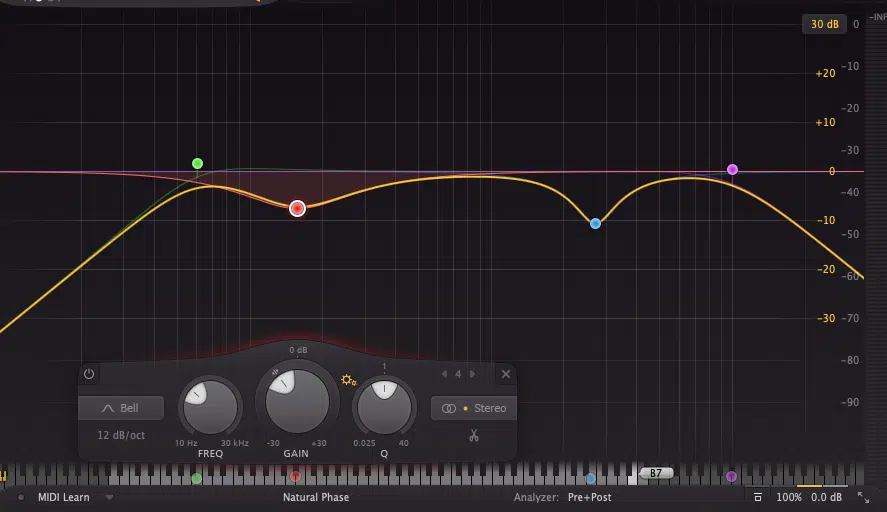
Remember, as a producer or artist you want to be familiar with all the different types of EQ.
This will remove most of the frequencies you don’t want to be affected as part of the distorted signal.
As well as isolate the ones you do intend to saturate and allow you to sculpt the signal prior to it hitting the distortion.
From here, only the frequencies you wish to be distorted will be sent through (the distortion) and the ones you don’t, will be EQ’d out.
Now you’ll have the freedom to push the distortion even harder on the area(s) you want to saturate.
Time for the fun part… EQ’ing the distorted signal.
EQ’ING THE DISTORTED SIGNAL
Since this concept involves using a Send, you’re working within a fully WET track that needs to be blended with the original.
Here is where you’re going to use your creativity as a guide.
Boost the area(s) that you want to be super-enhanced
Be sure that you’re actively listening to the signal that the distortion is being sent to.
You might be pleasantly surprised by just how far you actually can push it.
Remember, ‘normal’ EQ rules do not apply here.
COMPRESSING YOUR DISTORTED SIGNAL
In order to compress your signal to make it reach its full potential:
- Drive it with a high ratio 一 Typically in ‘limiting’ territory (around 10:1 or higher).
- Attack 一 Should be set to medium.
- Release 一 On the longer side for more control, or shorter if you’d like it to be more present.
As always, these parameters will depend on your send, the scope it covers, and what you’re trying to achieve.
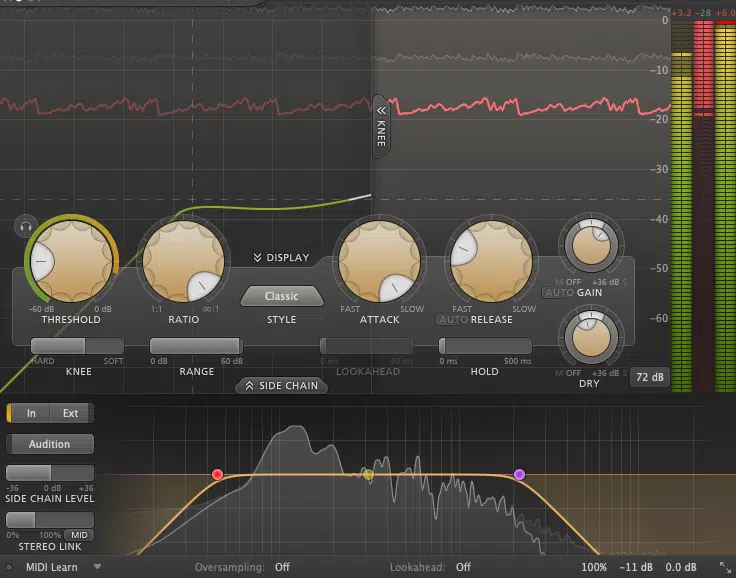
NOTE: This is also an ideal time to use a dynamic processor that offers a ‘program dependent’ Attack and Release time.
Meaning, it’s the processor itself that dynamically alters the attack/release based on the input signal.
You will commonly find this in some analog-modeled compressors, but largely throughout the limiter realm.
In theory, you’re doing this to make them sound more ‘crunchy’ and stronger all around.
In a much more targeted fashion than you normally would when applying this effect by standard means (such as directly on the track/signal itself).
You’re essentially going to be treating this signal in the same fashion you would when processing a signal using parallel compression.
Although, you’re not going to be pushing it quite as hard.
I suggest using vintage compressor types/emulations for this task; Optical Compressors in particular.
Next, you’re going to throw a Multiband Stereo Imager on that bad boy.
IF YOU DO NOT HAVE A MULTIBAND STEREO IMAGER:
Determine if your distortion is primarily comprised of low or high frequencies.
- If it’s mostly lower frequencies (or evenly balanced) 一 collapse the signal to MONO.
- If it’s mostly higher frequencies 一 Leave it as is, or incorporate some stereo width if you feel it’s beneficial to your unique mix.
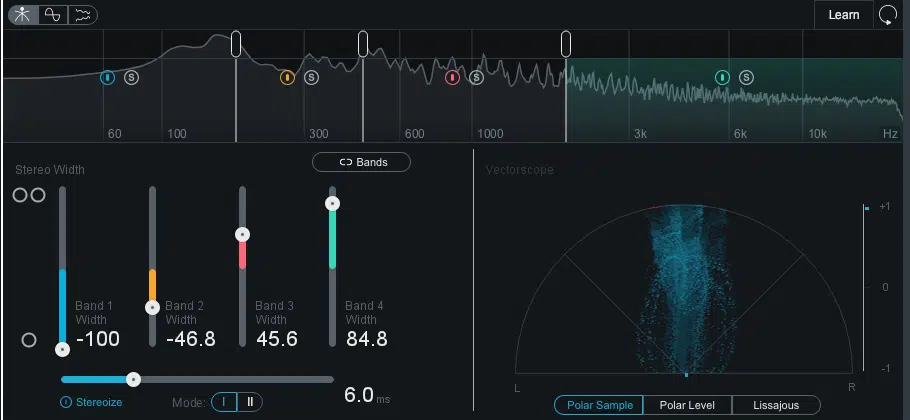
IF YOU DO HAVE A MULTIBAND STEREO IMAGER:
Collapse the low- and mid-frequencies to MONO.
Then, take the upper-mid/high frequencies and widen the signal.
Don’t go too crazy (as a beatmaker I know that’s difficult), but usually anywhere below 125% is safe.
Unless that is, the signal is extremely narrow or practically MONO to begin with and additional width is needed.
But, typically, it should be applied sparingly.
DISTORTION SECRET: PUSH IT TO THE LIMIT
For this step, you’re going to use a distortion method that is super rare and super beneficial.
It will build upon the 2-stage EQ you set up earlier.
- Place an additional EQ after your first pre-EQ setup.
- Place another one directly after the Distortion Send (before the second post-EQ).
By including 2 (extra) EQs with equal, yet opposite curves you can produce professional-quality, highly-admired results.
They will ultimately add ‘tonality’ to the distortion that is normally achieved through purely analog hardware.
Awesome, right?
It also allows you to seriously push some of the harmonics that are being sent through the distortion to their absolute limits.
Plus, eliminate that curve with another EQ (post-distortion).
This causes a highly-desirable form of ‘phase smearing.’
Your original signal will have the ability to be pushed much harder as well, so extra harmonics can be sent through.
At the same time, it will simultaneously cancel out any unwanted frequencies or harshness.
After completing this, you’re left with significantly crispy distortion on the designated areas of your signal.
This is a well-kept industry secret that adds a unique color/tone to the distortion and your signal (as a whole).
It is rarely accomplished using similar methods, hence why they try to keep it a secret.
Be aware of the fact that this technique may sound superior in certain situations over others, so choose wisely.
NOTE: If you’re looking for the best MIDI melodies that will sound great in any situation, download the FREE Unison Essentials MIDI Melodies.
Nonetheless, it’s something that you’re definitely going to want to experiment with before ruling out the option altogether, as the results (if executed properly) are truly unmatched.
Ironically, digital EQs tend to work best for this process, as you won’t be restricted by the confines of the ‘Q’ or the bands you’re currently using.
USING SENDS
While using a Send for this technique may, in fact, be successful in its attempts, it might not always produce ideal results.
Also, keep in mind that they almost always function best when saturation is being applied directly onto the track.
So, you have to determine which process is the sensible choice for your unique situation:
FOR MORE SUBTLE RESULTS:
STEP 1 一 Apply a significantly hefty top-end boost (High Shelf +7dB at 3K) that’s going into the distortion.
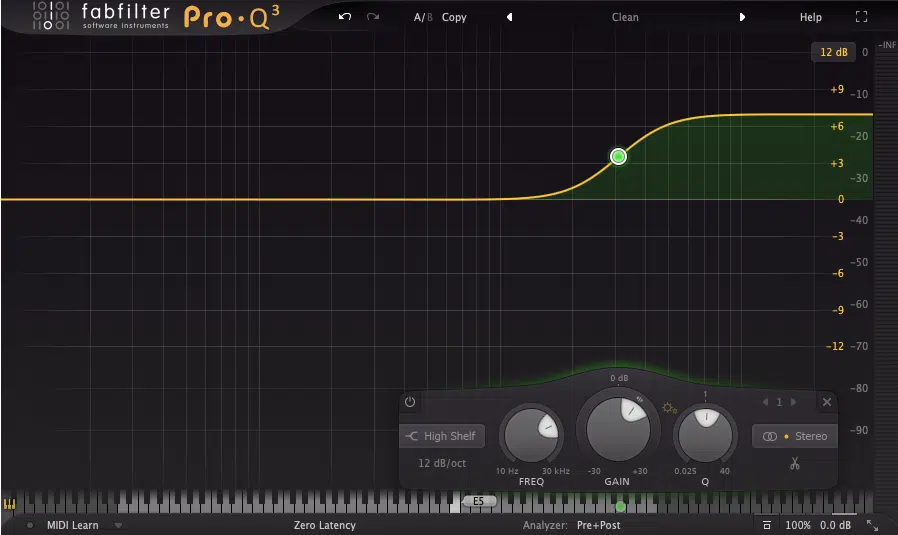
This will cause the distortion to respond more sensitively to the high-frequencies than normal (had it not been enhanced with a boost).
Granted, it may be way too much, but don’t worry, you’ll fix that in a minute.
STEP 2 一 Administer a cut (high shelf -7dB at 3K) in the same area as the boost, at either the same or similar level/depth in order to cancel it out.
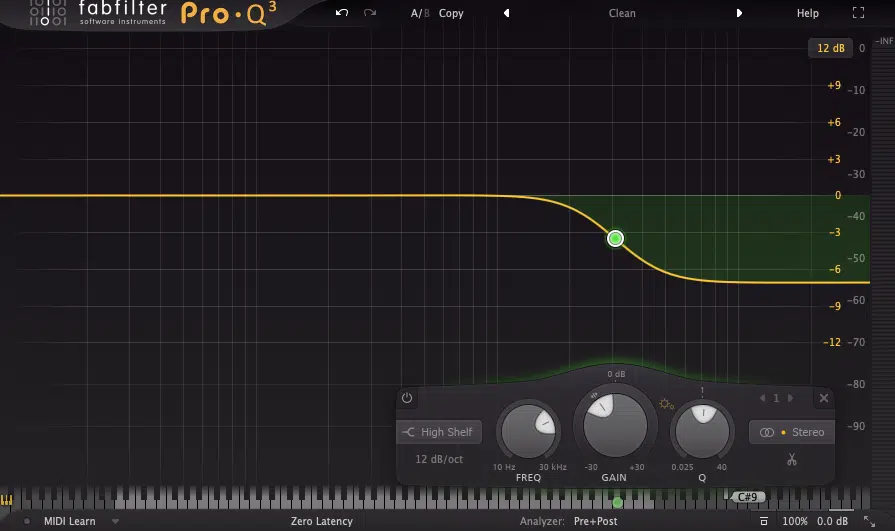
What you achieve by doing this, is a very over-driven top-end without an overload of harsh frequencies.
Now that you are familiar with how to properly execute this process, you can now apply the same steps to much more complex EQ curves!
NOTE: Administering this process at random may indeed work out sometimes.
However, it’s much more beneficial to emphasize designated sections of the signal that you wish to have picked up (without having to hear an apparent level boost).
Below is an example of a (slightly) outrageous EQ curve that sounds great on the string section…
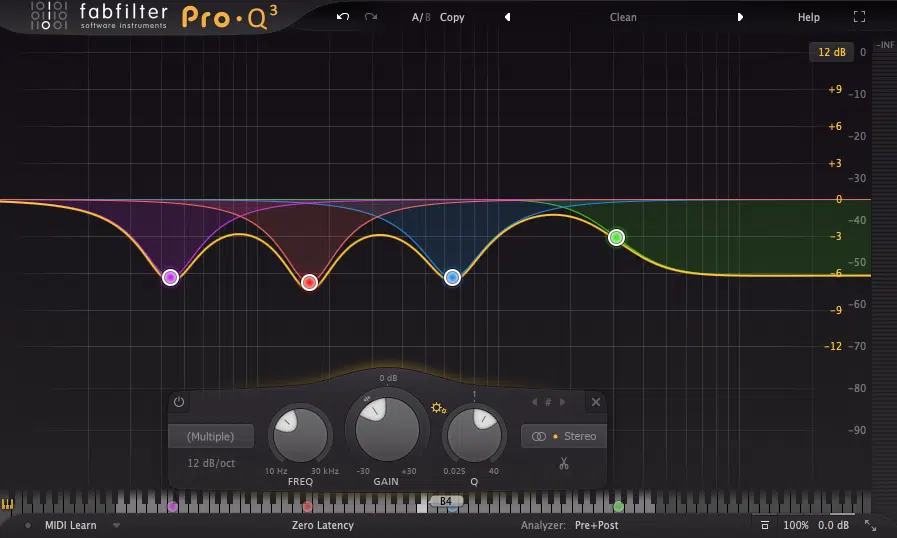
The goal was to emphasize the mid-range, with a few rather ambitious curves.
STEP 3 一 Repeat the same exact process except, this time, you’re going to draw those boosts in reverse (as cuts).
When you don’t administer, or forget to include this step, it will result in absolute disaster.
You won’t just get the normal harshness that accompanies distortion plugins, but worse… so do NOT skip it!
This step eliminates the harshness and the repercussions of the massive, wild boost that was applied in the form of phase cancellation.
While this term is typically synonymous with disaster and is to be avoided at all costs, there are ways to leverage, and take advantage of it.
Not many people, except true professionals (and now you!), know how to do this, so consider yourself ahead of the curve!
This same concept can be applied to many different processing types and techniques, not just distortion, so always keep it in mind.
There you have it, an insanely cool, exclusive distortion technique that has the potential to provide you with that unique edge that you’ve been searching for.
It will certainly make your music more fascinating, intriguing, and all-around insane.
KEEP IN MIND
Applying this distortion technique improperly can cause unfortunate ‘phase’ changes.
These phase changes typically contribute to this distortion techniques’ overall appeal.
However, as you now know, it can lead to unwanted phase issues/cancellation because, essentially, you’re creating phase shifts (known as ‘smearing’) with your EQ.
Subtle differences in the position and/or levels of your EQ bands will add to the ‘smearing’ as well.
This is why it’s important to open up a Phase Correlation Meter (when applying to stereo signals) in order to gauge whether it’s sufficiently ‘in-phase’ before moving on.
Otherwise, analyze your music, experiment, and go crazy!
This (scarcely-known) distortion technique will certainly stop your listeners dead in their tracks.
As well as make your tracks truly shine.
I guarantee you won’t regret it!
FINAL THOUGHTS
Distortion has been leveraged into one of the most essential additive processor methods, period.
You can use it in all types of creative ways to make your music stand out once you get familiar with it.
Now you have access to one of the most well-kept industry distortion secrets around to start you off!
But learning this distortion technique is just step 1… applying, practicing, and refining it is what’s important.
And there’s no better way to do so than with perfectly-mixed bass loops.
Luckily, we have the dopest selection around within the FREE Unison Essential Bass Loops.
Unison Bass Loop Packs are the best way for you to make your tracks powerful, catchy, and dance-worthy.
They contain the most fire basslines in the game, guaranteed to keep your listeners engaged, and your music unforgettable.
Until next time…


