Understanding subtractive synthesis is essential for creating unique and captivating sounds.
In this comprehensive guide, we’ll cover:
- What subtractive synthesis is (everything you need to know)
- How to use subtractive synthesis to make your tracks stand out
- How it compares to other synth types
- Interesting tips and tricks you can use
- 10 super creative subtractive synthesis techniques to revolutionize your production
Let’s start by exploring the importance of subtractive synthesis and its history.
Subtractive synthesis has been a cornerstone of electronic music production since the 1960s.
It’s a technique that allows producers to create a wide range of sounds by shaping and sculpting raw waveforms 一 resulting in anything from aggressive leads to lush pads.
With the ever-growing number of virtual instruments and synthesizers, having a solid grasp on subtractive synthesis can give you an edge in your music production career.
By mastering these synthesis techniques, you’ll be able to replicate the iconic sounds of your favorite artists or craft your signature sounds.
Table of Contents
Subtractive Synthesis vs. Other Types of Synthesis
Before diving into the specifics of subtractive synthesis, it’s essential that you understand how it differs from other types of synthesis.
This will give you a broader perspective on sound design and help you choose the right synthesis technique for your music production needs.
What Exactly is Subtractive Synthesis?
Subtractive synthesis is a method of creating sounds by removing (or “subtracting”) specific frequencies from a raw waveform.
This is done using filters, which can be adjusted to shape the sound and create a variety of textures.
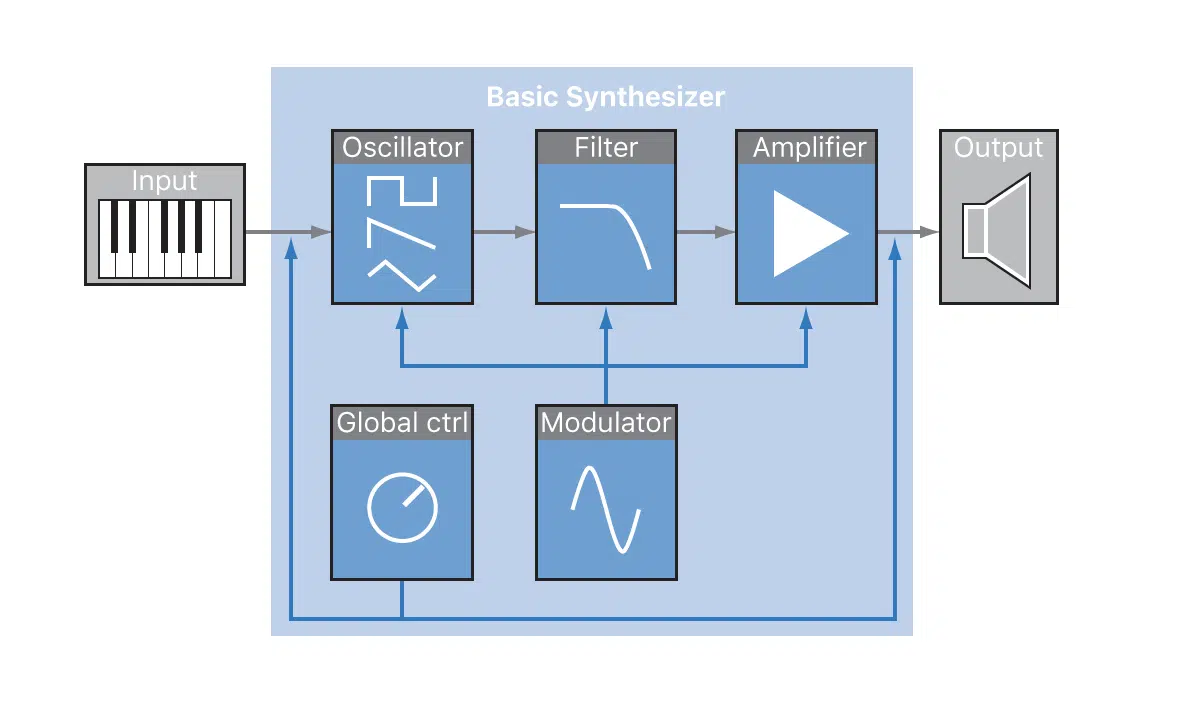
The resulting sound is often more complex and harmonically rich than the original waveform.
For example, you might start with a bright and buzzy sawtooth wave and use a low-pass filter to remove some of the high frequencies.
This could result in a warmer, more mellow sound – perfect for a deep bassline or a smooth pad.
Additive Synthesis
Additive synthesis, as the name suggests, is the opposite of subtractive synthesis.
Instead of removing frequencies, additive synthesis builds sounds by combining multiple sine waves (pure tones) at different frequencies and amplitudes.
Each sine wave represents a harmonic overtone, and when combined, they create complex sounds with epic harmonic content.
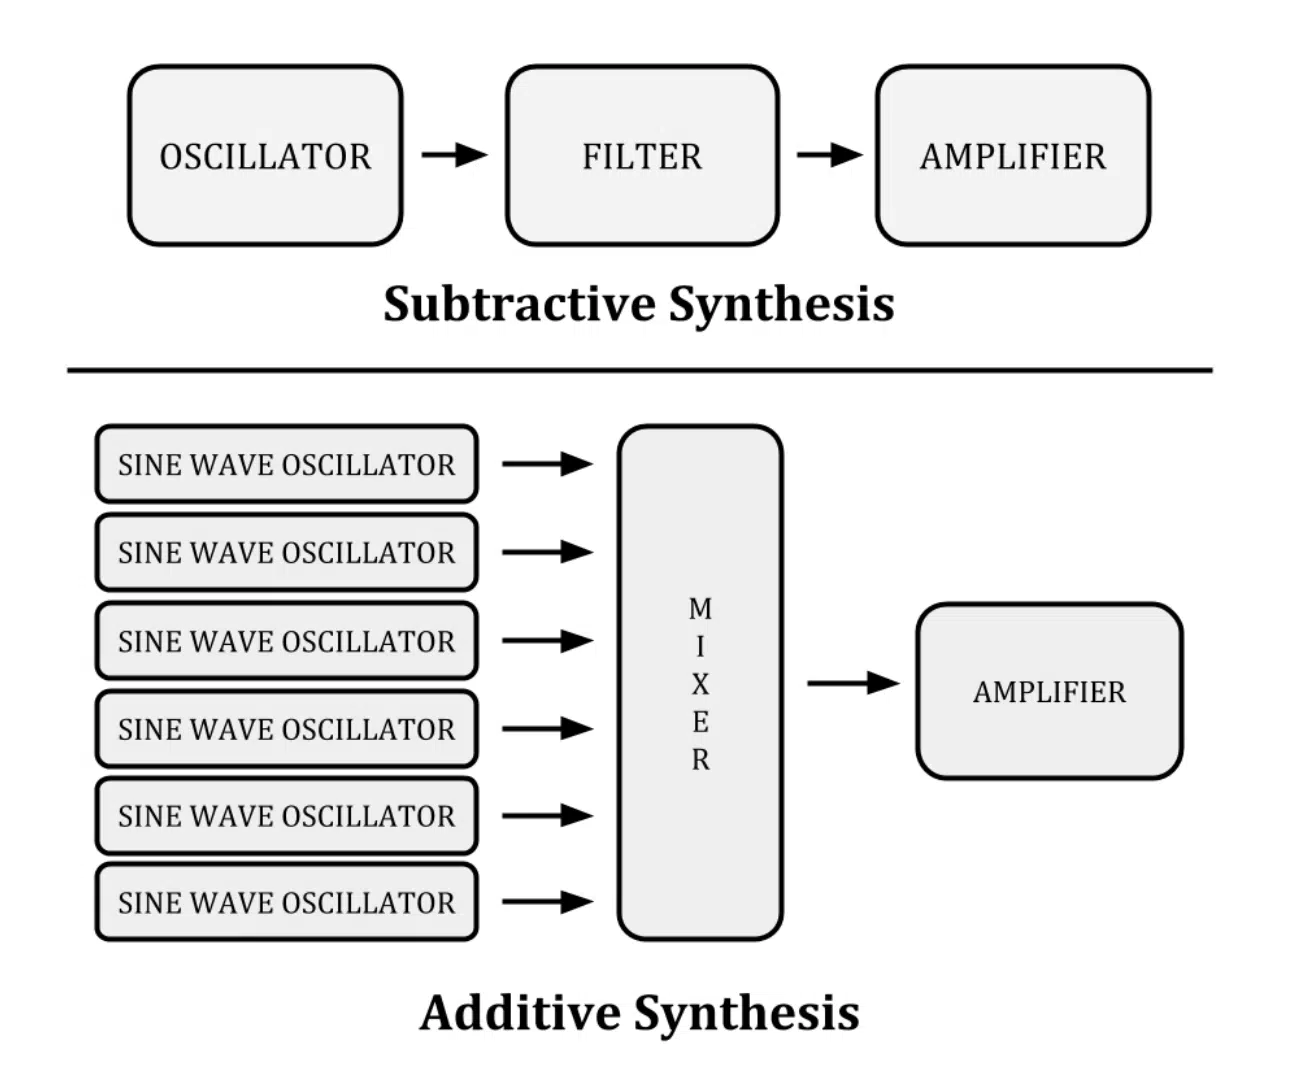
An example of additive synthesis in action is the famous Hammond organ, which uses drawbars to add or subtract harmonics.
It allows the player to craft a wide range of organ sounds.
Additive synthesis is also used in modern software synthesizers like Image-Line’s Harmor or Loom by AIR Music Technology.
Wavetable Synthesis
Wavetable synthesis involves using a series of pre-recorded waveforms (or “wavetables”) as the sound source.
By scanning through these waveforms or morphing between them, you can create evolving textures and timbres.
Wavetable synthesis is popular for its ability to produce unique, evolving sounds with a digital character.
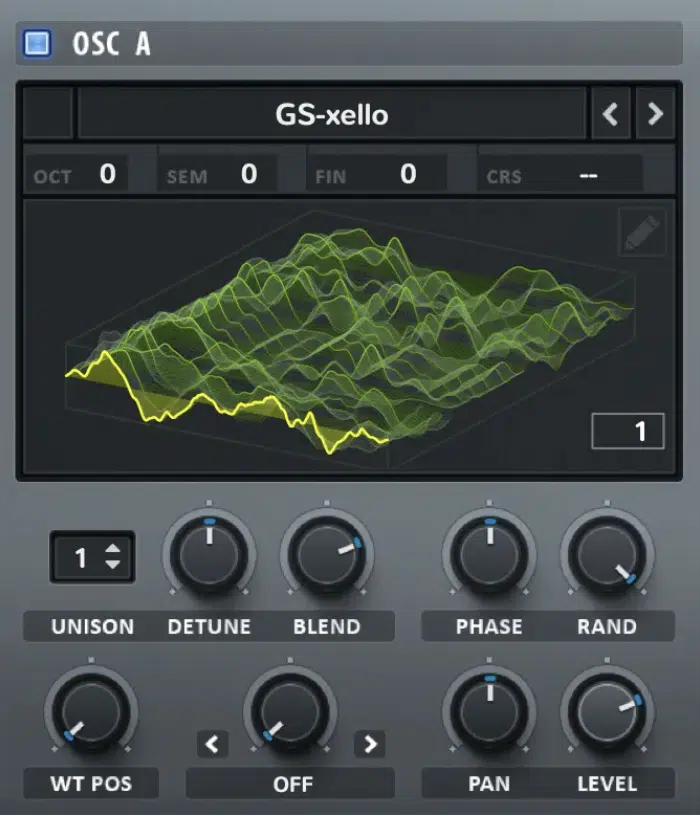
Serum by Xfer Records and Massive by Native Instruments are examples of popular wavetable synthesizers.
These synths have been used extensively in various genres, like dubstep and future bass.
They’re infamous for creating those distinctive, growling basslines and evolving pads that everyone loves.
Understanding Subtractive Synthesis: The Basics
Now that you have an overview of subtractive synthesis, let’s delve deeper into its fundamental concepts.
These building blocks are essential for mastering subtractive synthesis and unlocking its potential in your production.
A. Fundamental Frequency
The fundamental frequency is the lowest frequency in a sound and is responsible for its perceived pitch.
For example, if you play a note on a piano, the fundamental frequency determines the pitch you hear.
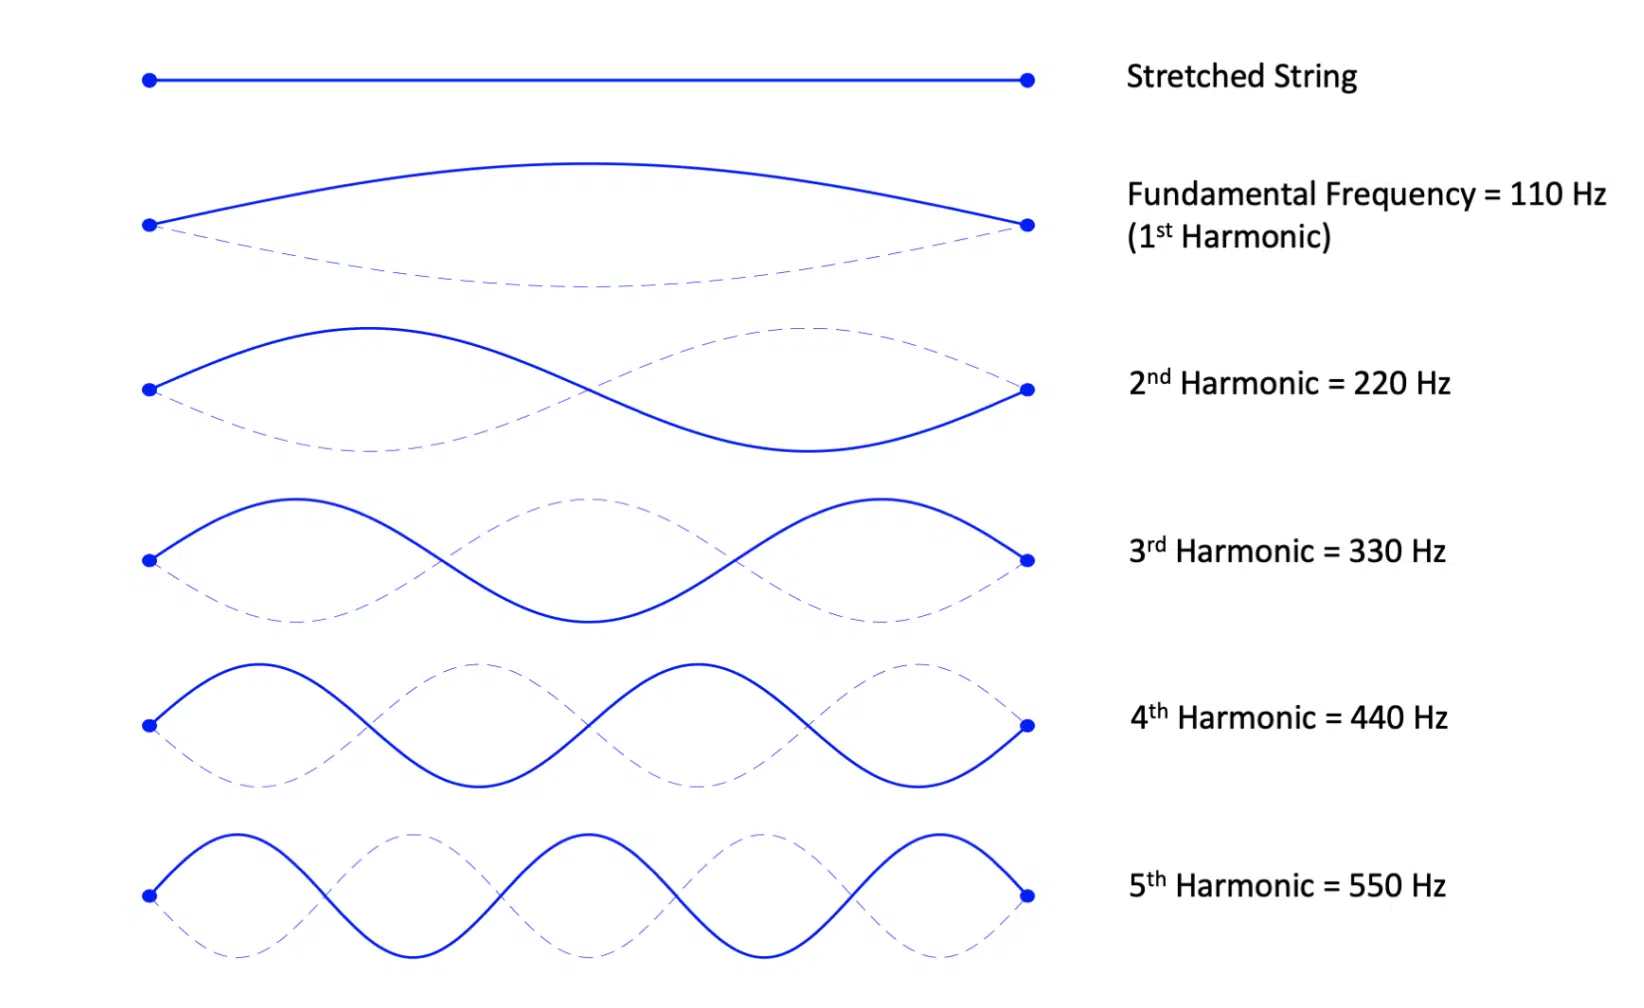
In subtractive synthesis, the fundamental frequency is generated by an oscillator.
That oscillator produces the initial waveform that will be shaped and sculpted using filters and other processing.
Let’s say you’re designing a lead sound for an electronic dance track… you’d want to ensure that the oscillator’s fundamental frequency is set to a suitable pitch range.
This will allow the lead sound to cut through the mix and be easily (and clearly) heard by your listeners.
B. Harmonic Overtones
Harmonic overtones are the higher frequencies that accompany the fundamental frequency in a sound.
These overtones are multiples of the fundamental frequency and contribute to the timbre or character of the sound.
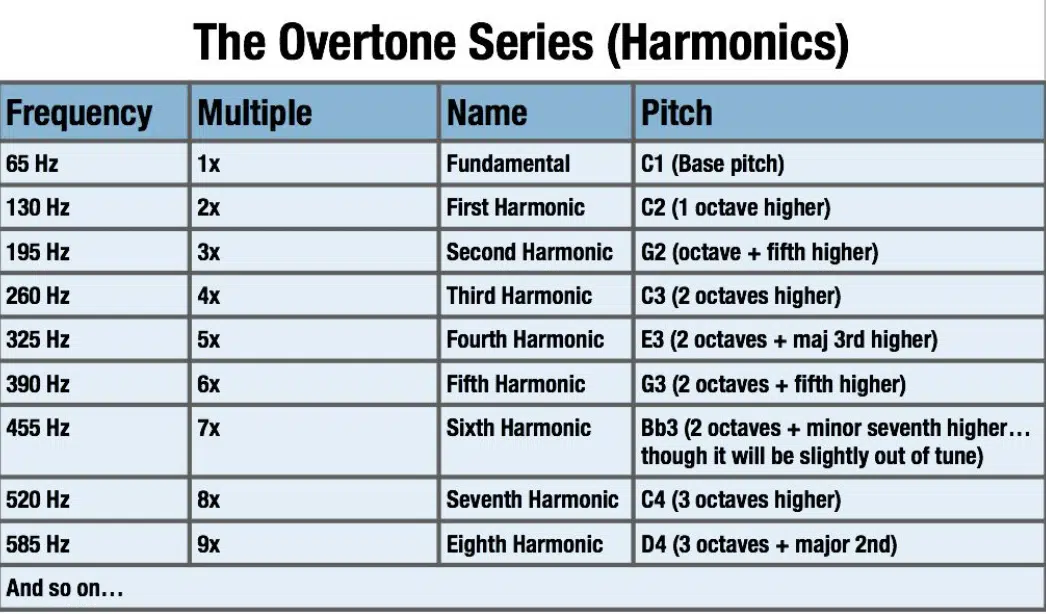
In subtractive synthesis, the harmonic content of a sound is determined by the type of waveform generated by the oscillator and the filter settings used to shape the sound.
For example, when creating a rich pad sound, you might use a waveform with a lot of harmonic content, like a sawtooth wave.
By adjusting the filter settings, you can emphasize or de-emphasize specific harmonics, creating a unique timbre that complements your specific track.
C. Pure Tone
A pure tone is a sound consisting of a single frequency without any harmonic overtones.
In music synthesis, a sine wave is the most straightforward example of a pure tone, as it contains only the fundamental frequency.
Although pure tones are not commonly used in subtractive synthesis, they are essential in understanding the building blocks of more complex sounds.
For example, a sine wave can be used as a sub-bass layer in electronic music.
By adding a pure sine wave at a low frequency beneath your main bass sound, you can create a powerful low-end foundation that supports the rest of the mix.
Basic Waveforms
When working with subtractive synthesis, it’s essential that you understand the characteristic of different basic waveforms.
Each waveform has a unique harmonic structure, which will greatly influence your final sound.
In this section, we’ll explore the primary waveforms used in subtractive synthesis and provide examples and tips for utilizing each in your production.
Sine Waves
As mentioned earlier, sine waves are pure tones consisting of only the fundamental frequency.
Sine waves have a smooth, rounded sound that’s free of harmonic overtones.
While not commonly used as the primary sound source in subtractive synthesis, sine waves can be highly effective in specific applications:
- Sub-Bass 一 Layer a low-frequency sine wave beneath your main bass sound to create a powerful low-end foundation.
- Bell-Like Sounds 一 Combine a sine wave with a short decay envelope and gentle modulation to create delicate, bell-like timbres.
- FM Synthesis 一 Use sine waves as carriers and modulators in FM synthesis to create complex, evolving sounds.

Square Waves
Square waves contain bright and hollow sounds, with a unique harmonic structure that contains only odd harmonics.
Square waves are perfect for creating a variety of unique sounds:
- Retro Leads 一 Emulate classic analog synthesizers by using a square wave for leads and applying a slight vibrato for added character.
- Chiptune-Style Sounds 一 Achieve an old-school video game console vibe by using a square wave with minimal processing.
- Warm Pads 一 Apply a low-pass filter to a square wave, then add some slow-moving modulation to create lush, evolving pads.

Triangle Waves
The triangle wave is similar to a sine wave but contains additional odd harmonics, giving it a slightly more complex timbre.
It’s useful for creating softer, more subtle sounds:
- Mellow Leads 一 Use a triangle wave with a touch of vibrato and glide (portamento) for expressive, smooth lead sounds.
- Subtle Basslines 一 Blend a triangle wave with another waveform to create a bass sound that’s present in the mix without being overpowering.
- Delicate Pads 一 Combine a triangle wave with a slow attack envelope and some light modulation to design gentle, evolving pads.

Sawtooth Waves
A sawtooth wave is rich in harmonic content, containing both even and odd harmonics, which results in a bright and buzzy sound.
This makes it a versatile waveform for various applications:
- Aggressive Leads 一 Use a sawtooth wave with a bit of detuning and distortion for powerful, cutting lead sounds.
- Thick Basslines 一 Layer multiple sawtooth waves with slightly different tunings to create a rich, full bass sound.
- Complex Pads 一 Apply a low-pass filter to a sawtooth wave and experiment with modulation to create evolving, harmonically rich pad sounds.

The sawtooth waveform is a staple in digital production, often used to create rich, warm pads, filthy basslines, or cutting leads due to their harmonic complexity and full-bodied sound.
Pulse Waves
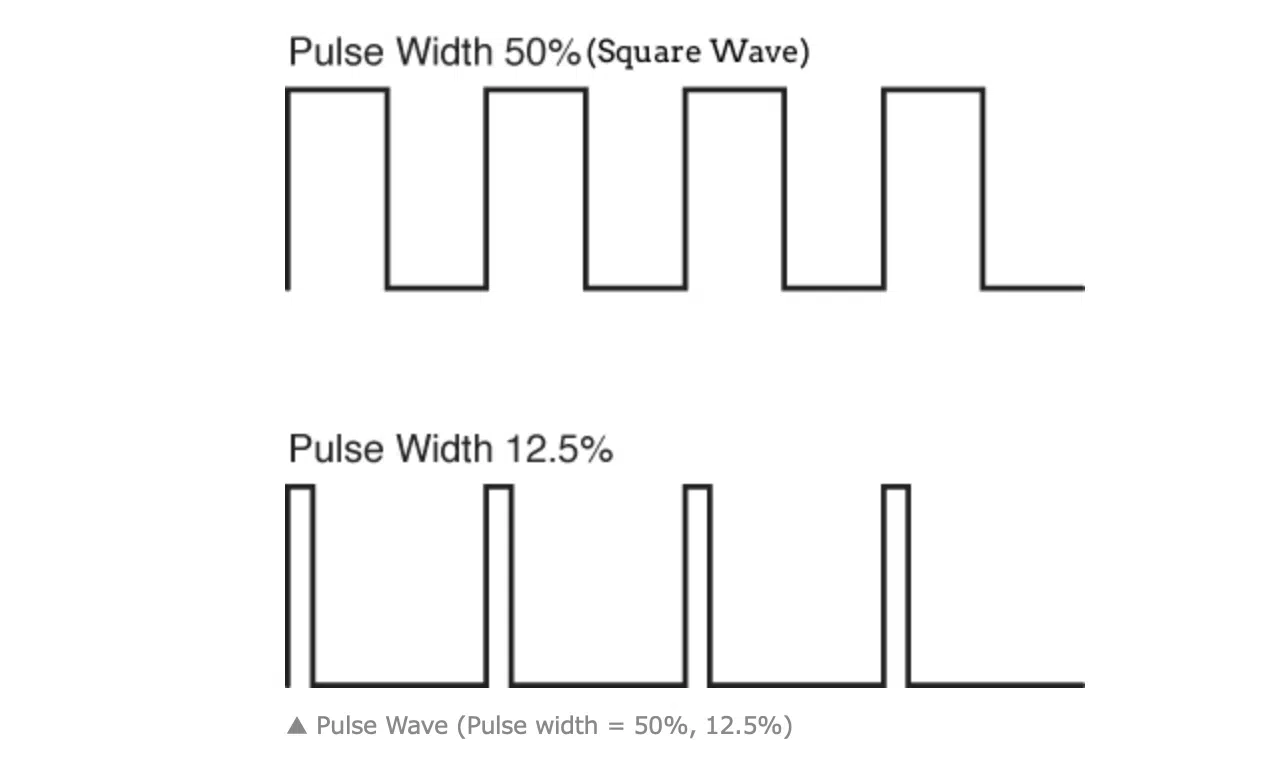
A pulse wave is a variation of the square wave, characterized by its adjustable duty cycle, which determines the ratio of the waveform’s “on” time to its “off” time.
By altering the duty cycle of a pulse wave, you can create a range of distinctive timbres, from thin, nasal sounds to rich, full-bodied tones.
Pulse waves are particularly useful for crafting unique lead sounds, chiptune-style effects, and interesting rhythmic patterns when modulated by an LFO.
Multiple Oscillators
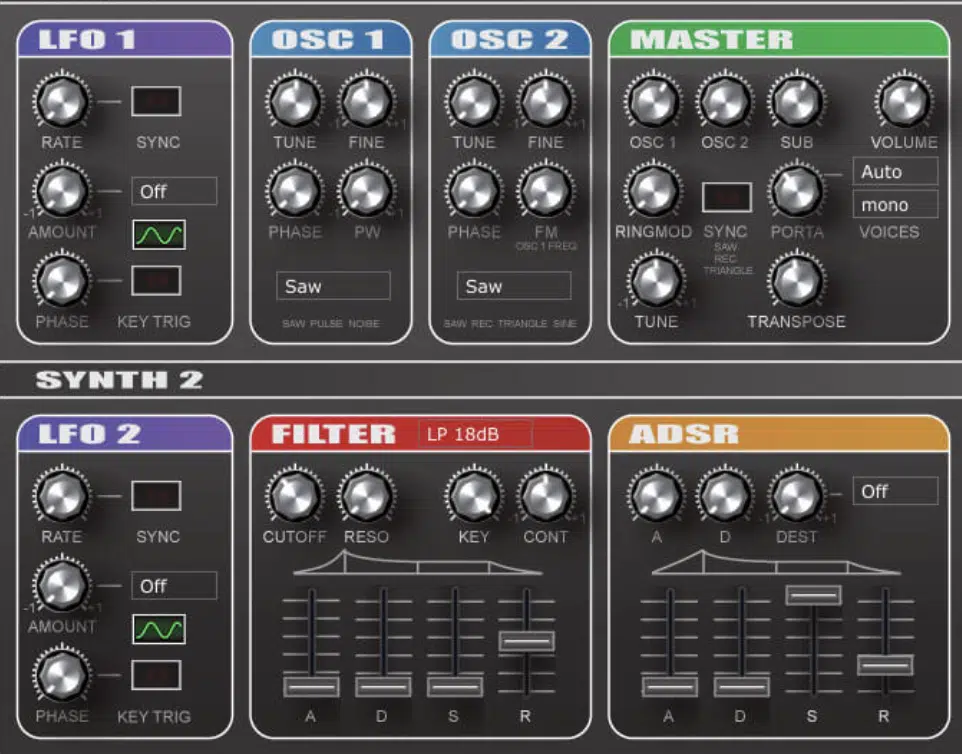
Many subtractive synths feature multiple oscillators, allowing you to create more complex sounds by combining different waveforms and tuning them to various pitches.
In this section, we’ll explore the benefits of using multiple oscillators and some creative techniques for crafting unique sounds.
Creating Harmonic Complexity
By combining different waveforms, you can create more harmonically complex sounds.
For instance, mix a sawtooth wave with a square wave to achieve a unique timbre that blends the characteristics of both waveforms.
Experiment with different combinations and tunings to discover new and exciting sounds for your music.
Creating Chords
You can use multiple oscillators to create chord-like sounds on a monophonic synthesizer.
By tuning each oscillator to a specific interval, such as a third or fifth, you can play full chords with a single key press.
This can be especially useful for creating lush, evolving pad sounds or thick, harmonic-rich leads.
Filters and Envelopes
Filters and envelopes are essential tools in subtractive synthesis for shaping the harmonic content and dynamics of your sound.
In this section, we’ll discuss the basics of filters and envelopes and provide some tips and techniques for using them effectively in your music production.
Filters
Filters are used to remove specific frequency ranges from a sound.
They allow you to sculpt the timbre and create unique textures.
The most common filter types in subtractive synthesis are low-pass, high-pass, and band-pass filters.
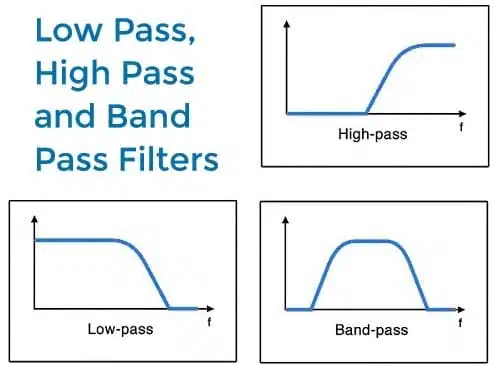
- Low-Pass filters 一 Use a low-pass filter to remove high frequencies, resulting in a warmer, more mellow sound. This is useful for creating deep basslines, smooth pads, or taming harsh lead sounds.
- High-Pass filters 一 Apply a high-pass filter to remove low frequencies, creating a thinner, more airy sound. This technique works well for designing plucky leads, percussive sounds, or emphasizing the high-end of a pad or bass sound.
- Band-Pass filters 一 Use a band-pass filter to isolate a specific frequency range, creating a focused, resonant sound. This can be effective for crafting unique lead sounds and sound effects or emphasizing a particular harmonic region.
Envelopes
Envelopes control the way a sound evolves over time, affecting parameters like volume, cutoff, or pitch.
The most common envelope components are Attack, Decay, Sustain, and Release (ADSR).
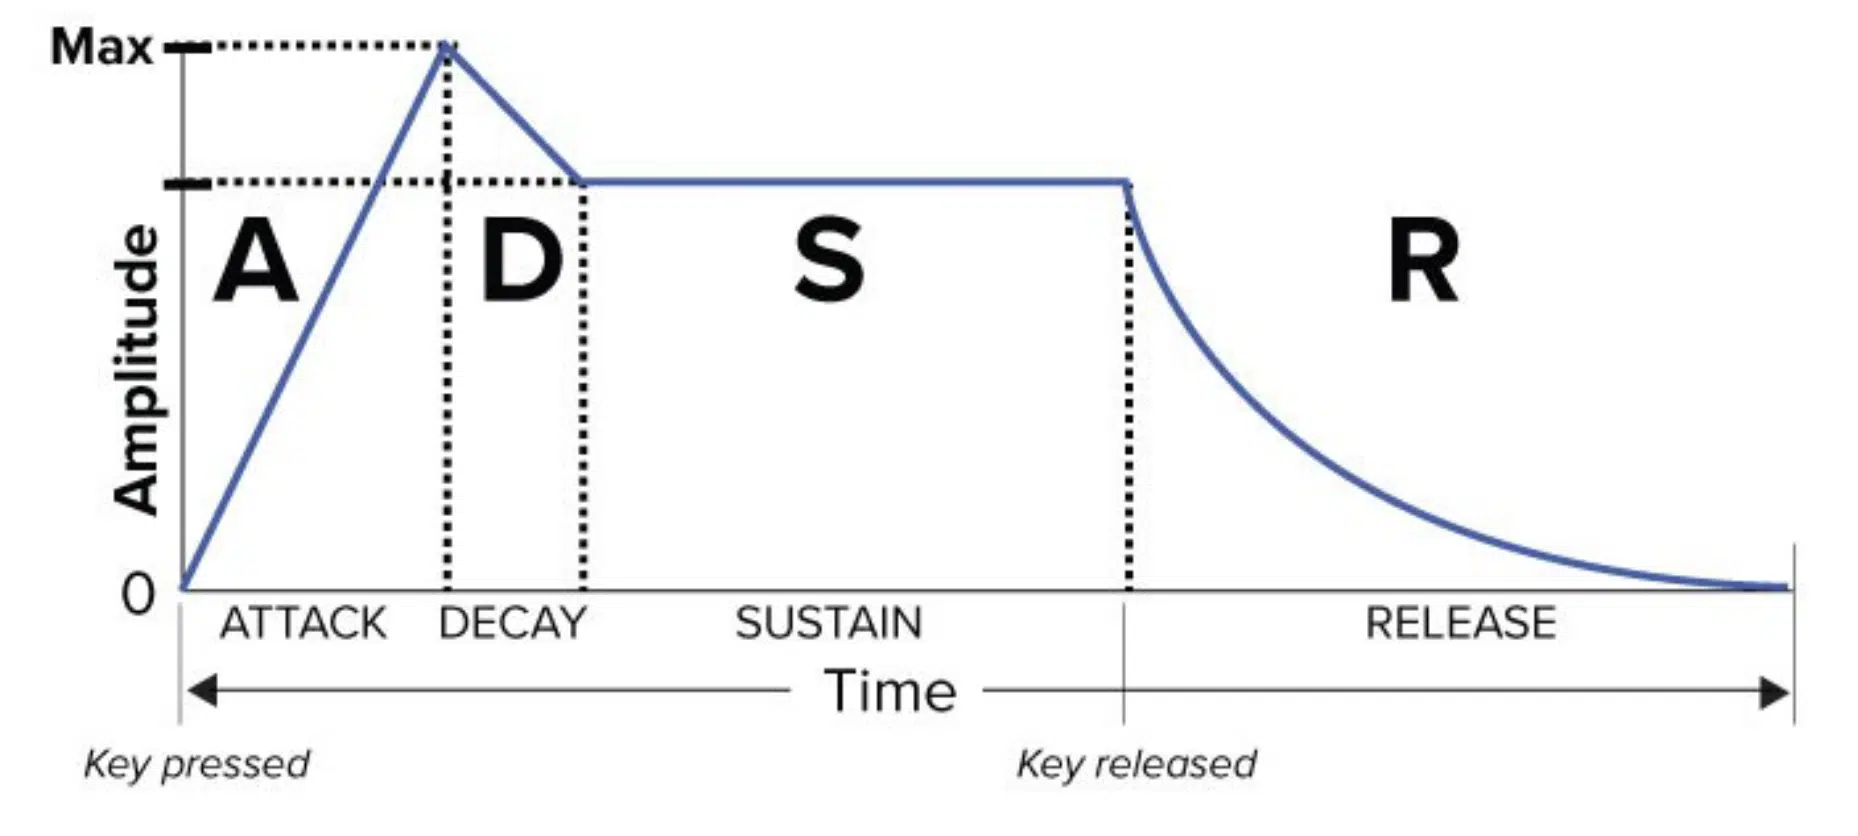
1. Attack 一 Use the attack parameter to control the time it takes for a sound to reach its maximum level. Longer attack times create softer, evolving sounds, while shorter attack times result in more percussive, immediate sounds.
2. Decay 一 The decay parameter determines\ how long it takes for the sound to go from its peak level to the sustain level. Use shorter decay times for plucky or percussive sounds and longer decay times for more sustained sounds.
3. Sustain 一 Sustain sets the level at which the sound will be held after the decay phase, as long as the key is pressed. Higher sustain levels result in more sustained sounds, while lower sustain levels create shorter, more staccato sounds.
4. Release 一 The release parameter controls how long it takes for the sound to decay to silence after the key is released. Longer release times create a more natural, reverb-like decay, while shorter release times result in abrupt cutoffs.
Experiment with different filter and envelope settings to shape your sounds and create a diverse palette of timbres.
Mastering the use of filters and envelopes in subtractive synthesis will enable you to design unique, expressive sounds that stand out in your mixes.
Modulation Sources
Modulation sources are essential components in subtractive synthesis.
They help you create movement and evolution within your sounds.
By modulating parameters like filter cutoff, pitch, and amplitude, you can design dynamic and expressive patches.
In this section, we’ll discuss common modulation sources and how to use them effectively.
LFOs (Low-frequency oscillator)

LFOs are a widely-used modulation source in subtractive synthesis.
They generate low-frequency waveforms that can be applied to various parameters, creating rhythmic changes or slowly evolving changes in the sound.
- Vibrato 一 Apply a sine wave LFO to the pitch of your oscillators to create a vibrato effect, adding expression to lead or pad sounds.
- Tremolo 一 Modulate the amplitude of your sound with an LFO to create a rhythmic pulsing effect, adding movement to sustained sounds or pads.
- Filter Modulation 一 Use an LFO to modulate the filter cutoff frequency, creating rhythmic or evolving changes in the timbre of your sound.
Envelopes
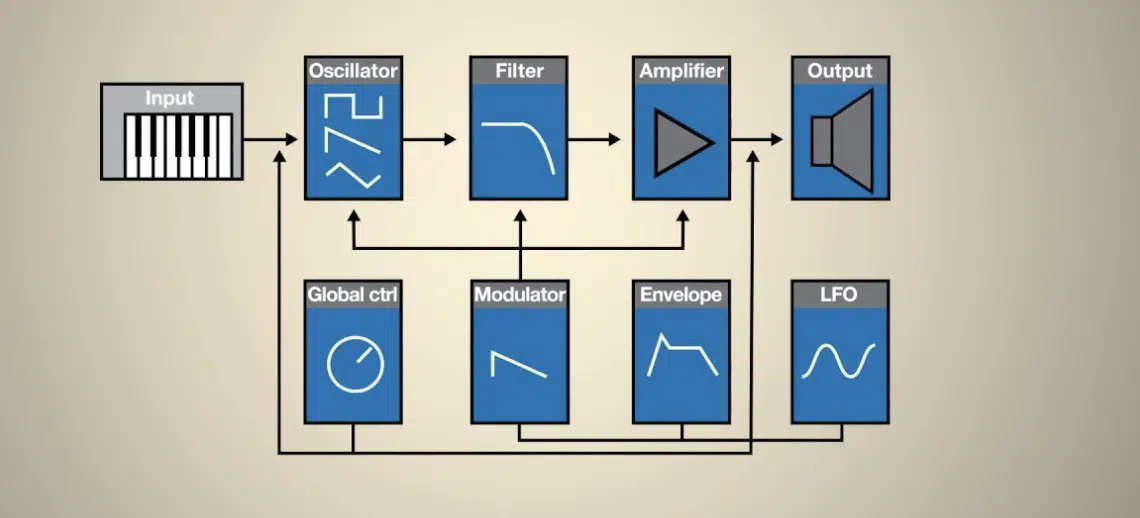
Envelopes can also be used as modulation sources, allowing you to create dynamic changes in your sound over time.
By applying an envelope to parameters like filter cutoff or pitch, you can design sounds that evolve and change as the envelope progresses through its various stages.
- Filter Envelope 一 Apply an envelope to the cutoff to create sounds that change in brightness over time. This technique is especially useful for designing plucky or evolving pad sounds.
- Pitch Envelope 一 Use an envelope to modulate the pitch of your oscillators, adding an expressive, evolving quality to your sound. This can be particularly effective for designing percussive or bell-like sounds.
Velocity
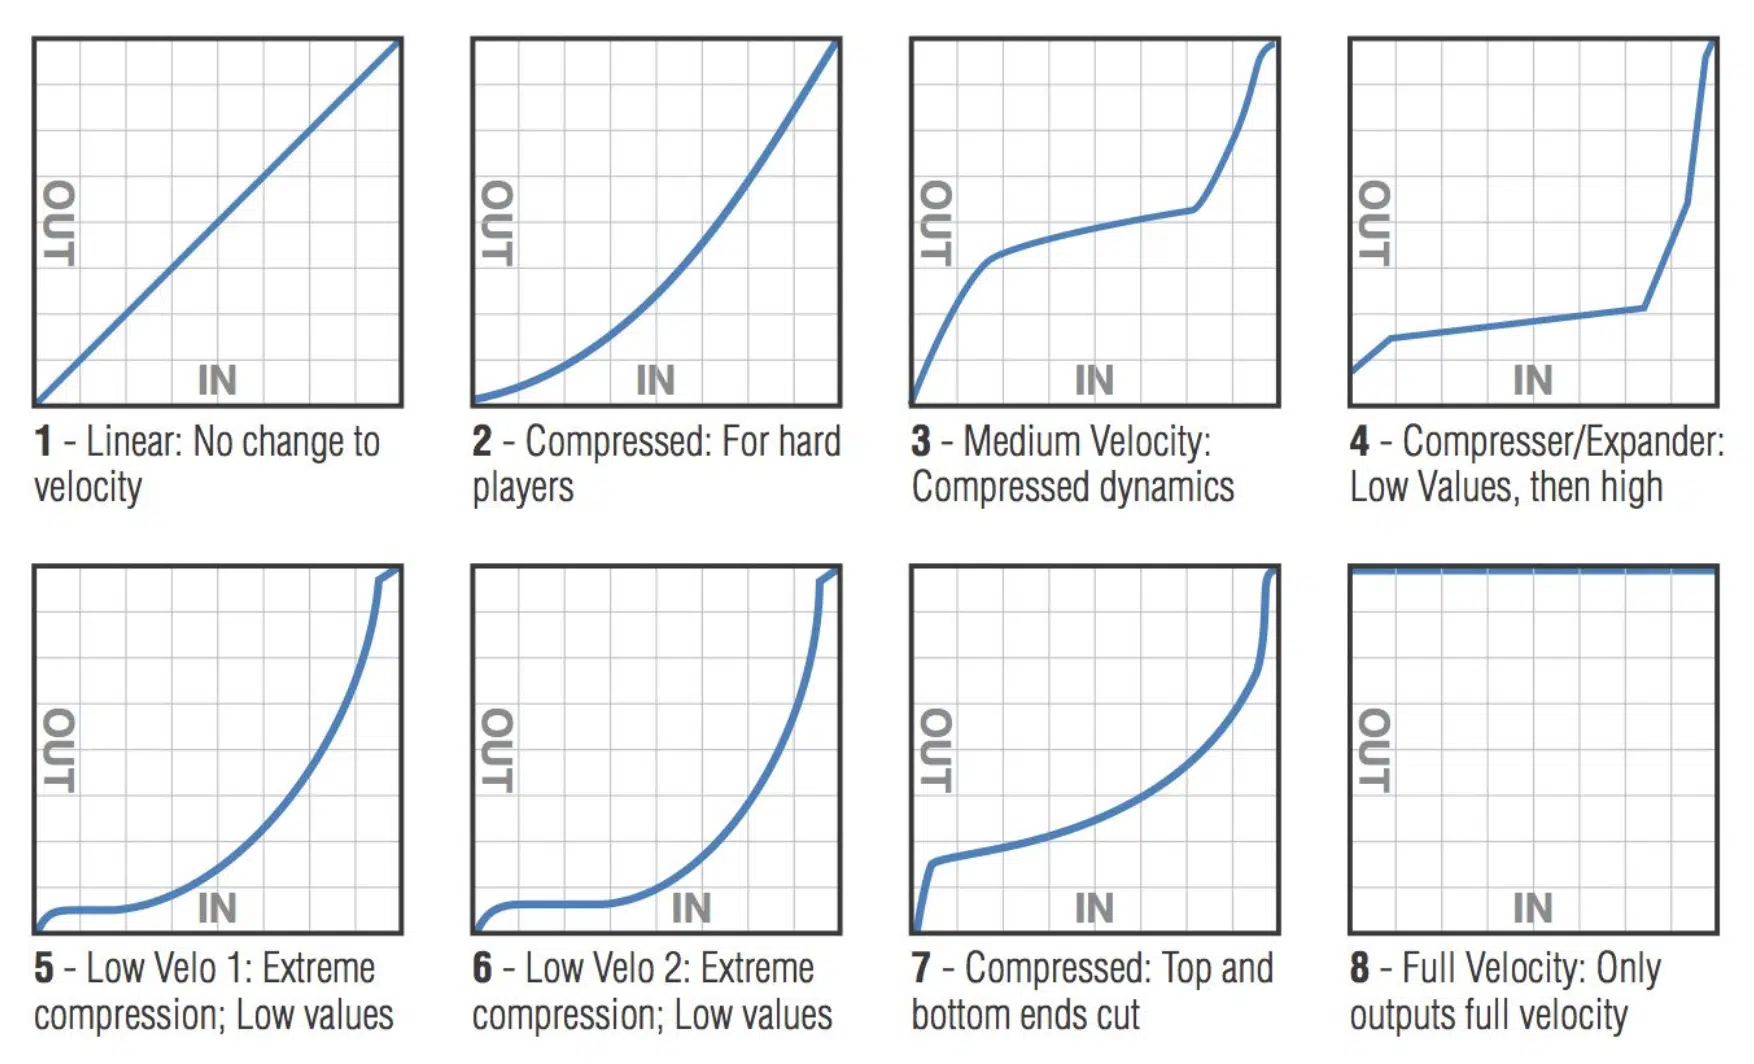
Velocity is a modulation source that corresponds to how hard a key is pressed on a MIDI controller.
By assigning velocity to various parameters, you can create more expressive, dynamic sounds that respond to your playing.
- Amplitude 一 Map velocity to the amplitude of your sound to create patches that respond to the intensity of your playing, resulting in a more expressive performance.
- Filter Cutoff 一 Assign velocity to the filter cutoff frequency, allowing you to control the brightness of your sound based on your playing dynamics.
- LFO Rate or Depth 一 Use velocity to control the rate or depth of an LFO, adding an additional layer of expressiveness to your sound.
Effects
Incorporating effects into your workflow can add depth, space, and character to your sounds.
Which is, of course, very important in order to create unique music.
In this section, we’ll discuss common effects used in music production and how to apply them to your subtractive synth patches.
Reverb
Reverb is an essential effect for creating a sense of space and depth in your mix.
1. Pads 一 Apply a generous amount of reverb to pad sounds to create an immersive, atmospheric quality.
2. Leads 一 Use a subtle amount of reverb on lead sounds to add depth and space without overwhelming the mix.
3. Percussive Sounds 一 Experiment with different reverb settings on percussive sounds to create unique textures and ambiance.
Adding reverb to your subtractive synth patches can make them sound more natural, spacious, and lush.
Delay
Delay is a versatile effect that can be used to create rhythmic interest, depth, and space in your subtractive synth sounds.
1. Echoing Leads 一 Apply a moderate amount of delay to lead sounds to create a sense of space and movement.
2. Rhythmic Pads 一 Use a synced delay on pad sounds to add rhythmic interest and complexity to your soundscapes.
3. Ambient Textures 一 Experiment with long, feedback-heavy delay settings to create evolving, ambient textures that can add depth and atmosphere to your productions.
Getting creative with your subtractive synth sounds can really expand your production skills and enhance your overall musicality.
Chorus
Chorus is an effect that thickens and enriches your sound by creating multiple, slightly detuned copies of the original signal.
1. Thickening Leads 一 Apply a subtle chorus effect to lead sounds to add warmth and fullness without overwhelming the mix.
2. Lush Pads 一 Use a moderate amount of chorus on pad sounds to create a rich, immersive quality.
3. Vintage Character 一 Experiment with chorus settings on various synth patches to emulate the sound of classic analog synthesizers.
A chorus can add warmth, depth, and character to your subtractive synth patches.
Distortion
Distortion can add harmonic content, warmth, and character to your subtractive synth sounds.
Aggressive Leads 一 Apply a moderate amount of distortion to lead sounds to add bite and presence.
Warm Basslines 一 Use a subtle amount of distortion on bass sounds to add warmth and harmonic richness.
Creative Sound Design 一 Experiment with different distortion types and settings on various synth patches to create unique, characterful sounds.
Make sure to use it judiciously to enhance your patches without overpowering your mix.
Subtractive Synths
Subtractive synths play a crucial role in shaping the sonic landscape of countless tracks and shaping a synth sound.
These versatile software instruments enable you to create a wide range of sounds, from earth-shaking basslines to lush pads and screaming leads 一 all with the convenience and flexibility of your DAW.
In digital music production, subtractive synths enable you to sculpt your synth sound by manipulating the frequency spectrum of your audio signal.
By selectively removing or attenuating specific frequencies, you can create a wide variety of timbres that suit your desired sonic character.
In this section, we’ll explore how most subtractive synths have been adapted to the digital domain and how they can enhance your music production arsenal.
A. Virtual Analog Synths
Virtual analog synths are digital emulations of classic analog subtractive synthesizers.
They’re designed to recreate the warmth, character, and sonic flexibility of their hardware counterparts.
These synths often include additional features and enhancements, such as expanded modulation options and built-in effects, giving you even more creative control over your sound design.
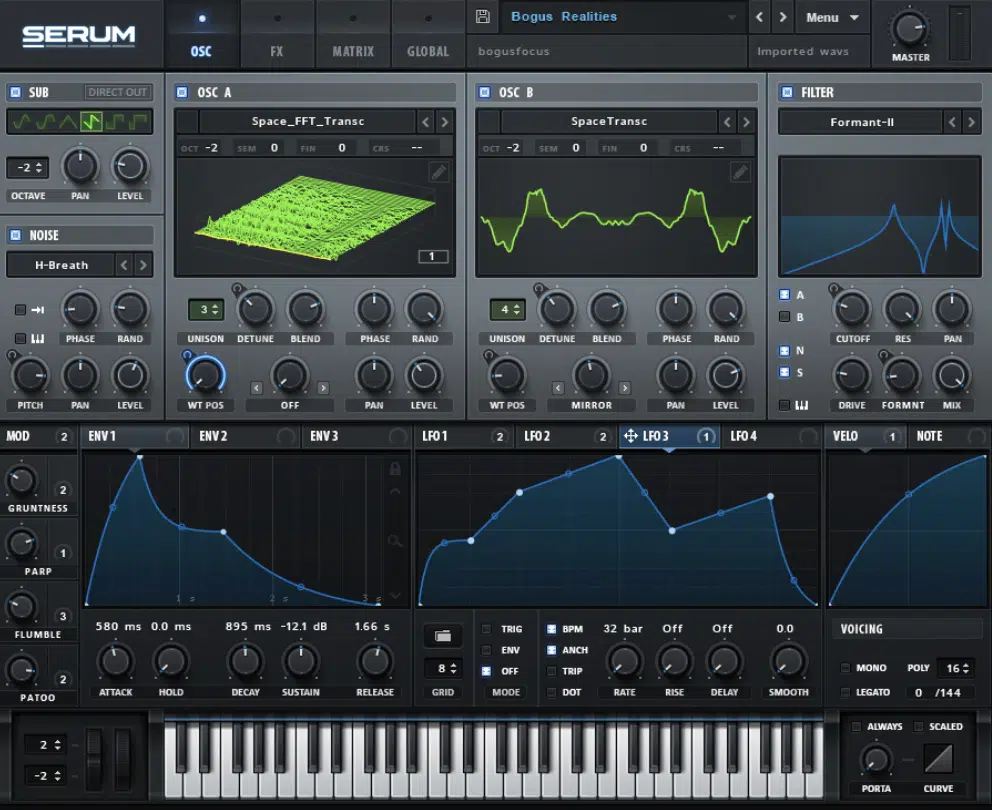
Examples of popular virtual analog synths include Serum, Sylenth1, and Massive.
B. Hybrid Synths
Hybrid synths combine subtractive with other forms of synthesis, such as wavetable, additive, or granular, to provide an even broader sonic palette.
These synths offer the best of both worlds, allowing you to create complex, evolving sounds that would be difficult to achieve using subtractive synthesis alone.
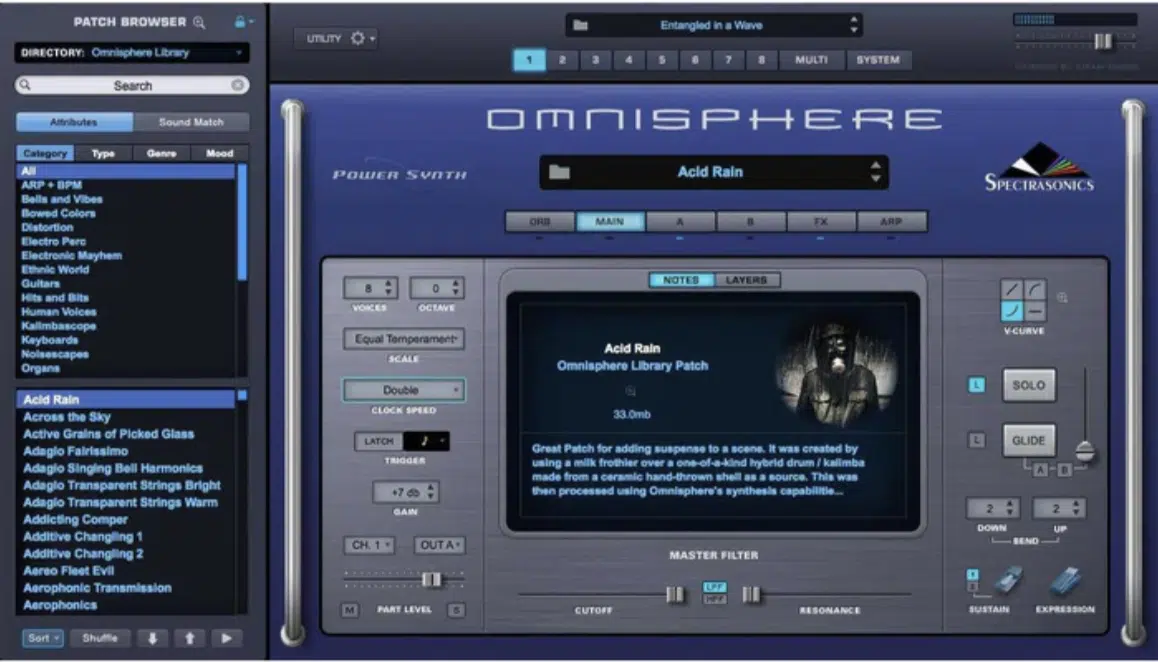
Examples of popular hybrid synths include Omnisphere, Pigments, and Falcon.
BONUS: 10 Creative Subtractive Synthesis Techniques
- Oscillator Sync
Use oscillator sync to create complex, evolving sounds with interesting harmonic content.
By syncing the pitch of one oscillator to another, you can generate rich textures that are perfect for expressive leads and intricate soundscapes.
- Ring Modulation
Apply ring modulation to create unique, metallic sounds that can add character to your productions.
By multiplying the frequencies of two waveforms, ring modulation generates a distinctive, inharmonic tone that’s ideal for crafting otherworldly effects or metallic percussion.
- Cross-Modulation
Use cross-modulation to create complex, evolving sounds by modulating one oscillator with the output of another.
Experiment with various modulation sources and targets to produce a wide range of textures, from subtle motion to chaotic, unpredictable patterns.
- Filter FM
Experiment with filter FM to create interesting, evolving textures by modulating the filter cutoff with an audio-rate oscillator.
This technique can add harmonic complexity to your sound, creating anything from subtle movement to aggressive, metallic timbres.
- Parallel Processing
Use parallel processing to create unique sounds by blending the outputs of multiple filters or effects.
By routing different parts of your synth patch through separate processing chains, you can create a more diverse and dynamic sonic palette.
- Sample & Hold Modulation
Apply sample & hold modulation to create random, unpredictable changes in your sound’s parameters.
By sampling and holding a random value at a specified rate, sample & hold can introduce an element of controlled chaos to your synth patches.
- Formant Filtering
Use formant filtering to create vowel-like sounds and textures that mimic the human voice.
By emphasizing specific frequency bands, formant filters can add an organic, vocal quality to your subtractive synthesis creations.
- Resonant Filter Sweeps
Create dramatic, evolving sounds by automating resonant filter sweeps over time.
Experiment with different filter types, resonance settings, and automation curves to generate a wide range of sonic textures and motion.
- Feedback Loops
Experiment with feedback loops by routing the output of a filter or effect back into itself, creating evolving, chaotic textures.
This technique can add depth and complexity to your sound, from subtle saturation to wild, self-oscillating chaos.
- Granular Synthesis
Apply granular synthesis techniques to your subtractive synth patches, breaking the sound into small grains and rearranging them in creative ways.
By manipulating the grain size, pitch, and playback direction, you can generate a vast array of textures, from shimmering atmospheres to glitchy, rhythmic patterns.
By exploring these creative subtractive synthesis techniques, you’ll be able to design a wide range of unique sounds and textures for your music productions.
They can seriously help you stand out in an increasingly competitive industry.
Remember to experiment and learn from your successes and failures.
Most importantly, have fun creating new and captivating sounds with subtractive synthesis!
Final Thoughts
And there you have it, folks!
We’ve journeyed through the fascinating world of subtractive synthesis and uncovered various ways you can skyrocket your workflow.
You now have the essential building blocks, techniques, and creative applications that will help you design elite sounds for your music productions.
As you continue to explore and experiment with subtractive synthesis, remember to:
- Embrace your curiosity
- Think outside the box
- Never be afraid to take risks
After all, it’s through experimentation and innovation that we, as music producers, create unforgettable sonic experiences that touch the hearts and souls of our listeners.
To further understand the fundamentals we’ve discussed today, and how to subtract harmonics from a rich waveform, download the FREE Unison Serum Essentials while using our Intensive Serum Guide as a reference.
This way, you can learn how to study and reverse engineer any preset, using any synth!
How awesome is that?
So, go forth and conquer the world of subtractive synthesis, the world needs a reason to smile.
Until next time…


Leave a Reply
You must belogged in to post a comment.