As a music producer, it’s crucial to harness the power of audio processing tools to create incredible mixes that captivate listeners.
In this comprehensive guide, we’ll dive deep into the world of low pass filters 一 revealing their secrets and sharing practical tips, tricks, and techniques to help you transform your tracks.
Whether you’re a seasoned producer or just starting out, get ready to embark on a sonic journey that will elevate your music production skills to new heights!
Table of Contents
- Low Pass Filter: Basics
- Comparing Filter Types
- Low-Frequency Signals
- High Frequency Signals
- Cutoff Frequency (CF)
- Input Signal (IS)
- Frequency Response (FR)
- RC Low Pass Filter
- Low Frequency
- Passive Filter
- Filter Circuits
- Impulse Response (IR)
- Q Factor
- Corner Frequency
- 10 Creative Ways to Use Low Pass Filters
- Final Thoughts
Low Pass Filter: Basics
A low pass filter, as the name suggests, is a filter that allows low-frequency signals to pass through while attenuating (reducing) the high-frequency signals.
It’s an essential tool for shaping the sound in your mix by removing unwanted higher frequencies and focusing on the low-end elements.
This is accomplished by reducing the amplitude of the frequencies above a specified cutoff frequency, while those below remain unaffected.
Low pass filters come in various types, including passive and active filters, as well as digital and analog.
The differences between these types lie in:
- Their design
- Their components
- The way they process the signal
We’ll dive deeper into some of these types later in the article.
Applications in Digital Music Production
Low pass filters are invaluable tools in digital music production for various purposes:
Mix Clarity 一 Removing high-frequency content from specific elements in a mix can help create space for other instruments, reducing clutter and improving overall clarity.
Sound Design 一 Low pass filters can be used to shape the tonal characteristics of synthesizers and samples, creating new and unique sounds.
Dynamic Effects 一 Automating low pass filters can add movement and interest to a track, creating rhythmic or expressive effects.
Common Filter Types and Their Characteristics
There are several different low pass filter types you can use to enhance your tracks.
The 4 most common include:
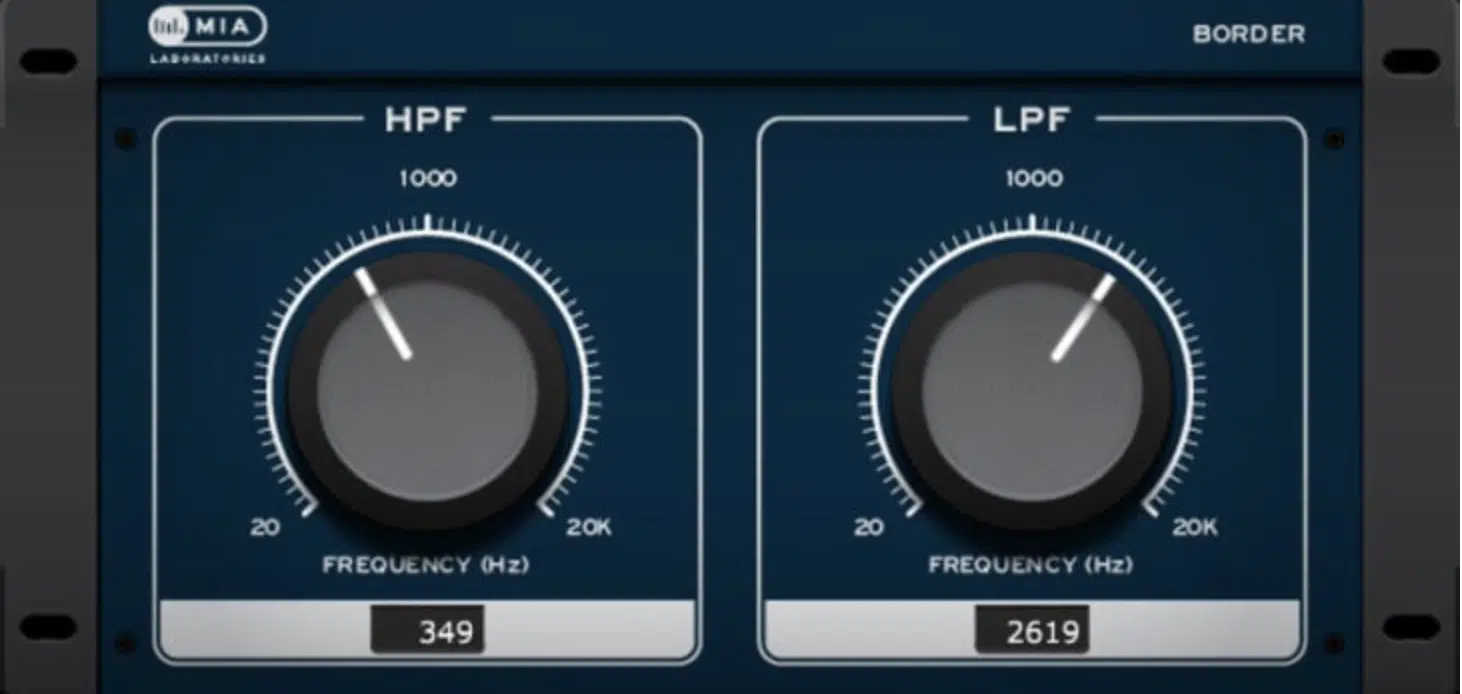
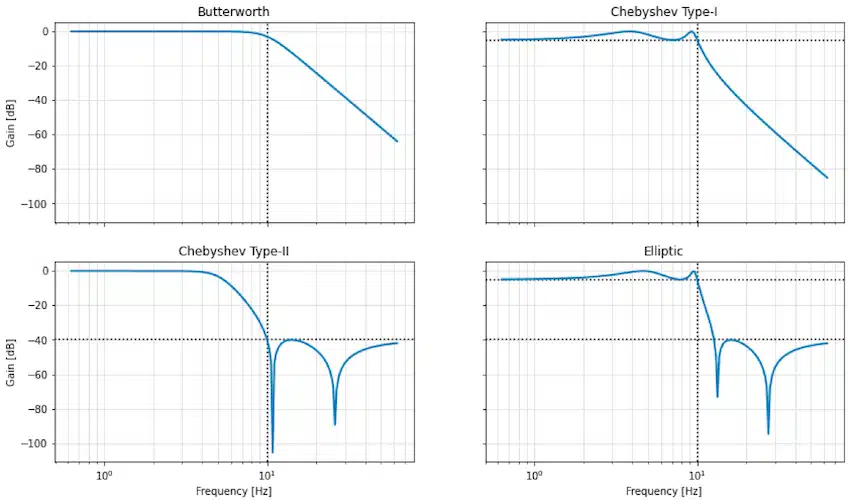
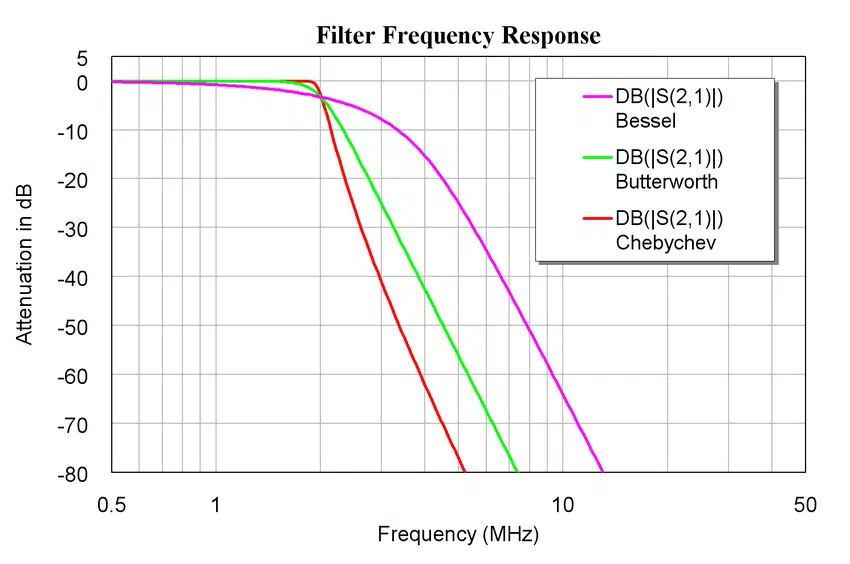
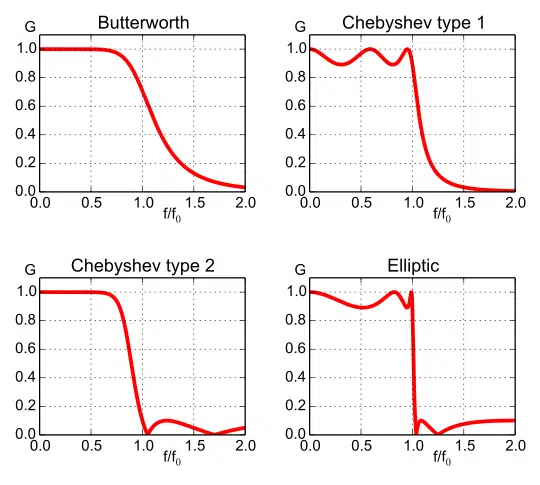
1. Butterworth Low Pass Filters 一 The Butterworth filter type offers a smooth frequency response with no ripples in the passband or stopband, providing a natural and transparent sound.
2. Chebyshev 一 Chebyshev filters have a steeper roll-off than Butterworth filters but introduce ripples in the passband, which can affect the sound’s character.
3. Bessel 一 Bessel filters prioritize phase linearity over frequency response, providing a more accurate representation of the input signal but a less steep roll-off compared to other filter types.
4. Elliptic 一 Elliptic filters have the steepest roll-off but introduce ripples in both the passband and stopband, which can result in a more aggressive sound.
Digital Low Pass Filter Controls and Parameters
When using a filter, you’ll typically encounter several controls and parameters.
These allow you to shape the filter’s effect on your sound:
- Cutoff Frequency 一 The cutoff frequency is the point at which the filter starts to attenuate high-frequency content.
You can adjust the cutoff frequency to determine which frequencies are allowed to pass through and which are reduced.
- Resonance (Q) 一 The resonance control, sometimes referred to as Q, determines the amount of boost or emphasis around the cutoff frequency.
Increasing the resonance can create a more pronounced filtering effect and can be used to emphasize specific frequency bands.
- Filter Slope 一 The filter slope, often measured in decibels per octave (dB/octave), determines the rate at which the filter attenuates frequencies above the cutoff frequency.
A steeper slope results in a more aggressive filtering effect, while a gentler slope creates a smoother transition between the passband and stopband.
- Filter Type 一 As mentioned earlier, there are different low pass filter types, each with its unique characteristics.
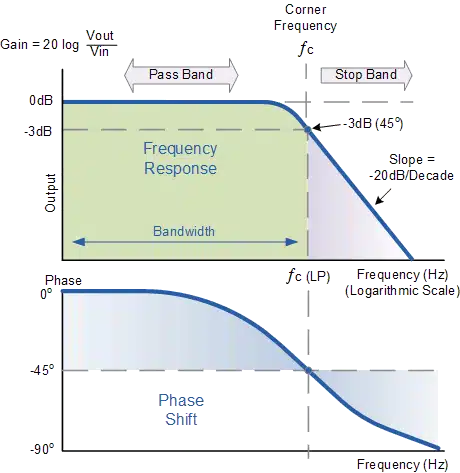
Switching between filter types allows you to experiment with different frequency responses and tonal qualities.
Tips for Using Low Pass Filters in Digital Music Production
1. Start Subtle: When using a low pass filter, begin with subtle settings to avoid removing too much high-frequency content. Gradually adjust the cutoff frequency and resonance to find the right balance for your mix.
2. Use in Parallel: Try using a low pass filter in parallel with an unaffected version of the same sound. This can add depth and warmth without completely removing the high-frequency content.
3. Combine with Other Effects: Experiment with combining low pass filters with other effects, such as distortion, reverb, or delay, to create new and interesting sounds.
4. Automate for Movement: Create movement and interest in your tracks by automating frequency or resonance. This can add a dynamic element to your mix and keep the listener engaged.
5. EQ Before Filtering: If you’re using a low pass filter to clean up a mix, consider using an equalizer to make precise adjustments to individual frequency bands before applying the filter. This can help you target specific problem areas more effectively.
6. Listen in Context: When using a low pass filter on an individual track, be sure to listen to the results in the context of the full mix. What may sound too dark or dull in isolation might be perfect when combined with other elements in your mix.
7. Avoid Over-processing: While low pass filters can be useful for shaping sounds, going too crazy with them can leave you with a crowded, undesirable final product.
8. A/B Comparison: When using a low pass filter, regularly compare the processed sound to the original, unprocessed version. This can help you ensure that the filter is enhancing the sound rather than detracting from it.
9. Filter Automation for Transitions: Automate the low pass filter’s cutoff frequency during transitions or breakdowns in your track to create a sense of build-up and release. This can be an effective way to add excitement and tension to your arrangement.
10. Experiment with Different Filter Types: As mentioned earlier, there are different types of low pass filters, each with its own unique characteristics. Don’t be afraid to experiment with different filter types to find the one that best suits your needs and the desired sound.
By expanding your understanding of low pass filter basics and exploring various techniques and tips, you’ll be better equipped to shape your sounds and create professional-sounding mixes.
Remember, practice makes perfect.
Don’t be afraid to experiment and learn from your experiences as you continue to hone your skills as a music producer.
Comparing Filter Types
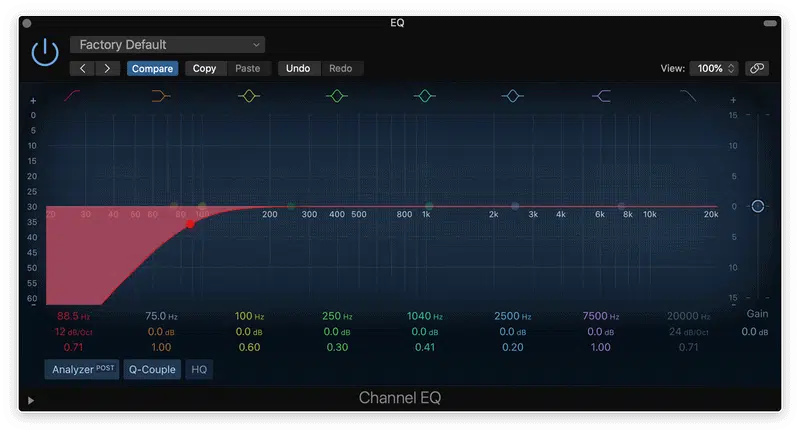
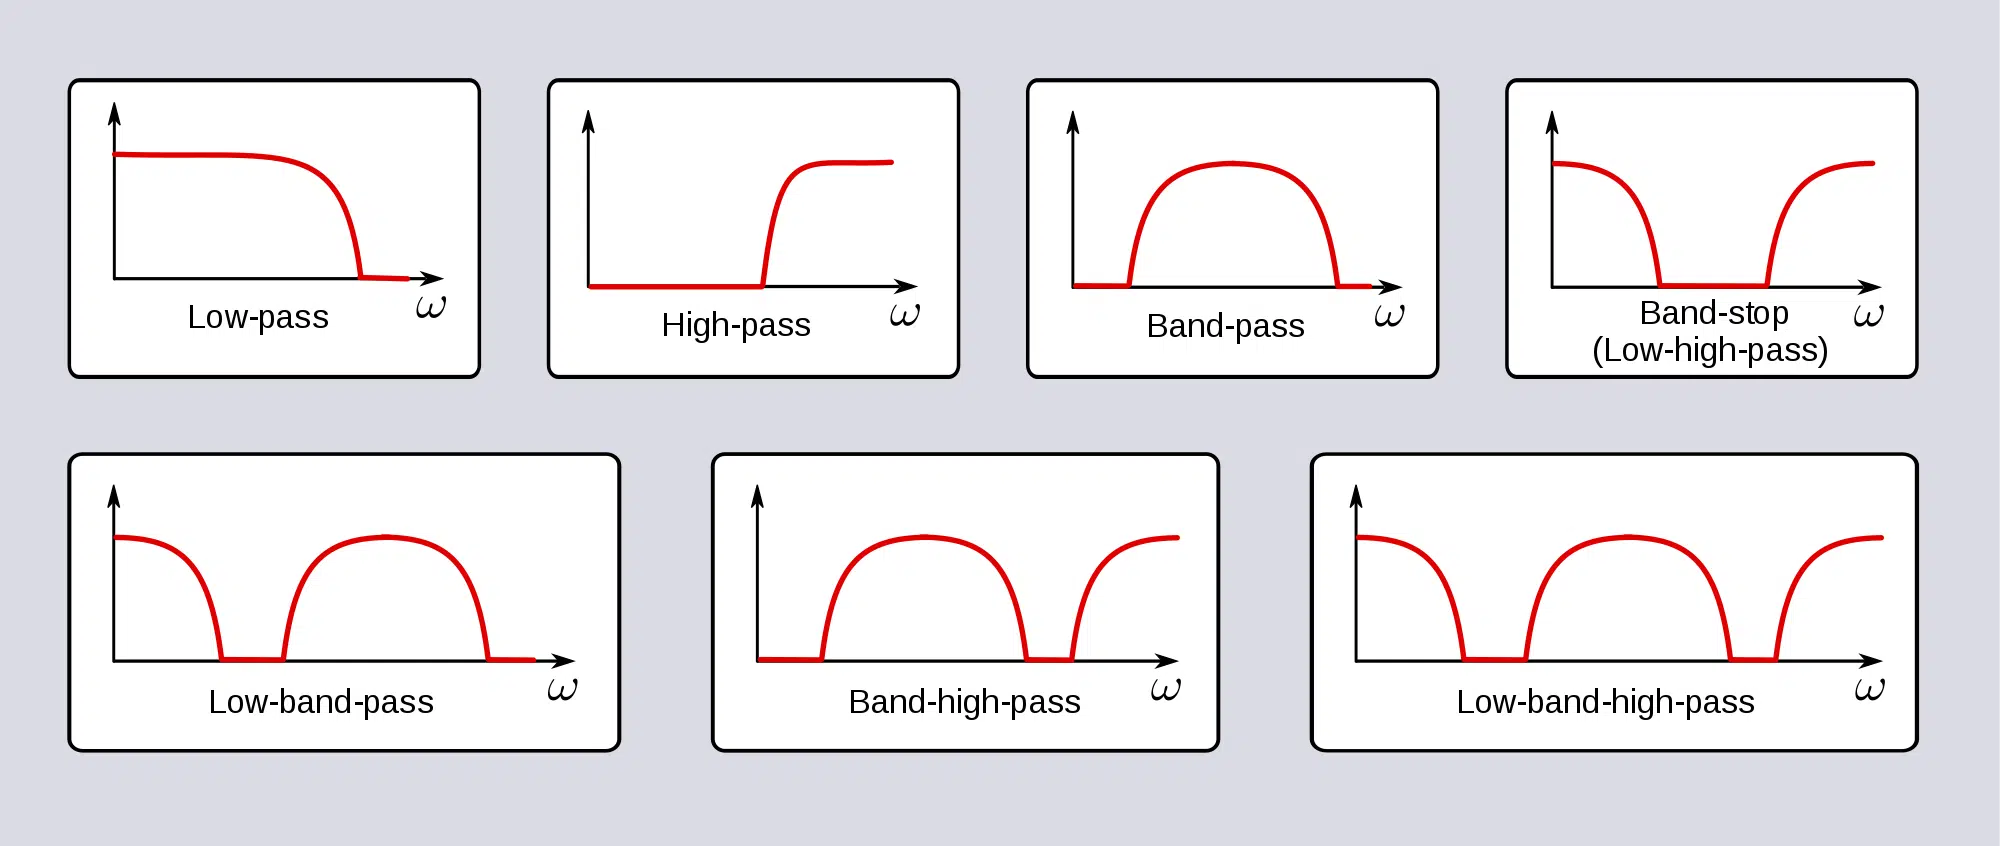
- High Pass Filters 一 Also known as a low-cut filter, a high pass filter allows high-frequency signals to pass through while attenuating low-frequency content below a specified cutoff frequency.
This type of filter is useful for removing rumble or low-frequency noise from recordings.
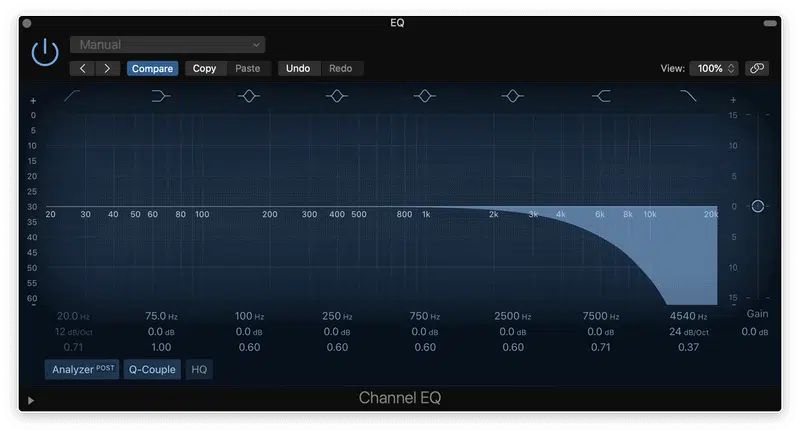
- Low Pass Filters 一 Allow lower frequency signals to pass through while attenuating high-frequency content above a specified cutoff frequency.
The ideal low pass filter can help eliminate harshness and create a smoother, warmer mix. Sometimes referred to as a high cut filter.
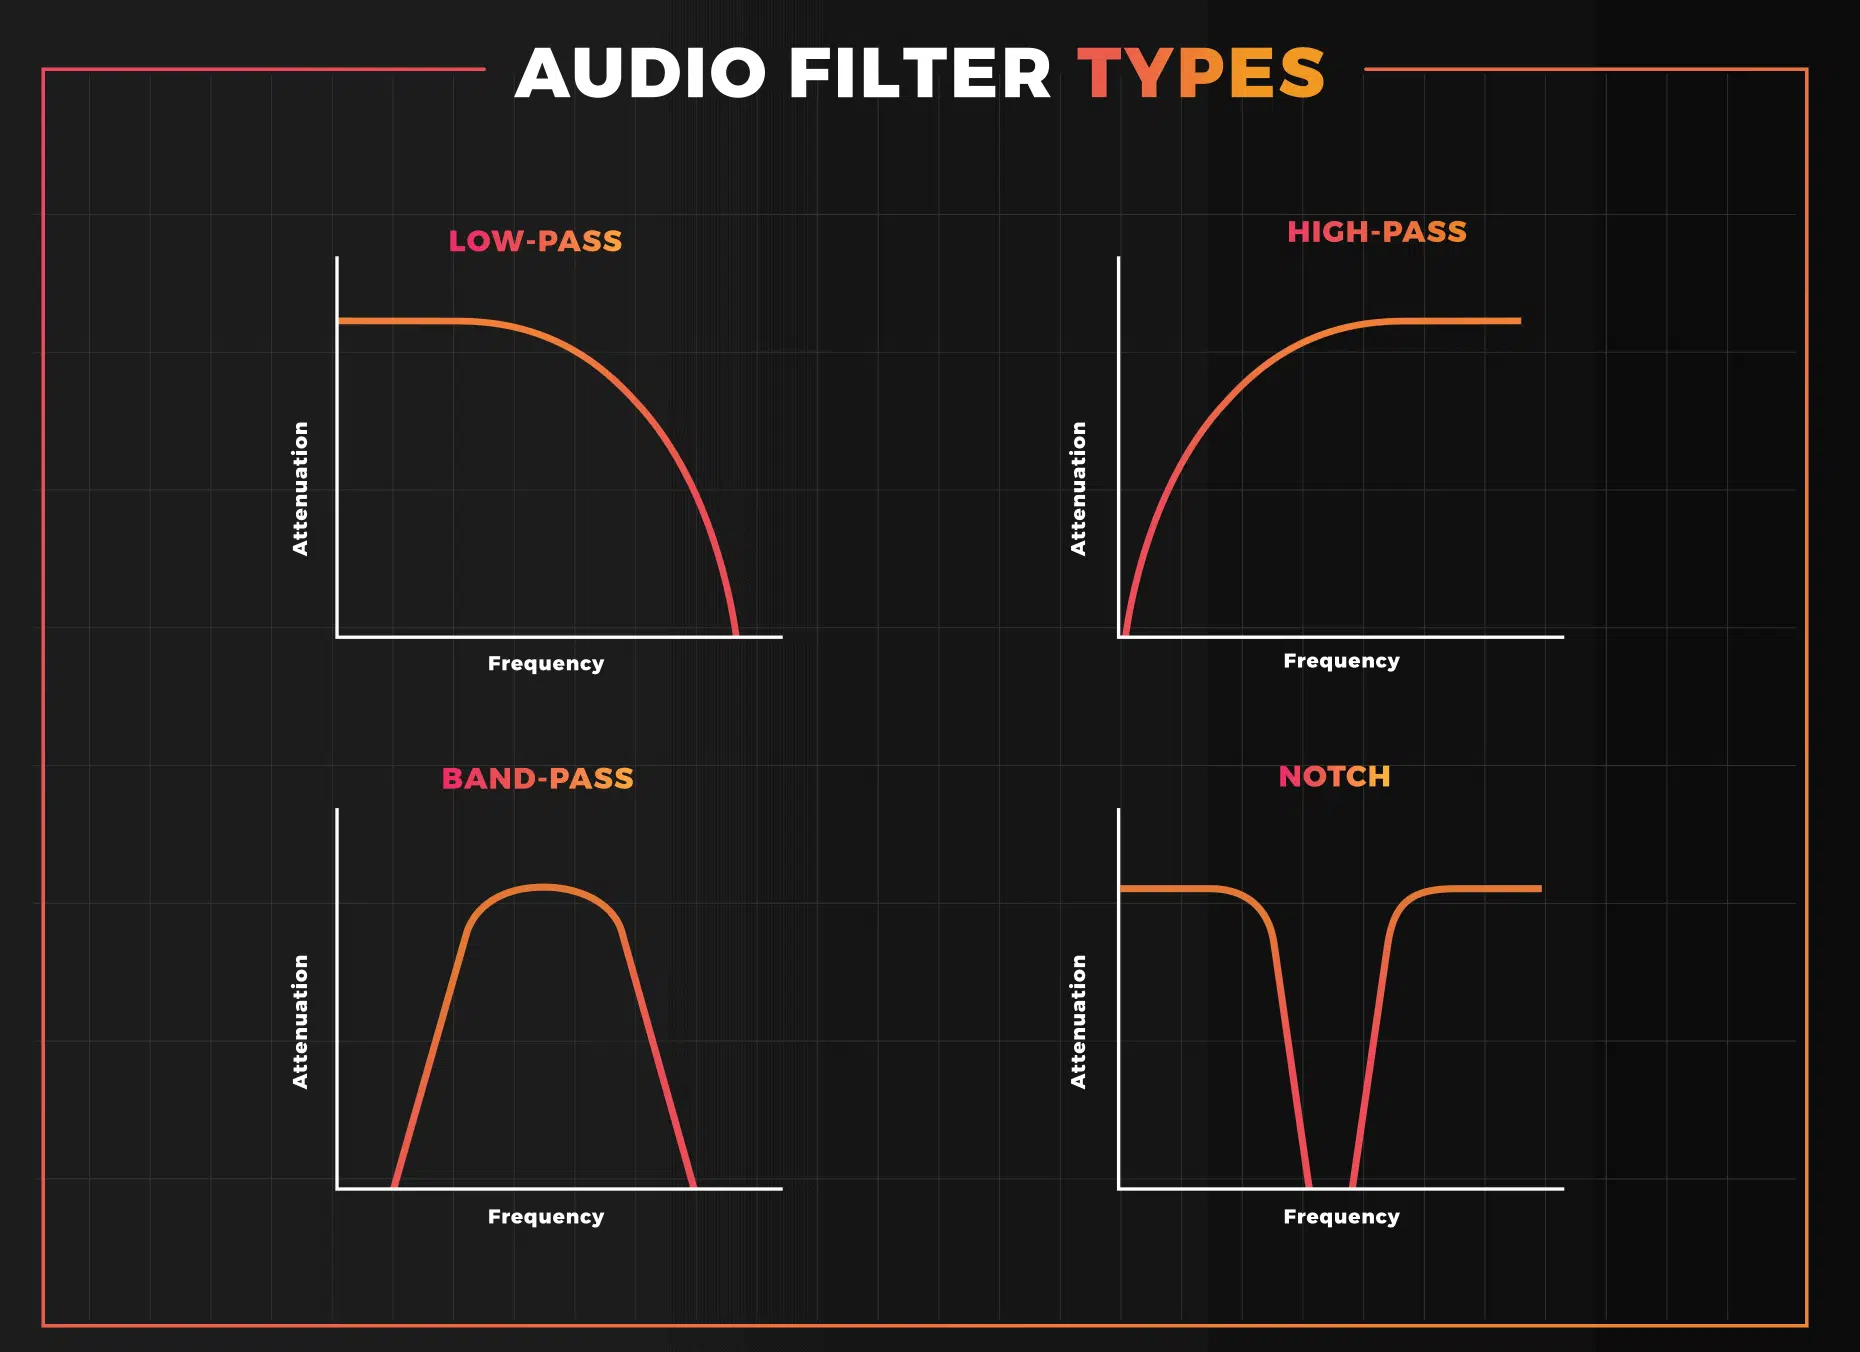
- Band Pass Filters 一 A band pass filter allows a specific range of frequencies to pass through while attenuating frequencies outside that range.
They combine elements of both high-pass and low pass filters and can be used to isolate specific frequency bands, making them useful for sound design and creating unique timbres.
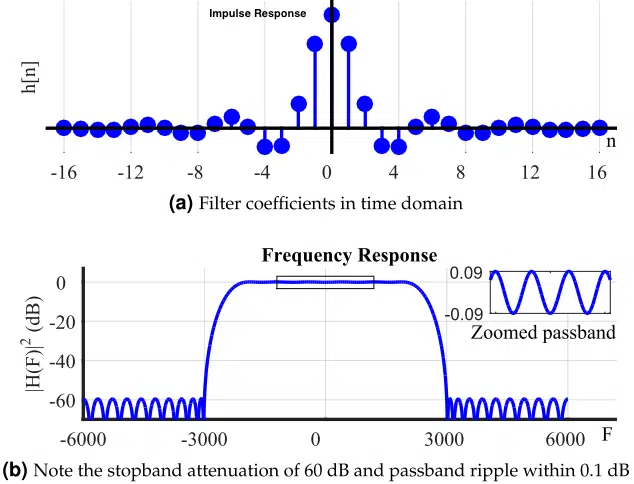
- Finite Impulse Response Filters (FIR Filter) 一 A Finite Impulse Response Filter is a type of digital filter that uses a fixed number of input samples to produce an output signal.
Unlike Infinite Impulse Response filters (IIR filter), FIR filters have a linear phase response and do not suffer from feedback-related stability issues. Notice the passband ripple below.
- Band-Stop Filters 一 A band-stop filter (or, Band Reject Filter) passes most frequencies untouched but attenuates those in a specific range to very low levels.
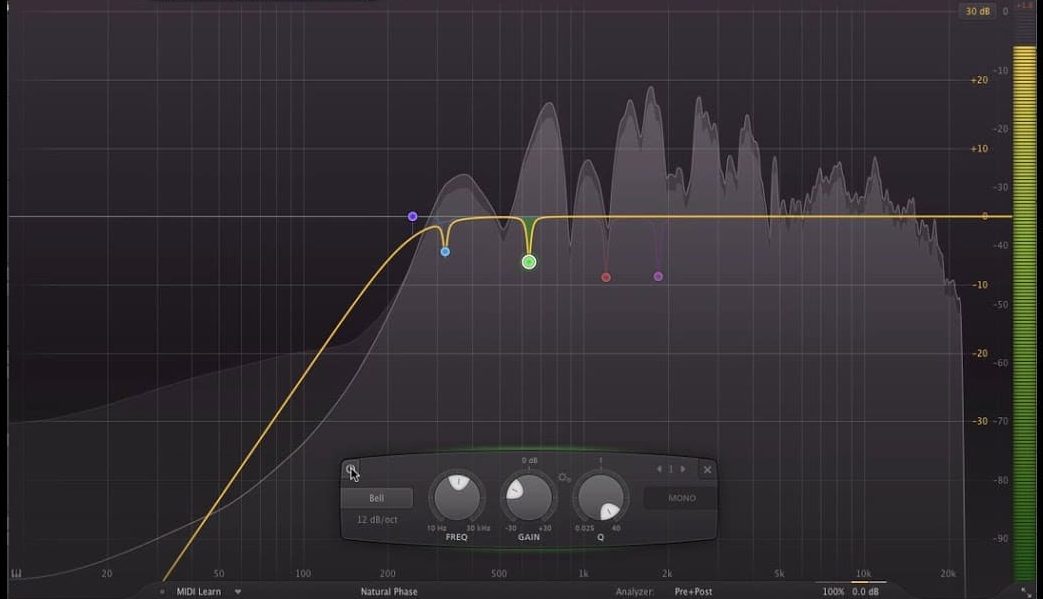
- Notch Filters 一 A band-stop filter with a narrow stopband (high Q).
Low-Frequency Signals
Low frequency signals are the foundation of any mix, usually representing bass elements such as kick drums and basslines.
Low frequency signals provide energy, warmth, and body to your mix.
Balancing low frequencies in your mix is crucial for creating a full, powerful sound.
- Too much low-end 一 Can cause muddiness.
- Too little low-end 一 Can make your mix feel thin and weak.
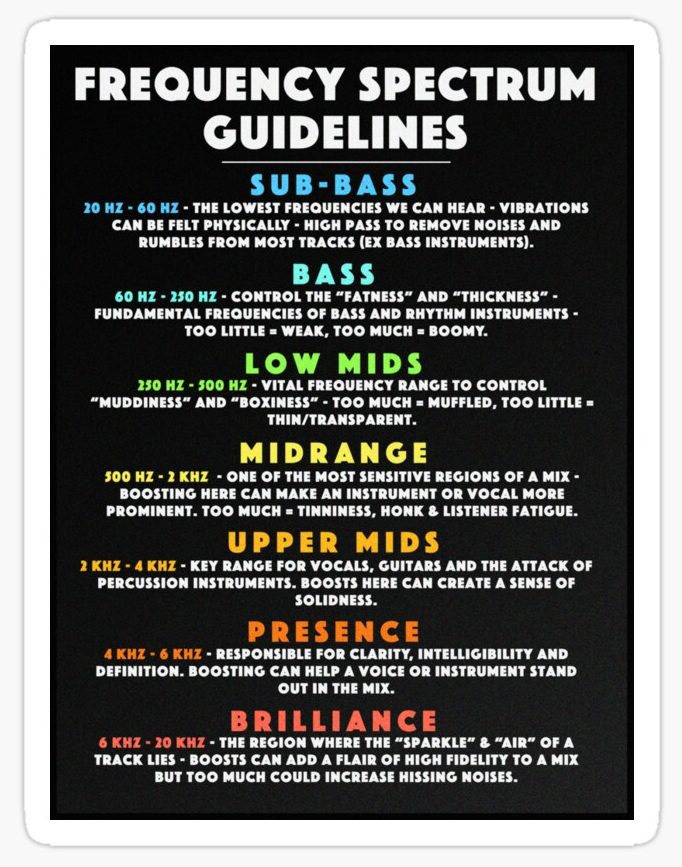
Low frequency signals typically range from 20 Hz to 250 Hz.
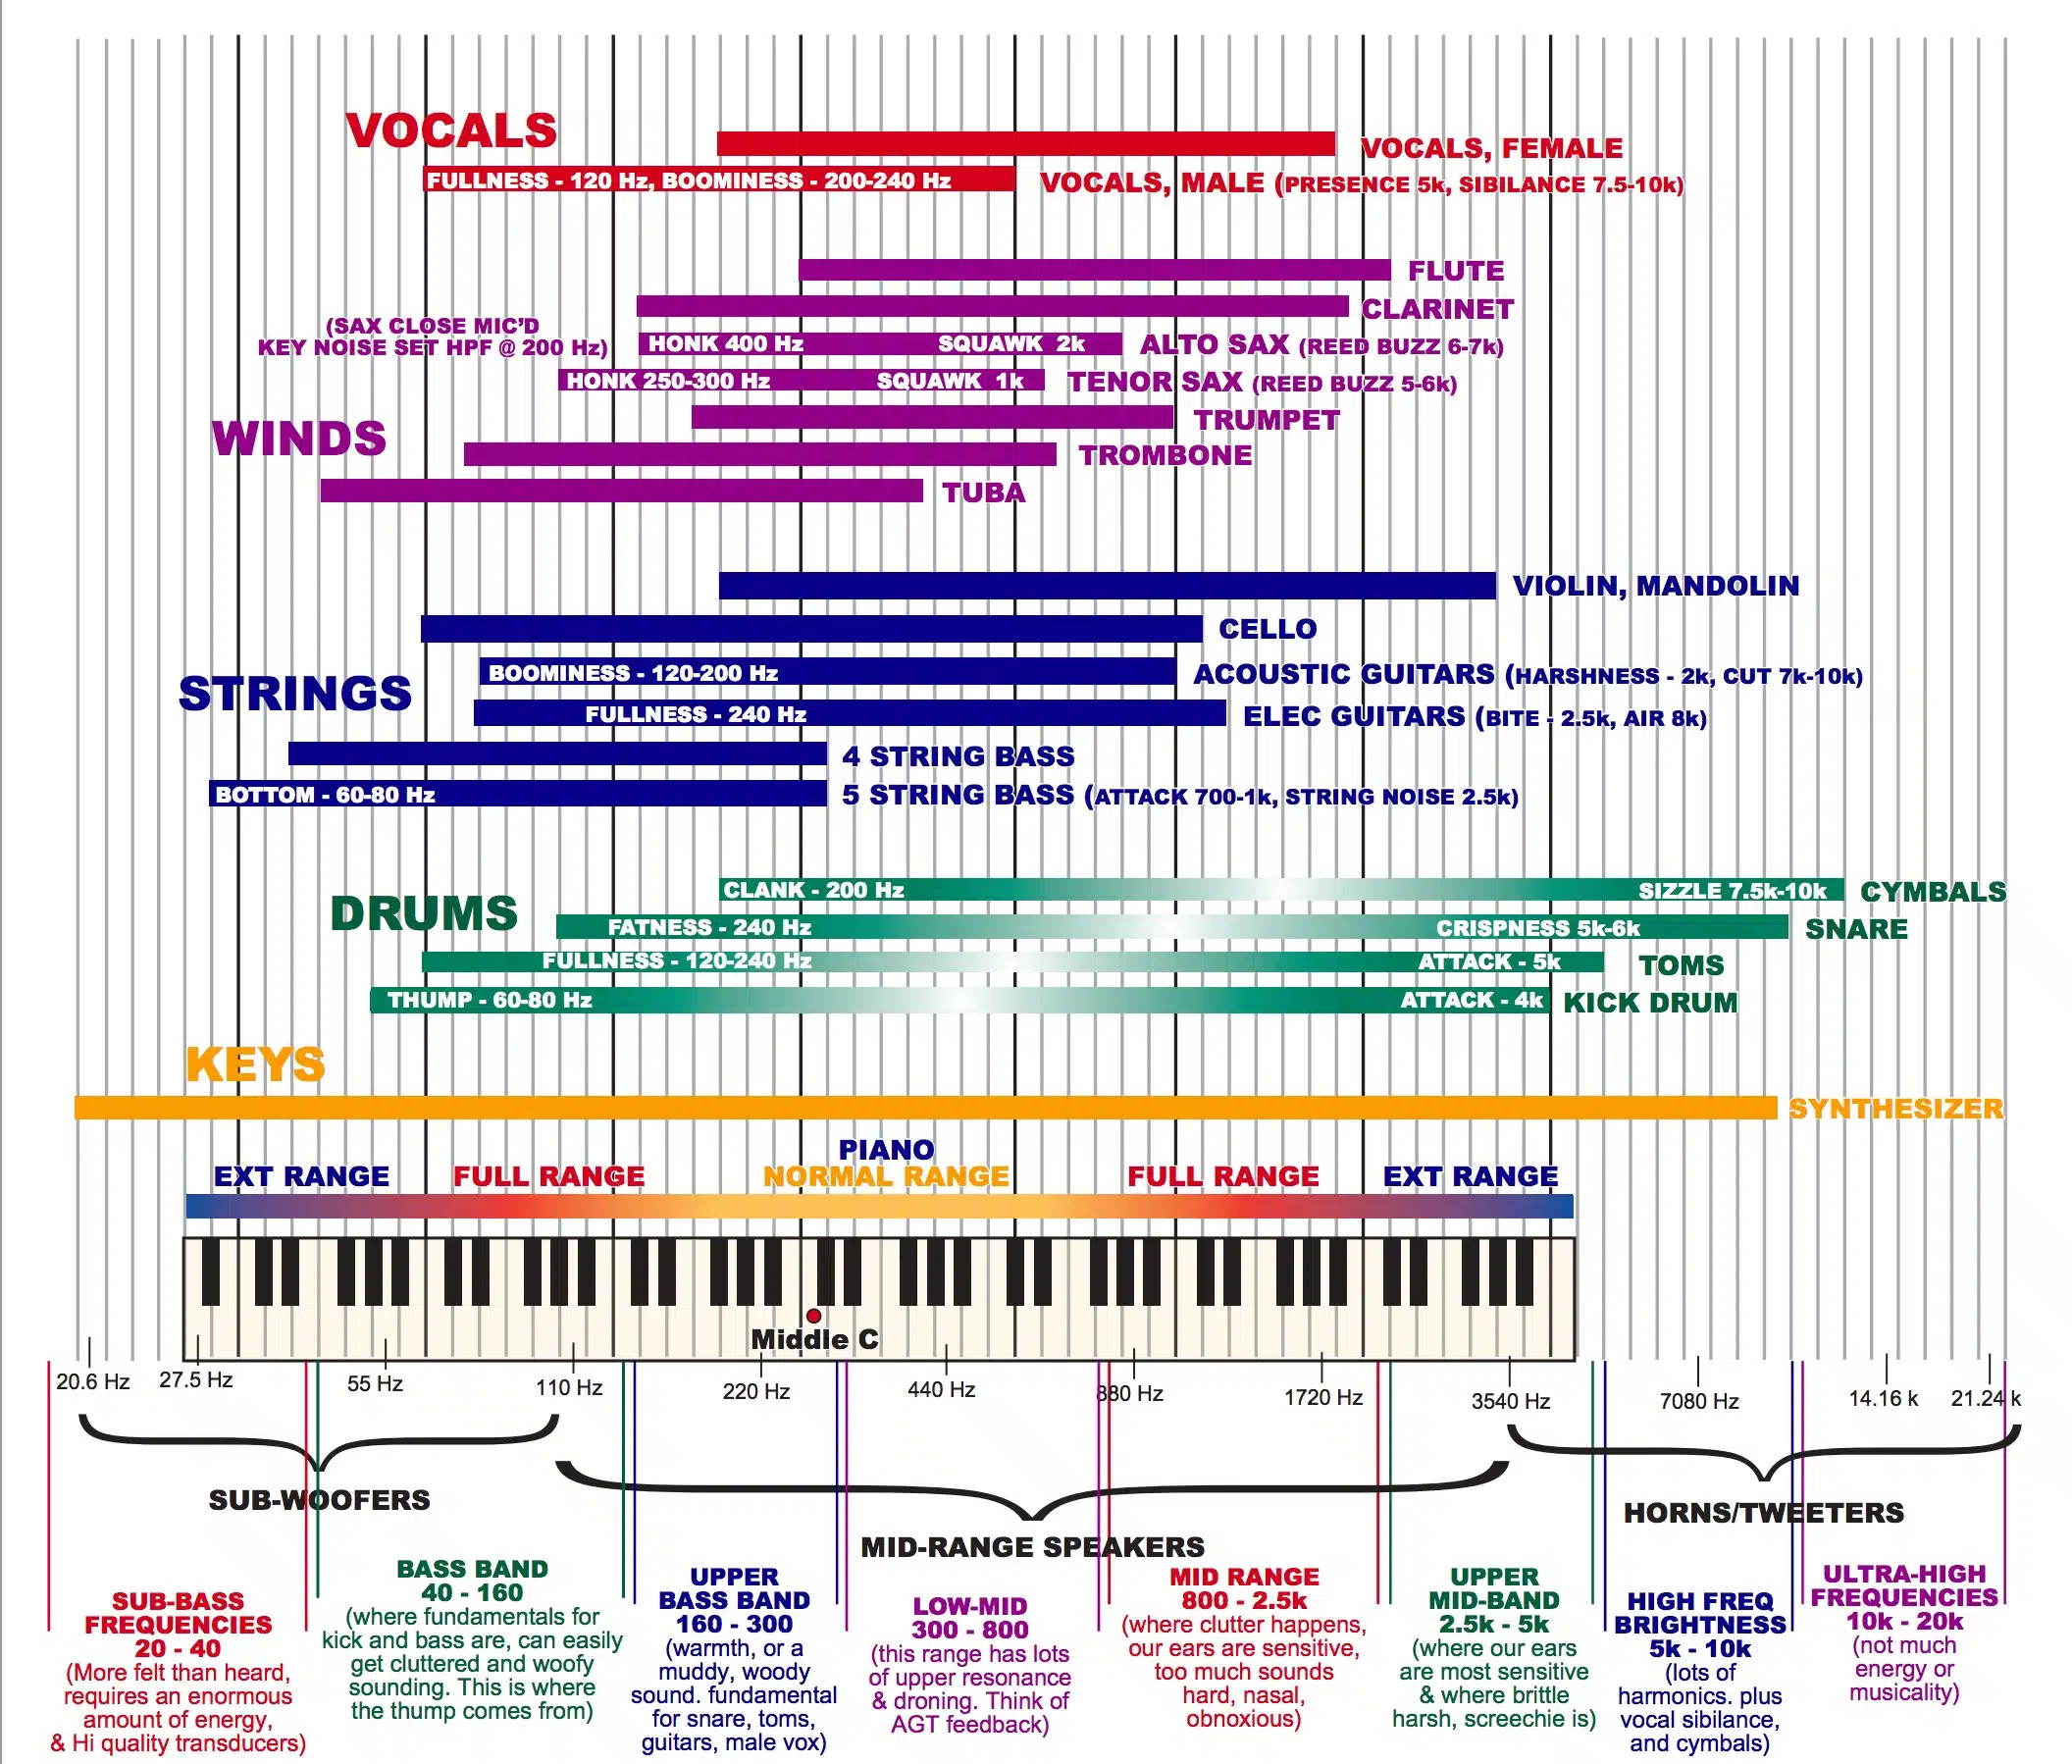
A low pass filter helps you manage low frequency signals, ensuring your mix remains clean and well-balanced.
They allow low frequency signals to pass through without affecting them.
This means that the elements of your mix that occupy the low-frequency range, such as basslines and kick drums, will remain intact and prominent.
High Frequency Signals
High frequency signals are the other end of the spectrum, representing the treble elements in your mix.
These include hi-hats, cymbals, and some vocal and instrumental harmonics.
High frequency signals typically range from 2 kHz to 20 kHz in the frequency spectrum and add brightness, clarity, and airiness to your mix.
When it comes to giving your mix a sense of presence, detail, and excitement, high frequency signals are essential.
However, too much high-end can result in a harsh, fatiguing sound.
Therefore, it’s crucial to find the right balance.
A low pass filter attenuates high frequency signals, reducing their presence in the mix.
This can help you to eliminate unwanted noise, harshness, or brightness; giving you greater control over the overall sound of your mix.
Cutoff Frequency (CF)
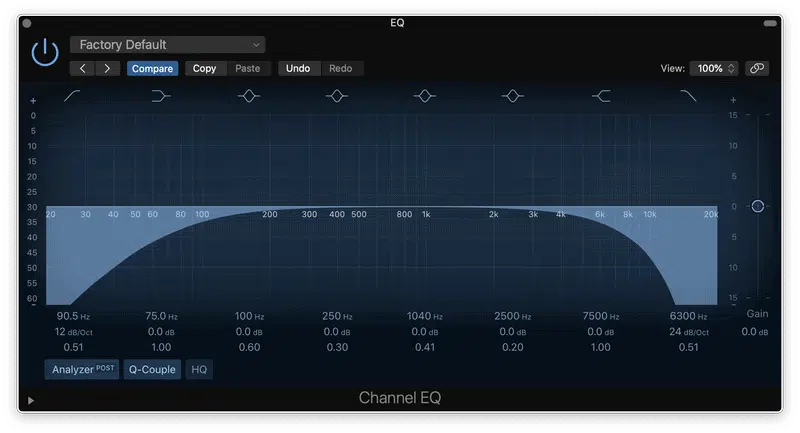
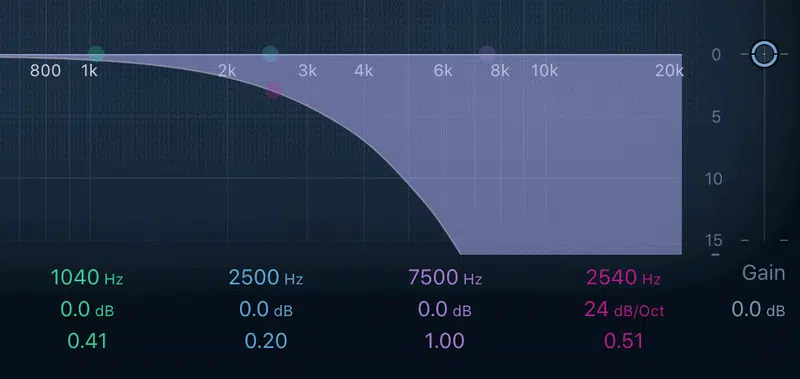
The cutoff frequency (frequency cutoff) is the point at which a low pass filter begins to attenuate high frequency signals.
It’s an essential parameter in low pass filtering because it determines which frequencies will be affected and by how much.
The CF is typically expressed in Hertz (Hz) and can be easily tweaked on most low pass filters.
By adjusting the CF, you can control the amount of high-frequency content that is removed from the mix.
Adjusting the Frequency Cutoff in a Low Pass Filter
To adjust the cutoff point in a low pass filter, you can either use a knob or slider on a hardware filter or a virtual control in a digital filter.
As you increase the CF, more high frequencies will pass through the filter.
This will result in a brighter overall sound and appeal.
Conversely, as you decrease the CF, fewer high frequencies will pass through.
This leads to a darker, more muffled sound.
Keep in mind which outcome you’d like when dealing with the cutoff point.
Input Signal (IS)
The input signal is the audio signal that enters the low pass filter.
It contains all the frequency content of your mix, from the low bass frequencies to the high treble frequencies.
What the low pass filter does, is processes the IS, attenuating the high frequencies based on the CF setting.
The IS plays a crucial role in the performance of a LPF.
The quality, level, and frequency content of the IS can significantly impact the filter’s effectiveness and the resulting sound.
To ensure optimal filter performance, make sure your IS is clean and free of noise, distortion, or clipping.
Also, it’s essential to balance the levels of the elements in your mix before sending them through the LPF.
This will help you achieve the desired sound more efficiently.
Frequency Response (FR)
Frequency response is the measure of how effectively a filter processes different frequencies.
It shows how much the filter attenuates higher frequencies relative to the CF.
A filter’s FR is crucial in determining its sound characteristics and how it will affect your mix.
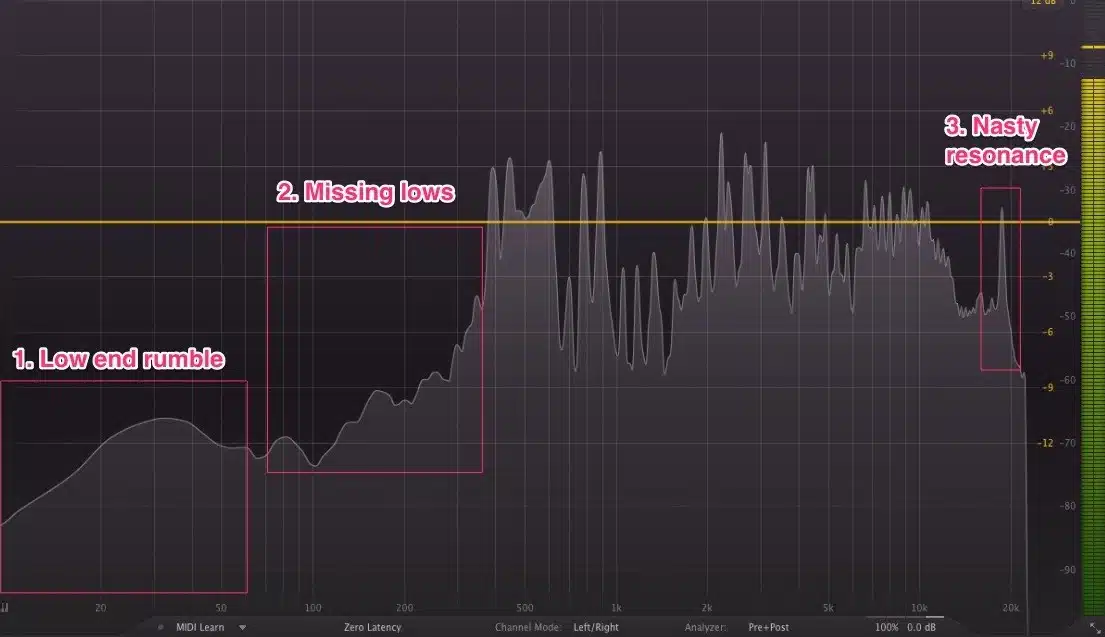
To analyze the FR of a low pass filter, you can use a spectrum analyzer, which visually displays the frequency content of the processed signal.
This can help you see how the filter is affecting the higher frequencies and make adjustments accordingly.
Improving the FR of a low pass filter involves:
- Selecting the right filter type
- Adjusting the frequency cutoff and Q factor
- Ensuring the input signal is clean and well-balanced
Experimenting with different filter settings can help you achieve the desired FR for your mix.
RC Low Pass Filter
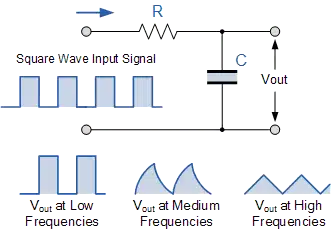
An RC low pass filter is a passive filter that uses a resistor (R) and a capacitor (C) to form a simple filter circuit.
The RC low pass filter works by charging and discharging the capacitor.
Which, in turn, affects the high-frequency content of the IS.
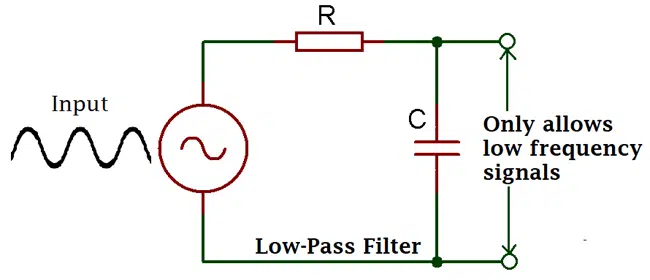
The basic design of an RC low pass filter consists of a resistor connected in series with the input signal and a capacitor connected to the ground.
The resistor and capacitor values determine the filter’s CF and response.
RC low pass filters are simple, cost-effective, and easy to build.
That’s what makes them popular for DIY projects and basic applications.
However, an RC circuit has a limited FR and can be affected by component tolerances.
This makes them less suitable for more demanding or precise applications.
Low Frequency
As we covered earlier, low frequencies are the foundation of a mix and provide energy, warmth, and body.
In terms of low pass filters, low frequencies are the signals that the filter allows to pass through unaffected while attenuating the high-frequency content.
Low frequencies play a significant role in the overall sound quality of a mix.
- A well-balanced low end 一 Contributes to a full, powerful sound.
- A poorly balanced low end 一 Can lead to muddiness or thinness in the mix.
By using a low pass filter, you can maintain the integrity of the low frequencies while removing unwanted high-frequency content.
This way, you can achieve a cleaner, more balanced sound.
Tips for Optimizing Low Frequency Performance
To optimize low-frequency performance with a low pass filter, follow these tips:
- Set the CF carefully to avoid removing essential high-frequency content that contributes to the mix’s clarity.
- Experiment with different filters and settings to find the best balance between low and high frequencies.
- Ensure your input signal is clean and well-balanced before processing it with a LPF.
Passive Filter
A passive filter is a type of low pass filter that uses passive components like resistors, capacitors, and inductors to process the input signal.
There are several types of passive filters, including:
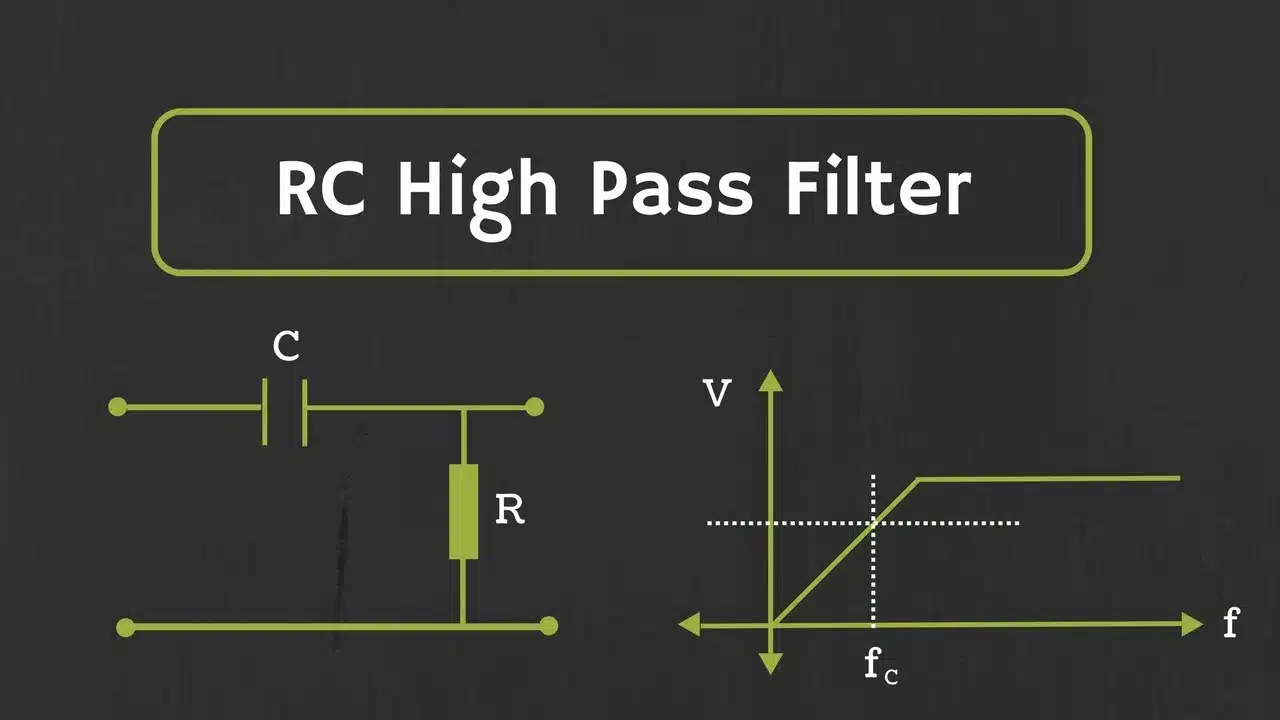
- RC Filter (discussed earlier). The picture below shows an RC High Pass Filter.
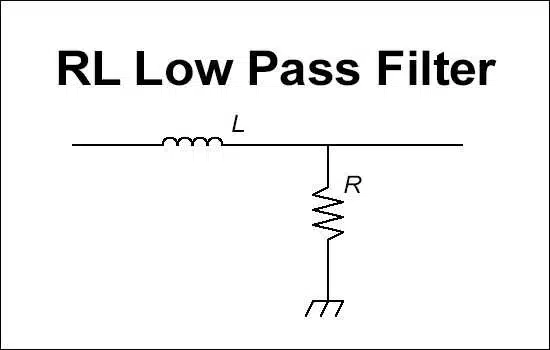
- RL Filter (RL Filter stands for Resistor-Inductor)
- RLC Filter (resistor-inductor-capacitor) filters
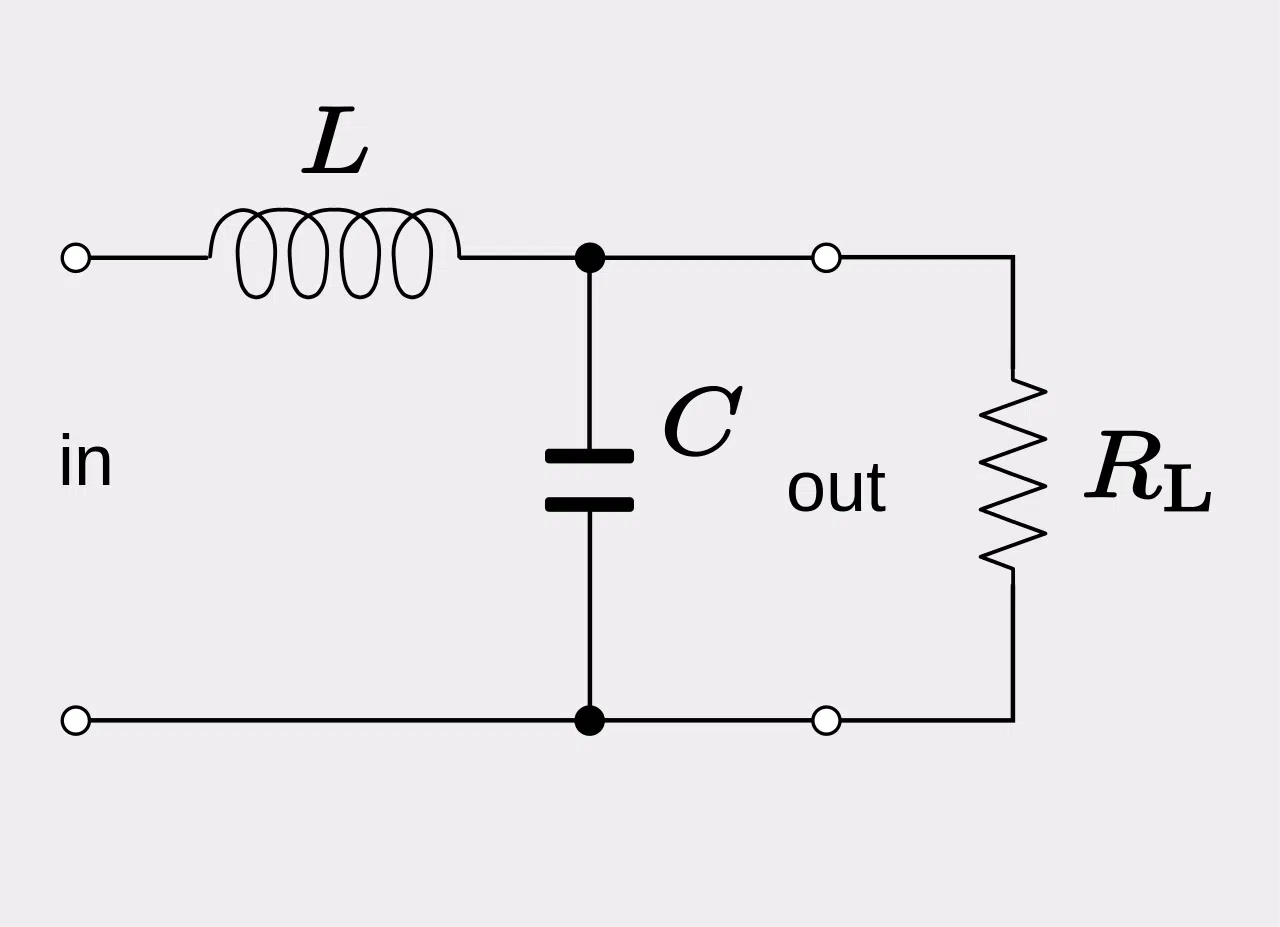
Each type has its own characteristics and applications.
Generally speaking, passive filters offer some advantages, such as simplicity, cost-effectiveness, and no need for external power.
However, they also have some drawbacks, like limited FR, potential signal loss, and susceptibility to component tolerances.
Passive filters are suitable for applications that require simplicity, such as basic audio processing or DIY projects.
For more advanced or demanding applications, Active Filters might be a better choice.
Filter Circuits
A filter circuit is an electronic circuitry responsible for processing the input signal components of a filter circuit including:
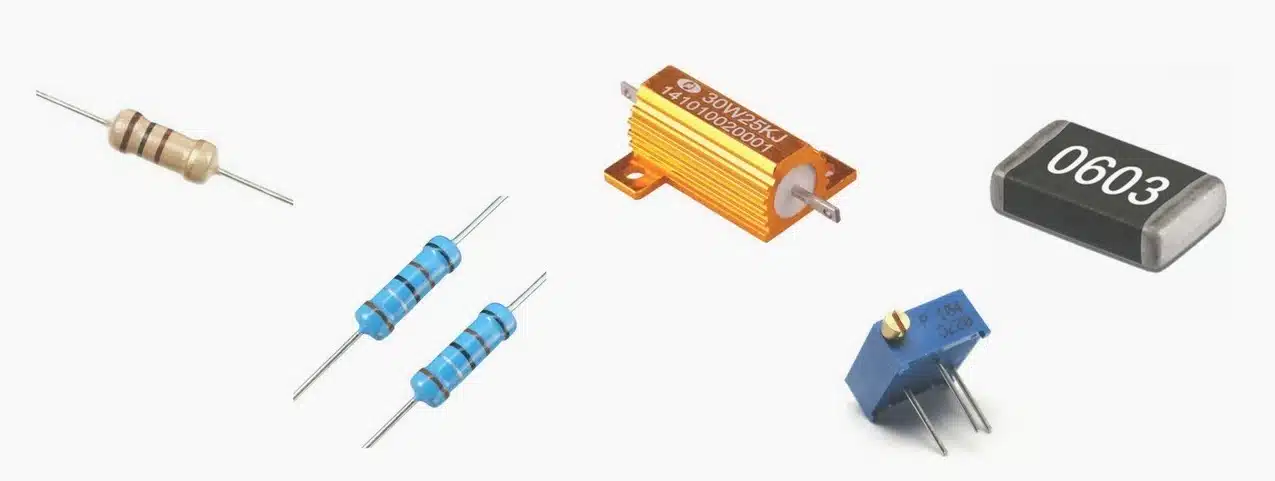
- Resistors 一 Reduce the amount of electrical current or obtain a certain voltage drop.
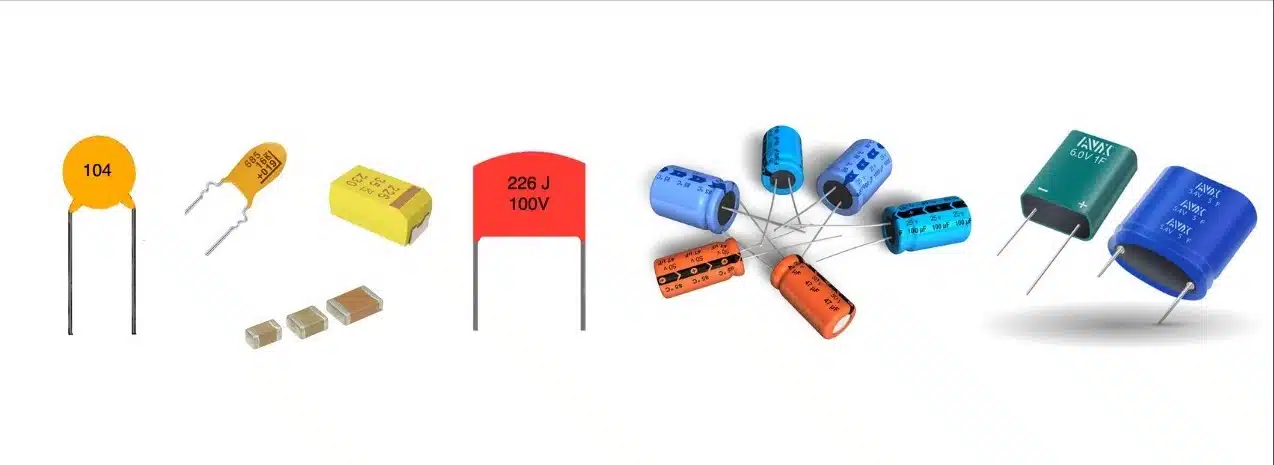
- Capacitors 一 Minimize the amount of distortion and feedback between the audio and power signal.
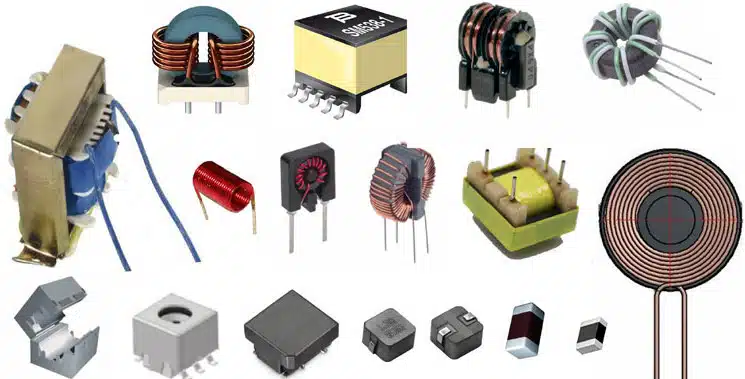
- Inductors 一 Allow direct currents to pass effortlessly through.
- Operational amplifiers (op-amps) 一 Take an input signal and amplify it. The amplified signal can then be used to drive speakers or other audio devices.
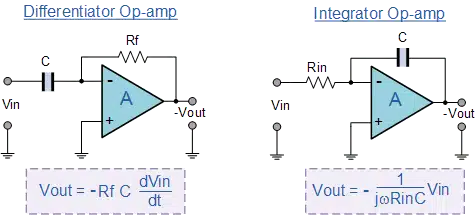
These components work together to shape the FR of the filter and attenuate the high-frequency content.
To design a low pass filter circuit, you’ll need to select the appropriate components.
Then, arrange them in a configuration that produces the desired CF and FR.
This might involve using a simple RC filter for a basic application or a more complex active circuit for advanced applications.
Troubleshooting Common Filter Circuits Issues
If you’re experiencing issues with your filter circuit, consider the following tips:
- Check the connections between components to ensure they are secure and free of shorts or breaks.
- Verify that the components are the correct values and specified tolerances.
- Use an oscilloscope or spectrum analyzer to analyze the filter order and performance, and identify any issues in the FR.
- If using an active filter, ensure the operational amplifier is functioning correctly and receiving the appropriate power supply.
Impulse Response (IR)
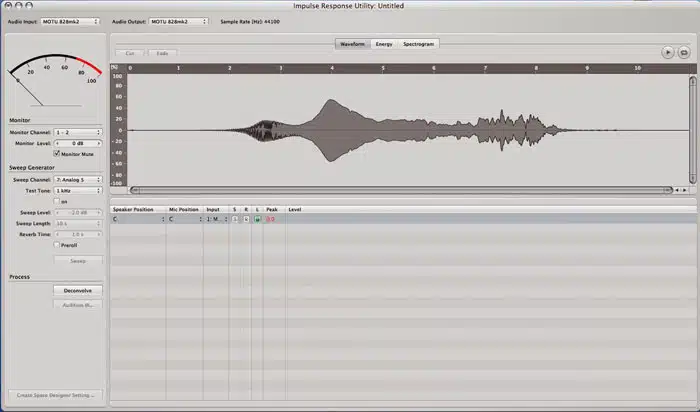
Impulse response is a measure of how a filter responds to a sudden, brief input signal (an impulse).
The IR can provide insights into the low pass filter’s performance, such as its transient response, ringing, and overshoot.
To analyze the IR of a low pass filter, you can use an oscilloscope or specialized IR analysis software.
By examining the filter’s response to an impulse, you can identify potential issues (like clipping) and optimize the settings for the best performance.
Tips for Optimizing Impulse Response
To optimize the IR of a low pass consider the following tips:
- Experiment with different filters 一 Each type can exhibit different IR characteristics.
- Adjust the frequency cutoff and Q factor 一 This will help you minimize ringing or overshoot while maintaining the desired FR.
- Ensure the input signal is clean and free of noise 一 This can affect the filter’s IR.
- If using an active low pass filter 一 Choose operational amplifiers with suitable performance characteristics for your application.
Q Factor
The Q factor, also known as the “Quality factor,” is a parameter that describes the sharpness of a filter’s FR around the cutoff frequency.
- A higher Q results in a more resonant and narrow transition band
- A lower Q creates a broader and smoother transition
The Q is crucial in determining the filter’s sound characteristics and how it will affect your mix.
In most low pass filters, you can adjust the Q factor through a dedicated control or by altering the component values in the filter circuit.
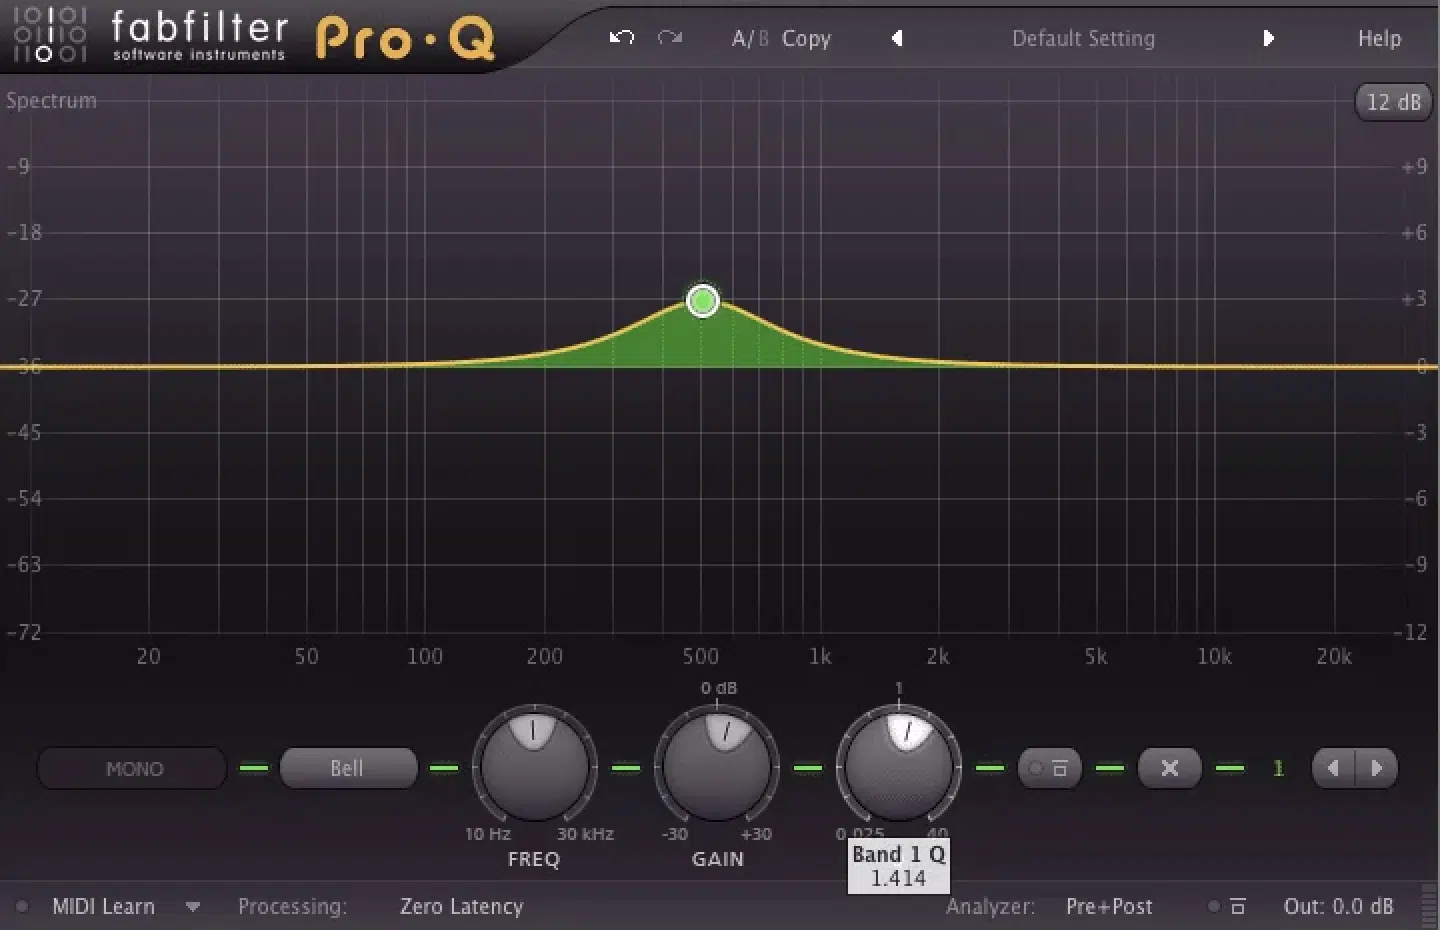
The optimal Q will depend on your specific application and the desired sound characteristics.
To adjust the Q for your desired results, follow these steps:
- Start by setting the cutoff frequency to the desired point in your mix.
- Gradually increase the Q to add more resonance and sharpness to the filter’s FR.
- Monitor the mix and adjust the Q until you achieve the desired balance between lower and higher frequencies.
- Experiment with different Q settings to find the best sound for your mix.
Corner Frequency
The corner frequency, also known as the -3dB point or breakpoint, is the frequency at which the filter’s output amplitude is reduced by 3dB (approximately 50%) compared to the input amplitude.
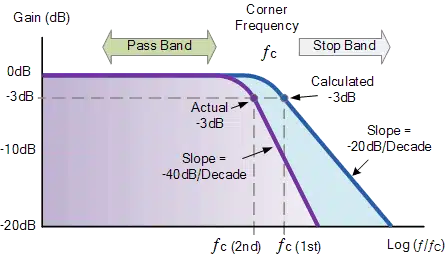
The corner frequency is crucial in low pass filters because it defines the boundary between the passband (where low frequencies are unaffected) and the stopband (where higher frequencies are attenuated).
Relationship Between Corner Frequency and Cutoff Frequency
In most low pass filters, the corner frequency and cutoff frequency are used interchangeably.
However, in some cases, the cutoff frequency might refer to the point where the filter’s output amplitude is reduced by a different amount (e.g., 6dB or 12dB).
Always make sure to check the documentation to ensure you’re using the correct terminology and settings.
10 Creative Ways to Use Low Pass Filters
1. Enhance the Groove of a Drum Loop
Try using a low pass filter to remove high-frequency content from a drum loop, leaving only the kick and snare.
This creates a more focused and groovy rhythm that works well in various genres.
2. Create Atmospheric Pads
Apply a low pass filter to a bright synth pad or string sound to create a darker, more atmospheric texture.
This adds depth and warmth to your mix, particularly in ambient or cinematic compositions.
3. Tame Harsh Vocals
If a vocal track has harsh or overly bright frequencies, use a low pass filter to gently reduce the high-frequency content.
This can make the vocals sit better in the mix and sound more natural.
4. Emulate Vintage or Lo-fi Sounds
Use a low pass filter to recreate the sound of vintage or lo-fi recordings.
By cutting higher frequencies, you can mimic the warmth and character of analog gear or old-school tape recordings.
5. Smooth Out Transitions
Apply a low pass filter to a track or entire mix during a breakdown or transition.
Then, gradually open the filter to reintroduce the higher frequencies.
This creates a sense of anticipation and builds tension in your arrangement.
6. Create Subtle Stereo Effects
Try applying different low pass filter settings to the left and right channels of a stereo track, such as a synth or guitar.
This can create subtle stereo movement and width, adding interest and depth to your mix.
7. Enhance the Perception of Depth
Use a low pass filter to create a sense of depth in your mix by applying it to elements that should appear further back in the soundstage.
Removing higher frequencies from these elements can make them sound more distant, as they’re absorbed more quickly in the air than low frequencies.
8. Clean Up Busy Mixes
If your mix feels cluttered or lacks clarity, use low pass filters on individual tracks to remove unnecessary high-frequency content.
This creates more space for essential elements and improves overall clarity and balance.
9. Create a Radio or Telephone Effect
Apply a low pass filter combined with a high pass filter to a vocal or dialogue track to create a “telephone” or “radio” effect.
This is a fun and creative way to add character or emphasize specific elements in your mix.
10. Experiment with Filter Automation
Automate the cutoff frequency of a low pass filter to create rhythmic or expressive effects.
This can add movement and interest to static sounds, such as sustained pads or lead synths, and can even be used to create rhythmic patterns in a track.
With these creative uses of low pass filters in digital music production, you can take your tracks to new heights and explore unique soundscapes.
Final Thoughts
As we wrap up this sonic expedition, I hope you’ve discovered the immense power and potential that low pass filters hold in shaping your music production journey.
By mastering the art of low pass filters, you’ll be able to unlock new creative possibilities, design unique soundscapes, and sculpt flawless mixes/chord progressions that will captivate your audience.
Remember, the beauty of music production lies in experimentation and pushing boundaries, so don’t be afraid to dive deep and explore the vast universe of low pass filters.
With this newfound knowledge and expertise, you’re now equipped to conquer the music production world, one low pass filter at a time.
To try out our creative tip #1, you’ll need the dopest drum loops around…
Luckily, you can find the most jaw-dropping, pristine drum loops on the planet within the FREE Unison Essential Drum Loops pack.
Inside this renowned pack, you’ll find 12 professional-quality, perfectly mixed drum loops for you to plug & play straight into your tracks.
Simply use a low pass filter to remove high-frequency content from any of the drum loops, but leave only the kick and snare.
This creates a more zoned-in, funky rhythm that will work well in various genres.
So, go forth, create, and let your sonic signature resonate through the ears and hearts of listeners everywhere!
Until next time…


Leave a Reply
You must belogged in to post a comment.