Understanding the intricacies of audio processing can make or break your tracks.
One of the most critical aspects of shaping your sound lies in the art of dynamic control, and that’s where the age-old debate of limiting vs compression comes into play.
In this ultimate guide, we will:
- Examine the world of compressors and limiters
- Explore their similarities & expose their differences
- Explain 6 game-changing strategies to skyrocket your production
So, buckle up and join me on this sonic journey as we unravel the mysteries of these essential audio tools.
Table of Contents
What is Compression?
Compression is a dynamic audio processing technique that reduces the dynamic range (loudest and quietest parts) of an audio signal.
This means that it brings down the volume of loud parts while leaving the quieter parts relatively untouched.
The result is a more balanced and consistent sound across the entire track.
For example, a vocal track in a song may have varying levels of loudness, making it difficult for the listener to hear the lyrics consistently.
Applying compression to that track can help even out the loudness and ensure the vocals sit properly in the mix.
How Compressors Work
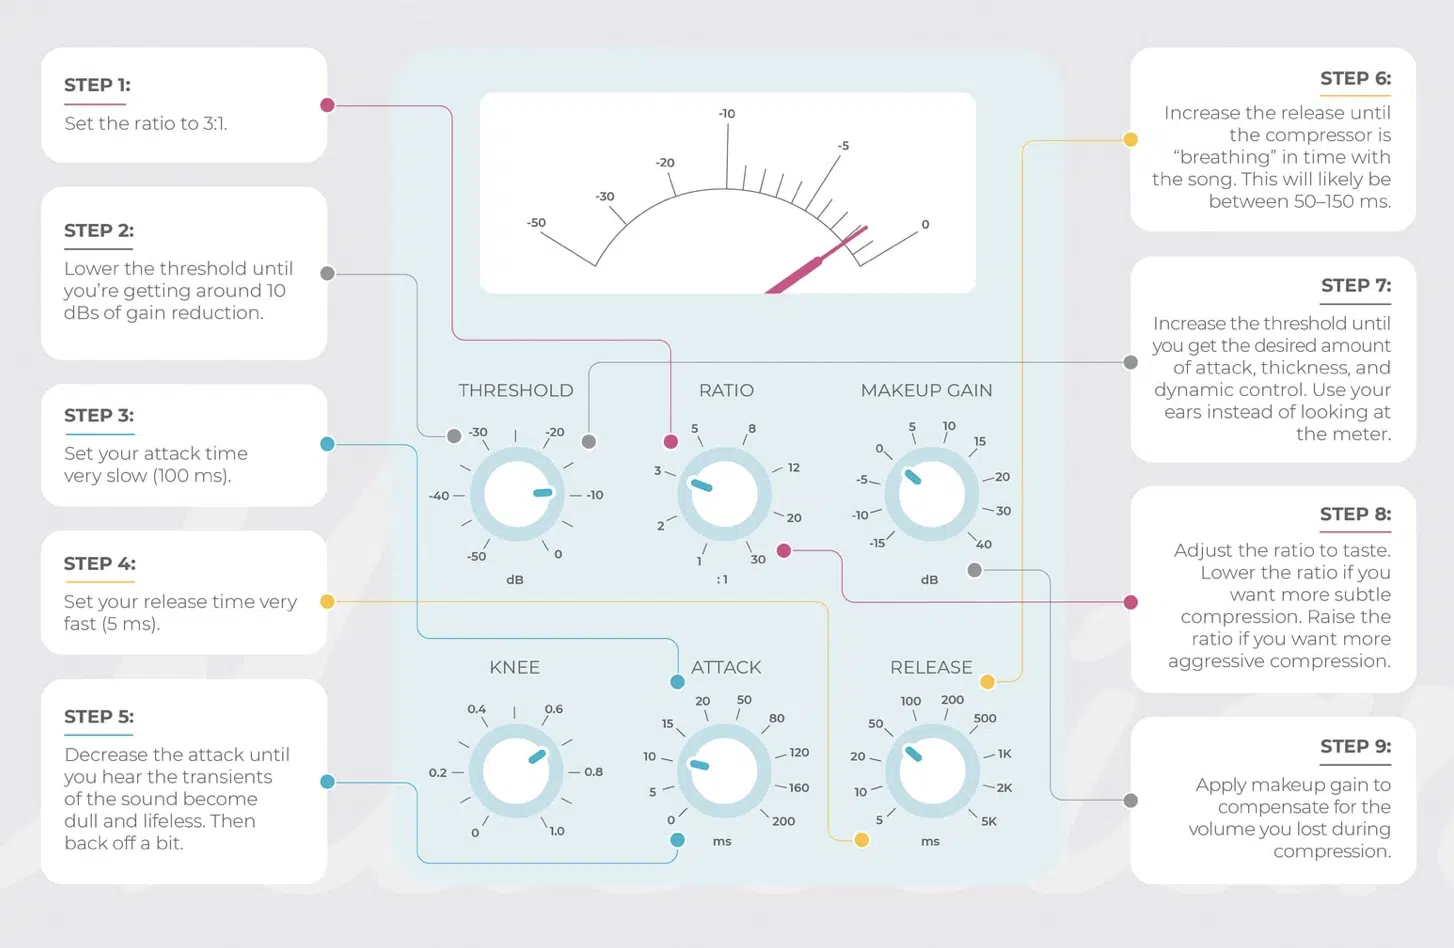
Compressors work by automatically reducing the gain of an audio signal when it exceeds a specified threshold point.
Key parameters of a compressor include:
- Threshold
- Ratio
- Attack time
- Release time
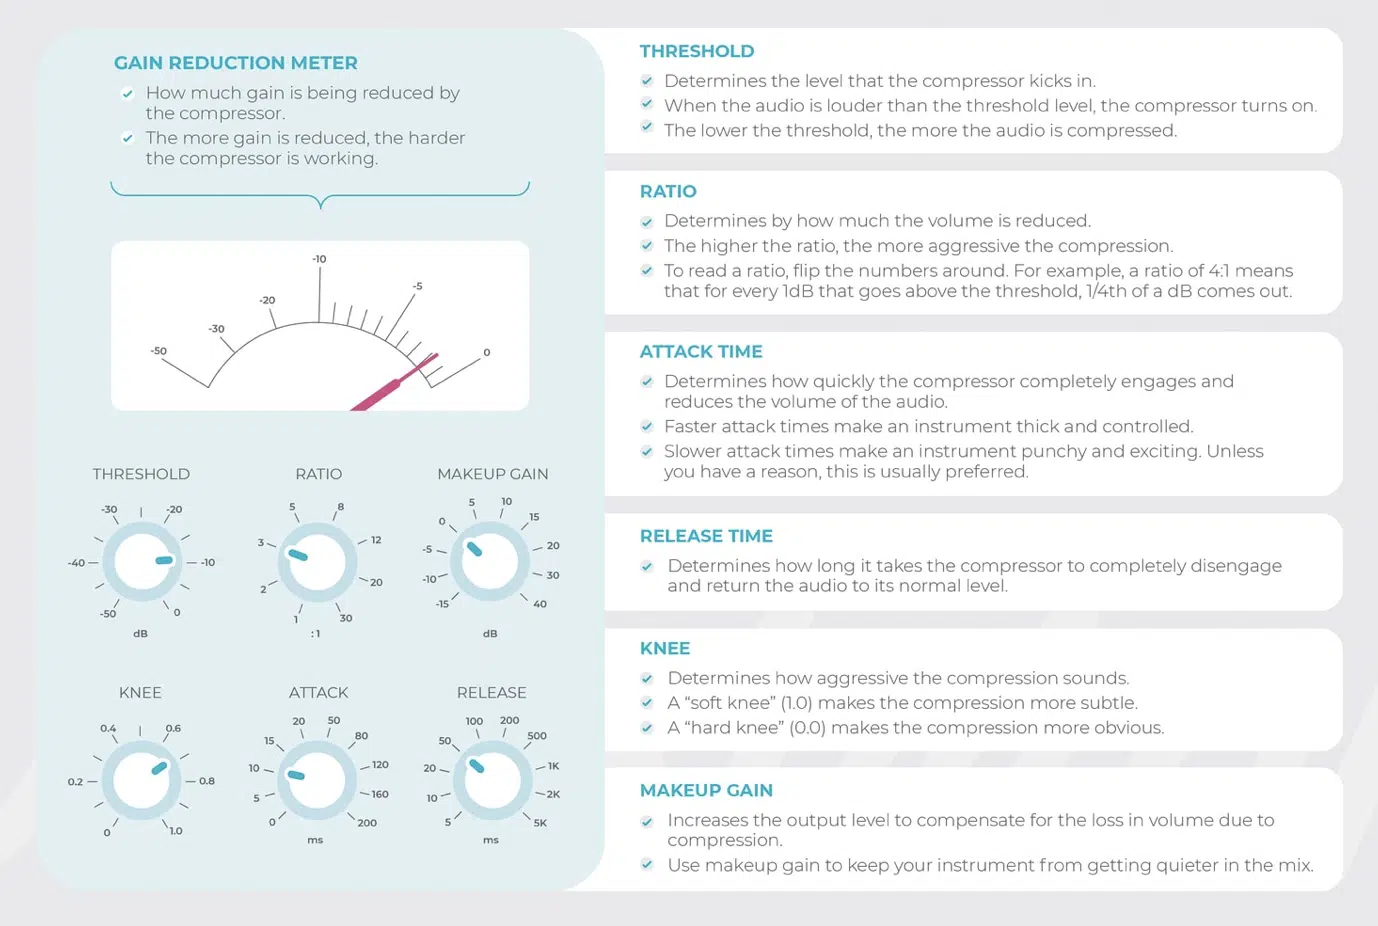
By adjusting these settings, you can control the amount of compression applied and shape the overall character of the sound.
For instance, when mixing drums, you might use a compressor with a fast attack time to tame the initial transients of the drum hits 一 while allowing the sustain and tail of the sound to come through more prominently.
Common Uses of Compressors
Compressors are used in various stages of production, including recording, mixing and mastering.
They can be applied to individual tracks (or the entire mix) in order to:
- Control dynamics
- Enhance clarity
- Add sustain to instruments
- Help elements in a mix sit better together
For example, applying compression to a bass guitar track can help tighten the low end and add sustain to the notes.
This will give the bass more presence in your mix.
What is Limiting?
A limiter is a specialized type of compressor designed to prevent an audio signal from exceeding a specified output level.
It does this by applying an extremely high compression ratio when the signal reaches the threshold level, effectively putting a “ceiling” on the loudness.
The primary purpose of limiting is to avoid distortion and protect the integrity of the finalized output signal.
Limiters are often used in mastering to ensure that the final mix is loud enough to compete with other commercial releases without causing distortion or clipping.
How Limiters Work
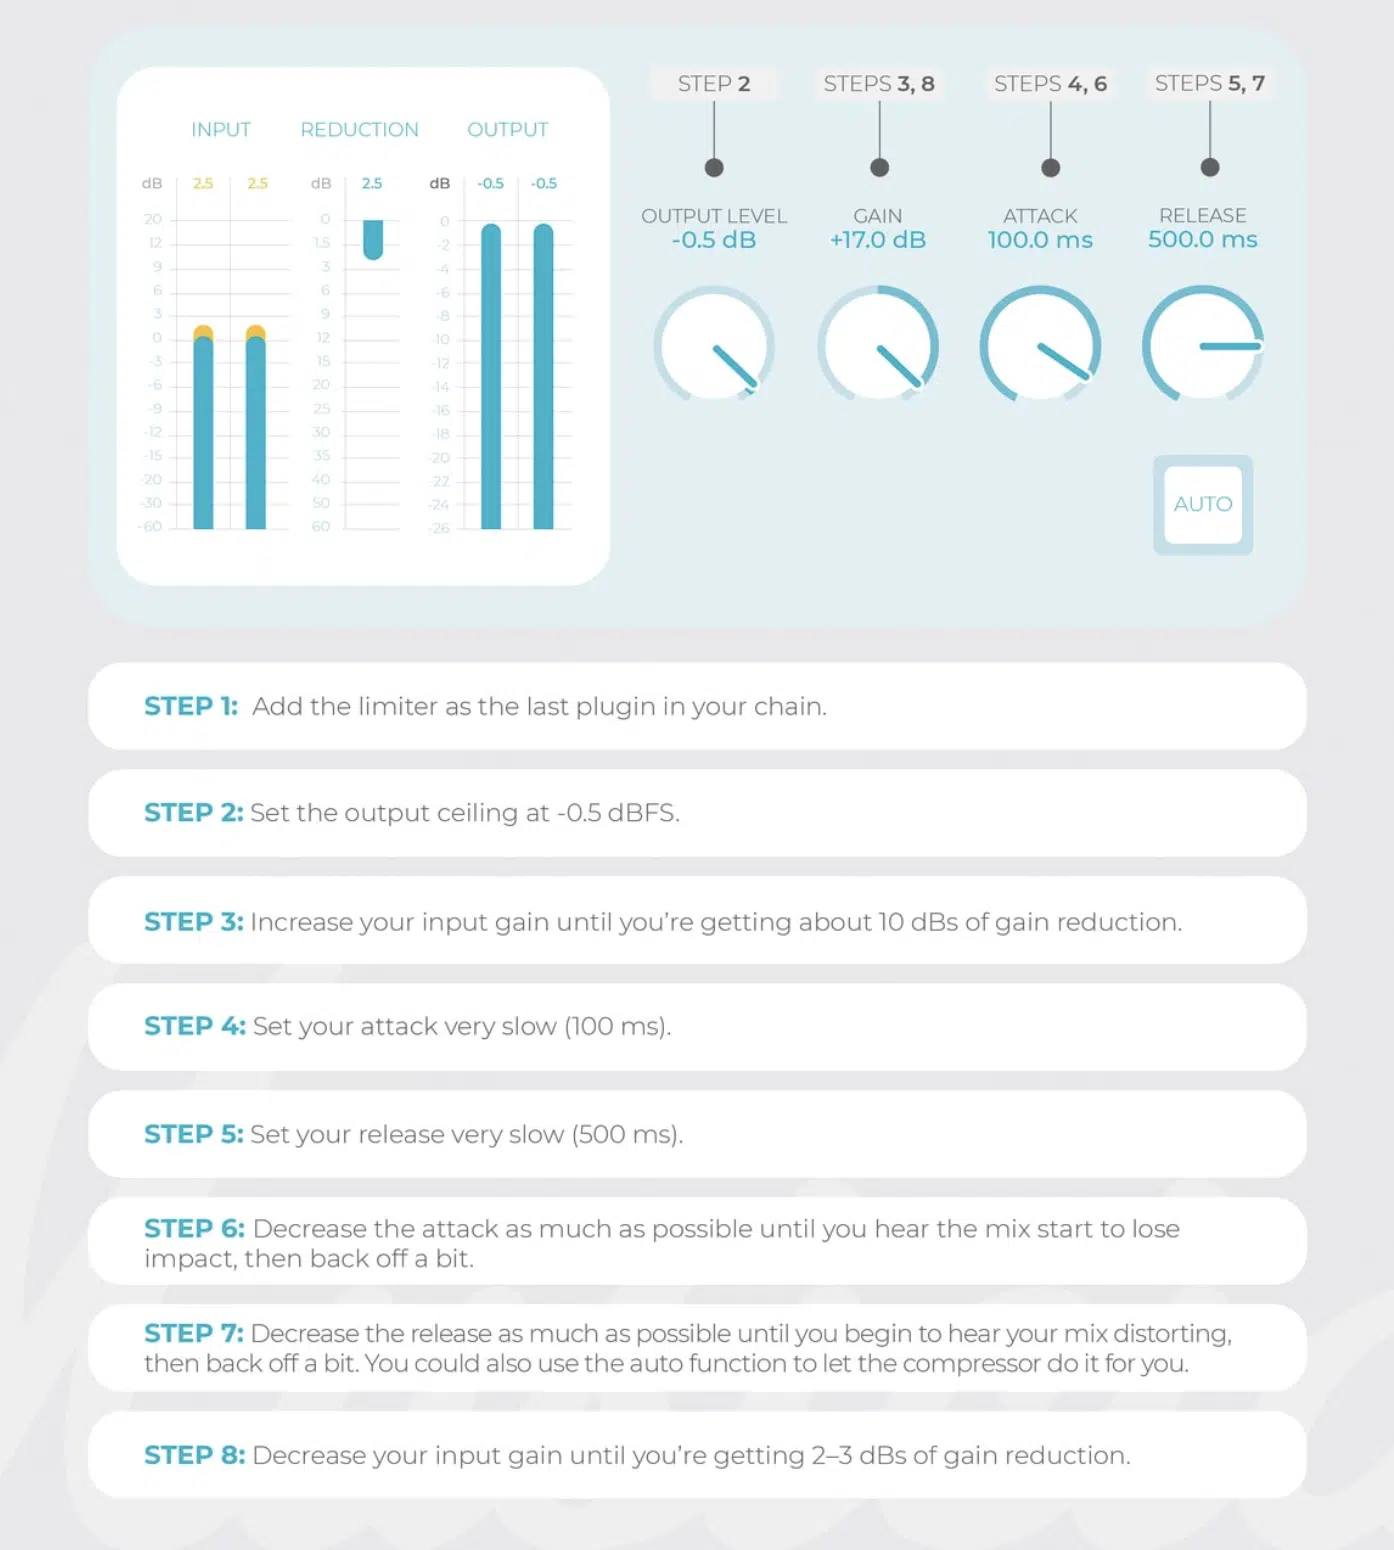
Limiters work by applying a high compression ratio (often 10:1 or higher) and a very fast attack time when the signal reaches the threshold level.
This ensures that any sudden peaks in the volume are quickly reduced.
The release time on a limiter is also crucial, as it determines how long the gain reduction is applied after the signal drops below the threshold.
For example, when mastering a rock song with aggressive guitar parts, a limiter can be used to catch and control any sudden peaks in the audio signal.
This helps guarantee the output remains clean and clear.
Common Uses of Limiters
Limiters are most commonly used during the mastering stage to ensure a loud, polished sound without causing digital clipping or distortion.
They can also be used in mixing to control the output of individual tracks or buses, providing an extra layer of protection against unwanted peaks.
For example, a limiter can be placed on the mix bus to ensure that the overall mix does not exceed a specific loudness level.
So, if you’re releasing an album, for instance, it helps to maintain a consistent output signal across all of the included songs.
Limiter vs Compressor: Key Differences
Limiters and Compressors share many similarities, but they also share a variety of differences as well.
The following sections describe their most prominent differences.
A. Ratio Settings
One of the main differences between limiters and compressors lies in the ratio settings.
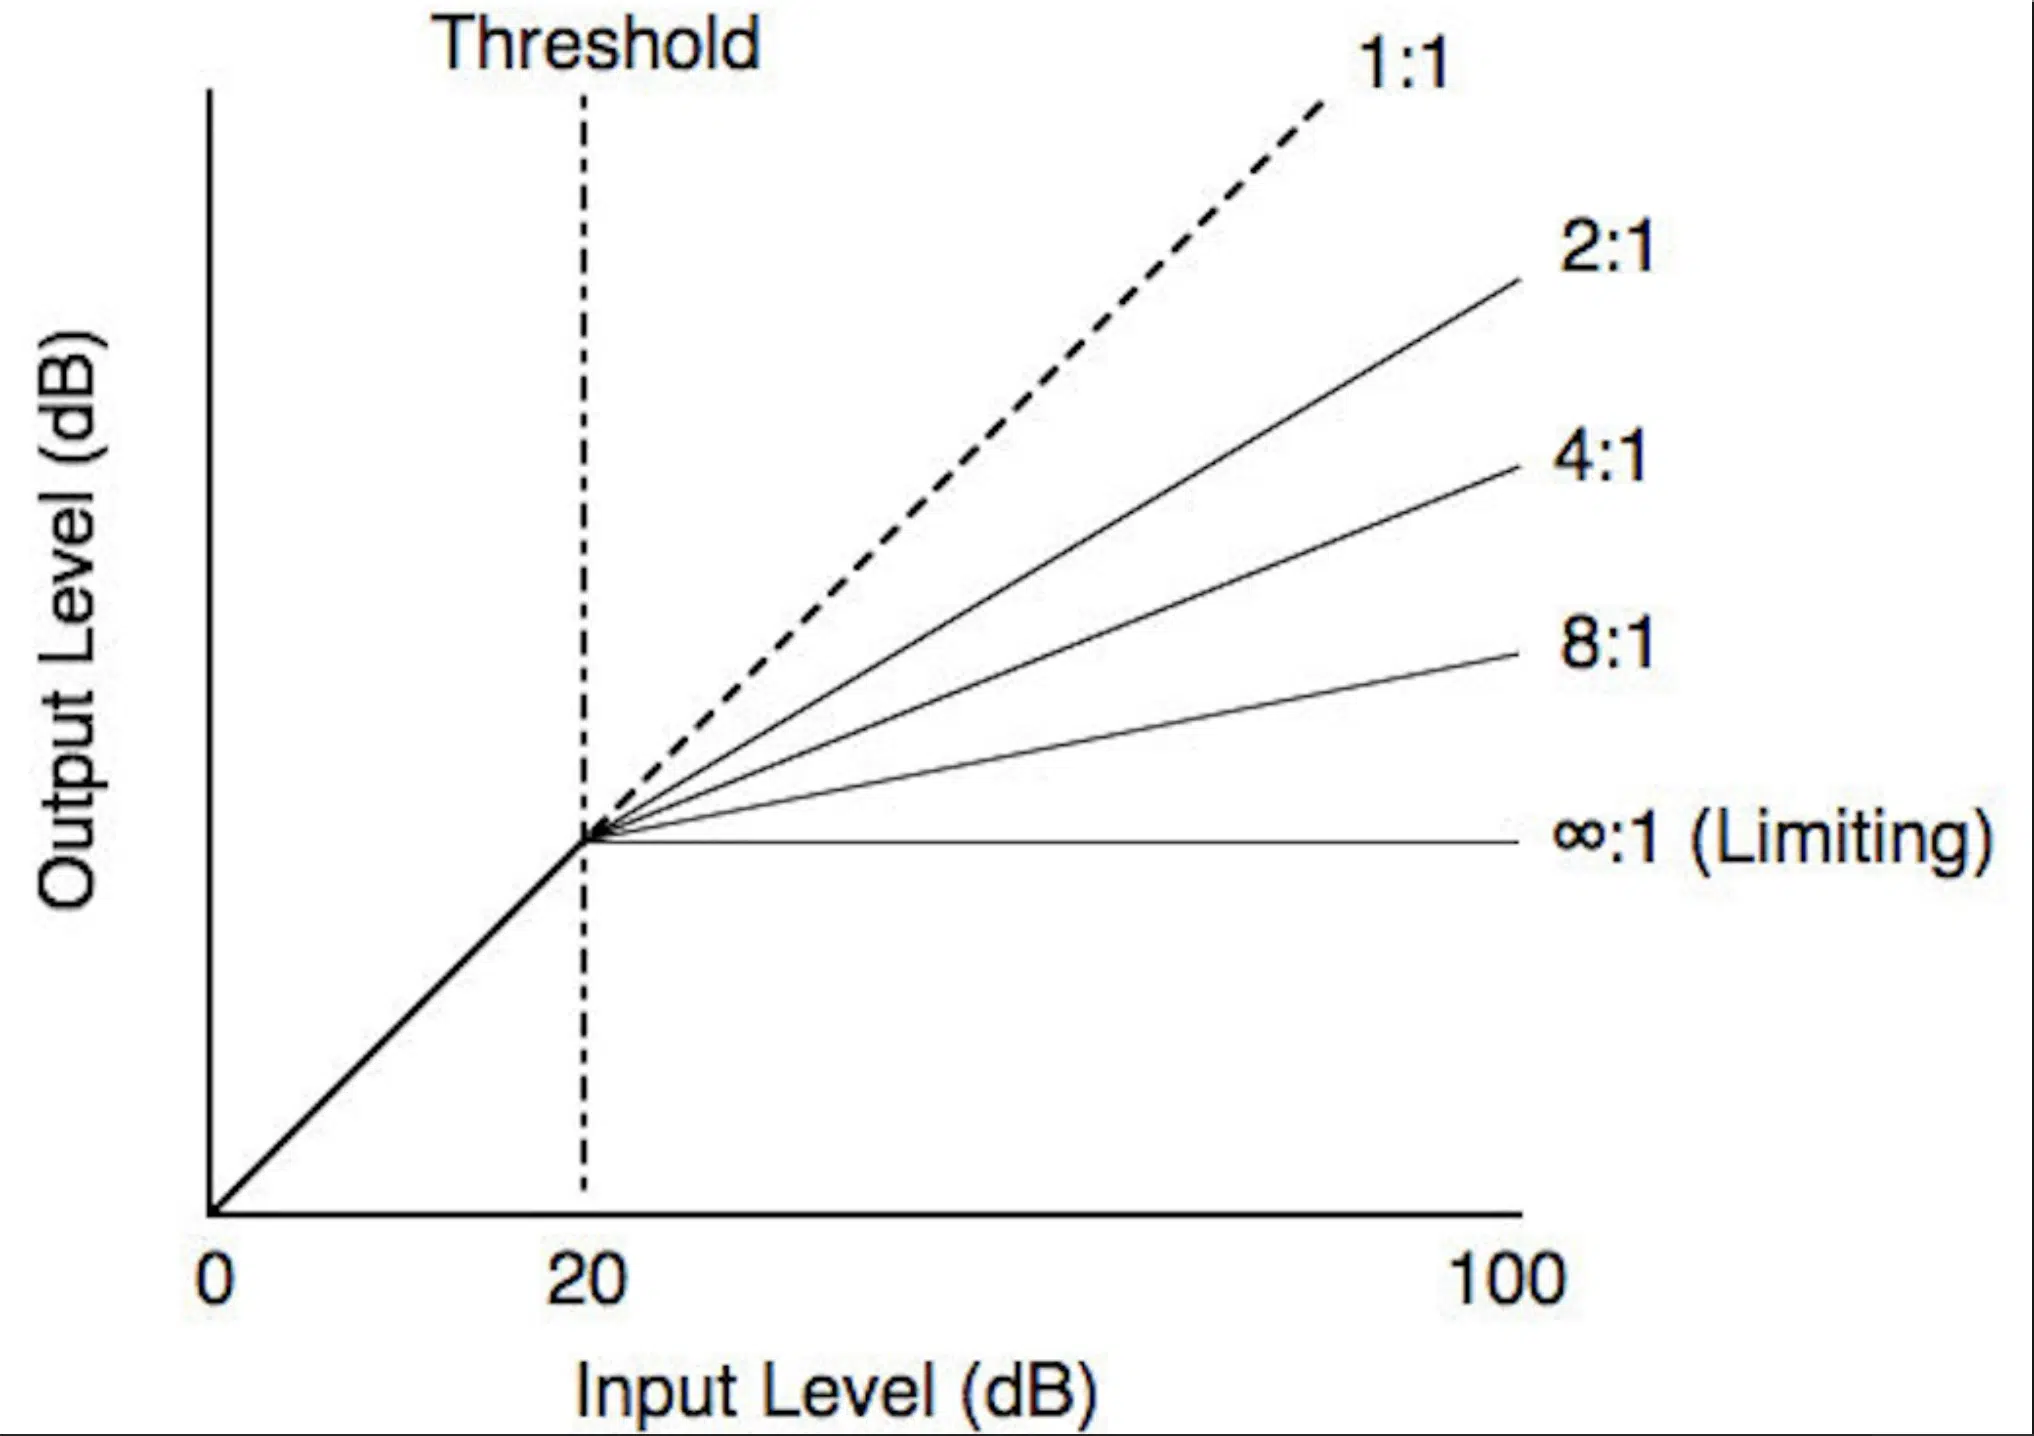
- Compressors 一 Typically have adjustable ratios ranging from 1.5:1 to 10:1 or more; allowing for varying levels of gain reduction depending on the input signal.
For example, a compressor with a 4:1 ratio would reduce the output by 4 dB for every 1 dB the input level exceeds the threshold.
- Limiters 一 Have a fixed, high ratio (often 10:1 or higher) to ensure that the audio signal does not exceed the specified output.
This high ratio means that limiters will almost completely suppress any peaks that go above the threshold.
It essentially serves as a safeguard against distortion and clipping.
B. Attack & Release Times
The attack and release in limiters are generally much faster than those in compressors.
This is because limiters are designed to catch and control very loud, sudden peaks in the audio signal.
It prevents distortion and preserves the integrity of the final output.
- Limiters 一 Might have an attack of 0.1 ms to ensure it quickly clamps down on any transients that exceed the threshold.
- Compressors 一 Often have more adjustable attack and release, allowing you to shape the overall character of the sound.
A slower attack on a compressor might allow a snare drum‘s transient to pass through before the compression kicks in, emphasizing the drum’s attack.
Conversely, a fast attack on a compressor could smooth out the transient, creating a more even and controlled sound.
C. Dynamic Range Control
Dynamic range refers to the difference between the quietest parts and loudest parts of an audio signal.
It represents the range of amplitude levels present in a recording 一 from the softest sounds to the most intense peaks.
Both compressors and limiters are used for dynamic range control, but they approach this task in slightly different ways.
- Compressors 一 Reduce the dynamic range by automatically lowering the gain when the signal level goes above a set threshold.
For example, you might use a compressor on a vocal track to control the dynamic performance and make the session more consistent.
When a loud sound occurs, this will prevent it from overpowering the mix.
- Limiters 一 Prevent the signal from exceeding a specific output by applying an extremely high compression ratio.
This is particularly important during the mastering stage, where the goal is to achieve a loud, pristine sound without causing digital clipping or distortion.
By using a limiter, you can ensure that the loudest parts of the mix are controlled, and the overall loudness is consistent across various playback systems.
Controlling the dynamic range effectively can elevate your mix by maintaining a balanced and polished sound.
By carefully using compression and limiting to tame the dynamic range, you can ensure that:
- The quieter parts of your mix are audible.
- The loudest parts are not overwhelming the overall mix.
This will ultimately help you to achieve a consistent and professional dynamic range.
Gain Reduction and Input Gain
Gain reduction is the amount by which a compressor or limiter reduces the level of an audio signal when it exceeds the threshold.
When mixing music, a compressor acts as a vital tool to control the dynamics of your tracks.
As the compressor compresses the signal, it reduces the gain of the loudest parts (loud sounds).
When the compressor kicks in, it compensates for the lost gain, ensuring a balanced and polished mix.
In compressors, the amount of gain reduction depends on:
- The ratio setting
- Input gain
- The difference between the input level and the threshold
For instance, if you’re compressing a vocal track with a 3:1 ratio and the input level is 9 dB above the threshold 一 the compressor will apply 3 dB of gain reduction.
In limiters, gain reduction is applied more aggressively due to the very high ratio setting, ensuring that the output level does not exceed the specified limit.
For example, a limiter might have a 20:1 ratio and be set to prevent the output from going above -0.1 dBFS.
Any peaks that would push the output above this limit would be quickly and aggressively reduced.
Limiter vs Compressor: Input & Output Gain
Both compressors and limiters allow you to control IG and output level.
- Input gain (IG) 一 The level of the audio signal entering the processor
- Output level (also known as output gain or makeup gain) 一 The level of the signal after processing.
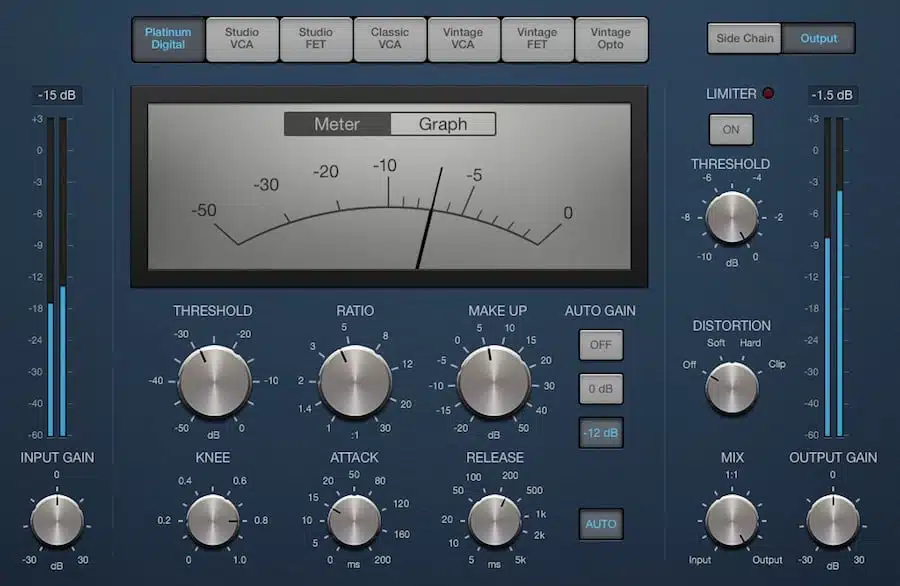
Adjusting IG and output allows you to achieve the desired level of compression or limiting and maintain a consistent loudness across your mix.
For example, when using a compressor on a drum track, you might adjust the IG to ensure that the peaks are triggering the desired amount of compression.
After applying a compressor, you can adjust the output level or makeup gain to compensate for any loss in volume caused by gain reduction.
This helps to maintain a consistent level while still achieving the dynamics you desire.
In the case of limiters, adjusting the input signal can help you achieve the desired loudness while still preserving the dynamics of your mix.
If you find that your mix is too quiet after you apply some limiting, you can increase the IG to push the overall level closer to the specified output limit.
BE CAUTIOUS: Don’t push the IG too high, as this can result in over-limiting and a squashed, lifeless sound.
Threshold Level and Soft Knee
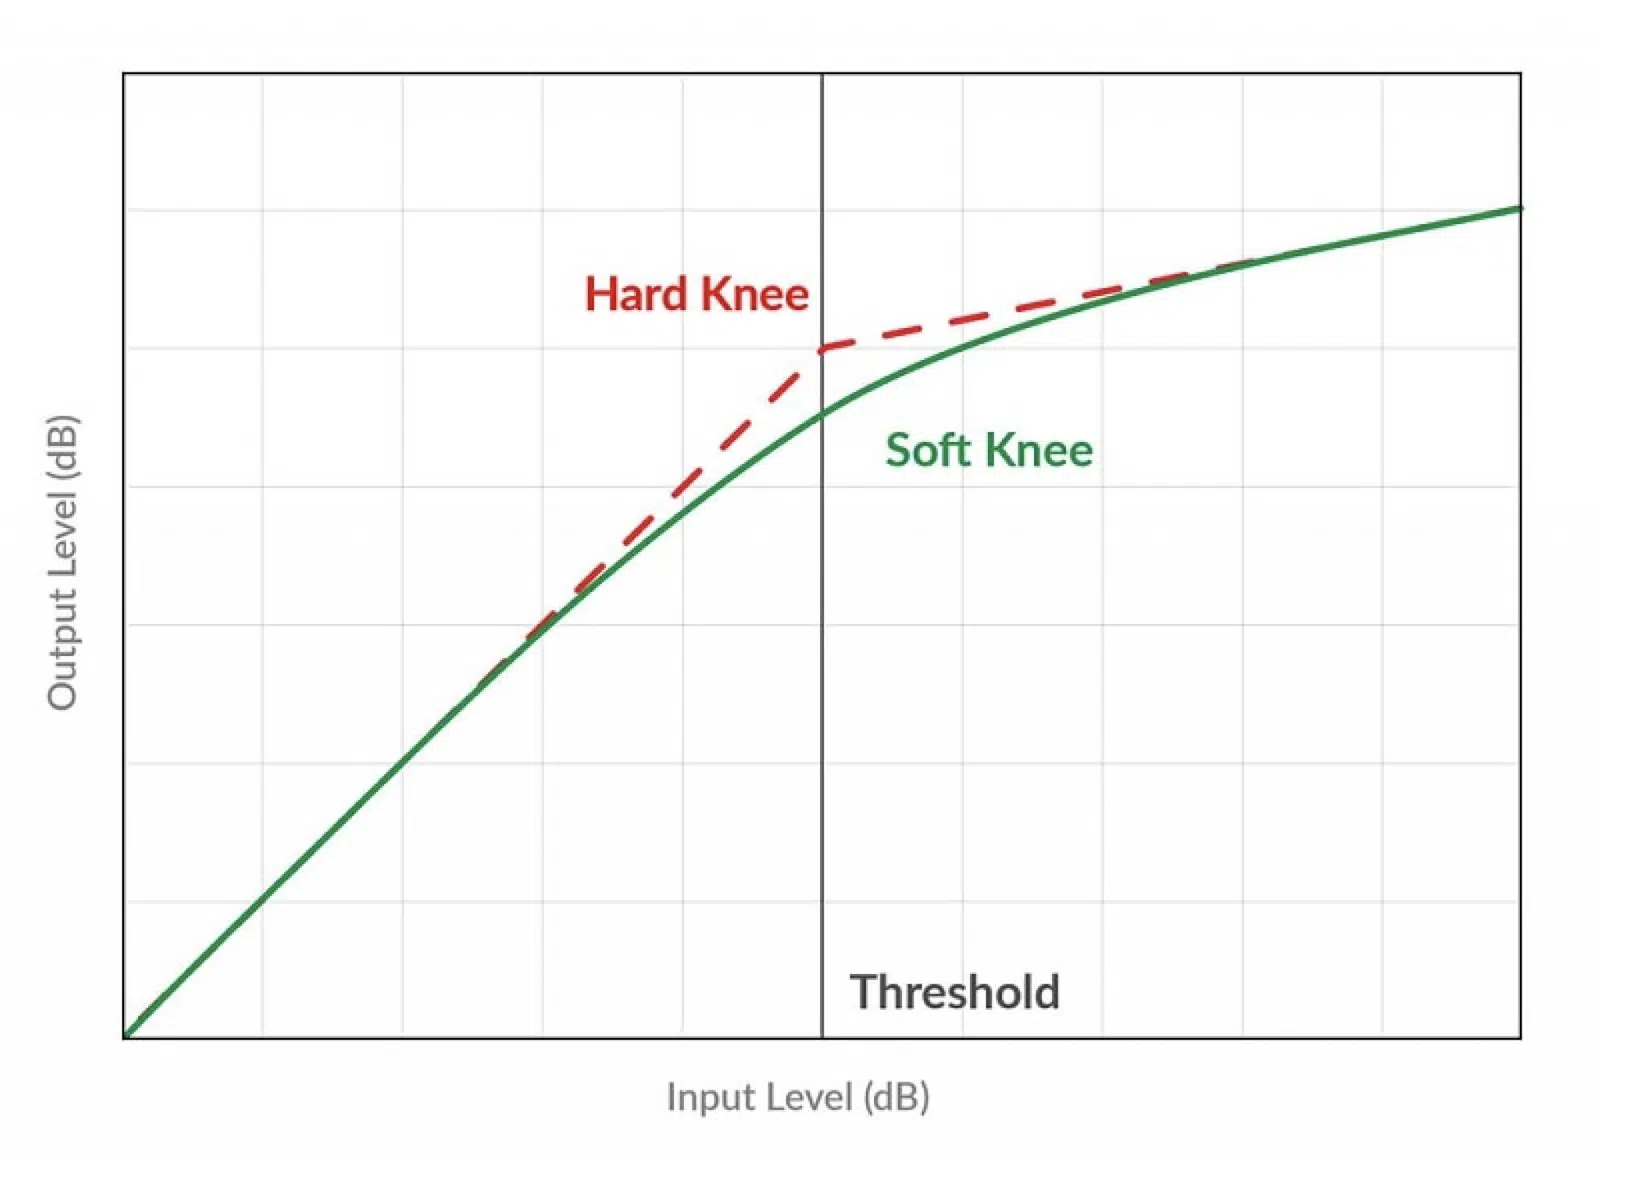
The threshold is the point at which a compressor or limiter starts to apply Gain Reduction to the signal.
In compressors, setting the threshold is crucial for controlling the dynamic range and achieving the desired level of compression.
In limiters, the threshold determines the maximum output level that the signal can reach without causing distortion or clipping.
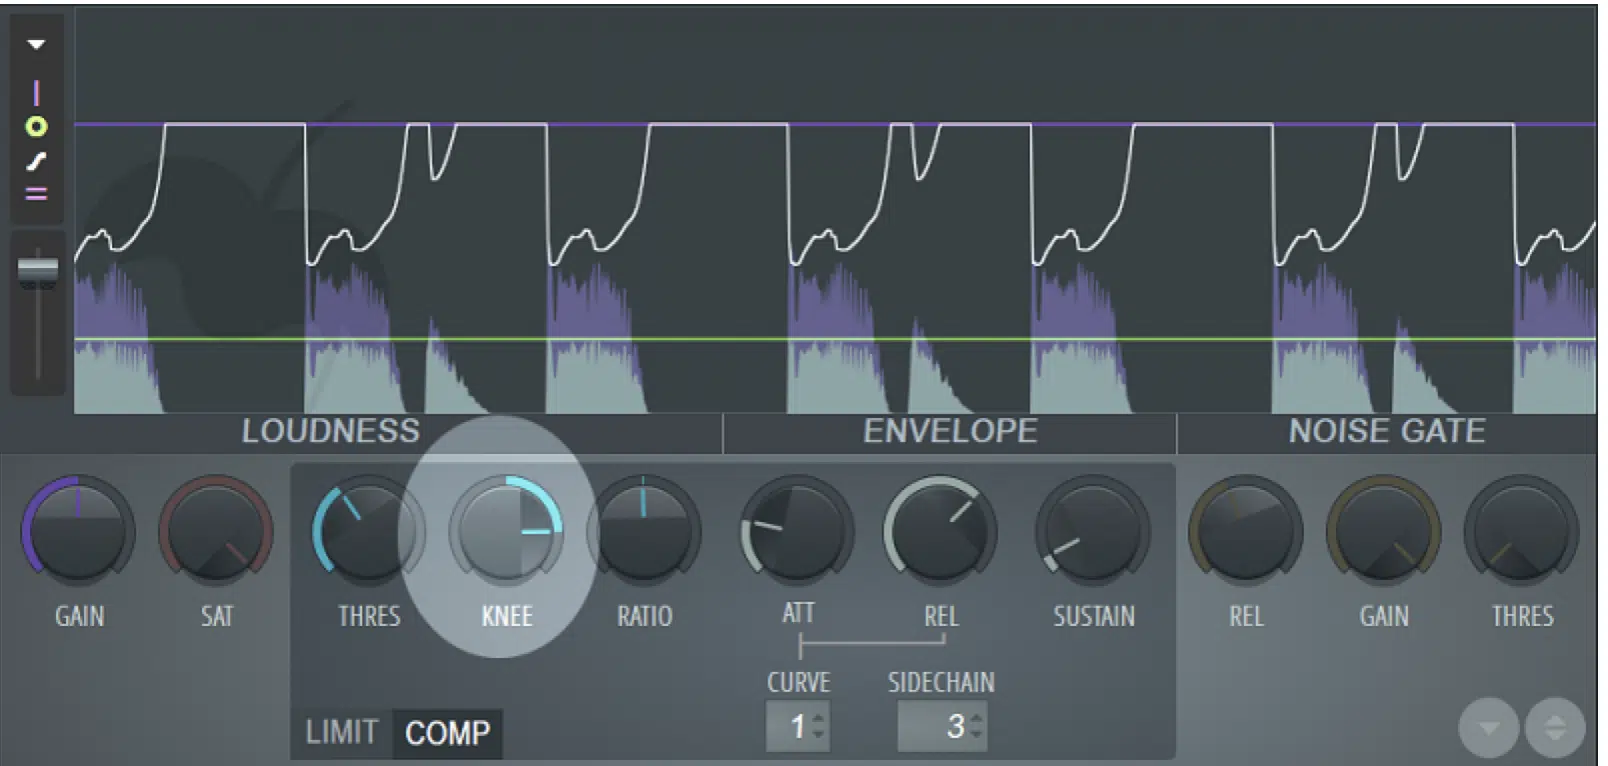
A soft knee setting in a compressor gradually introduces compression as the signal approaches the threshold.
This will give you a smoother, more transparent compression effect.
This can be particularly useful when you want to apply gentle compression to a track without introducing noticeable artifacts.
Limiters typically do not have a soft knee setting, as they are designed to provide more aggressive gain reduction when the signal reaches the threshold.
When to Use Compression and Limiting
In order to properly know the differences between limiting and compression, you must know when exactly to apply them.
Compression During Recording & Mixing
Compression can be applied during the recording and mixing stages of audio production to:
- Control dynamics
- Enhance clarity
- Help elements in a mix sit better together
It is common to use a compressor on individual tracks, such as vocals, drums, or guitars, to achieve a more balanced sound and prevent sudden peaks in volume from overpowering the mix.
For example, when recording a dynamic vocalist, you might use a compressor with a moderate ratio and a fast attack to tame any sudden peaks in volume.
This can help to produce a more consistent vocal performance that sits well in the mix without causing issues during the mastering process.
Limiting During Mastering
Limiting is most commonly used during the mastering process to ensure a loud, polished sound without causing digital clipping or distortion.
By applying a high compression ratio and a fast attack, limiters prevent the signal from exceeding a specified output level.
They protect the integrity of the final output and ensure that the master translates well across different playback systems.
For instance, a mastering engineer might use a limiter to increase the overall loudness of a track while still preserving its dynamics and transients.
By carefully adjusting the input, threshold, and output, you can create a polished, professional sound that competes with other commercial releases in terms of loudness and clarity.
Dealing with Unwanted Noise in the Mixing Process
As an audio engineer, one of the challenges you may face during the mixing process is dealing with unwanted noise.
This noise can be caused by various factors, such as electrical interference, ambient sounds captured during recording, or noise generated within the chain itself.
The noise floor is the level at which the unwanted noise becomes audible, and it’s crucial to manage it effectively to ensure a clean, professional mix.
Dynamics Control for a Cleaner Mix
Dynamics processing plays a significant role in managing unwanted noise and preserving the integrity of your mix.
By carefully applying compressors and limiters to loud sounds, you can prevent them from overpowering the mix while also keeping the unwanted noise at bay.
Compression acts to reduce the dynamic range of the audio signal, which can help minimize the impact of unwanted noise on the overall mix.
Tips From an Audio Engineer to Minimize Noise
Audio engineers employ several strategies to minimize background noise and maintain a clean signal throughout the mixing process.
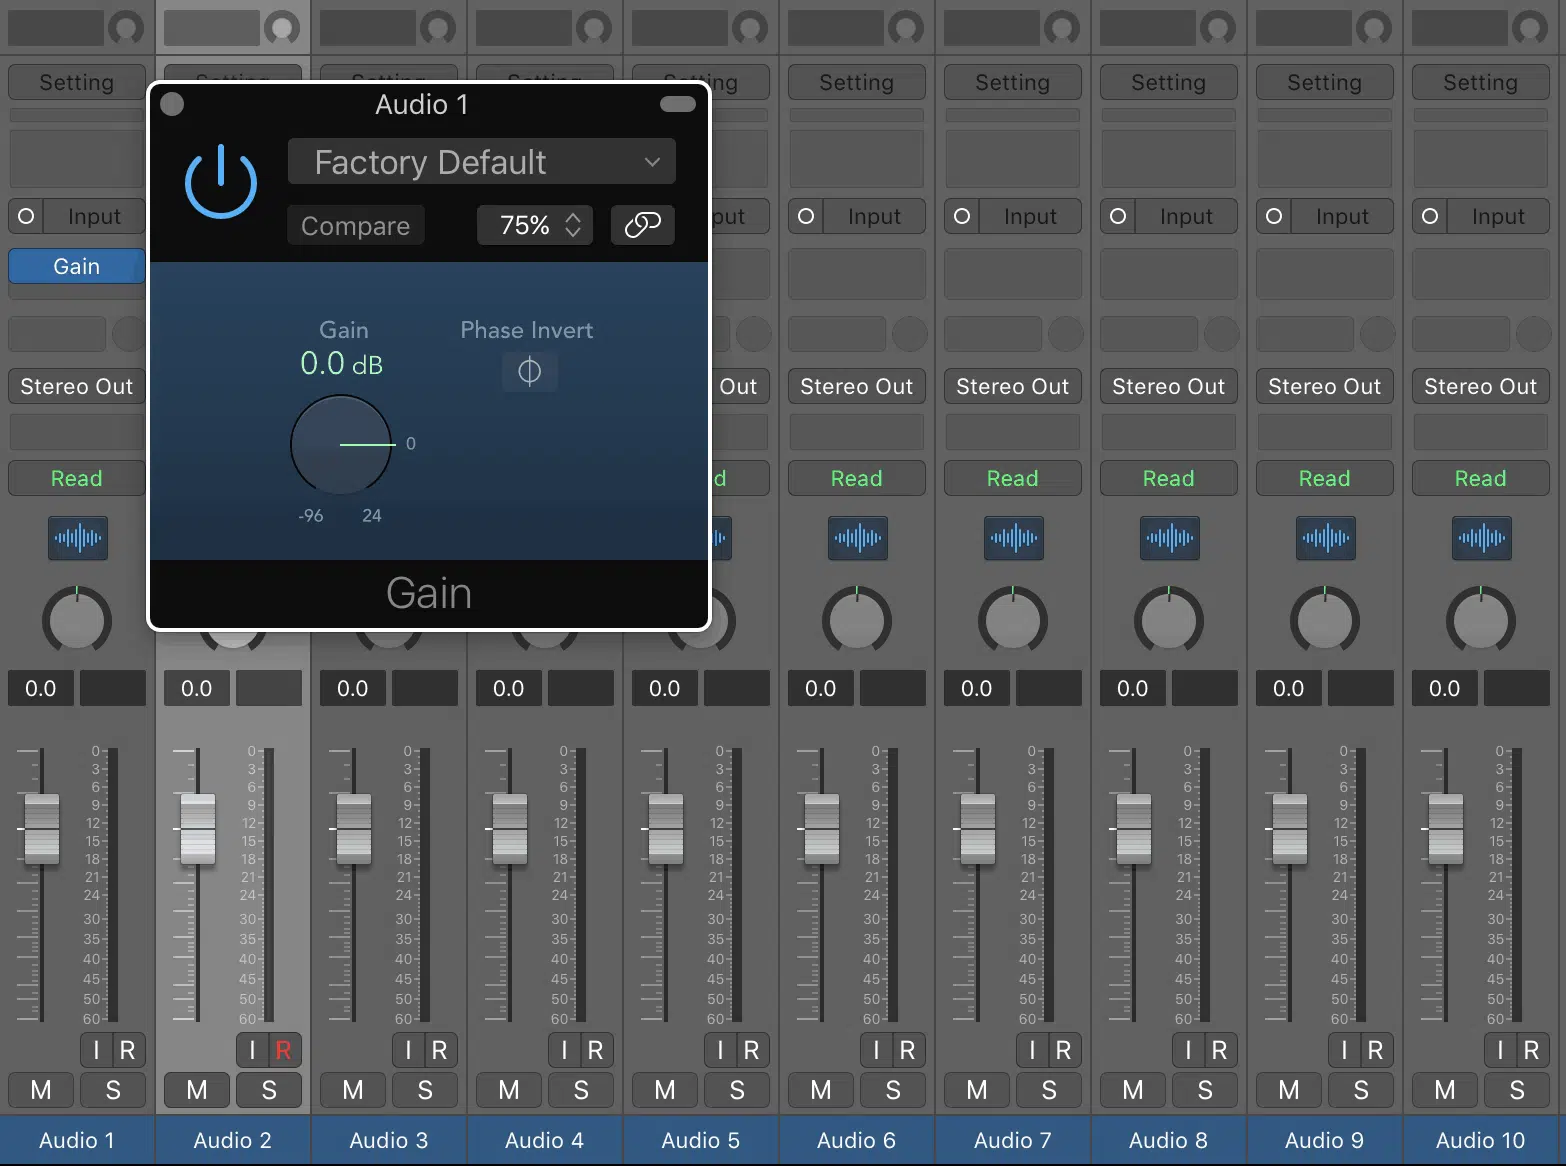
One key approach is to carefully manage the gain staging within the signal chain.
This will ensure that each component’s input and output levels are optimized to prevent noise from being introduced or amplified.
Additionally, using high-quality equipment and cables, isolating noisy elements, and applying noise reduction techniques when necessary can all contribute to a cleaner, more pristine mix.
Compressors and Limiters in Different Genres
Compressors and Limiters are used in very different ways depending on the specific genre.
Let’s take a look at how compressors and limiters are utilized throughout the most popular genres of today:
-
Electronic Dance Music
In electronic dance music (EDM), both compression and limiting play crucial roles in achieving the loud, powerful sound that the genre is known for.
Compression can be used on separate tracks like kick drums, basslines, and synths to tighten up their dynamics and create a more cohesive mix.
For example, sidechain compression is often used in EDM to duck the bassline whenever the kick drum hits.
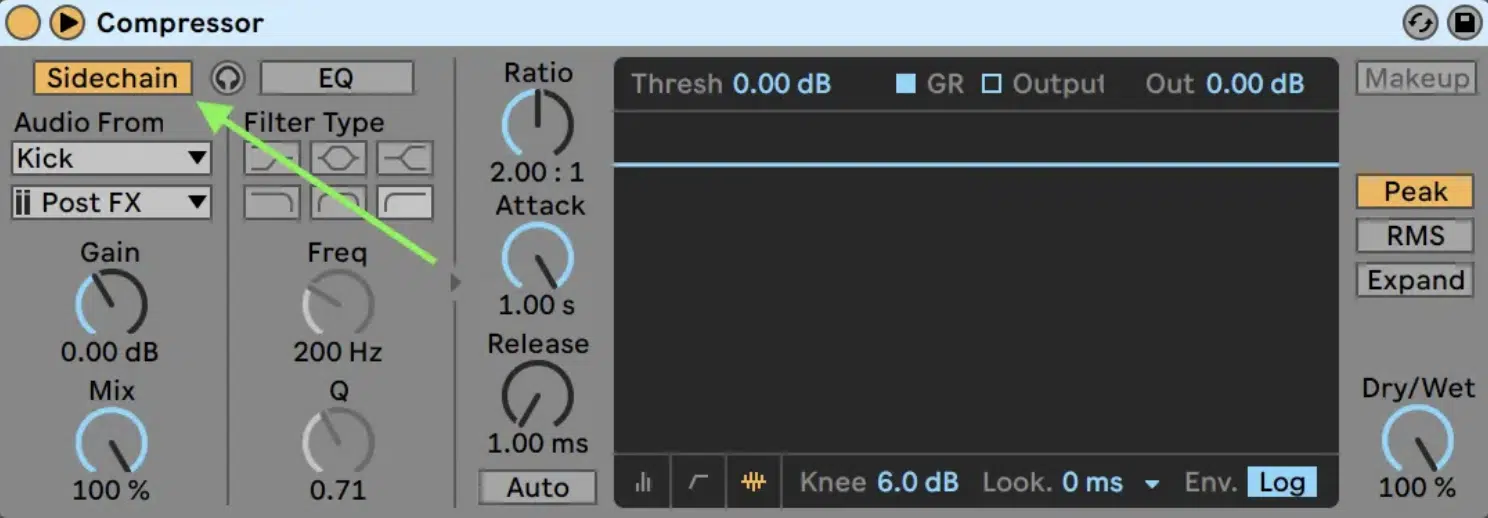
This creates a rhythmic “pumping” effect that adds energy and excitement to the track.
Limiting, on the other hand, is essential during the Master to achieve the loudness that EDM demands.
An audio engineering specialist may use a combination of brick wall limiting and multiband limiting to ensure that the final output is loud and powerful.
-
Hip-hop & Trap
In hip-hop music and trap music, compressors and limiters play a significant role in achieving the genre’s characteristic punchy drums, powerful basslines, and clear vocal tracks.
It can be applied to separate tracks like 808 bass, kick drums, snares, and vocals to tighten their dynamics and help them stand out in the mix.
For example, a compressor with a moderate ratio and fast attack can be used on a snare drum to emphasize its attack and make it cut through the mix.
Parallel Compression is a popular technique in hip-hop digital audio production during the mixing stage.
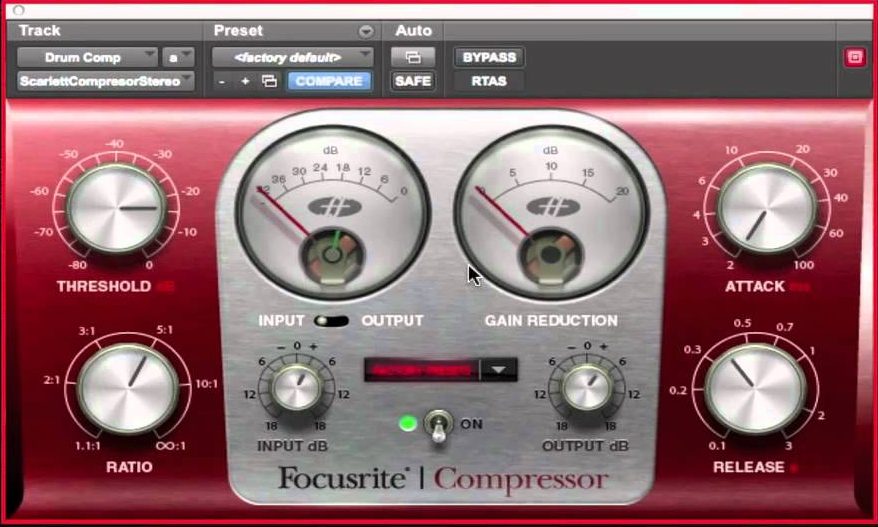
It involves a heavily compressed version of a drum track being blended with the original, unprocessed track, which adds weight and presence to the drums while still retaining their natural dynamics.
Trap music often features rapid hi-hat patterns, and a compressor with a fast attack and release time can help to control their dynamics; making them sound tighter and more focused.
This technique creates a more cohesive hi-hat sound that doesn’t overpower other elements in the mix.
Rock & Pop
In rock and pop music, compression is frequently used to control the dynamics of individual instruments like electric guitars, drums, and vocals.
For instance, a compressor with a moderate ratio and slow attack time might be used on a snare drum to add sustain and thickness while preserving the natural attack of the drum.
Limiting is used more sparingly in rock and pop music, mainly during the master to ensure a consistent loudness across the entire track.
Drum Parallel Processing
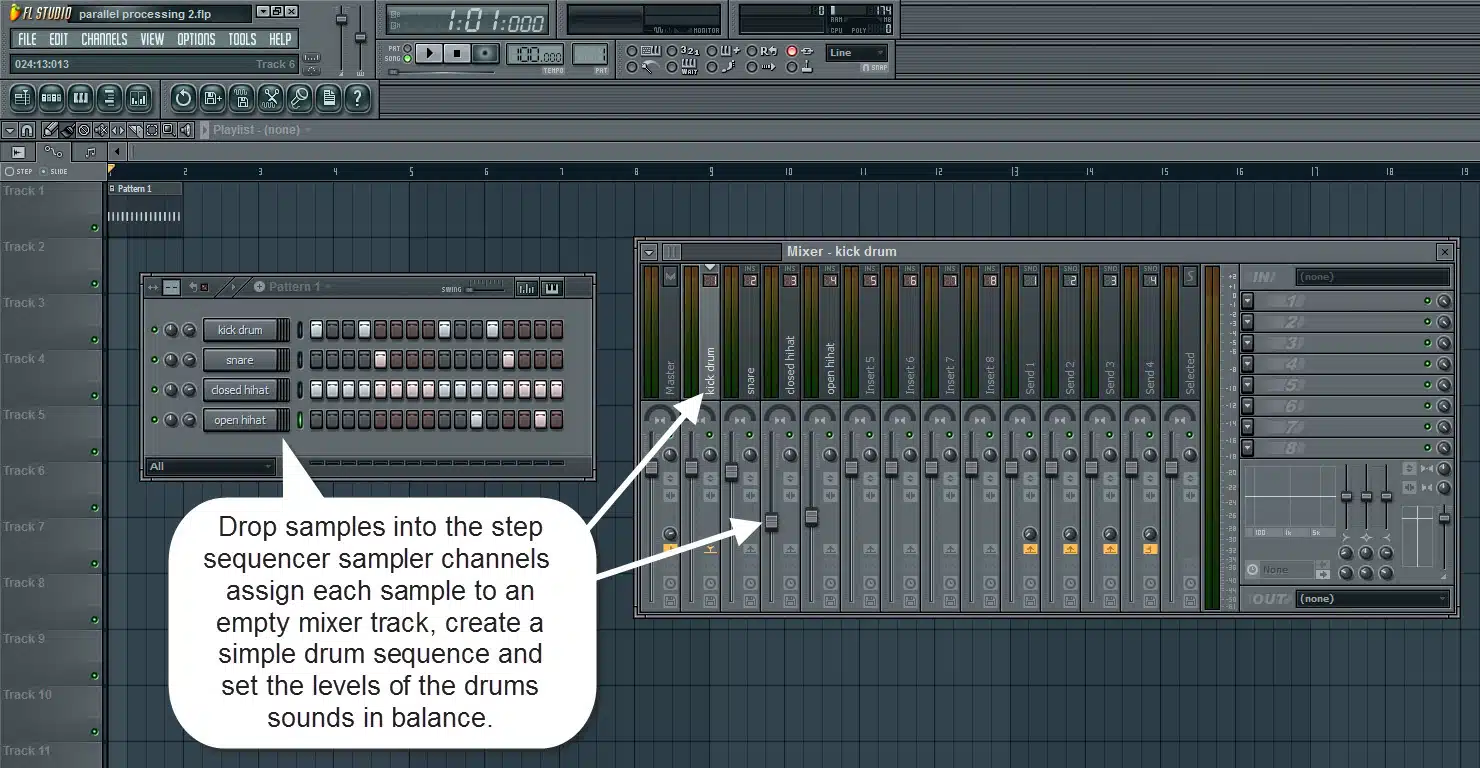
Parallel processing is a technique where a heavily processed version of a track is blended with the original, unprocessed signal.
In drum parallel processing, a compressor or limiter is applied to a duplicate of the drum track, and the two tracks are mixed together.
This can create a powerful, punchy drum sound that combines aggressive compression or limiting with the natural dynamics of the original track.
For example, you might use a compressor with a high ratio and fast attack and release times on a parallel drum track.
Then, you would blend it with the unprocessed drum track to achieve a punchy, larger-than-life drum sound that still retains its natural dynamics and transients.
6 Limiting & Compression Techniques To Elevate Your Mixes
1. Inter-Sample Peak Limiting
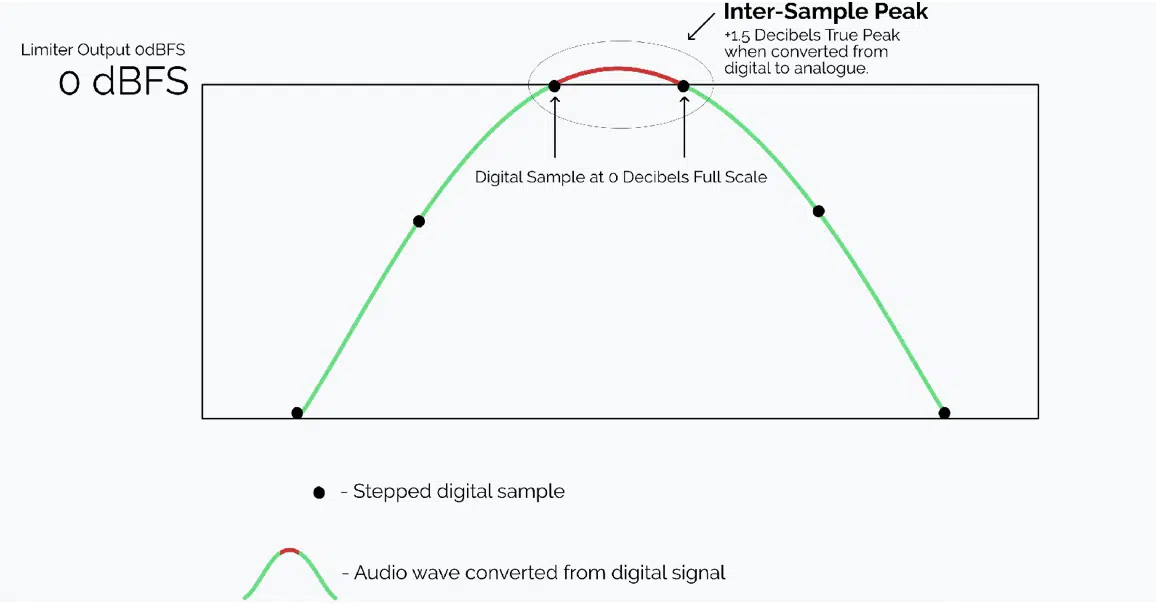
Inter-sample peaks are brief, transient spikes in an audio signal that can occur between digital samples.
These peaks can lead to unintentional clipping and distortion when the audio is converted to an analog signal during playback.
Inter-sample peak limiting is a technique that helps prevent these peaks from causing distortion by accounting for them during the limiting process.
Some limiters come with inter-sample peak detection, which allows you to tackle these issues more effectively.
2. Multiband Limiting
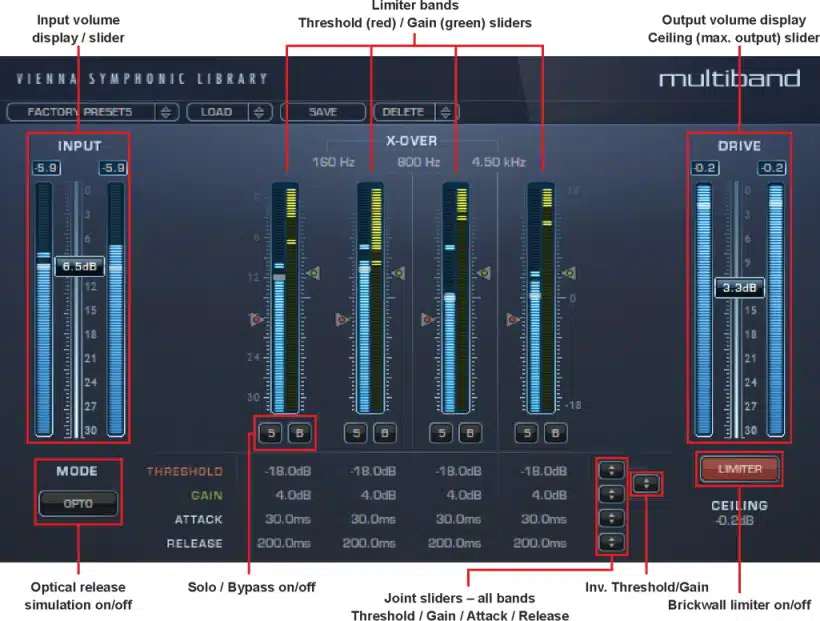
Multiband limiting is a technique where the signal is split into multiple frequency bands, and each band is limited separately.
This allows for more precise control over the limiting process, as you can adjust the settings for each frequency band independently.
Multiband limiting can be particularly useful when dealing with complex mixes.
Or, when you want to preserve the dynamics of specific frequency ranges while still achieving a louder overall sound.
3. Adaptive Release
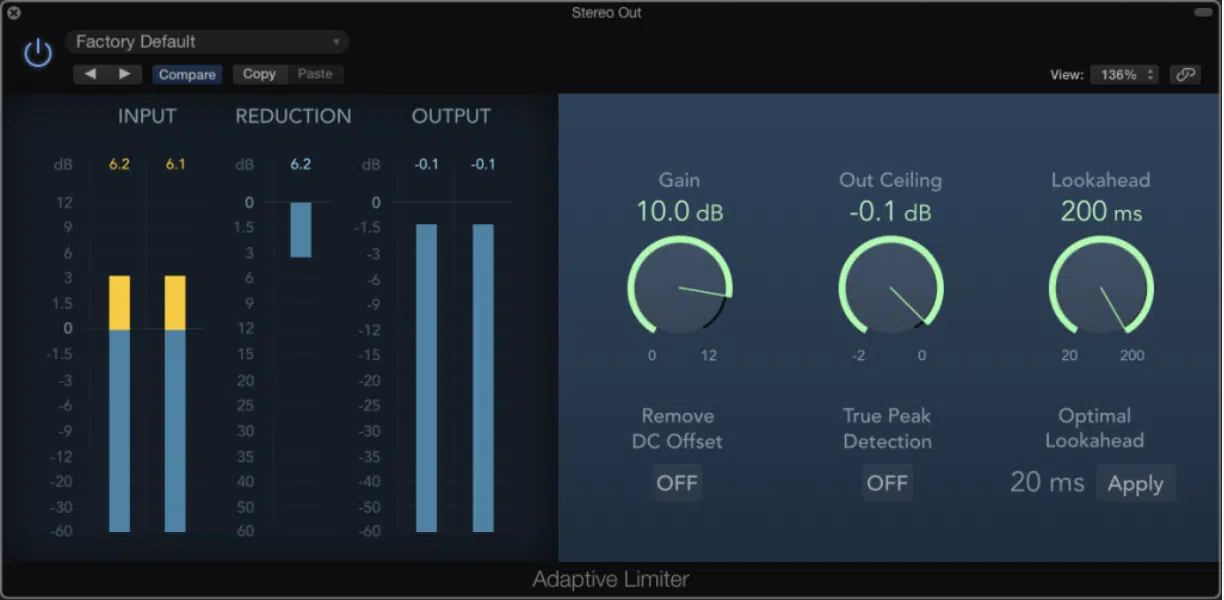
Adaptive release is a feature found in some limiters that automatically adjusts the release time based on the characteristics of the incoming signal.
This can help to create a more transparent limiting effect by allowing the limiter to respond more accurately to the dynamics of the audio.
Adaptive release can be especially beneficial when working with a wide variety of materials, as it can help to prevent the over-limiting or “pumping” artifacts that can occur with fixed release times.
4. Parallel Compression

Parallel compression is a technique where a heavily compressed version of a track is blended with the original, unprocessed signal.
This technique allows you to maintain the natural dynamics of the original track while adding weight and presence from the compressed version.
Also, it can be particularly effective on drum tracks or vocals, as it can help to create a more powerful, punchy sound without losing the original dynamics.
5. Sidechain Compression
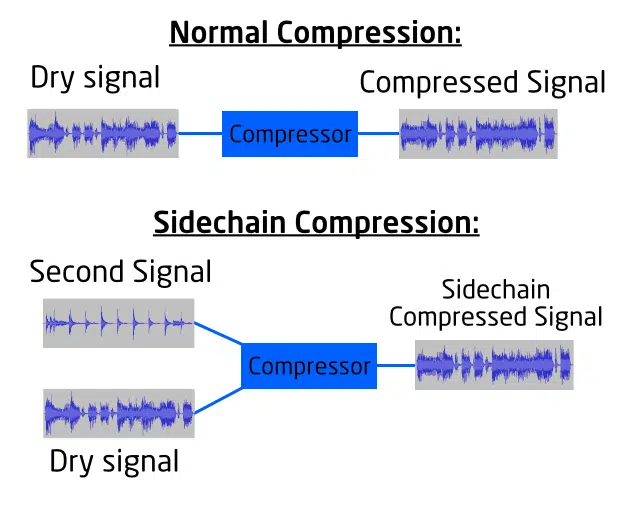
Sidechain compression is a technique where the compression applied to one track is controlled by the level of another track.
This is often used to create space in a mix.
An example would be ducking a bassline when a kick drum hits or lowering the volume of background music when vocals are present.
Sidechain compression can create a more balanced mix by allowing important elements to stand out without clashing with other tracks.
6. Mid/Side Compression
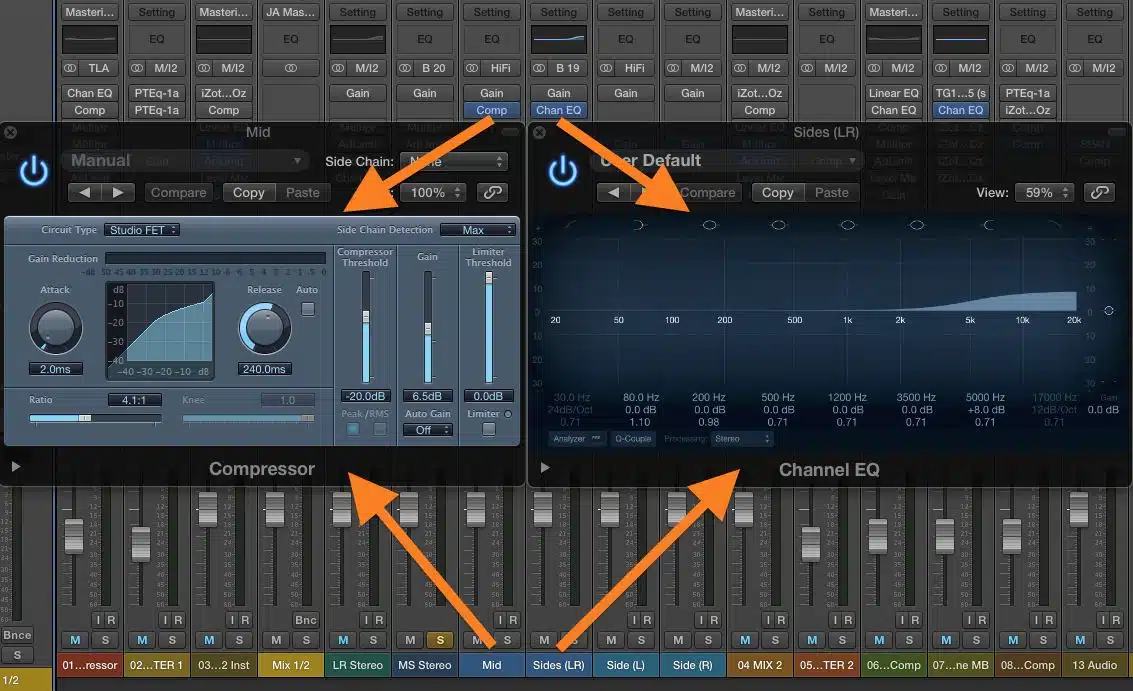
Mid/side compression is a technique that processes the mid (center) and side (stereo) information of a signal separately.
By compressing the mid and side channels independently, you can achieve a greater sense of space and depth in your mix.
For example, you might apply more compression to the mid-channel to tighten up the center of the mix while leaving the side channels less compressed to preserve the stereo width and ambiance.
It can be especially useful during mastering or when working with stereo tracks that need more precise control over their dynamics.
Final Thoughts
Limiting and compression are essential tools in music production, each with its unique strengths and applications.
Understanding the key differences between them and knowing when to use each one can make a significant impact on your mixes.
By mastering the art of compression and limiting, you’ll be well on your way to achieving professional-sounding tracks that stand up against the competition.
So, get out there and start experimenting with these powerful audio processors, and watch your mixes come to life.
But before you do, you’ll need the dopest sounds around to practice these new techniques.
Luckily, inside the FREE Unison Beatmaker Box (Free Teaser) Pack, you’ll have access to the sickest bass loops, most entrancing melody loops, addicting drum loops, and the most hypnotizing guitar loops on the planet.
They’re all crafted by professionals and pristine beyond belief.
You’ll also have access to all the matching audio stems & MIDI, so you can manipulate them however you’d like.
I suggest starting with some side-chaining practices to kick you off.
Until next time…


Leave a Reply
You must belogged in to post a comment.