Going hand in hand with yesterday’s article, today we’re talking all about bit depth vs sample rate.
As a producer, knowing the differences between the two can seriously help you improve your recordings, mix with more precision, and avoid any unnecessary digital artifacts.
Plus, understanding how bit depth affects dynamic range and how sample rate influences frequency response will give you total control over the quality and clarity of your tracks.
This way, you’ll be able to choose the right settings for recording music, mixing, and exporting like a professional.
We’ll be covering everything you need to know about bit depth vs sample rate, like:
- What bit depth actually does ✓
- How sample rate affects audio quality/a sound wave ✓
- The relationship between bit depth and dynamic range ✓
- Why audio sample rates impact frequency response ✓
- How to prevent aliasing in your recordings ✓
- Best bit depth for recording music and mixing ✓
- Sample rate and bit depth tips, tricks, and techniques ✓
- When higher sample rates actually make a difference ✓
- CPU performance vs. audio quality—finding the balance ✓
- Choosing the right settings for different platforms ✓
- Much more about bit depth vs sample rate ✓
By the end of the article, you’ll know exactly how to choose the best bit depth and sample rate for your workflow and avoid common mistakes that degrade audio quality.
You’ll successfully record with razor-sharp precision, mix like the best of them, and export tracks that sound clean and professional.
Your tracks will be optimized for streaming, free of unwanted noise or distortion, and ready for upload to any streaming platform.
Table of Contents
Bit Depth vs Sample Rate: Breaking it Down
When working with digital audio, bit depth vs sample rate plays a huge role in the clarity, accuracy, and quality of your sound. Whether you’re recording, mixing, or mastering, knowing how these two factors affect the resolution of your audio signal and frequency response can make a big difference in the final result. So, let’s kick things off by discussing sample rate and bit depth must-knows.
-
What is Bit Depth?
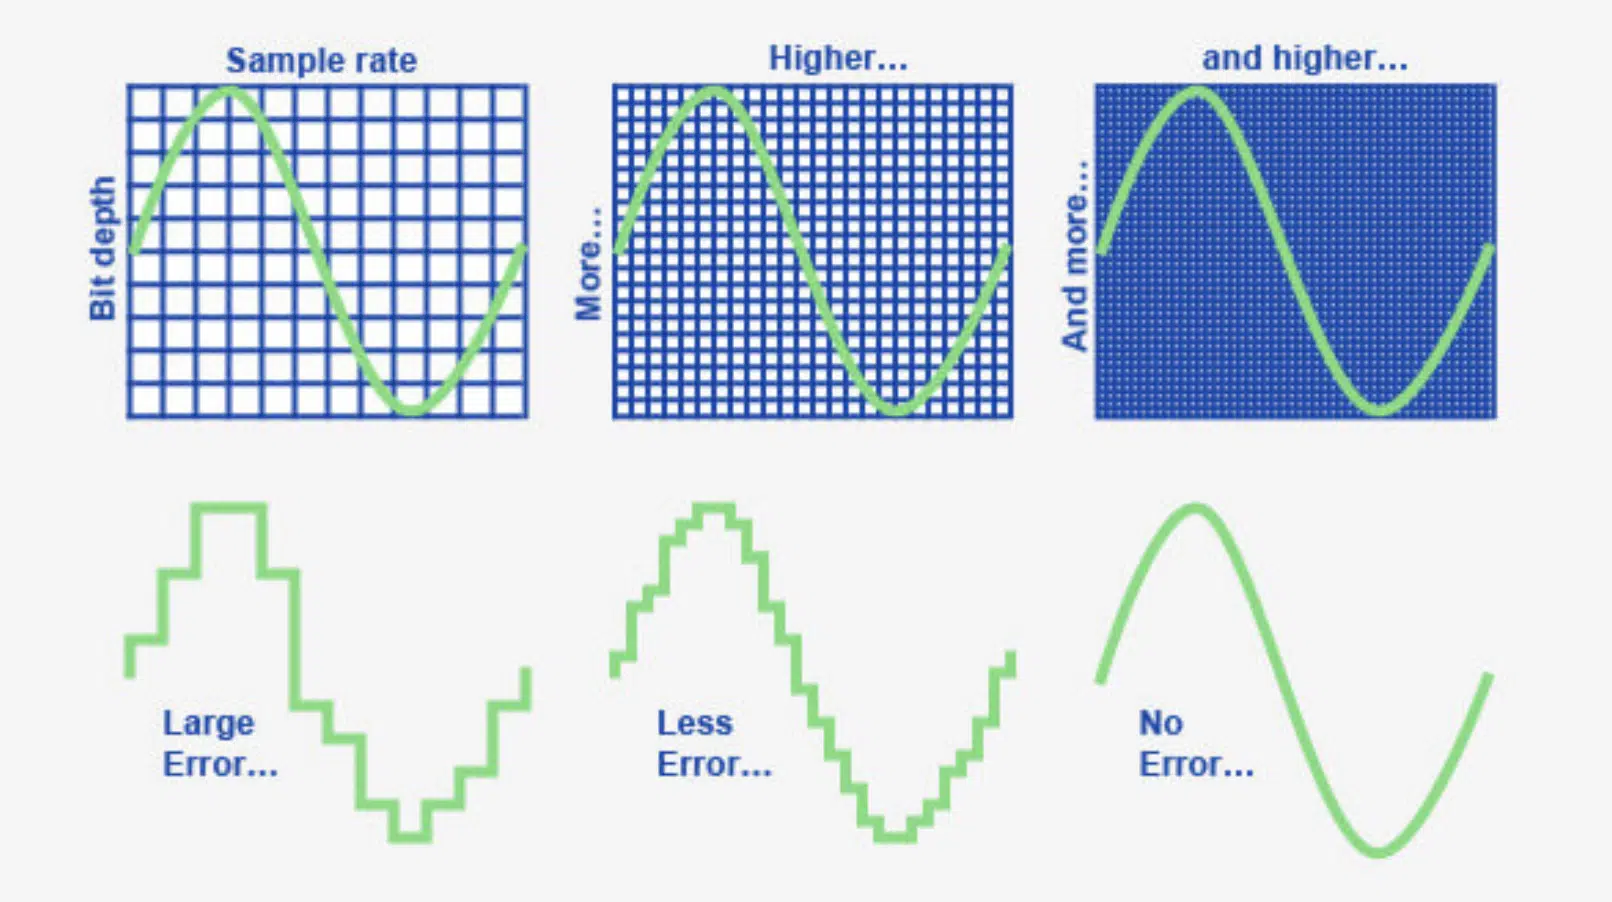
Bit depth refers to/controls how precisely amplitude levels are captured in digital audio, determining the dynamic range and noise floor of a recording.
16-bit audio files can represent 65,536 possible amplitude values per sample.
24-bit audio files, on the other hand, jump to 16,777,216 一 making quieter details more accurate and reducing unwanted digital noise.
Higher bit depth allows for greater headroom, meaning you won’t introduce quantization noise when applying gain adjustments or processing effects.
The dynamic range also expands with bit depth—16-bit audio has about 96 dB, while 24-bit audio reaches 144 dB for smoother fades and quieter reverb tails.
If you’re recording, higher bit depth helps retain the full range of performances without adding artificial graininess or distortion.
Don’t worry, we’ll break it down further in a minute.
-
What is Sample Rate?
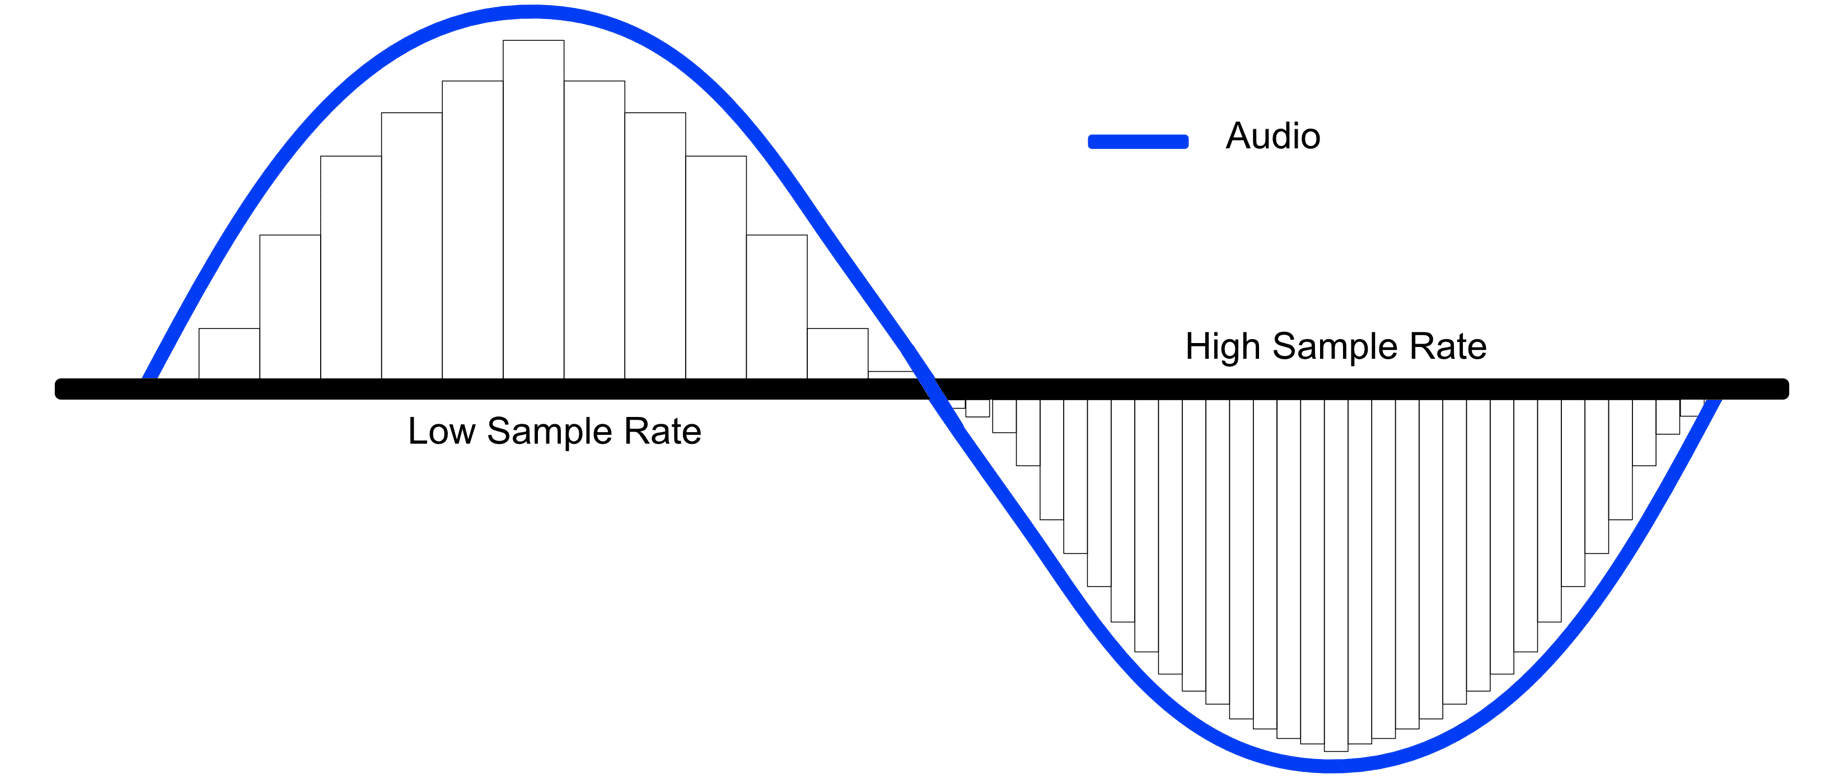
Sample rate refers to/defines how often the input audio signal is captured per second, directly affecting the frequency response of the final audio.
A 44.1 kHz sample rate takes 44,100 snapshots per second, which allows for a Nyquist frequency of 22.05 kHz, covering the full range of the human ear/human hearing.
If your audio includes higher frequency components, a 48 kHz audio sample rate extends the Nyquist frequency to 24 kHz.
This is why it’s the standard for video and professional recordings.
For extreme sound design or high-detail recordings, using 96 kHz pushes the Nyquist limit to 48 kHz, which reduces the risk of aliasing artifacts when applying pitch shifts or time-stretching effects.
While higher sampling rates improve accuracy, they also increase CPU load and file sizes, so it’s all about balancing performance and quality based on your project’s needs.
Pro Tip: Remember, when converting an analog sound wave/continuous analog waveform into a digital signal, choosing the right sample rate and bit depth ensures you capture the full detail and dynamic range of the original sound wave.
If these settings are too low, the original sound wave can lose important high-frequency details and transient accuracy.
This will make your recordings sound dull and lifeless, and nobody has time for that.
How Bit Depth Affects Your Music Production Workflow
When comparing bit depth vs sample rate, it’s important to understand how bit depth directly impacts the clarity, detail, and noise floor in your recordings and mixes. Choosing the right bit depth can mean the difference between a clean, professional sound and unwanted distortion or noise creeping into your tracks. So let’s get into it.
-
Dynamic Range and Noise Floor
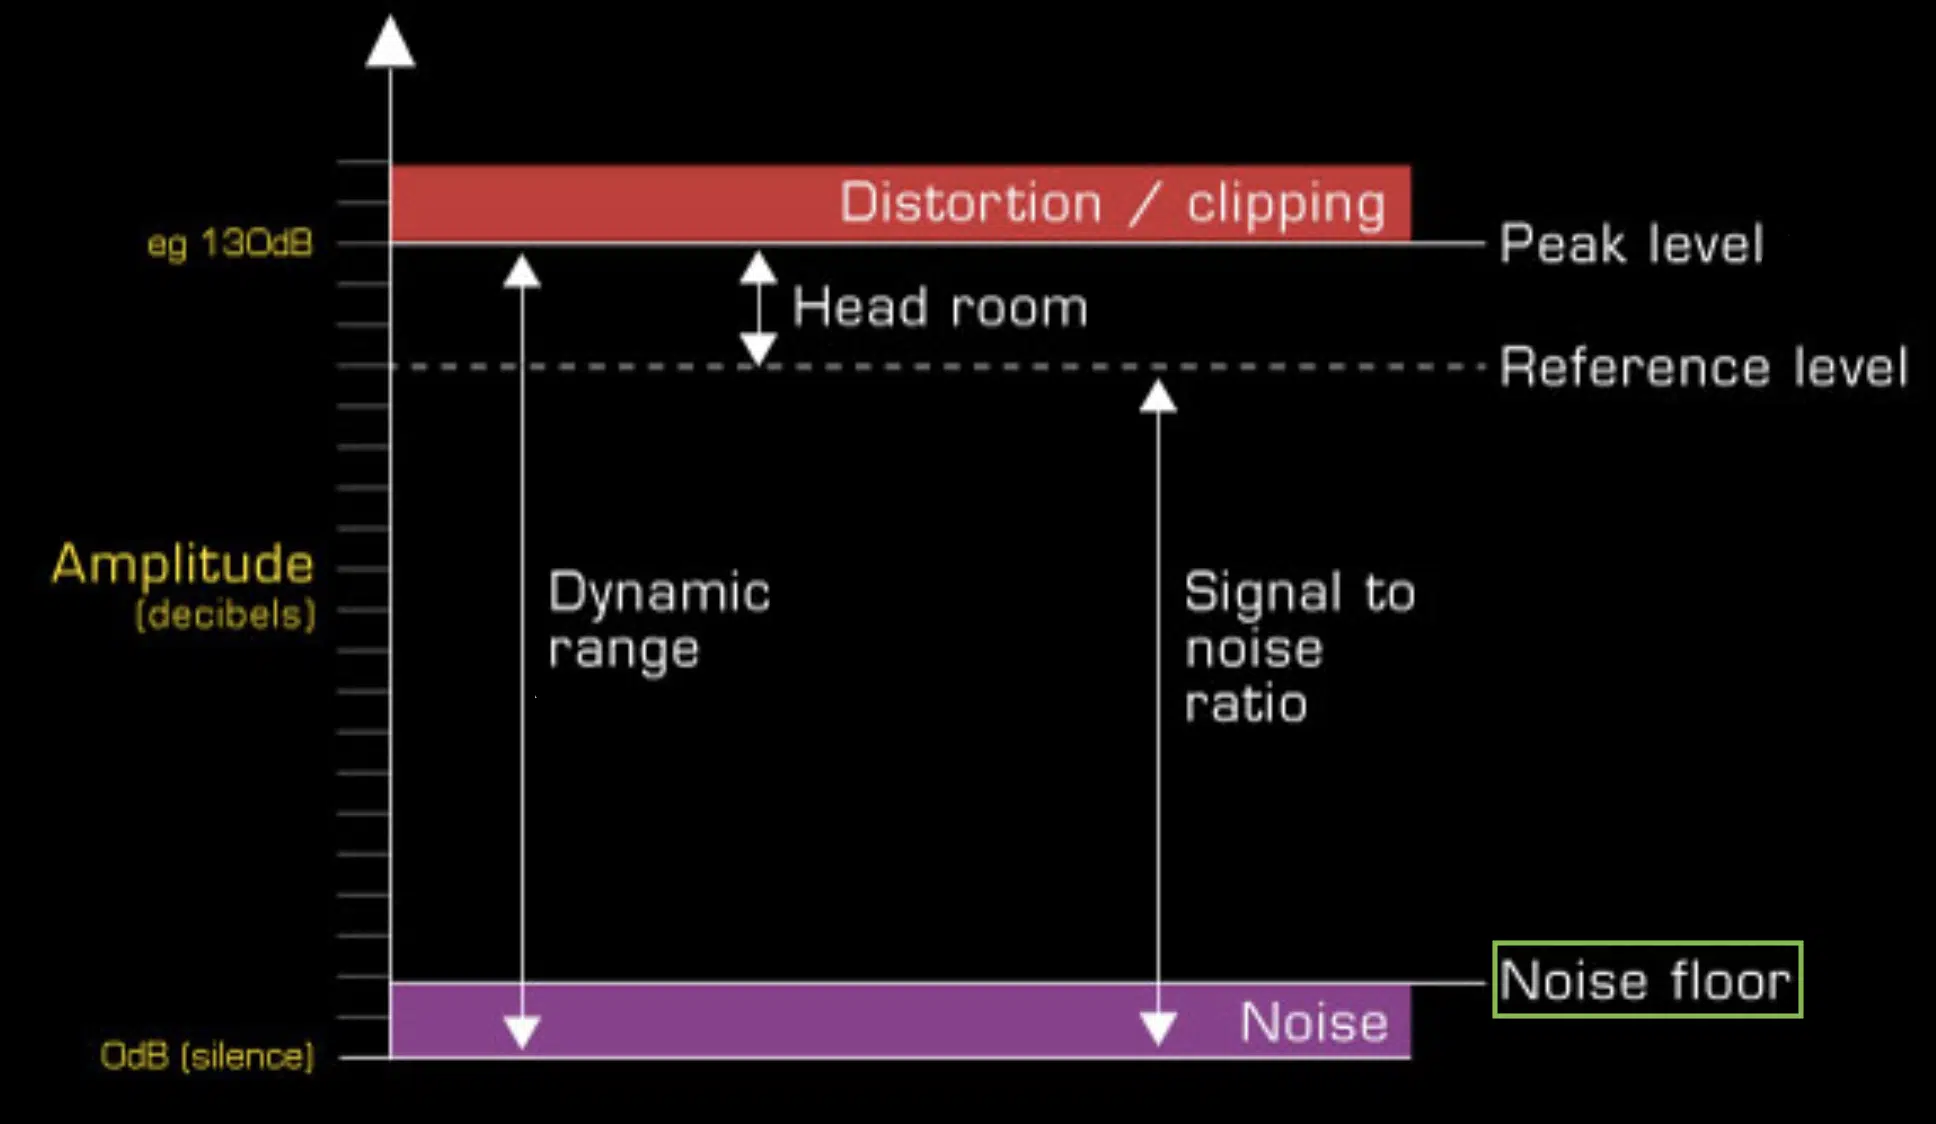
The bit depth of a digital audio file determines how many volume levels can be accurately captured.
This directly affects dynamic range and the noise floor of your recordings.
Dynamic range is the difference between the loudest and quietest sounds a system can capture, measured in dBs.
A higher bit depth increases dynamic range 一 preventing unwanted distortion and clipping in louder sections.
The noise floor refers to the quietest level of background noise in a recording.
Lower bit depths introduce quantization noise, which makes subtle details harder to hear, especially when it comes to quiet passages.
A higher bit depth provides greater resolution for low-level sounds, reducing quantization noise, which occurs when amplitude levels are rounded due to limited digital values.
At 16-bit, the dynamic range is around 96 dB (meaning anything quieter than this level could get lost in digital noise).
Keep in mind that moving to 24-bit increases the dynamic range to 144 dB.
This allows for cleaner fades, more detailed reverb tails, and better overall clarity in quiet ambient textures without unwanted artifacts.
If you’re recording delicate instruments like acoustic guitar, soft vocals, or orchestral strings, using a higher bit depth ensures that every subtle nuance is captured without introducing digital distortion.
-
Choosing the Right Bit Depth for Recording and Mixing
When deciding between 16-bit, 24-bit, and 32-bit float, it all comes down to how much detail and headroom you need in your project.
16-bit audio is standard for CD-quality recordings and works fine for finished, exported tracks, but it isn’t ideal for audio recording because it limits the possible dynamic range and increases the risk of quantization noise.
24-bit audio is the industry standard for audio recording and mixing.
This is because it offers 144 dB of dynamic range, which prevents low-level noise buildup and gives you more room to make gain adjustments.
Most audio interfaces operate at 24-bit, so setting your DAW’s bit depth to 24-bit ensures that you’re getting the best resolution without unnecessary processing strain.
Side note, if you’re looking for the absolute best audio interfaces in the game, I got you.
Now, If you’re working with extreme dynamic processing, heavy automation, or aggressive gain staging, using 32-bit float gives you virtually unlimited headroom.
This prevents clipping and preserving transient detail even after multiple stages of processing.
However, 32-bit float recordings take up more storage space and aren’t necessary unless you’re working in high-resolution post-production, film scoring, or extreme sound design.
For most producers, sticking with 24-bit when audio recording and mixing.
Then, exporting at 16-bit for final delivery, offers the best balance of quality, flexibility, and the size of audio files.
How Audio Sample Rate Affects Audio Quality
When looking at bit depth vs sample rate, understanding how the audio sample rate affects your sound quality is just as important as choosing the right bit depth. While bit depth controls the greater dynamic range and resolution, audio sample rate determines how accurately frequencies are captured and whether your digital audio is clean or distorted by aliasing.
-
Nyquist Frequency and Aliasing

The Nyquist frequency is always half the audio sample rate, meaning a 44.1 kHz audio sample rate can accurately reproduce frequencies up to 22.05 kHz.
Since human hearing typically maxes out around 20 kHz, this is why 44.1 kHz became the industry standard for CDs (which are pretty much dead now) and digital music.
However, when an audio signal contains frequencies higher than the Nyquist limit, aliasing occurs 一 creating unwanted distorted tones not in the original recording.
These artifacts fold back into the audible range and make high frequencies sound unnatural or introduce harsh, metallic textures.
To prevent aliasing, professional recordings often use 48 kHz or 96 kHz sample rates, which push the Nyquist frequency higher and allow for cleaner processing in pitch shifting, time-stretching, and synthesis.
So, if you want to sound like a true professional, this is the way to go.
-
Does a Higher Sample Rate Improve Sound?
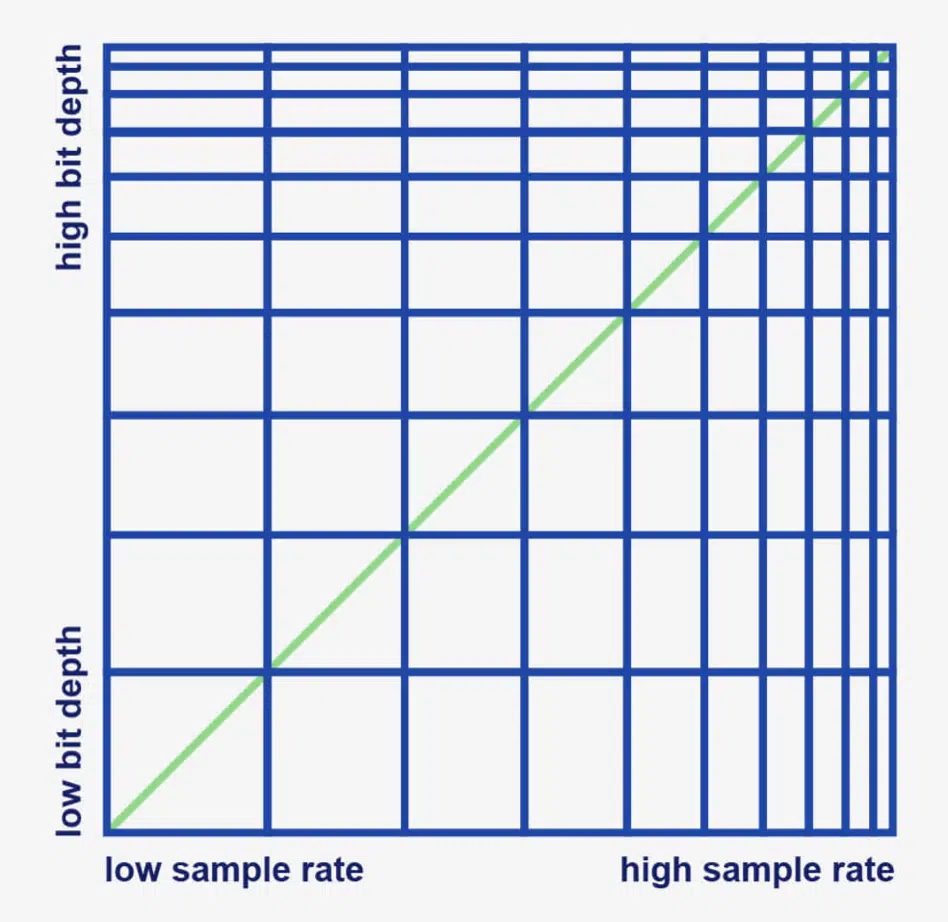
A higher sample rate doesn’t automatically make your digital audio sound better… It depends on what you’re recording and how you process it.
In a standard mix with vocals, drums, and instruments, 44.1 kHz or 48 kHz is more than enough because the Nyquist frequency covers the entire audible range.
But when working with synths, extreme sound design, or high-resolution acoustic recordings, using 96 kHz can reduce aliasing in plugins that generate high-frequency harmonics, such as:
- Distortion
- FM synthesis
- Granular processing
Some high-end reverb and modulation effects also benefit from higher audio sample rates, as they create smoother tails and avoid unnatural filtering.
However, going beyond 96 kHz (such as 192 kHz) rarely provides an audible benefit and only increases CPU load and file size.
This makes it basically unnecessary for most music production workflows.
Best Bit Depth and Sample Rate Settings for Different Music Production Tasks
Choosing the right audio bit depth vs sample rate settings for each stage of your production process will help make sure you get clean recordings, efficient processing, and high-quality exports. Whether you’re tracking vocals, mixing instruments, or mastering for distribution, knowing when to adjust the sample rate and bit depth settings can save CPU power and prevent unnecessary artifacts. So let’s recap.
-
Recording Vocals and Instruments

When recording, using 24-bit depth is the industry standard because it provides 144 dB of dynamic range for cleaner recordings with no unwanted noise floor.
An audio sample rate of 48 kHz is ideal for most professional audio recording situations, as it captures the full frequency range.
This ensures compatibility with film and broadcast audio.
If you’re recording acoustic instruments with intricate details, like classical piano or violin, a 96 kHz audio sample rate can provide more clarity for high-end transients.
However, using 96 kHz or higher for standard vocal tracking is unnecessary since human speech rarely exceeds 20 kHz 一 making 48 kHz the best balance of accuracy and efficiency.
Just keep in mind that keeping your DAW set to 24-bit/48 kHz during tracking ensures you capture all the detail you need without overloading your CPU.
-
Mixing and Mastering Considerations For Bit Depth and Sample Rate
When mixing, your audio bit depth vs sample rate settings affect how your plugins process sound and whether aliasing artifacts appear, like we talked about.
Keeping your session at 24-bit/48 kHz ensures that certain effects operate smoothly without introducing high-frequency distortion, like:
- EQs
- Compressors
- Saturation effects
Some high-end reverbs and delay plugins sound better at 96 kHz, as they generate longer reflections and tails without unnatural filtering.
However, increasing the audio sample rate beyond 96 kHz during mixing rarely provides an audible benefit and only increases CPU usage.
When exporting for mastering, it’s standard to keep the mix at 24-bit but let the mastering engineer decide whether to downsample the audio sample rate based on the final delivery format.
Speaking of mastering engineers, if you want to learn how to become a mastering engineer, I got you covered.
NOTE: For distribution, most streaming platforms require a 16-bit / 44.1 kHz file, which is why applying dithering before reducing audio bit depth is essential for preventing unwanted quantization noise.
-
How Higher Bit Depth and Sample Rates Affect CPU Load
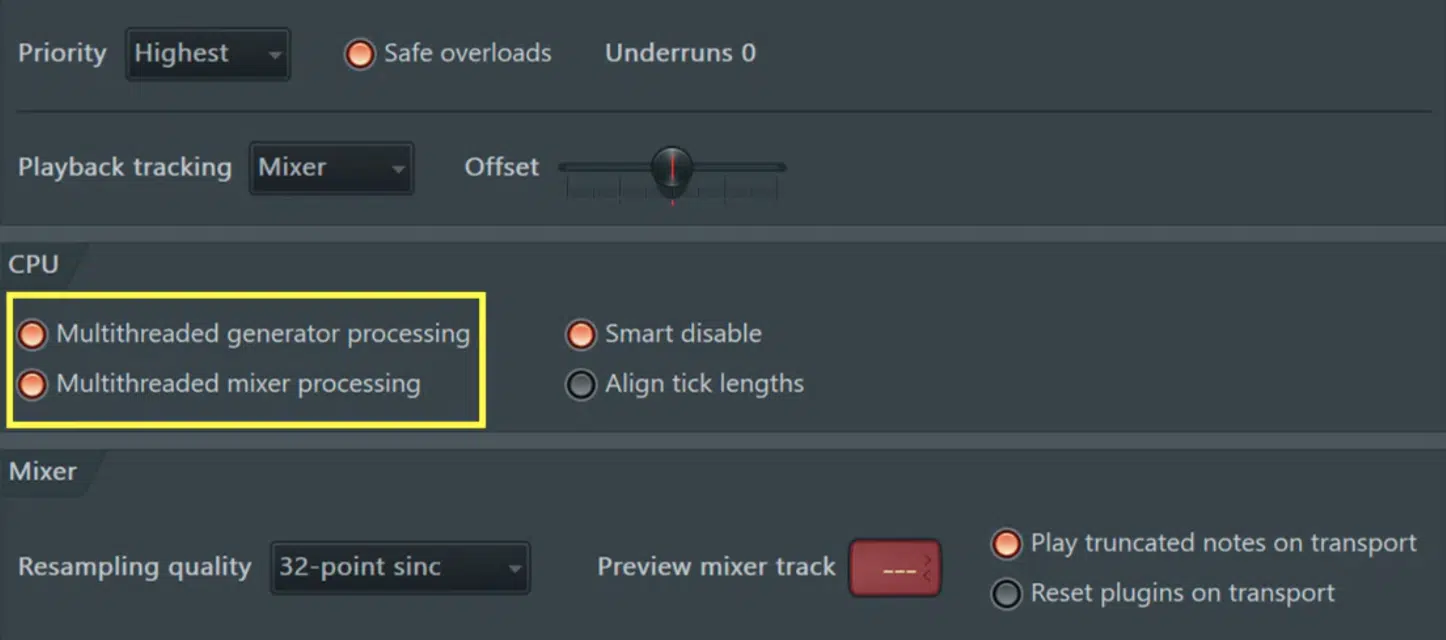
Running your session at a higher bit depth and sample rate gives you more precision and clarity, but it also demands more from your CPU and storage.
You definitely have to keep this in mind.
A 24-bit / 48 kHz session keeps processing efficient, while moving to 96 kHz doubles the required CPU power/disk space since it processes twice as much data per second.
If you’re running a complex session with multiple synths, effects chains, and high-quality plugins, higher sample rates can lead to buffer underruns and latency issues, especially on older computers.
Some virtual instruments and heavy-processing effects (like convolution reverbs and harmonic exciters) already oversample internally.
This means running your DAW at 96 kHz or higher might not even improve sound quality because it just strains your system.
If you start experiencing crackling audio, dropouts, or sluggish plugin response, lowering the audio sample rate to 48 kHz while keeping 24-bit depth is often the best way to maintain sound quality that is professional without taxing your CPU.
-
Oversampling vs. Increasing Sample Rate
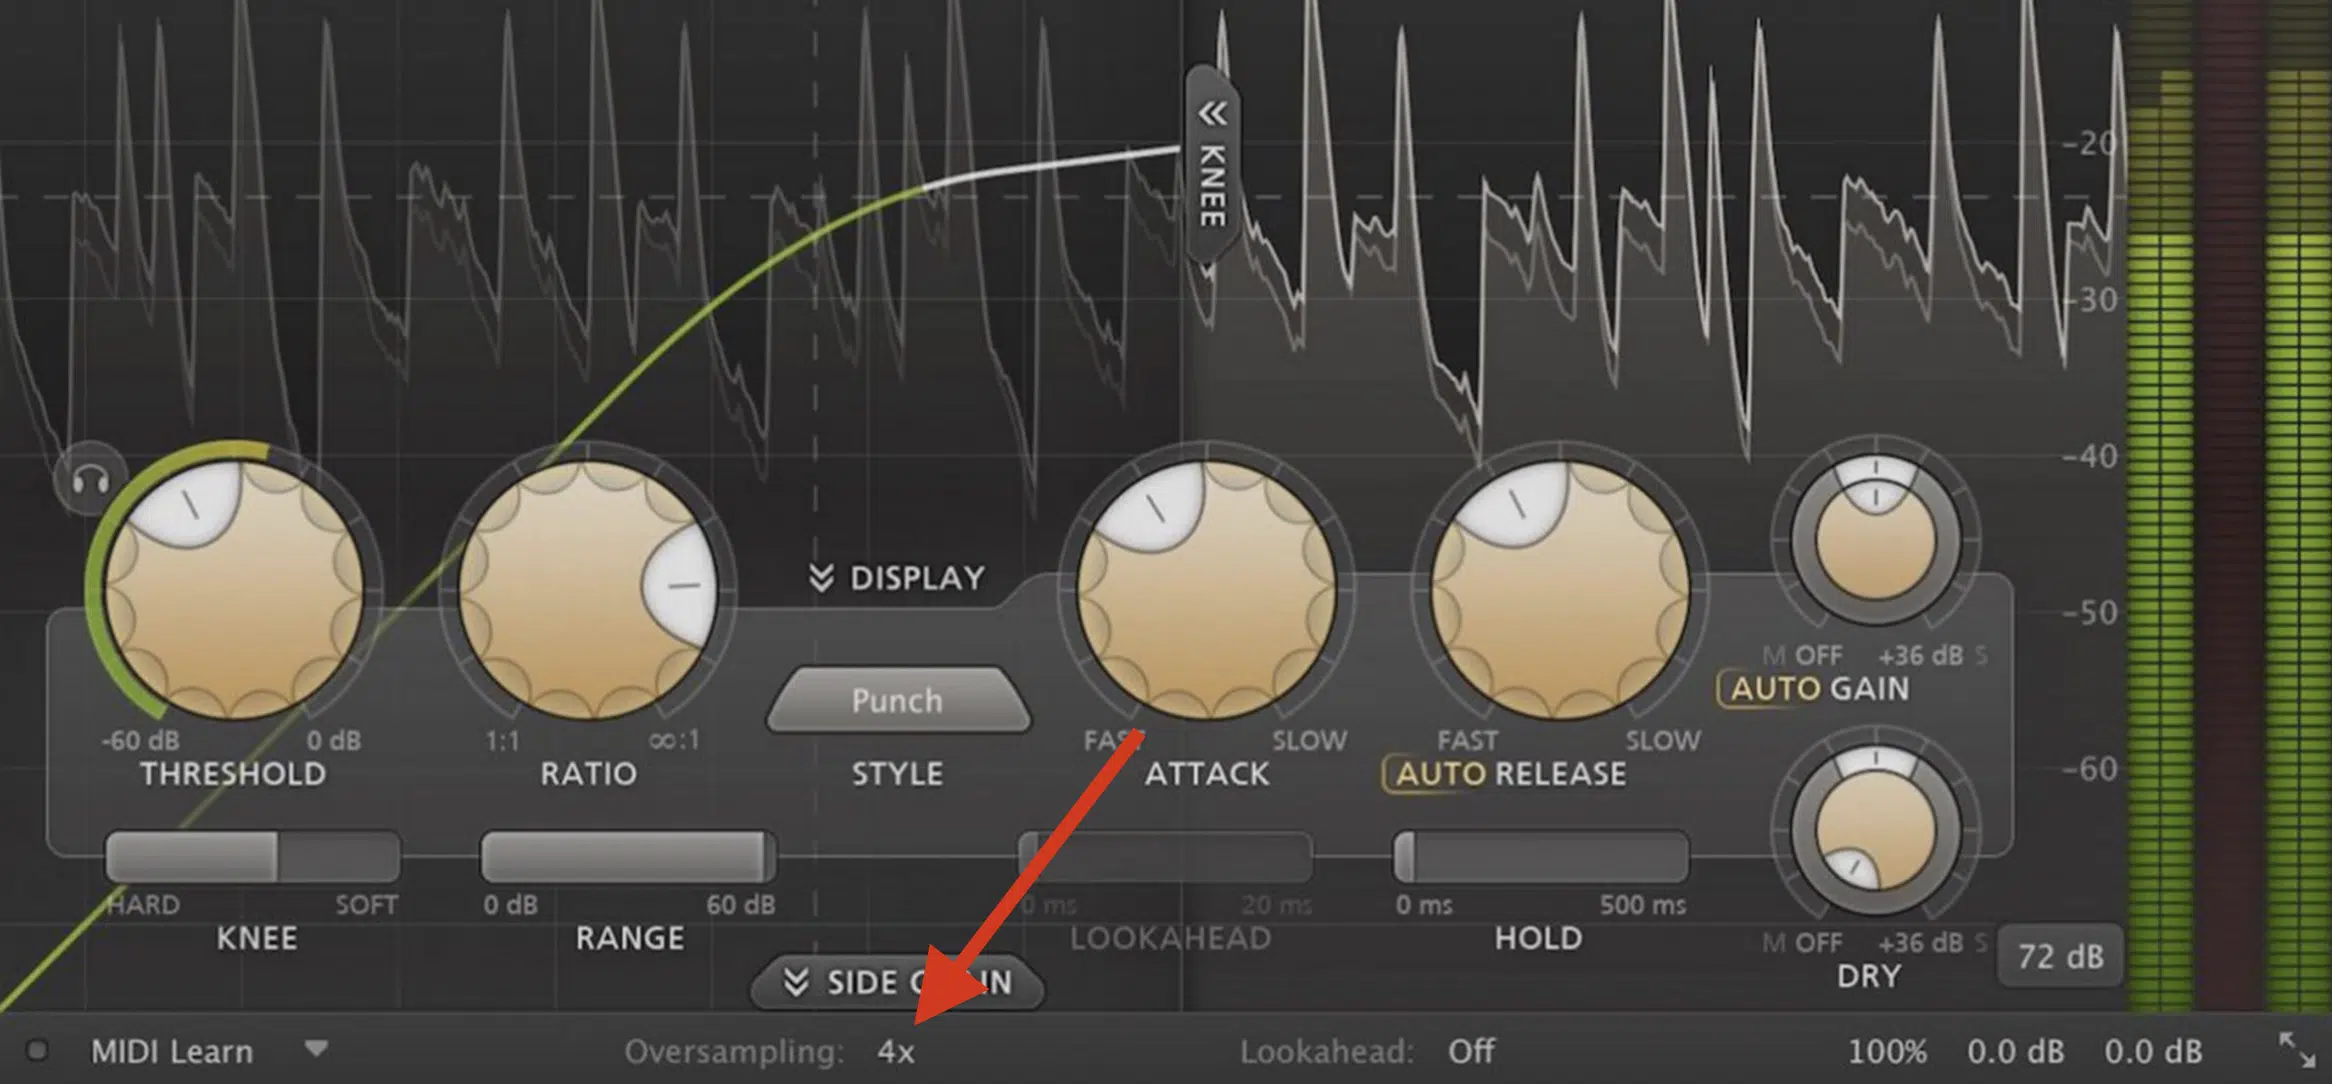
Instead of increasing your session sample rate, you can use oversampling.
This temporarily processes digital audio at a higher resolution before downsampling it back to your project’s settings.
Many high-end plugins, like FabFilter Saturn 2, Soundtoys Decapitator, and iZotope Ozone 11, include 2x, 4x, or even 8x oversampling to reduce aliasing.
And improve high-frequency processing as well, of course.
Unlike raising your session’s sample rate, which affects everything in your project, plugin oversampling only applies to specific effects.
You get all the benefits without the massive CPU load (win-win, am I right?).
This is especially useful for distortion, saturation, and limiters, where harmonic generation can introduce unwanted artifacts if processed at lower sample rates.
However, enabling too much oversampling can still increase CPU strain, so a good rule of thumb is to only use it where it makes a noticeable difference.
If your DAW or plugin offers real-time and offline oversampling, you can keep it low during playback and switch to 4x or 8x during rendering.
This equals better final quality without slowing down your workflow.
For example, if you’re using FabFilter Saturn for multi-band saturation, keeping oversampling at 2x during playback prevents unnecessary CPU load, while switching to 4x or 8x during export ensures cleaner harmonic processing without aliasing.
Final Thoughts
And there you have it: everything you need to know about bit depth vs sample rate.
With all this knowledge, you’ll be able to successfully choose the best settings for recording and mixing, avoid unwanted noise and distortion, and optimize your tracks for any platform.
Plus, you’ll understand how sample rate affects frequency response, why bit depth impacts dynamic range, and when higher settings actually make a difference.
Just remember, it’s all about balancing quality and CPU performance and knowing when to adjust your settings based on your project’s needs.
So don’t blindly crank up your sample rate or bit depth without considering the impact on your workflow.
Otherwise, you’ll end up wasting CPU power and storage without any real benefit, and you certainly don’t want that.
And, as a special bonus, you’ve got to check out all these mind-blowing Free Sample Packs that are making major waves right now.
There’s everything you could need to enhance your sounds/appeal, from MIDI files and basslines to full-blown beatmaker packs and drum kits.
There are even project files that show you everything you need to know (from start to finish) about how to make a pro-level beat.
They were all created by the best producers and sound designers in the game, plus, they’re all 100% royalty-free, so feel free to use them however you’d like.
Regardless of genre or style, you’ll definitely find something to enhance your skills and make your beats really pop.
Bottom line, when it comes to learning all about bit depth vs sample rate, it really boils down to understanding how they affect your audio quality, processing, and final output.
Once you fully master that, you’ll be able to dial in the best settings for every stage of production and make the right decisions about CPU efficiency and sound clarity.
You’ll have complete control over your recordings, mixing, and mastering process so your tracks sound polished, professional, and ready for release all day.
Until next time…


Leave a Reply
You must belogged in to post a comment.