Dithering is a fundamental concept in music production, acting as a crucial bridge between the world of digital audio and our innate, analog listening experiences.
It’s a clever technique used to enhance the quality of your audio files during the process of bit-depth reduction, preserving the subtle details and nuances of your sound.
Though it might seem counterintuitive, by introducing a controlled amount of noise (yes, noise!), dithering helps mask quantization errors.
It prevents your music from suffering the harsh, metallic sound of digital distortion.
In today’s article, we’ll be covering:
- What exactly is dithering & why it’s critical in digital audio production ✓
- Quantization, noise shaping, bit depth, and sample rate ✓
- Different types of dithering and when to use them ✓
- The essential function of dithering in the mastering process ✓
- Dithering tips & tricks ✓
- How dithering impacts your final audio file ✓
By the end of this guide, you’ll have a solid understanding of dithering and the knowledge to apply it effectively in your own projects to achieve the best possible audio quality.
So, let’s dive in…
Table of Contents
What is Dithering?
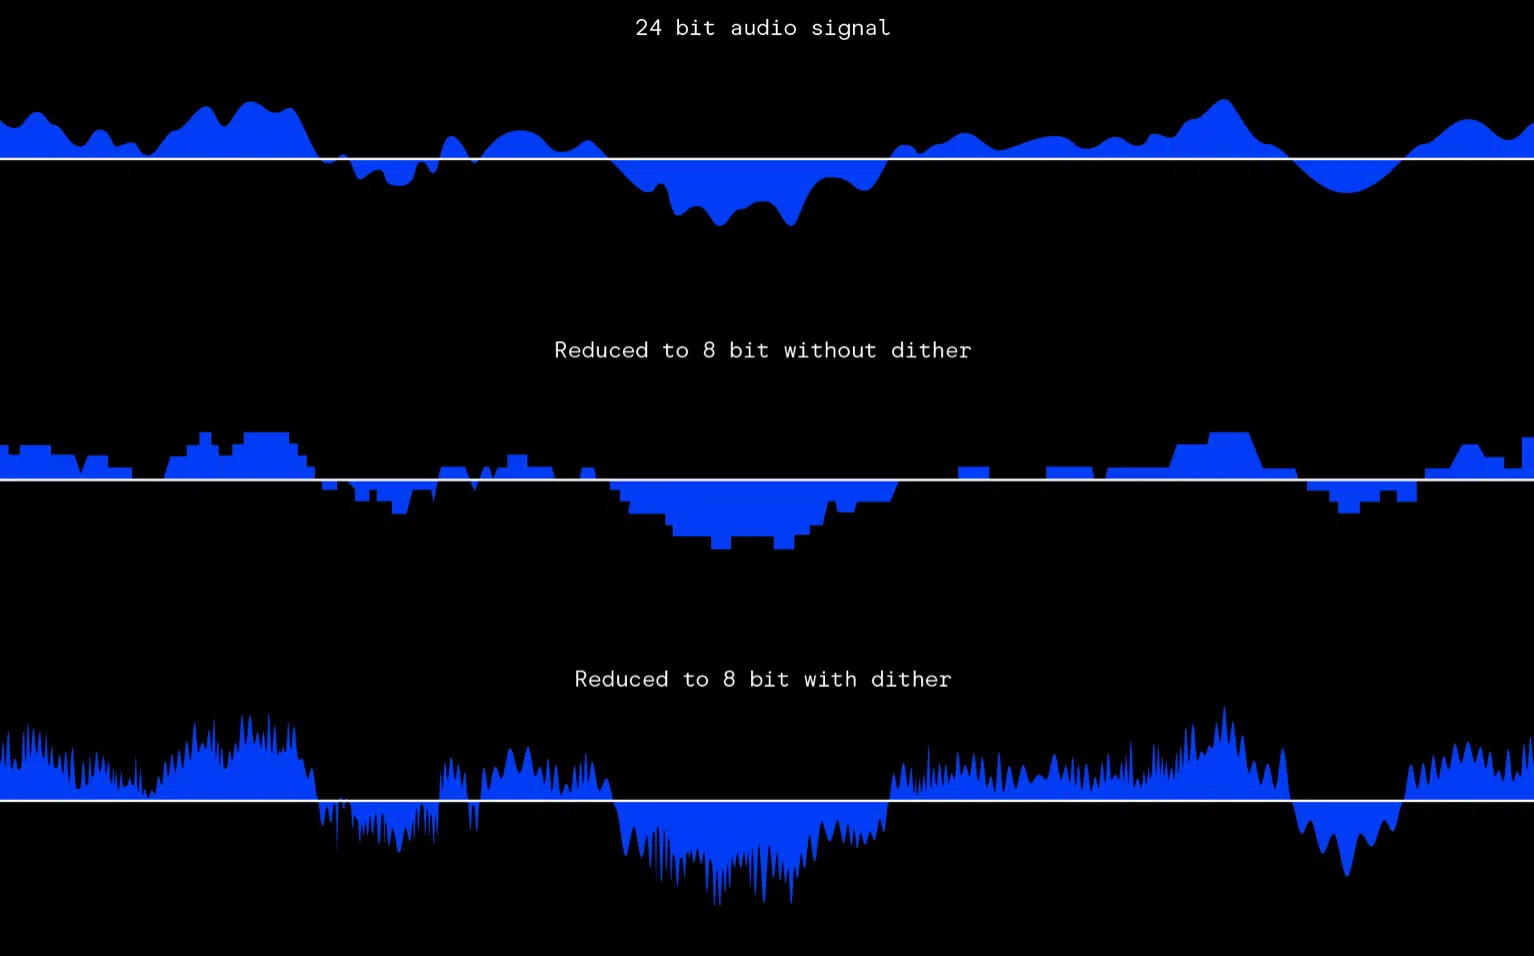
In the realm of digital audio, dithering is a technique used to minimize audio quantization errors and distortion, especially during the bit-depth reduction process.
It involves adding a specific type of low-level noise to your audio file before reducing its bit depth.
The beauty and brilliance of dithering lies in its paradoxical function, because when we think “noise,” we often view it as something bad.
However, in the right context, noise can actually be beneficial to the quality of a given audio file once its undergone bit-depth reduction.
Dithering strategically uses noise to prevent the degradation of your audio file’s overall quality during the conversion process from a higher bit depth (such as 24 bit) to a lower bit depth (like 16 bit).
It’s important to note that the noise we’re talking about here is incredibly low-level, often sitting just above the noise floor, and generally undetectable.
The quantization errors it prevents, however, is not just detectable, but rather insufferable (particularly to the subconsious).
Most of the time, it’s inaudible to the human ear, especially when the music is playing.
However, its impact on the quality of your audio files is profound.
Without dithering, when you reduce the bit depth of your audio, you’ll end up with quantization distortion.
This distortion is a form of error that occurs during the quantization process, and it can make your audio sound harsh or degraded.
By adding dither, you essentially remove these quantization errors, resulting in a smoother and more pleasing sound.
Bit Depth & Sample Rate
In the realm of digital audio, two fundamental concepts are: bit depth and sample rate.
These two factors determine the audio file’s fidelity or how closely the digital audio replicates the original analog signal.
Understanding these concepts is critical to grasping the purpose and value of dithering.
-
Bit Depth
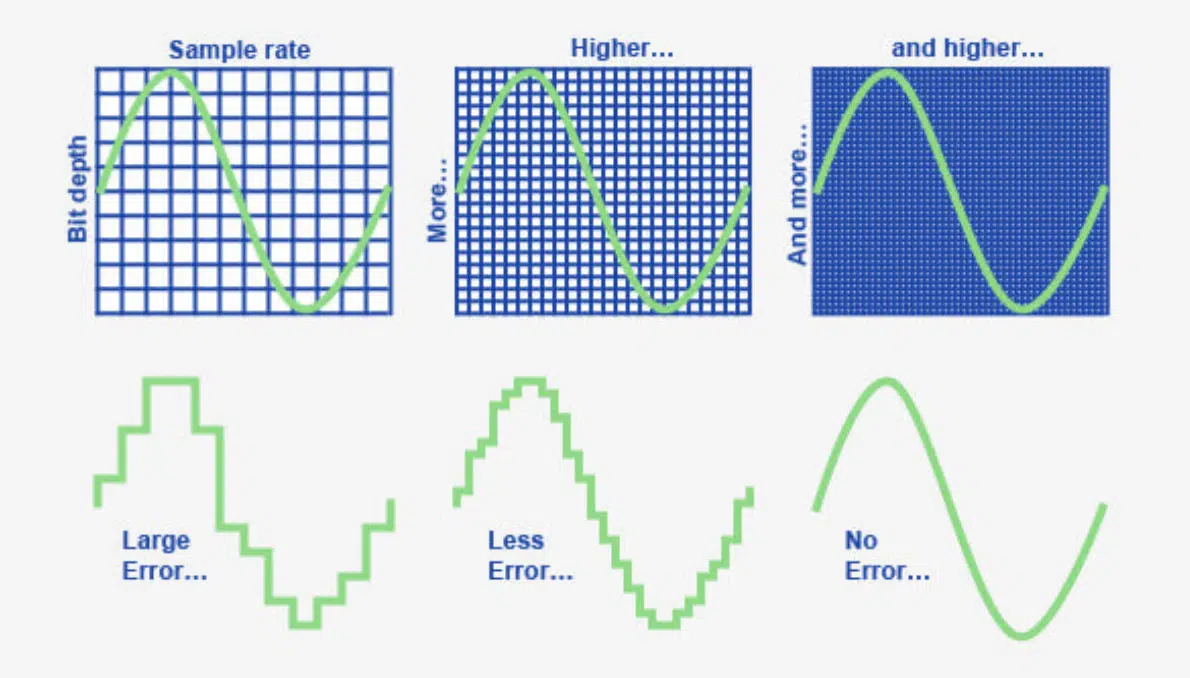
Bit depth is an indicator of the dynamic range of your audio file.
It determines the number of possible amplitude values each sample can take on.
A higher bit depth means more possible values, translating to a more accurate representation of the original audio signal.
The most common bit depths are:
- 16 bit audio
- 24 bit audio
- 32 bit audio (floating-point; near infinite headroom)
The bit depth of your digital audio file plays a significant role in determining its sound quality.
The higher the bit depth, the more accurately your digital audio can capture the nuances and details of the original analog signal (plus more headroom).
16 bit audio, with its 65,536 possible amplitude values per sample, is capable of delivering excellent sound quality.
However, when you compare it to 24 bit audio, with its 16.7 million possible values, the difference in the level of detail captured is super significant.

This difference becomes especially noticeable when dealing with very quiet sounds or delicate, nuanced performances.
These sounds might get lost in a 16 bit recording, whereas a 24 bit recording can capture them with much greater accuracy.
Choosing the right bit depth for your project largely depends on your end goal.
If you’re producing music for a CD, you’ll be working with 16 bit audio.
But, if you’re creating high-resolution audio files for digital distribution or you’re working on a soundtrack for a film, you might opt for 24 bit audio.
NOTE: A higher bit depth means larger audio files. So, if storage or bandwidth is a concern, 16 bit audio might be a more practical choice.
Having said that, if you’re like me and like to future proof thing, 24-bit is quickly becoming the industry standard, since CDs are basically dying out.
-
Sample Rate
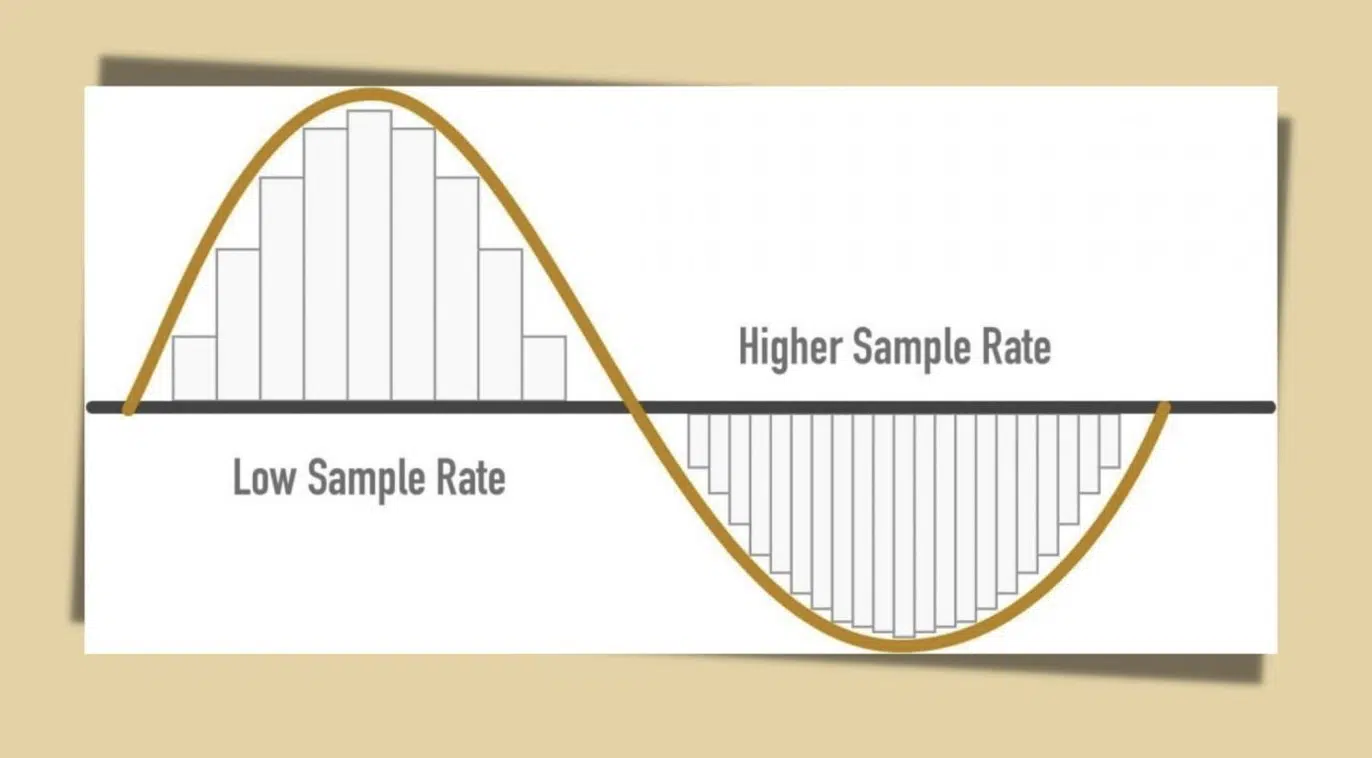
Sample rate, on the other hand, defines the number of times your audio signal is sampled per second.
The more samples taken, the more accurately the digital audio file can reproduce the original signal’s frequencies.
Common sample rates include 44.1 kHz and 48 kHz.
The higher the sample rate, the more accurately the digital audio can represent the original analog signal.
When dithering, it’s essential to choose a dither noise that is below the Nyquist frequency (half the sample rate).
This prevents the dither noise from causing aliasing, a type of distortion that can occur when the sample rate is too low to accurately represent the audio signal.
Moreover, a higher sample rate can allow for more effective noise shaping, as there is more ‘room’ in the higher frequencies to shape the dither noise.
If you’d like to learn all about sample rates, in great detail, make sure to check out our sample rate article.
The Role of Dithering in Digital Audio
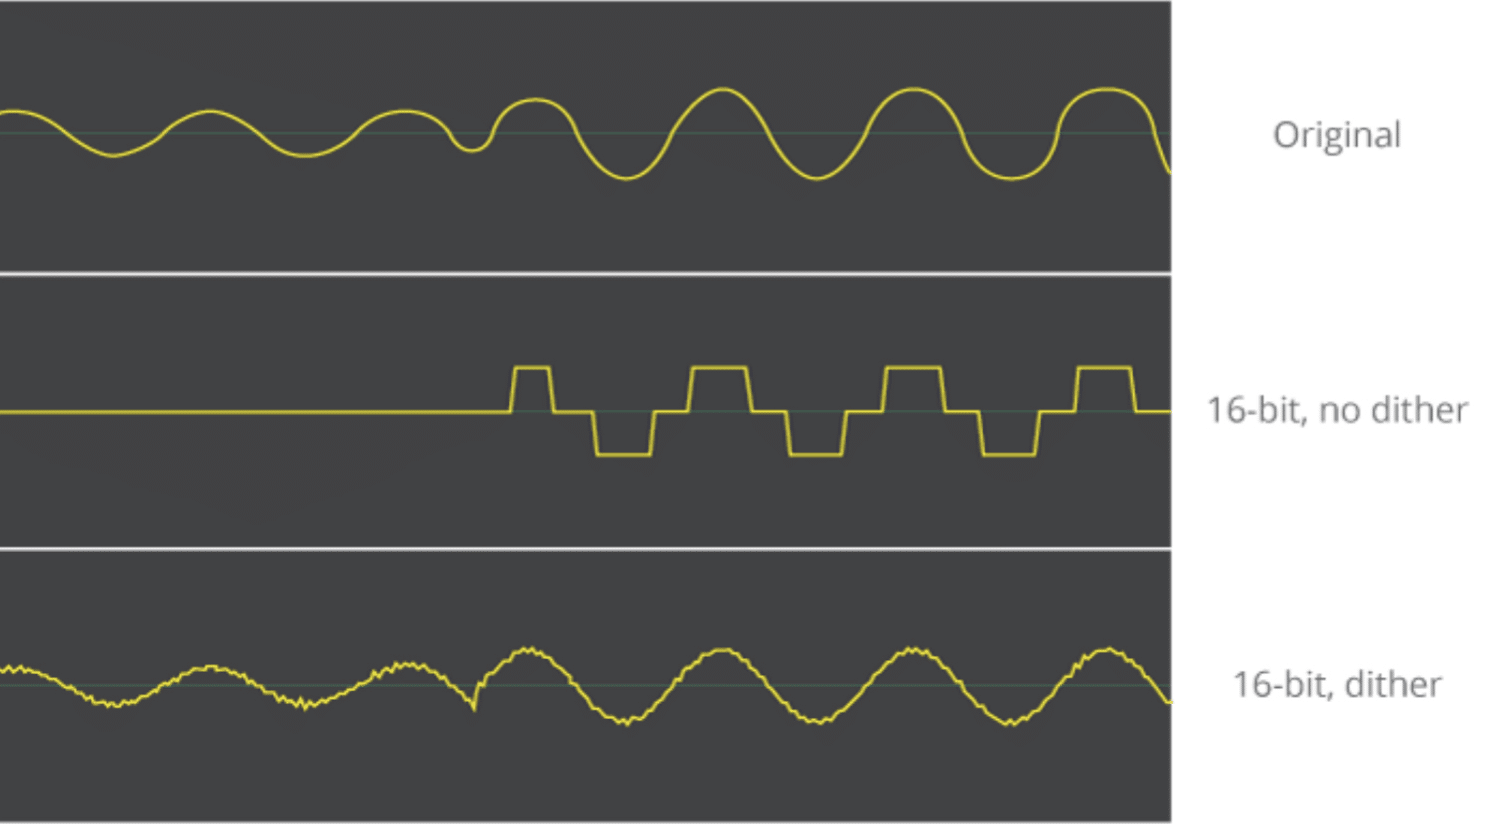
Now that we’ve established what bit depth and sample rate are, let’s explore how dithering fits into this equation.
In the process of digital audio production, there are instances where you need to reduce the bit depth of your audio file 一 for instance, when you’re readying your track for distribution.
During this bit depth reduction, quantization errors can occur, leading to distortion (and not the good kind like harmonic distortion/harmonic saturation) in your audio file.
If you’d like to learn all about harmonic distortion, we’ve got you covered.
You may be thinking, “I’d never convert my samples to a lower bit-depth,” which is something I understand.
However, this is oftentimes implemented without your knowledge, especially when you upload your tracks to just about any streaming service.
Breaking It Down
By adding a carefully calculated amount of noise (dither) to the audio signal, you can mask these quantization errors and reduce distortion.
In essence, dithering is a way to trade quantization distortion for a virtually undetectable hiss.
The effects of dithering are most noticeable in quieter parts of your mix or during fade-outs.
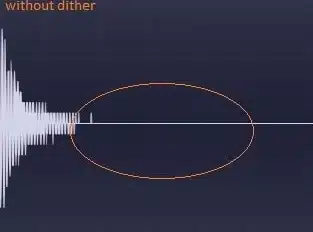
- Without Dithering 一 You may notice a sort of grainy, ‘gritty’ sound (quantization distortion).
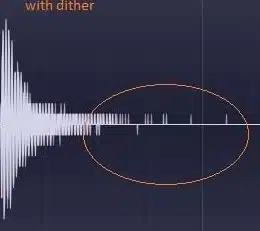
- With Dithering 一 This distortion is replaced by a very low-level noise, which is generally more pleasing to the ear.
Despite its subtle impact, the effects of dithering accumulate over time.
The more processing you do, the more important dithering becomes.
As you stack effects, bounce tracks, and do more work on your mix, the potential for quantization distortion increases.
By understanding and applying dithering correctly, you can ensure your digital audio files maintain their integrity throughout the production process.
Understanding Quantization and Its Distortions
In order to truly understand dithering, you need to grasp the concept of quantization distortion, so let’s break it down.
NOTE: Audio quantization is very different than the quantization we’re all familiar with applying to elements such as MIDI.
-
What is Quantization?
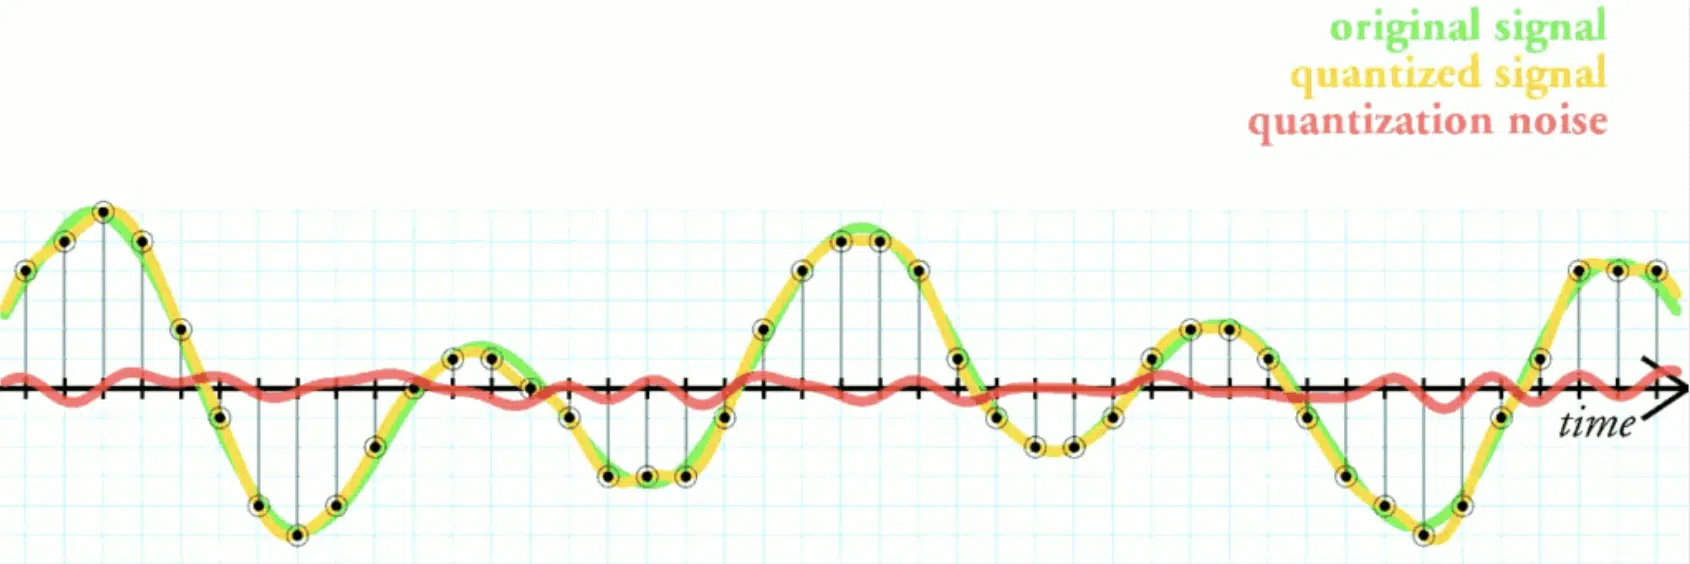
To further our understanding of dithering, we need to delve deeper into the concept of quantization.
In digital audio, quantization is the process of mapping a large set of input values to a smaller set of output values.
Simply put, it’s how we convert a continuous analog signal into a discrete digital signal.
When you record audio into your DAW from, for example, your audio interface, the continuous analog signal from your microphone needs to be converted into digital information.
This process involves sampling the audio signal at regular intervals (determined by your sample rate) and then quantizing these samples to the nearest value allowed by your bit depth.
This is the quantization process in a nutshell.
-
How Quantization Distortion Occurs
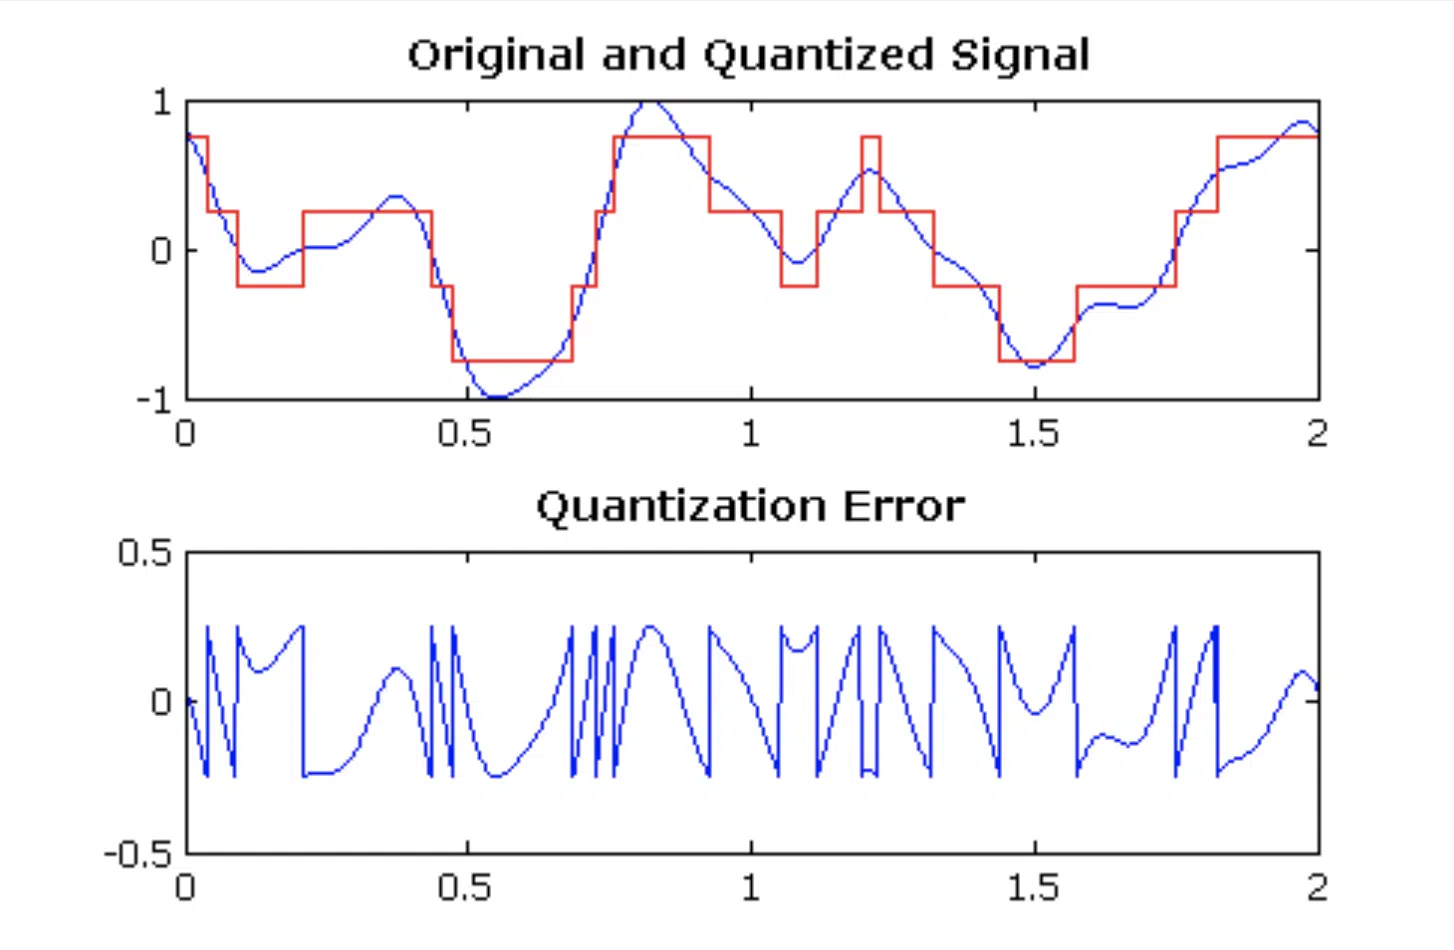
The quantization process isn’t perfect… it introduces a type of error known as quantization error.
This error is the difference between the exact value of the original analog signal and the nearest representable digital value.
The greater the bit depth, the lesser the rate of quantization error.
But when you need to reduce the bit depth, such as when you’re finalizing a track for release, you’re increasing the potential for these errors.
This results in quantization distortion, which will ultimately degrade the quality of the audio file.
By adding a specific type of noise to the audio signal before reducing its bit depth, we can ‘randomize’ these errors.
Instead of unpleasant distortion, we get a low-level quantization noise that is much less noticeable.
Understanding how and when to apply dithering is a key skill, especially when it comes to quantization noise.
It helps preserve the quality of your audio files, ensuring your listeners get the best possible experience.
What is Noise Shaping?
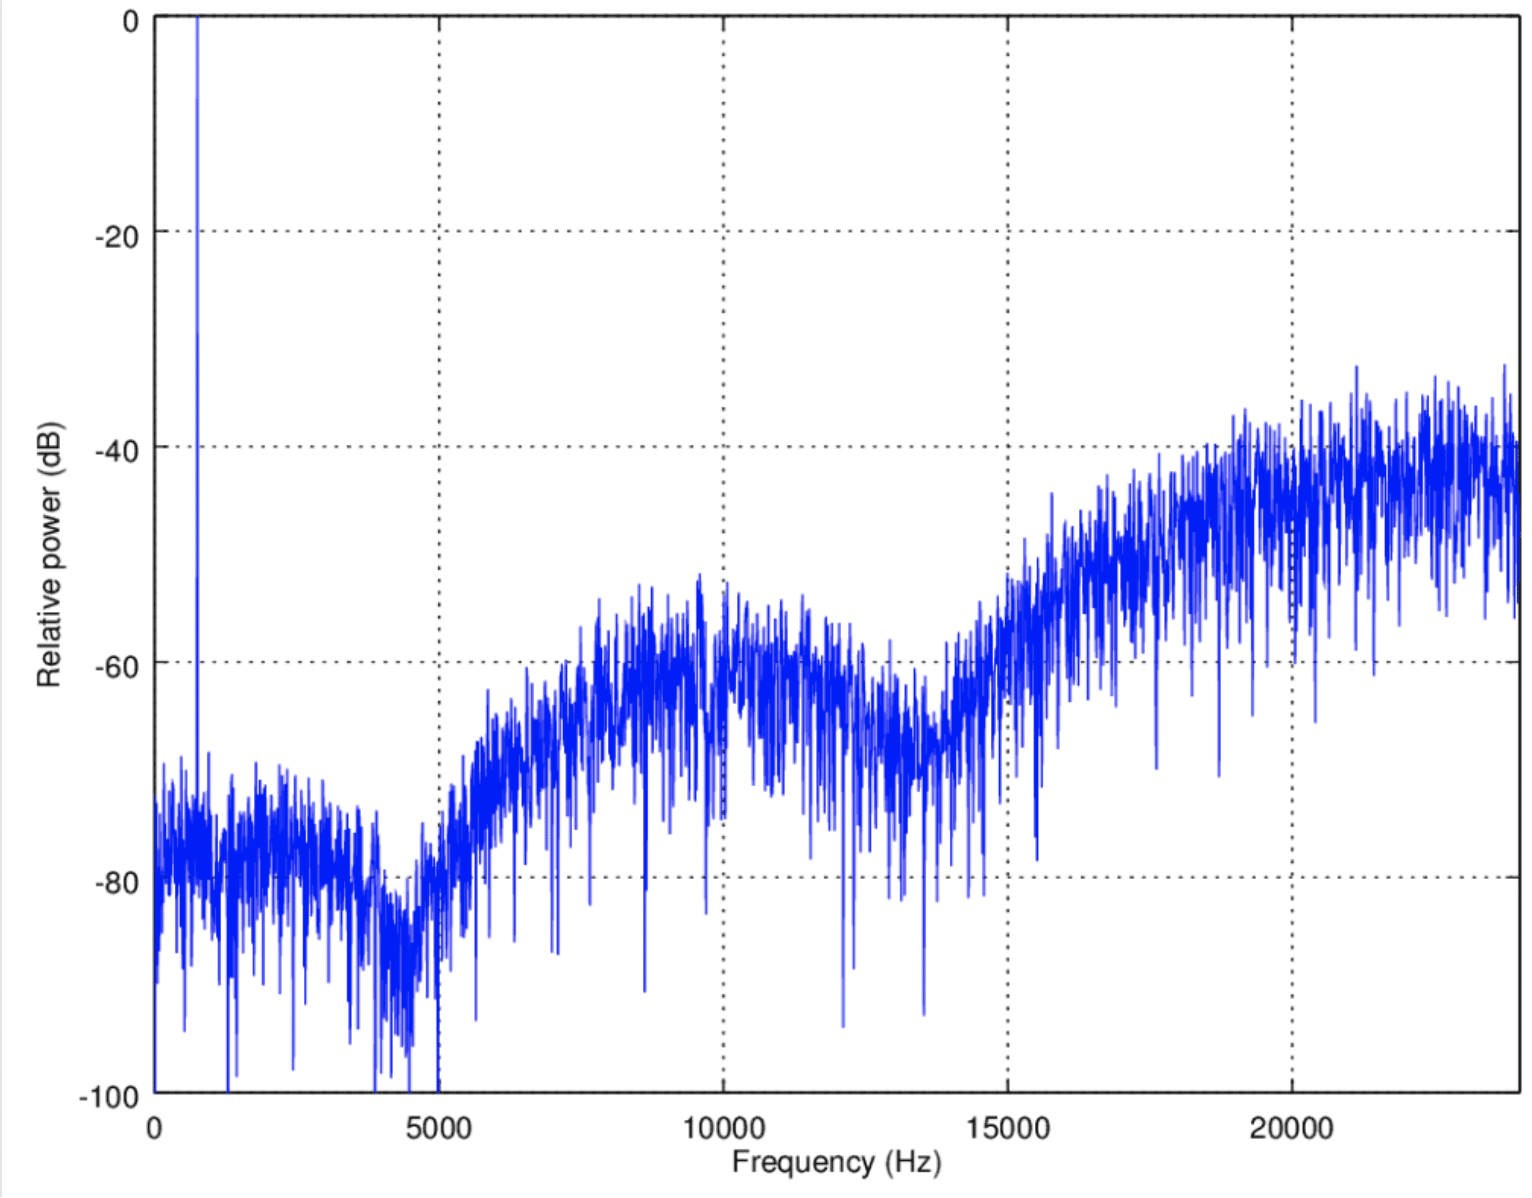
While dithering adds noise to reduce quantization errors, we can take this a step further with a process called noise shaping.
In essence, noise shaping is a form of filtering applied to the dithering process.
It doesn’t eliminate the noise added by dithering but redistributes it in a way that makes it even less noticeable to the human ear.
The human ear is not equally sensitive to all frequencies.
We’re more sensitive to frequencies in the middle of our hearing range (around 2 kHz to 4 kHz), and less so to very low and very high frequencies.
Noise shaping takes advantage of this by moving the dither noise to frequency areas where our ears are less sensitive, thereby making the noise even less noticeable.
When dithering, these different shaping models are typically referred to as dither ‘algorithms,’ and there are many popular options.
NOTE: There are various types of shaping methods, such as rectangular probability density function and triangular probability density function, which we will discuss in a future article.
-
How Noise Shaping Works
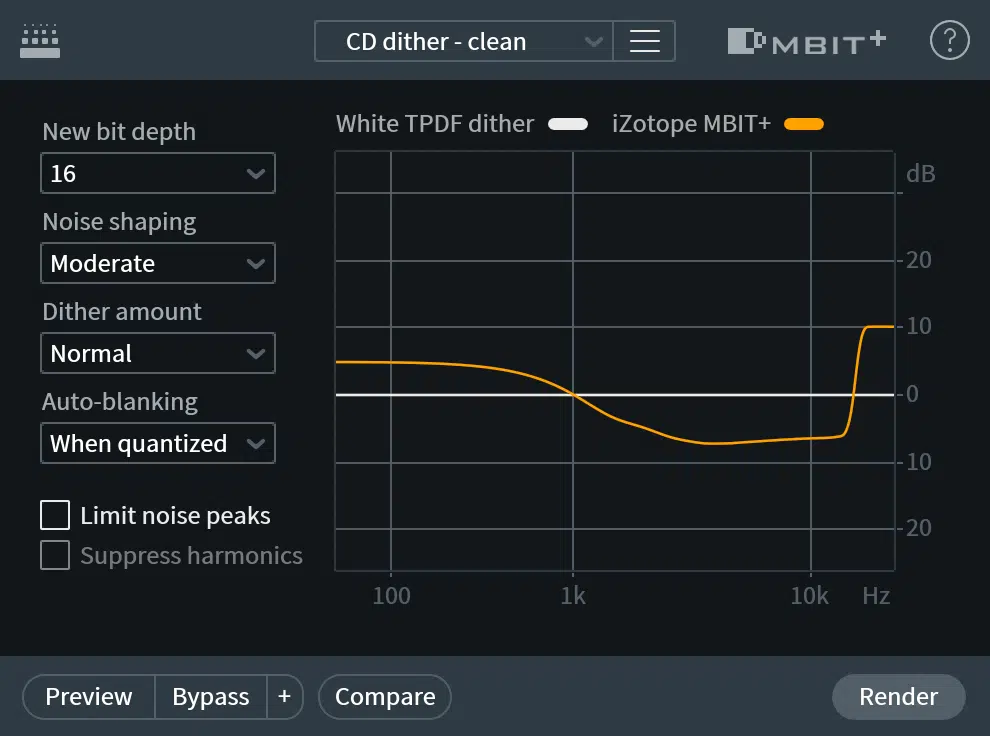
Noise shaping works hand-in-hand with dithering.
When you apply dithering to your audio, it adds a layer of noise uniformly across the frequency spectrum – this is a form of white noise.
But with noise shaping, you can move this noise around within the frequency spectrum through the use of filters.
This is equivalent to how you’d create the various sub-types of white noise, such as pink, brown, blue, and red.
Noise shaping algorithms are designed to push the dither noise towards the extremes of the frequency spectrum 一 either very low or very high 一 where our ears are less sensitive.
The result is that the noise becomes even less audible than with dithering alone, allowing for an even cleaner sound.
-
The Impact of A Noise Shaper on the Noise Floor
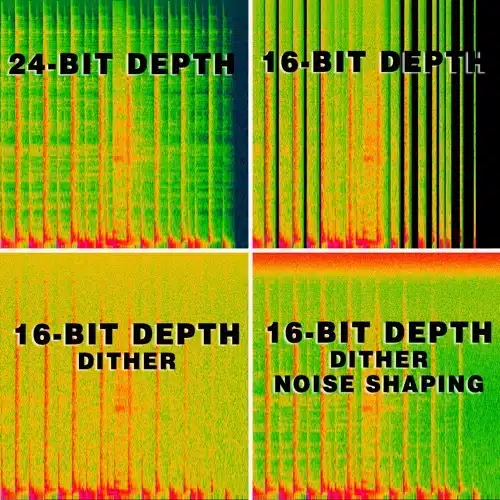
Noise shaping has a significant impact on the final noise floor of your audio file.
The noise floor is the measure of the signal created from the sum of all the noise sources and unwanted signals within your system.
In an ideal world, we’d want no noise floor at all, but in reality, there’s always some level of noise present.
Granted, a lot less in the digital world compared to the analog realm, but you get the point.
By using noise shaping, you can effectively ‘shape’ the noise floor of your audio file, making the dither noise less audible and improving the overall audio quality.
This technique is particularly useful in preserving the quality of quieter (or silent) passages and fade-outs, where the noise floor becomes more noticeable.
-
The Role of Noise Spectrum in Dithering
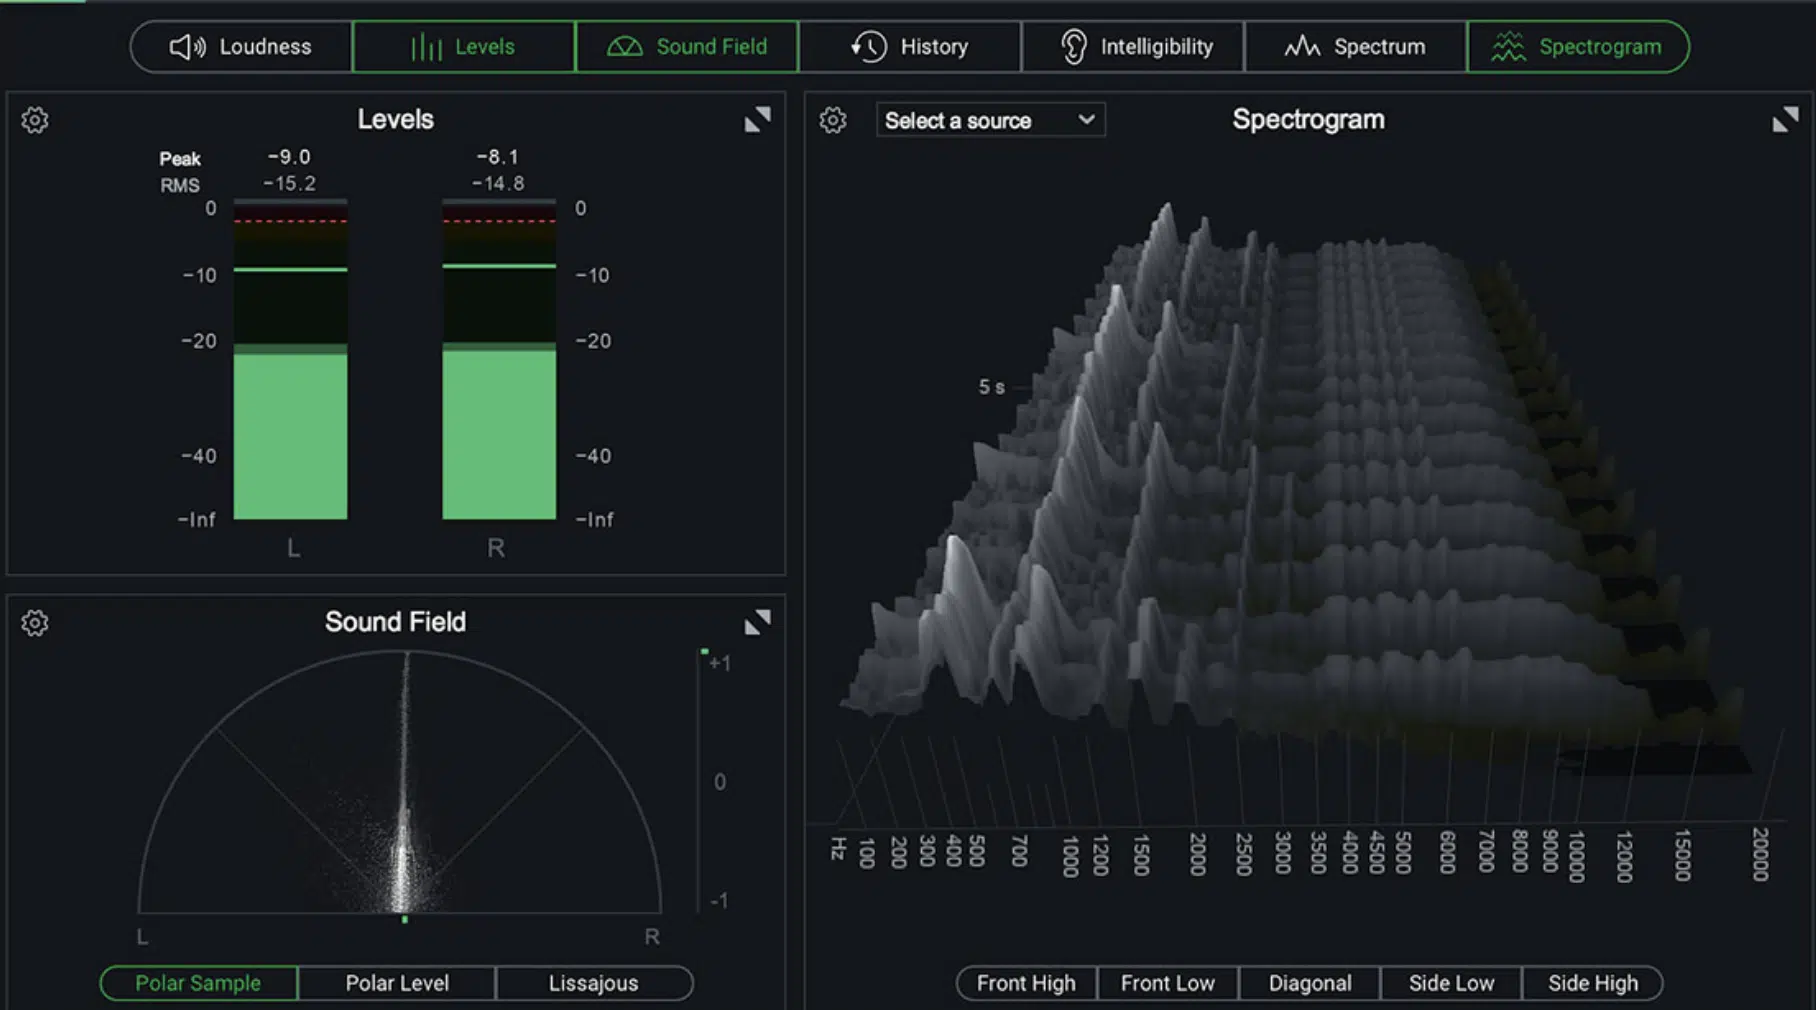
The noise spectrum in dithering refers to the distribution of noise across different frequencies.
Different types of dithering can result in different noise spectrums, which can influence the perceived noise in your final audio file.
The type of dithering you choose directly impacts the noise spectrum.
For example, a flat dither spectrum (like with TPDF) has an equal amount of noise at all frequencies.
Whereas noise shaping can create a skewed spectrum, pushing more noise to frequencies where it’s less perceptible.
Understanding the noise spectrum can be crucial to leveraging dithering effectively.
A well-chosen dithering type can minimize the perceived noise in your audio, leading to a cleaner, more professional-sounding final product.
Dithering in the Mastering Process
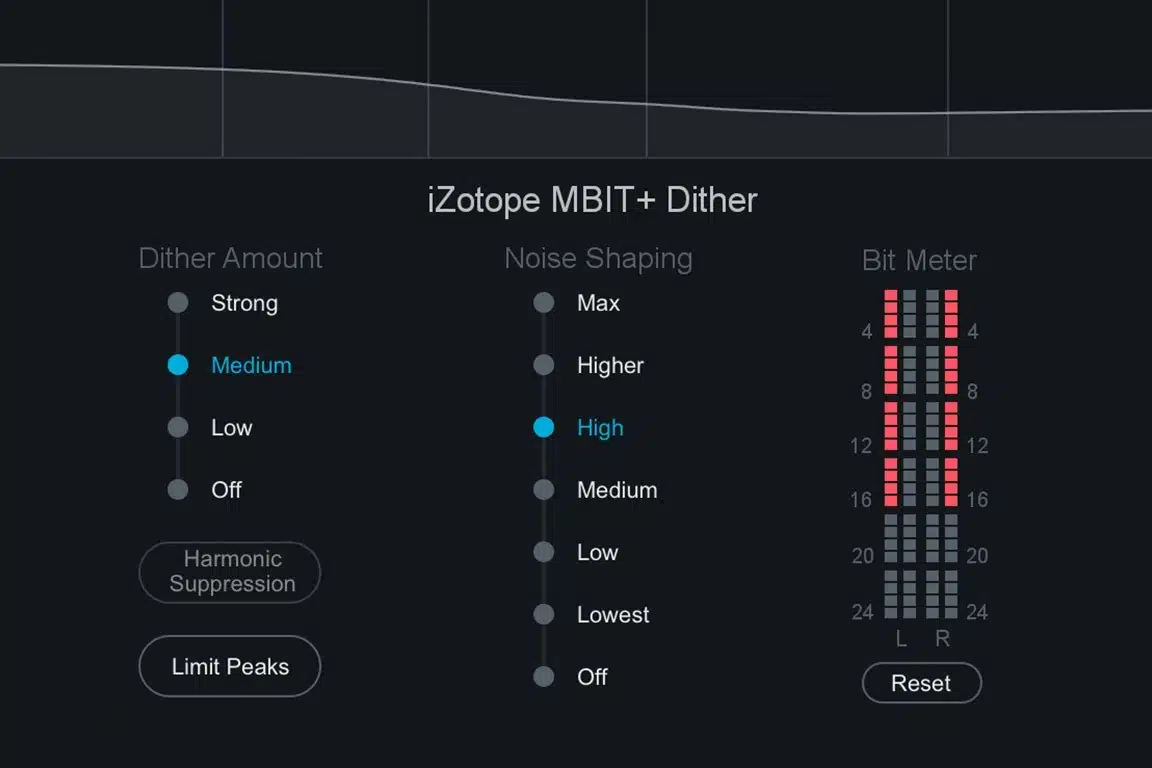
Dithering plays a crucial role in the mastering process.
As you’ve learned, digital audio is all about representing an analog signal as accurately as possible.
However, during the mastering process, when you’re reducing the bit depth of your audio file (say, from 24 bit to 16 bit), you’re inevitably going to lose some information.
This is where dithering comes in.
By adding a small amount of noise to your audio, dithering can help mask these quantization errors, preserving the quality of your audio even when the bit depth is reduced.
Applying dithering in your mastering process is quite straightforward.
Most DAWs and mastering software include dithering options.
Typically, you’ll apply dithering as the very last step in your mastering chain, right before you export your final audio file.
When you’re ready to apply dither, you’ll choose the type of dither and the bit depth you’re going to.
Remember, different types of dither can yield different results, so it’s worth taking the time to listen carefully and choose the one that sounds best with your audio.
-
Avoiding Truncation Distortion with Dithering
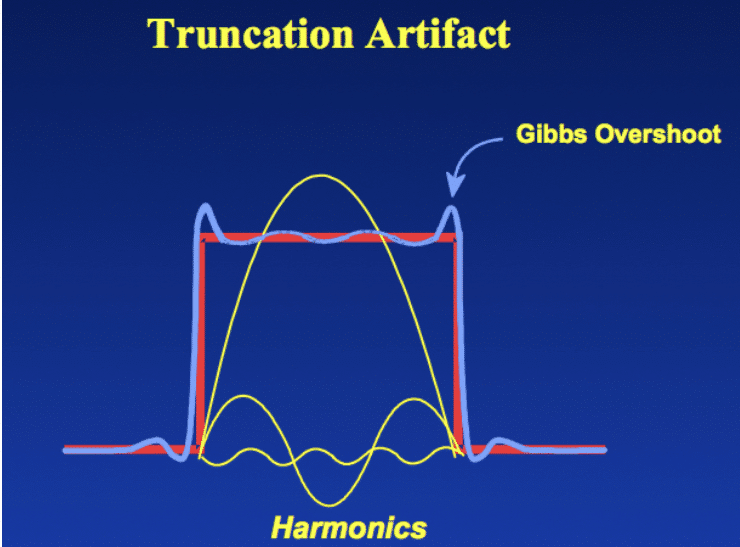
One of the key benefits of dithering is its ability to prevent truncation distortion.
Truncation distortion occurs when the least significant bits of your audio are discarded during bit depth reduction, leading to a loss of detail and a harsh, distorted sound.
By adding dither, you can effectively ‘smear’ these truncation errors across different frequencies.
It turns potentially harsh distortion into a gentle, less noticeable hiss.
This can make a big difference in the quality of your final audio file, especially when you’re working with delicate, nuanced performances or quiet, subtle sounds.
If you’re interested in 25 mixing mistakes, some similar to this type of distortion, we’ve got you covered.
How to Add Dither to Your Mix: Tips & Tricks
When it comes to adding dither to your mix, the process is fairly straightforward, but there are some key tips and tricks that can help you get the most out of it.
Make Sure It Comes Last
Dither should always be added as the final step in your mastering chain.
This is because any further digital audio processing after dithering can re-introduce quantization errors.
For instance, let’s say you’ve finished your mix, applied all your EQ, compression, reverb, and other effects, and you’re ready to bounce down to a 16 bit audio file.
At this point, right before you hit the export button, is when you’d add your dither.
This ensures that any quantization distortion caused by the bit depth reduction is masked by the dither noise.
Speaking of EQ, compression and reverb, if you’re looking for the best EQ plugins, best compression plugins, or best reverb plugins of 2023, look no further.
Listen Carefully
Different types of dither can result in slightly different sonic characteristics.
It’s not a one-size-fits-all scenario, so take your time, experiment with different dither types and listen carefully.
Use your ears to decide which type of dither sounds best with your particular mix.
Less is More
When adding dither, remember that the goal is to mask quantization errors, not to add unnecessary noise.
Dither noise should be just loud enough to cover up quantization distortion, but not so loud that it’s perceptible in your final audio file.
By keeping these tips in mind, you can ensure that you’re using dither effectively to maximize the quality of your audio files.
Summing It Up: How To Dither Audio
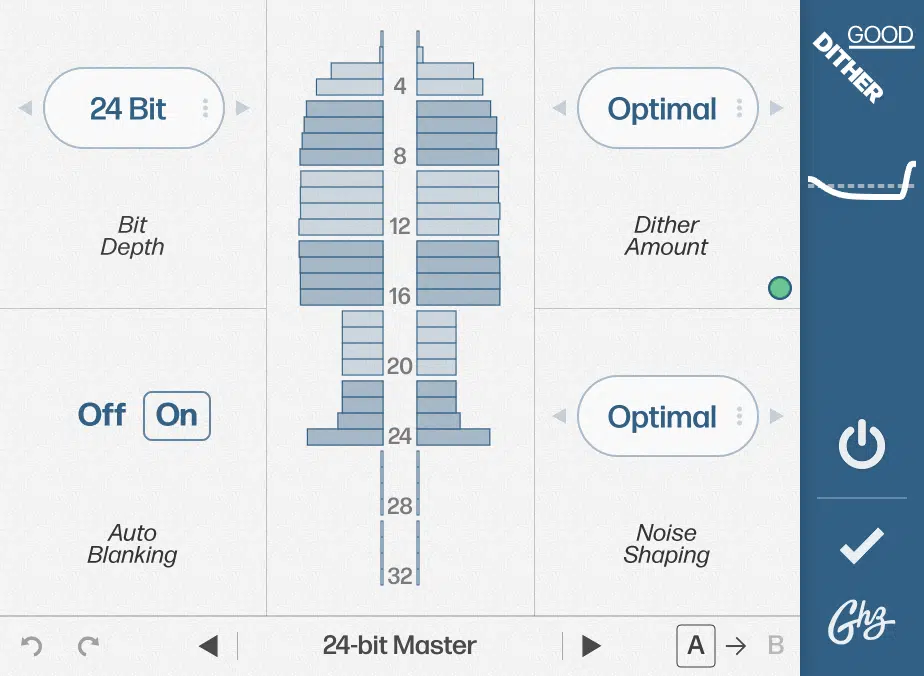
Dithering can profoundly influence the final output of your audio file.
On the surface, it might seem counterintuitive to add noise to improve the quality, or retain the fidelity of your audio.
Still, it’s crucial to understand that the noise we’re adding through dithering is purposefully designed to mask quantization errors that occur during bit depth reduction.
When you’re reducing the bit depth of your audio file, you’re essentially trying to squeeze more information into fewer bits.
This can cause a loss of detail and introduce quantization distortion, making your mix sound harsh and digitally flawed.
By introducing a layer of carefully controlled noise, dithering can effectively mask these quantization errors.
It’s like smoothing out the rough edges in your digital audio files.
While you might think that adding random noise would make your mix sound worse, the noise added by dithering is usually so low in level that it’s barely perceptible.
It’s also far less obtrusive than the harsh, metallic sound of quantization and truncation distortion.
Moreover, dithering can preserve the dynamic range and subtleties of your original signal.
If you’re working with a piece of music with a lot of dynamic range, dithering can help maintain that range even when you’re reducing the bit depth.
Finally, dithering helps to retain the detail in the quieter parts of your mix that might otherwise be lost during bit depth reduction.
Final Thoughts
And there you have it, the captivating world of dithering unraveled.
Understanding and applying dithering can significantly elevate your digital audio production and make your tracks stand out from the crowd.
It’s all about maintaining the rich, delicate sound of your original signal, even when you’re navigating the tricky process of bit depth reduction.
Remember, dithering is a tool, and like any tool, it’s most potent when used correctly.
So, continue experimenting, continue learning, and above all, continue creating!
To ensure your dithering efforts aren’t wasted on subpar sounds, make sure to download the dopest free 808 samples in the game (no joke).
This pack, created with the utmost attention to detail and quality, provides excellent starting points for your tracks.
It will ensure that every bit of detail preserved by dithering truly shines.
Until next time…


Leave a Reply
You must belogged in to post a comment.