As a producer, plugins are everything, that’s a fact, so, if you’re a new Logic Pro X user, then learning how to add plugins to Logic Pro X is key.
Whether you’re looking to expand your library with new virtual instruments or enhance your mixes with cutting-edge effects, mastering this process is essential.
The good news is, adding plugins to Logic Pro X is super straightforward once you know the steps.
That’s why we’re I’m breaking down everything you need to know, step-by-step, like:
- Understanding plugin formats ✓
- How to install plugins super easily ✓
- Downloading the right installer ✓
- Running the installation process ✓
- Locating installed plugins ✓
- Accessing the Plugin Manager ✓
- Scanning for new plugins ✓
- Validating your plugins ✓
- Dealing with third-party VSTs ✓
- Inserting plugins on tracks ✓
- Organizing your plugin library ✓
- Much more about how to add plugins to Logic Pro X ✓
After this article, you’ll know everything about installing and managing plugins in Logic Pro X, with some pro tips thrown in.
Plus, you’ll be able to customize your workflow, load up virtual instruments, and create the perfect mix with ease like an expert.
This way, you can get back to creating music and not worry about the technical issues.
So, let’s dive in…
Table of Contents
- Before We Get Started: Understanding Plugin Formats Supported by Logic Pro X
- How to Add Plugins to Logic Pro X in 6 Simple Steps (2024)
- Step 1: Downloading the Plugin Installer
- Step 2: Running the Installer To Install Plugins
- Step 3: Locating Installed Plugins After Installation
- Step 4: Launching Logic Pro X and Accessing Plugin Manager
- Step 5: Validating Plugins After You Install Plugins
- Step 6: Inserting Plugins on Tracks
- Organizing Plugins in Logic Pro X
- Keeping Plugins Up-to-Date
- How to Add Plugins to Logic Pro X: Final Thoughts
Before We Get Started: Understanding Plugin Formats Supported by Logic Pro X
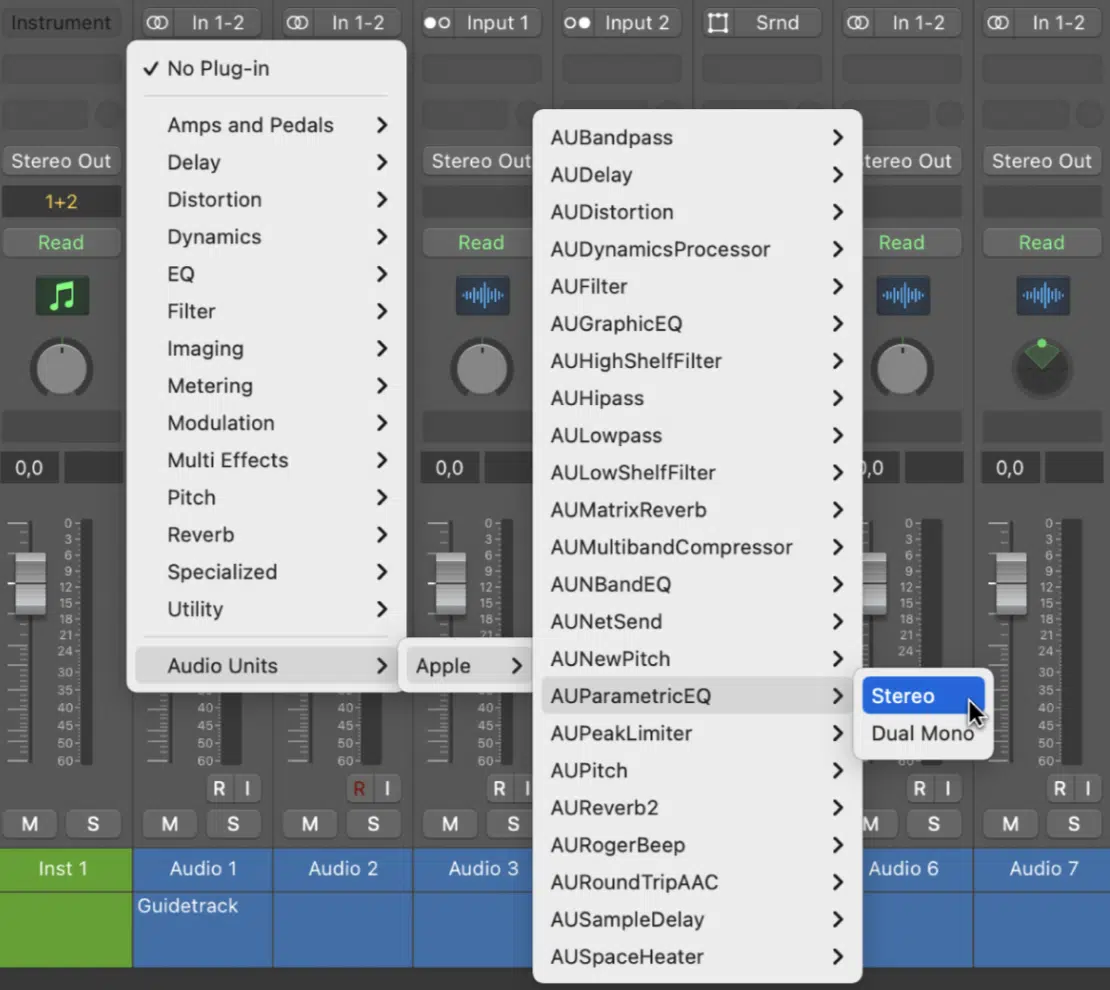
Before you start installing plugins left and right, it’s important to know that Logic Pro X primarily supports Audio Units (AU) format.
This means that if you’re downloading third-party plugins, they need to be in this specific format to work properly.
Many plugins come in multiple formats, including a VST format, but for Logic Pro X, you’ll want to focus on those that offer AU (audio unit) support.
Always double-check the plugin’s compatibility with Logic Pro X before you download, as this will save you from any installation headaches down the road.
Remember, not all VST plugins are available in AU format, so keep that in mind when shopping for new tools.
How to Add Plugins to Logic Pro X in 6 Simple Steps (2024)
Plugins are essential for transforming your Logic Pro X projects from basic to pro-level. Whether you’re looking to install VST plugins, add new virtual instruments, or just explore some cool third-party plugins, learning how to add plugins to Logic Pro X is a must. So, let’s start with how to download the plugin installer.
Step 1: Downloading the Plugin Installer
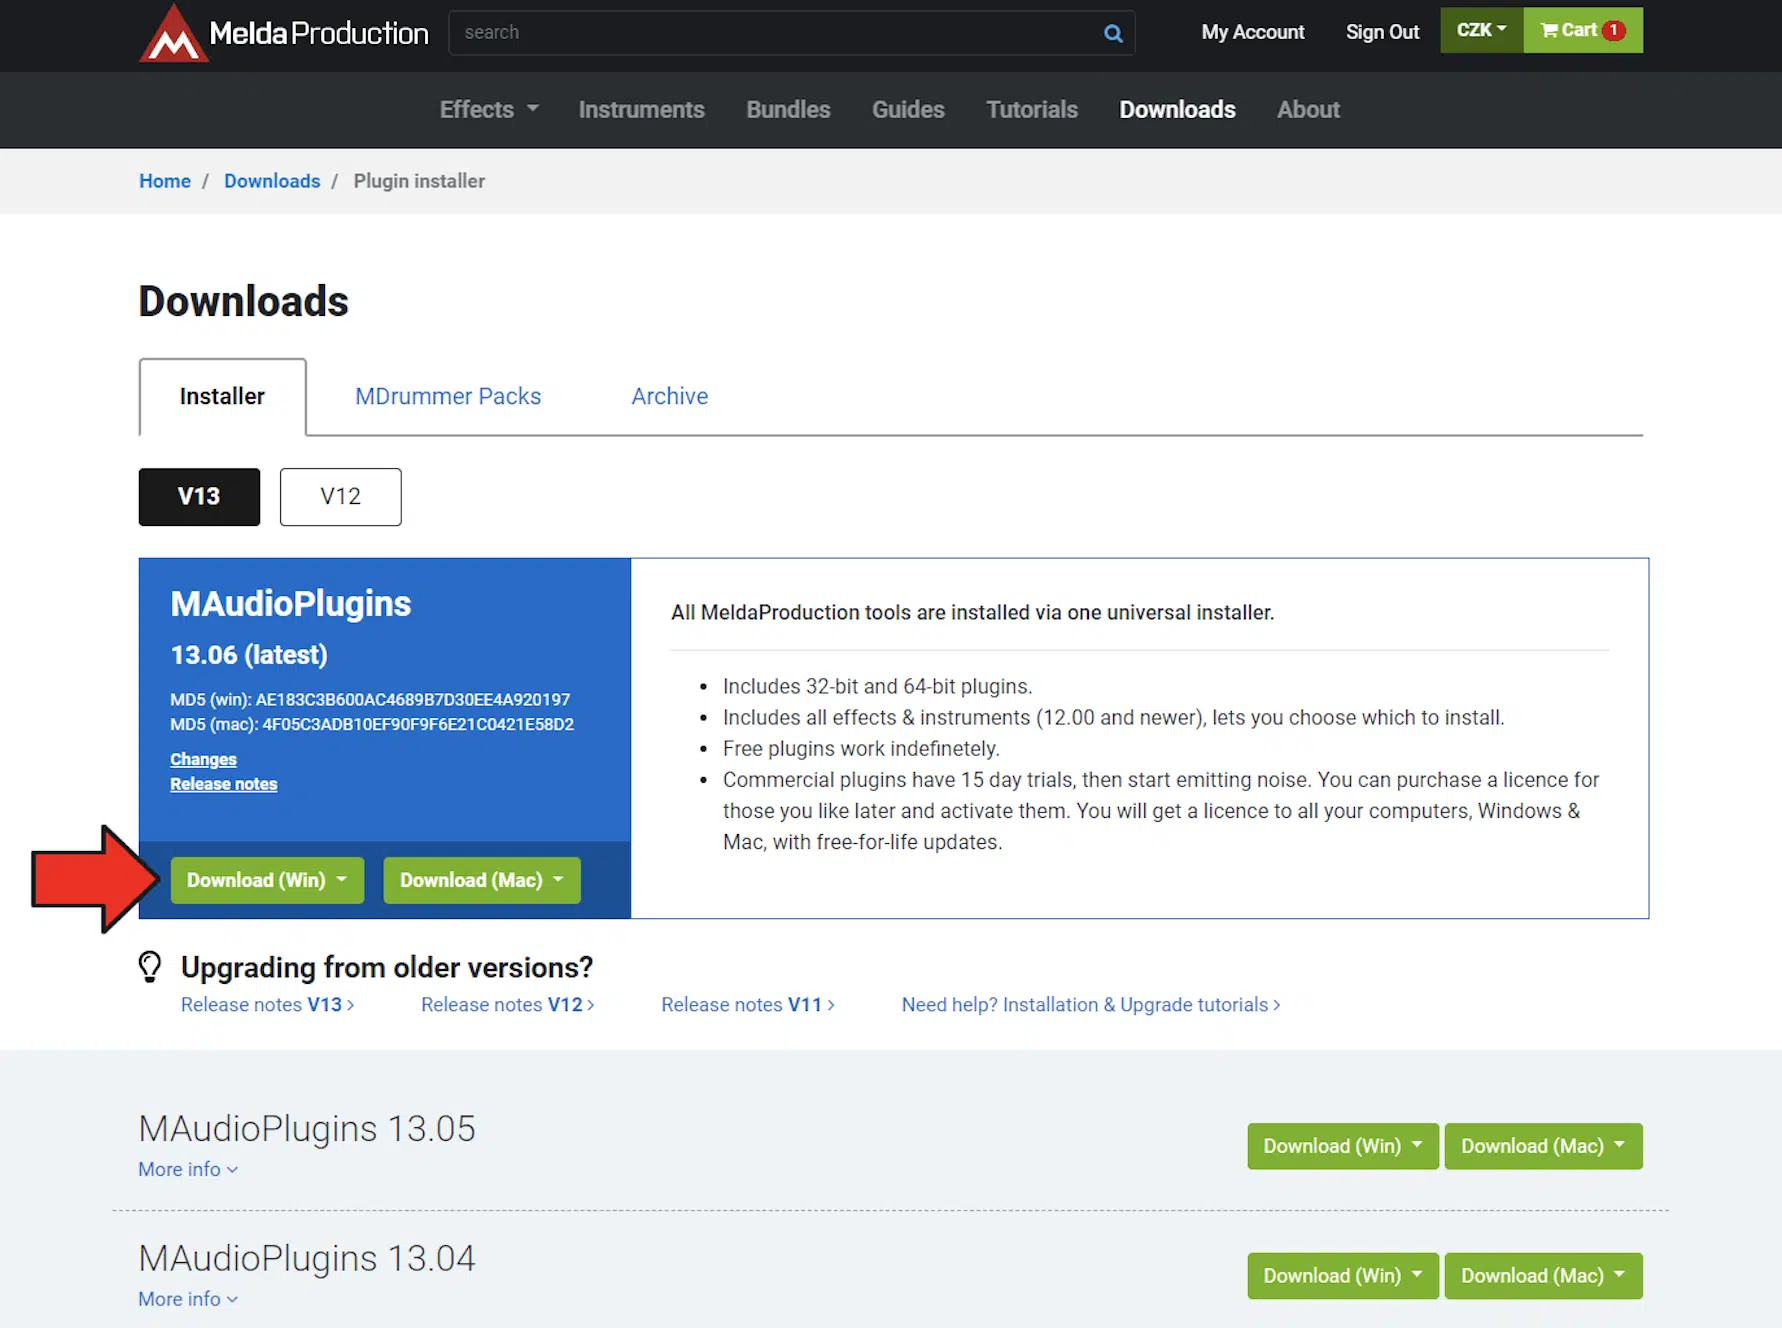
When you’re learning how to add plugins to Logic Pro X, the first thing you’ll need to do is download the plugin installer from a trusted source.
Let’s say you’ve decided to add a new reverb plugin to your setup…
Head to the developer’s website, like Valhalla DSP for their popular reverb tools or MeldaProductions, which are some of my favs, and find the download page.
Always choose the audio unit version to ensure it works with Logic Pro X.
Once you click download, your browser might ask where to save the plugin file 一 select an appropriate folder on your Mac, like a dedicated “Plugins” folder in your Documents.
This way, you won’t lose track of the installer file later which would suck.
Also, remember to keep your downloads organized, so you can easily access and reinstall if needed.
NOTE: keep a backup of your installers on an external drive or cloud storage for safekeeping. This will save you time in the future if you ever need to reinstall your plugins.
Step 2: Running the Installer To Install Plugins
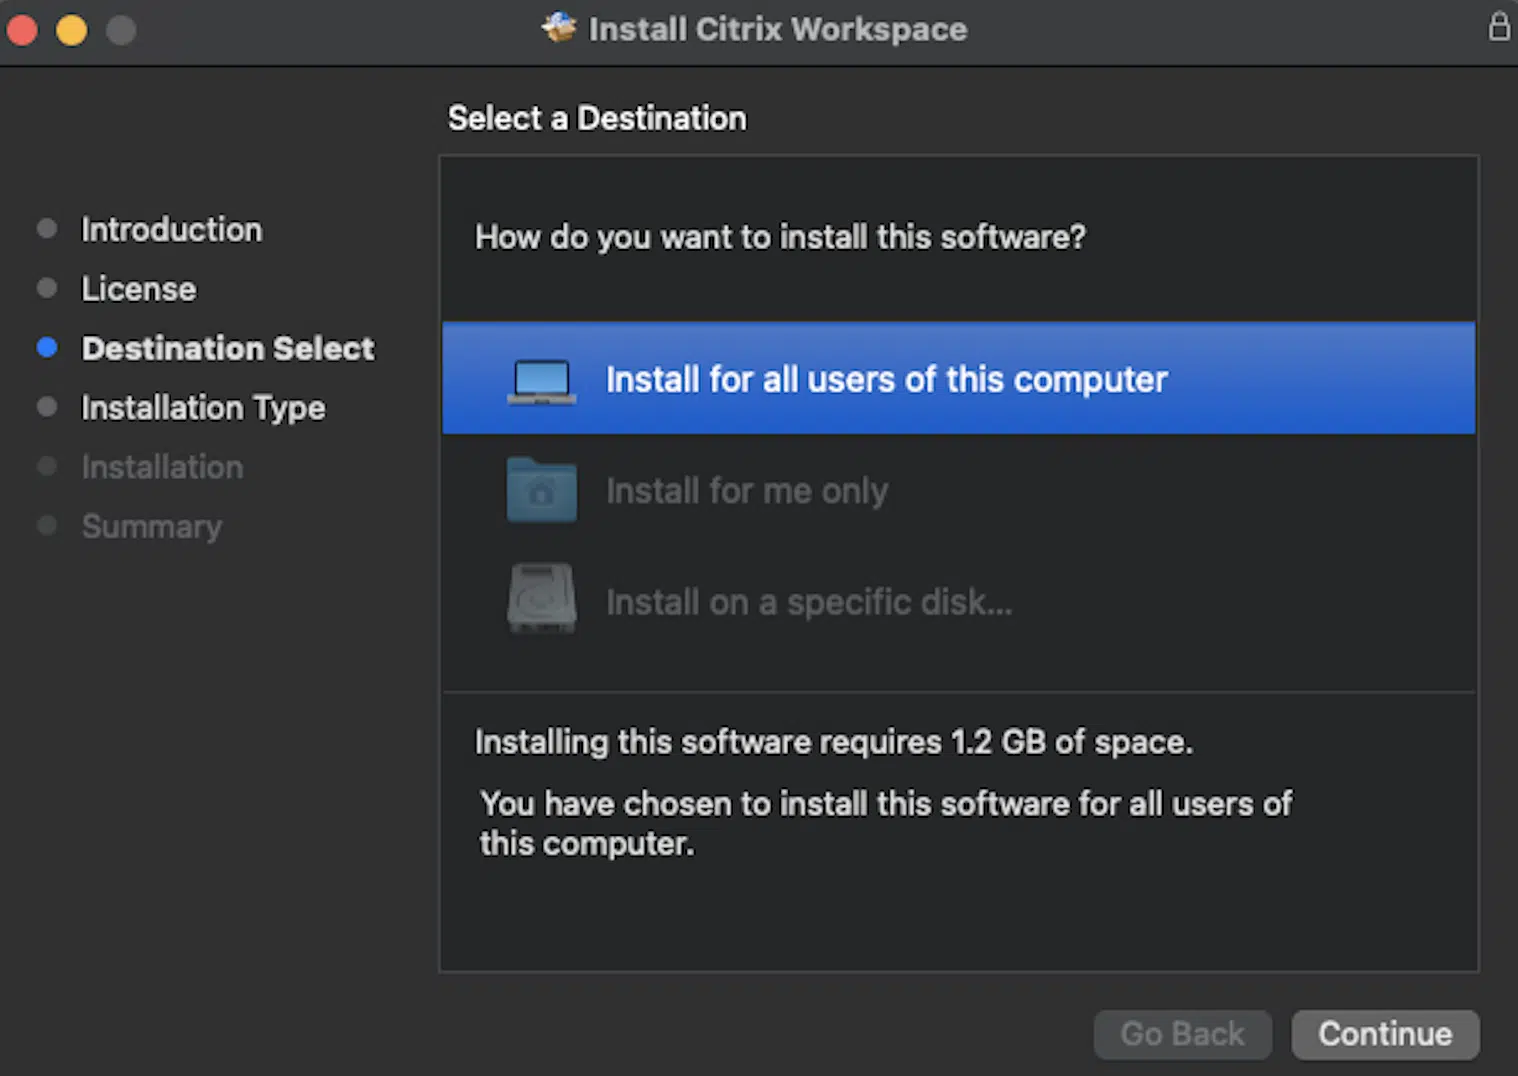
After downloading the installer, you’re going to navigate to the folder where it’s saved.
Double-click the plugin file to begin the installation process, and just know that most plugin installers will guide you through the process with an easy-to-follow wizard.
For example, if you’re installing a popular plug-in like Serum, the installer will ask you to:
- Agree to the terms and conditions
- Choose the installation location
- Confirm the plugin formats to install
Make sure to select the Audio Units (AU) option when prompted.
It’s a good idea to install the plugin in the default location recommended by the installer, usually in the ‘Components’ folder on your Mac computer.
This sets it up so Logic Pro X will automatically recognize it when you open the software, which is great.
Once the installation completes, you’ll get a confirmation message, and your new plugin will be ready to use 一 super easy.
Step 3: Locating Installed Plugins After Installation
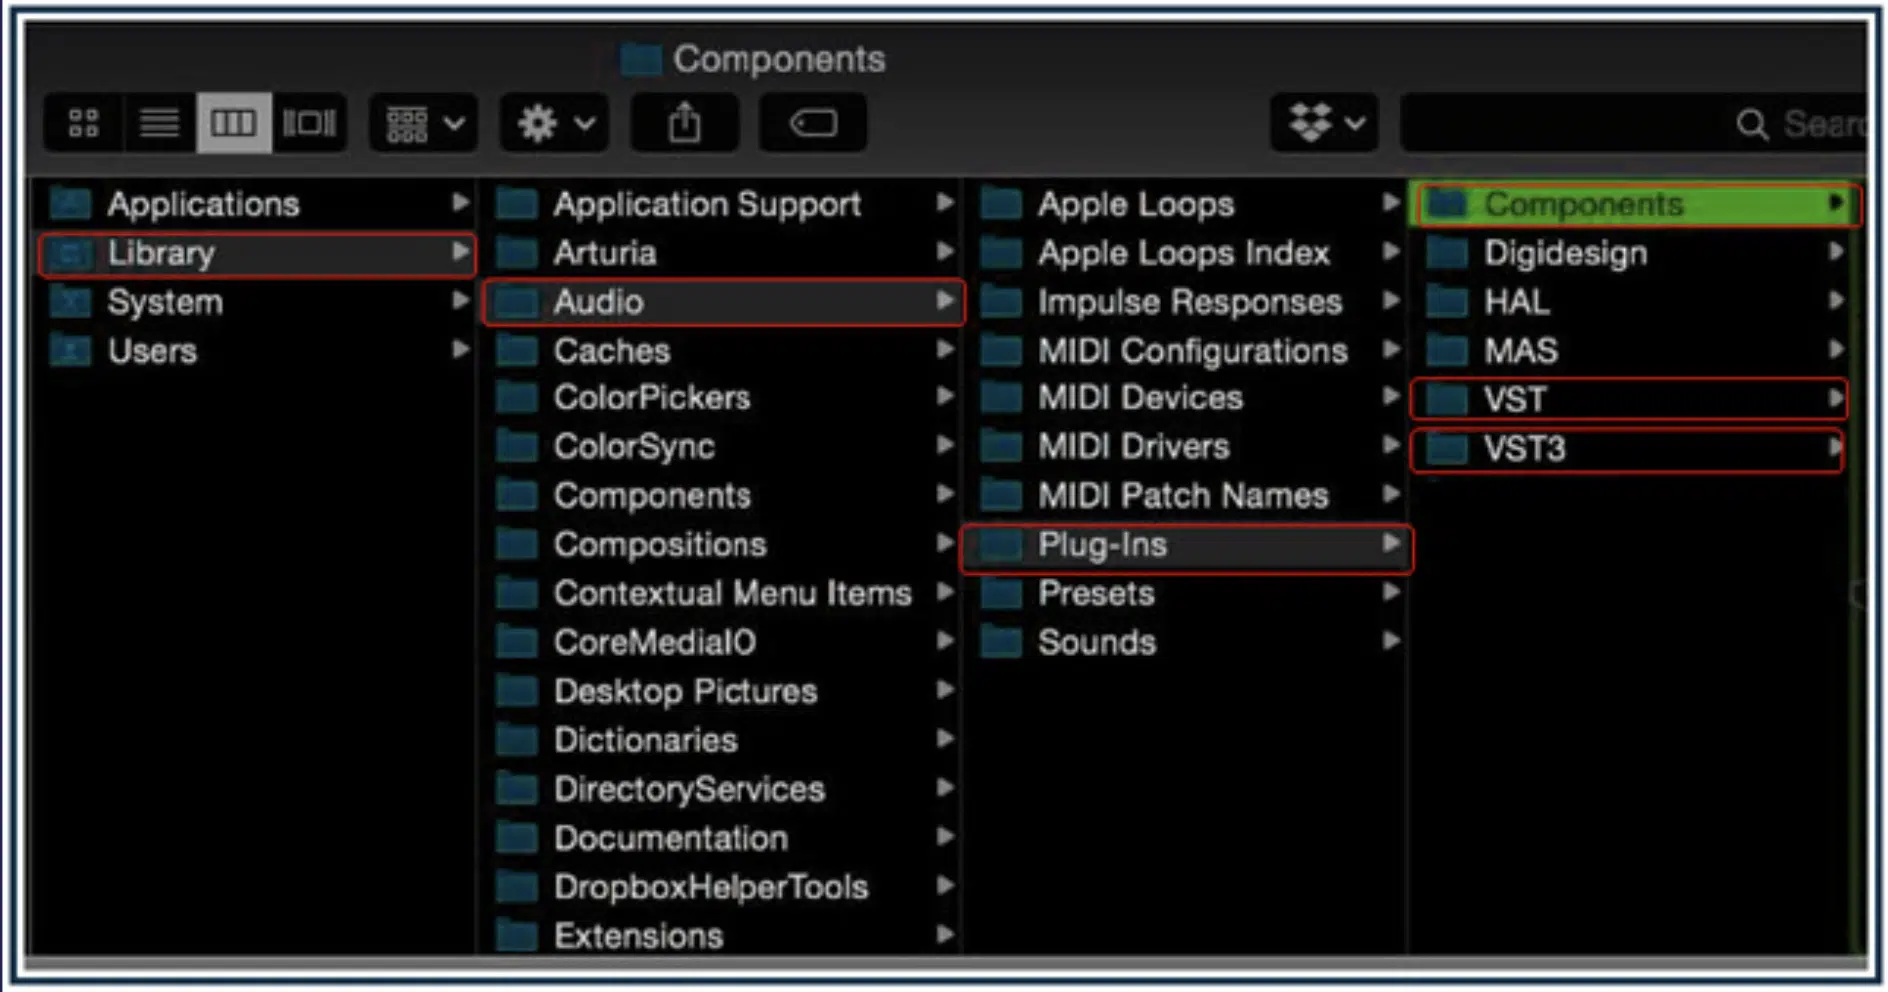
Once you’ve finished installing the plugin, it’s time to make sure Logic Pro X can find it, which is the main thing you need to worry about.
Typically, Audio Units (AU) plugins are installed in the “Components” folder on your Mac like I mentioned.
To verify the installation, open Finder, then navigate to “Macintosh HD > Library > Audio > Plug-Ins > Components.”
If you don’t see it here, double-check that you installed the plug-in in the correct folder during setup.
Sometimes, the installer might place the plug-in in a different location, so it’s always good to keep track of where files go.
NOTE: For users navigating the macOS file system, accessing the Macintosh HD might require you to open the Finder, select “Go” from the top menu, and then “Go to Folder” before typing in the path to the Components folder.
-
Pro Tip
Bookmark this folder or add it to your Finder sidebar for quick access in the future so you can enhance your beats. Having direct access to the Components folder makes troubleshooting much easier if a plugin doesn’t show up in Logic Pro X later on.
Step 4: Launching Logic Pro X and Accessing Plugin Manager
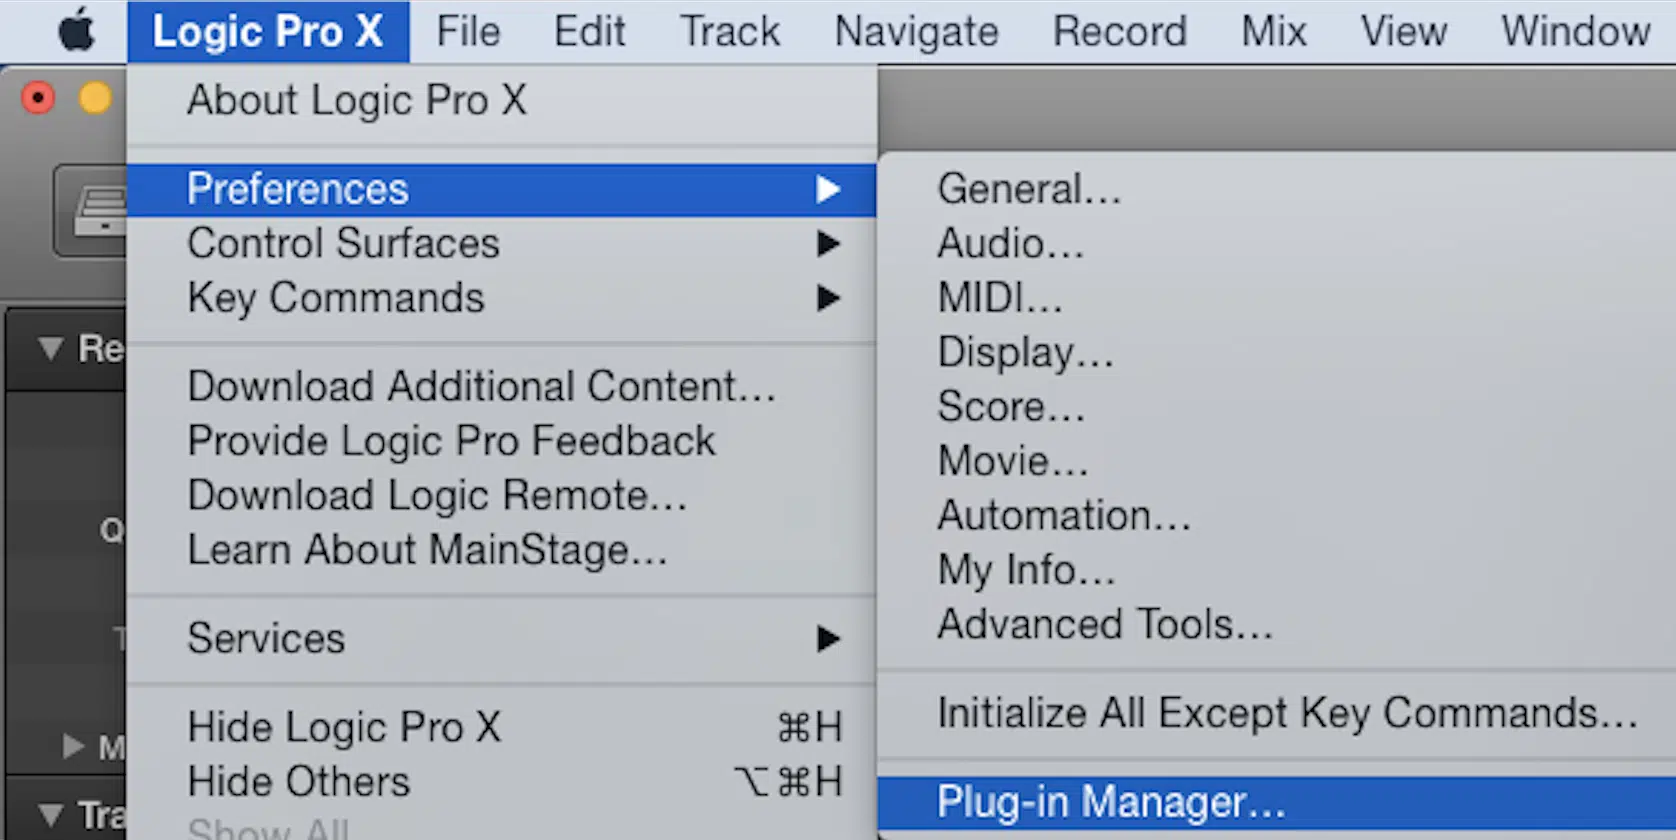
Now that your plugin is installed, it’s time to fire up Logic Pro X and make sure everything is working correctly.
Simply launch Logic Pro X from your Applications folder or Dock.
Once Logic Pro X is open, go to the “Logic Pro X” menu in the top left corner of your screen, then select “Preferences” and “Plug-in Manager.”
The Plugin Manager is where you can see all the installed plugins, both native and third-party, so you can go to town.
Side note, if you want to see how Logic Pro X compares to FL Studio or Pro Tools, we’ve got you covered.
-
Pro Tip
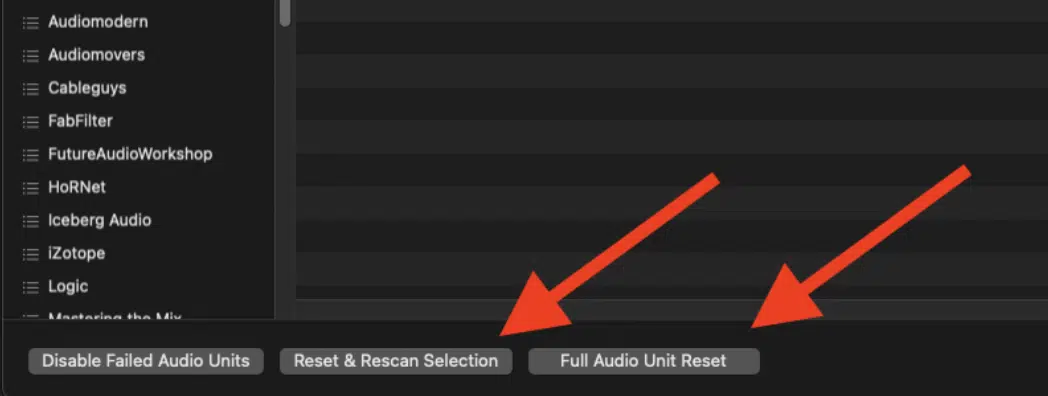
If you’ve installed a lot of plug-ins over time (which you will as a producer, of course), use the search bar in Plugin Manager to quickly find your new plugin.
For instance, type “Serum” in the search bar to check if it’s listed and enabled.
If the plugin is not showing up, try rescanning for new plugins by clicking the “Rescan” button at the bottom of the Plugin Manager window.
Simply click it to initiate a new scan of your system’s plugin folders.
This is especially useful if you’ve just installed new plugins but don’t see them in your available options.
Remember, only enabled plug-ins will appear in your Logic session, so make sure the checkbox next to your new plugin is ticked.
Step 5: Validating Plugins After You Install Plugins

Piggy-backing off of step 4, let’s talk about validation one more time.
When you scan for new plugins, Logic Pro X might identify some that need validation…
This means Logic Pro X needs to verify that the plug-in is compatible with your specific system and is functioning correctly.
You’ll see a list of plugins that require validation in the Plugin Manager.
If you’ve just installed a new plugin and it appears in this list, simply select it and click “Validate.”
NOTE: If the plug-in doesn’t validate on the first try, don’t panic 一 this can happen occasionally with third-party plugins like, let’s say, Waves plugins.
Just try rescanning, or double-check that you’ve installed the correct version of the plugin as we touched upon.
Make sure to check the developer’s website on your computer for any specific installation instructions or updates that might be required to get the plugin working.
Validating plugins ensures that they will load correctly in your Logic sessions without causing crashes or glitches, which can completely mess up your vibe.
Step 6: Inserting Plugins on Tracks
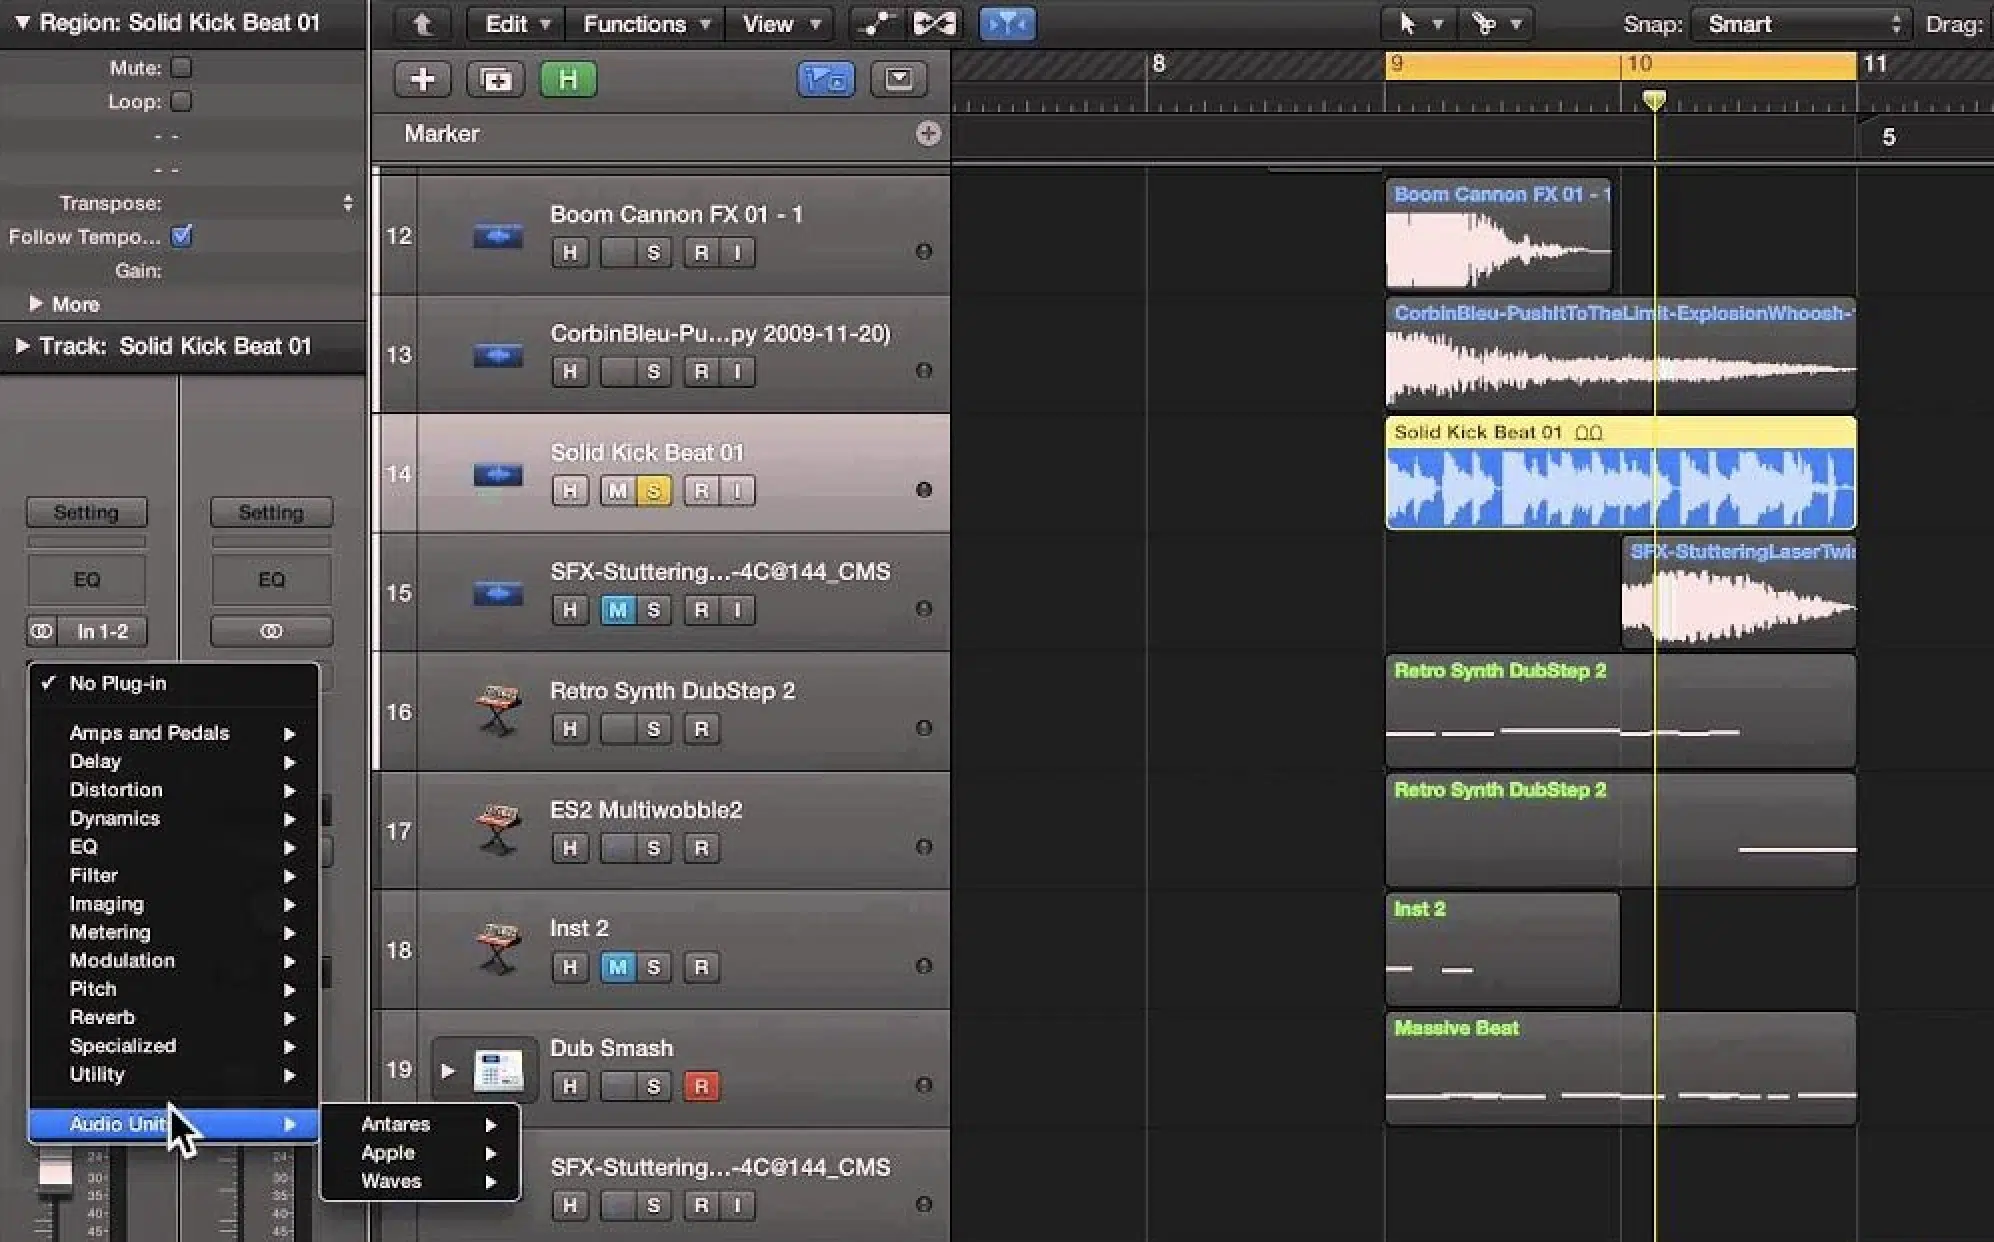
Once your plugins are installed and validated, you’re ready to start using them in your Logic Pro X projects finally.
To add a plugin to audio tracks, open Logic Pro session and create a new audio or MIDI track, depending on the type of plug-in you’re using.
For example, if you’ve installed a virtual instrument like Serum, create a new MIDI track.
Then, go to the channel strip on the left side of your screen, and under the “Instrument” slot, click the dropdown arrow to select your plugin from the list.
If it’s an effect plugin, like a reverb, delay, or compressor, insert it in one of the “Audio FX” slots on an audio tracks channel strip.
You can chain multiple plug-ins together on a single track to create complex effects.
For example, you could add an EQ, followed by a reverb, then a compressor, all on the same channel strip, to sculpt your sound exactly how you want.
This flexibility is what makes Logic Pro X such a powerful digital audio workstation for music production.
-
Pro Tip
When building your signal chain, make sure to consider how each plug-in affects the overall sound of your project.
For example, after you’ve downloaded a new reverb plugin, try placing it at different points in the chain (before or after other effects like EQ or compression) to see how it alters the final sounds.
Experimenting with the order of your plugins can lead to some truly unique sounds and polished results.
Organizing Plugins in Logic Pro X
As you start racking up more plugins (which you definitely will, quickly), keeping them organized in Logic Pro X is a must, period, end of story.
I know it sounds like a little thing, but trust me, when you’re in the zone, you want everything nice and organized to match your unique flow.
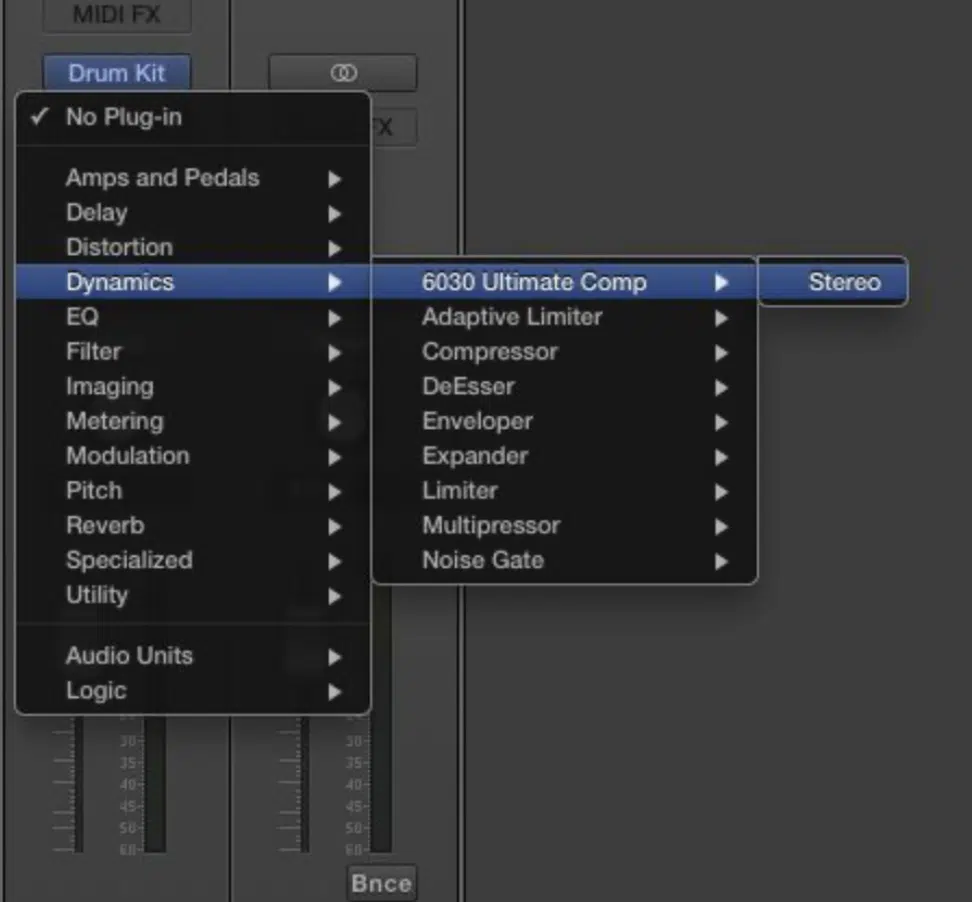
By default, Logic Pro X organizes plug-ins by category, such as “Dynamics” for compressors or “Reverb” for reverb effects.
However, you can customize these categories in the Plugin Manager.
For example, if you frequently use certain plugins, you can create a custom folder in the Plugin Manager, like “Favorites,” and simply drag your most-used plugins into this folder.
This way, they’re always easy to find.
When you’re learning how to add plugins to Logic Pro X, rename your plugins in the Plugin Manager for easier identification…
This is especially helpful if you have multiple plugins from the same developer, which I guarantee you will.
For instance, if you have several reverb plugins, you could rename them to include the plugin’s key feature, like “Plate Reverb” or “Hall Reverb,” to quickly differentiate them.
Staying organized helps you work faster and keeps your creative process moving 一 it’s all about not having to break your flow.
Keeping Plugins Up-to-Date

Finally, it’s important to keep your plug-ins up-to-date to ensure they’re always compatible with the latest version of Logic Pro X.
Most plug-in developers release updates regularly to:
- Fix bugs
- Add new features
- Improve compatibility with updated digital audio workstations
To check for updates, visit the developer’s website or use any built-in update checker that some plug-ins offer.
For example, a familiar plug-in like Serum might notify you of updates directly within the plug-in interface.
Always install updates as soon as they’re available to avoid any potential issues with your plugins in future Logic sessions.
Keeping your plugins updated ensures they perform optimally and take full advantage of the latest improvements in music production technology.
How to Add Plugins to Logic Pro X: Final Thoughts
If you want to learn how to add plugins to Logic Pro X, then this guide is your key.
It’s all about understanding the plugin formats, properly downloading and installing your plugins, and making sure everything is organized and validated in Logic Pro X.
Plus, making sure that your plugins are up-to-date and easily accessible will keep your workflow smooth and your creativity flowing.
It’s really easy, so don’t think too much about it 一 simply follow these steps to add plugins to Logic Pro X, and you’re good to go.
To give you an even better grasp of how to apply these concepts, I highly recommend checking out these super valuable Free Project Files.
This pack includes three Logic Pro X project files that show you exactly how pro-quality tracks are made.
They’ll help you see how to add plugins to Logic Pro X in real-world projects, giving you insight into how top producers set up their signal chains and process their sounds.
Plus, because these files are royalty-free, you can use them as a template or inspiration for trying out some sick new things.
Remember, mastering how to add plugins to Logic Pro X opens up endless creative possibilities because plugins will undoubtedly up your game.
Whether you’re adding virtual instruments or tweaking your effects, knowing how to add plugins to Logic Pro X will keep your tracks sounding fresh and professional.
Until next time…


Leave a Reply
You must belogged in to post a comment.