Audio compression is absolutely crucial when it comes to professional music production.
It is the unsung hero that shapes your music, controls its dynamic range, and gives it a polished, radio-ready sound.
However, if misunderstood or misused, it can also strip your music of its life and energy.
That’s why it’s super important to understand the ins & outs of audio compression and learn how to use it effectively.
In this comprehensive guide, we will journey through the fascinating world of audio compression 一 exploring its functions, techniques, and applications in great depth.
By the time you reach the end of this guide, you’ll have a firm grasp of how to use audio compression to enhance your music production.
Here’s a glimpse of what we’ll be delving into:
- What is Audio Compression? ✓
- Understanding the Audio Signal ✓
- Threshold, Ratio, Attack, and Release ✓
- Gain Reduction and Compression Techniques ✓
- Output Gain & Make-Up Gain ✓
- Practical Applications of Audio Compression ✓
- Expert Audio Compression Tips & Tricks ✓
By the end of this journey, you’ll have a firm grasp of how to use audio compression to enhance your music production.
Let’s dive in!
Table of Contents
- What is Audio Compression?
- The Role of an Audio Compressor
- Diving into Dynamic Range
- Understanding the Audio Signal
- Gain Reduction
- Hard Knee vs Soft Knee
- Make Up Gain: The Secret Sauce of Output Gain
- Mastering Attack & Release in Audio Compression
- Various Types of Audio Compression
- What Is Audio Compression: Final Thoughts
What is Audio Compression?
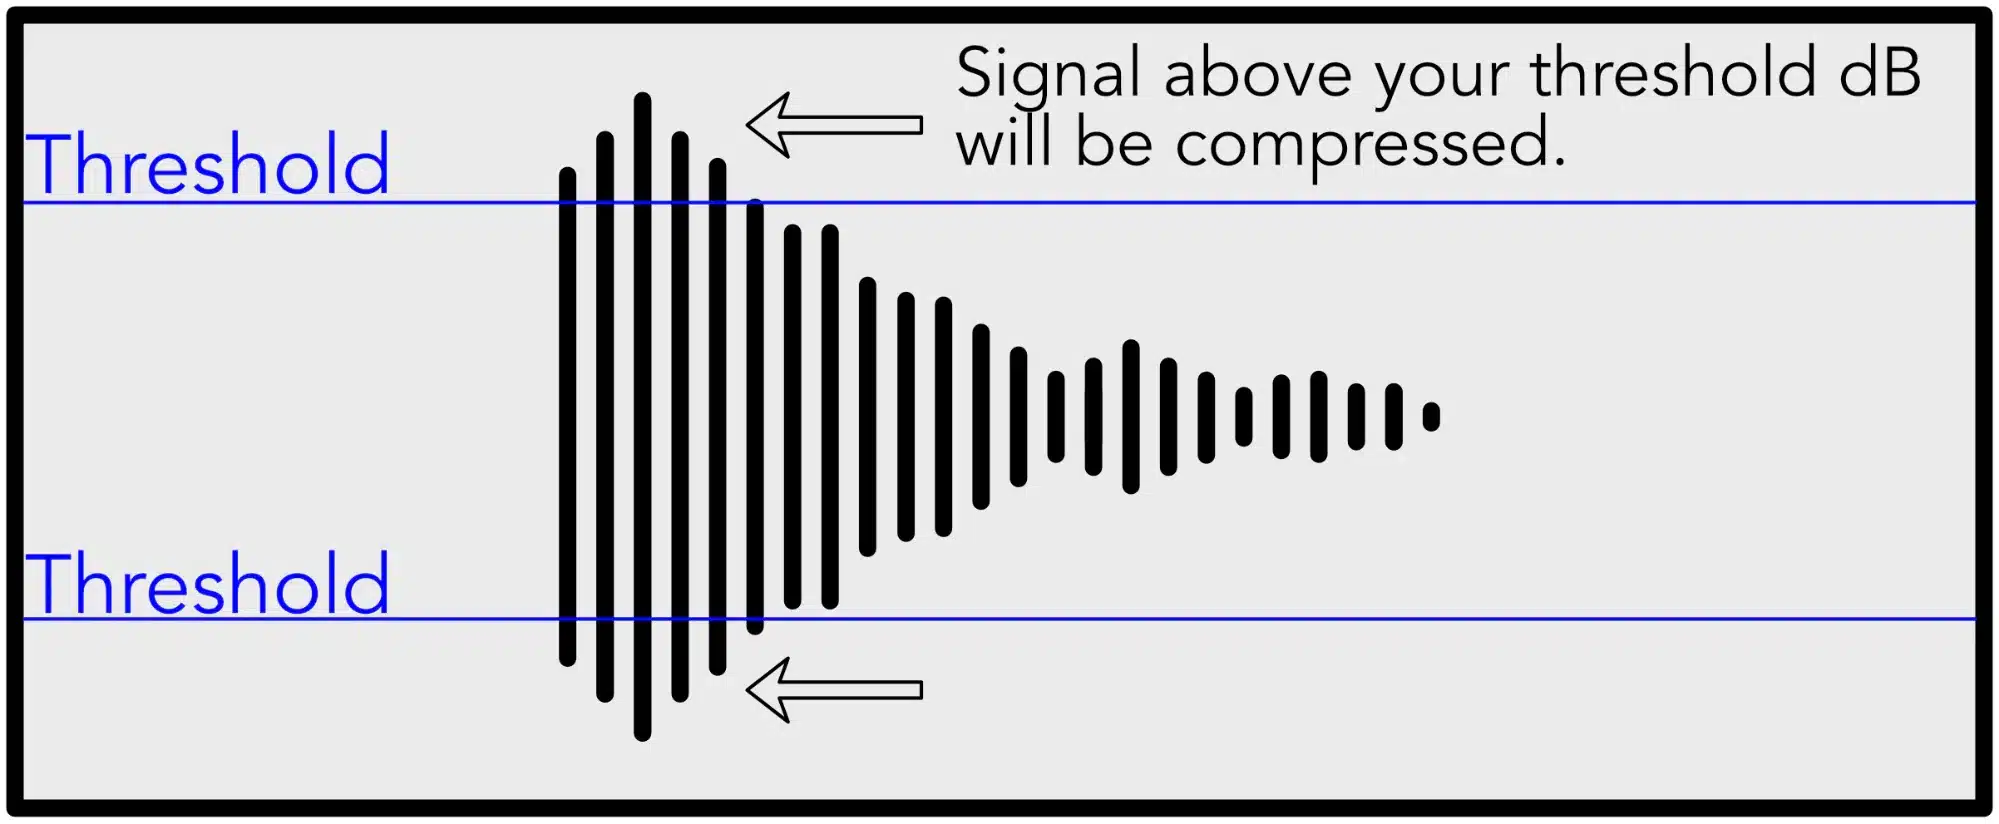
Audio compression, in its simplest form, is all about controlling the dynamic range of your music.
Picture this: you’re working on a new hip-hop track.
You’ve got this infectious beat, a catchy hook, and your verses are pure fire.
But there’s a problem… Some parts of the track are louder than others.
The drop is earth-shattering, but the verses seem to fade into the background.
The punchy bassline overpowers the delicate hi-hats, and the listener struggles to catch the lyrics over the powerful instrumentation (during certain sections).
This is where audio compression comes into play.
In the world of music production, dynamic range refers to the difference between the loudest & the softest parts of an audio signal.
So, when we talk about audio (dynamic) compression, we’re talking about reducing the dynamic range of an audio signal.
This is done by making the loud parts quieter, which in turn brings up the overall level of the quieter parts once the signal is boosted back up to its original level.
The result is a more balanced and consistent level of loudness throughout the track.
However, audio compression isn’t just about making the loud parts quieter and the quiet parts louder.
It’s also a powerful tool that can:
- Shape the tone and character of your music
- Add punch and power to your drums
- Bring clarity and presence to your vocals
- Glue your mix together to create a cohesive, professional-sounding track
This tone and character is why hardware or analog compressors are so revered, even today, as digital compressors don’t inherently have this ability.
Unless they’re specifically modeled after them, naturally.
The Role of an Audio Compressor
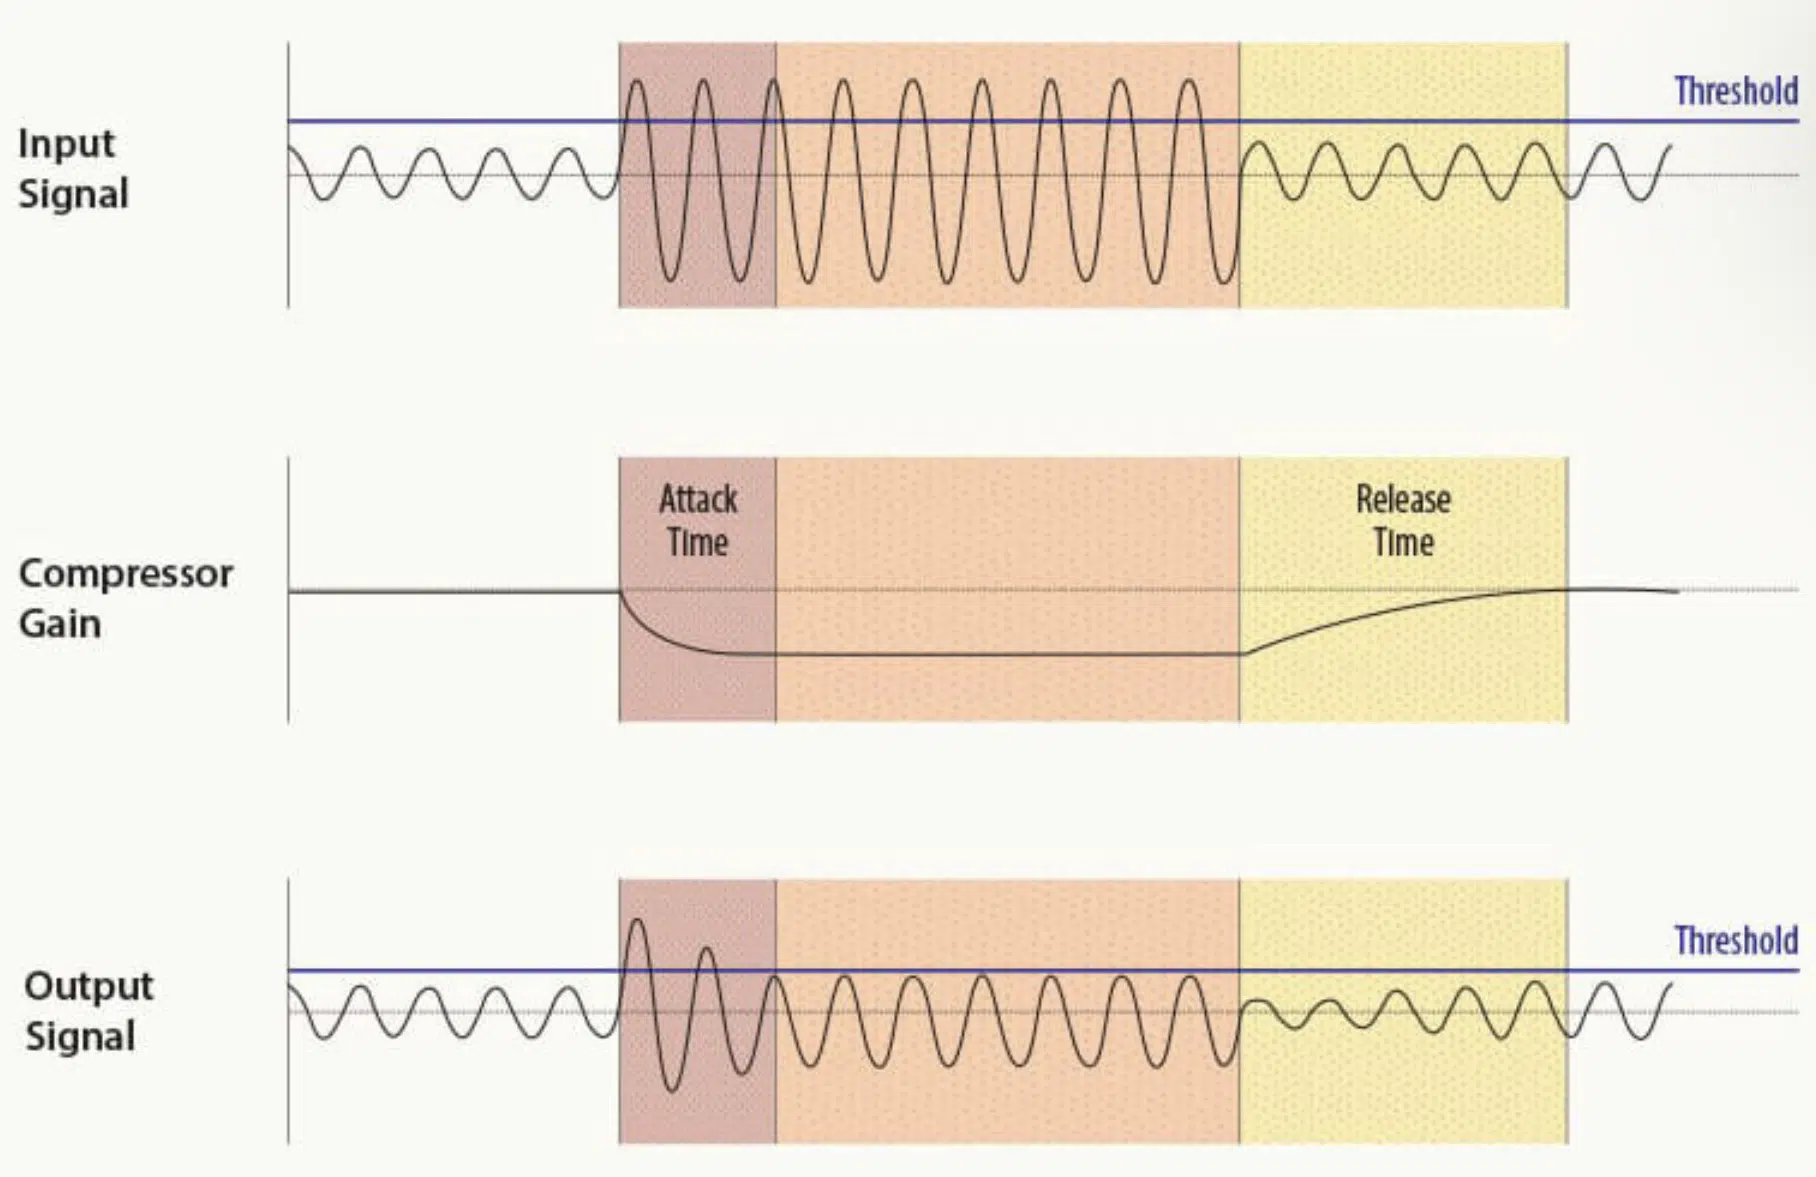
But how does an audio compressor make all this happen? Well, it’s all about thresholds and ratios.
Once the audio signal crosses a certain threshold, the compressor kicks in, reducing the volume based on the set ratio.
For instance, if the ratio is set at 4:1, for every 4 dB above the threshold, the output will be reduced by 1 dB.
Consider you’re mixing a track with a powerful snare drum.
Without compression, the snare might stand out too much, distracting from the rest of the mix.
However, by setting a threshold and ratio on your audio compressor, you can ensure that the snare doesn’t overpower the other elements.
The audio compressor isn’t just about thresholds and ratios, though.
It also has attack and release controls:
- The attack time 一 Determines how quickly the compressor responds once the input signal crosses the threshold.
- The release time 一 How long it takes for the compressor to stop compressing and returns to its inactive state after the input signal falls below the threshold.
These controls greatly affect the character of your sound plus, of course, the compression’s characteristics itself.
Diving into Dynamic Range
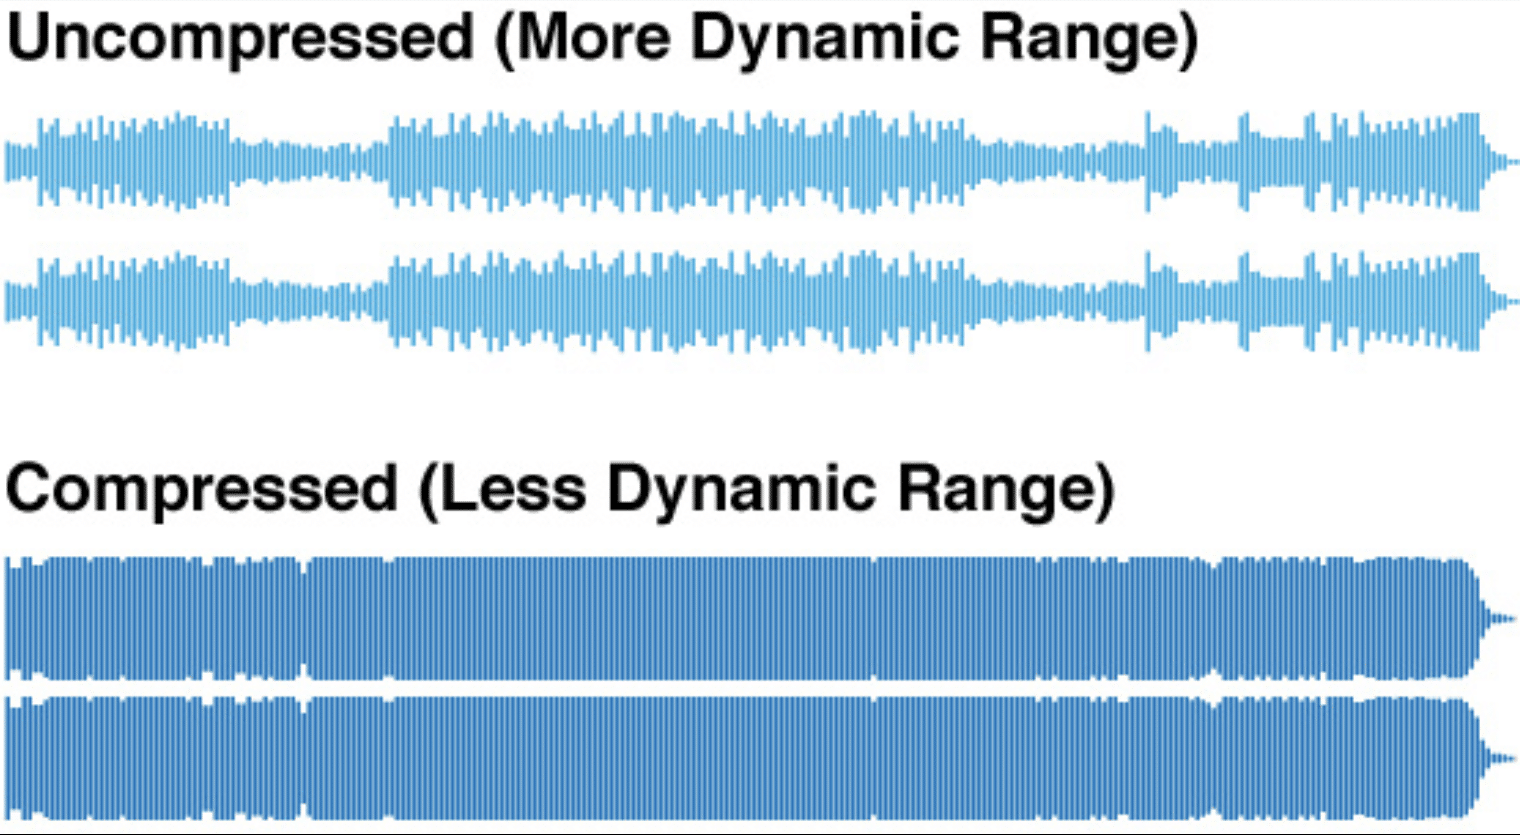
Dynamic range plays a crucial role in shaping the sound of your music.
As we previously mentioned, it’s the difference between the softest and loudest parts of your sound.
A wide/large dynamic range gives your music depth and dimension.
However, it can also make it difficult for listeners on lower-end speakers or noisy environments to hear the softer parts.
This is where compression comes in handy, helping to balance the loud and quiet parts.
Achieving a balanced mix with the right dynamic range is an art.
By using an audio compressor, you can manage the dynamic range effectively 一 ensuring that the loud parts aren’t too loud and the quiet parts aren’t too quiet.
Let’s say you’re working on a vocal track where the singer’s pitch varies widely.
Some notes are sung softly, while others are belted out.
In this case, using an audio compressor will help you to bring out the softer notes and tame the louder ones, achieving a balanced and consistent sound.
The key to this balance lies in setting the right threshold and ratio on your compressor.
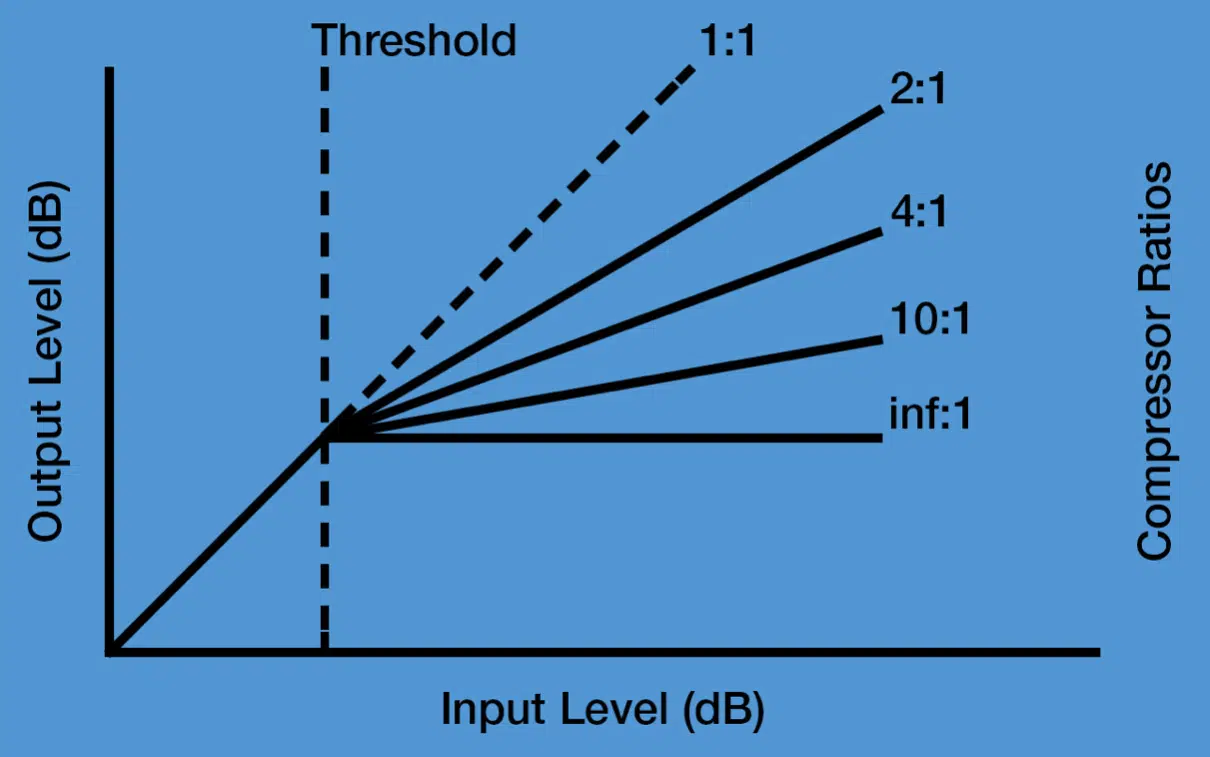
- The threshold 一 Determines the point at which compression begins.
- The ratio 一 Dictates how much the signal is reduced once it crosses that threshold.
This is where your ears come into play.
Start by slowly adjusting the threshold until the loudest parts of your track trigger the compressor.
Then, tweak the ratio until you get a sound that feels balanced and controlled.
Pro Tip
If you make a track or audio signal’s dynamic range too small/narrow, it can have a disastrous effect and essentially suck the life out of whatever you’re compressing.
It’s a surefire way to sound unprofessional, and surely lead to a bad mix and master that may suffer more than if you didn’t use compression in the first place.
Understanding the Audio Signal
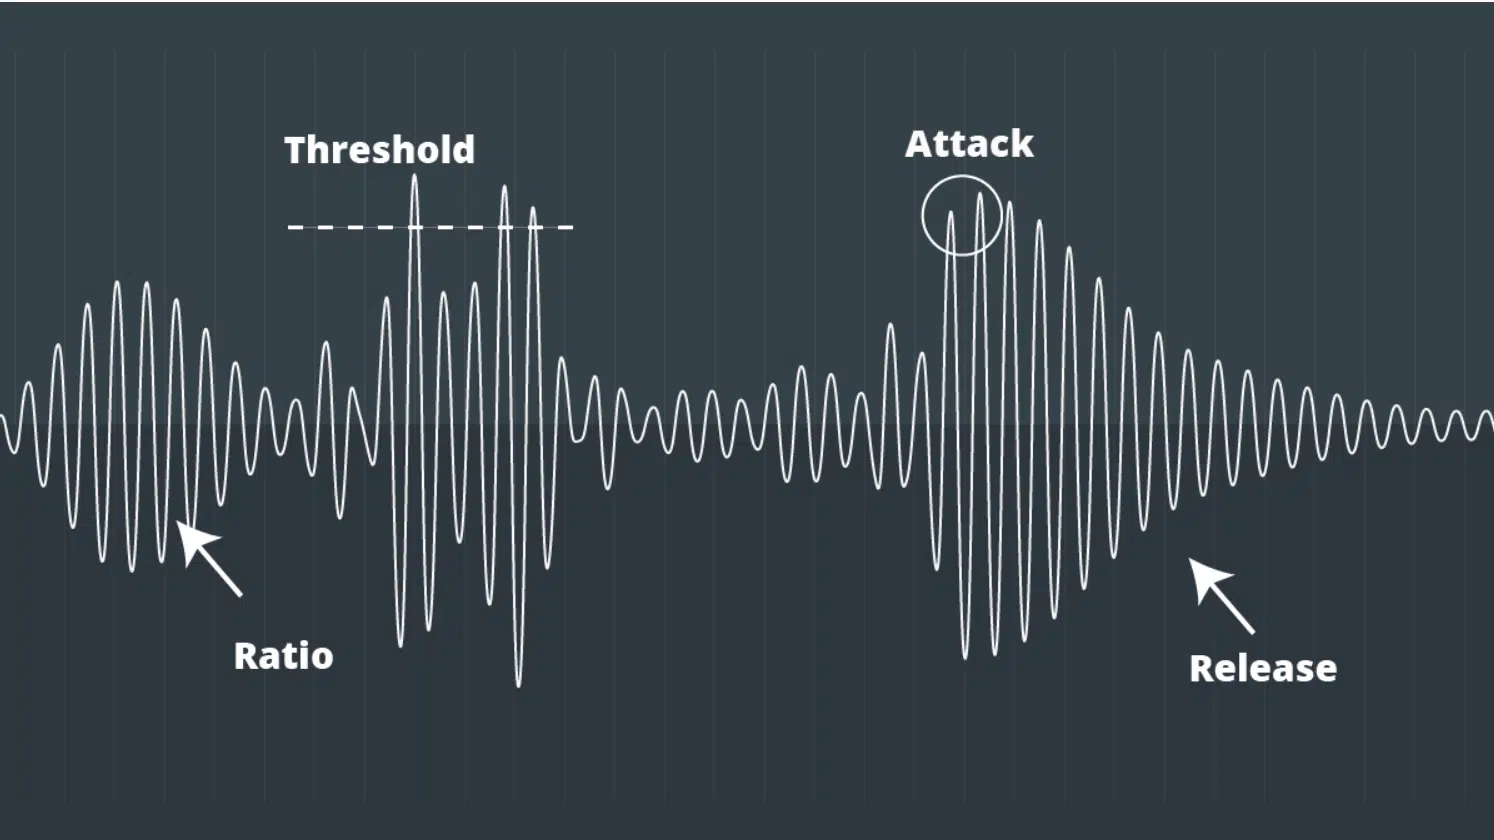
The core of compression lies in the transformation from an input signal to an output signal.
The input signal is the original, raw sound that enters the compressor.
Once inside, the compressor applies gain reduction based on the parameters you’ve set, such as:
- Threshold
- Ratio
- Attack time
- Release time
The result is a compressed output signal.
Let’s take a drum kit as an example… the input signal would be the raw sound of the drums being played.
This might include loud crashes from the cymbals and softer sounds from the snare drum.
After setting your compressor parameters, these diverse sounds are molded into a balanced and harmonious output signal.
Separate elements will be glued together more cohesively and sound more balanced.
-
Compressed Signal vs Uncompressed Signal
In the realm of music production, quality audio files are super important.
When it comes to the word “compression” in audio, it comes in 2 very distinct forms.
One is the type of compression we’re covering in this article (dynamic range compression) and the other being audio file compression.
It focuses around the type, format, and size of the audio file itself.
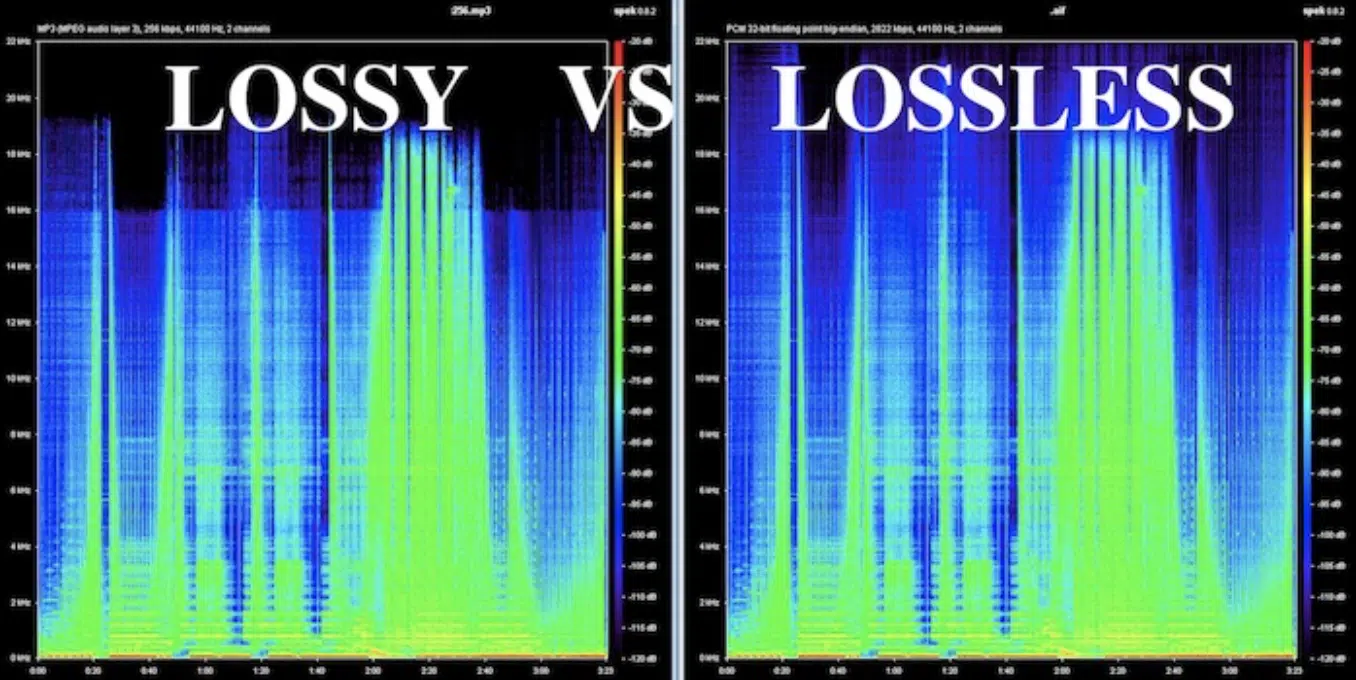
- Compressed audio files (lossy): have undergone data reduction to make the file size smaller.
- Uncompressed files (lossless): maintain all the original data.
For instance, a .WAV file is an example of an uncompressed audio file.
It offers high quality but comes with a larger file size.
On the other hand, an MP3 is a compressed audio file, making it smaller in size but with loss of quality.
This depends on the various compression amounts available, and results in a smaller file with more sever loss of quality.
PRO TIP
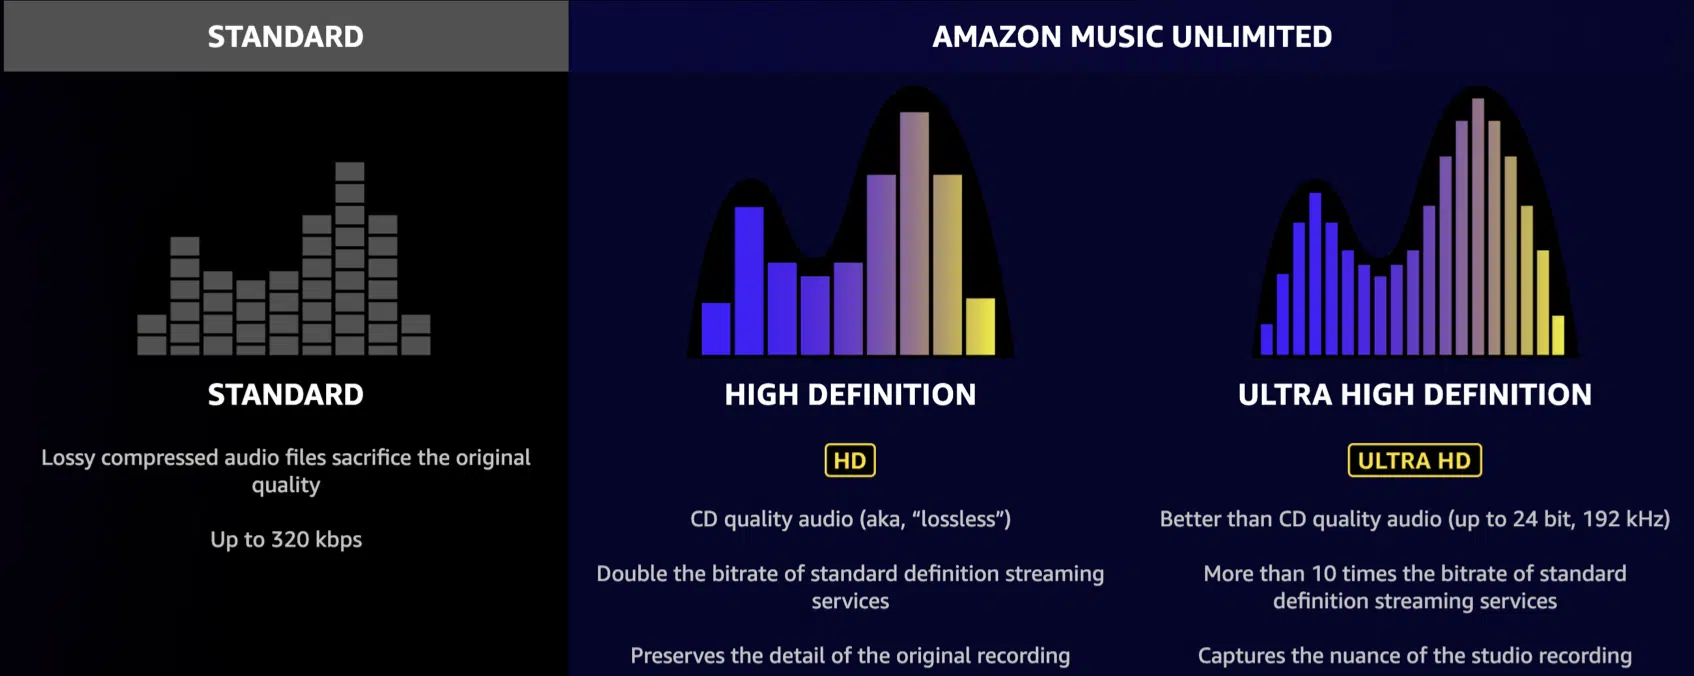
While compressed files are great for saving space, using high-quality, uncompressed files for your mixing and mastering is generally the best practice.
This ensures that you’re working with the best possible audio quality before you apply any compression.
This why, as of late, streaming services offer a ‘lossless’ playback plan which allows users to playback their audio in an uncompressed state/format.
When testing for playback compatibility, it’s best to listen back in both compressed and uncompressed (lossless) formats, so you can gauge what your listeners will hear as well.
Gain Reduction
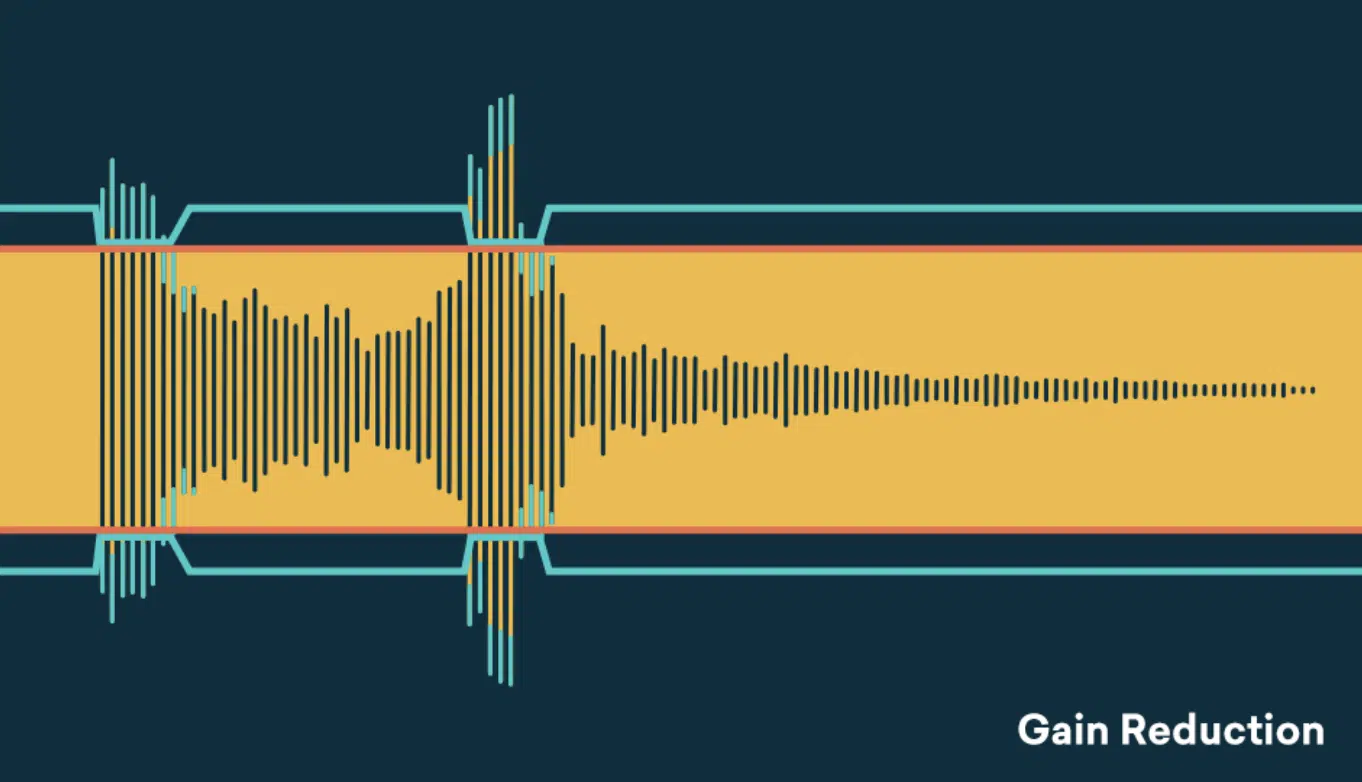
Gain reduction is the powerhouse behind audio compression.
It’s the process of reducing the level of an audio signal, based on the compressor’s settings.
By adjusting the gain of an audio signal, you can control its dynamic range, creating a more balanced and consistent sound.
Imagine you’re working with a bass guitar track that has a few notes significantly louder than the rest.
By applying gain reduction, you can tame these louder notes 一 bringing their volume closer to the rest of the track.
This results in a more balanced and cohesive bassline.
Hard Knee vs Soft Knee
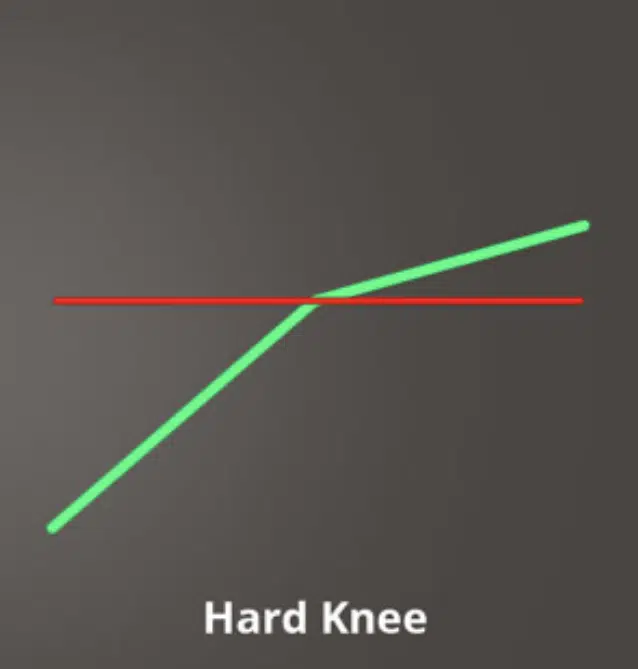
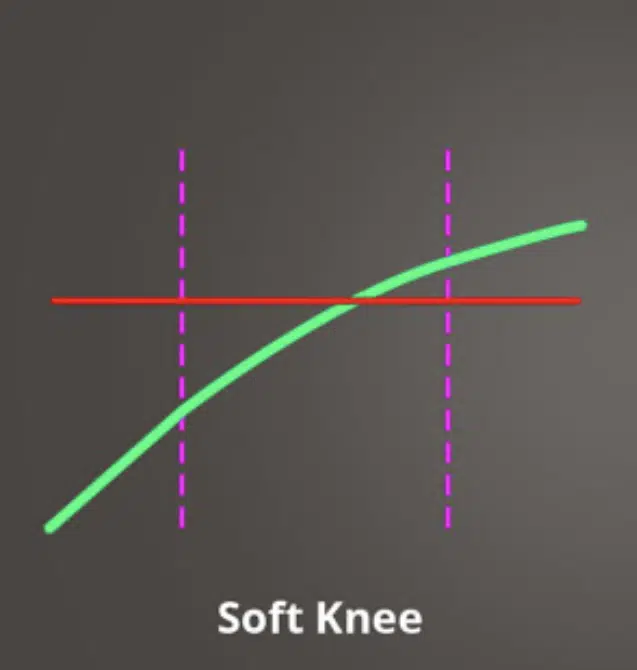
When it comes to the ‘gain reduction curve’ you have two main options:
- Hard knee compression 一 Applies gain reduction abruptly once the signal crosses the threshold
- Soft knee compression 一 Applies gain reduction gradually, creating a smoother transition.
Consider a vocal track with sudden loud peaks.
Using hard knee compression, you could sharply reduce these peaks, ensuring they don’t overpower the rest of the vocals.
However, this might result in an unnatural sound.
Using soft knee compression is traditionally the more transparent option (which is super important to be aware of during the compression process).
This is because you’re able to make your peaks sound smoother, while maintaining a more natural vocal performance.
NOTE: Many modern compressors allow you to set the gain reduction (curve) value at some point in between hard knee & soft knee.
Make Up Gain: The Secret Sauce of Output Gain
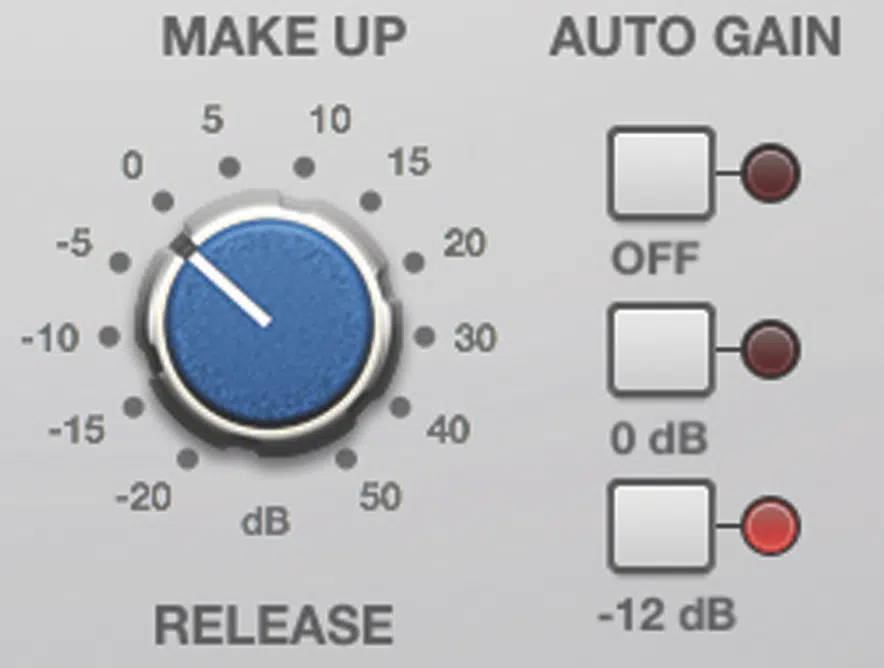
Make-up gain is a specific type of output gain used after compression to compensate for the reduction in volume that occurs during compression.
But remember, making things “loud” isn’t the same as making things clear and refined, so proceed with caution if you’re going to attempt this technique.
I’ve personally heard many songs get completely demolished because of this obsession with being the loudest… do not let that happen to you!
Let’s revisit the snare drum example for a minute.
After applying compression, your snare might sound quieter in the mix… let’s say by 3 dB.
However, by adding a make-up gain value of 3 dB, you can restore its original loudness, making sure it cuts through the entire mix as intended.
But again, proceed with caution.
-
Keep In Mind
It’s scientifically proven that louder always sounds better.
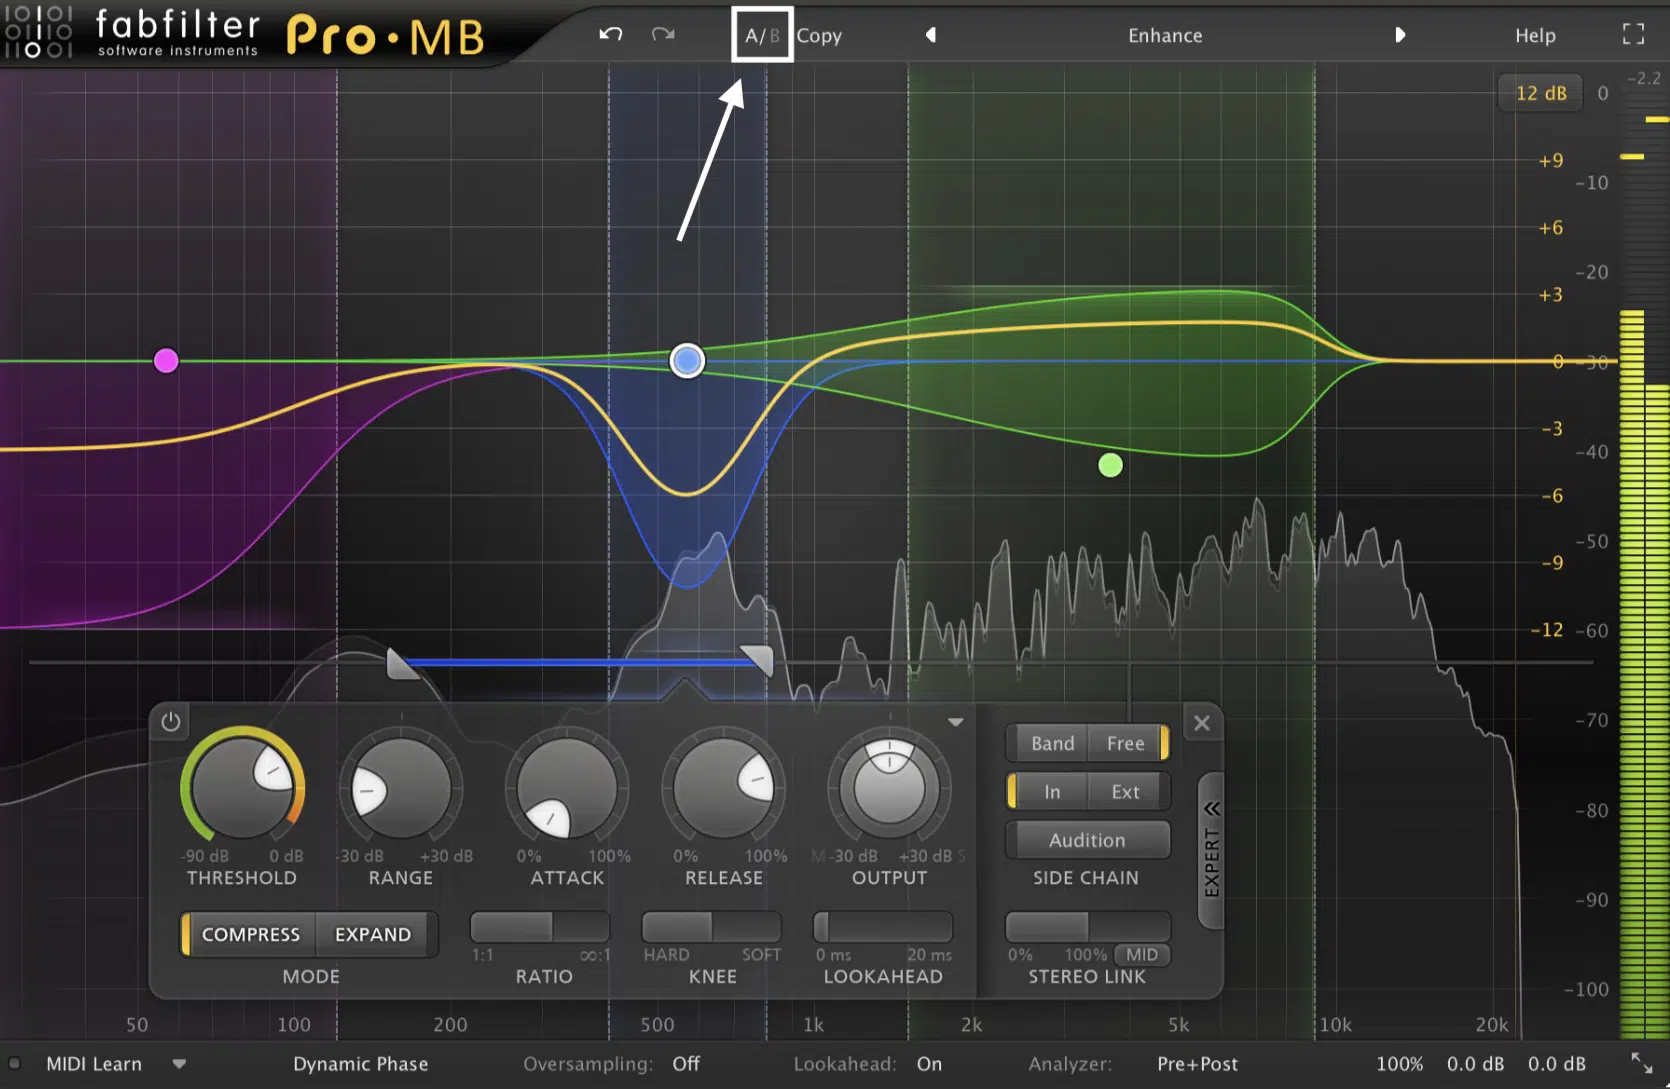
So, when comparing and contrasting the effects of compression on a signal in order to determine if you’ve achieved the desired result, make sure to A/B the compressed and uncompressed signal at the same level.
For example, if the original signal was at -12 dB, and the post-compressed signal is at -8 dB, you must add an additional 4 dB.
This also ensures that you won’t have to unnecessarily adjust your mixer faders every time you tweak the compression on any given track’s compression.
Mastering Attack & Release in Audio Compression
Attack and release times play a crucial role in shaping the sound of your compressed audio.
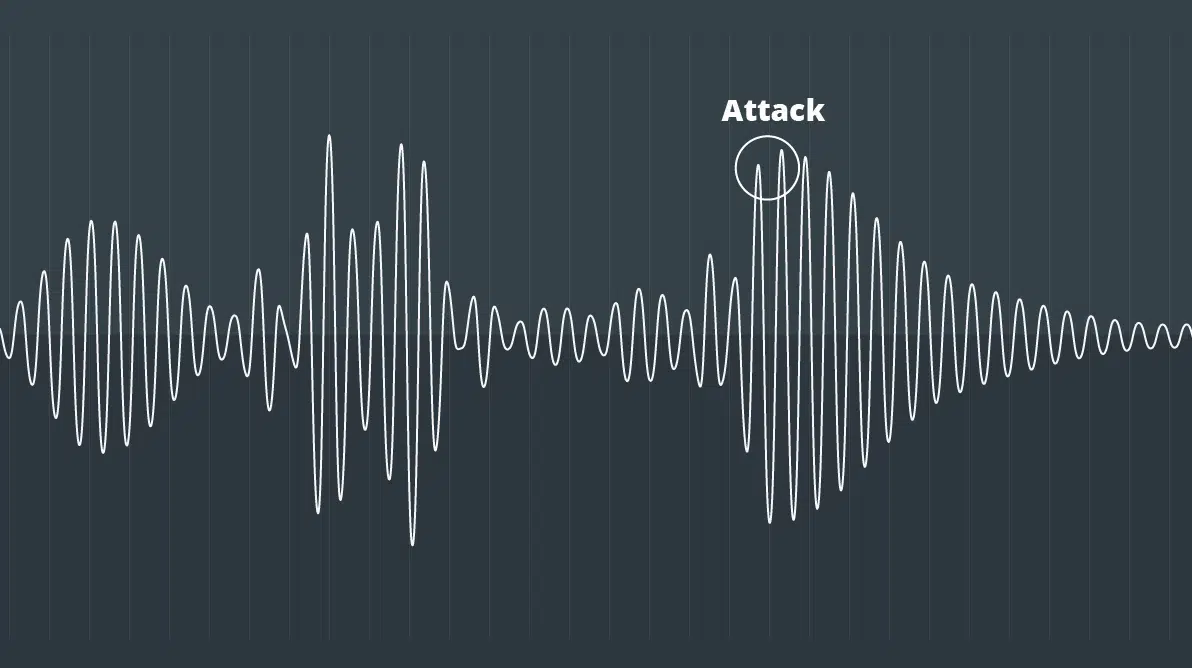
- The attack time 一 Determines how quickly the compressor responds once the input signal crosses the threshold.
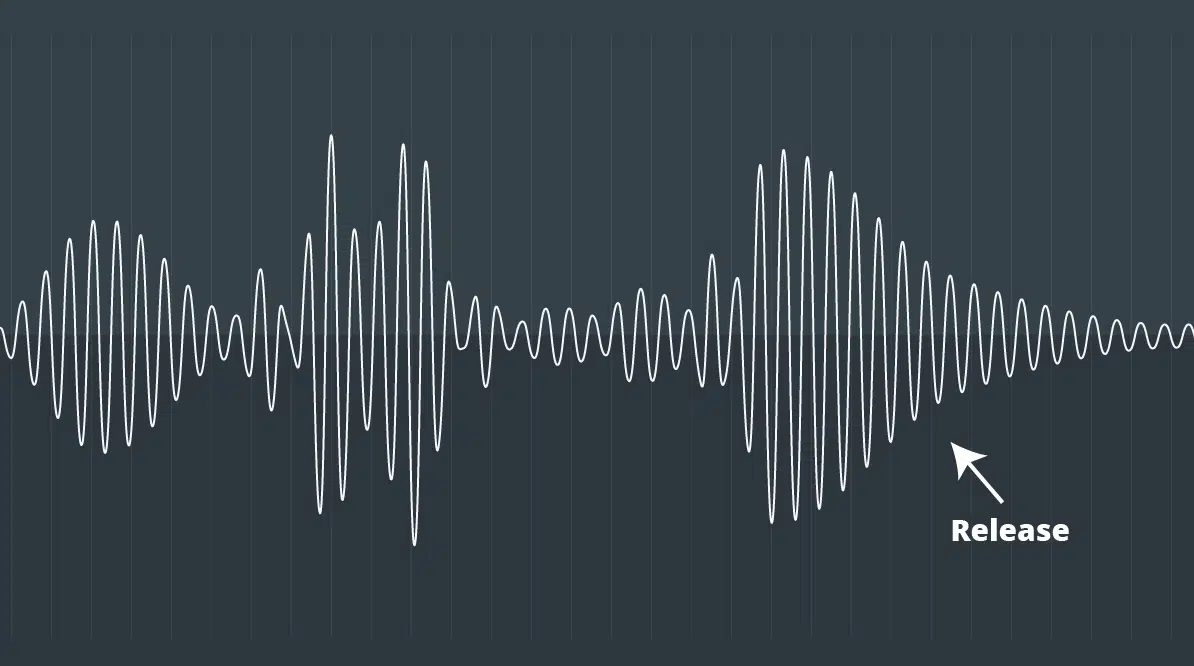
- The release time 一 Dictates how long it takes for the compressor to stop compressing after the input signal falls below the threshold.
-
Breaking It Down
Consider a punchy kick drum in a dance track.
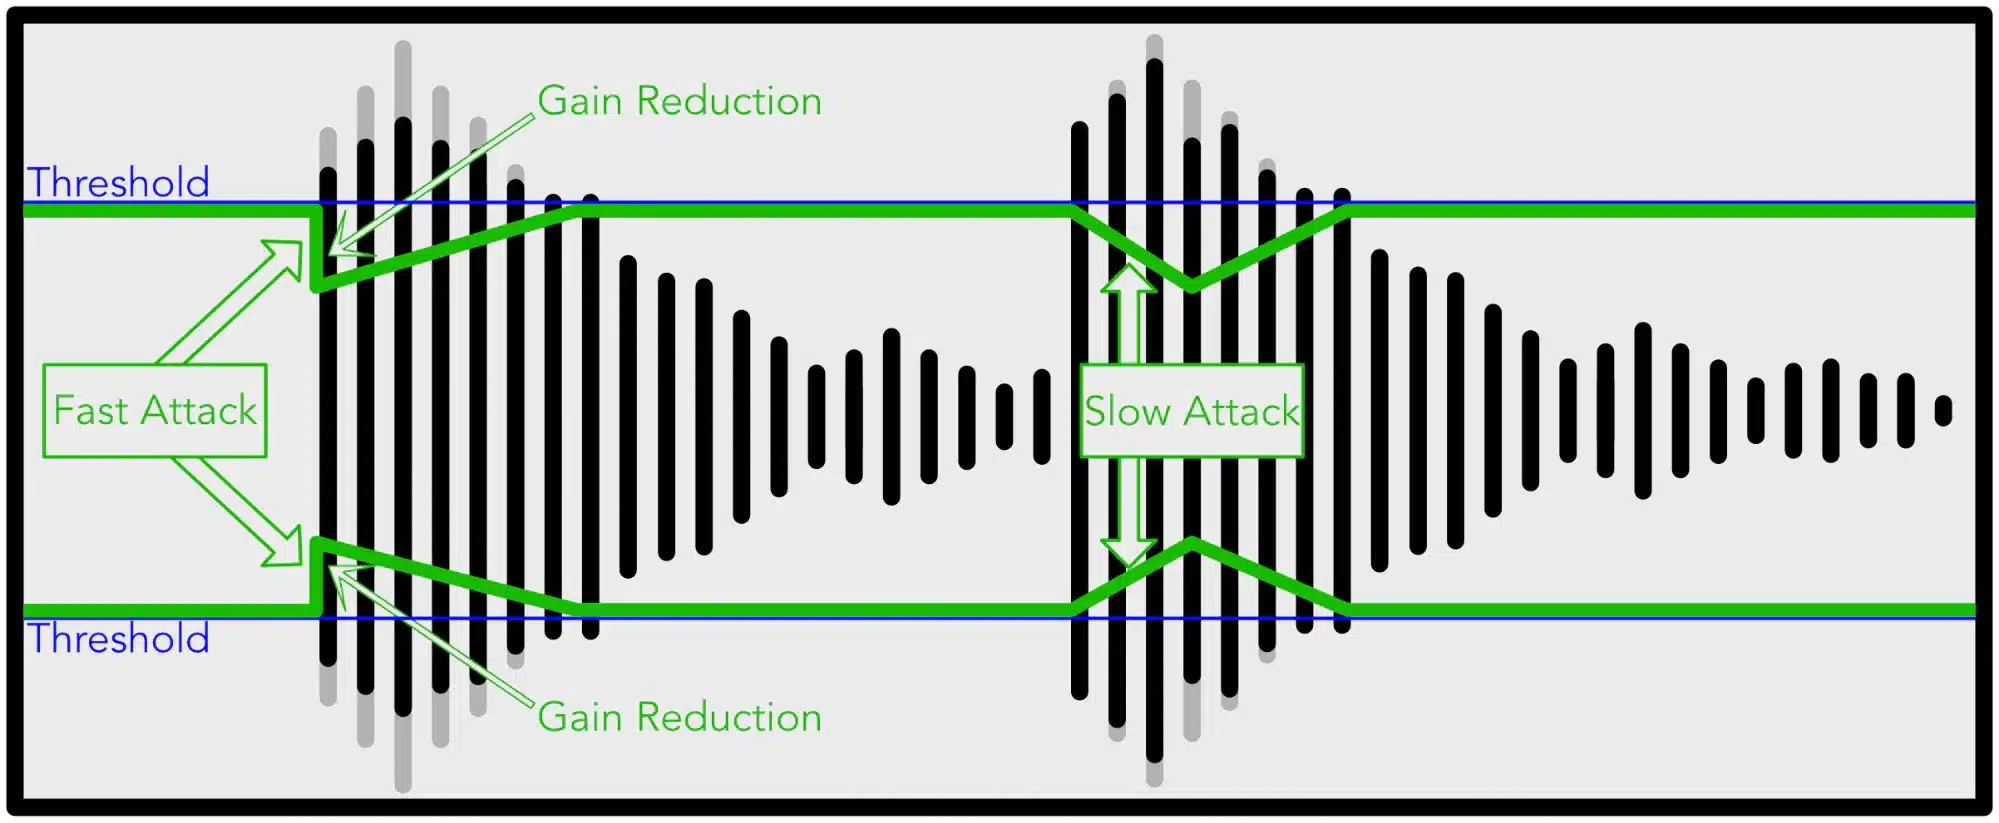
- A fast attack time 一 Could take the punch out of the kick and smear the attack portion; making it sound softer.
- A slower attack time 一 Would let some of the initial punch through before the compression kicks in, preserving its impactful sound.
Finding the sweet spot for attack and release times often involves a bit of trial and error.
Every sound source is different, and what works for one might not work for another.
It’s all about listening carefully and adjusting these parameters until you achieve the desired sound.
Imagine you’re compressing a vocal track…
- If the attack time is too fast 一 It might squash the life out of the performance, making it sound dull and lifeless.
- But if it’s too slow 一 It might not catch the loudest parts, resulting in a less controlled sound.
Similarly, if the release time is too fast, it could make the vocals sound choppy, while a release time that’s too slow might not allow the compressor to recover between phrases.
This causes some parts to be overly compressed and introduce the (unintended) ‘pumping’ effect.
The key is to find a balance that complements the rhythm and pacing of the vocal performance.
PRO TIP
Depending on your track and how rhythmic you’d like the mixing process to be, it’s sometimes beneficial to time your Attack and Release based on your track’s tempo.
You can do so with the help of a tempo calculator or delay time calculator.
Additionally, you can create an advanced (subtle) rhythmic movement, typically achieved only by the true masters of the audio engineering world.
Various Types of Audio Compression
Now that you’ve got a solid grasp on what compression is, let’s dive into some of the most common compression sub-types.
-
Sidechain Compression
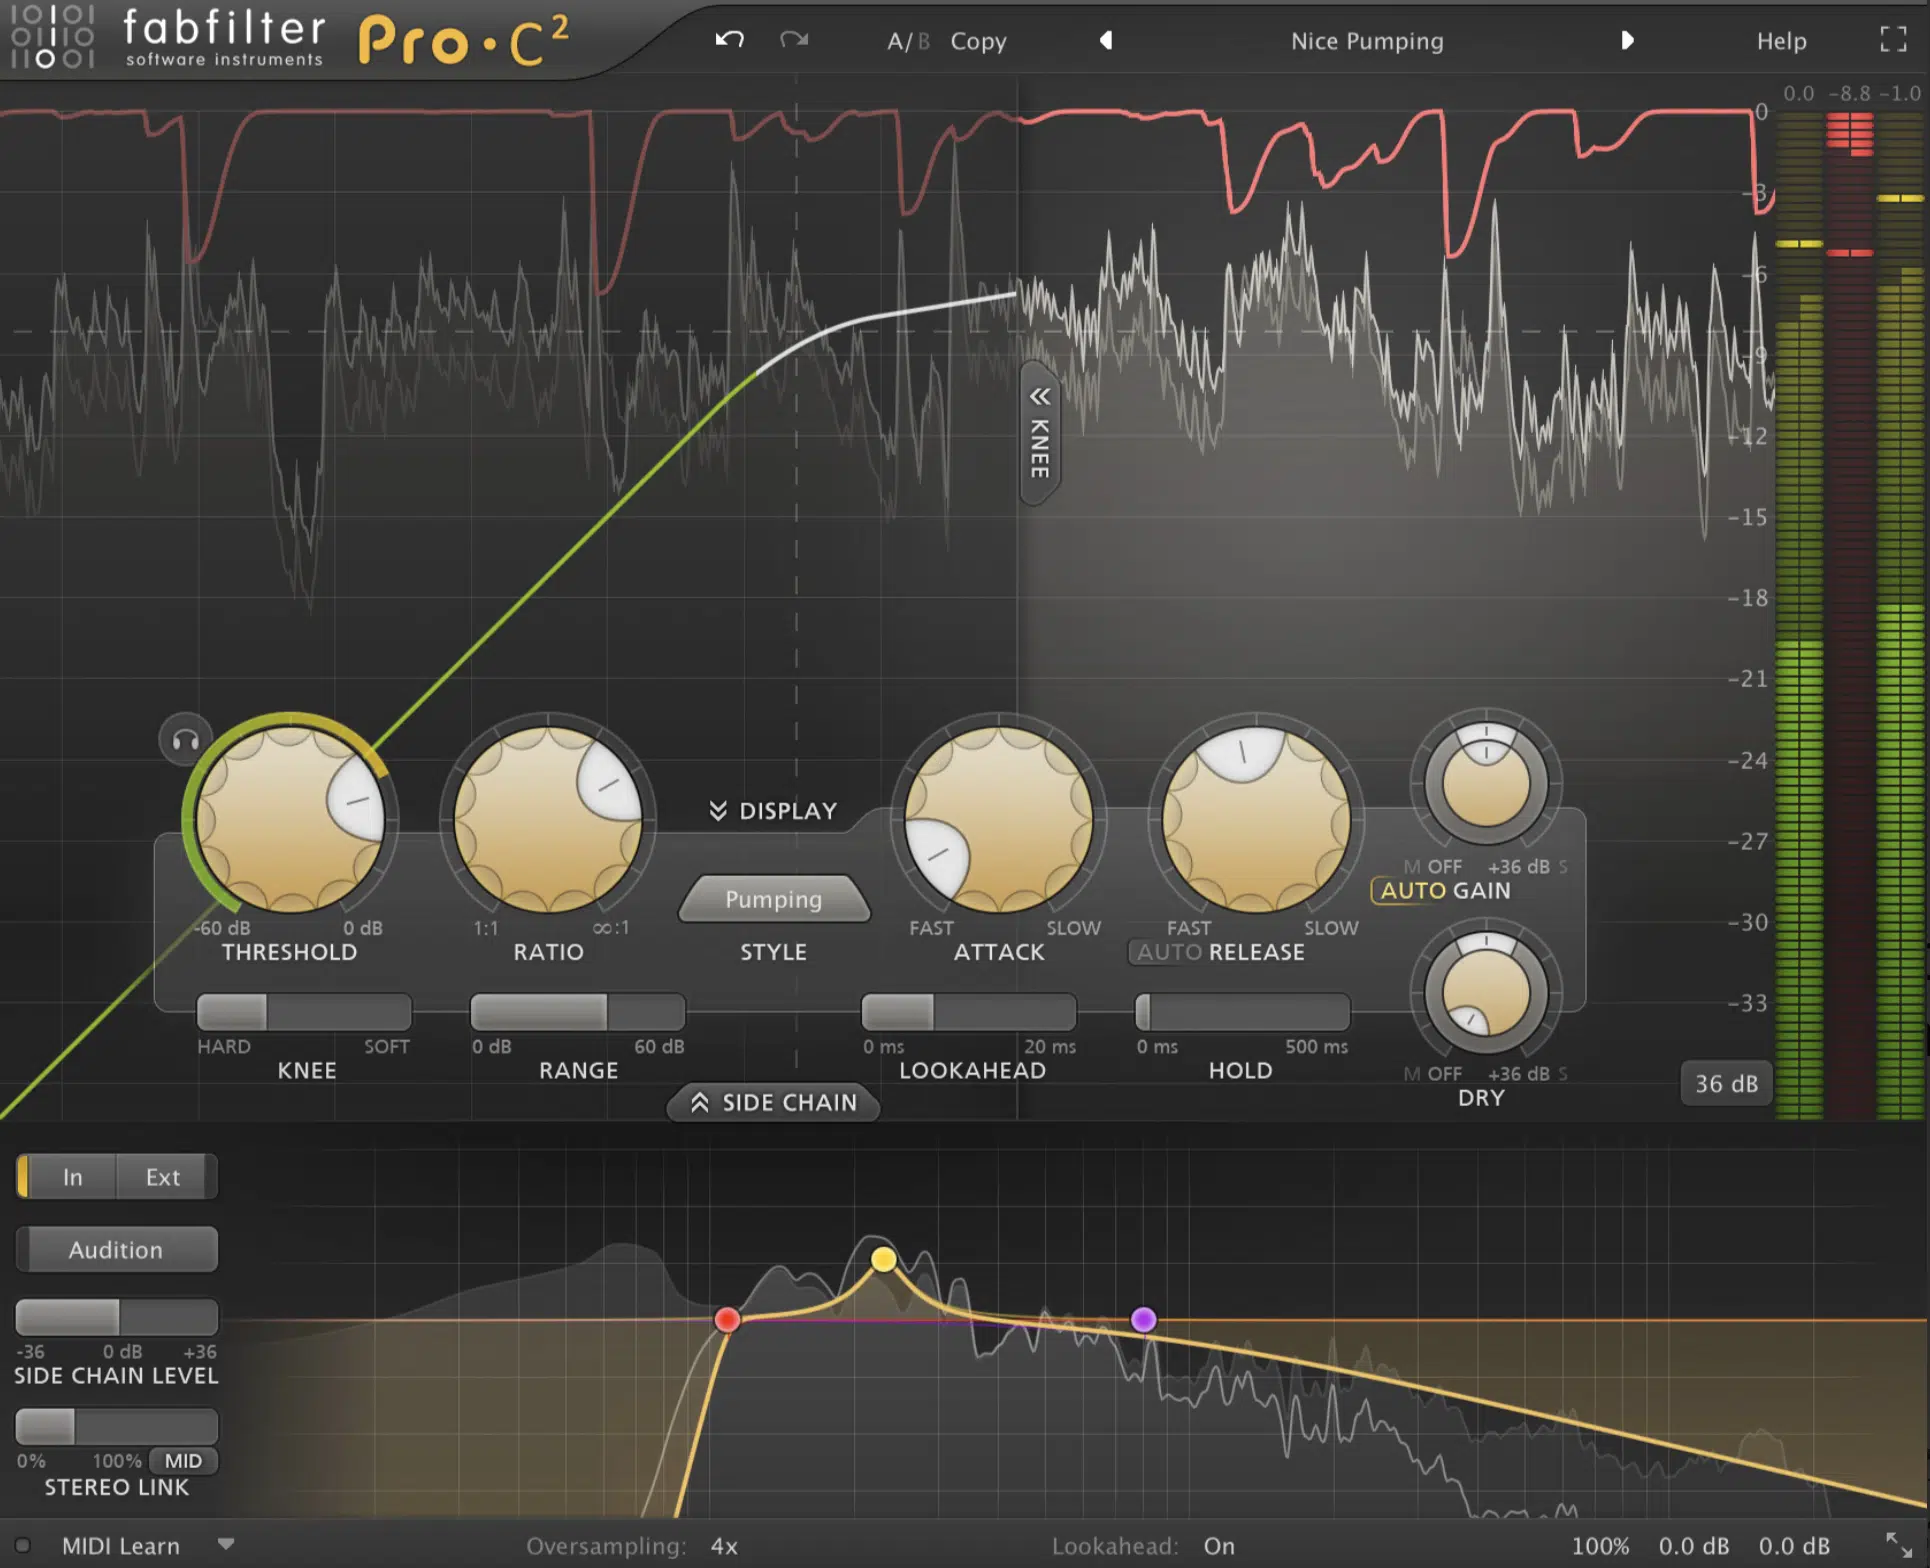
Sidechain compression is a more advanced technique that allows you to use the audio signal from one track to trigger the compressor on another.
This can be used creatively to:
- Create rhythmic pumping effects
- Carry out corrective mixing duties
- Add functionally to ensure certain elements of your mix always stand out
A classic example is in dance music, where the kick drum is side-chained to the bass line.
Every time the kick drum hits, the compressor reduces the volume of the bass, creating a rhythmic “pumping” effect.
This effect makes the mix feel more cohesive and helps the kick drum punch through the mix.
It also prevents the 2 low-end elements (in a mix) from clashing or from causing phase issues when played simultaneously.
-
Parallel Compression
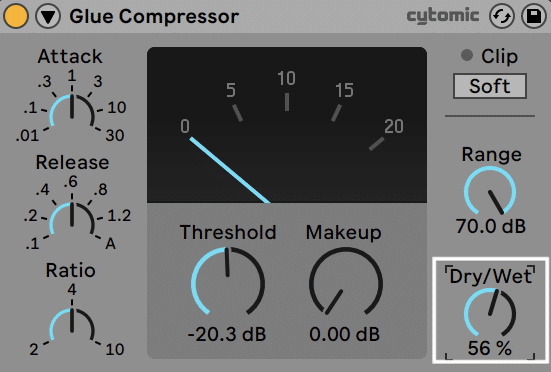
Parallel Compression, also known as New York Compression, is a potent technique for adding depth and energy to your mix.
The process involves mixing an unprocessed ‘dry’ signal with a heavily compressed version of the same signal.
This creates a robust, punchy sound that maintains the dynamic range of the original.
For instance, you might apply heavy compression to a duplicate of your drum track or BUS, then blend it with the original.
This adds power and thickness without losing the nuance of the performance.
-
Multiband Compression
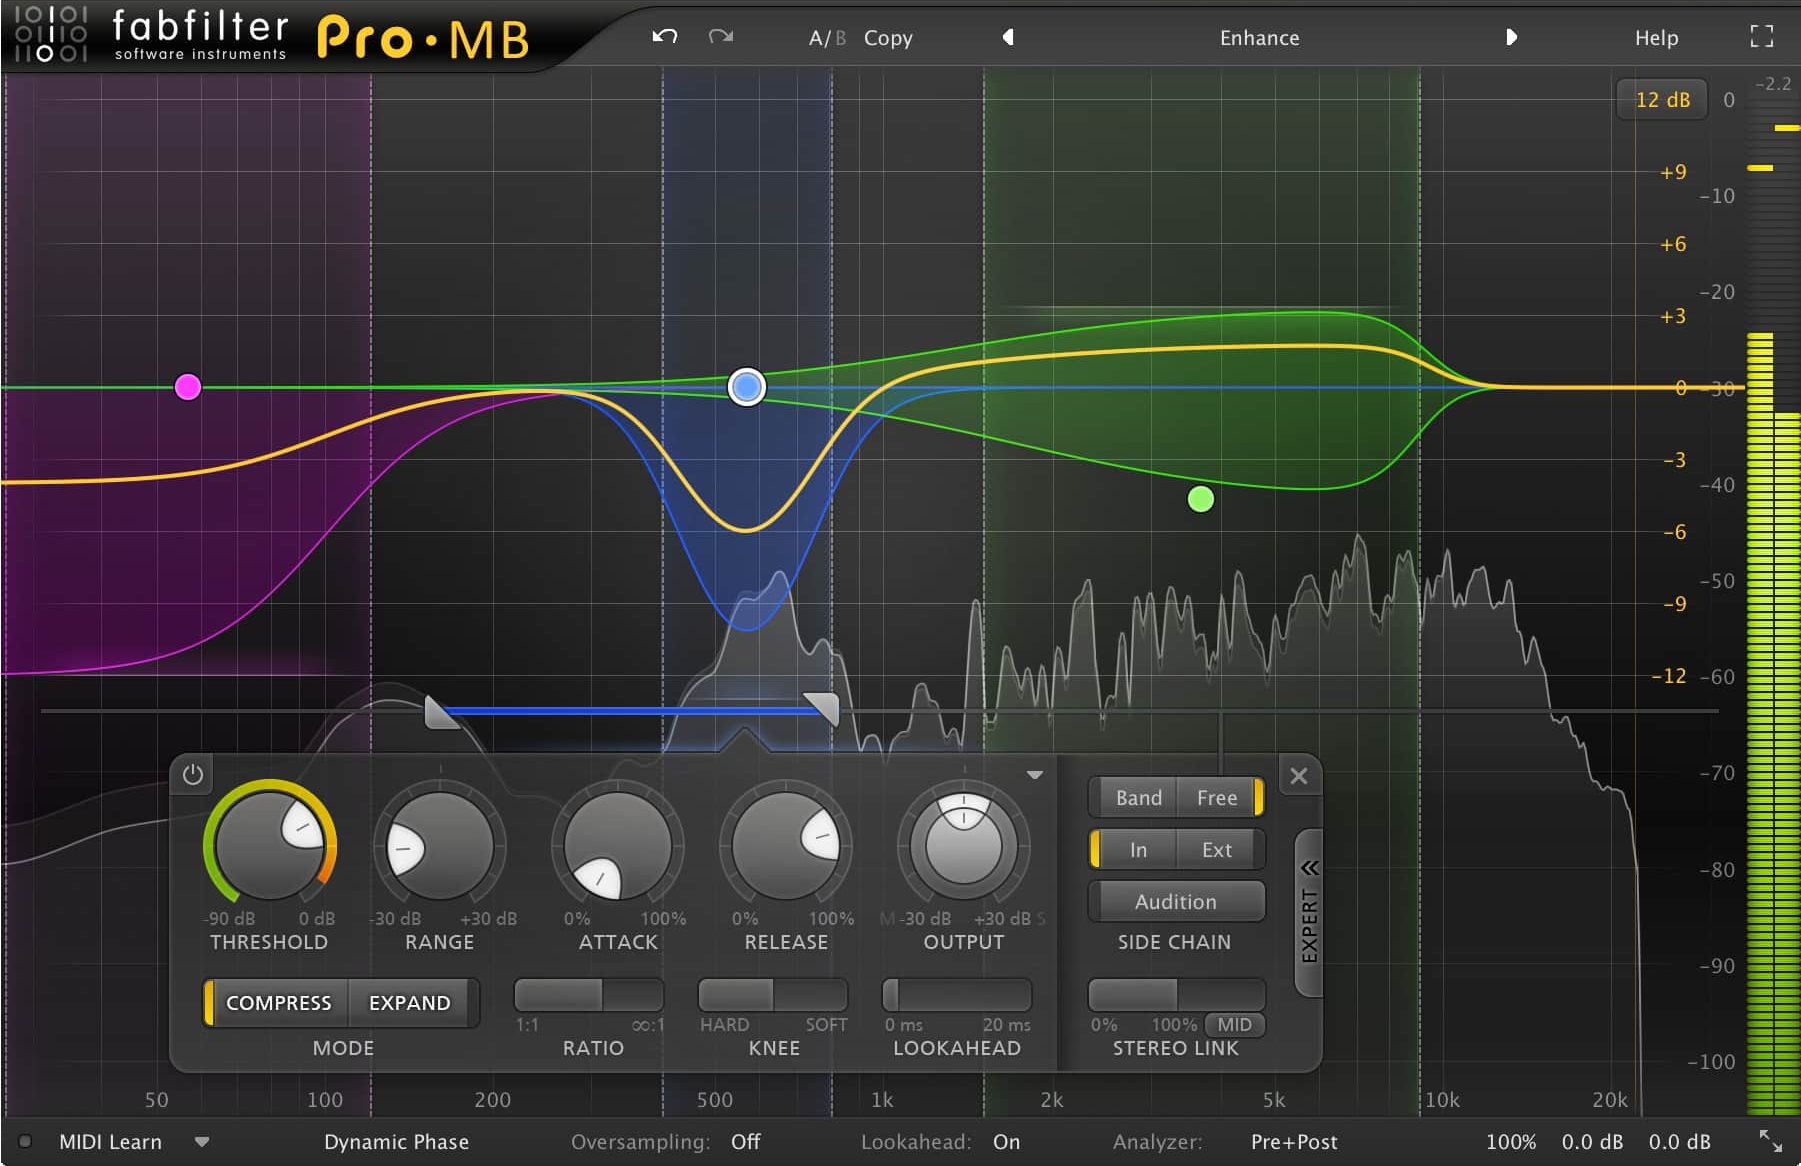
Multiband Compression is like having a team of tiny, frequency-specific compressors working on your track.
It allows you to compress different frequency ranges of an audio signal separately.
This means you could compress the bass frequencies of a track differently than the mid or high frequencies.
As well as have surgical control over your compression applications.
It’s a great tool for managing complex signals like a full mix or a busy instrumental, as well as an indispensable tool for side-chain compression.
-
Upward Compression
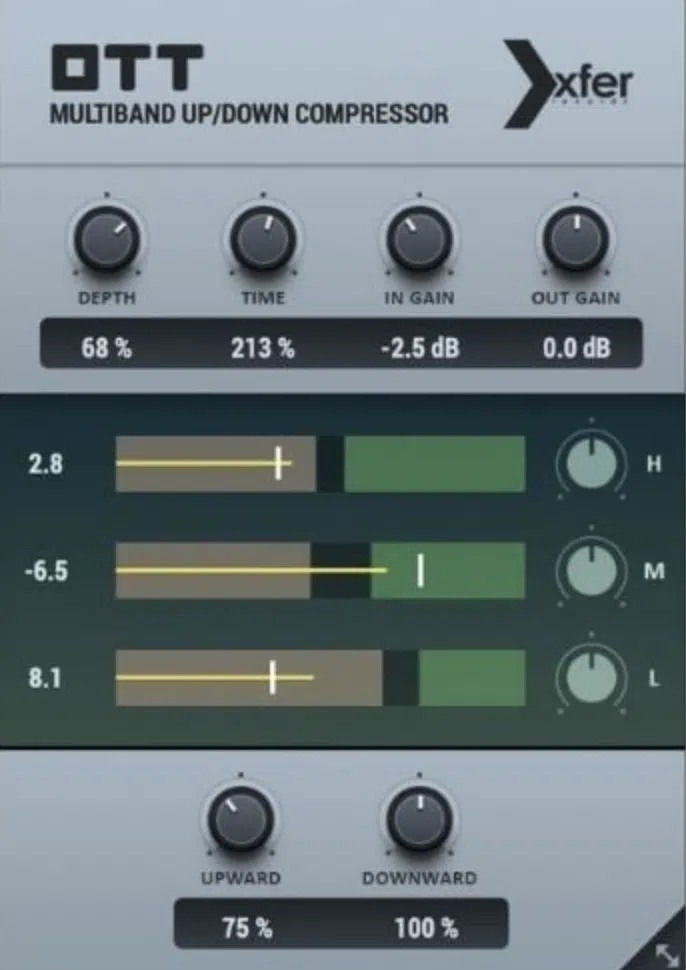
Upward compression, while less commonly discussed, holds a wealth of potential for your audio work.
Unlike standard (downward) compression that reduces the level of audio that exceeds a certain threshold, upward compression increases the level of audio that falls below a set threshold.
In other words, it makes the quiet parts louder.
This tool can be particularly handy when dealing with audio that has a wide dynamic range.
For instance, if you have a vocal track where certain words or phrases get lost in the mix, upward compression can bring those quieter elements up to a more audible level without affecting the louder parts.
It’s essentially like a compressor that’s effecting the signal in the opposite/reverse way.
-
Using Compression for Tone Shaping
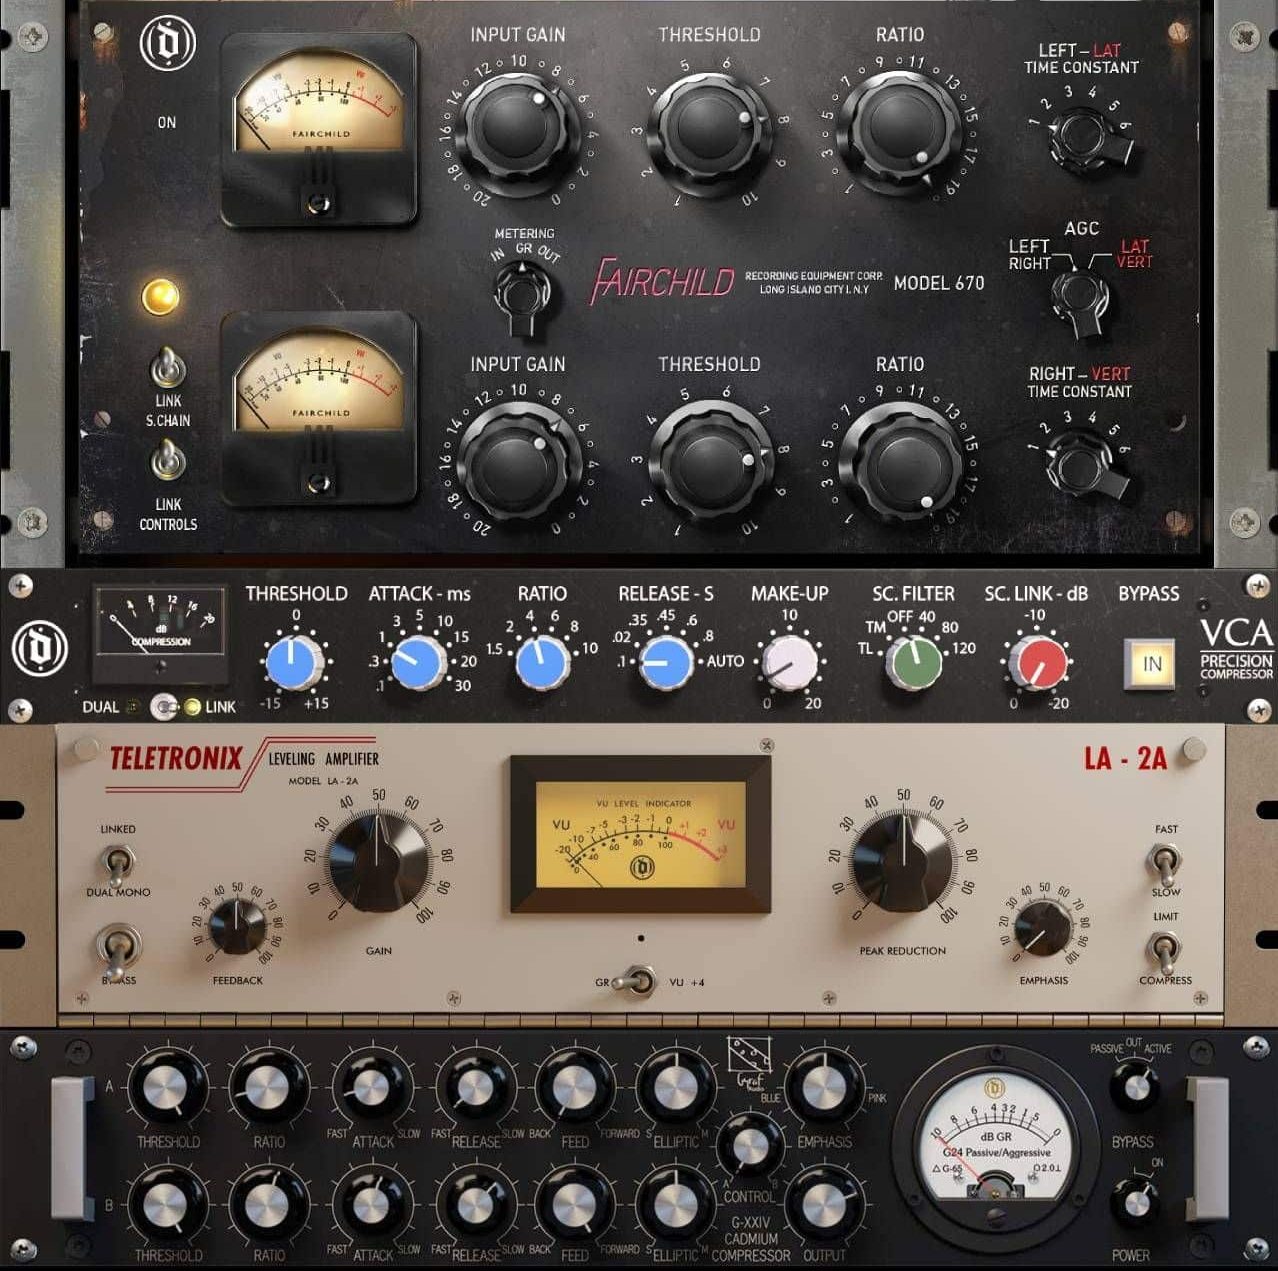
Compression doesn’t just control dynamics; it can also be a powerful tone-shaping tool.
By adjusting the attack and release times, you can influence the tonal character of your audio.
A faster attack time might give you a tighter, more focused sound, while a slower attack time can make your audio feel more open and lively.
Play around with these settings to see how they shape your sound.
Remember, vintage/analog modeled compressors are the most powerful emulations and are preferred in this realm.
-
Automating Compressor Settings
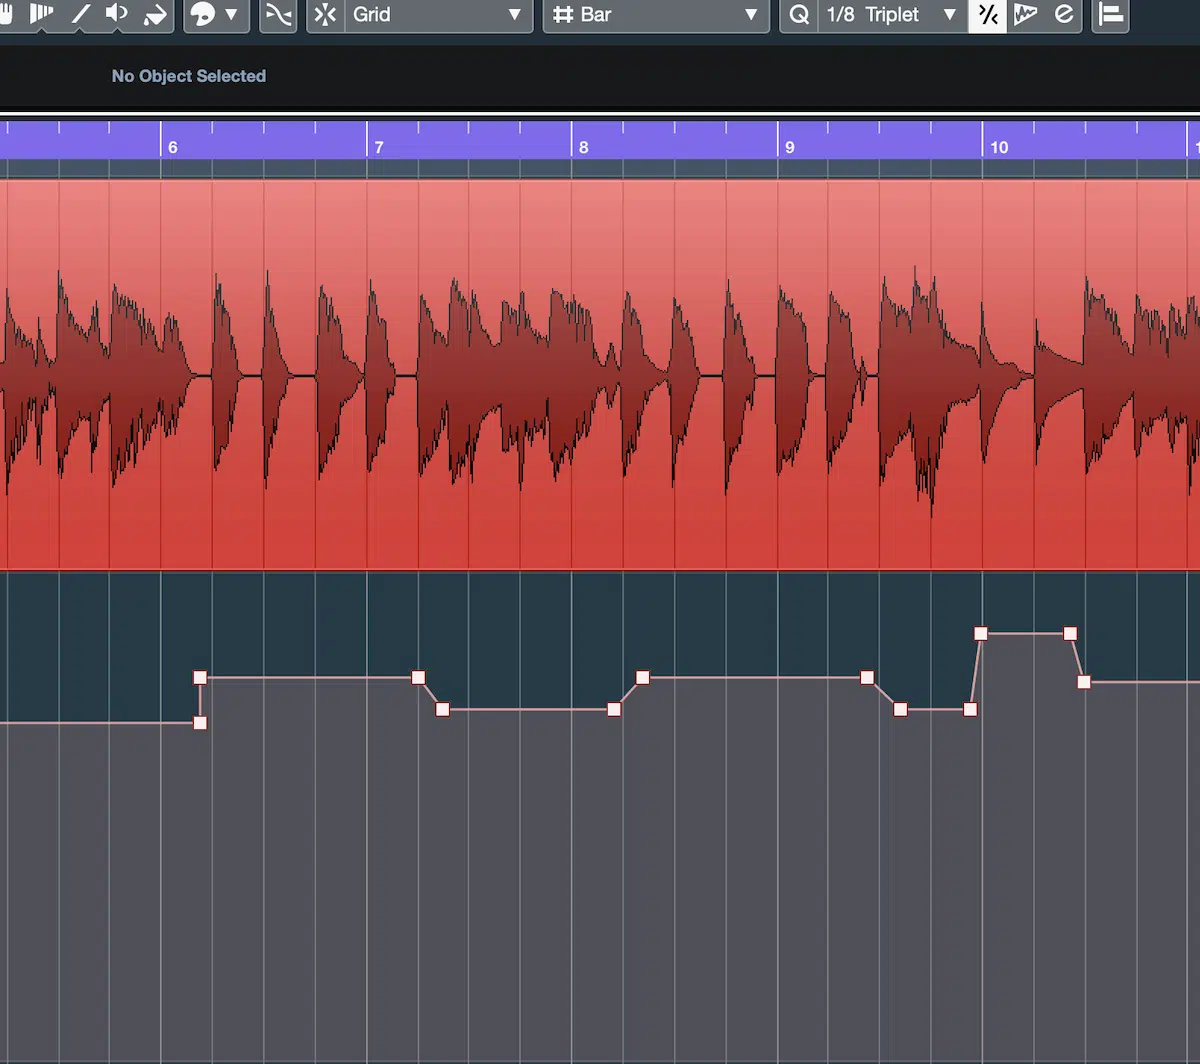
Remember, compression isn’t just a set-it-and-forget-it thing.
For more complex mixes, consider automating your compressor settings/compression sounds.
Automation allows you to change compressor settings throughout your track, ensuring the compressor responds appropriately to different sections of your song.
For example, you might want less compression during quieter verses and more during a loud chorus.
Automation gives you the freedom to make these adjustments smoothly.
-
Experiment With Different Audio Compressors
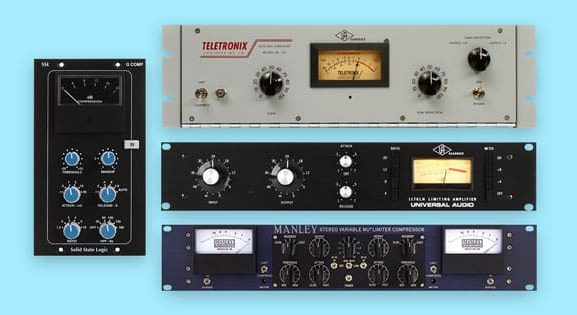
Different compressors have unique tonal characteristics.
For instance, a FET compressor is known for its aggressive, punchy character, which can add an exciting edge to your drums or vocals.
On the other hand, a tube compressor (which produces a tube sound) could offer a rich, warm, and smooth tone, perfect for taming harsh frequencies or adding character to a dull mix.
Don’t hesitate to experiment with different types, models, and compressor transitions.
Each brings something unique to the table, and finding the right one can be like discovering your secret weapon.
Just remember, excessive compression can make things sound absolutely horrible, so proceed with caution.
NOTE: To find the real difference between the various types, be sure to compare & contract its results on the same signal with relatively the same settings.
The effects can vary greatly.
What Is Audio Compression: Final Thoughts
There you have it: a deep dive into the universe of audio compression.
Now you never have to ask yourself “what is audio compression” again.
You’ve come a long way 一 from comprehending what audio compression is to mastering gain reduction, attack and release times, and output gain.
You’ve even added a few pro-tips to your arsenal, which can certainly come in handy.
But your compression journey is just beginning… now, it’s time to apply these skills to your music.
Download these versatile, high-quality free drum loops.
By applying techniques like parallel compression to the included drum loops, you can bring them to life in your mixes.
This will help you create unique sounds and further enhance your newfound understanding of compression.
Remember, the world of audio compression is vast and exciting, and the beauty of it lies in experimentation.
So, go ahead and push the limits to your heart’s content.
Until next time…


Leave a Reply
You must belogged in to post a comment.