EQ is one of the most essential components of professional music production.
Today, we’ll be breaking it all down for you in detail, with a particular focus on vocals.
Mastering the art of EQ is not just about making your mix sound good, it’s about bringing your music to life and emphasizing its unique character.
Plus it’s the key to ensuring your musical vision gets translated properly.
This article is your comprehensive guide to understanding vocal EQ’ing 一 designed to provide you with the knowledge and skills needed to take your mixes to the next level.
So, what’s on the vocal EQ chart agenda?
- Grasping EQ basics & the frequency spectrum ✓
- Understanding frequency ranges & their impact on vocals ✓
- Utilizing EQ charts effectively ✓
- Distinguishing & EQ’ing male & female vocals ✓
- Practical EQ tips, tricks & techniques for professional results ✓
- Advanced EQ strategies and troubleshooting ✓
- The role of the EQ chart in creating dynamic mixes ✓
- A handy EQ cheat sheet for your future reference ✓
By the end of this article, you’ll have a deep understanding of EQ, and you’ll be able to enhance your vocals tenfold.
So, let’s dive in…
Table of Contents
- Vocal EQ Made Easy: Your Ultimate EQ Cheat Sheet
- The Magic of the EQ Chart
- The Vocal EQ Cheat Sheet
- Formants
- Male vs Female Vocals
- The EQ Chart: Your Key to Mixing Mastery
- The Role of the High Pass Filter
- The Role of the Low Pass Filter
- Mastering EQ: Tips & Tricks
- Using the EQ Chart to Create Dynamic Mixes
- Advanced Techniques & Troubleshooting
- Vocal EQ Chart: Final Thoughts
Vocal EQ Made Easy: Your Ultimate EQ Cheat Sheet
For this first section, let’s break down a few vital elements that will help you get a deep understanding of the inner workings of EQ.
The Frequency Spectrum
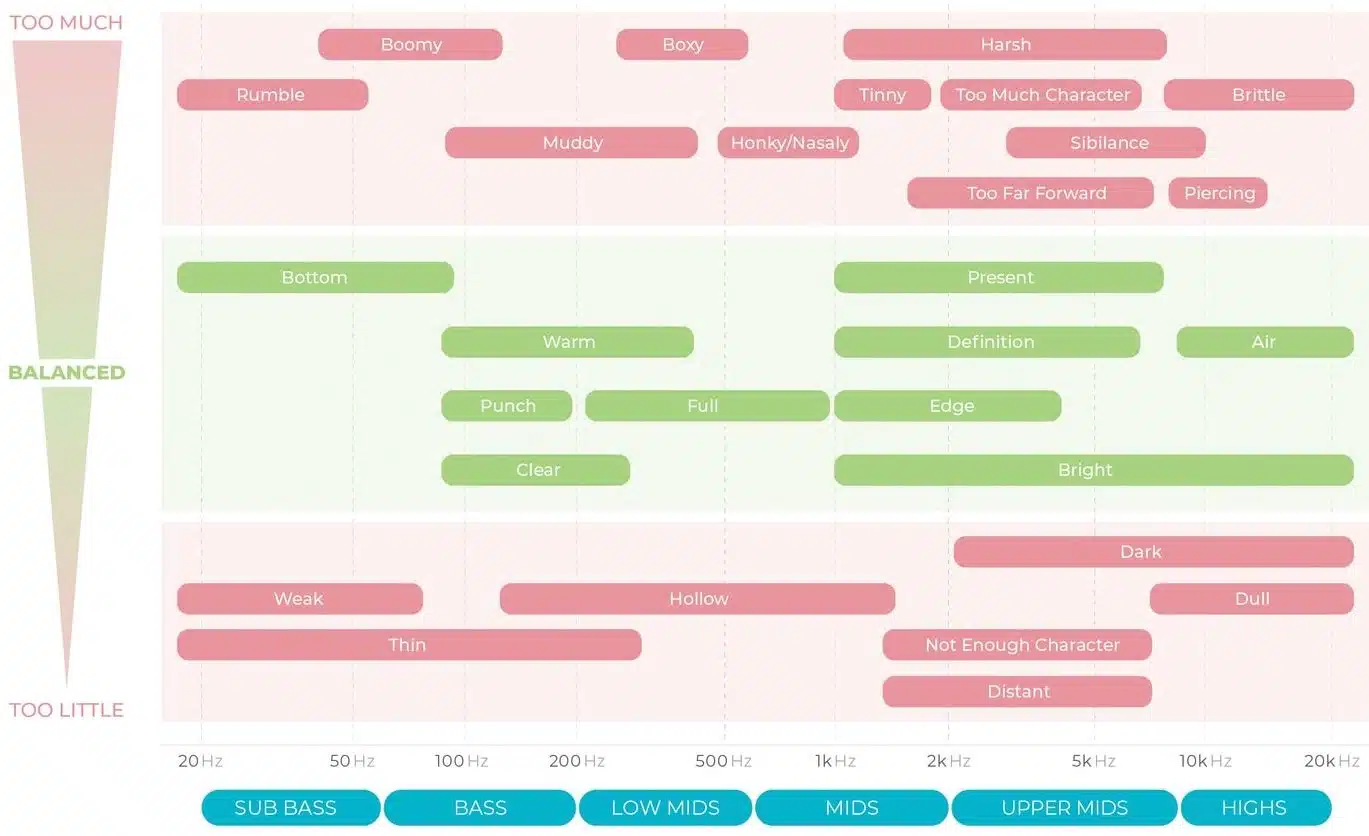
The frequency spectrum is like a vast ocean, full of different sounds that range from the lowest of lows to the highest of highs.
It’s a crucial concept for any music producer, and understanding it can make the difference between a mix that sounds amateur and one that sounds professional.
Think of the frequency spectrum as a huge band of all the different frequencies that humans can hear 一 typically ranging from 20 Hz to 20,000 Hz (or 20 kHz).
That’s a lot of frequencies, right?
But don’t worry, the EQ chart is here to help you navigate these waters.
For instance, let’s say you’re working on a track and there’s a vocal double that’s sounding a bit too sharp.
You check your EQ chart and see that the ‘sharpness’ usually resides around the 2 kHz to 4 kHz range, which is typical with all signals if harshness is detected.
So, you decide to reduce some of those frequencies
Suddenly, your vocals sound much smoother and sits better in the mix… boom, that’s your EQ chart at work.
NOTE: The 2 kHz – 4 kHz range is the most sensitive to human hearing and, if certain frequencies end up hurting your ears at certain intervals, this range is usually to blame.
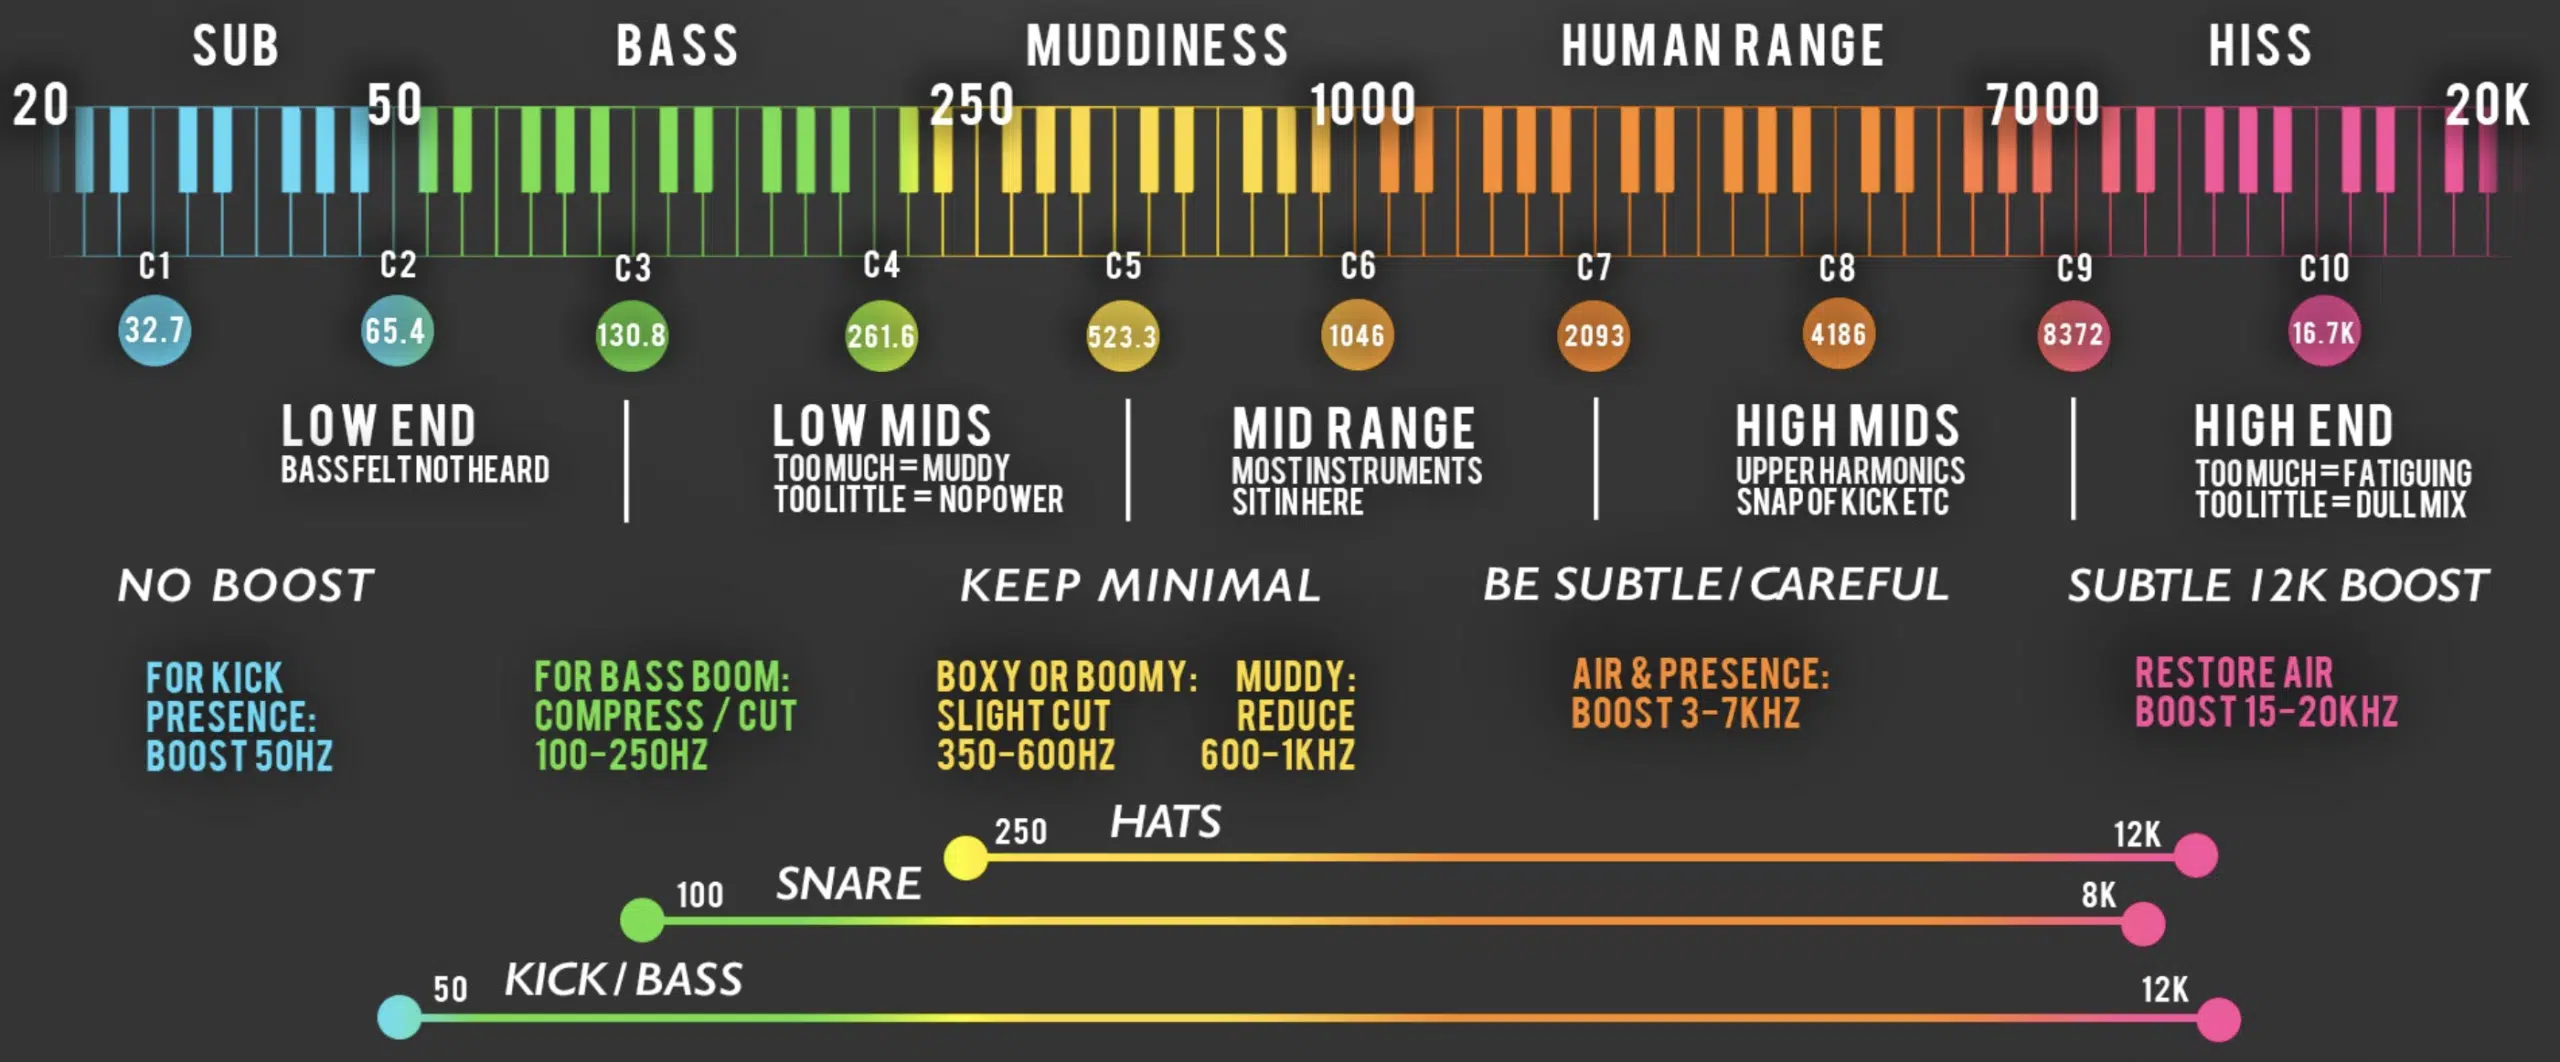
It’s a misconception that the top-end is always the culprit, which is why de-essers focus on this range by default.
Sure, the top-end can also be responsible for some of the harshness, but to a much lesser (and different) degree.
Remember, the key to mastering the frequency spectrum lies not just in understanding it, but in knowing how and when to apply that knowledge.
The Magic of the EQ Chart
The EQ chart is your cheat sheet, and your potential secret weapon.
It’s a map of the frequency spectrum that shows you where different instruments typically reside.
This includes:
- The fundamental frequencies (the ‘body’ of the sound).
- The harmonics (the ‘character’ of the sound).
For instance, if your vocal track and your acoustic guitar are competing within the same frequency range, you can use your EQ chart to identify the exact frequencies to adjust.
You could cut certain frequencies on the guitar to allow the vocals to shine, or boost the vocal frequencies for more clarity.
The EQ chart helps you make informed decisions, leading to cleaner and more balanced mixes.
The Vocal EQ Cheat Sheet
Since we’re primarily targeting vocals in today’s article, let’s cover the vocal frequency charts.
The Breakdown of Vocal Frequency Ranges
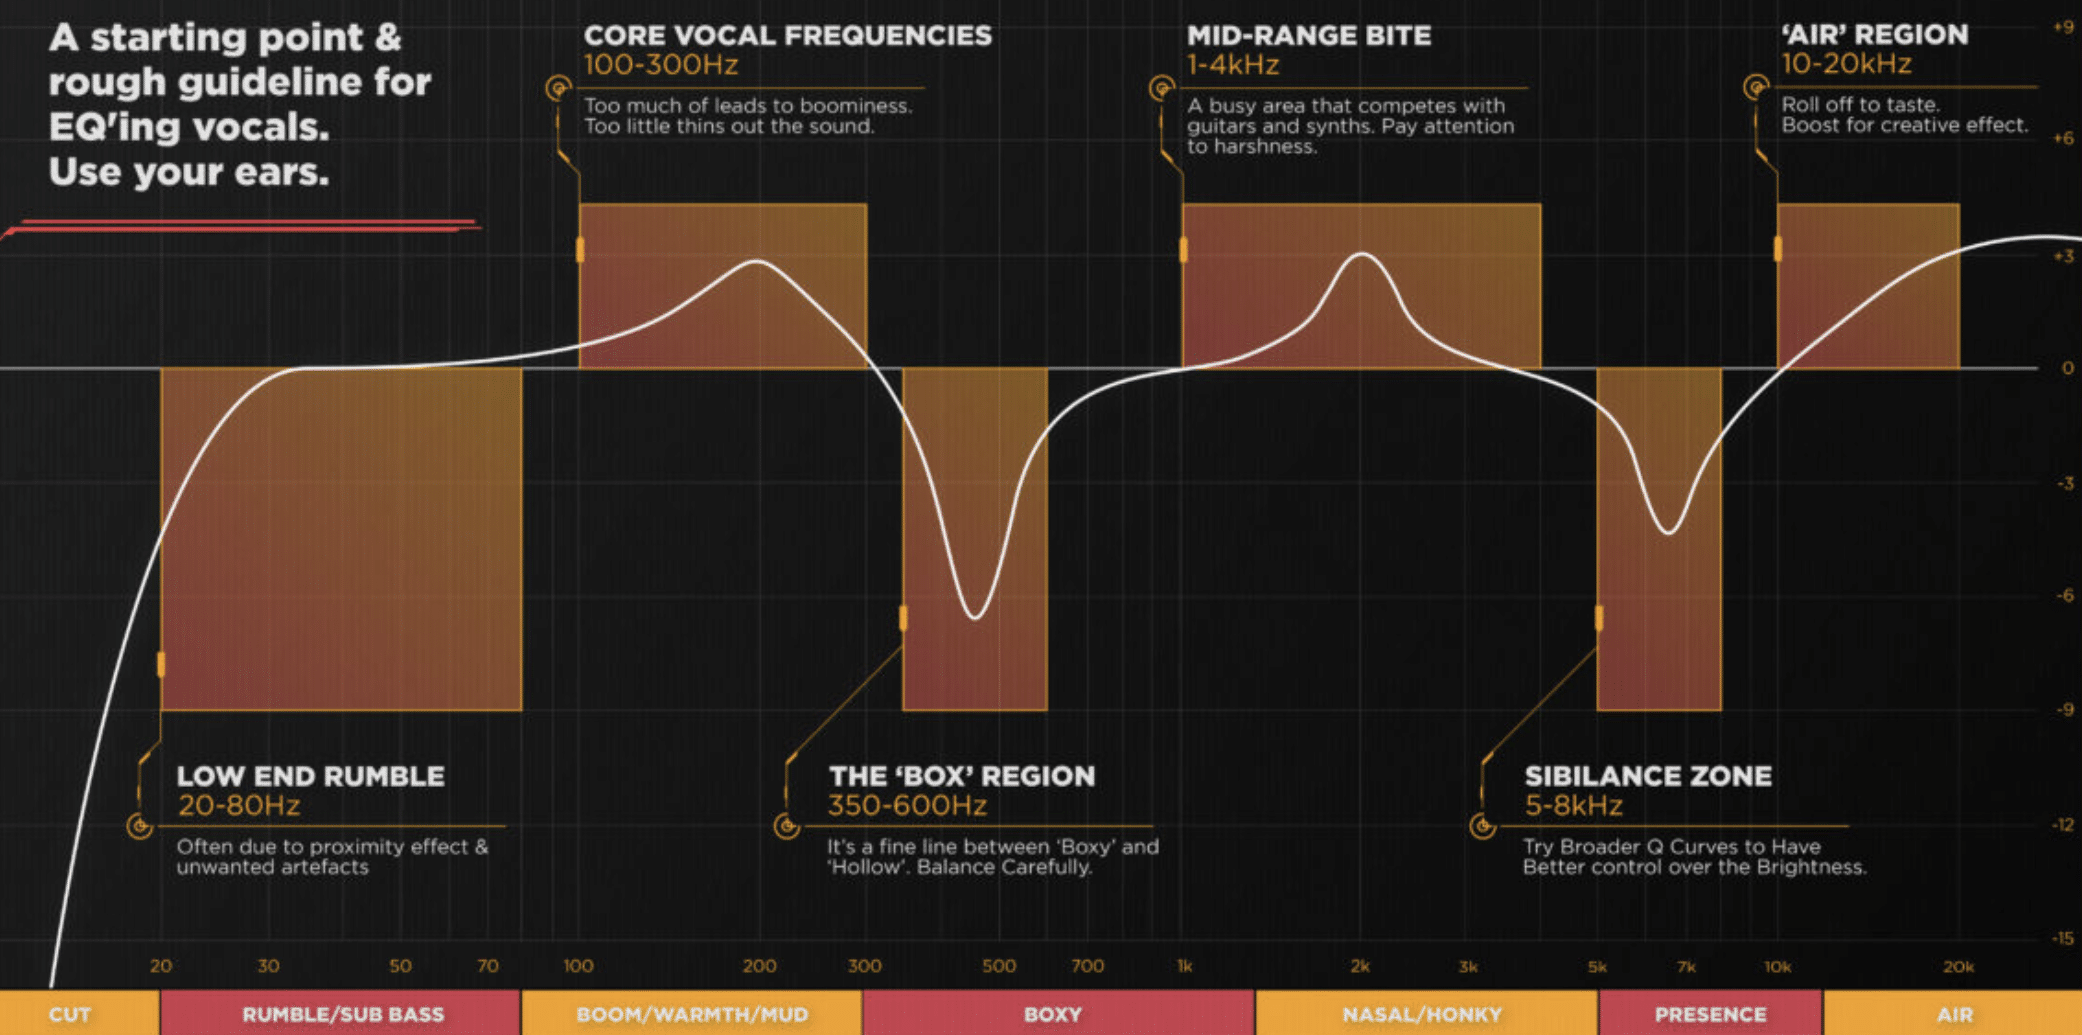
When it comes to EQing vocals, understanding the frequency ranges is crucial.
Each range corresponds to different characteristics of the voice and thus requires different EQ treatments.
Low frequencies: often between 20 Hz to 250 Hz.
This is where the “body” or “weight” of the vocal resides.
If your vocal sounds thin or lacks depth, you might want to consider boosting in this range.
But be careful: too much boost here can make your vocal sound muddy or boomy.
This is also where you’d typically apply a high-pass filter to eliminate any unwanted low-frequency rumble.
Low-mids: from 250 Hz to 500 Hz.
This range can give your vocal some warmth and fullness.
However, excess in this range can make your vocal sound boxy or muffled.
Cutting at around 300 Hz can help reduce this issue.
The mid-range: from 500 Hz to 2 kHz.
This is a critical area for vocals, as it can greatly affect the vocal’s clarity and presence in the mix.
Specifically, 500 Hz is a critical point to consider.
This is because boosting here can add fullness, while cutting can reduce muddiness.
The high-mids: from 2 kHz to 4 kHz, are where the vocal presence lies.
A boost in this range can help your vocal cut through the mix.
This is also the region where sibilance (those harsh “s” and “t” sounds) usually occurs.
So, careful and precise EQ’ing is certainly needed here.
The highs: from 4 kHz upwards.
This is where the “air” or “brightness” of the vocal resides.
A boost above 6 kHz can add sparkle to your vocal, making it shine in the mix.
Remember, these are general guidelines.
Every vocal is unique and will require different EQ moves.
Use your ears and trust your instincts as you navigate through these frequency ranges.
The upper-highs: Starting from 10 kHz and above.
This is the realm of “airiness” and “crispiness” in vocals.
A boost in this range, especially with a high shelf, can introduce a sense of breathiness and openness to your vocal track.
But tread lightly, as too much boosting can lead to an unnatural sibilance or hiss noise.
As always, these are just starting points.
Each vocal track presents its own unique challenges and opportunities.
So, trust your ears and let your intuition guide you as you explore these upper sections of the frequency spectrum.
Formants
A key aspect that makes up vocals in general is formants.
Formants are an integral part of understanding vocals in the realm of music production.
They are the resonant frequencies of the vocal tract when we speak or sing, and they play a huge role in characterizing our voices.
In essence, formants are like vocal fingerprints.
Each voice has its unique pattern of formants, which contributes to the distinctive sound we associate with individual singers.
Understanding and manipulating these formants can be a powerful tool in shaping the tone and character of vocals in a mix.
Male vs Female Vocals
There’s a noticeable difference between male and female vocals in terms of frequency ranges, so let’s break it down a little further.
-
Male Vocals
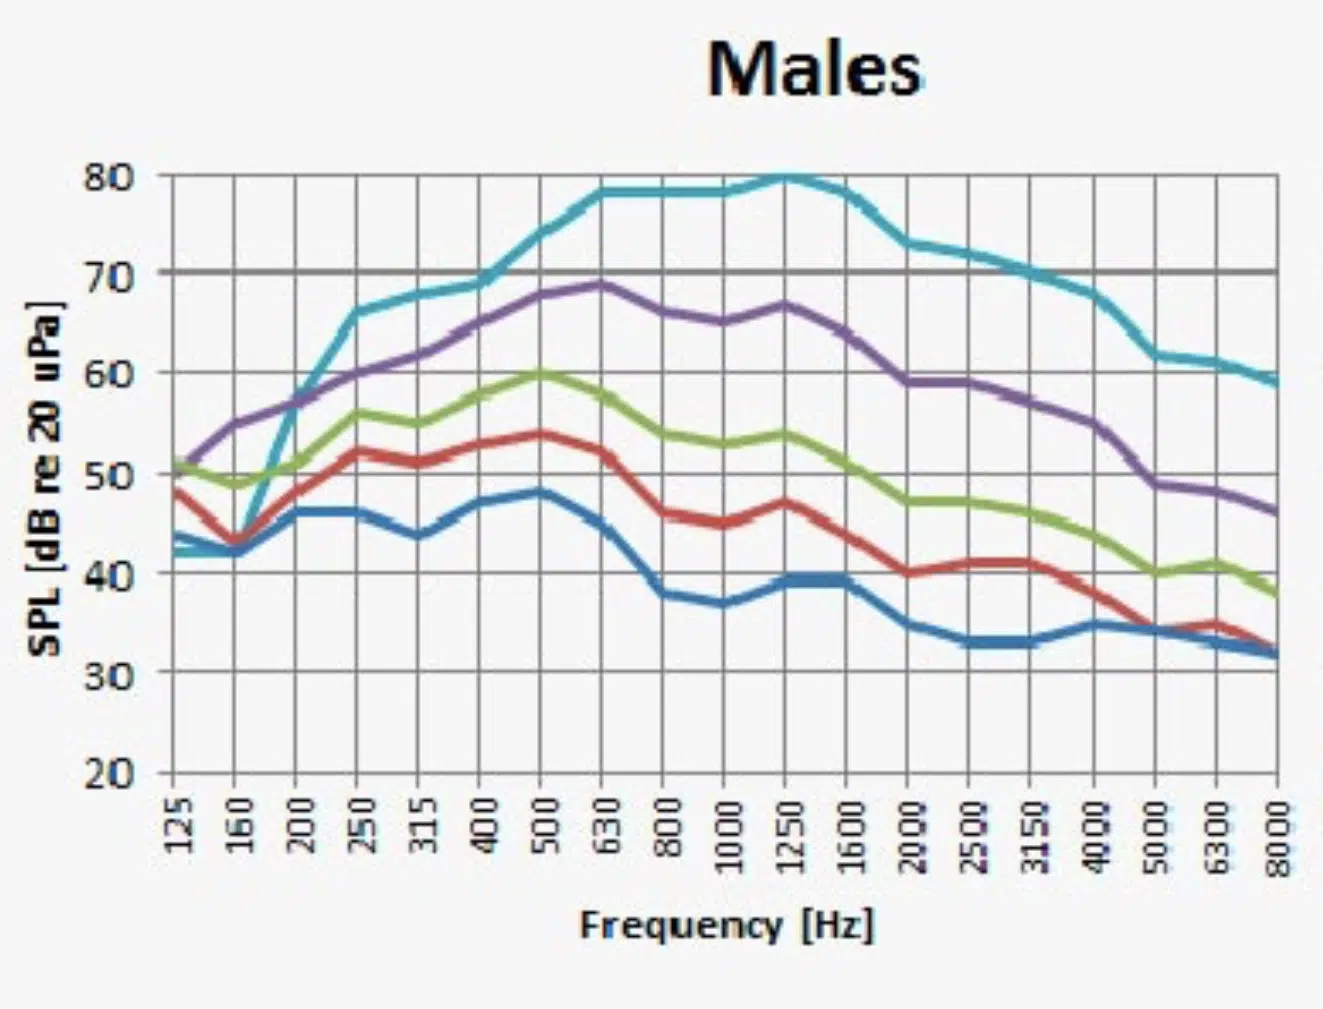
When it comes to EQing male vocals, there are some general characteristics to consider.
Men’s voices typically have a lower fundamental frequency than women’s, often falling between 85 Hz and 180 Hz.
This lower range is where the depth and richness of a male voice come from.
To add fullness to a male voice, consider a gentle boost around 120 Hz.
However, be careful not to overdo it, as too much boosting in this range can lead to a muddy sound.
Try to adhere to the “3dB rule” when boosting and/or cutting particularly for enhancement purposes, whether its a vocal track or any other track type.
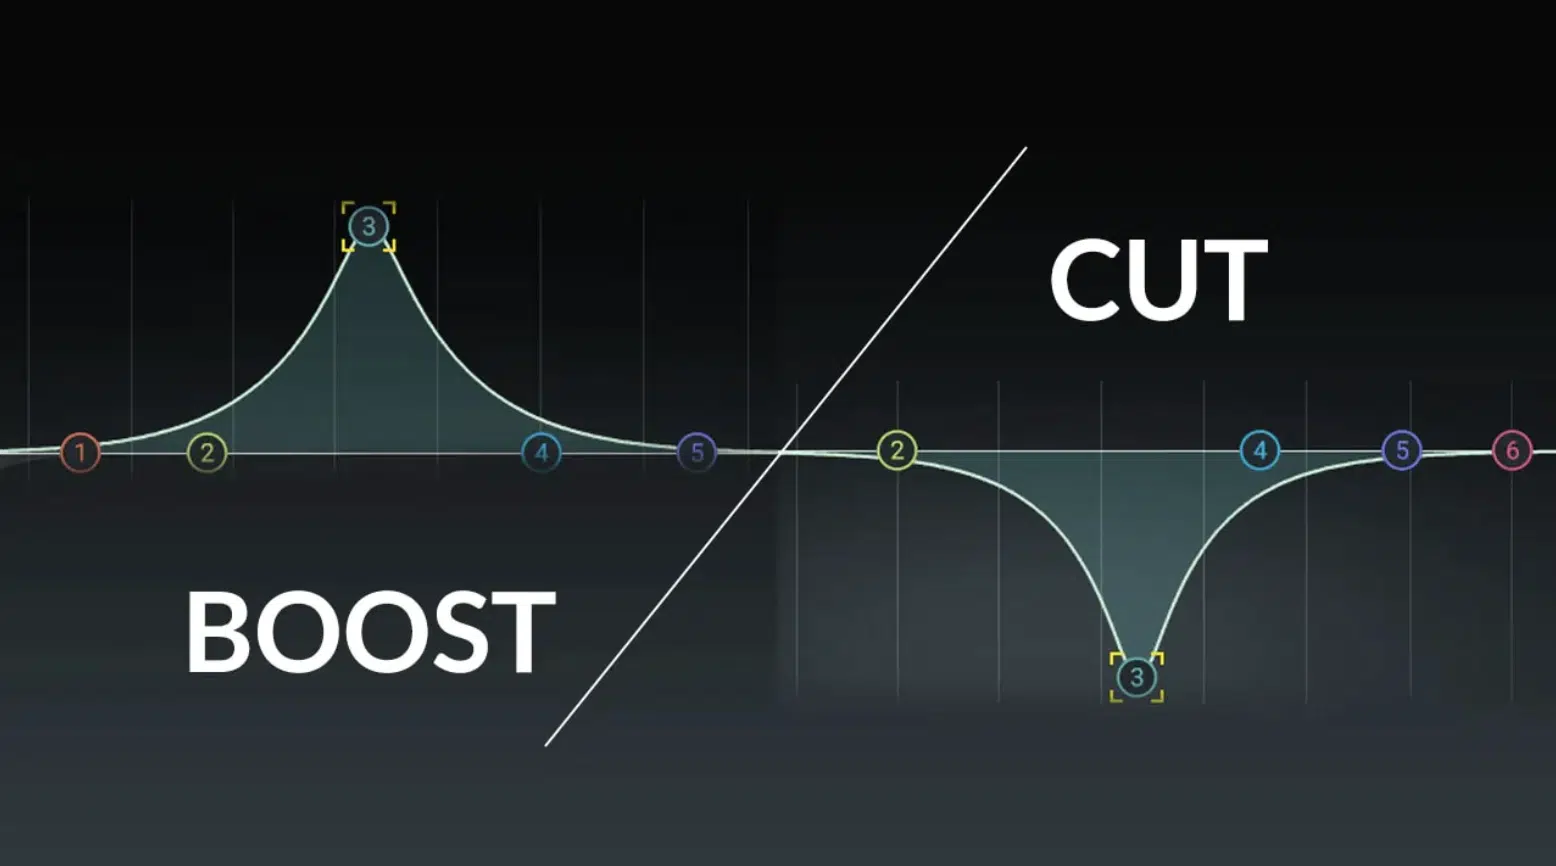
Wide general boosts are generally a safer bet than sharp/narrow ones.
Also, Q size (below) can be just as important as the dB value you’re using to cut/boost.
For example, if the vocal sounds boxy or muffled, a cut around 300-500 Hz can help to clear things up.
The presence in male vocals is usually found around 3 kHz to 5 kHz.
A slight boost here can make the vocal stand out more in the mix.
Just be careful of sibilance, which can also occur in this range.
-
Female Vocals
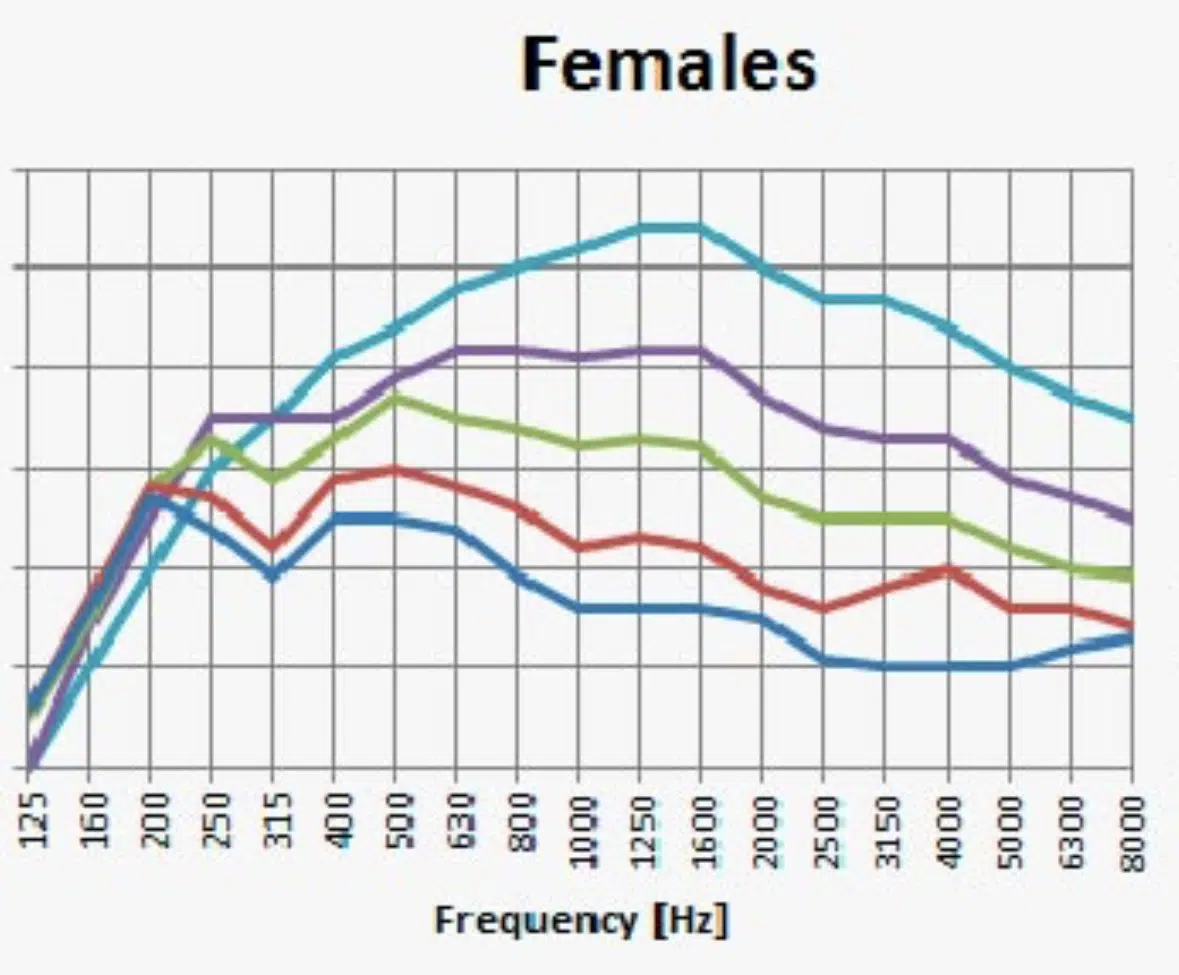
Female vocals, on the other hand, tend to have a fundamental frequency ranging between 165 Hz and 255 Hz.
This means their voices are generally higher pitched and can have a brighter quality.
The warmth in a female voice can often be enhanced with a slight boost around 200 Hz to 400 Hz.
To add clarity or presence, consider a boost around 3 kHz.
If the vocals sound harsh or overly bright, a slight cut in the 3 kHz to 6 kHz range can help to soften them.
The “air” or “sparkle” in female vocals is often found above 10 kHz.
A high shelf boost in this region can add a lovely breathiness to the voice.
Remember, these are starting points.
Always use your ears and let the context of the mix guide you and your EQ decisions.
The EQ Chart: Your Key to Mixing Mastery
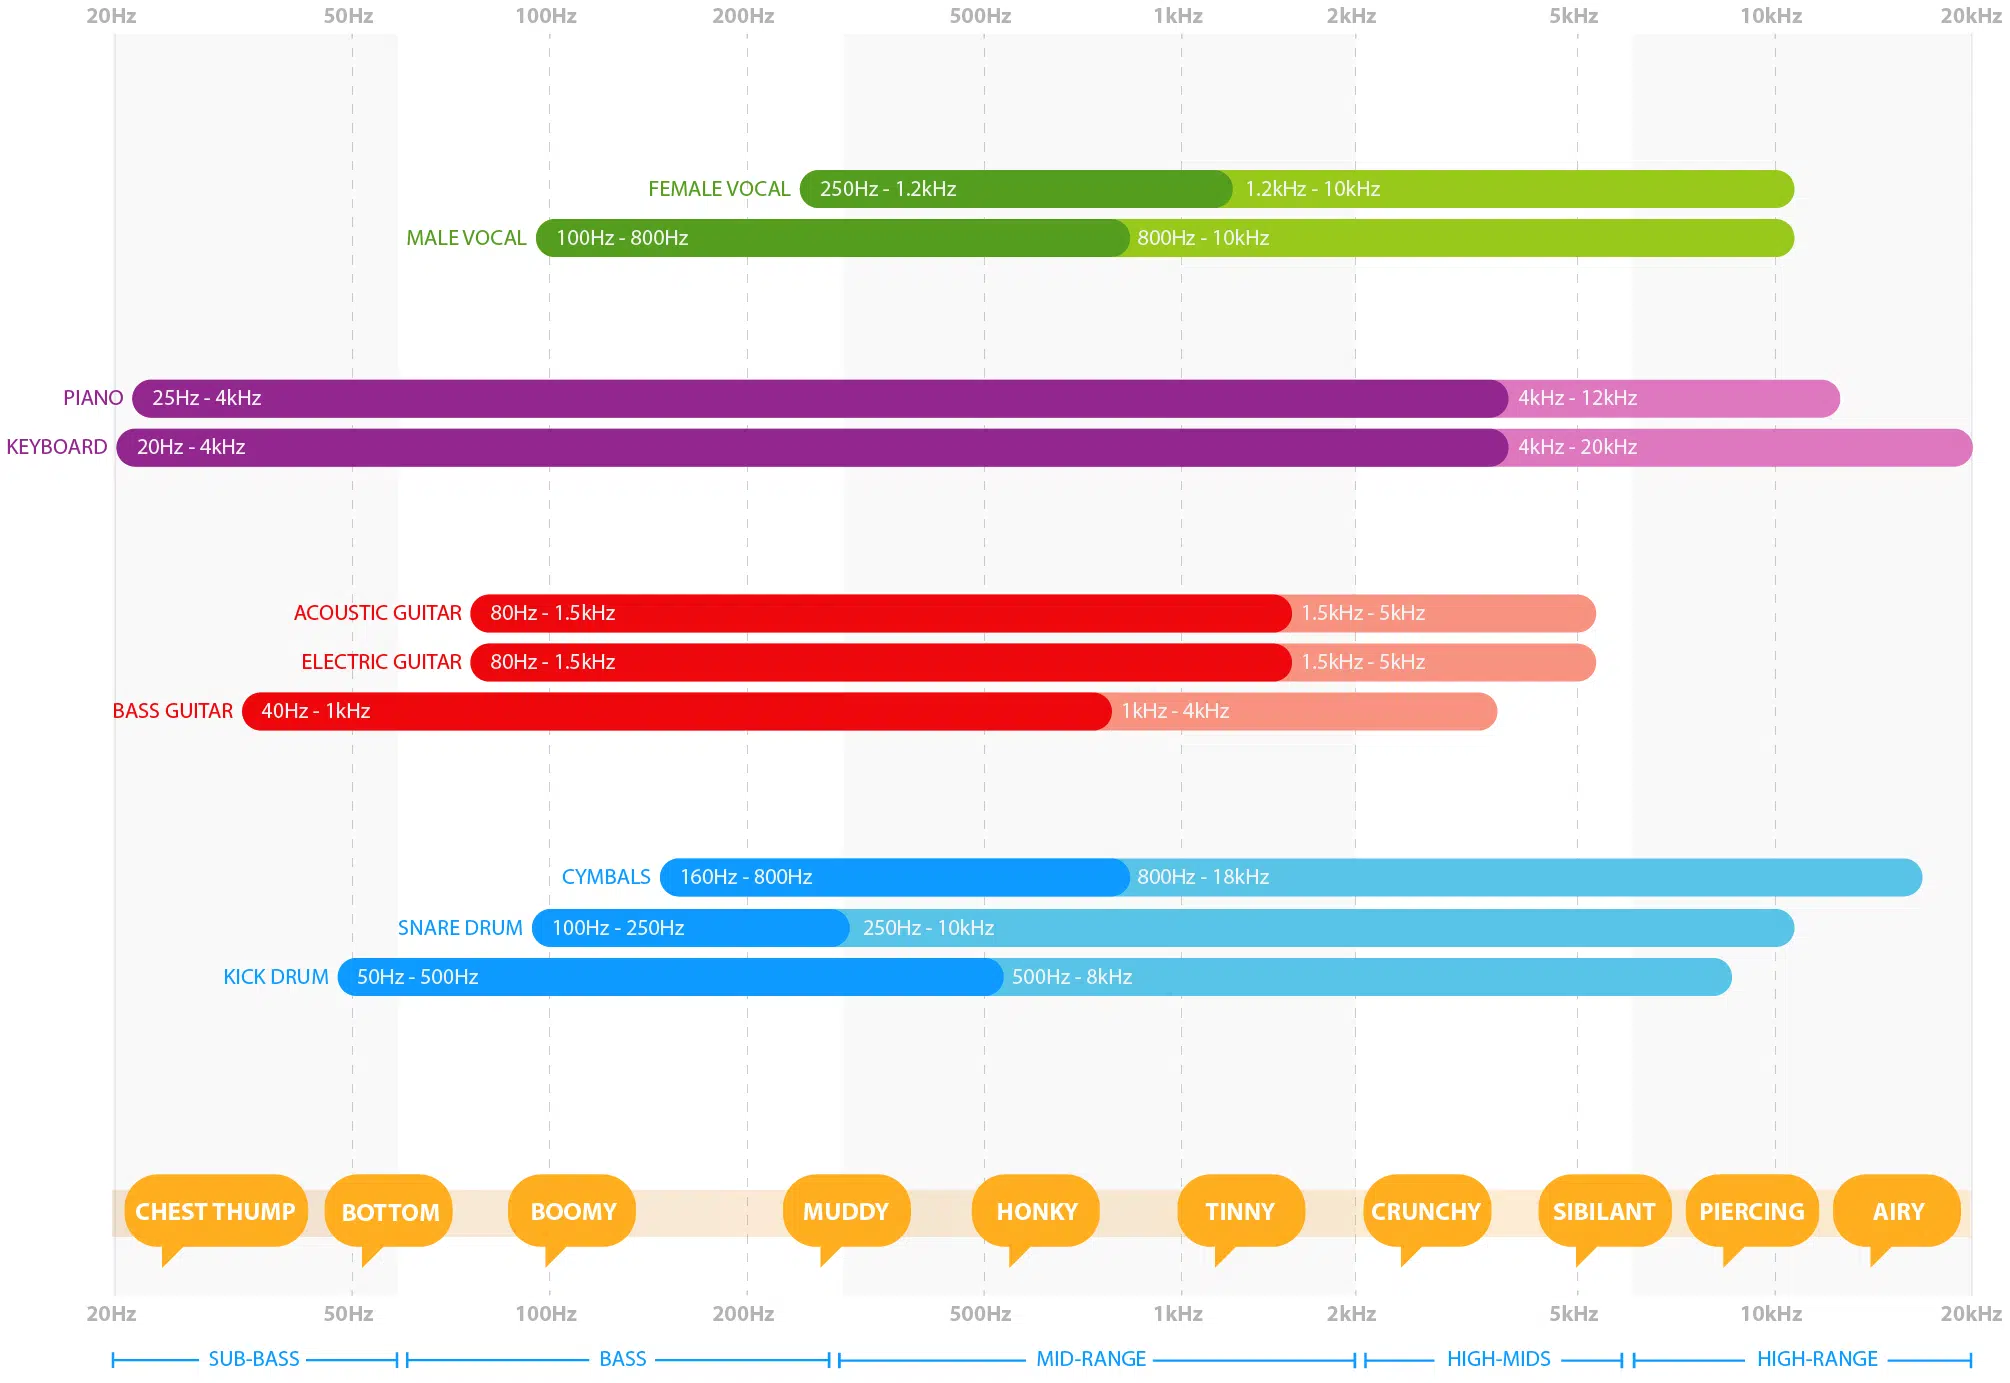
As a music producer, you need to juggle a lot of different elements and instruments.
And when it comes to EQing, having a handy instrument frequency chart can make your life so much easier.
So, let’s break down what to look for in different instruments.
The Low-End
Within the low-end, you have the bass guitar and the kick drum, which are typically dominant in the 60 Hz to 250 Hz range.
Boosting here can add more punch and body.
But, be careful of muddiness and low-end rumble, especially if your mix includes other low frequency instruments like an acoustic bass.
A high-pass filter can help clean up the low end.
The Mid-Range
This is where instruments like electric guitars and acoustic guitars reside (from 250 Hz to 2 kHz).
- Boosting around 500 Hz ─ Can add warmth.
- Cutting around 300 Hz ─ Can help reduce muddiness.
This is a critical range for these instruments, as it can greatly affect their tone and presence in the mix.
The Upper Mid-Range
The upper mid-range is where most string instruments, including violins and cellos, have their fundamental frequencies.
This range, from 2 kHz to 4 kHz, is where a lot of the character and intensity of these instruments reside.
A boost here can bring out the richness and expressiveness of the strings, but be careful of harshness.
The High/Top-End
Which is where many of your percussion instruments, like cymbals and hi-hats, live.
Boosting above 6 kHz can add sparkle and airiness, but too much can introduce hiss noise.
Remember, your mix is like a puzzle, with each instrument occupying its own space in the frequency spectrum.
An EQ chart can help guide your decisions, but, again, always trust your ears and consider the overall context of the mix.
The Role of the High Pass Filter
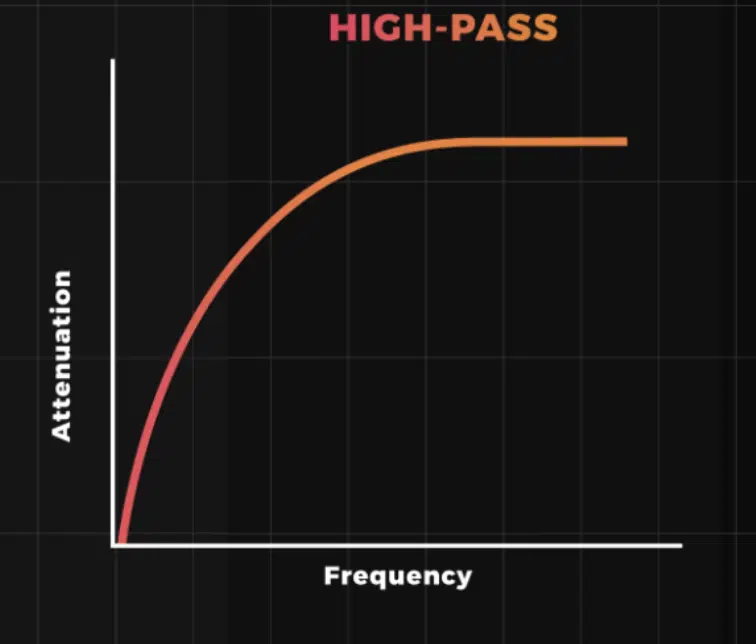
The high-pass filter (HPF), also referred to as a lo-cut filter, is a crucial tool when EQing.
It allows frequencies above a certain point to pass through while reducing the lower frequencies.
This is particularly useful for reducing rumble and unwanted low-frequency noise.
For instance, vocals rarely need information below 80 Hz.
So, applying a high pass filter around this point can clean up your vocal sounds, and make space for frequencies that actually belong.
It’s all about making room for the low frequency instruments, like the bass guitar or kick drum.
The Role of the Low Pass Filter
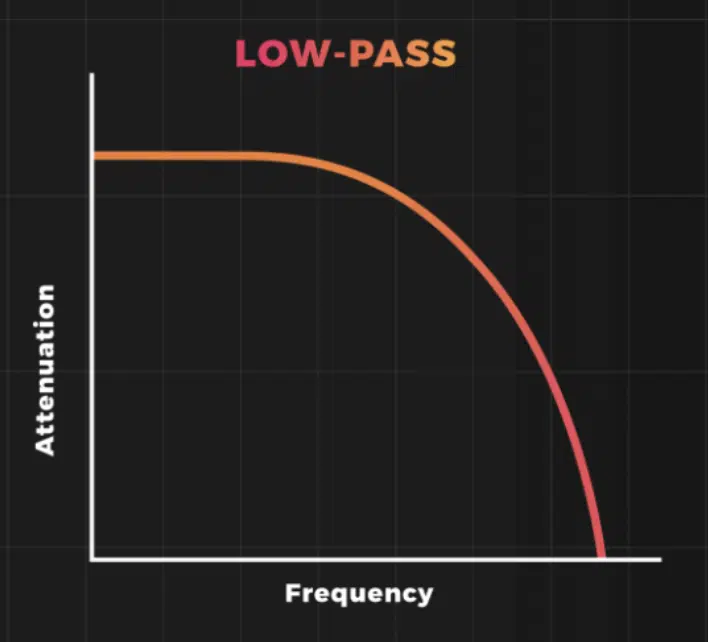
On the flip side, we have the low-pass filter (LPF), also known as a hi-cut filter.
It allows frequencies below a certain point to pass through while reducing the high frequencies.
This type of filter is super handy for taming harshness and hiss noise in your tracks.
If your vocal track has excessive top-end frequencies, you can use a low-pass filter to reduce them.
Typically, this would be set somewhere above 10 kHz, but remember, every track is unique, so use your ears!
NOTE: Typically, you want the slope/steepness of the curve to be low and gentle to prevent removing too much ‘sparkle’ (or, ‘air) residing in the very top end.
Mastering EQ: Tips & Tricks
Now that you have a basic understanding of the different frequency ranges and the EQ chart, here are some tips & tricks to improve your workflow and EQ process.
-
How to EQ Vocals Like a Pro
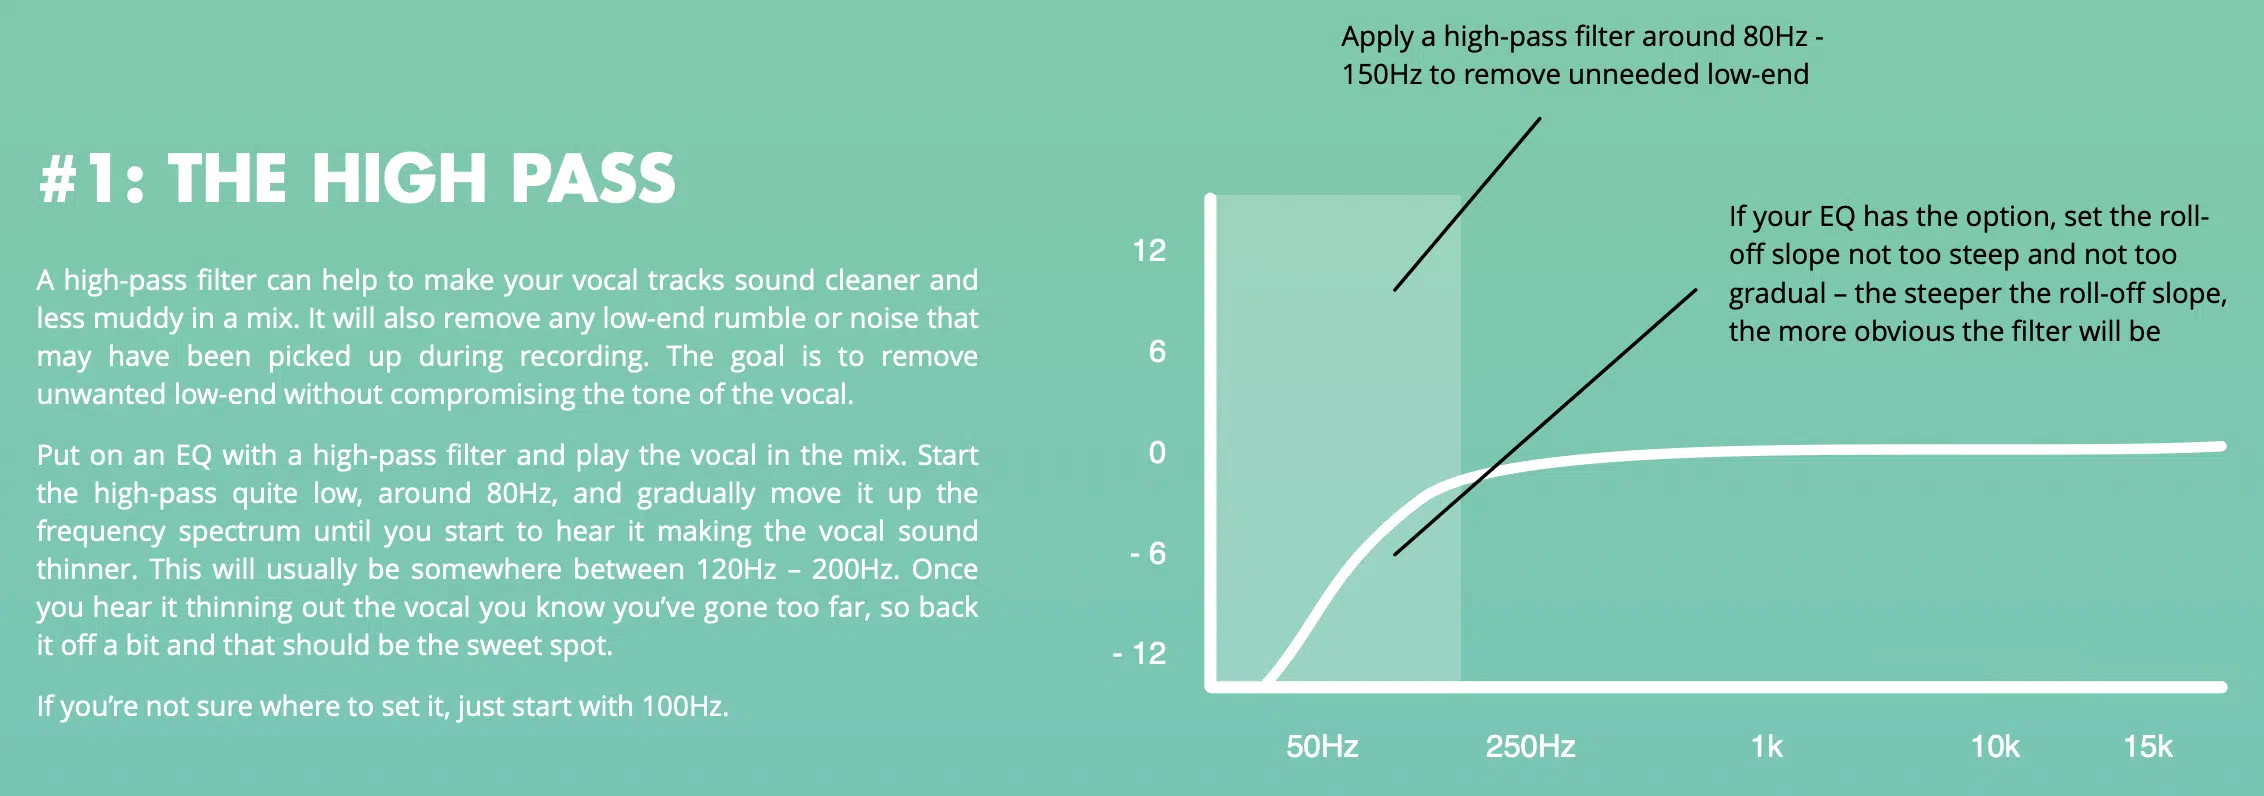

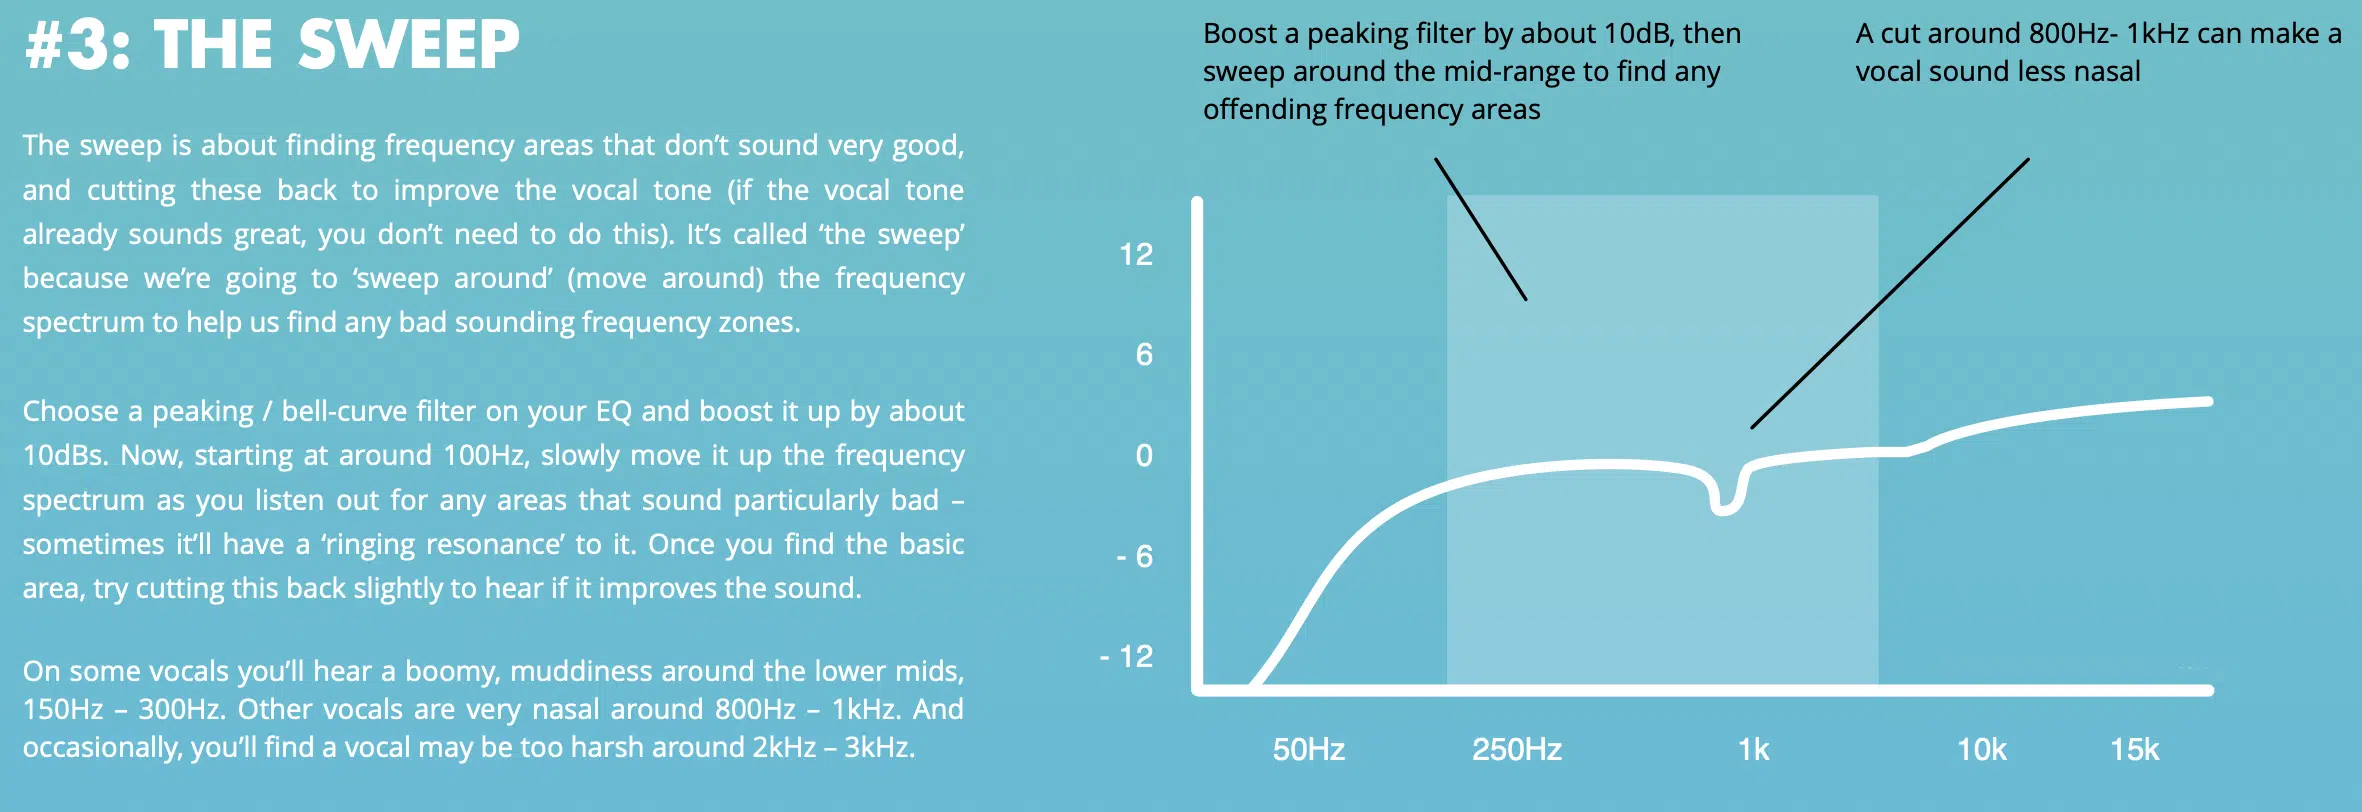
EQ’ing vocals is an art, and it takes practice.
Start with a high pass filter curve in your EQ to clean up the lows, then listen for any problematic frequencies.
- If the vocals sound nasal ─ You might need to use a bell-shaped curve to cut around 1 kHz.
- If they sound harsh ─ Try cutting around 3 kHz to 6 kHz (again, with a bell-shaped curve).
Remember, EQ is as much about cutting as it is about boosting.
Instead of just boosting what sounds good, try to identify and reduce what sounds bad.
This can often lead to cleaner, more natural-sounding vocals.
-
Nailing the 500 Hz & 300 Hz Frequencies
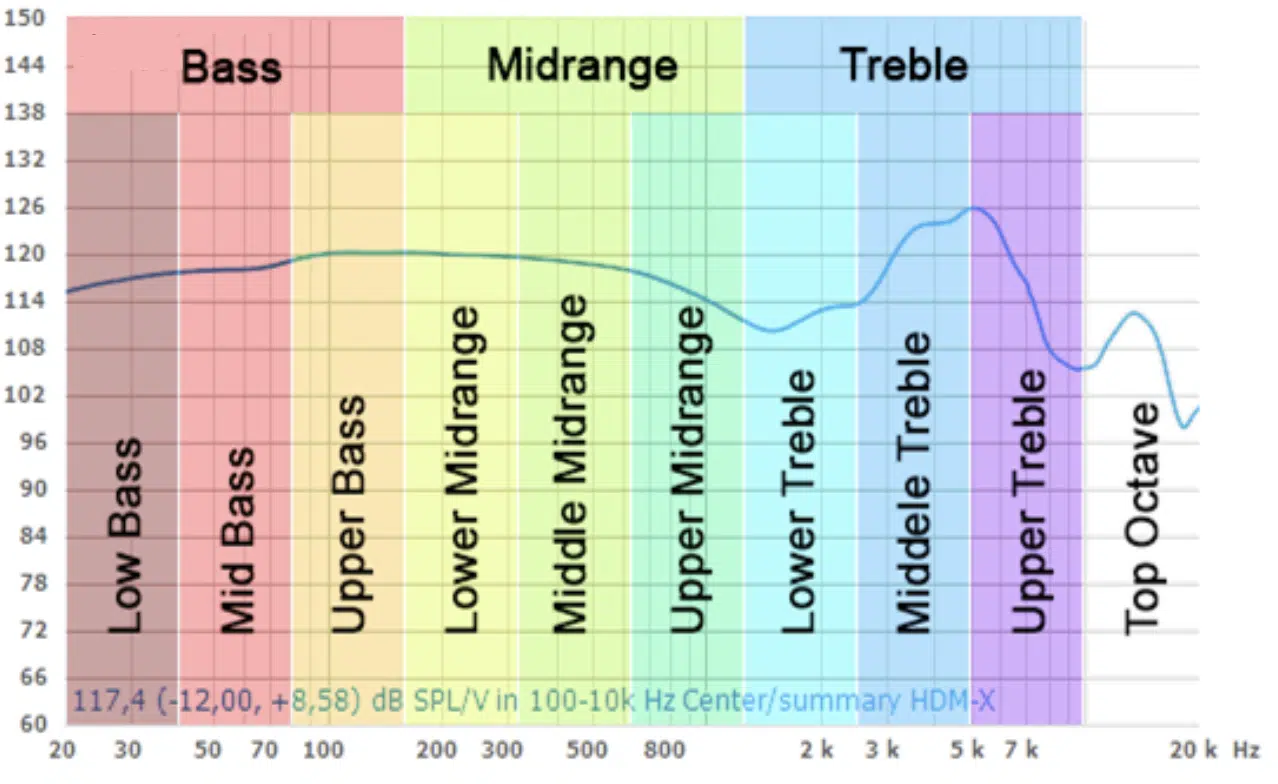
When EQing vocals, the frequencies around 500 Hz and 300 Hz play a significant role.
The 500 Hz range often contributes to the ‘body’ or ‘weight’ of the vocal, while the 300 Hz range can add warmth.
However, too much in these areas can cause your vocals to sound muddy or boxy.
Let’s take an instance where your vocal track seems to lack weight or presence…
A gentle boost around 500 Hz could help to rectify this issue.
On the other hand, if your vocals are sounding too boxy or muffled, a cut around 300 Hz might be what’s needed.
Remember, the key here is subtlety 一 small EQ moves can make a significant difference.
-
Adding Clarity and Fullness with EQ
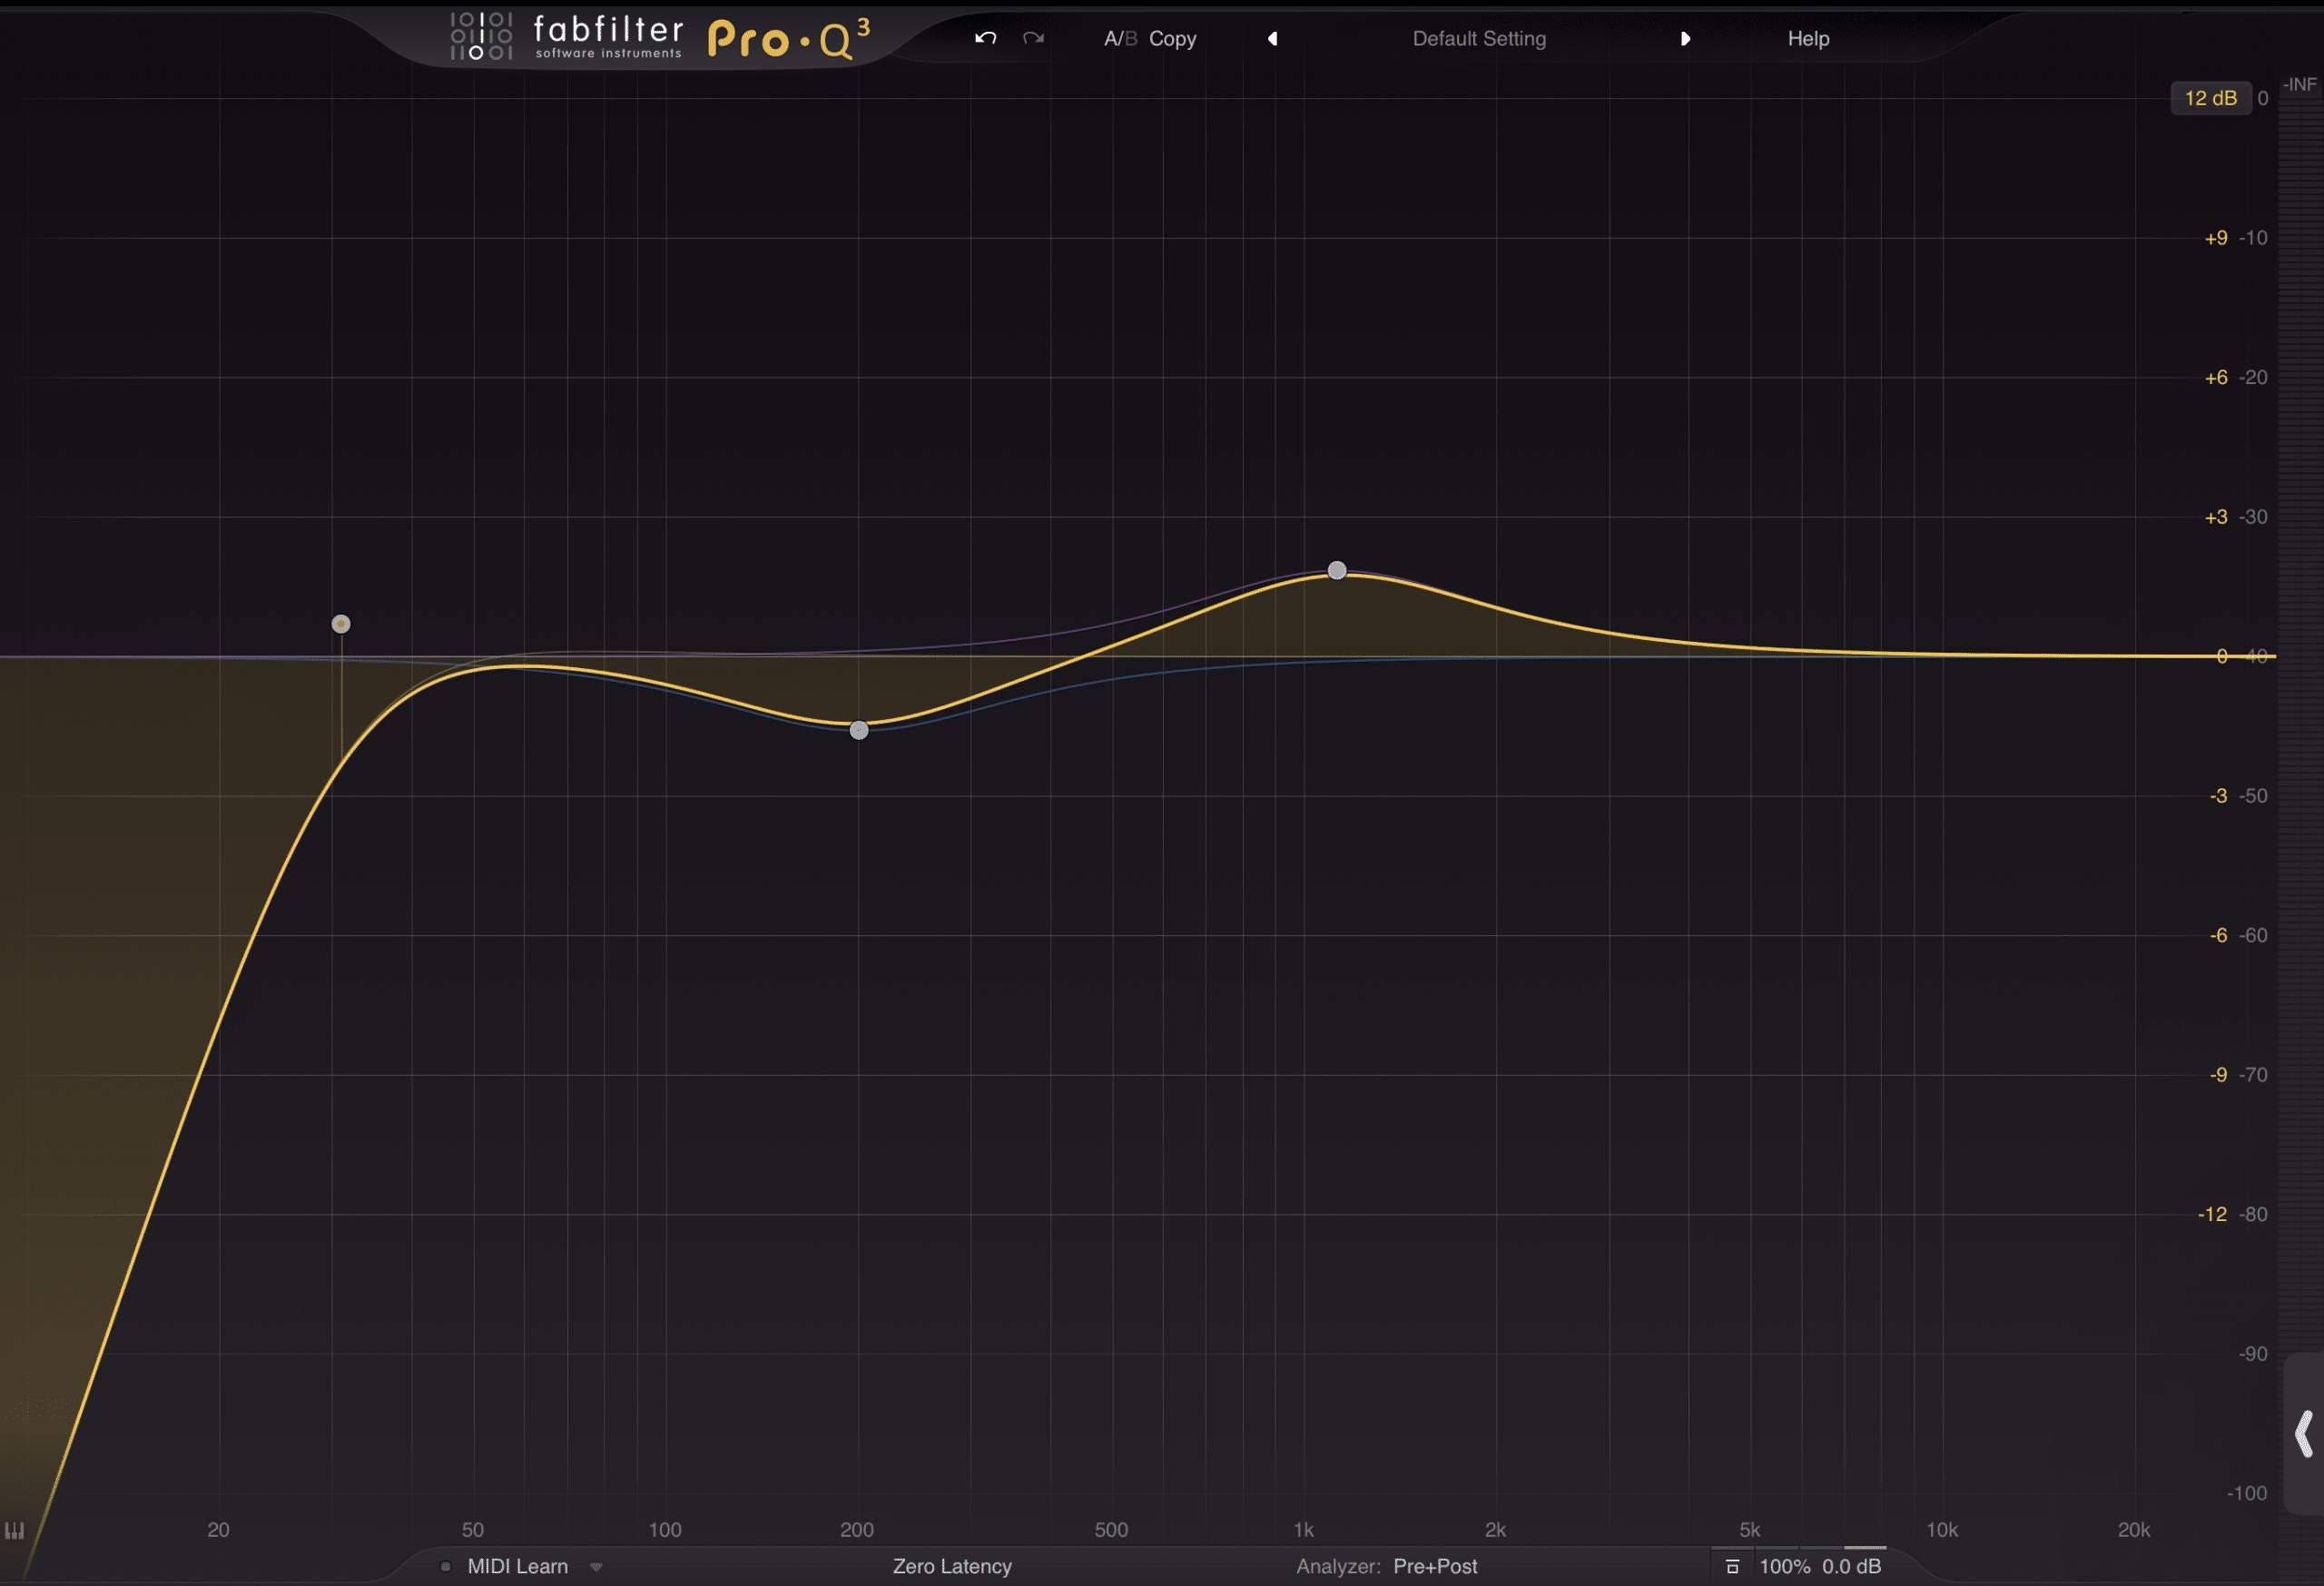
EQ is a powerful tool for adding both clarity and fullness to your vocals.
The mid-range frequencies, particularly around 1 kHz to 2 kHz, are crucial for vocal clarity.
A boost here can help your vocals cut through the mix without increasing volume.
On the flip side, to add fullness or body to your vocals, you might want to look at the lower frequencies.
A subtle boost around 200 Hz can add a pleasing warmth and depth to the voice.
But be careful, as too much boost here can lead to muddiness.
For example, if you have a thin-sounding vocal track, try boosting around 200 Hz for added fullness.
If the same track seems buried in the mix, a boost around 1500 kHz could help it shine through.
Using the EQ Chart to Create Dynamic Mixes
Creating a successful dynamic mix is what makes your tracks stand out from other, basic mixes.
For this next section, we’ll divulge how to make sure your mix is dynamically supreme.
-
The Power of the Parametric Equalizer
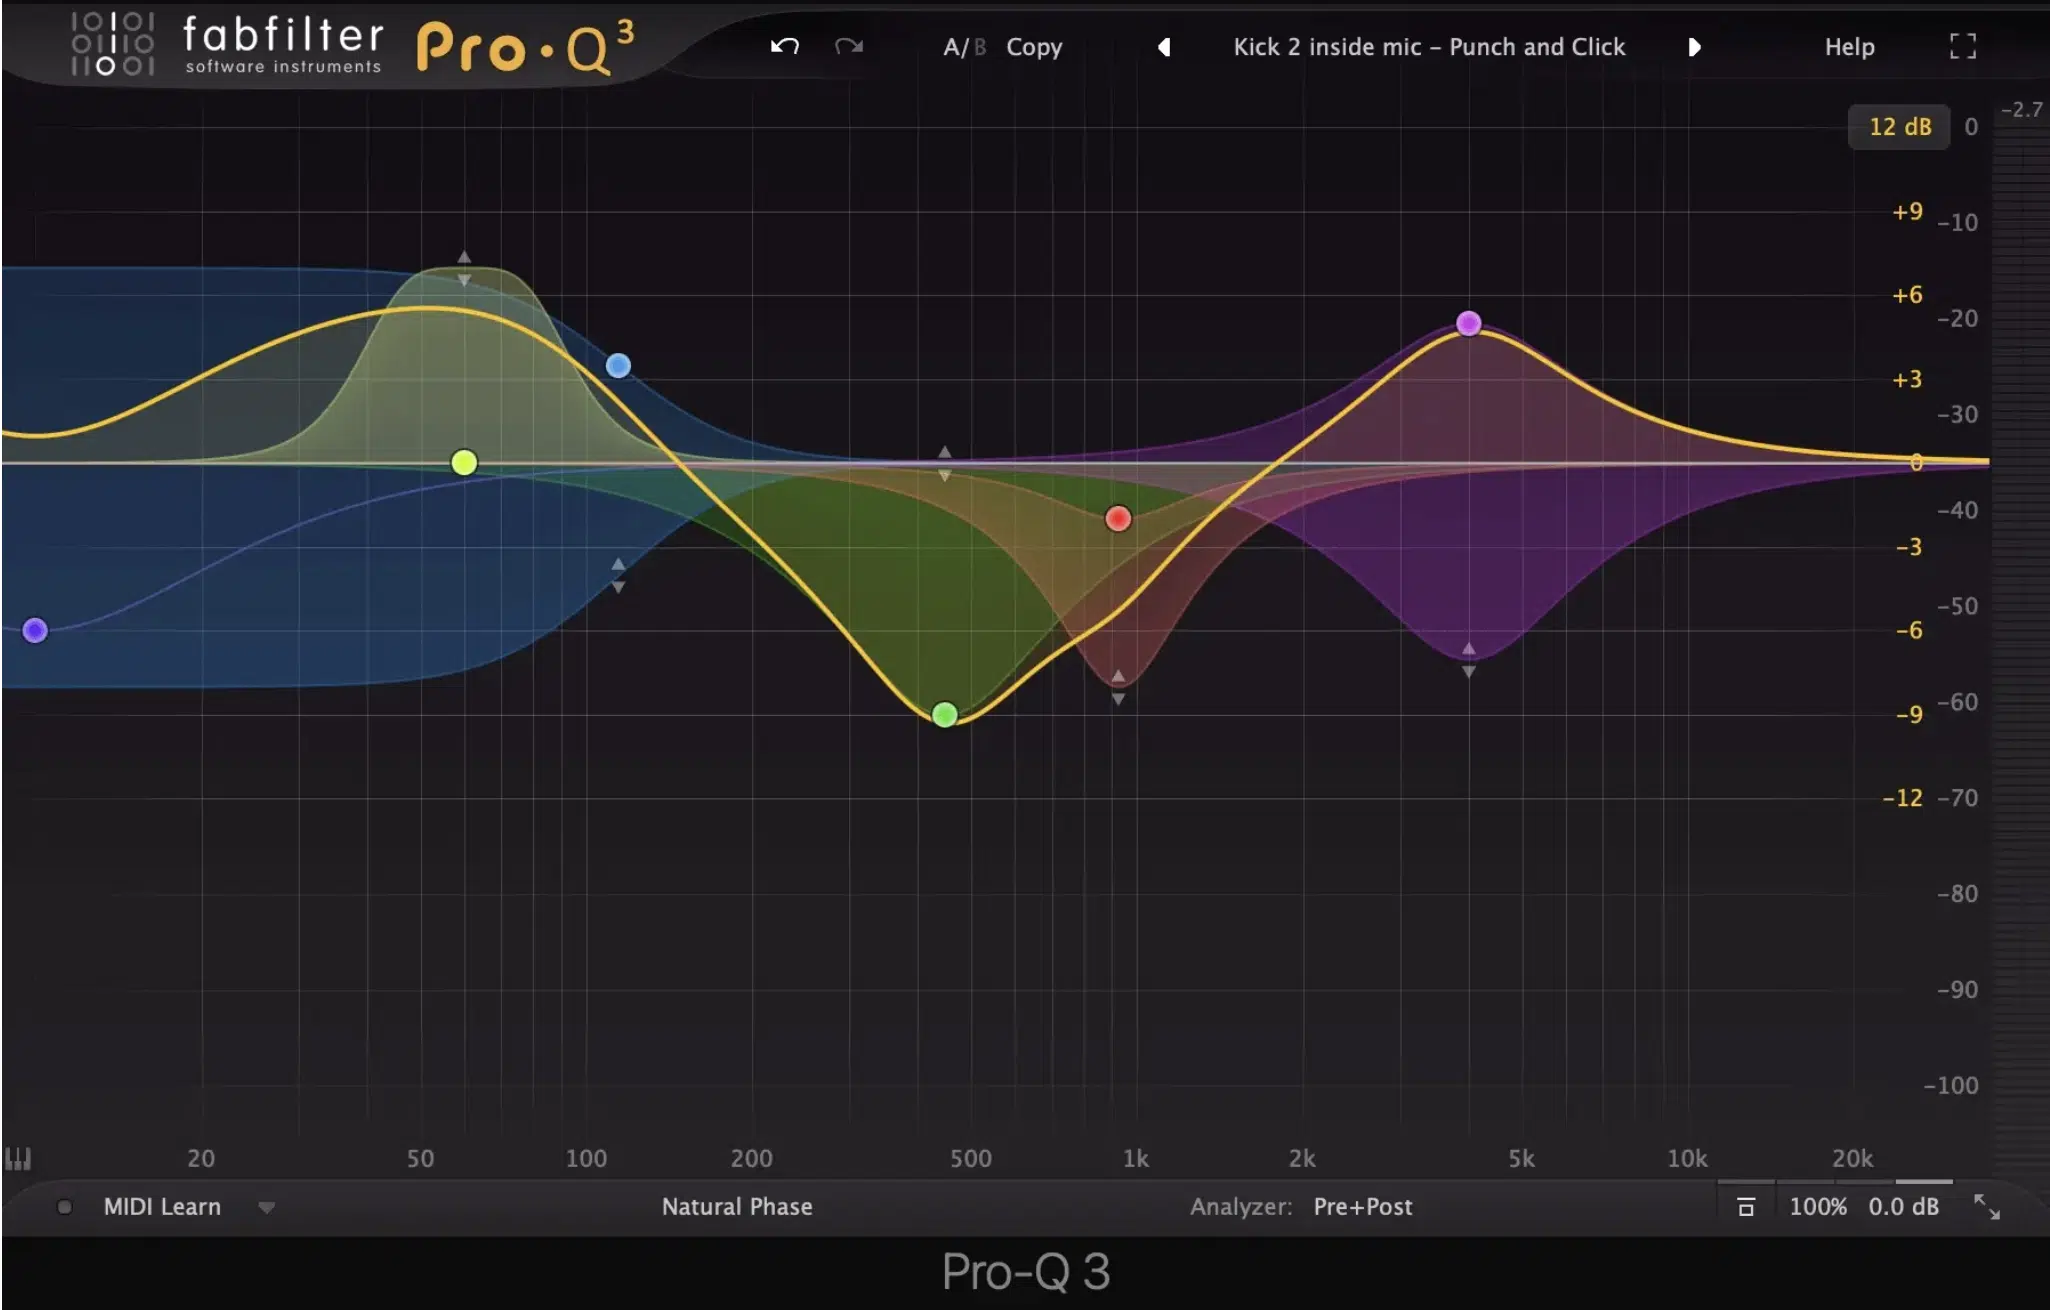
The parametric equalizer is one of the most versatile tools in your mixing arsenal.
It allows you to:
- Select any frequency you want to boost or cut
- Choose how wide or narrow the Q factor is
- Determine the amount of boost or cut you apply
This level of control makes the parametric equalizer an excellent tool for shaping your vocals.
For example, if your vocals are getting lost in the mix, you could use a parametric EQ to boost the key frequencies that add presence to the vocal (typically around 2 kHz to 4 kHz).
Or if the vocals sound too harsh, you can pinpoint the offending frequencies (often around 3 kHz to 6 kHz) and apply a cut.
-
Tackling Problem Frequencies
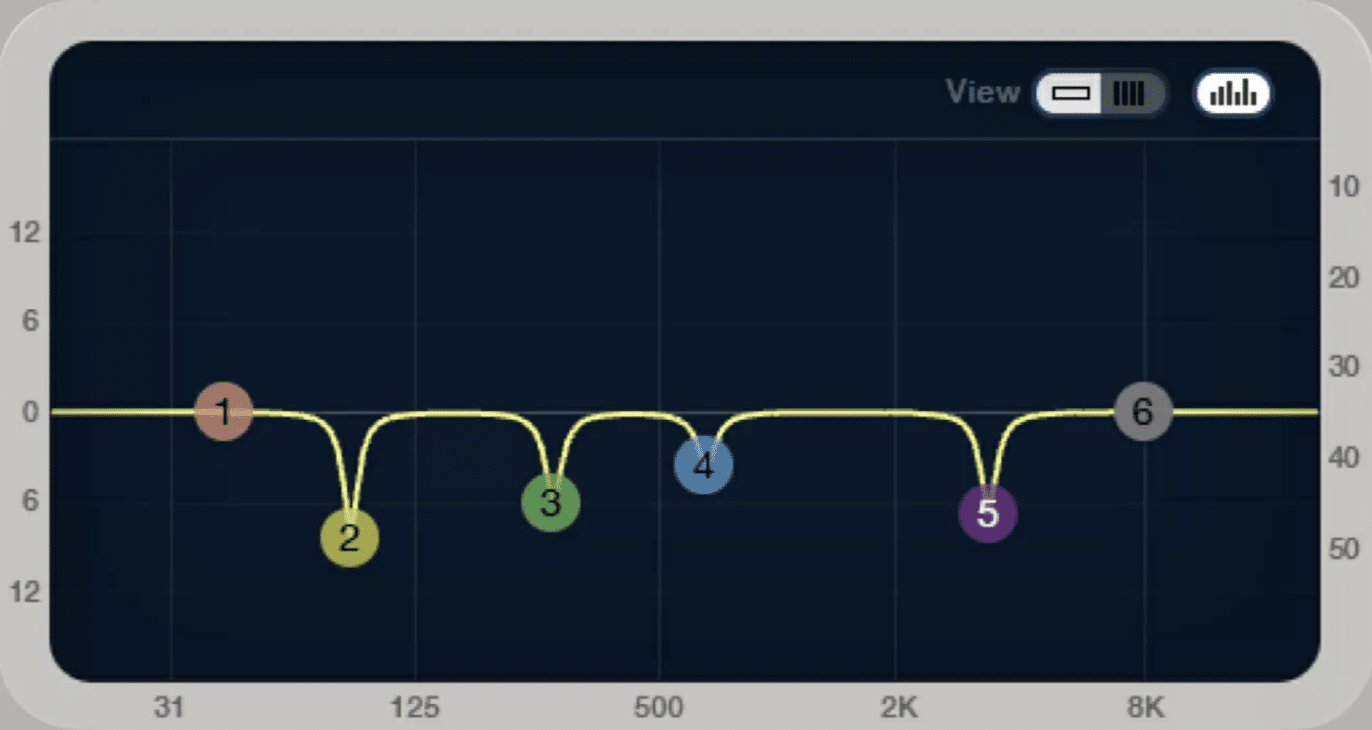
Every vocal recording will have problem frequencies – those that cause the vocals to sound too harsh, too muddy, or too nasal.
Identifying and tackling these frequencies is crucial for achieving a clean, balanced vocal sound.
A common method for finding these problem frequencies is the ‘sweep and destroy’ technique.
This involves boosting a narrow Q on your EQ and ‘sweeping’ it across the frequency spectrum until you find frequencies that sound particularly unpleasant.
Once you’ve identified them, you can apply a cut to reduce their impact.
For example, if your vocals sound nasal, the problem frequencies are often found around 1 kHz.
Using the ‘sweep and destroy’ technique, you can precisely locate and reduce these frequencies.
Advanced Techniques & Troubleshooting
Now let’s discuss some more advanced techniques and troubleshooting methods to help you navigate your EQ chart journey.
-
Mastering the Narrow Q & Wide Q Factor
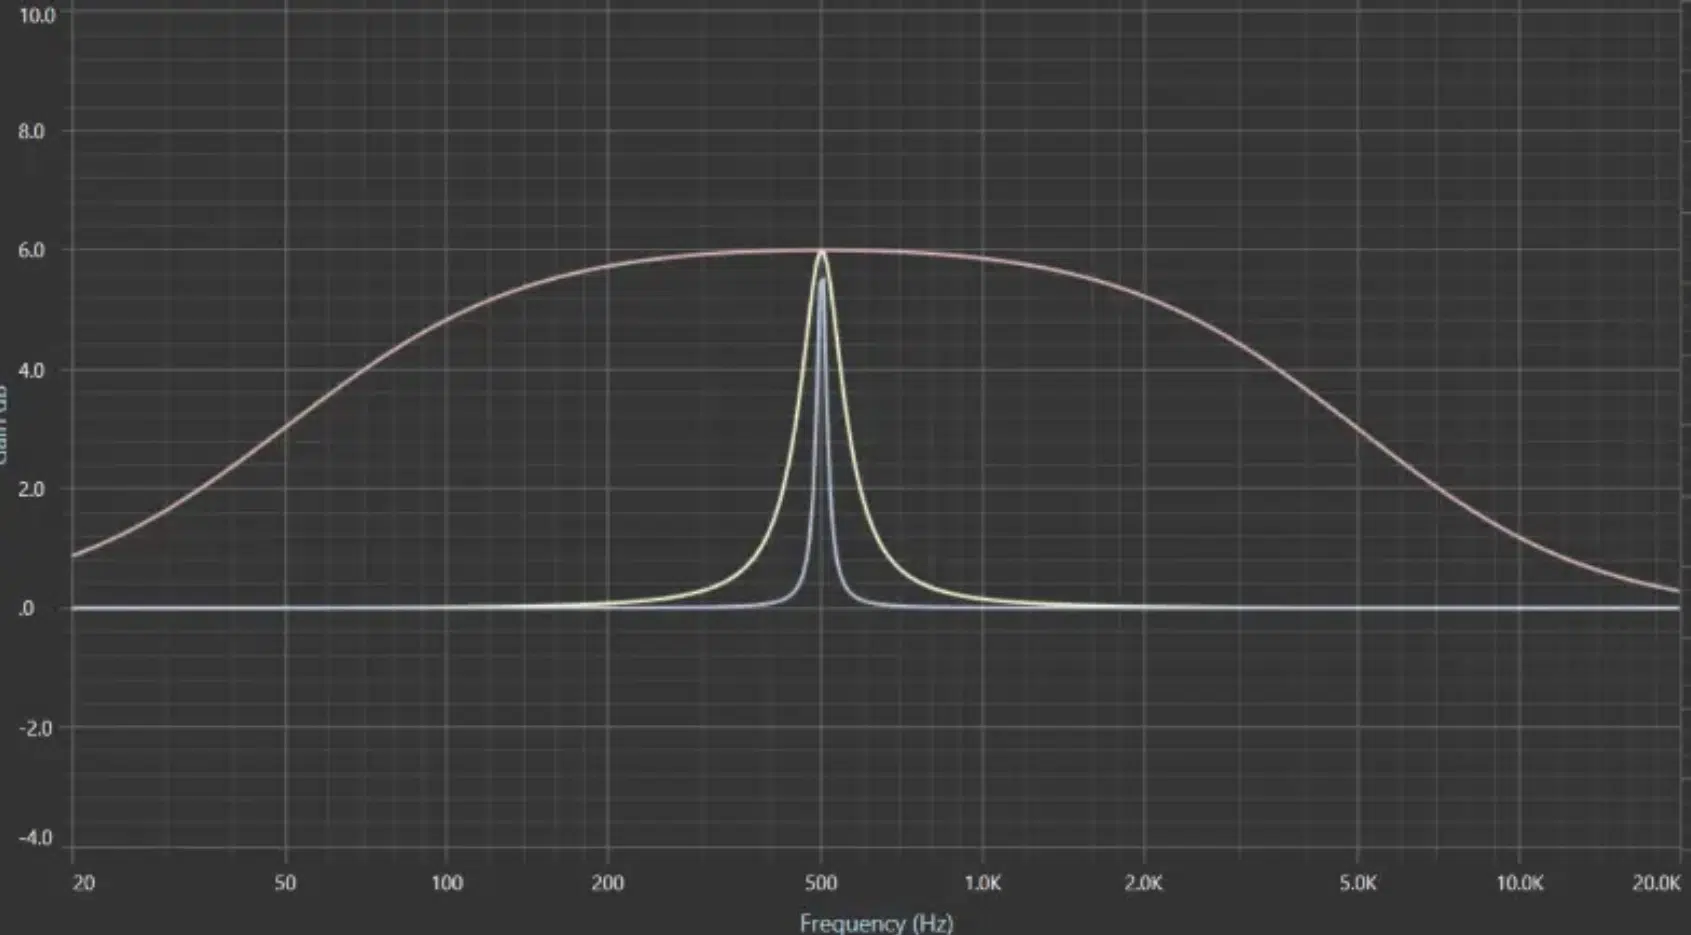
The Q factor is an essential concept in EQ that dictates how many frequencies around your chosen frequency are affected.
- A narrow Q (high Q value) ─ Affects fewer frequencies.
- A wide Q (low Q value) ─ Affects a broader range.
Mastering the use of narrow and wide Q can elevate your EQ skills.
A narrow Q is ideal for surgically removing problematic frequencies.
For instance, if a specific frequency in your vocal track causes resonance or feedback, a narrow Q allows you to cut that exact frequency without affecting the surrounding ones.
On the other hand, a wide Q is excellent for making musical boosts or cuts.
If you want to add some airiness or sparkle to your vocals, a wide Q boost above 10 kHz can make the vocals shine without introducing harshness.
-
The Impact of Bandpass Filters in Your Mix
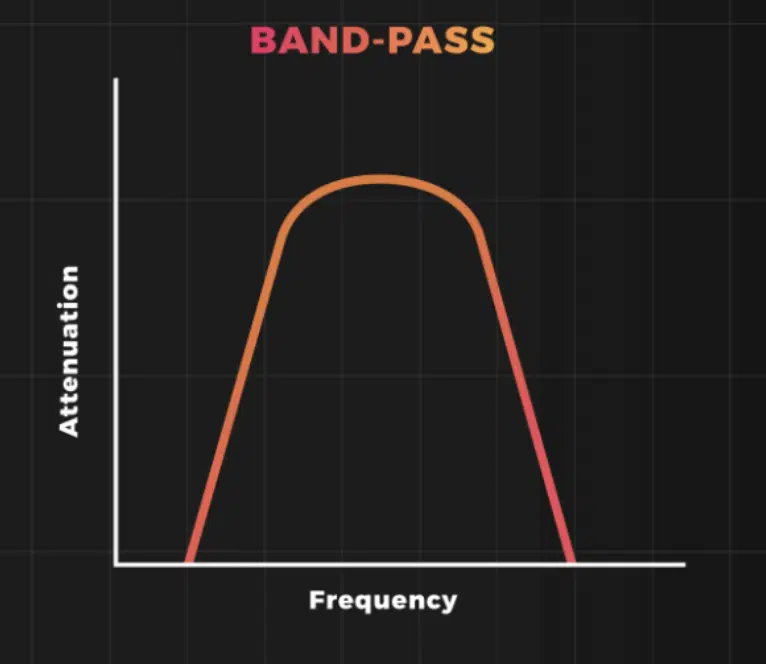
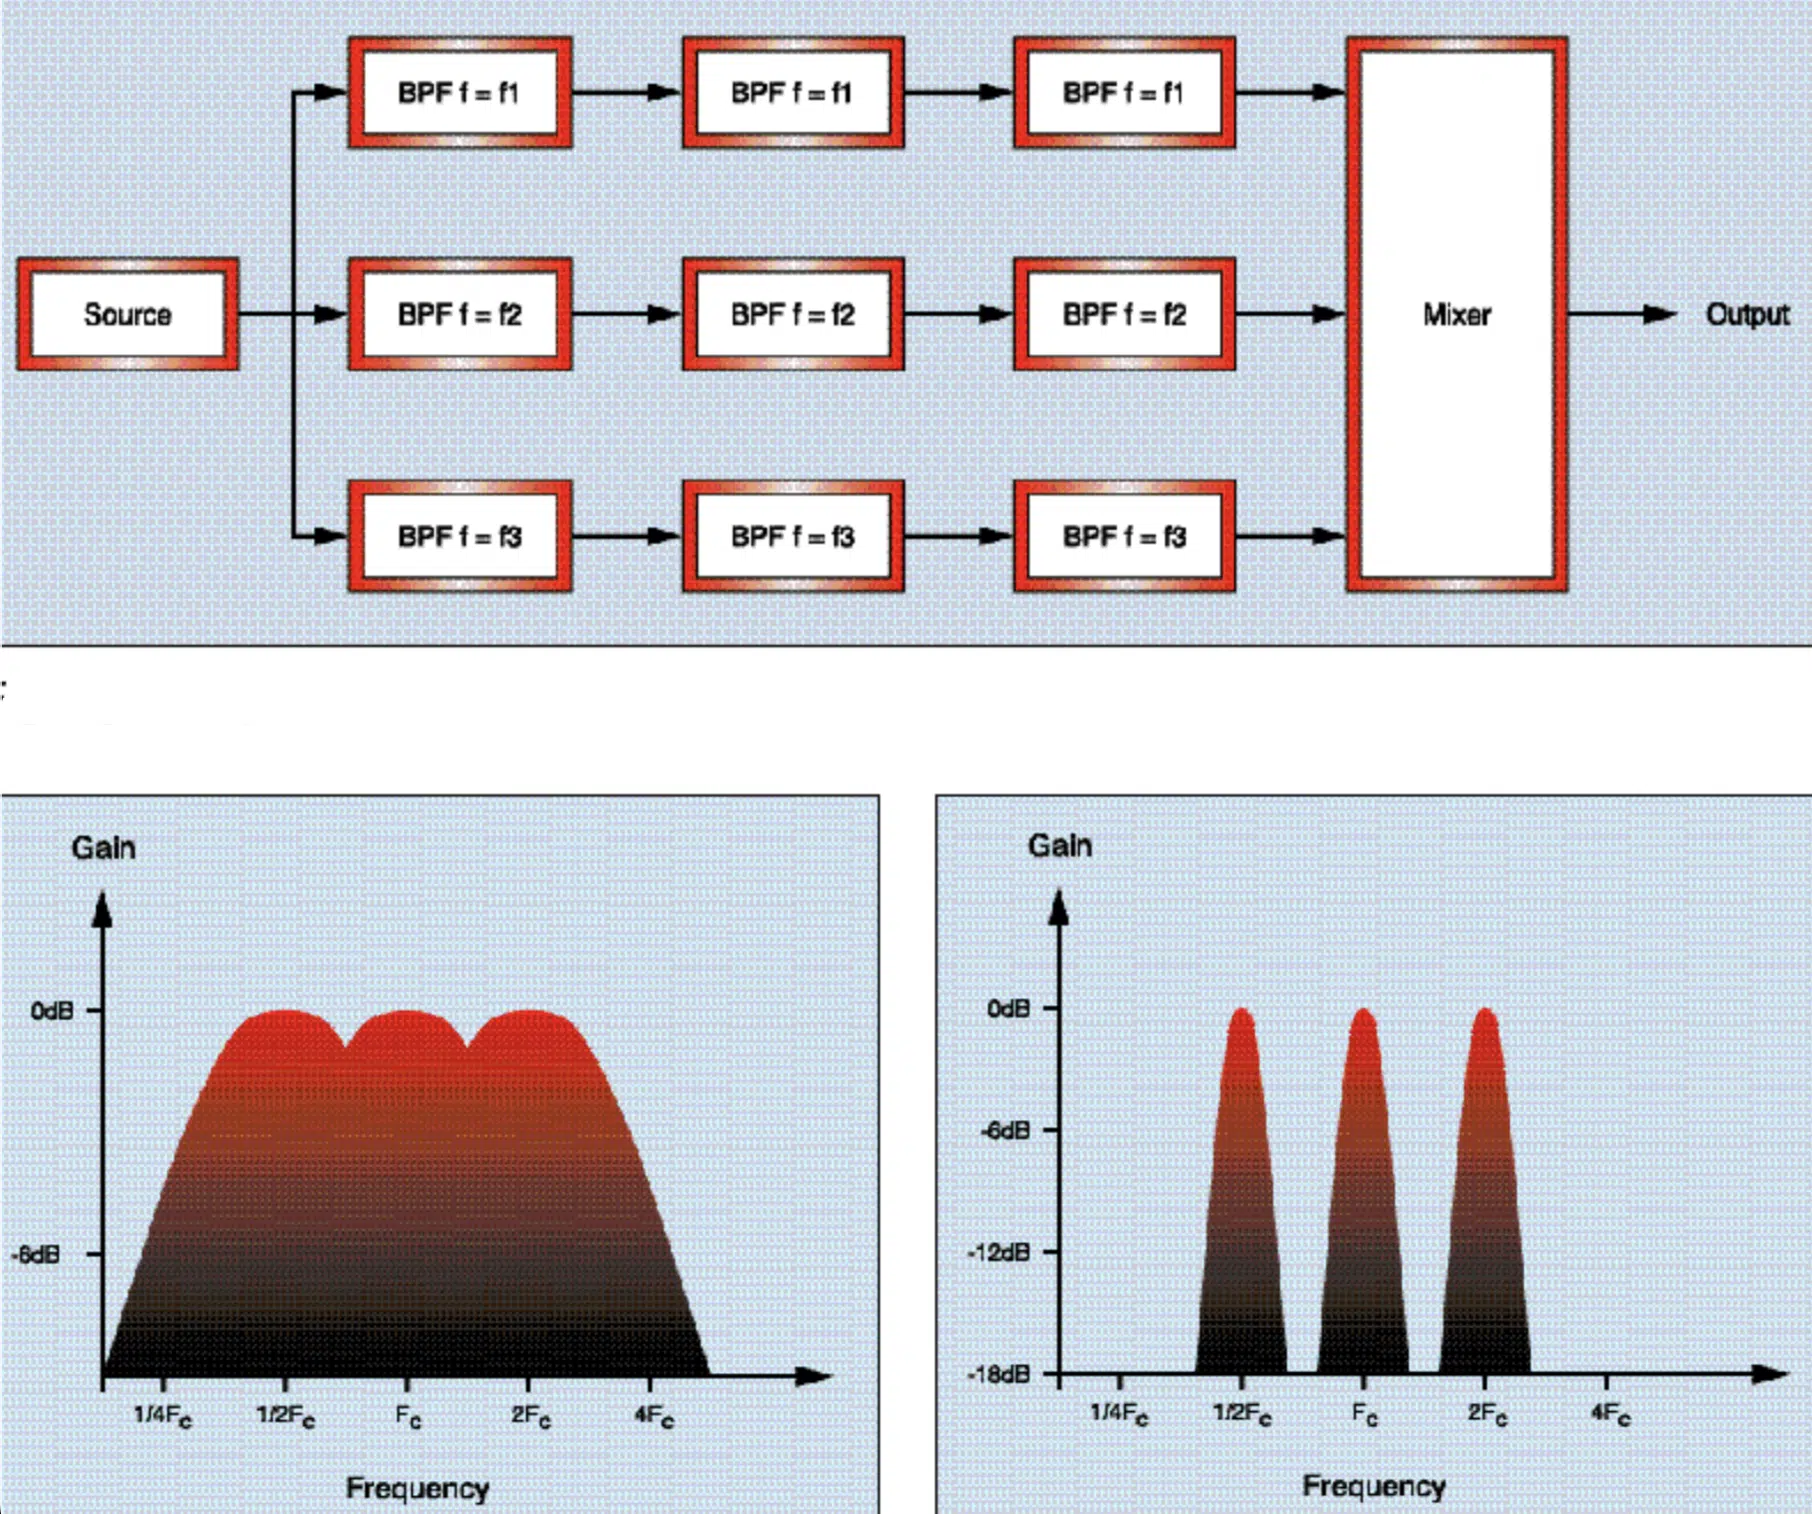
Bandpass filters can be a secret weapon in your EQ arsenal.
These filters allow only a specific range of frequencies to pass through, effectively cutting off the frequencies above and below this range.
Bandpass filters can be used creatively to alter the character of your vocals.
For example, if you want your vocals to have a ‘telephone effect’, you could use a bandpass filter to allow only the mid-range frequencies to pass through.
This will create a narrow, distant sound.
This technique can be used sparingly for dramatic effect in your mix.
-
The Secret of Upper Harmonics in Vocal EQ
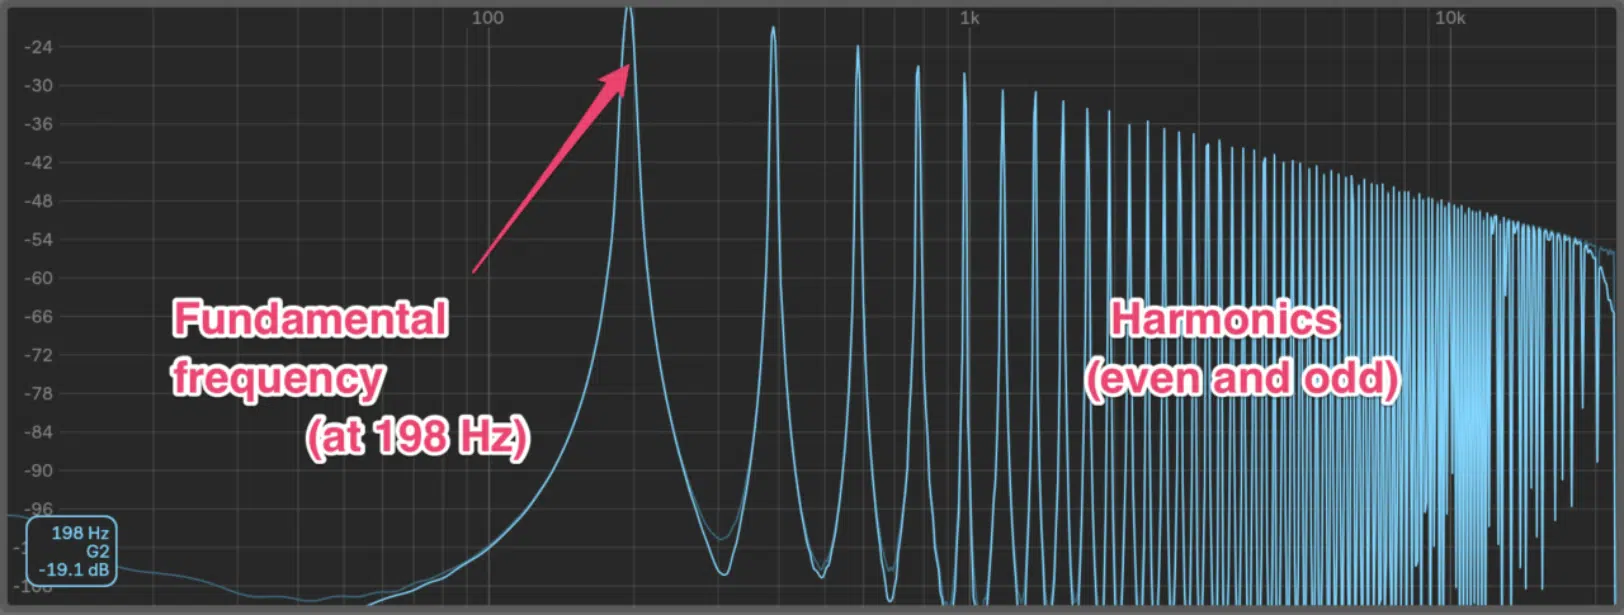
Upper harmonics, typically found in the high-frequency range, play a critical role in the perceived ‘brightness’ or ‘airiness’ of a vocal.
These are multiples of the fundamental frequency and contribute to the overall timbre and character of the voice.
Understanding and manipulating these harmonics can allow you to make your vocals shine.
A boost in the upper harmonics (usually above 5 kHz) can add a sense of clarity, presence, and sparkle to your vocals.
For instance, if you have a vocal track that sounds dull or lacks presence, try boosting the upper harmonics gently.
This can make the vocals feel ‘closer’ to the listener and help them stand out in the mix.
-
Reduce Sibilance & Add Sharpness
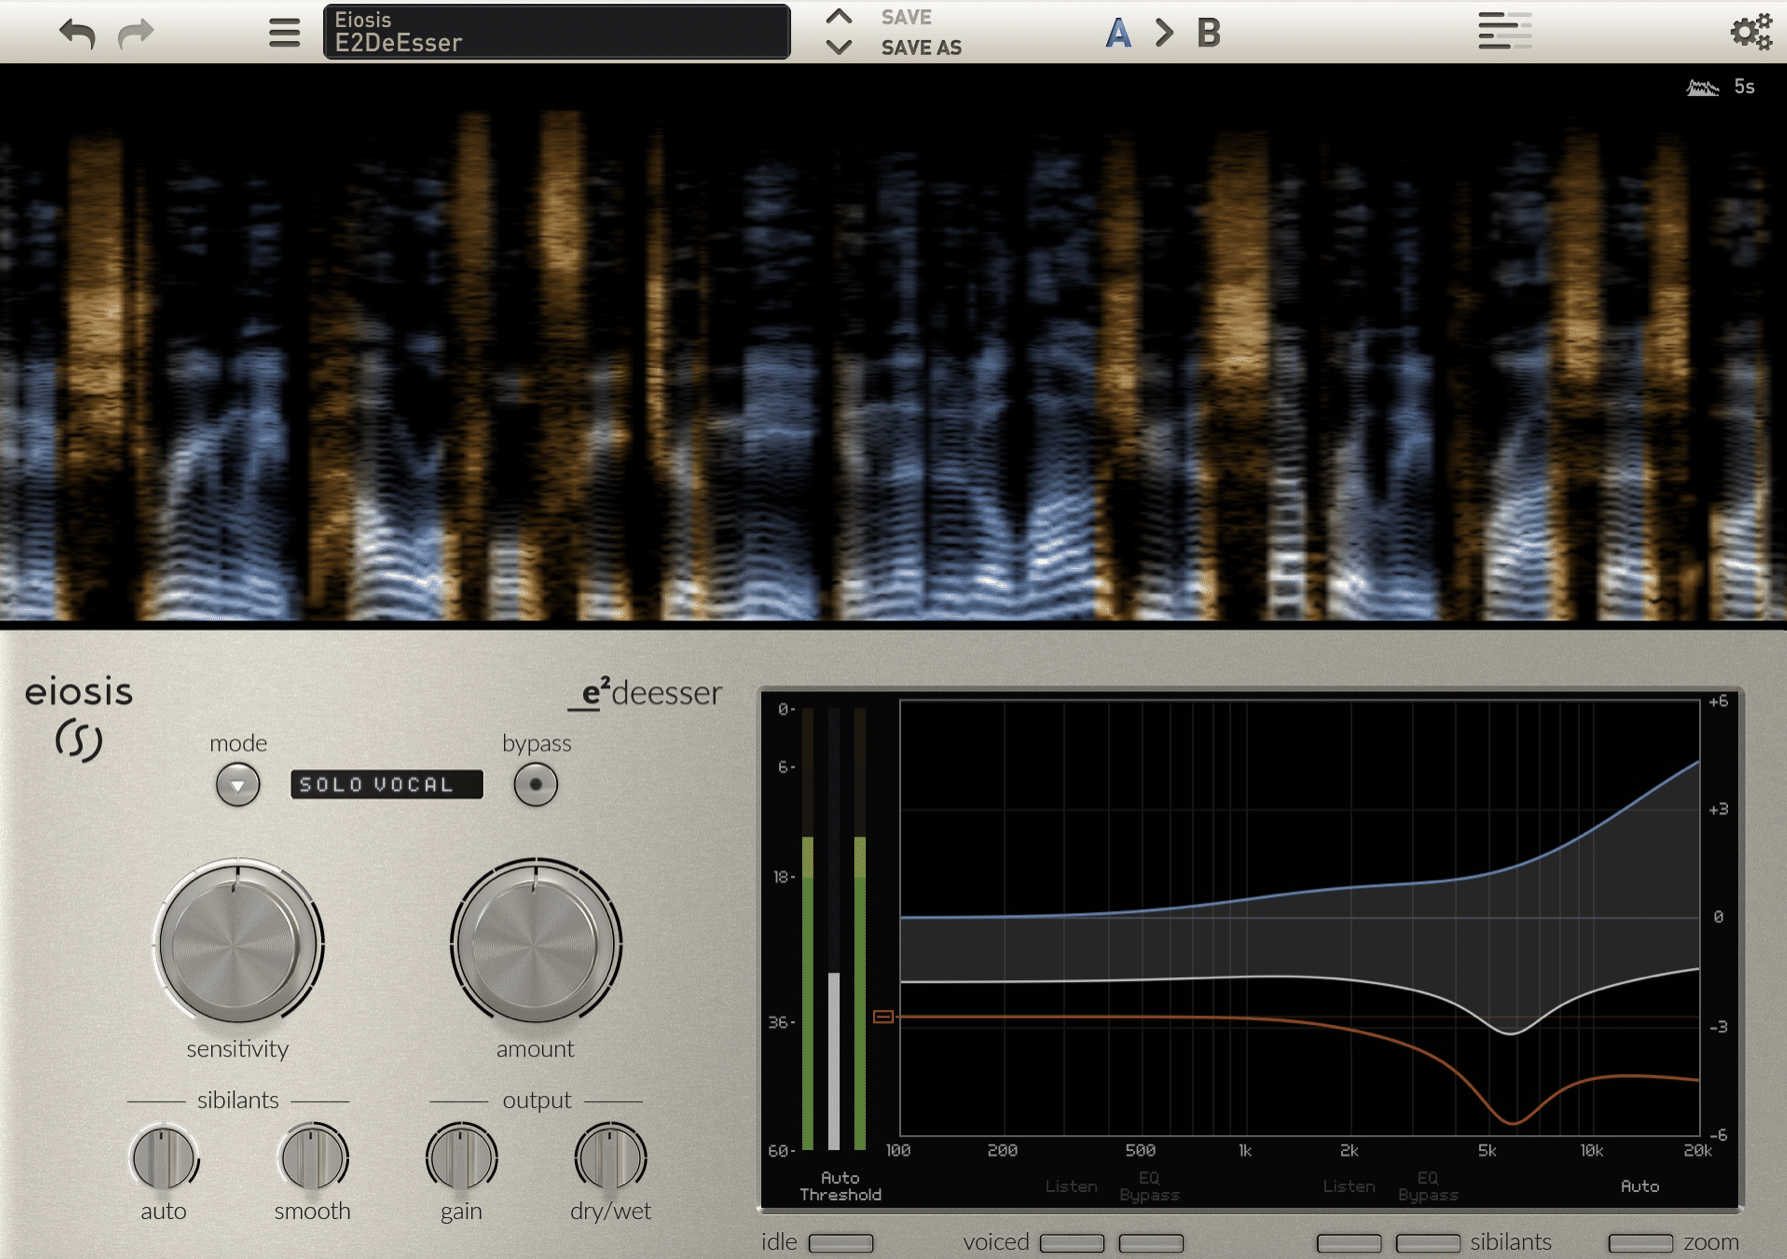
Sibilance is a common problem in vocal recordings, characterized by harsh ‘s’ or ‘sh’ sounds that can become overly prominent.
EQ, specifically a type of EQ called a de-esser, can be used to combat this issue.
A de-esser works by reducing the volume of specific high-frequency ranges where sibilance occurs, usually around 5 kHz to 10 kHz.
By applying a narrow Q cut in this range, only when the ‘s’ sounds occur, the harshness can be reduced without affecting the overall vocal tone.
On the other hand, if your vocals lack sharpness or definition, a boost in the 2 kHz to 6 kHz range can help.
NOTE: Dynamic EQs are also incredible substitutes for de-essers (and countless other techniques) and usually passed off to a dynamic processor such as a multiband or side-chain compressor.
This can bring out the ‘bite’ in the vocals, helping them cut through the mix.
Vocal EQ Chart: Final Thoughts
After reading this article, you now hold a powerful Vocal EQ Cheat Sheet that can guide you through the complex world of audio production.
With the knowledge you’ve gained about the frequency spectrum, the high pass filter, and specific frequency ranges, your vocals will no longer hide in the mix; they will shine.
However, the journey doesn’t stop here.
Remember, the art of EQing vocals is just as much about listening and practice as it is about knowledge.
The guidelines provided here are starting points, and the real magic happens when you apply them in your own context, based on the unique needs of each vocal track.
For some inspiration and hands-on practice, I highly recommend downloading these professionally crafted vocal samples.
These vocals are prime examples of perfectly EQ’d vocals for you to study and learn from.
They provide a valuable opportunity to reverse engineer some top-notch vocal EQ’ing.
By using them as reference tracks, you can deepen your understanding and sharpen your EQ skills.
Remember, experimentation and constant learning are keys to become an EQ master.
Until next time…


Leave a Reply
You must belogged in to post a comment.