Audio clipping impacts sound quality in various, significant ways.
It can occur when the amplitude of an audio signal exceeds the maximum capacity of a system, resulting in distortion and loss of audio fidelity.
Clipping not only affects the clarity of sound but also influences the overall listening experience, potentially leading to a degraded audio output.
As a music producer, it’s important to understand all aspects of audio clipping.
This way, you can produce clear, high-quality audio tracks and avoid the pitfalls of unintentional distortion.
In today’s article, we’ll break down:
- Everything you need to know to answer “What is audio clipping?” ✓
- The distinctions between digital clipping & analog clipping ✓
- How to recognize visual and auditory signs of clipping ✓
- Strategies for effectively preventing clipping ✓
- Managing input signal levels and headroom ✓
- Choosing the right audio equipment so no clipping will occur ✓
- Insights into the role of amplifiers and master faders ✓
- A deep dive into soft clipping vs. hard clipping ✓
- Techniques to optimize output voltage and signal level ✓
- Best recording practices to prevent clipping ✓
- Methods for fixing clipped audio in post-production ✓
- Selecting the right audio restoration software ✓
- Much more ✓
By the end of this article, you’ll be equipped with an in-depth understanding of audio clipping, helping you manage and control it effectively in your tracks.
With this knowledge, you’ll be able to enhance the quality of your tracks and operate like a seasoned professional.
It will ensure that your music not only sounds good but also maintains the highest audio standards.
So, let’s dive in…
Table of Contents
- Audio Clipping Defined
- Audio Signal Basics
- 32 Bit vs 64 Bit
- Digital Clipping vs Analog Clipping
- Recognizing the Signs of Audio Clipping
- Strategies to Prevent Clipping
- The Role of Digital Information in Audio Clipping
- Bonus: Choosing the Right Audio Restoration Software
- What is Audio Clipping: Final Thoughts
Audio Clipping Defined
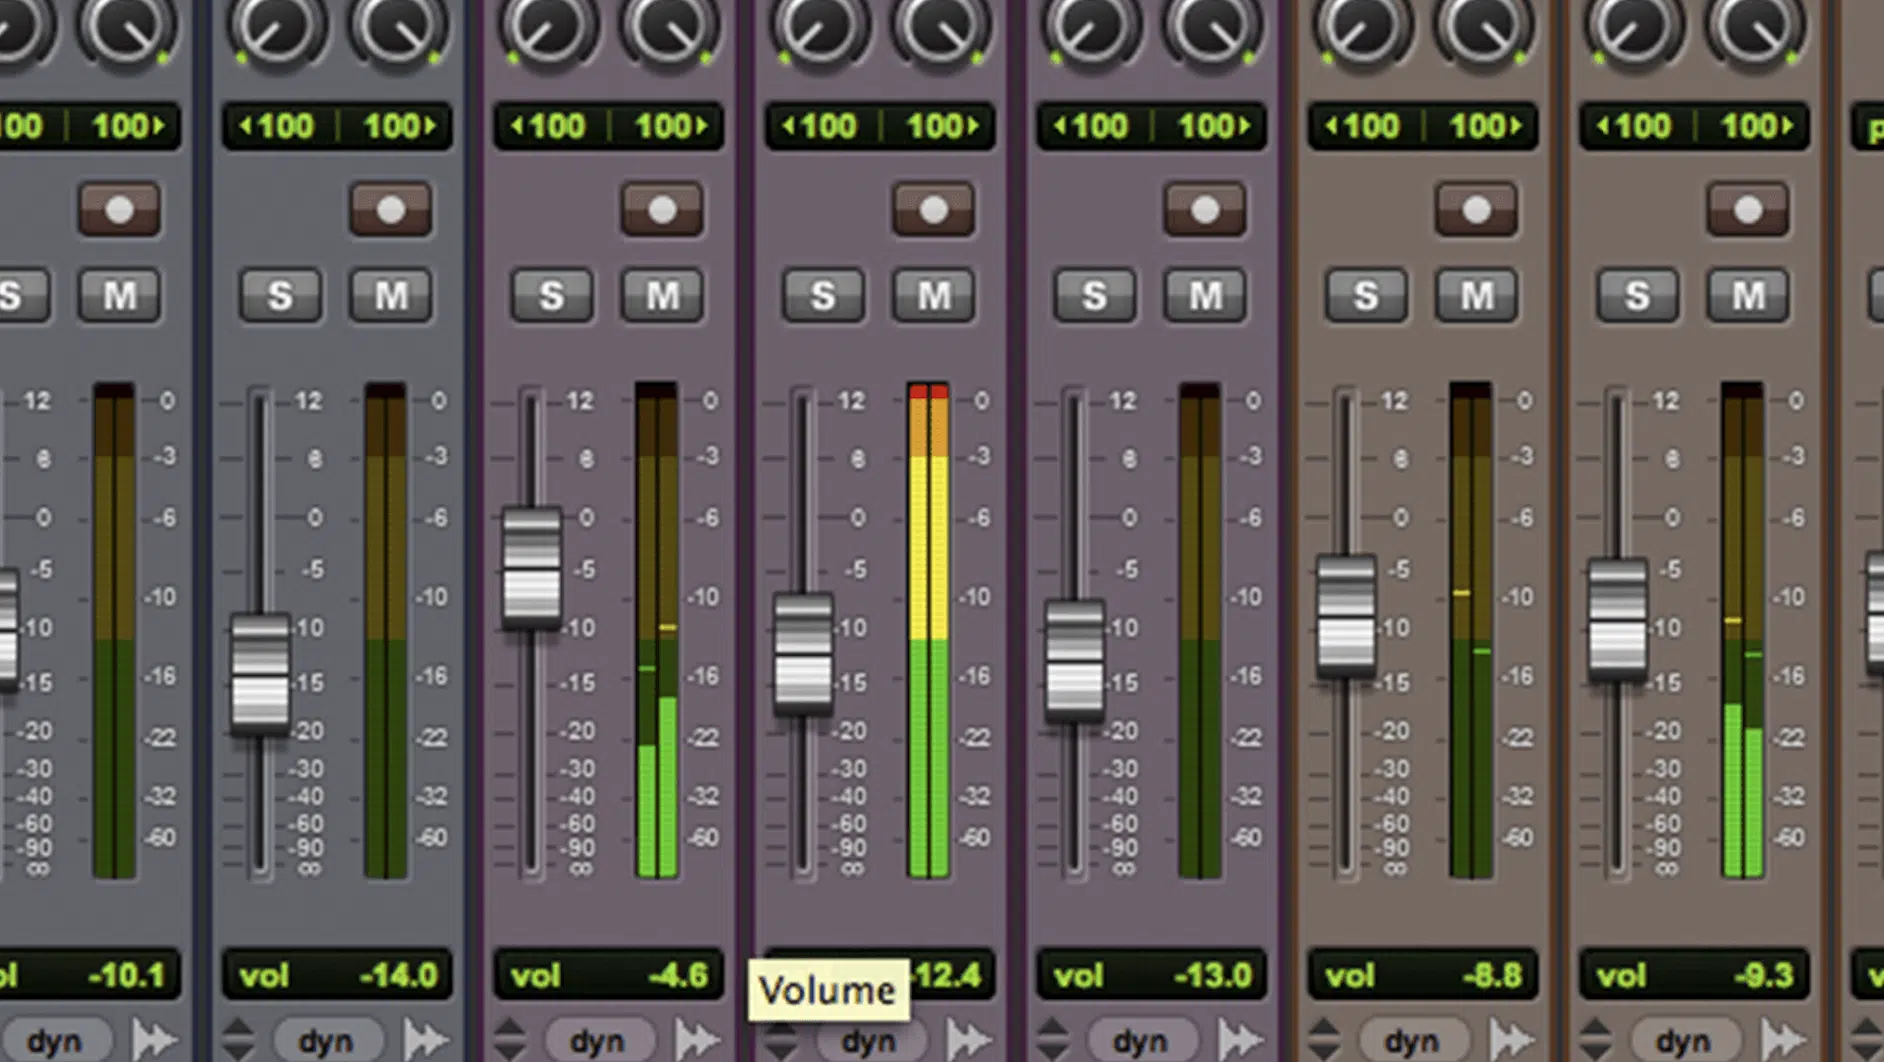
Understanding what is audio clipping is super important to producing mind-blowing tracks, on the same level as the professionals.
Audio clipping occurs when the amplitude of an audio signal exceeds the maximum limit that a system, whether analog or digital, can handle.
This amplitude overstepping results in a part of the signal being ‘clipped’ off, leading to distortion.
The essence of audio clipping lies in its impact on audio quality.
When an audio signal is clipped, the top and bottom of the waveform are truncated 一 altering the original sound.
This not only affects the fidelity of the recording but also introduces unwanted harmonic distortion, which can significantly degrade the overall listening experience.
As music producers, it’s essential to recognize that clipping can occur at various stages of the recording and production process.
From the input signal to the final output, each stage presents potential risks for clipping.
This makes monitoring signal levels at every step crucial for preserving the integrity of the audio.
Audio Signal Basics
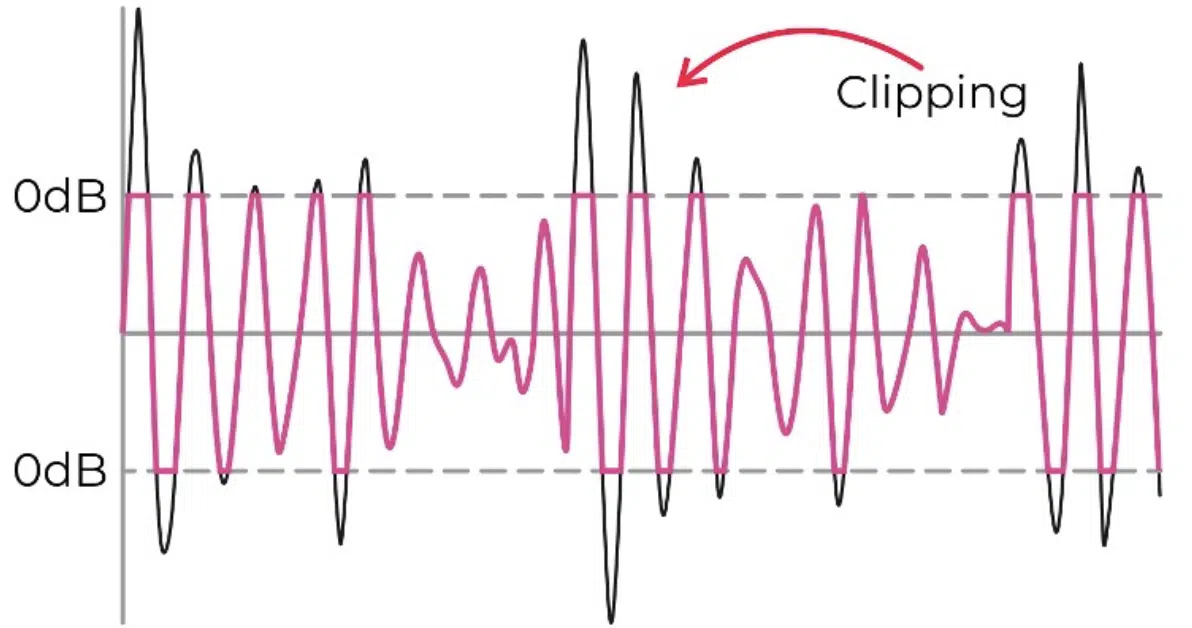
An audio signal is an electrical representation of sound, typically as a varying waveform.
In digital systems, this waveform is converted into digital information, comprising a series of binary data that accurately represents the original audio.
The integrity of this audio signal is paramount in maintaining audio quality.
When the signal remains within the system’s dynamic range, it accurately reproduces the intended sound.
However, once the signal level surpasses this range, audio clipping occurs 一 leading to the loss of audio information and the introduction of distortion.
A sine wave, often used in audio testing, provides a clear example of this.
A pure sine wave represents a smooth, periodic oscillation.
In the event of clipping, this sine wave transforms into a squared-off waveform, visually and audibly manifesting the detrimental effects of audio clipping.
-
How Clipping Distorts an Audio Signal
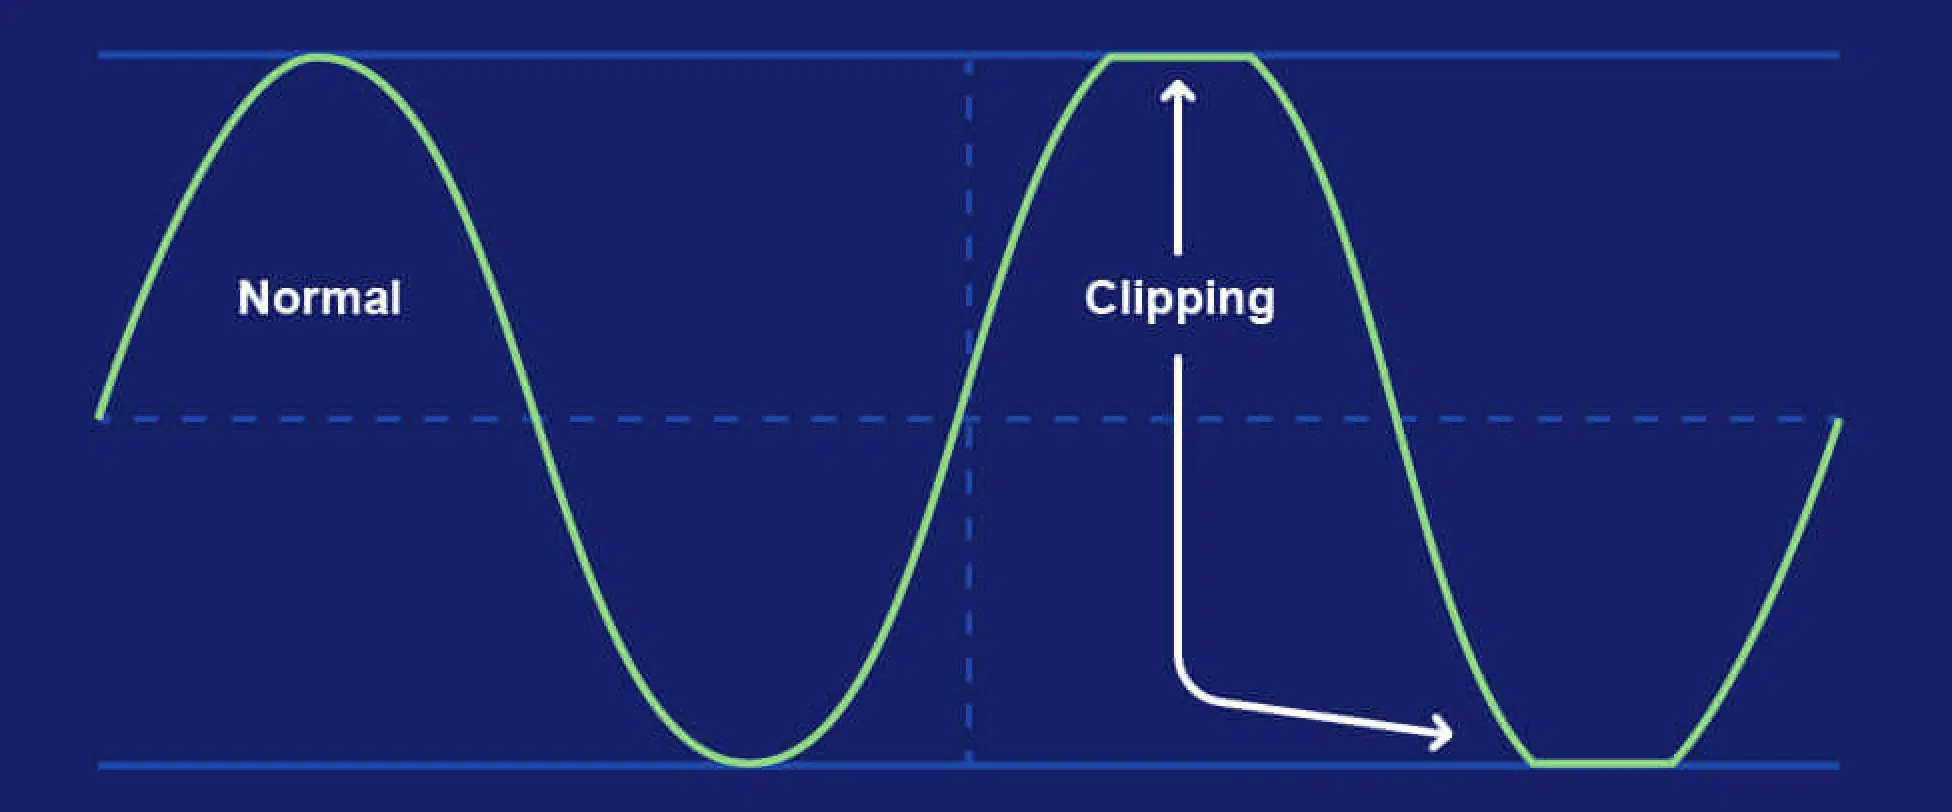
Clipping distorts an audio signal by altering its original waveform.
The clipped waveform no longer represents the true sound, as the peaks of the waveform are cut off.
This creates a harsh, distorted version of the original audio.
This distortion manifests not just in the loss of audio fidelity but also in the generation of additional (often discordant) frequencies.
These frequencies can mask or overshadow the original sound, leading to a mix that is:
- Less clear
- Very harsh (unpleasant)
- More fatiguing to listen to
In recording and mixing, the challenge lies in balancing the desired loudness with the risk of clipping.
Remember, ‘loudness’ isn’t the ultimate goal, cohesion is.
Pushing the amplifier too hard or setting the input signal too high can easily lead to a scenario where audio clipping occurs.
This will compromise the overall audio quality (and loudness factor).
32 Bit vs 64 Bit
In the context of digital audio and clipping, the terms “32-bit” and “64-bit” refer primarily to the bit depth of audio processing and file formats. Bit depth is an important concept in digital audio as it determines the dynamic range of the audio signal, affecting the potential for audio clipping.
-
32-Bit Floating Point Audio
In a 32-bit floating point format, audio is processed with a significantly higher dynamic range compared to traditional fixed-point formats like 16-bit or 24-bit.
This extra range provides more headroom, reducing the risk of audio clipping.
The key advantage of 32-bit floating point is its ability to handle signal levels above 0 dBFS (decibels relative to full scale) without clipping.
This is because the floating-point format can represent very large numbers, pushing the ceiling of digital clipping much higher.
This doesn’t mean that clipping is impossible in a 32-bit system, but it does mean that internal processing is far less likely to cause clipping.
However, the final output, typically a 16 or 24-bit fixed-point format, can still clip if levels are not managed properly.
-
64-Bit Audio Processing
64-bit processing in audio workstations refers to the precision with which the production software handles audio data.
While it doesn’t directly relate to bit depth in the same way as file formats, 64-bit processing allows for more precise calculations and less rounding error during DSP (Digital Signal Processing) operations.
This precision is beneficial in complex signal chains or when applying multiple effects, as it minimizes the cumulative errors that can occur with 32-bit processing.
It contributes to maintaining audio quality but does not inherently change the dynamics or the clipping behavior of the audio signal.
Regardless of the bit depth or processing precision, clipping can occur at two main points:
- During recording (input stage)
- At the final output stage
When a signal is recorded too hot (too loud) or if the final mix is too loud, clipping will occur at the analog-to-digital conversion stage or at the digital-to-analog conversion stage.
NOTE: Proper gain staging and monitoring of levels are essential in both 32-bit and 64-bit environments to prevent clipping.
While higher bit depths and more precise processing offer more headroom and fidelity, they don’t eliminate the need for careful level management.
Digital Clipping vs Analog Clipping
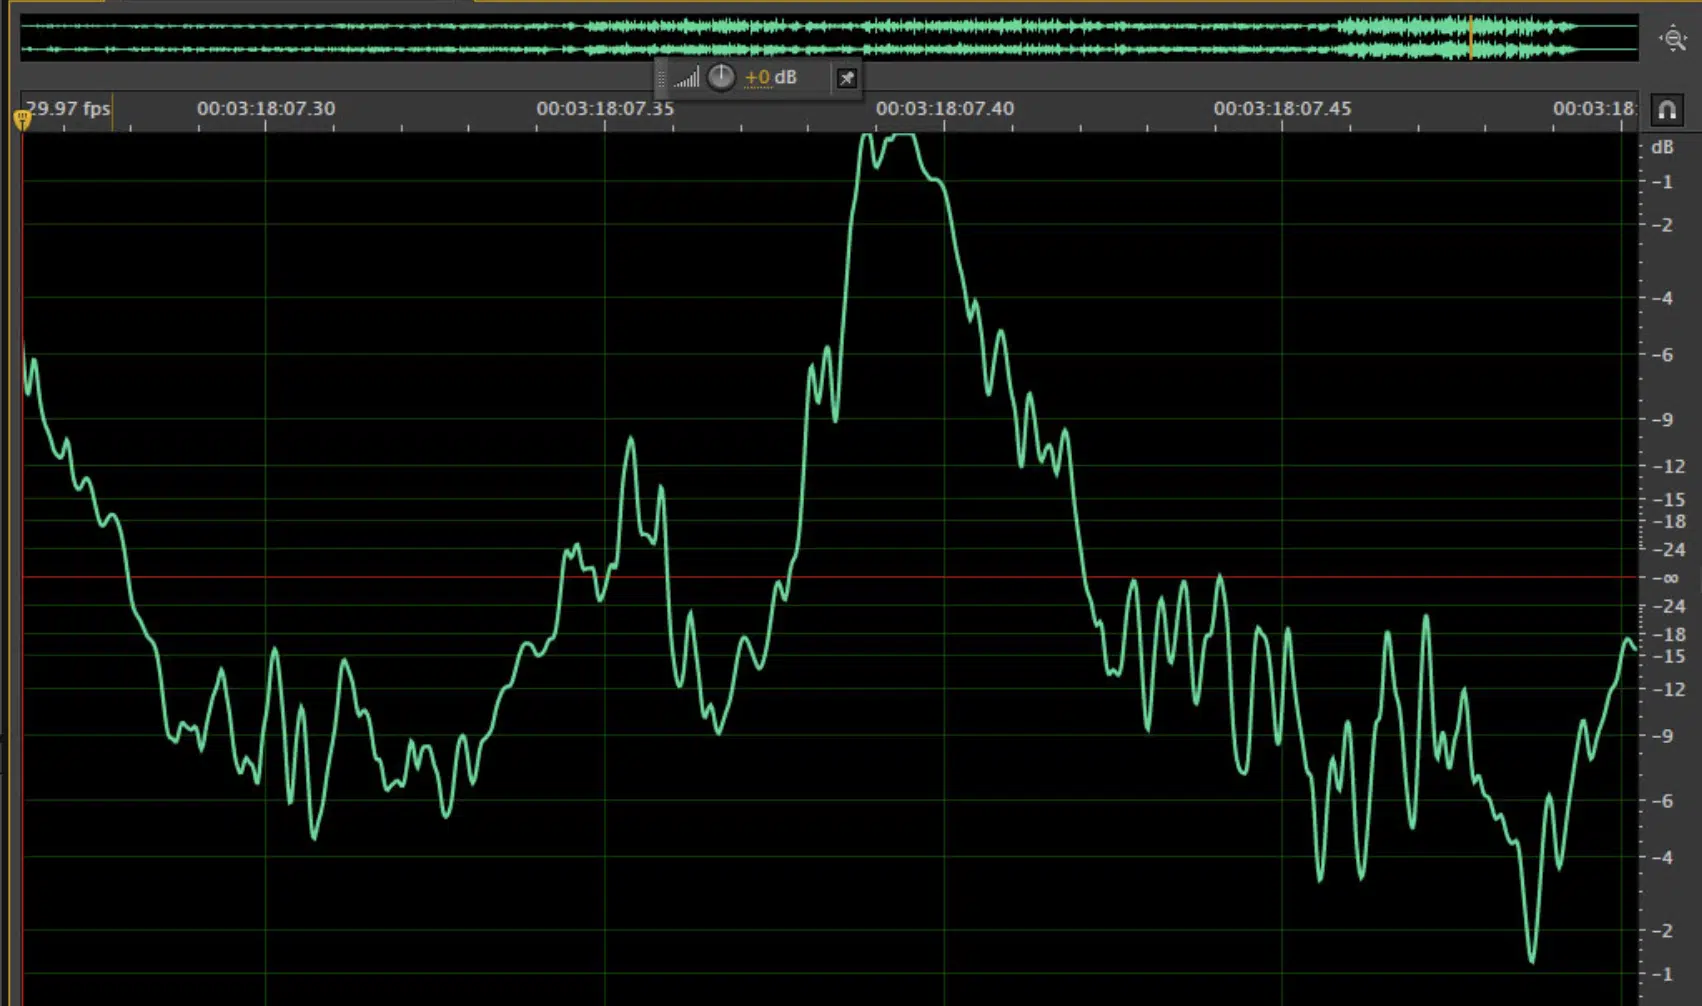
Digital clipping and analog clipping, while similar in concept, exhibit distinct characteristics.
- Digital clipping in digital systems happens abruptly when the signal exceeds the maximum level that digital audio can encode 一 resulting in a harsh sound.
- Analog clipping, occurring in analog equipment like an amplifier, often presents a more gradual onset.
Analog equipment can sometimes handle levels slightly beyond their maximum level.
Therefore, producing a warmer, more gradual form of distortion before severe audio clipping sets in.
Understanding these differences between digital and analogue clipping is crucial.
In digital clipping, once the maximum digital level is reached, any additional increase in the input signal results in a flat-topped waveform.
This will severely distort the sound/signals.
Analog clipping, while also undesirable, can sometimes be used creatively to add character to the sound, with extreme caution to avoid excessive distortion.
Recognizing the Signs of Audio Clipping
Identifying audio clipping early in the production process is essential to maintaining high audio quality. Let’s look at the visual and auditory signs that will help you answer the question, “When will audio clipping occur?”
-
Visual Indicators: Waveforms and Meters
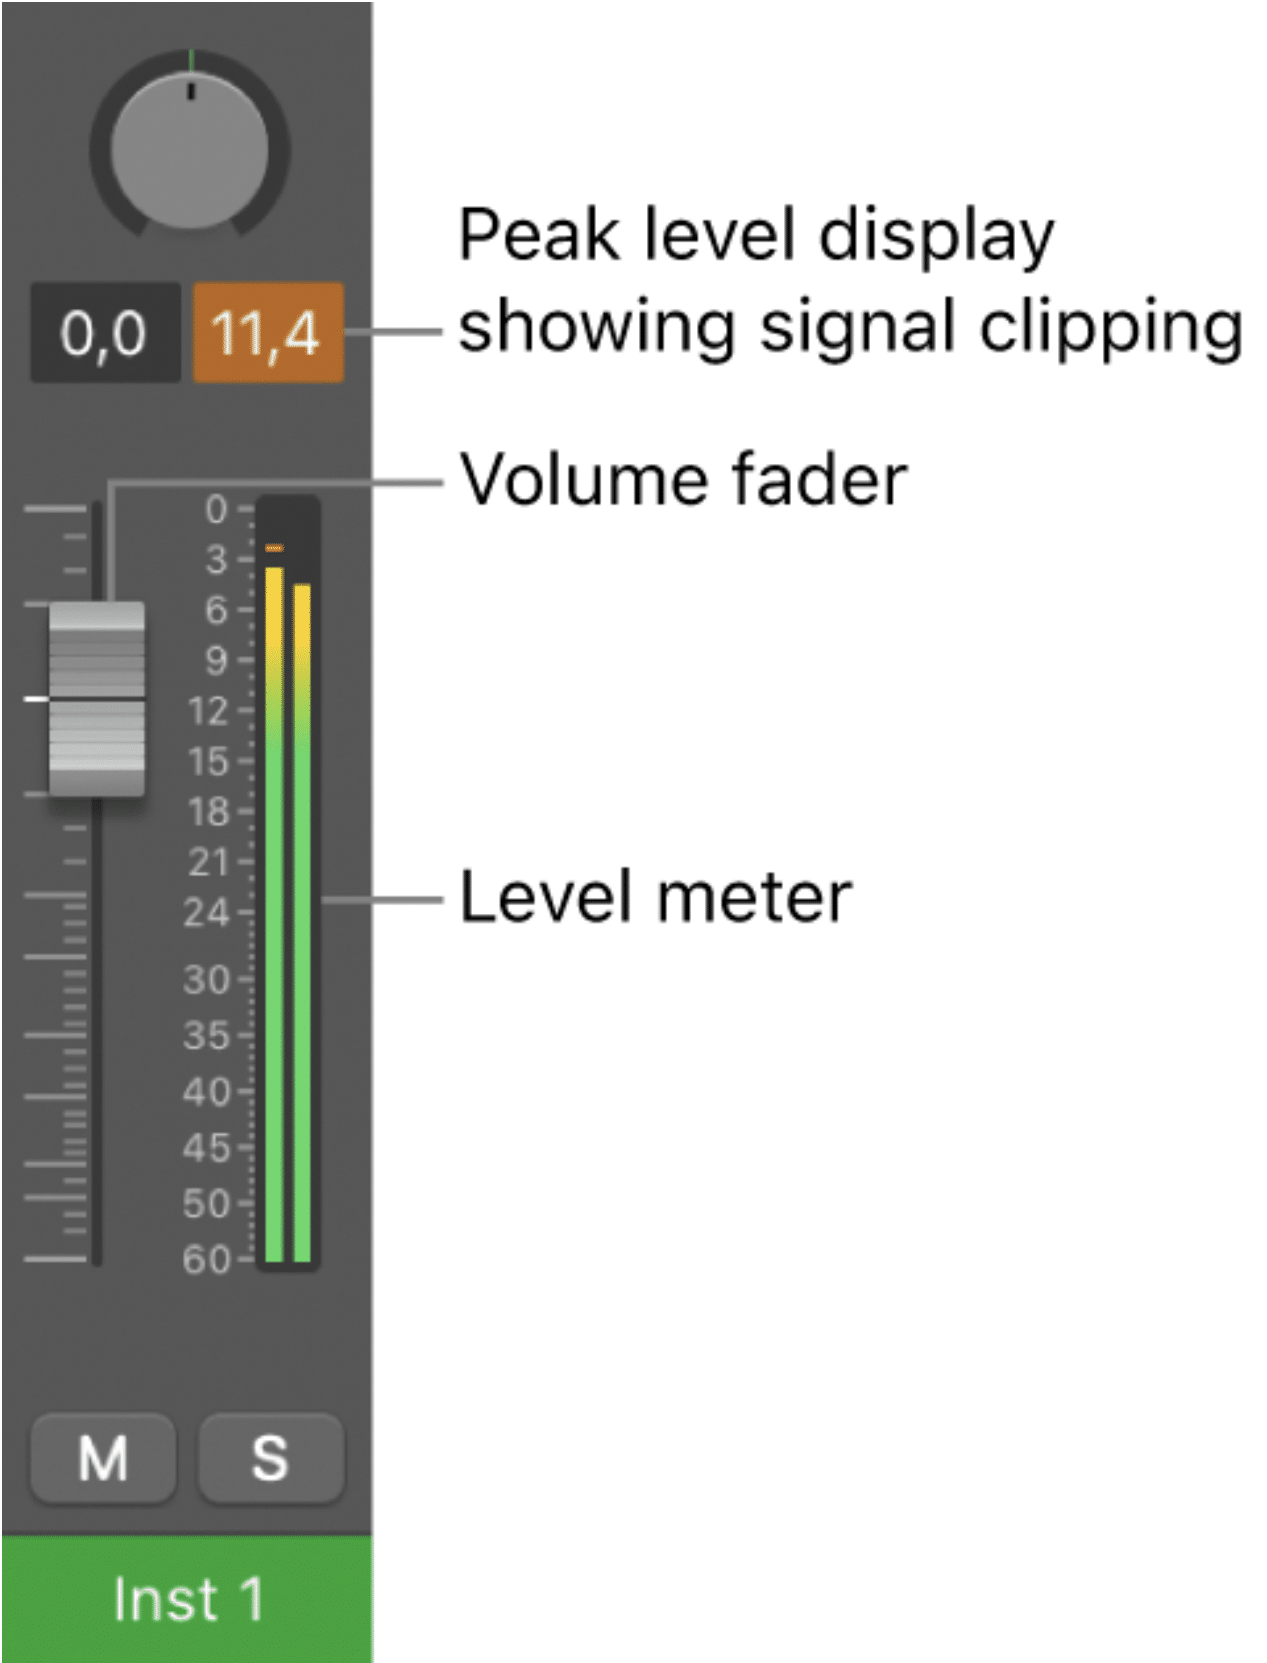
One of the most straightforward ways to detect audio clipping is through visual indicators.
In digital systems, waveform displays and meters are invaluable tools.
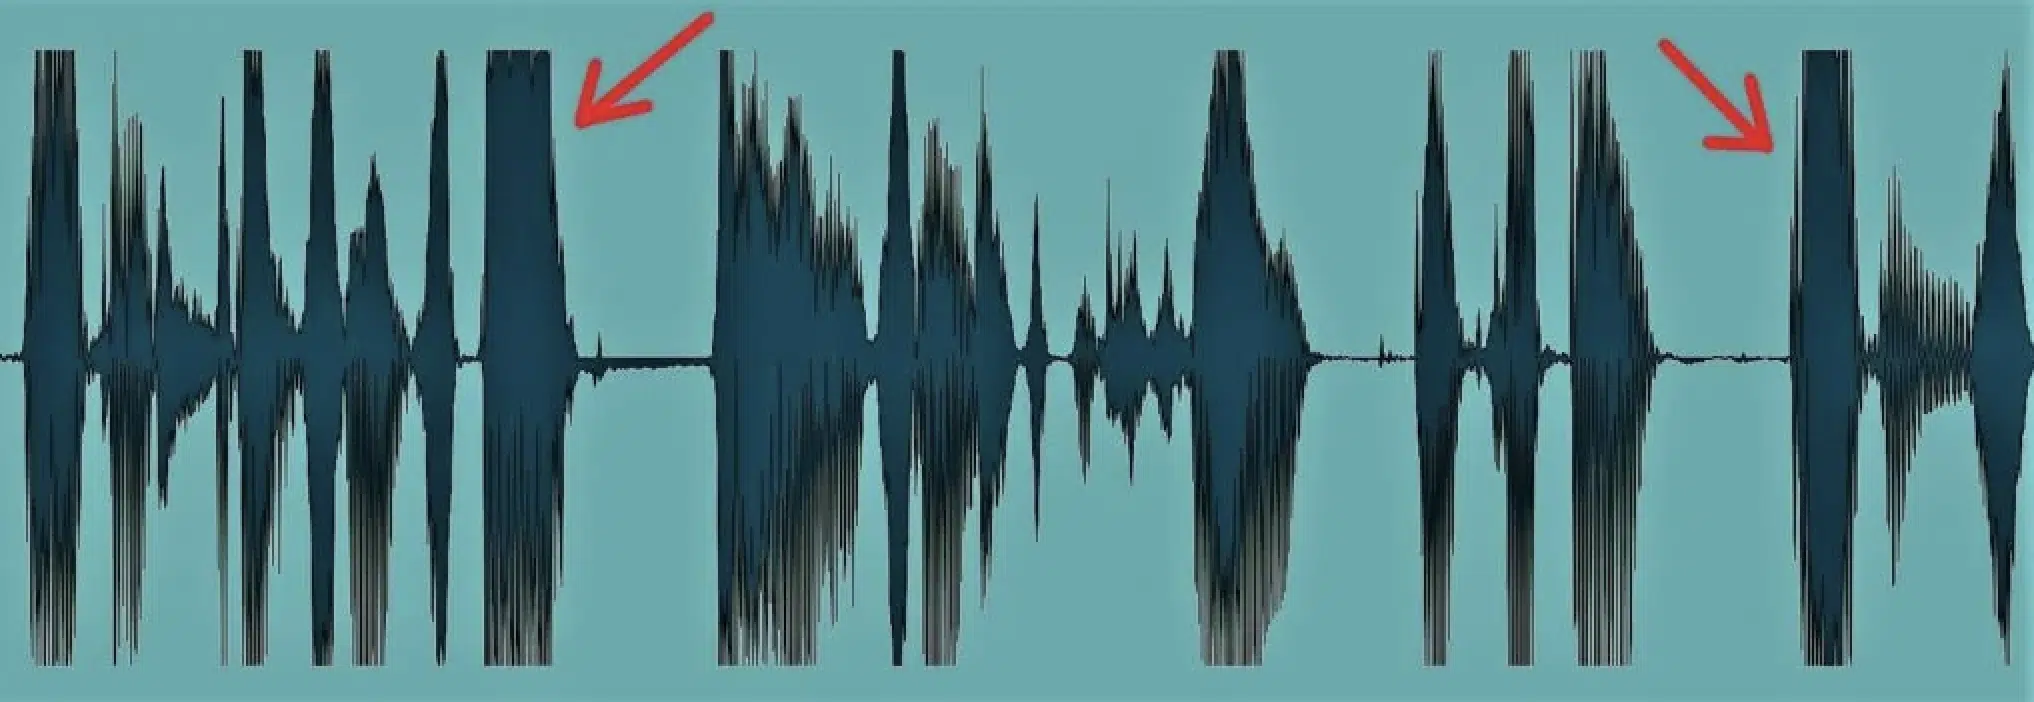
A clipped waveform is easily recognizable by its squared-off peaks 一 indicating that the signal has exceeded the system’s maximum capacity.
Additionally, most digital audio workstations (DAWs) and audio equipment feature meters that display signal levels.
These meters often turn red (red light) or indicate ‘clipping’ when the audio signal breaches the threshold.
They provide you with a clear warning to reduce the signal level.
NOTE: Carefully analyzing the waveform display can reveal early signs of waveform distortion, allowing you to adjust levels before clipping causes irreversible damage to the audio quality.
Understanding how to read these visual cues is a fundamental skill for any digital music producer.
Keeping an eye on the waveform and meter readings during recording, mixing, and mastering helps in taking timely action to prevent clipping.
-
Pro Tip: Auditory Symptoms of Clipping
Auditory symptoms of clipping are equally telling.
Clipping audio often produces a noticeable harshness or distortion in the sound.
This is particularly evident in high-frequency sounds, where audio clipping introduces a grating, unpleasant quality.
In severe cases, audio clipping can cause a complete breakdown of the audio signal, resulting in:
- Pops
- Crackles
- Significant loss of clarity
Listening for these auditory signs of clipping audio is crucial in avoiding the detrimental effects of audio clipping.
Strategies to Prevent Clipping
Preventing clipping audio is not just about rectifying it after it occurs, but about implementing strategies to avoid it altogether. The following, are some effective approaches to managing your audio signal and equipment to prevent clipping audio.
-
Managing Input Signal Levels
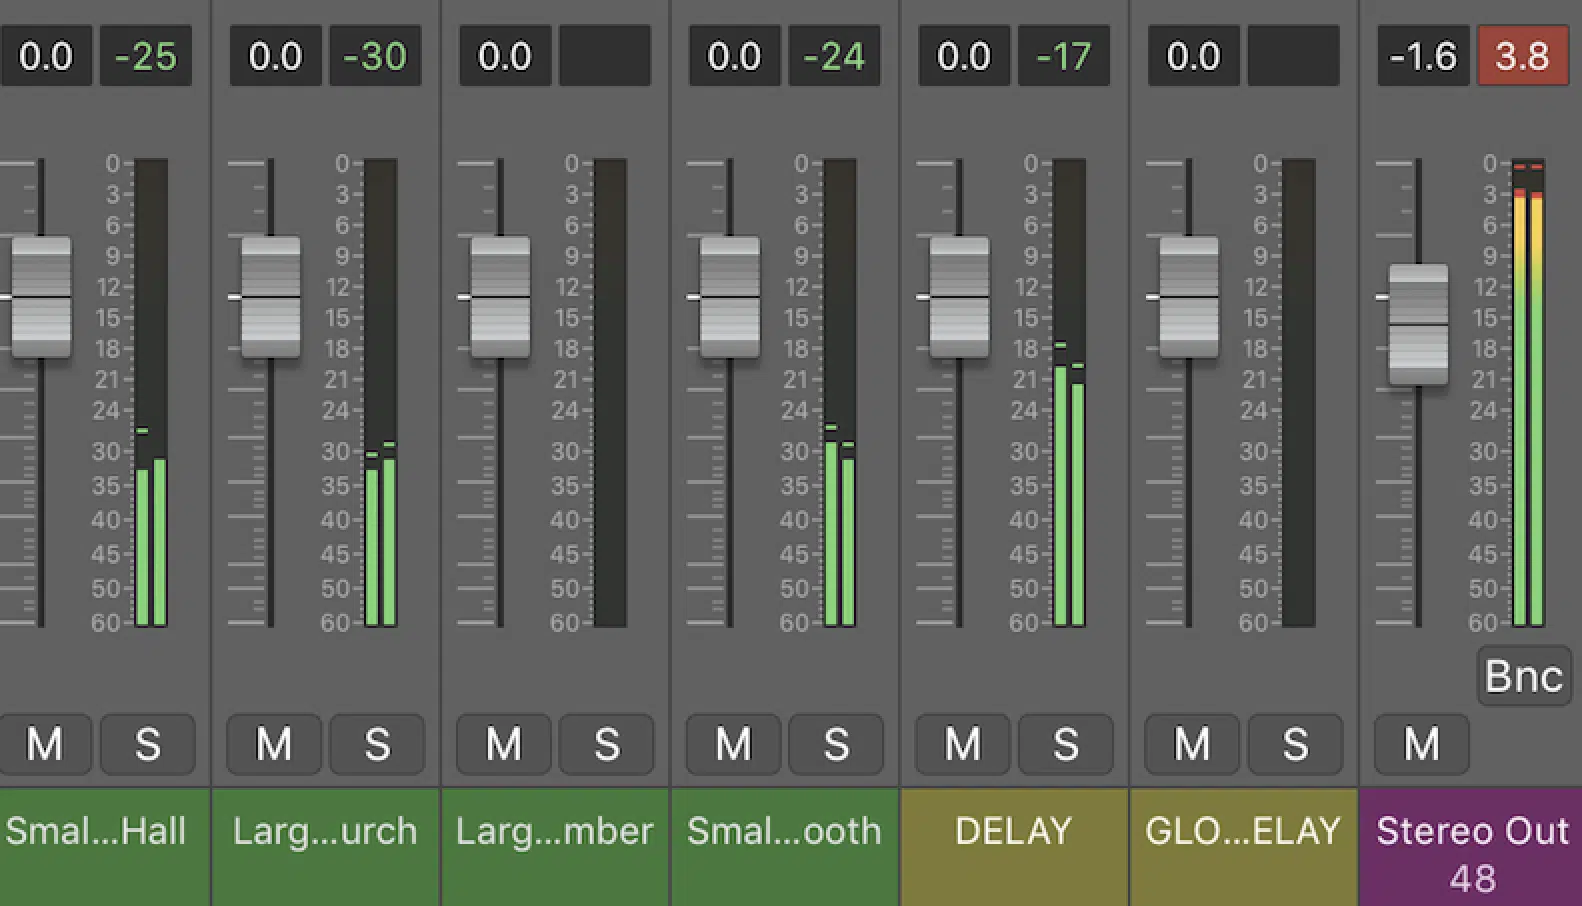
Managing input signal levels in the input stage is a crucial aspect of producing professional music.
A well-managed input signal ensures that the output will avoid distortion caused by clipping.
The key is to set the input signal at a level that is high enough to capture the full richness of the desired sound, yet not so high that it exceeds the system’s capacity.
By carefully calibrating the input signal, you can achieve a clear, distortion-free output, which is essential for high audio quality.
This delicate balance between the input signal level and the output quality is what sets professional recordings apart.
Monitoring the input signal closely is vital for preserving audio quality.
Regular checks on the input signal level can prevent instances where the output might suffer due to unexpected spikes in the signal.
For instance, during a vocal recording session, dynamic variations in the performer’s voice can cause fluctuations in the input signal.
By actively managing these levels, you ensure that the output remains consistent and free from clipping.
It’s a practice that requires attention and precision but pays off significantly in terms of the final audio quality.
Additionally, aligning the input signal with the output capabilities of your recording equipment is crucial.
If the input signal is too high for the output capacity of your system, it will inevitably lead to clipping.
An input signal that’s too low might not utilize the full dynamic range of your equipment, leading to a less impactful output.
It’s all about finding that sweet spot and sticking to it.
-
Importance of Amplifiers and Master Faders
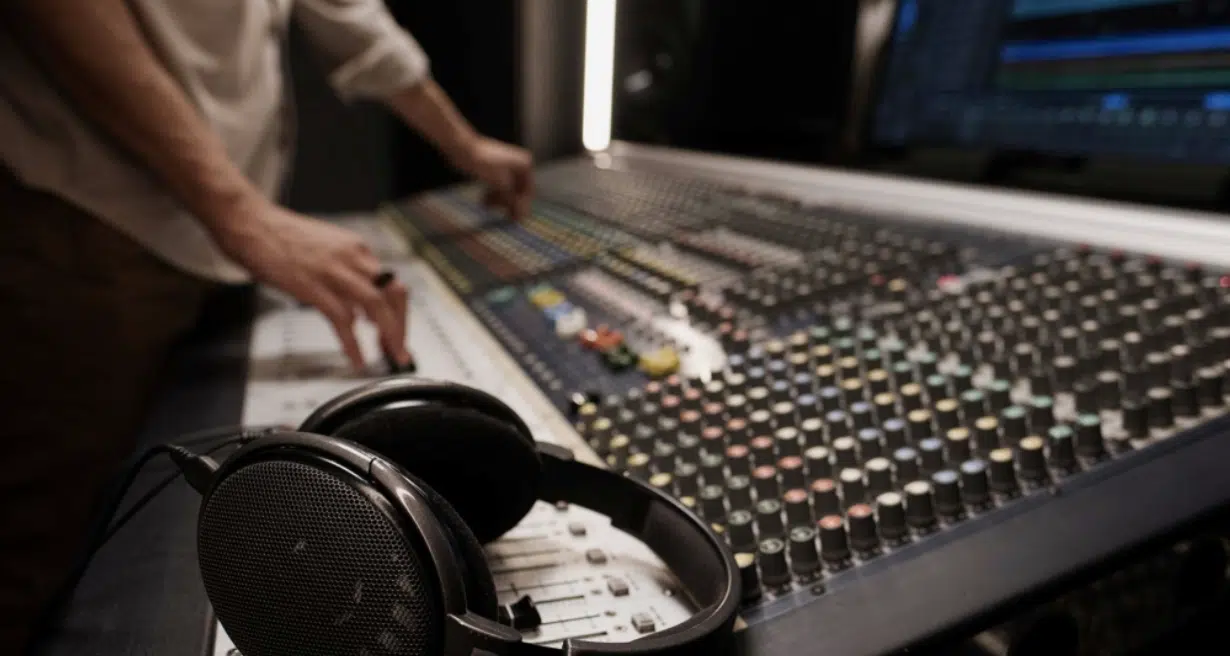
Amplifiers play a pivotal role in signal processing, especially in analog systems.
A well-designed amplifier can provide a smoother sound (even at higher volumes), helping you to avoid audio clipping.
Again, it’s about finding that sweet spot where the amplifier enriches the desired sound without entering the distortion zone.
Similarly, master faders in your digital audio workstation are crucial in controlling the overall signal level of your mix.
Keeping an eye on the master fader and ensuring it doesn’t go into the red-lining territory is key to avoid clipping 一 particularly in the final stages of mixing and mastering.
If you want to learn more about the mixing and mastering processes, we’ve got you covered.
NOTE: Red-lining is simply the term used to describe when the levels on an audio meter reach and exceed the maximum limit.
It is typically indicated by the meter turning red, signaling a high risk of audio clipping and potential distortion.
So, being familiar with your amplifier and master faders is key to making sure no clipping occurs in your tracks.
The Role of Digital Information in Audio Clipping
In the digital domain, understanding how audio clipping manifests and impacts our work is vital.
Digital systems translate audio signals into digital information, where each sound wave (square wave, sine wave, etc.) is represented by a series of binary data.
When these systems encounter an original signal that exceeds their maximum digital level, known as full scale, audio clipping occurs.
This clipped signal loses parts of its digital information, resulting in audible distortion.
In digital clipping, the waveform doesn’t just distort 一 it gets truncated.
Meaning, it creates a squared-off waveform that is sharply different from the original audio’s sine wave.
This can severely impact the audio quality, especially in certain instances or uploading requirements where fidelity is key.
-
Soft Clipping vs Hard Clipping
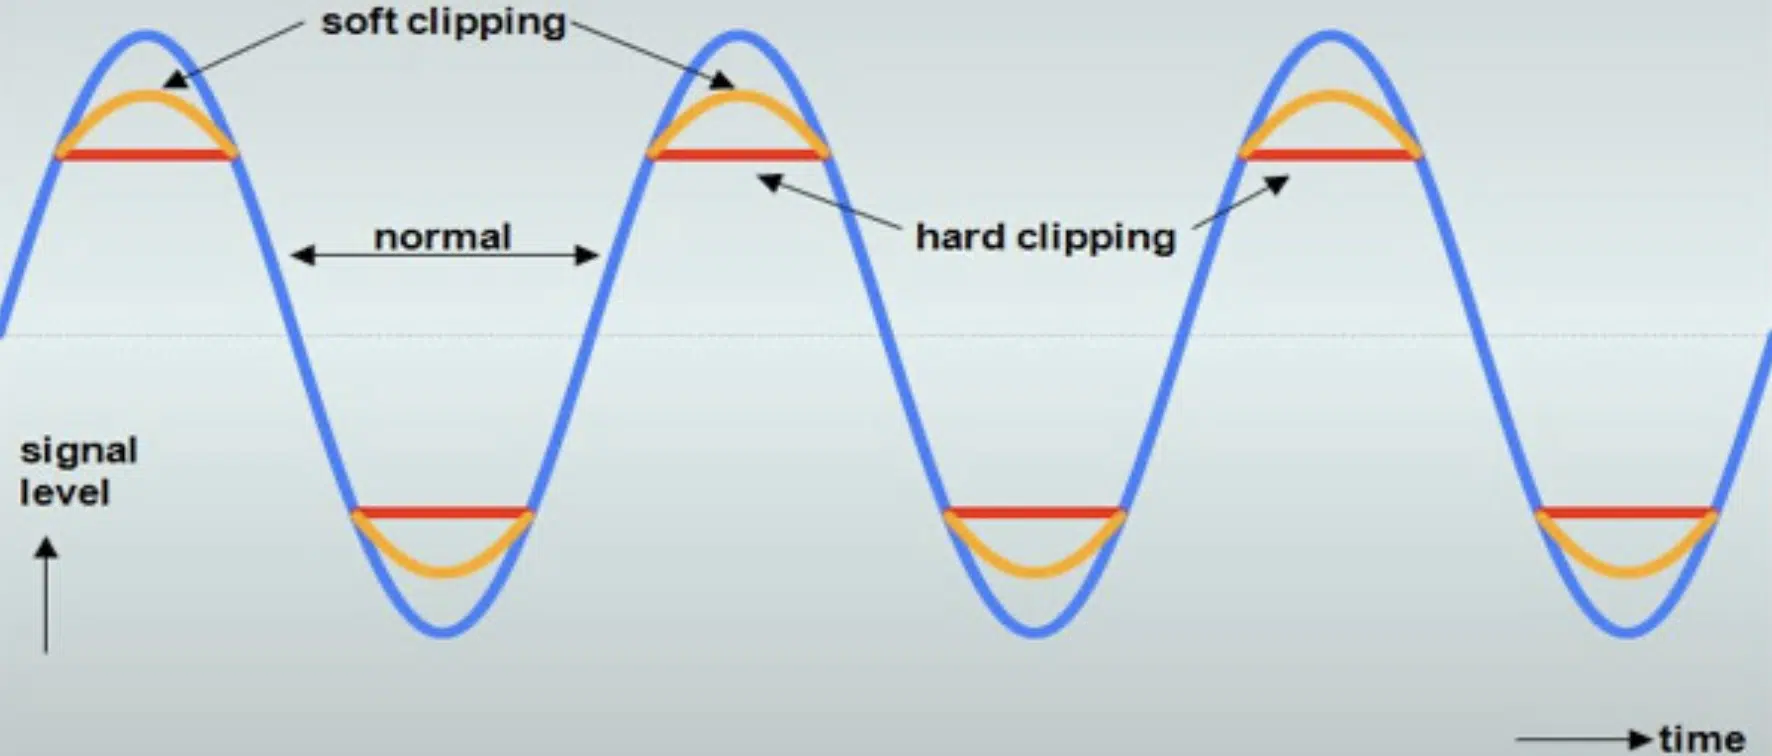
Understanding the big difference between soft clipping and hard clipping is essential for any music producer or audio engineer.
Soft clipping, often used in analog equipment, refers to the gradual increase in distortion as the signal level approaches and surpasses the threshold.
Think of a soft clip like a gentle slope leading to a distorted peak.
Remember, a soft clip often results in a warmer, more musical form of distortion.
Hard clipping, on the other hand, is more abrupt and aggressive.
It’s common in digital systems where once the signal exceeds a certain threshold, it immediately gets clipped 一 creating a harsh, brittle sound.
NOTE: This is often undesirable and doesn’t sound good as it can introduce significant audio artifacts.
As well as reduce the overall audio quality.
In practice, soft clipping can be used creatively, for example, to add warmth to a guitar signal.
Hard clipping, while generally avoided, can be employed for specific effects, such as creating a lo-fi sound or adding grit to a track.
Bonus: Choosing the Right Audio Restoration Software
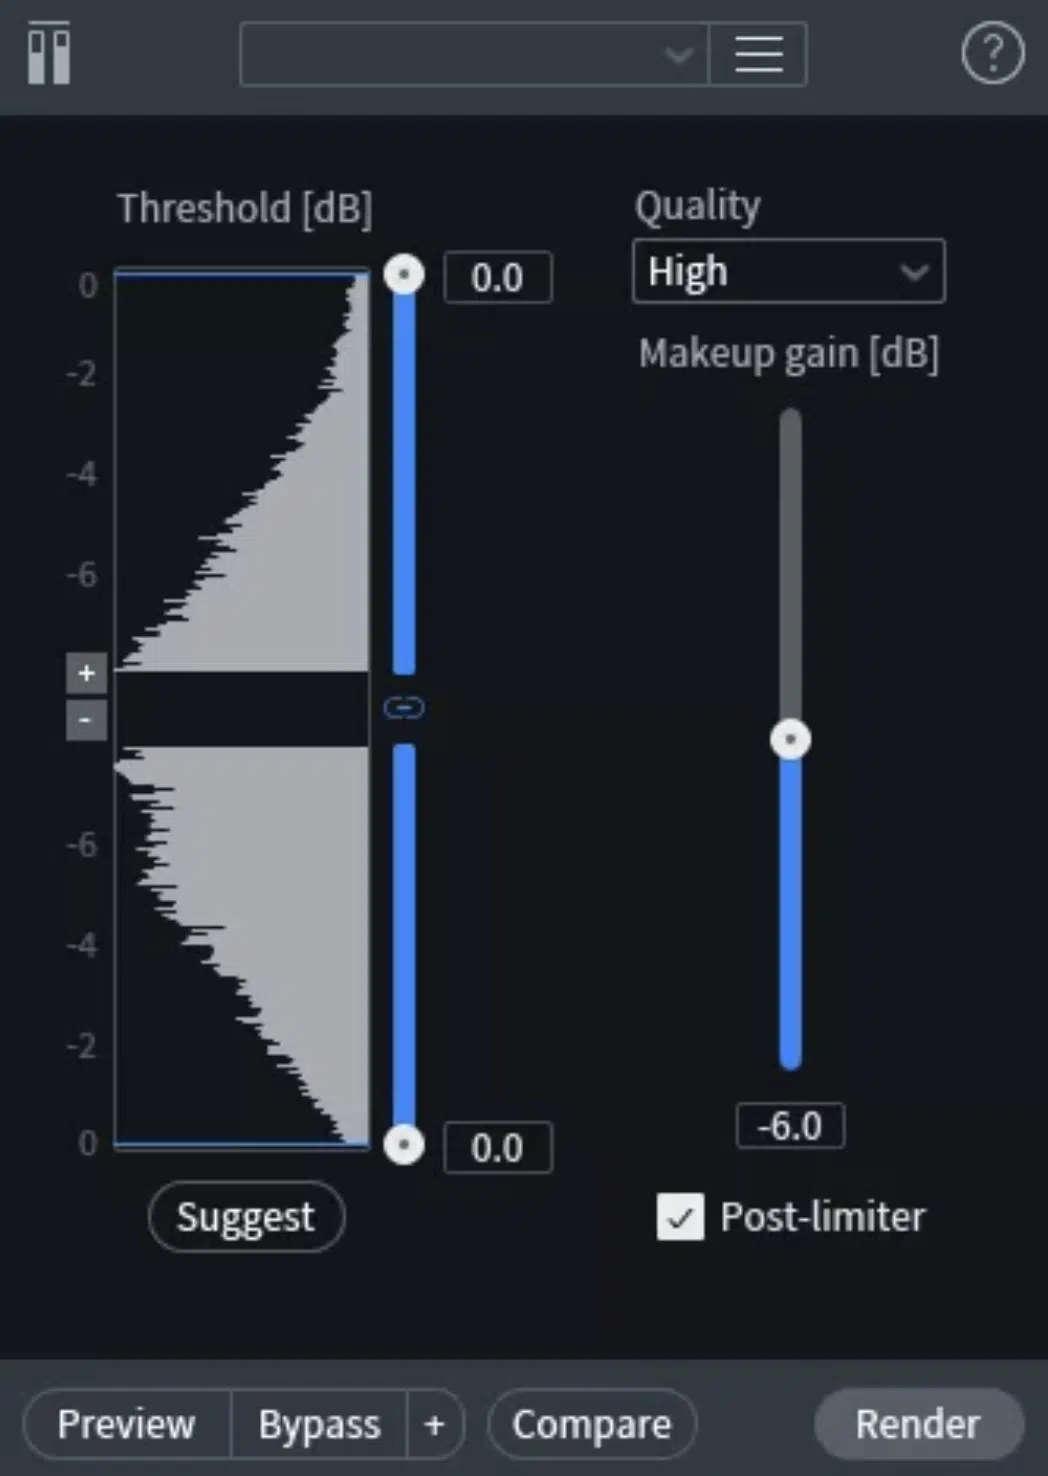
When it comes to choosing audio restoration software, it’s important to consider the specific needs of your project.
Especially when you’re first figuring out “What is audio clipping.”
Some software is better suited for minor clipping, while others can handle more severe cases.
Features to look out for include the:
- Ability to handle different types of audio clipping sound
- Flexibility to adjust the level of restoration
NOTE: Audio restoration software like RX De-Clip can be used to reconstruct clipped waveforms, saving recordings that might otherwise be unusable.
Additionally, when you’re looking to discover when clipping can occur, consider the user interface and workflow.
The software should integrate seamlessly into your existing studio setup and be intuitive to use.
A great example (and my personal favorite) includes iZotope’s RX suite.
It is renowned for its comprehensive set of tools, including its De-Clip module, catering to a wide range of audio restoration needs.
What is Audio Clipping: Final Thoughts
Understanding what is audio clipping is crucial for any music producer aiming to create pristine tracks.
Knowing what is audio clipping helps in identifying and preventing distortion, ensuring that your audio quality remains high.
This knowledge empowers producers to make informed decisions, from the initial recording stages to the final mastering process.
For those looking to incorporate perfectly mixed, flawless audio into their projects, these Free Project Files offer an invaluable resource.
These project files (available for Ableton, FL Studio, and Logic Pro) showcase professional-quality tracks 一 providing insights into how seasoned producers achieve their sound.
By using these files, you can see firsthand how to manage audio levels effectively and avoid the pitfalls of audio clipping.
This can elevate your music production skills and help you create tracks that resonate with clarity and quality.
Whether you’re a beginner or a seasoned pro, integrating these project files into your workflow can be a game-changer in your journey to mastering what is audio clipping.
Plus, will help you produce chart-topping tracks with zero audio clipping, of course.
Until next time…


Leave a Reply
You must belogged in to post a comment.