FL Studio arguably has the best piano roll out of all other DAWs when it comes to flexibility, user-friendly design, and the number of features it offers.
It can handle everything from basic note placement to complex automation 一 helping you create professional-grade tracks with ease.
Plus, it allows you to tweak, perfect and even generate your melodies, chords, and patterns like a true professional.
That’s why we’re breaking down absolutely everything you need to know about the FL Studio Piano Roll, like:
- Navigating the Piano Roll interface ✓
- Loading and playing instruments ✓
- Drawing and editing notes ✓
- Using the Paint Tool, Select Tool, and Slice Tool ✓
- Understanding the grid and quantization ✓
- Advanced note manipulation (not just add notes/select notes) ✓
- Humanizing your MIDI patterns ✓
- Vertical lines vs horizontal lines ✓
- Automating parameters and applying effects ✓
- Importing and exporting MIDI files ✓
- Leveraging ghost notes and slide notes ✓
- Tips and tricks for efficient workflow ✓
- Why it stands out over all other piano rolls ✓
- Much more ✓
After reading this article, you’ll know everything about the FL Studio Piano Roll; from the most basic functions to advanced techniques.
All with specific details, in-depth breakdowns, and pro tips along the way.
This way, you can work faster, make sure your tracks sound polished, and be able to experiment with new ideas and creative possibilities all day long.
So, let’s dive in…
Table of Contents
What is the FL Studio Piano Roll?
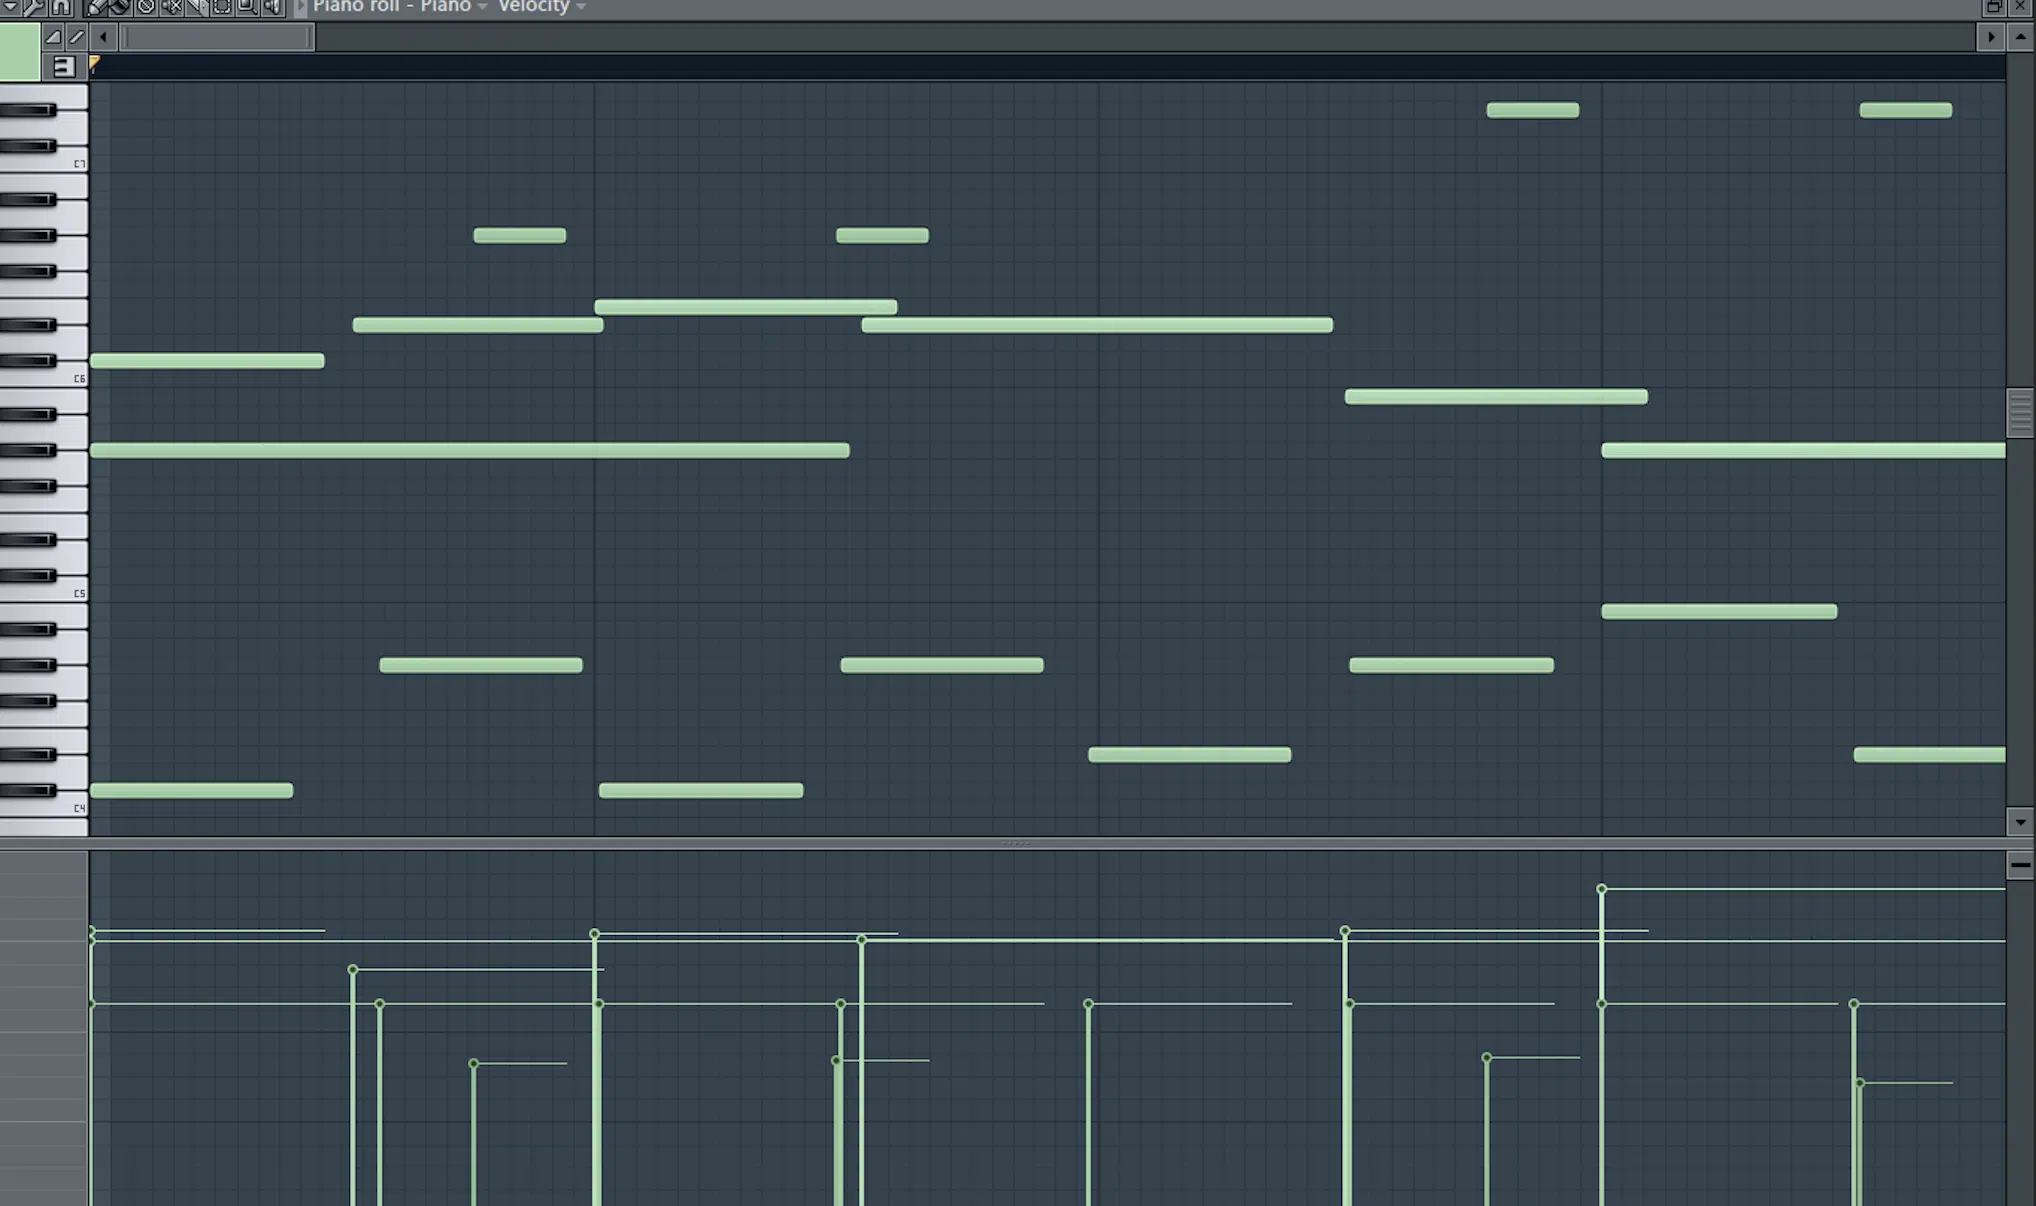
The FL Studio Piano Roll plays a huge role when it comes to having full control over every note and sound in your music.
Whether you’re laying down intricate melodies, building complex chords, or tweaking the smallest details in your MIDI, the piano roll has all the tools you need.
With its grid system and versatile editing options, you can shape your sound with precision 一 making sure each element fits perfectly in your mix.
If you’re serious about music production, the FL Studio piano roll is going to seriously blow your mind and help you perfect your creative process.
We’ll be breaking down everything throughout this article, so buckle in.
Getting Started with the FL Studio Piano Roll
To really understand and take advantage of the power of the FL Studio Piano Roll, you need to get comfortable with the basics. Let’s start by exploring how to navigate (and master) the interface and load up some instruments.
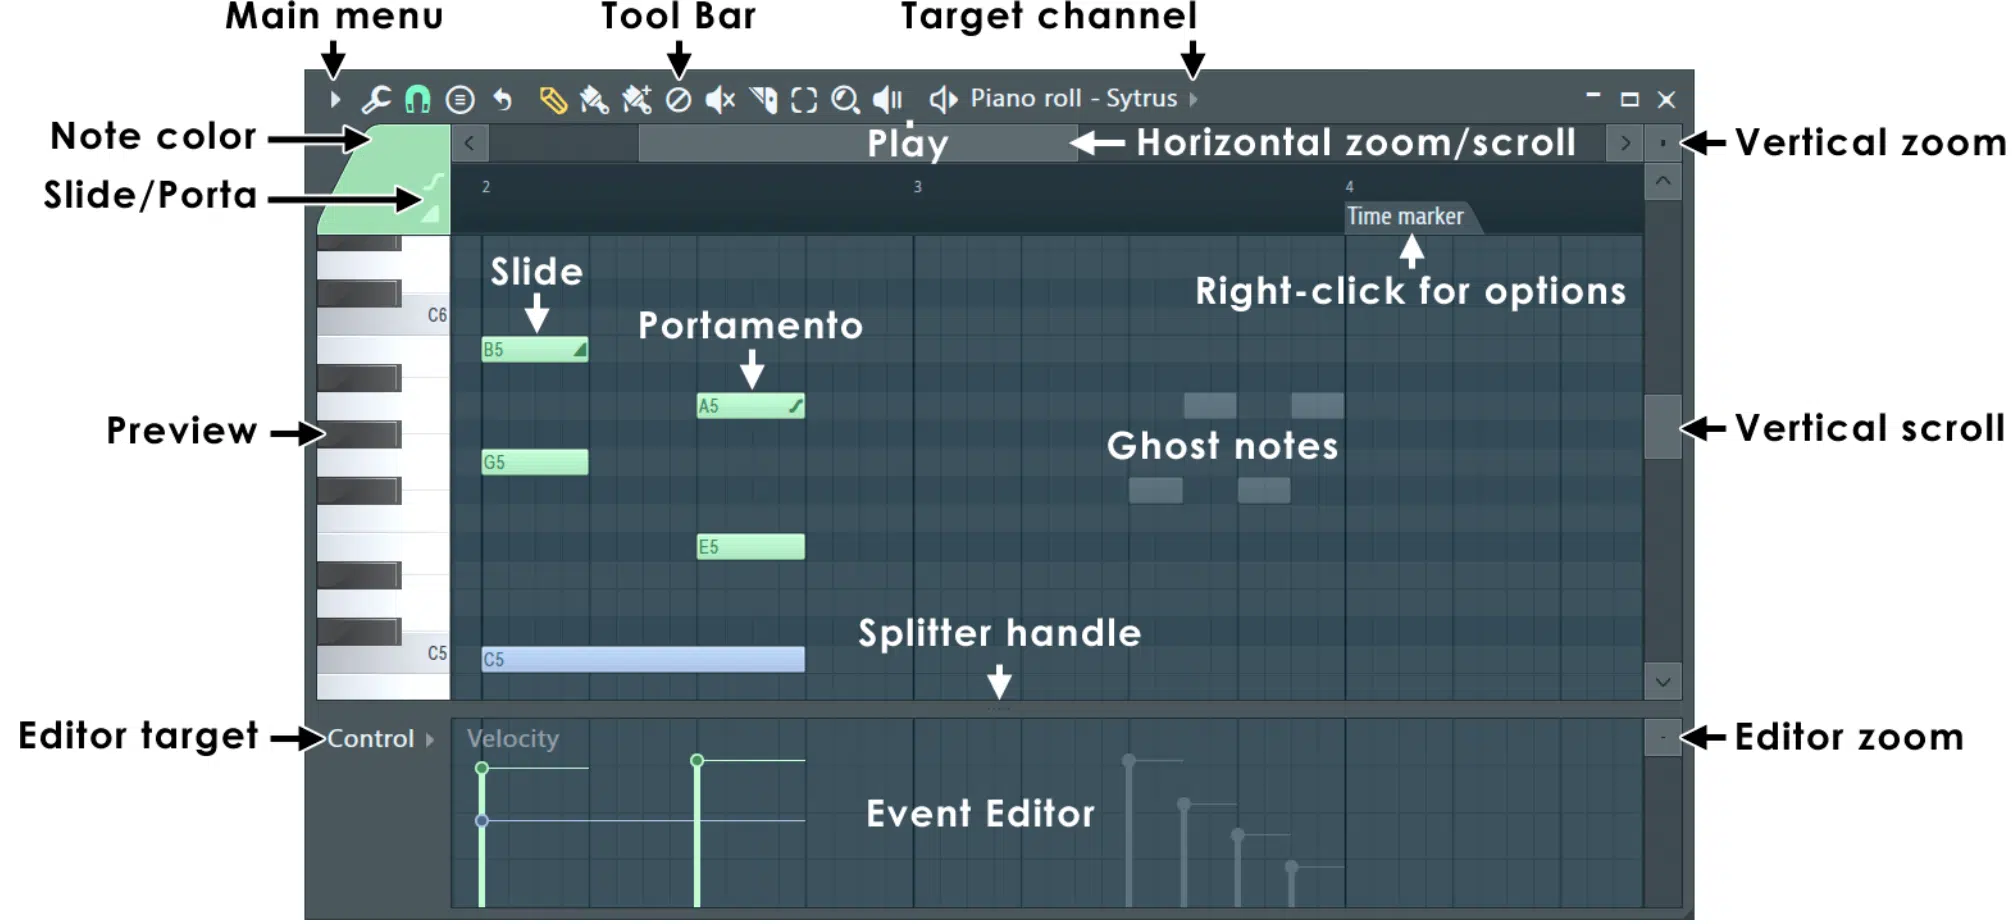
When you first open the FL Studio Piano Roll, you’ll see a grid that might look complicated, but it’s designed to make your life much easier.
Yes, it can be extremely complicated since it has the most features and unique functions you can find in any DAW’s piano roll…
However, these features are mostly hidden and tucked away in sub-menus, which makes it operate as simply and bare-bones as you’d like.
The grid is your workspace where you’ll draw, edit, and perfect your notes 一 along with all the additional information they can contain.
On the left side of the screen, there’s a list of MIDI channels.
This is where you’ll easily switch between different instruments or sounds you’ve loaded into your project.
The upper left corner of the Piano Roll features a menu that gives you access to key tools like:
- Quantization
- Scale highlighting
- Snapping settings
These are super important when it comes to keeping your notes in time and key, as well as for accessing the advanced functionality that makes FL’s Piano Roll so special.
The grid itself is very traditional, divided by vertical line (vertical axis) and horizontal line (horizontal axis) variations that represent pitch and time.
This way, you can visually map out your melodies and rhythms.
As you get familiar with the layout, you’ll find it’s designed to match your unique workflow so you can focus more on creativity and less on navigation (which is great).
Pro Tip
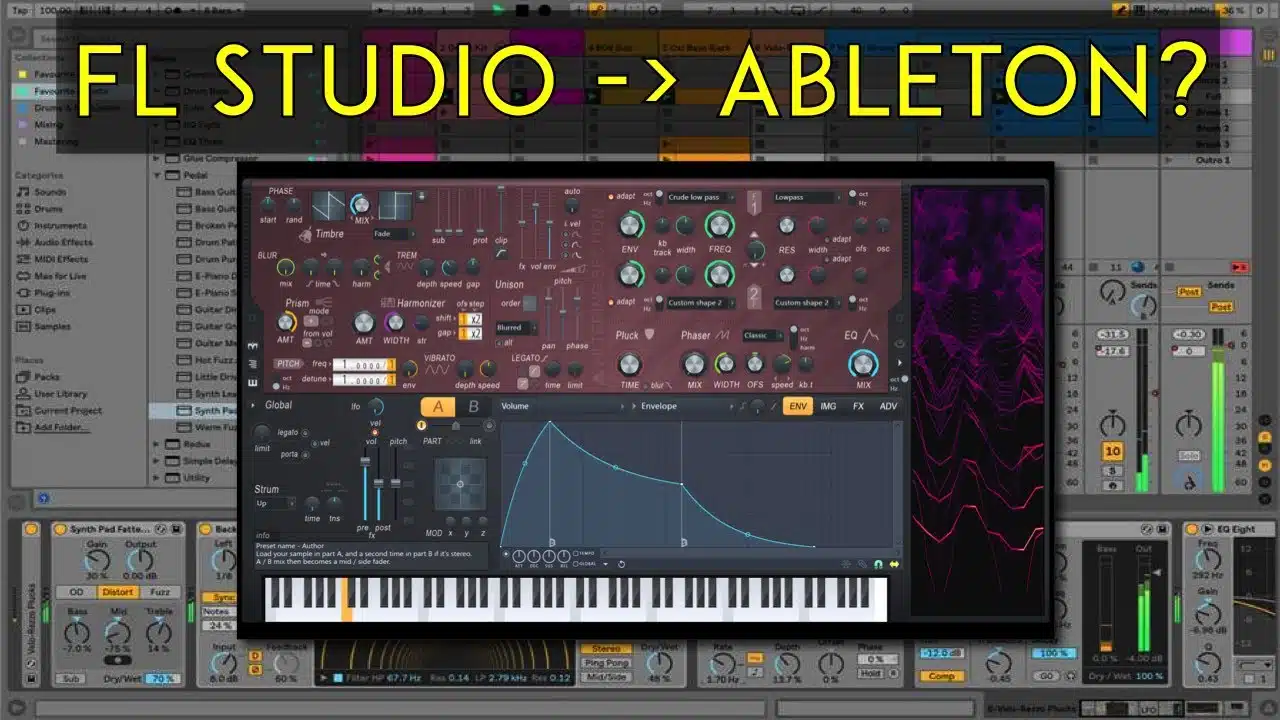
FL’s Piano Roll is so legendary that many professional producers use it in conjunction with their favorite DAW.
How is this done?… Well, Image-Line, knowing the value of their Piano Roll, has made a VST/AU plugin version of FL Studio.
It lets you load FL Studio into any DAW and use the Piano Roll just as you would in FL Studio (pretty cool, right?).
This doesn’t only apply to the Piano Roll as the plugin loads FL Studio as a whole, which makes it possible to create a hybrid DAW approach to your production.
It also allows you to use some of FL’s great plugins and instruments anywhere! It’s truly incredible.
-
Loading and Playing Instruments in the Piano Roll
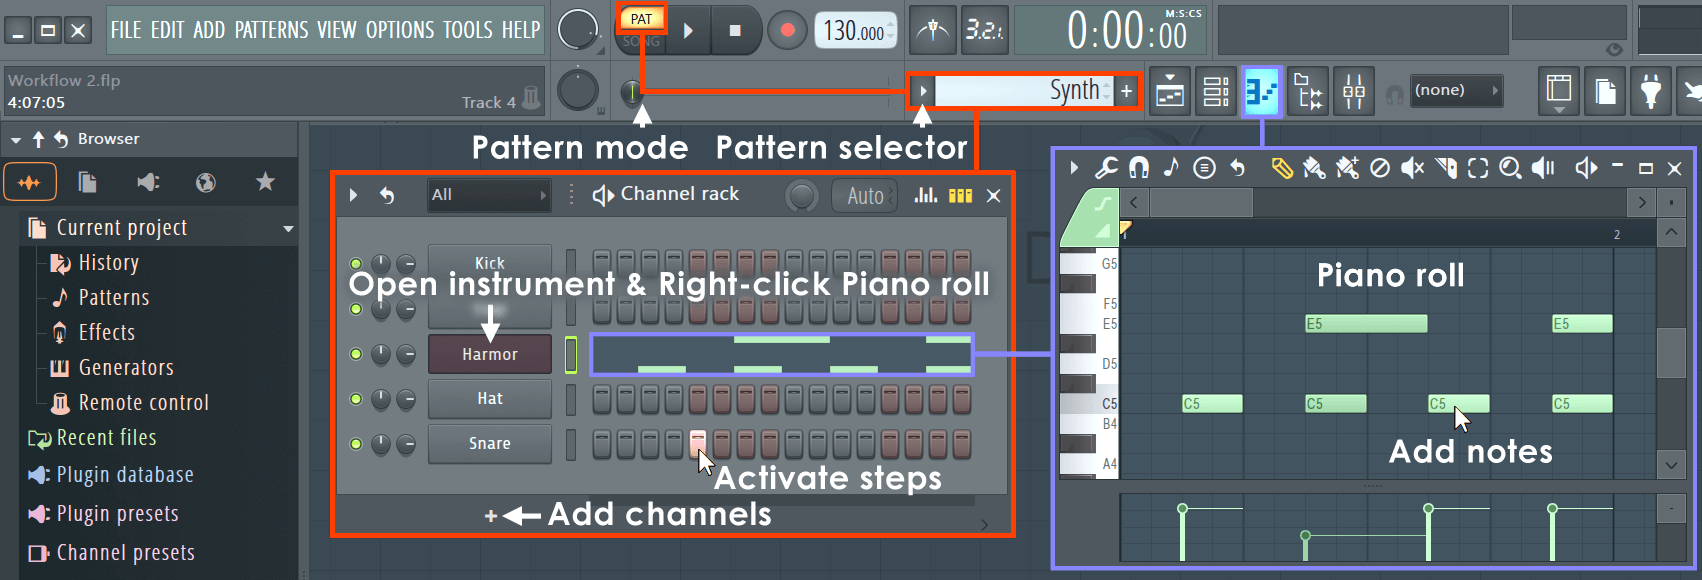
Getting started with the FL Studio Piano Roll means loading up your instruments so you can get to what matters: creating your own unique sound.
You can easily load an instrument by selecting a track from the channel rack, and it’s now linked to the Piano Roll.
Once your instrument is loaded, you’re ready to start adding notes…
Simply play or click within the grid to place a note, and you’ll instantly hear the produced sound.
The Piano Roll is designed to let you preview notes quickly 一 just hover and double click on a note to hear how it fits into your track.
If you’re working with multiple instruments, FL Studio makes it easy to switch between MIDI channels and different instrument tracks within the same Piano Roll.
This is perfect for layering sounds all day long.
The flexibility it brings means you can build complex arrangements without needing to jump between different windows so you can stay in the zone.
Basic Functions and Tools
Once you’ve got your instruments loaded, you’ll use the following core functions to help you shape your sound, whether you’re sketching out a quick idea or tweaking a complex arrangement. So, let’s break it down.
-
Drawing and Editing Notes
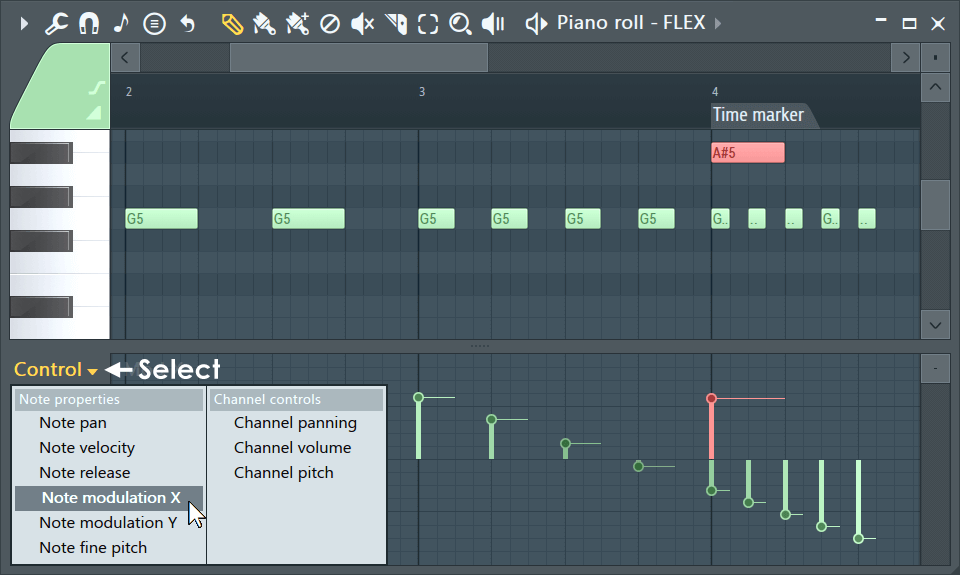
When it comes to drawing notes in the FL Studio Piano Roll, it’s really as simple as clicking on the grid and getting down to business.
Each note you place represents a specific pitch and note length, which you can adjust by dragging the edges of the note horizontally.
For example, if you’re creating a bassline, you might start by drawing longer notes to hold the groove.
A melody on the other hand might require shorter, staccato notes for a more rhythmic feel (it’s all about your end goal, of course).
Adjusting note pitch is just as easy 一 you can move the notes up or down on the grid to change the pitch, allowing you to experiment with different melodies on the fly.
To edit your notes further, right-click on a note to delete it or use the select tool to highlight and move multiple notes at once.
This way you can quickly tweak your ideas so you can make sure that every note in your track sounds exactly the way you want it.
NOTE: If you need to make more precise adjustments, the FL Studio Piano Roll also offers tools to fine-tune note velocity, giving you control over the intensity of each sound.
-
Using the Paint Tool, Select Tool, and Slice Tool
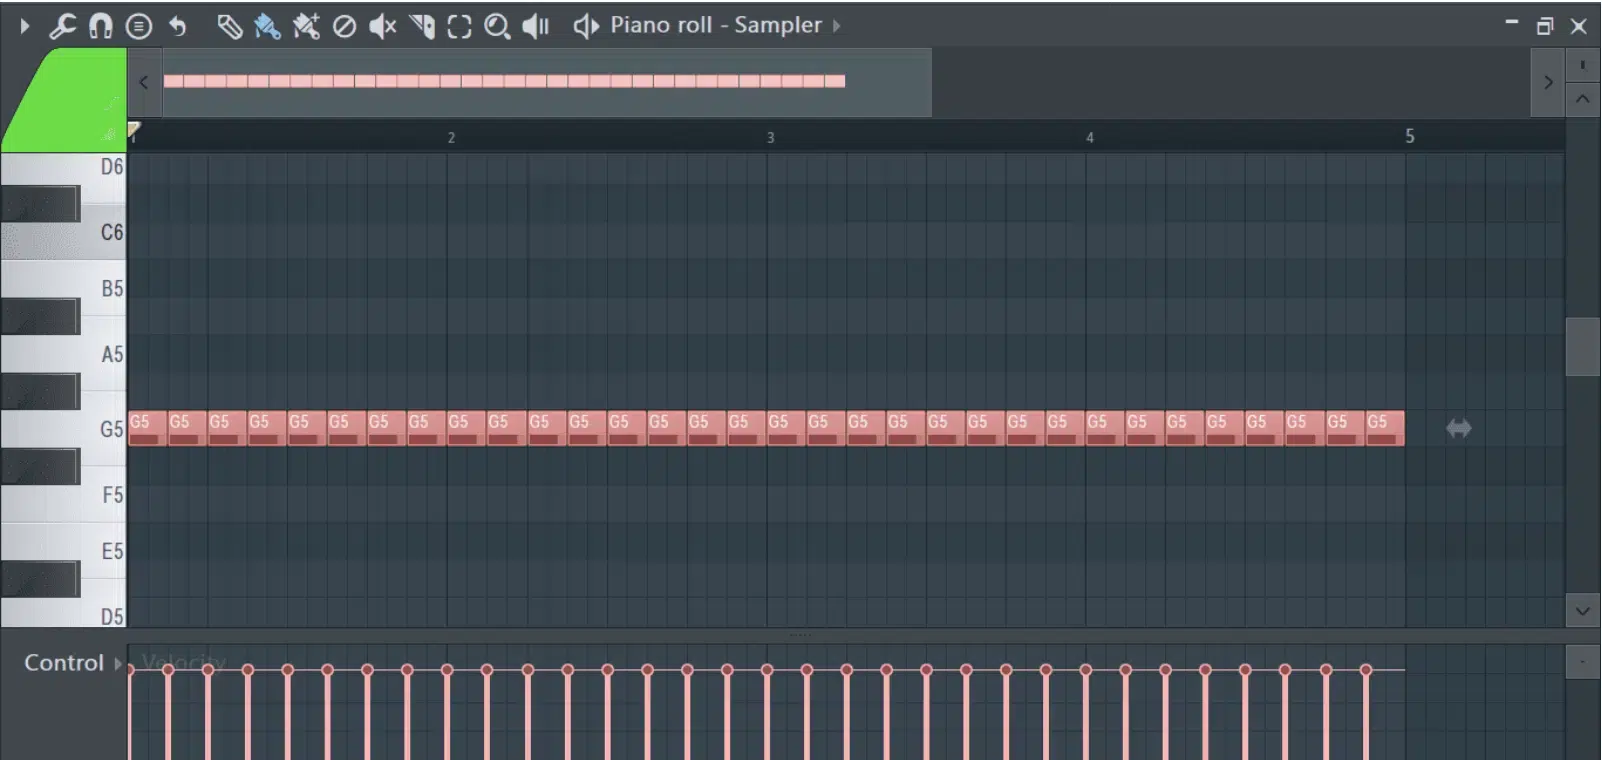
The Paint Tool is an incredibly versatile feature in the FL Studio Piano Roll.
It allows you to quickly draw and repeat notes across the grid, which is great when you’re working on repetitive patterns like hi-hats or arpeggios.
For example, if you’re creating a rapid snare roll, you can drag the Paint Tool across the grid to instantly lay down a series of evenly spaced notes.
You can then take it further with a few other tools that allow you to compress or expand the distance between these evenly spaced notes.
Yes, even in multiple musical time marker intervals of your choice 一 creating some unique snare and hi-hat rolls.
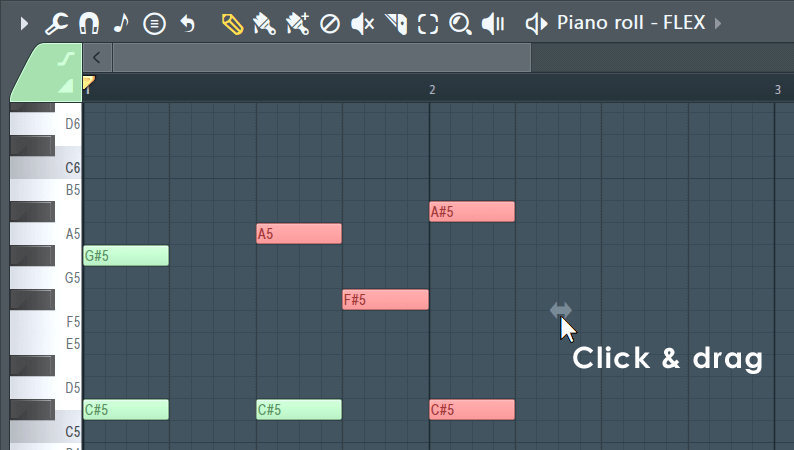
The Select Tool comes in handy when you need to make broader edits, such as moving an entire chord progression or shifting a melody to a different part of the track.
With the Select Tool, you can highlight multiple notes and then drag them to a new position or copy and paste them to create variations.
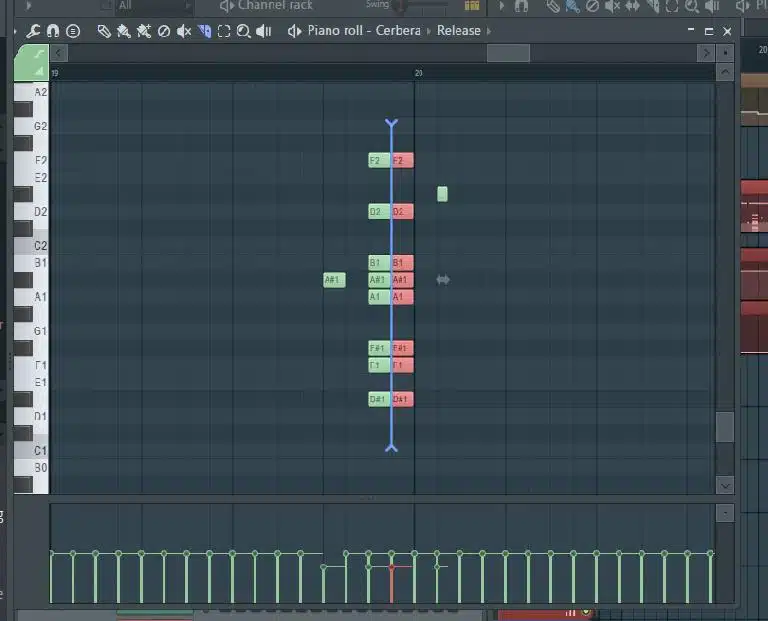
The Slice Tool is your go-to for more advanced edits…
It allows you to cut notes into smaller segments, which is perfect for creating intricate rhythms or adjusting note length without having to redraw the entire pattern.
A really cool thing about this is it gives you options to slice, just like how you would create a roll with the Paint Tool.
Meaning, you’ll get multiple repeating slices in musical time intervals with just a swipe of your mouse (which is awesome).
NOTE: All of these tools can be accessed quickly from the menu or by using keyboard shortcuts for a faster and more efficient workflow in the FL Studio Piano Roll environment. If you want to learn all about FL Studio shortcuts, we’ve got you covered.
-
Understanding the Grid and Quantization
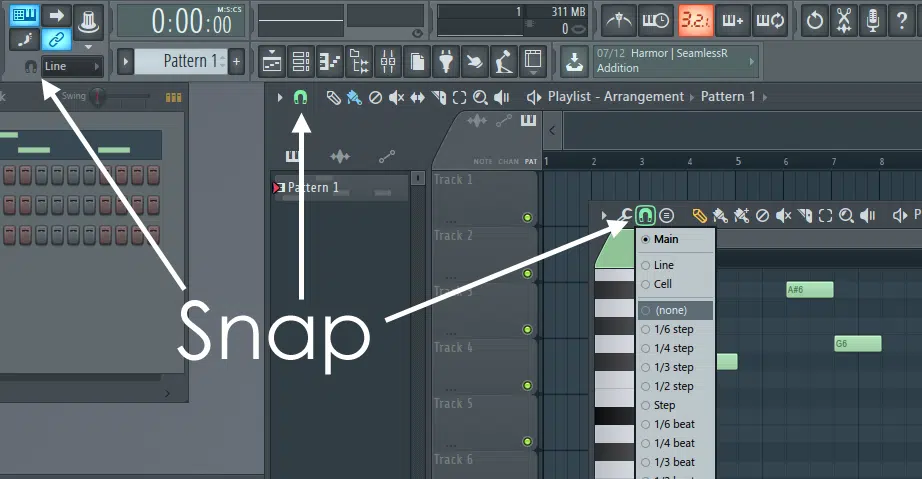
The grid in the FL Studio Piano Roll is your best friend when it comes to keeping your notes in time, divided into:
- Beats
- Measures
It helps you visually align your notes with the tempo of your track.
For example, if you’re working on a house beat, you’ll likely place your kick drum on the first beat of each measure 一 using the grid to ensure perfect timing.
The Quantize feature further enhances this by snapping your notes to the nearest beat or division of a beat, which is key for keeping your track tight and rhythmically accurate.
You can customize the grid to fit various time signatures or note values.
This makes it easier to create complex rhythms or switch between different scales (minor scales/major scales).
For those moments when you want to break away from rigid timing, you can adjust the grid settings or turn off quantization to allow for more human-like timing in your melodies.
You can also change these values anytime, having selected notes quantized to specific values while others remain at different values or even with no quantization at all.
Whether you’re locking in a drum pattern or experimenting with note length, the grid and quantization tools in the FL Studio Piano Roll ensure that your notes always fall exactly where they need to be.
Pro Tip
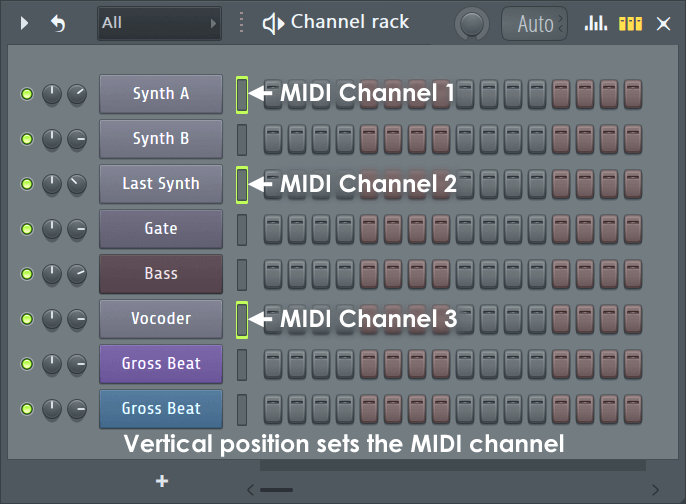
Don’t forget that FL Studio also has its unique step sequencer, traditionally found in hardware sequencers, which is intimately intertwined with the Piano Roll.
This way you can use both in conjunction and switch back and forth seamlessly, as anything input into the step sequencer will instantly show up in its appropriate place on the grid.o
It’s awesome because you can manipulate things in a way that you wouldn’t be able to access through traditional step-sequencing.
This makes it a true hybrid approach.
Advanced Editing Techniques
Once you’ve mastered the basics, it’s time to explore some of the more advanced editing techniques that the FL Studio Piano Roll offers. These features will allow you to refine your compositions and add complexity to your tracks, making them truly stand out.
-
Advanced Note Manipulation
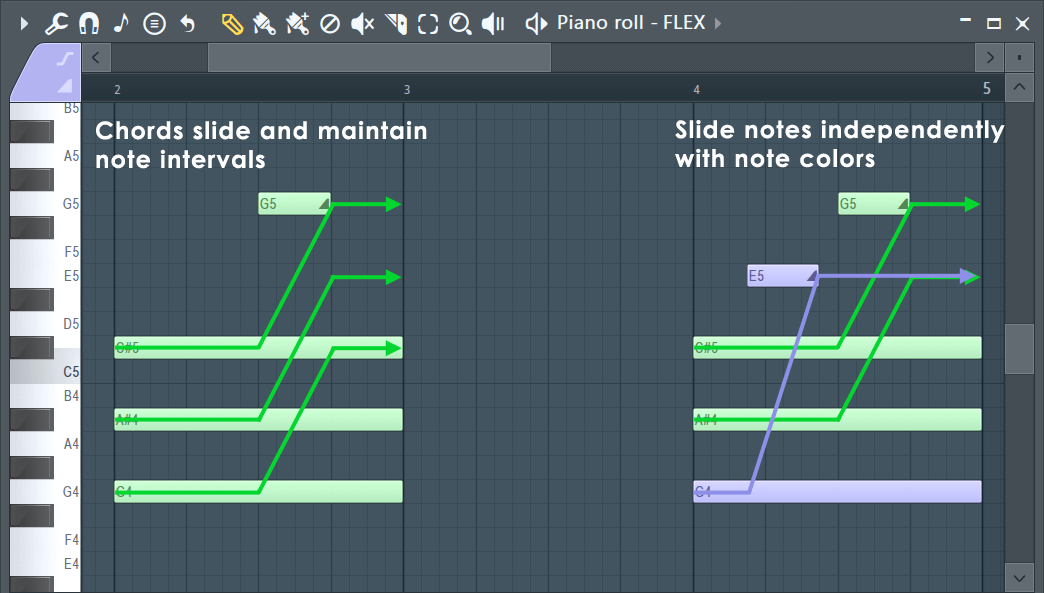
The FL Studio Piano Roll gives you powerful tools to manipulate notes beyond just placing them on the grid.
One of the most creative and useful features is slide notes, which allow you to create smooth transitions between pitches.
For example, if you’re working on an 808 line, you can use slide notes to create glides quickly and flawlessly slide from one pitch to another.
It adds unique expression and complexity to your 808 pattern 一 something that would traditionally require other means and workarounds.
Another advanced technique is ghost notes…
These are notes from other patterns, usually on entirely different tracks, that can appear, (when enabled of course) faintly in the Piano Roll.
Ghost notes help you align your new notes with existing melodies or chords without having to switch back and forth between patterns.
This feature is a game-changer when you’re layering different sounds or trying to create harmonies and/or counter-melodies that fit perfectly with the rest of your track.
With these advanced editing tools, the FL Studio Piano Roll becomes a place where you can fully express your musical ideas with a more optimized workflow than you’ll find in almost any other DAW.
Honestly, non-FL users (or those who are not even fans of the software) often envy its Piano Roll, so don’t underestimate it.
-
Using the Stamp Tool
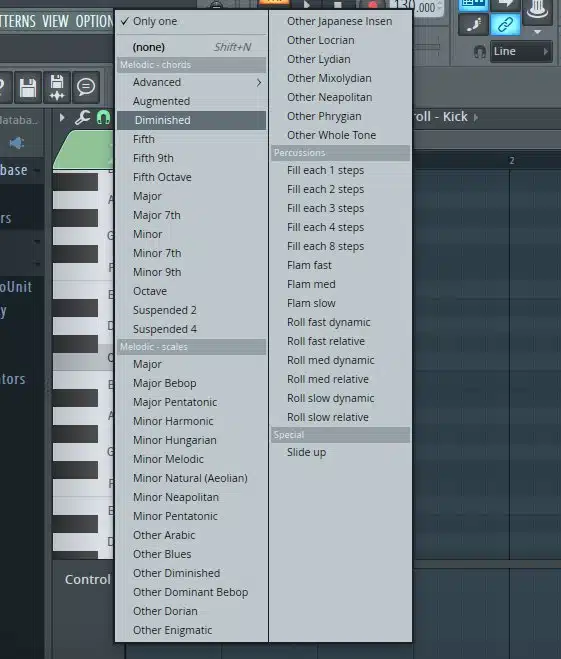
If you’re looking to create complex chords or patterns on the fly, the Stamp Tool in the FL Studio Piano Roll is invaluable.
The Stamp Tool allows you to automatically generate chords by selecting a root note and a chord type from the menu.
For example, if you want to lay down a minor seventh chord, simply choose the minor seventh option and click on the root note.
Then, the FL Studio Piano Roll will generate the chord for you, easy peasy.
This is perfect for speeding up your workflow, especially if you’re experimenting with different chords and want to hear how they sound in context.
Or, if you don’t have much experience with music theory.
Think of it as creating progressions with predefined puzzle pieces that you already know will be in key, so you don’t have to worry about sounding like an amateur.
The Stamp Tool lets you choose from a variety of scales and chord progressions that you can then stamp onto the grid.
Let’s say you’re working in a minor key and want to add a melody that fits perfectly within the scale…
You can use the Stamp Tool in the FL Studio piano roll to place notes that adhere to the selected scale.
This not only ensures that your melodies are in key, but it also opens up creative possibilities by allowing you to explore different harmonic ideas quickly.
NOTE: The Stamp Tool is accessible from the Piano Roll’s menu and can be used in conjunction with other editing tools to refine and enhance your note patterns.
-
Exploring the New Chord Generator
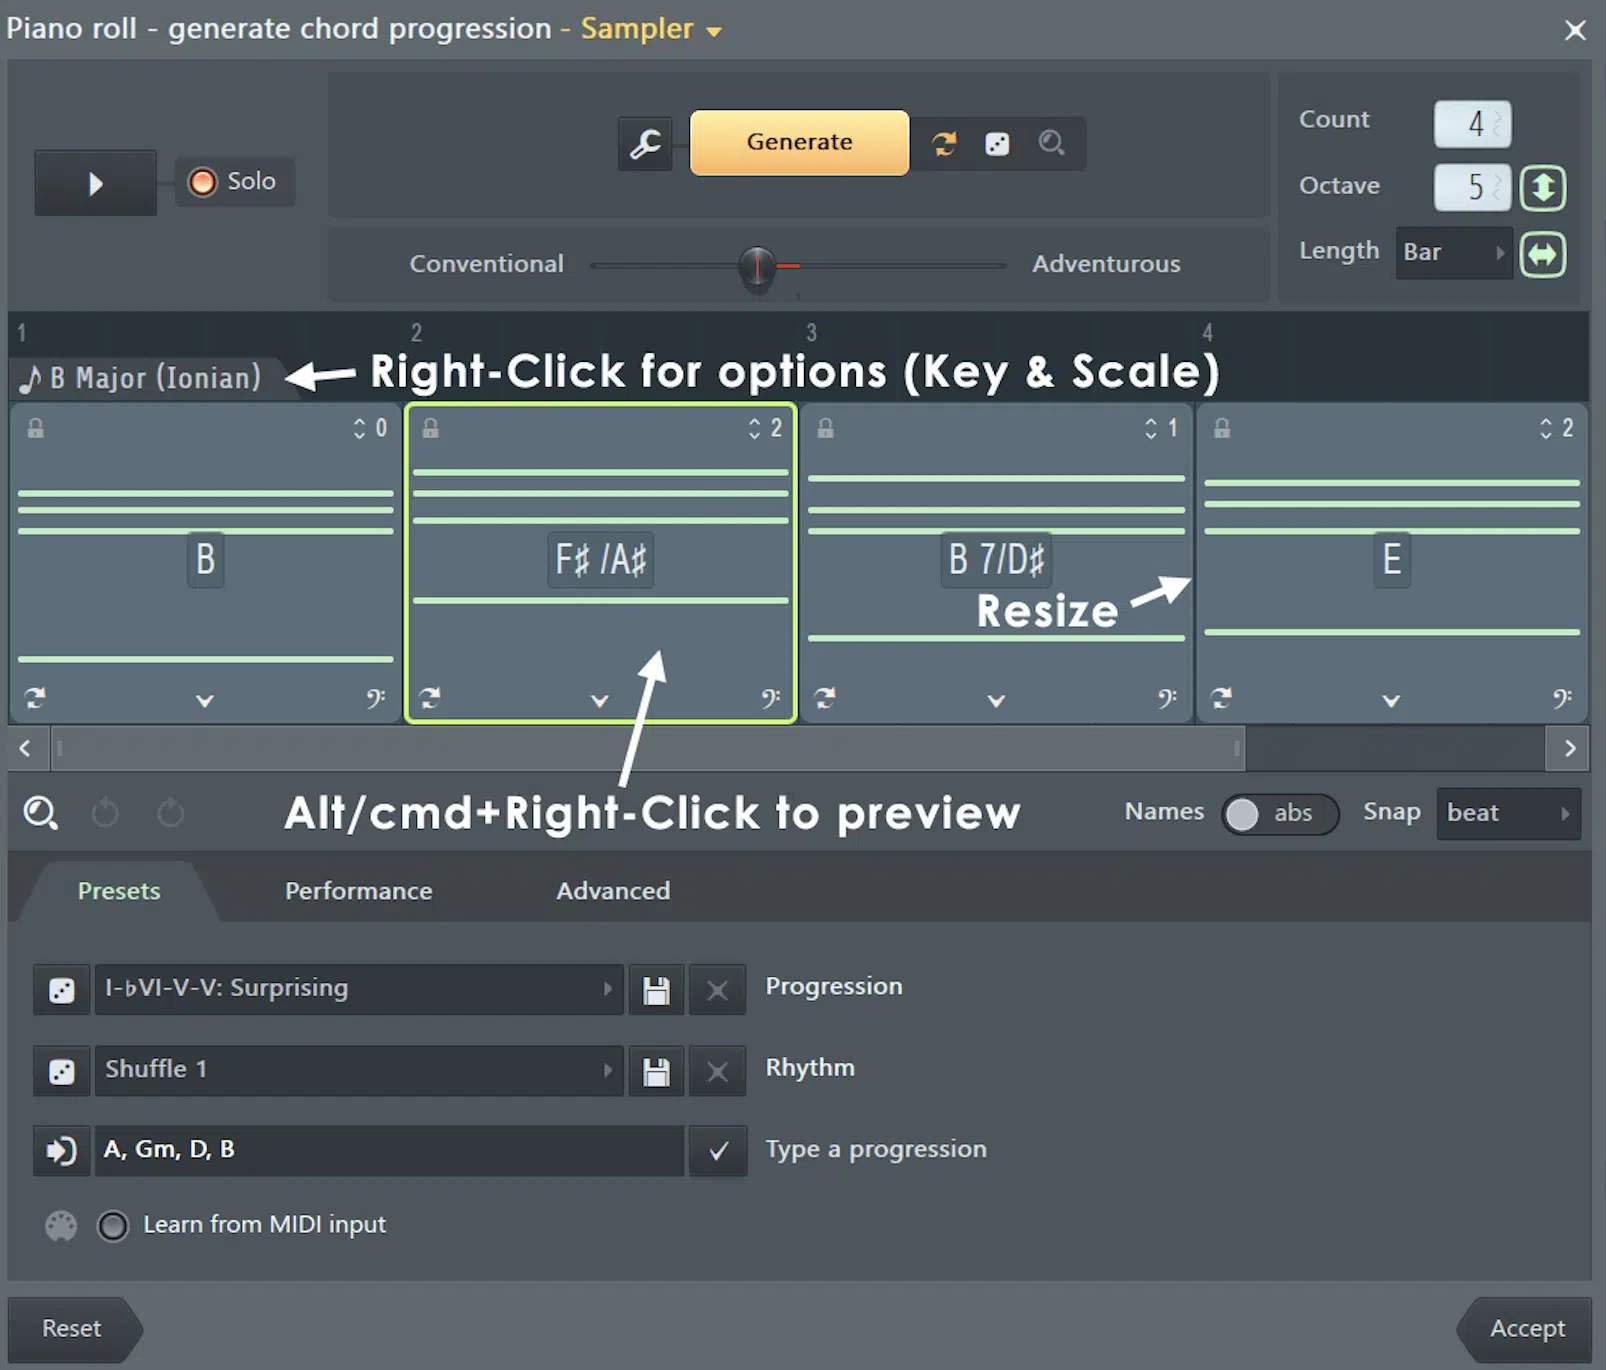
The latest addition to the FL Studio Piano Roll is the Chord Generator, a powerful tool designed to make chord creation even easier and more intuitive.
Unlike the Stamp Tool, which offers predefined chords, the Chord Generator allows you to customize and experiment with chord structures in real-time.
You can select notes (a root note, specifically), choose from various chord types, and then tweak additional parameters like:
This gives you full control over the harmonic content of your track and is super useful because chord progressions can set your track apart.
Whether you’re laying down a moody trap beat or an uplifting pop chorus, the Chord Generator provides endless possibilities for creating fresh, modern sounds.
With its intuitive interface and deep customization options, the Chord Generator is quickly becoming a fav for those looking to push the boundaries of their music in the FL Studio piano roll.
-
Humanizing Your MIDI Patterns
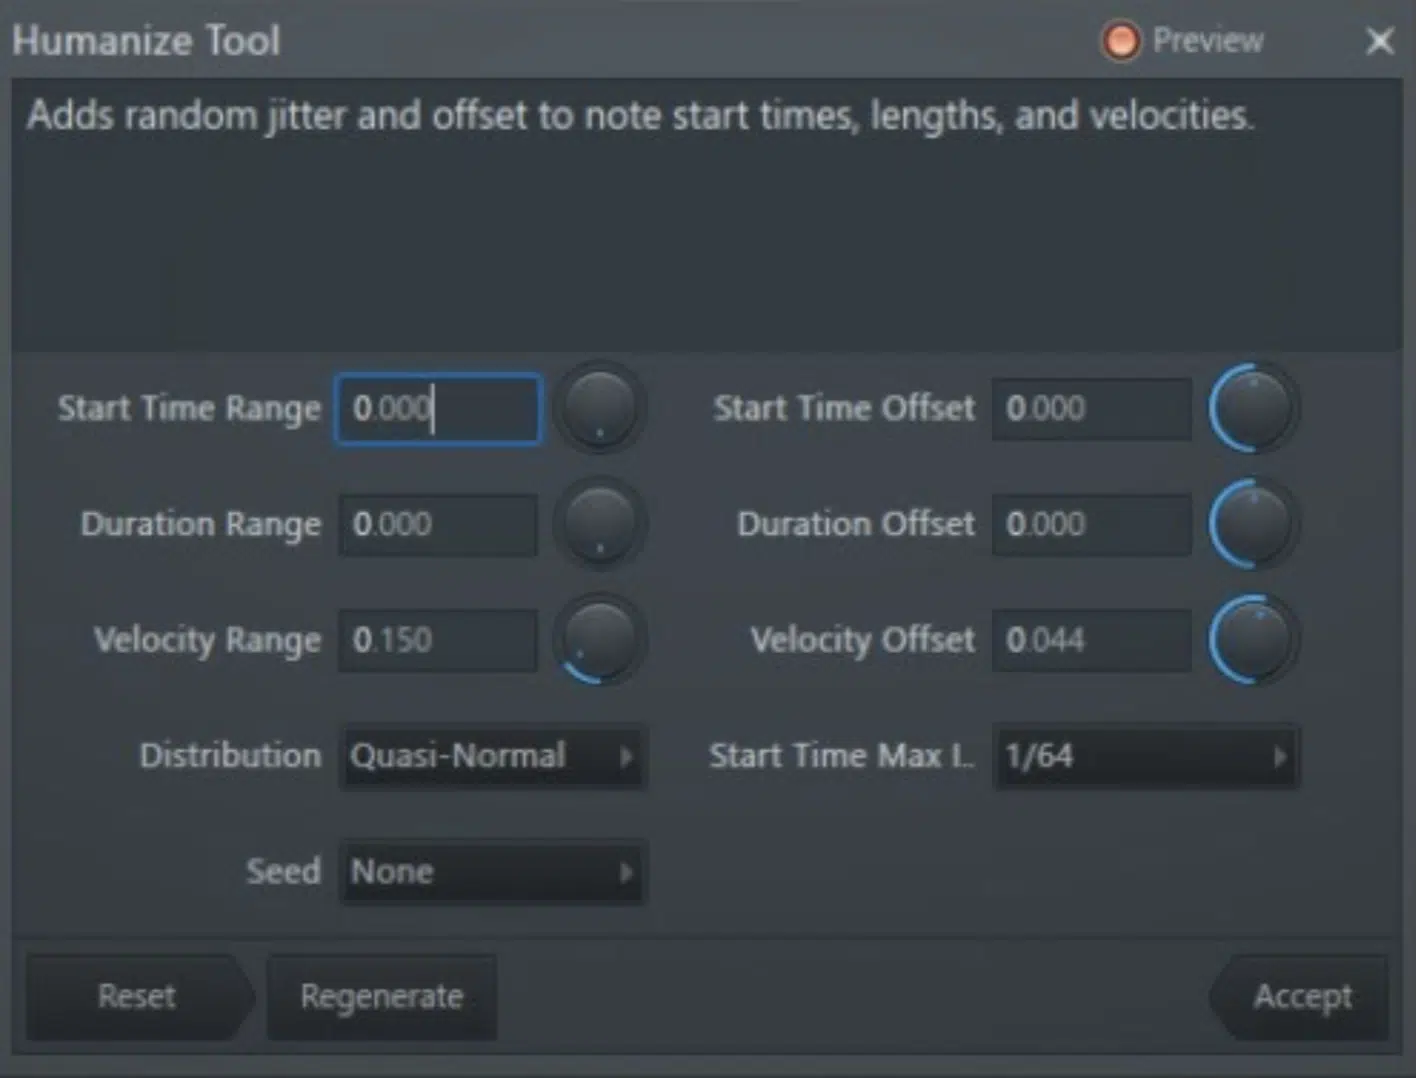
One of the major challenges in digital music production, especially when composing using MIDI, is avoiding the overly mechanical feel that can come from perfectly quantized MIDI patterns.
The FL Studio Piano Roll offers several features to help you “humanize” your MIDI data/MIDI note data automatically by simply enabling the Humanizer.
It alters the velocity and timing of the notes in a “human” way, as if every note was played by hand (none of that robotic vibes happening).
You can scale how much humanization you want and even enable velocity and timing humanization independently.
Traditionally, you would have to start doing this manually by adjusting the velocity and timing of individual notes 一 slightly varying the note velocity and shifting the notes off the grid ever so slightly.
This makes a big difference in how your track feels and is perceived by the human ear, especially when dealing with instruments like piano or strings.
Another technique is to use the Note Randomization tool, which can subtly shift the timing and note length of your notes played to mimic the natural variations that occur when playing live.
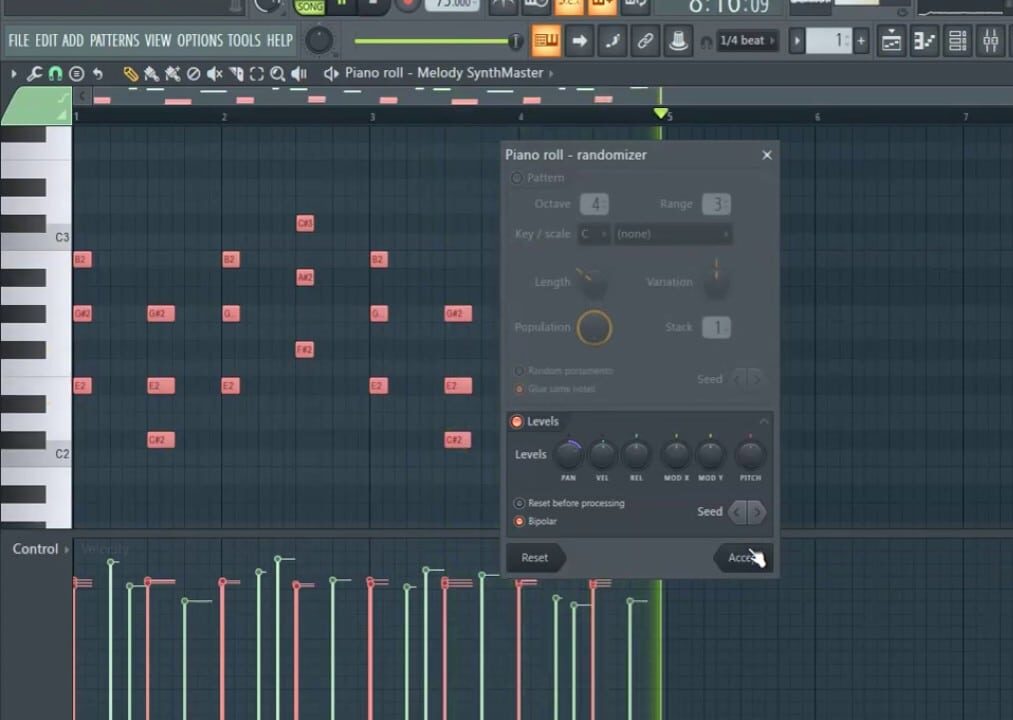
It also does much more as it can randomize a wide range of note properties, which I really love.
For example, if you’re working on a drum pattern, applying a slight randomization to the notes can make the beat feel more natural.
Just like it was played by a drummer rather than programmed.
You can also experiment with the Shift key in the FL Studio piano roll to nudge a single note/multiple notes slightly off the grid 一 adding a bit of swing or groove to your patterns.
These techniques, when used correctly, can transform your MIDI patterns from rigid and mechanical to super lively and expressive.
It will give your music a cleaner, more professional sound.
NOTE: While both the Humanizer and Randomization tools can be used to achieve similar effects, they serve slightly different purposes. The Humanizer tool is specifically designed to alter/play notes in a way that mimics human playing, while the Randomization tool is more of a purely random process that can have different results depending on what you’re aiming for. Both tools can produce great, but different, results depending on the context.
Automation and Effects
Adding automation and effects directly within the FL Studio Piano Roll can take your tracks to a whole new level. They let you create dynamic changes over time so your music is more engaging and professional. So, let’s get into it.
-
Automating Parameters within the FL Studio Piano Roll
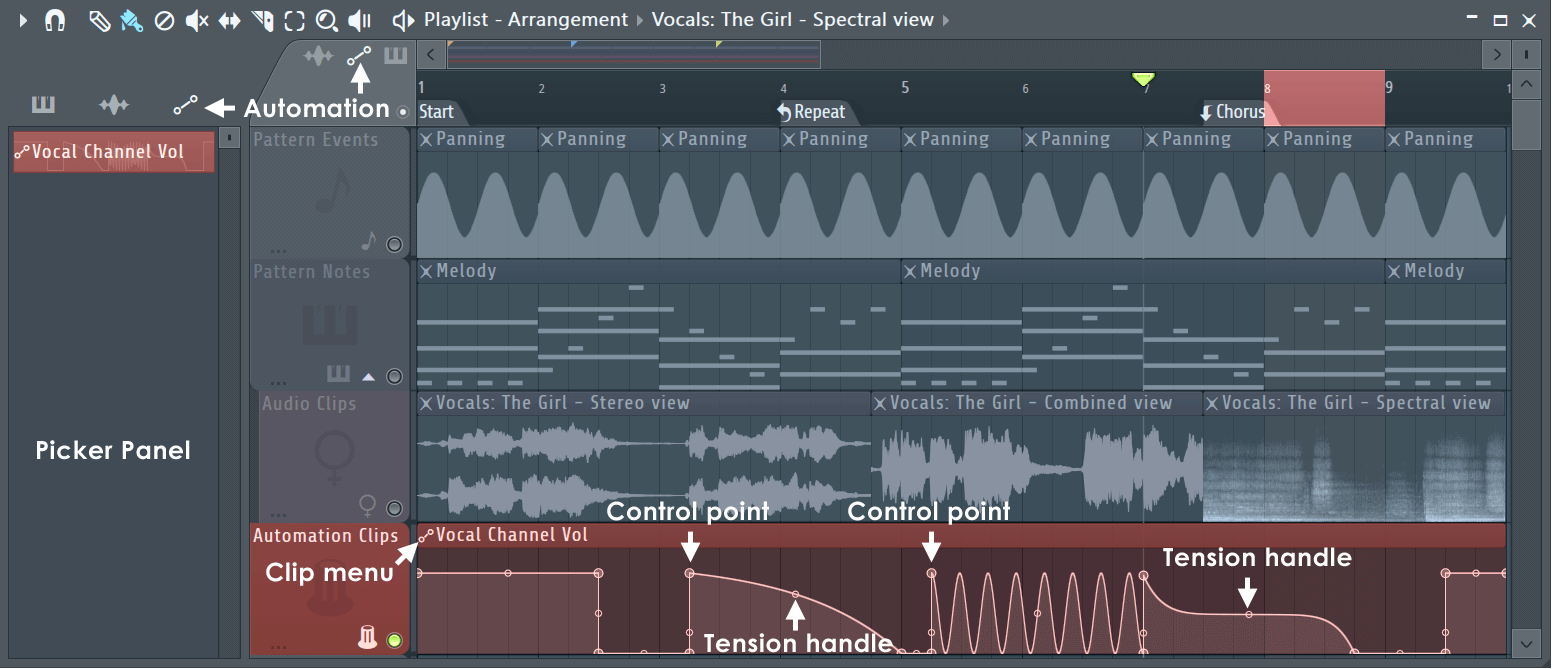
Automation is one of the most powerful aspects of music production, and the FL Studio Piano Roll makes it easy to implement.
You can, directly within the piano roll, automate virtually any parameter, like:
- Volume
- Panning
- The cutoff frequency of a synth
- Any accessible MIDI CC within a given plugin
For example, if you want a filter to gradually open up over the course of a drop, you can draw a custom automation curve that controls the filter’s cutoff.
This will make the transition smooth and dynamic.
To add automation, right-click on the parameter you want to automate and select “Create Automation Clip,” which allows you to draw the curve within the Piano Roll or playlist view.
This feature is super useful when working with evolving soundscapes or intricate melodies that require precise control over how they develop over time.
You can also automate note pitch to create pitch bends within a melody, adding extra expressiveness to your tracks.
With automation, the possibilities are endless, and the FL Studio Piano Roll gives you the tools to bring your creative vision to life.
Pro Tip
The FL Studio piano roll lets you create automation clips that can be tied to any parameter, but it also allows you to freely move these clips anywhere within the grid (shown above). This means you’re not locked into keeping the automation exactly where it was created, giving you more flexibility when you’re arranging your automation curves to fit your track.
Bonus: Generative Arps, Sequences & Random “Riffs” in the FL Studio Piano Roll
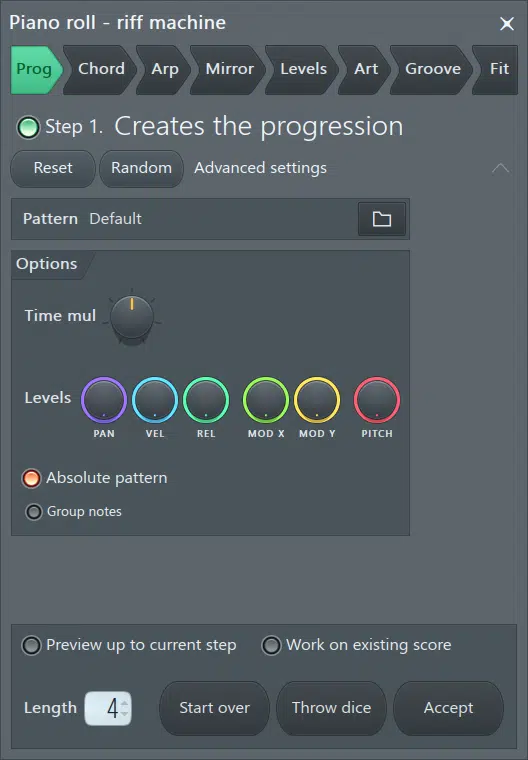
The FL Studio Piano Roll includes some powerful tools for generating creative, unpredictable patterns.
This is a true game-changer when you’re looking for inspiration or trying to break out of beat block.
One of these tools is the Riff Machine, which can (based on your input) automatically generate:
- Arpeggios
- Sequences
- Even random riffs
To use the Riff Machine, simply select a pattern in the Piano Roll and access it from the Tools menu.
From here, you can tweak various settings like scale, note length, and rhythm to create patterns that range from subtle variations to completely random sequences.
This is super useful for creating background textures or adding complexity to your tracks without spending hours manually programming each note.
NOTE: The Riff Machine is not only a great tool for generating ideas, but it also helps you explore new musical directions that you might not have considered, making it a must-use feature for any producer looking to push their creative boundaries.
Pro Tip: Waveform Helper View
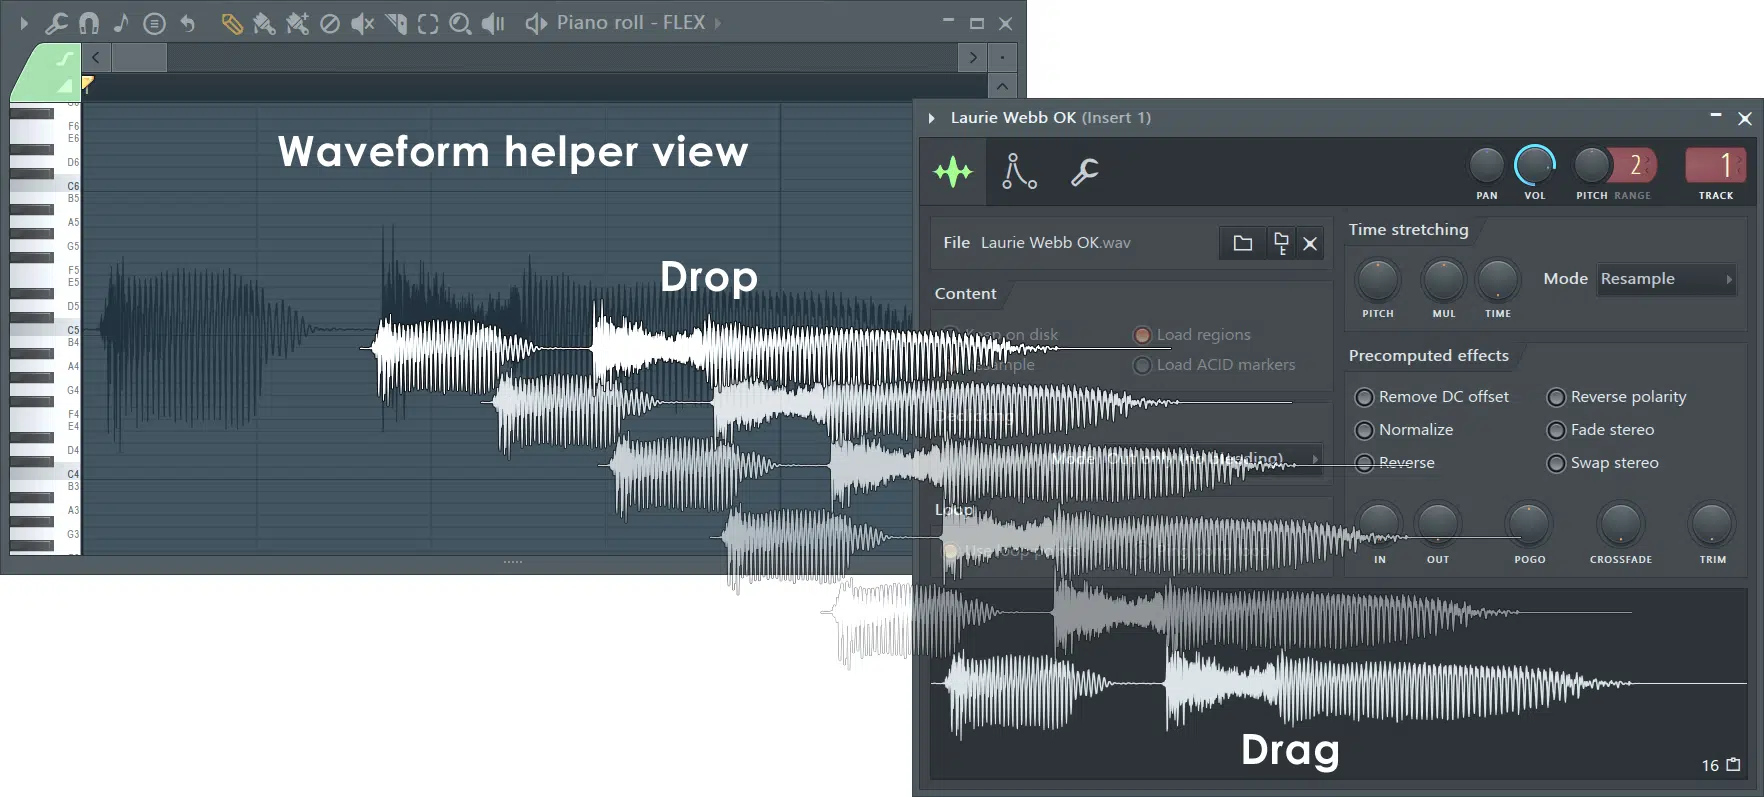
The Waveform Helper View is a lesser-known but incredibly useful feature in the FL Studio Piano Roll that allows you to see the waveform of your audio directly within the Piano Roll.
This is great when you’re working on a remix or when you want to match your MIDI notes to specific transients or beats in an audio sample.
To enable this view, simply drag an audio clip into the Piano Roll, and the waveform will appear in the background behind your notes.
This visual reference makes it easier to align your notes played with the rhythm and timing of the audio 一 ensuring that everything syncs perfectly.
Whether you’re matching notes to a vocal track or creating a melody that fits with a sampled drum loop, the Waveform Helper View provides a clear guide to help you achieve precise timing and alignment.
FL Studio Piano Roll: Final Thoughts
The FL Studio Piano Roll is, hands down, the greatest piano roll for any producer looking to take their music to the next level.
It can handle everything from the simplest of melodies to the most complex arrangements, giving you a level of control and flexibility that other DAWs can’t match.
Whatever you’re working on, the FL Studio Piano Roll can help you lay it down with precision and creativity every single time.
And now, after reading this article, you’ll be able to take advantage of the full potential of the FL Studio piano roll, making your tracks sound better than ever before.
To push your skills even further, you’ve got to check out the Unison Free Project Files.
These include 3 professional project files, all available in FL Studio, that break down exactly how to create professional-quality tracks from start to finish.
By studying these files, you can really enhance your own tracks and make sure they’re on par with the greats.
Each project was created by expert producers and sound designers 一 giving you access to truly invaluable insights and techniques and helping you to understand the piano roll even more.
Remember, every great producer started with the basics and built their skills over time, and there’s no limit to how far you can take things.
So, keep experimenting, keep learning, and most importantly, keep making music that you’re actually proud of with the FL Studio piano roll.
Until next time…


Leave a Reply
You must belogged in to post a comment.