In the world of music production, having a deep understanding of the tools and techniques at our disposal is crucial.
High-pass filters are one of those essential tools that can significantly impact your sound.
In this comprehensive guide, we’ll explore everything you need to know about high pass filters, covering topics such as:
- The basics of high pass filters & how they work ✓
- Cutoff frequency and its significance ✓
- Frequency response and phase shift ✓
- Implementing high pass filters in your workflow ✓
- Filter design and selection ✓
- Tips & tricks for using high pass filters like a boss ✓
So, get ready for an exciting deep dive into the world of high-pass filters and how they can revolutionize your music production.
We cover everything, in detail, so you won’t have any unanswered questions or feel like you’re missing something.
Let’s dive in…
Table of Contents
- What Are High-Pass Filters?
- How High-Pass Filters Work
- High-Pass vs. Low-Pass Filters
- The Cutoff Frequency
- Resonance
- Frequency Response & Phase Shift
- Linear phase EQ
- Using A High-Pass Filter When Mixing
- Using A High-Pass Filter In Sound Design & Synthesis
- Using A High-Pass Filter When Mastering
- Tips & Tricks for Using High-Pass Filters
- Final Thoughts
What Are High-Pass Filters?
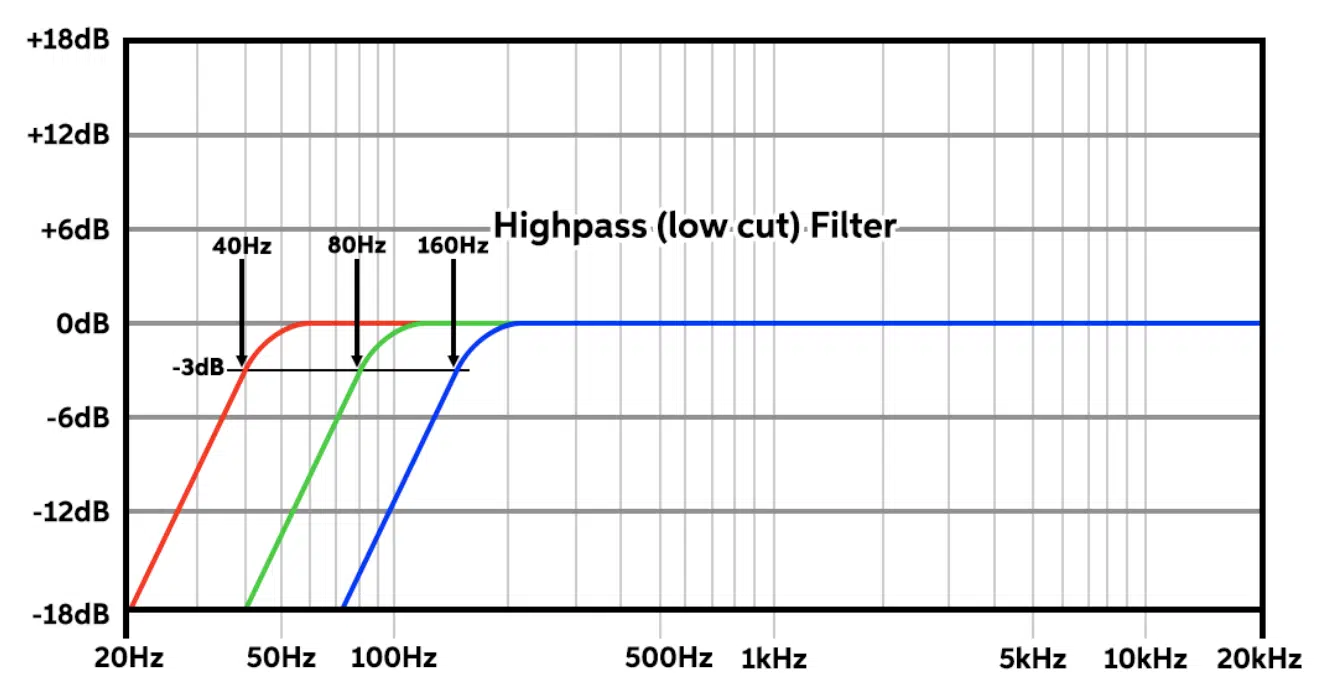
High-pass filters are a type of electronic filter that allows high-frequency signals to pass through while attenuating (reducing) low-frequency signals.
To avoid confusion, this is also known as “Low-Cut.”
They’re widely used in music production, audio processing, and image processing to eliminate unwanted low frequencies and enhance the overall sound quality.
Historically, we used a mix of passive and active filters, which is still true today through the use of analog equipment.
In the modern world, digital filters are most commonly used, and if you see a passive high pass filter and active high pass filter in the digital world, it would be of the analog-modeled variety.
The primary function of high-pass filters is to create a more refined audio output by focusing on the lower frequency components in a given audio signal, track, or mix.
By removing low-frequency noise, rumble, and other distractions, high-pass filters allow you to concentrate on the most important aspects of your sound.
One important thing to note is that high pass filters aren’t just limited to electronic music production.
They can be found in various applications, such as radio communication systems, where they help eliminate low-frequency interference.
As well as audio equipment (like speakers and microphones), which protect against potential damage from excessive low frequencies.
How High-Pass Filters Work
The basic principle behind high-pass filters is that they allow frequencies above a certain cutoff frequency point to pass through 一 while reducing the amplitude of frequencies below that point.
The key to understanding how high-pass filters work lies in the concept of the cutoff frequency.
This is the frequency at which the filter starts to take effect.
It serves as a boundary between the frequencies that are allowed to pass and those that are attenuated.
As you move further away from the cutoff frequency, the attenuation of the unwanted frequencies becomes more and more pronounced.
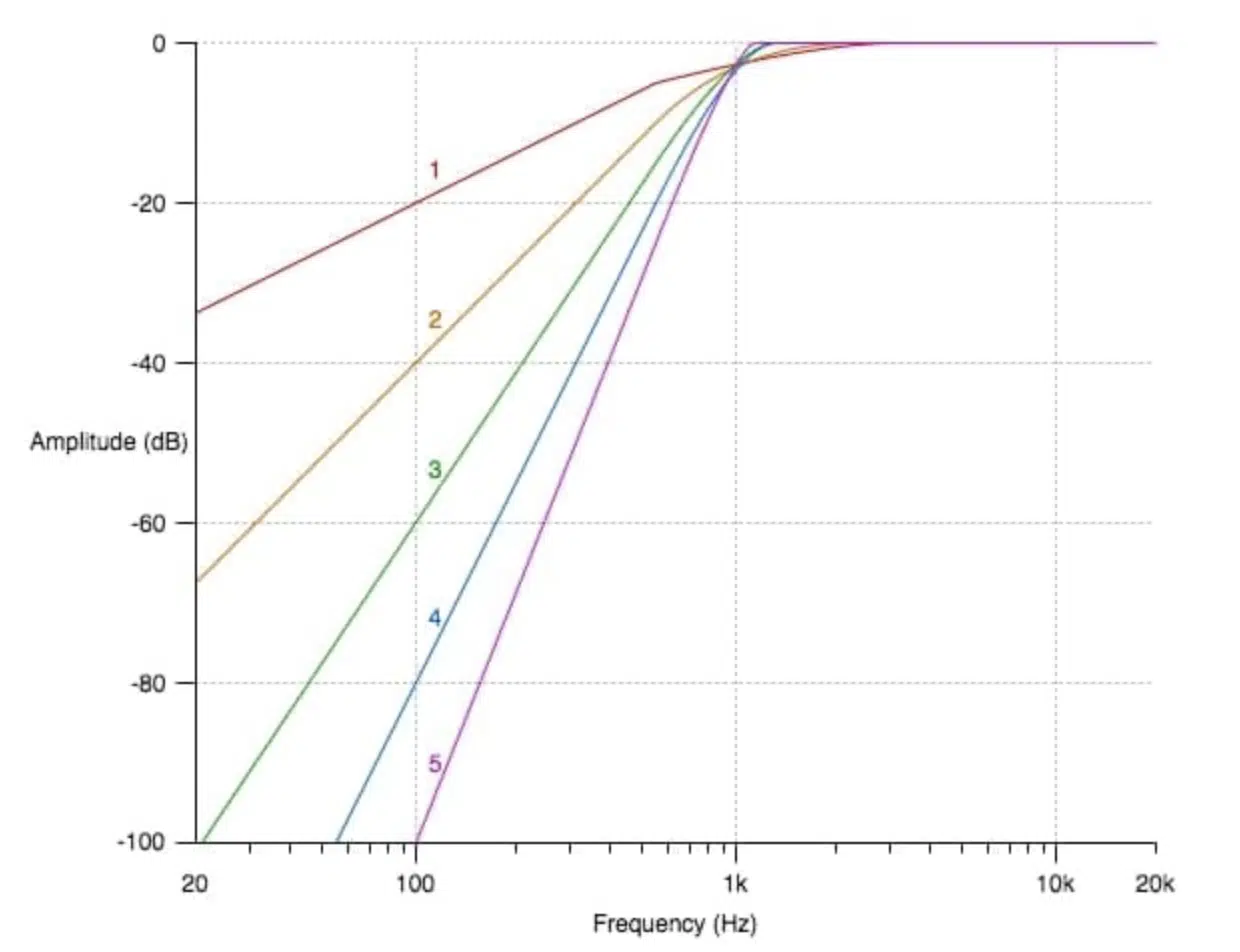
The steepness of the transition between the passing and attenuating frequencies is determined by the filter’s order, also known as “Poles.”
These are usually described in terms of dB values (12dB, 24dB, 36dB, 48dB).
Each set of 12dB is called an “order.”
For example, a 24dB steepness curve would be considered a “second order high pass filter” or “2 Pole Filter.”
A higher-order filter will have a steeper transition, meaning it will more effectively isolate the desired frequencies from the undesired ones.
This can be particularly useful when you need more precise control over the filtering process.
NOTE: Unless you’re using extremely steep/high-order filters, this will never entirely eliminate all the frequencies below the cutoff. It would simply attenuate them gradually.
High-Pass vs. Low-Pass Filters
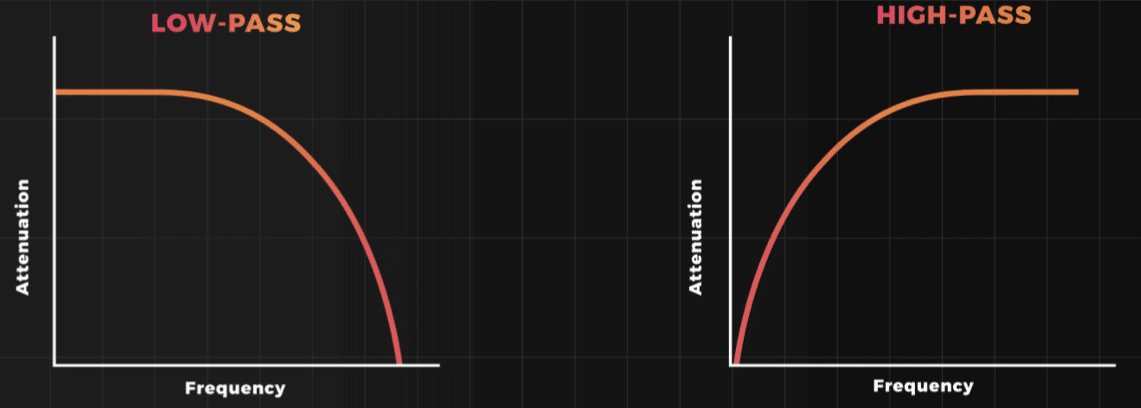
- High-Pass Filters 一 Attenuate lower frequencies and allow high frequencies to pass through.
- Low-Pass Filters 一 Allow low frequencies to pass and attenuate high frequencies.
Both types of filters play a vital role in shaping the sound and removing unwanted frequencies in music production.
A low pass filter is commonly used to remove high-frequency noise, such as hiss or clicks, from audio recordings.
Additionally, low-pass filters can be used creatively to create a sense of distance or warmth when you’re mixing music.
Whereas high frequencies are often associated with a sense of presence and clarity.
Using resonance in conjunction with low-pass filters can create wicked effects and is responsible for the most popular effects of today.
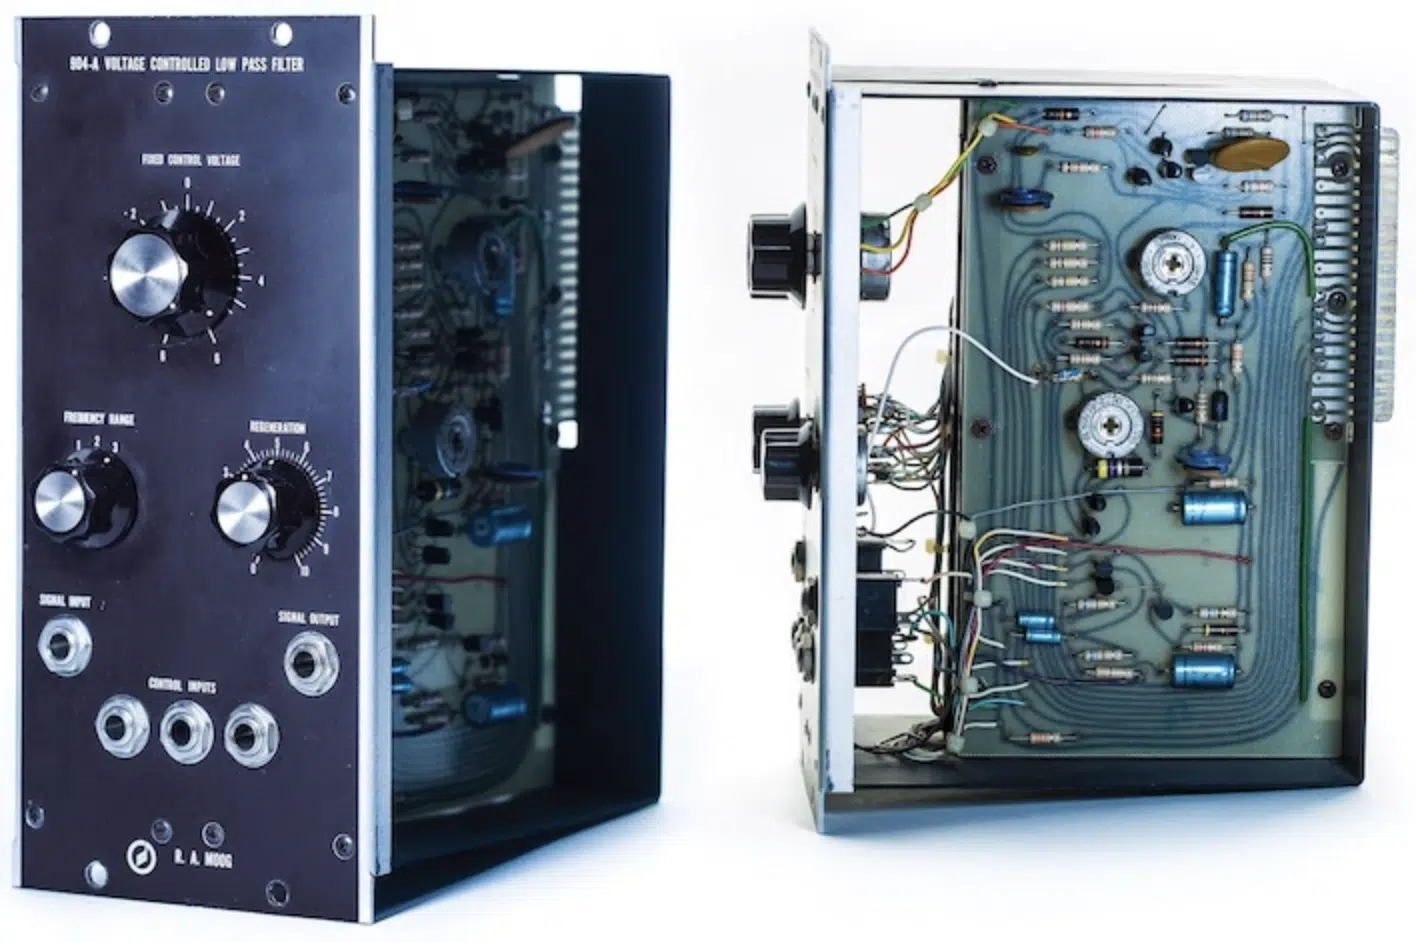
In fact, the prized Moog HP Filter is not just renowned for the cutoff of the filter itself, but rather its legendary resonance control.
The choice between using a high pass filter or a low pass filter will depend on the needs of your unique music and specific project.
In some cases, you might even want to use both types of filters simultaneously to achieve a more balanced and refined sound.
Aside from a high pass filter and a low pass filter, there are also other filter types, and here is the definition of two more commonly explored types:
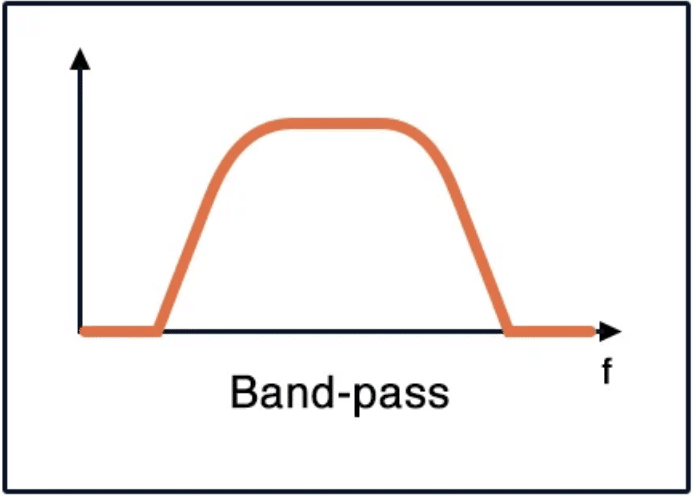
- Bandpass filters 一 A bandpass filter allows a particular range of frequencies between two cutoff points to pass, attenuating the frequencies outside this range.
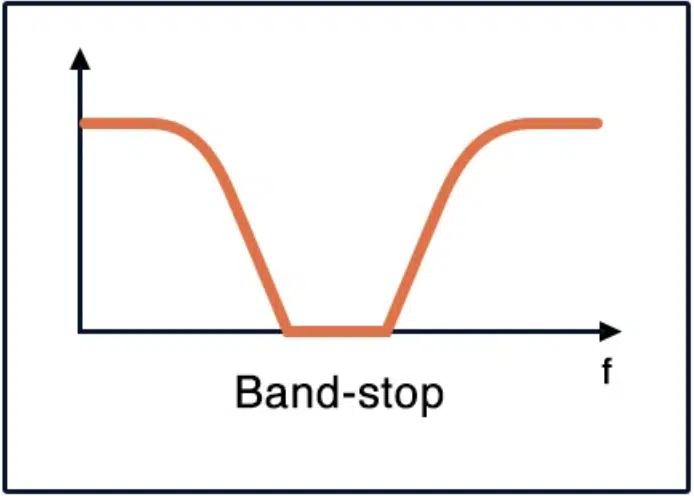
- Bandstop filters 一 A band stop filter attenuates a specific frequency range between two cutoff points, allowing frequencies outside of this range to pass through.
PRO TIP
If you were to use a high pass filter and low pass filter side-by-side, it would have the same effect and look just like a band-pass filter.
The Cutoff Frequency
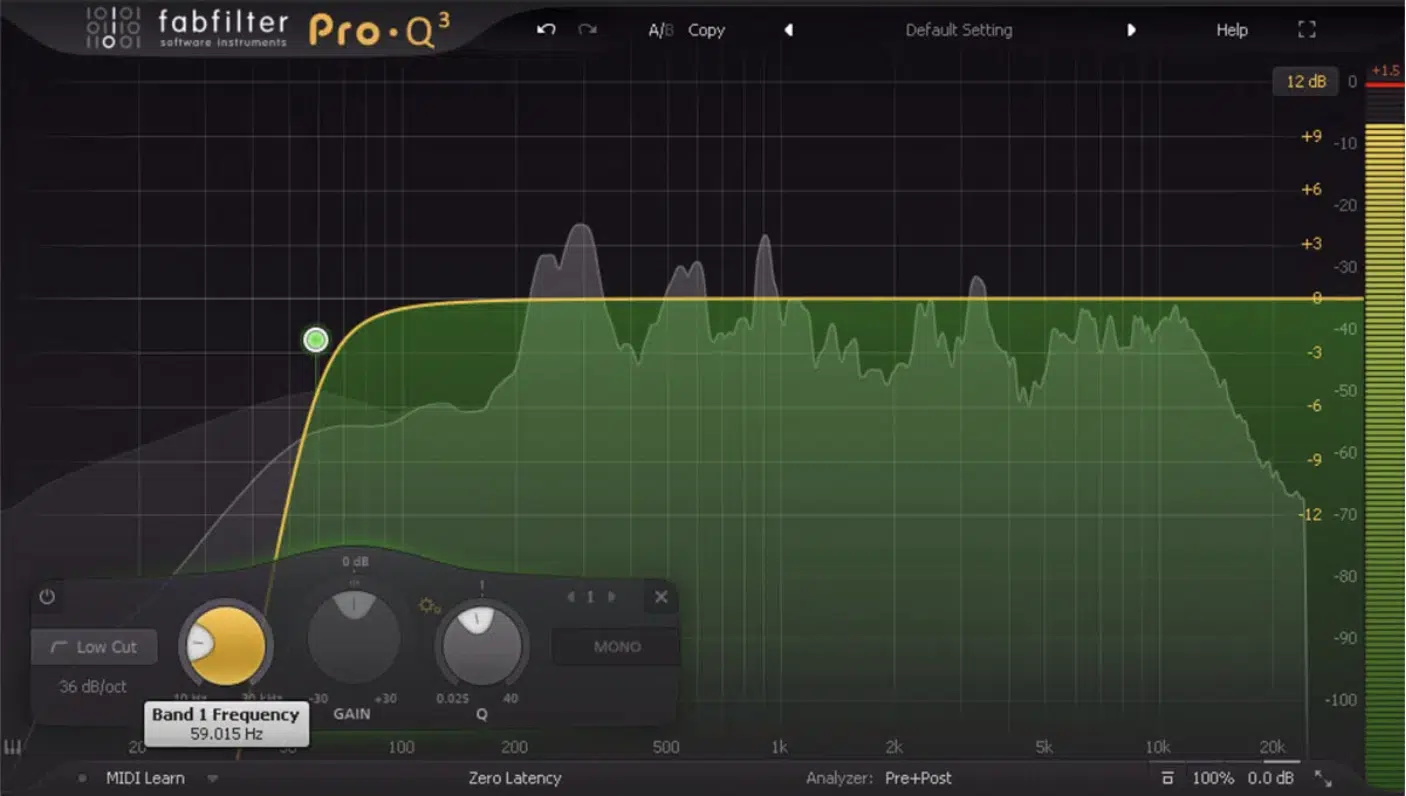
The cutoff frequency is a critical parameter in the design and operation of a high-pass filter
It defines the point at which the filter starts to take effect and serves as a boundary between:
- The frequencies that are allowed to pass
- The frequencies that are attenuated
The importance of the cutoff frequency lies in its ability to control the balance between preserving the desired frequency components and removing the unwanted ones.
By carefully selecting the cutoff frequency, you can ensure that your high pass filter is effectively targeting and eliminating the low-frequency noise and rumble.
As well as other distractions that you want to remove from your audio signal, of course.
Adjusting The Cut Off Frequency
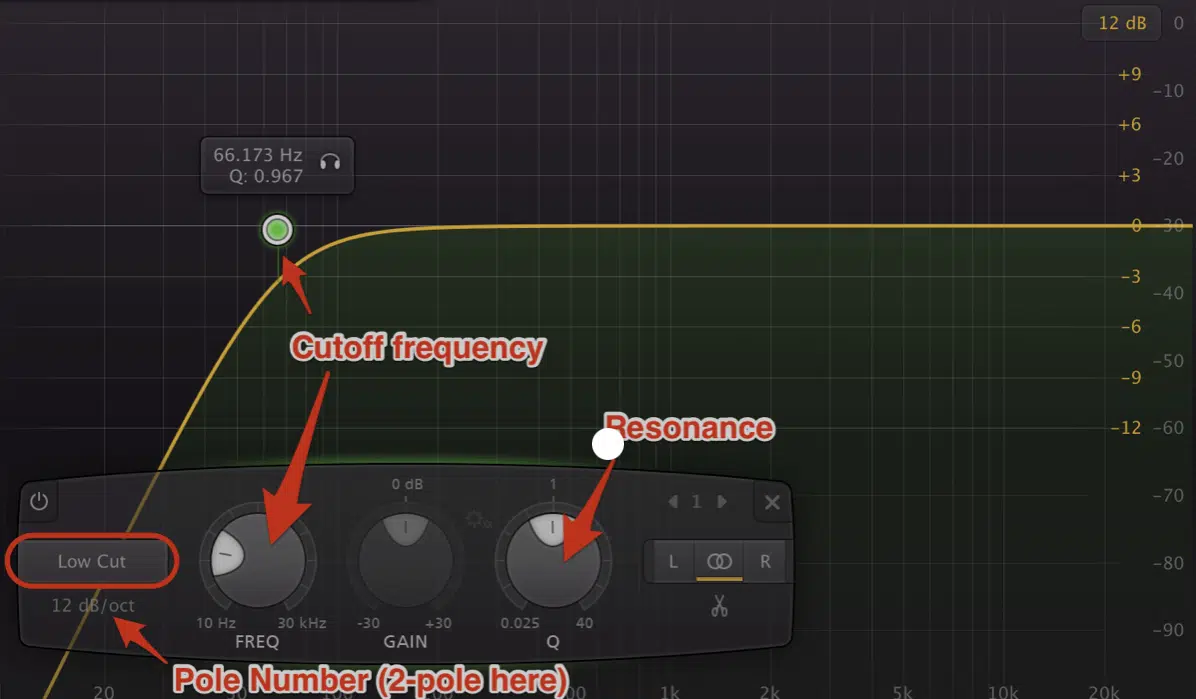
Adjusting the cutoff frequency often involves experimentation and fine-tuning to achieve the desired effect (like everything else in music production).
You can use a software-based equalizer or hardware-based filter to adjust the cutoff frequency and observe the changes in your audio signal.
For example, let’s say you’re working with a kick drum track.
You might start with a relatively low cutoff frequency to remove unwanted low-frequency rumble (referred to as “rolling off”) while preserving the fundamental frequency of the kick.
It may seem counterproductive to remove some of a kick’s low-end.
However, in reality, removing the very low frequencies can actually enhance the lower frequencies that occur above the cutoff point.
As you increase the cutoff frequency, you may find that the kick drum starts to lose its low-end impact, which is a travesty, as we all know.
To rectify this, you can fine-tune the cutoff frequency to strike the perfect balance between eliminating unwanted lower frequencies and preserving the kick drum’s power and character.
Add a bit of resonance to zero in on the fundamental frequency and increase the perceived low-end even more (just don’t overdo it).
A little resonance goes a very long way, as too much can actually reduce the perceived level/tone.
Resonance
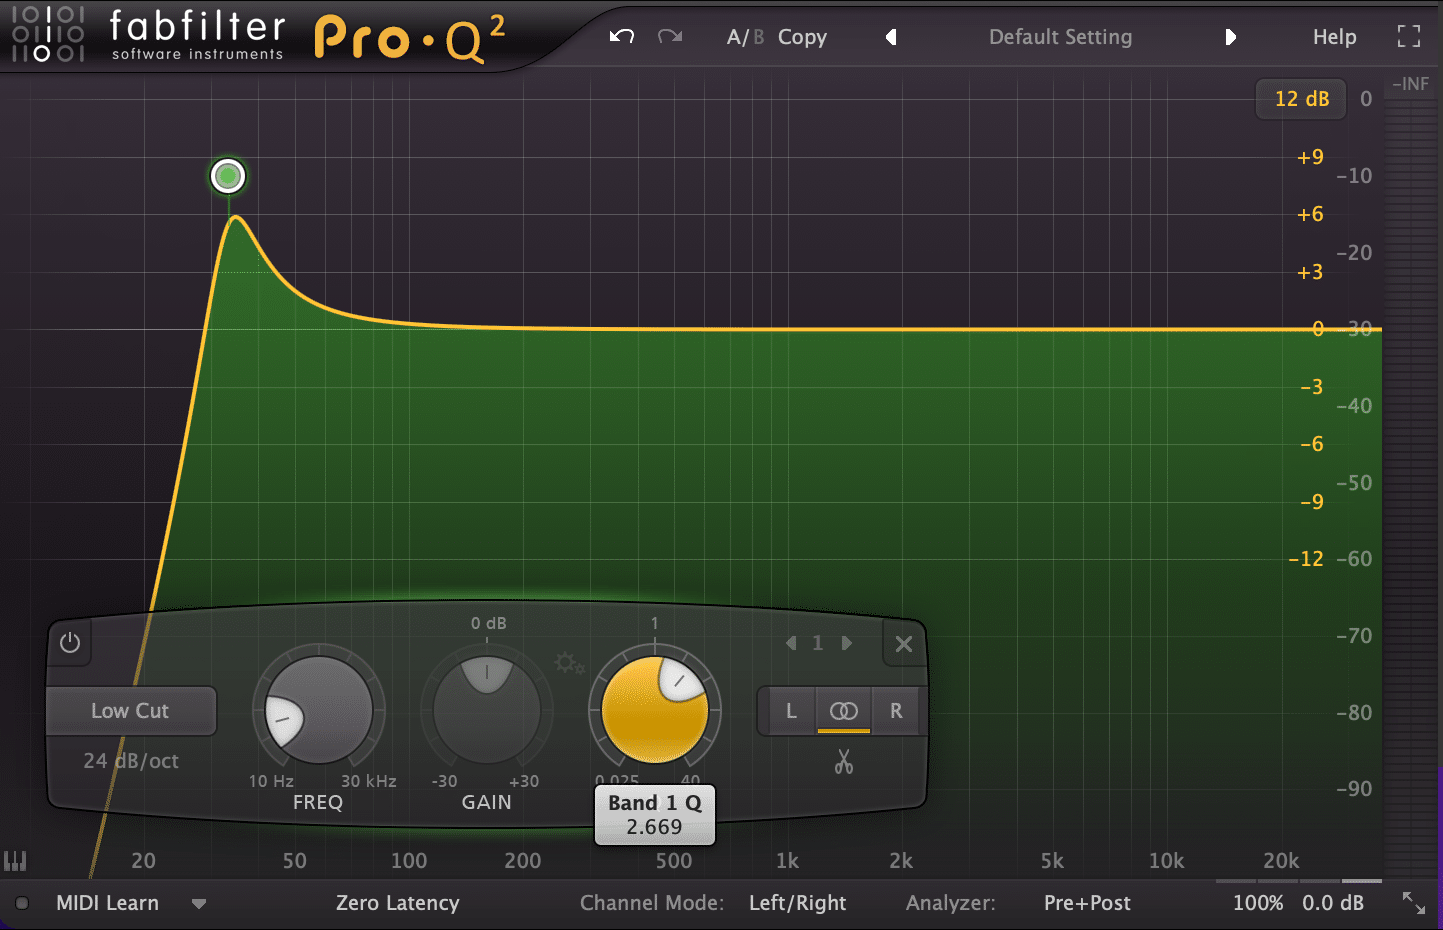
Resonance, usually displayed as “Q” in DAWs, occurs when a filter amplifies or emphasizes a specific frequency or frequency range.
This causes it to stand out and become more pronounced in the output signal.
In the context of filters, resonance is often associated with a boost in gain around the filter’s cutoff frequency.
This can create a more pronounced effect, adding character and color to the sound being processed.
In high-pass filters, resonance can be applied by introducing a peak or boost near the cutoff frequency.
This can be especially useful in sound design and synthesis, where adding resonance can emphasize specific harmonics or frequency bands
It gives the filtered sound a distinct tonal quality which is quite desirable.
By adjusting the resonance amount, you can control the sharpness of the peak and the degree to which the cutoff frequency is emphasized.
Frequency Response & Phase Shift
Now, let’s cover 2 key characteristics of the high-pass filter: Frequency Response and Phase Shift.
-
Frequency Response
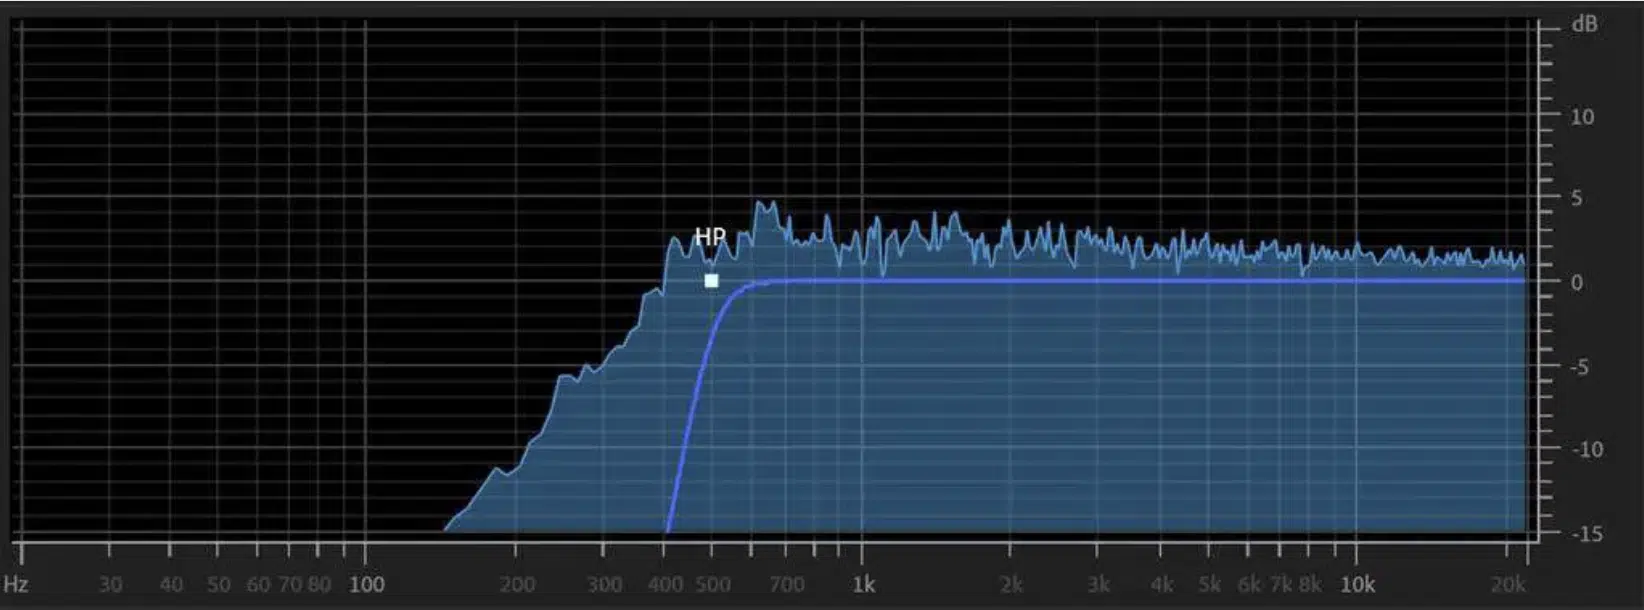
The frequency response of a high-pass filter is a graphical representation of how the filter affects the amplitude of different frequency components in the input signal.
It shows the relationship between the input and output signals’ amplitudes as a function of frequency 一 providing insight into the filter’s performance across the frequency spectrum.
A typical frequency response plot for a high pass filter will show a gradual attenuation of low-frequency signals below the cutoff frequency.
The attenuation becomes more pronounced as the frequency decreases.
Above the cutoff, the frequency response plot will show a relatively constant gain.
This indicates that high-frequency signals are allowed to pass through the filter with minimal attenuation.
Side note, if you’d like to learn how to analyze your music to decipher these factors, we’ve got you covered.
-
Phase shift
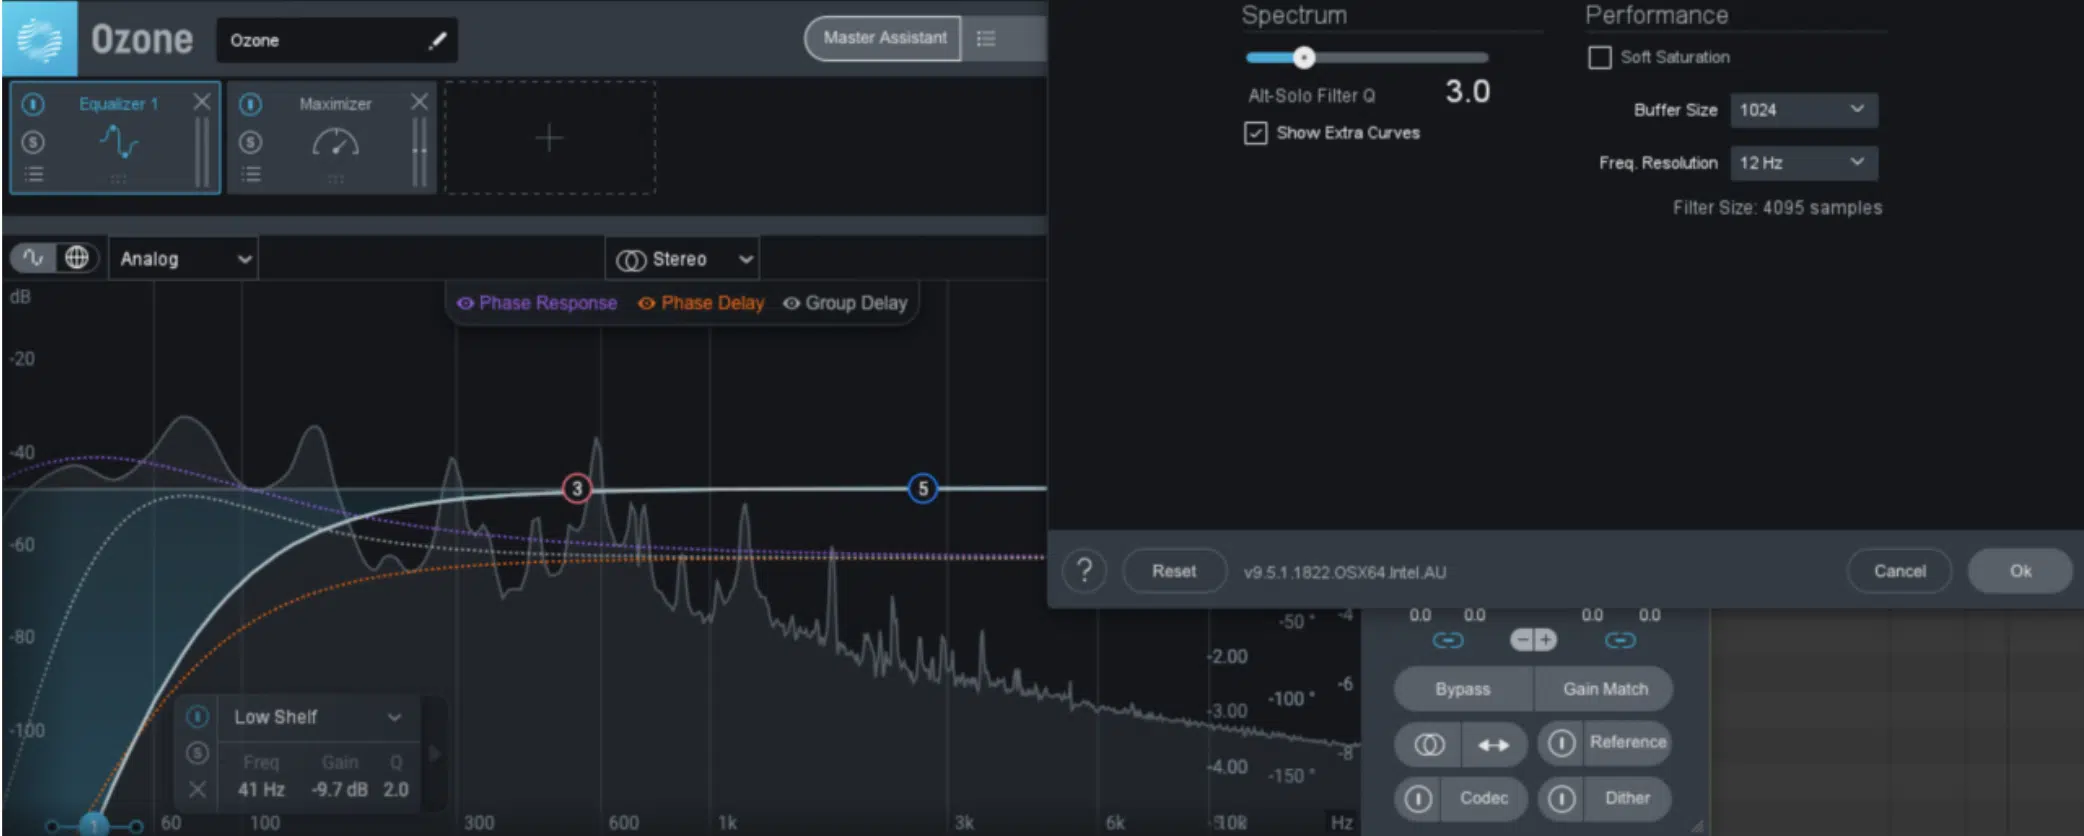
Phase shift is another super important characteristic of the high pass filter, which describes the change in phase (or timing) of the output signal compared to the input signal.
It occurs due to the reactive nature of the passive components used in the high-pass filter circuit.
Digital filters were made to behave in the same fashion while attempting to limit this shift as much as possible through more modern DSP processing.
In a high-pass filter, the phase shift increases as the cut off frequency changes and resonance is introduced.
The largest phase shift occurs near the cut off frequency point.
This can result in subtle timing differences between the input and output voltage signals, which may affect the overall sound quality and perception of the audio.
With that said, not all phase shifts (or inconsistencies) are bad.
Certain hardware units are even praised for the signature ways they alter the phase of a signal.
However, in the digital world, these non-linear inconsistencies can cause more problems than they are worth, so keep that in mind.
Linear phase EQ
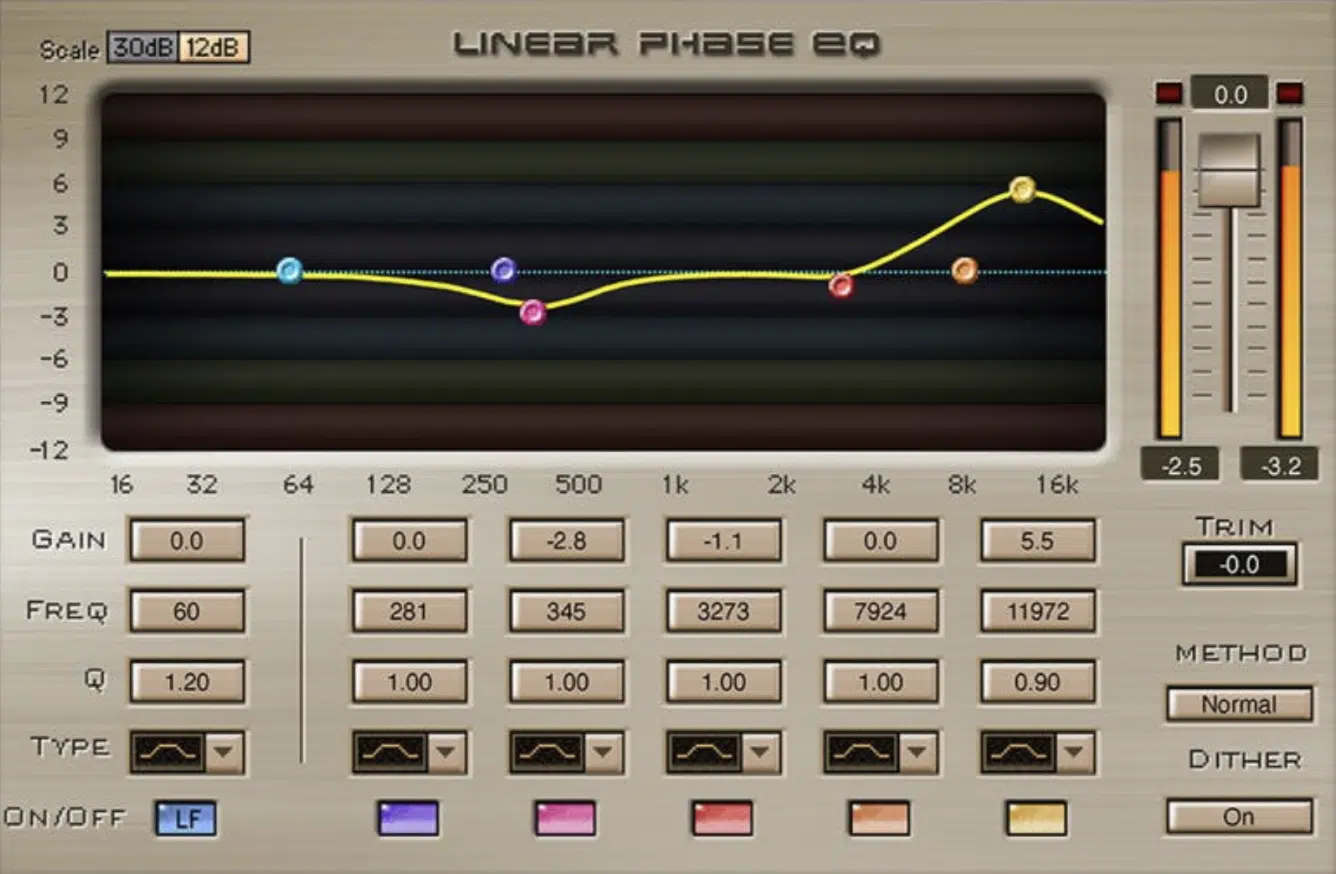
Linear phase EQ is a type of equalization that preserves the phase relationships between different frequency components in the input signal.
Essentially, it eliminates the shift in phase that’s typically associated with a high-pass filter.
This can result in a cleaner, more transparent sound, particularly in situations where phase coherence between multiple tracks is essential.
However, linear phase EQ can be more computationally intensive than traditional equalization methods and will introduce additional latency in the processing chain.
This is typically not an issue if you’re not dealing with live, or real-time scenarios.
Plus, the trade-off in a mix/master session is worth it, with the proper delay compensation, naturally.
Additionally, linear phase EQ can sometimes result in pre-ringing artifacts, usually perceived as a difference in overall tone, which may be noticeable in certain situations.
So, when implementing this type of EQ, just be careful, cautious, and precise.
Also, try to not use very high resonant values, just to stay clear of those annoying, unwanted sounds.
If you want to learn all about EQ, we’ve got you covered.
Using A High-Pass Filter When Mixing
High-pass filters play a crucial role in the mixing process.
They help to eliminate low-frequency clutter and create a cleaner, more focused mix by:
- Removing unwanted low-frequency noise, such as microphone rumble or HVAC/AC noise.
- Cleaning up the low end of individual tracks, such as vocals or guitars, to make room for bass-heavy instruments like kick drums and bass guitars.
- Reducing low-frequency build-up in reverbs and delays to maintain clarity and prevent a muddy mix.
They also create separation between instruments by removing overlapping low-frequency content, which allows each instrument to occupy its own space in the mix.
Using A High-Pass Filter In Sound Design & Synthesis
High-pass filters are also valuable tools in sound design and synthesis.
They can be used to shape the timbre and texture of synthesized sounds by:
- Removing low-frequency harmonics from a sound source to create a thinner or more delicate timbre.
- Modulating the cut off frequency with an envelope, LFO, or other modulation sources to create dynamic, evolving textures.
- Emphasizing specific harmonics or frequency bands by combining a high pass filter with a resonant peak or boost near the cut off frequency.
If you’d like to learn all about how to become a master at sound design, we break it all down.
Using A High-Pass Filter When Mastering
In the mastering stage, high-pass filters can be used with caution to address low-frequency issues that might not have been resolved during the mixing process by:
- Removing subsonic frequencies that could cause problems with vinyl cutting or playback on certain speaker systems.
- Taming excessive low-frequency content that could cause distortion or overloading of the playback system.
- Applying a gentle high pass filter to the side channel of a mid-side EQ to create a more focused stereo image.
It’s essential to use passive high-pass filters and active high-pass filters with caution when you’re Mastering.
Overly aggressive filtering can lead to a loss of low-end impact and warmth in the final product.
Side note, if you’re curious about the difference between mixing and mastering (everything you need to know), we’ve got you covered.
Tips & Tricks for Using High-Pass Filters
At this point, you should be acclimated with high-pass filters, their function, their purpose, and much more. Now, let’s jump into the fun stuff.
-
Start With A Gentle Slope
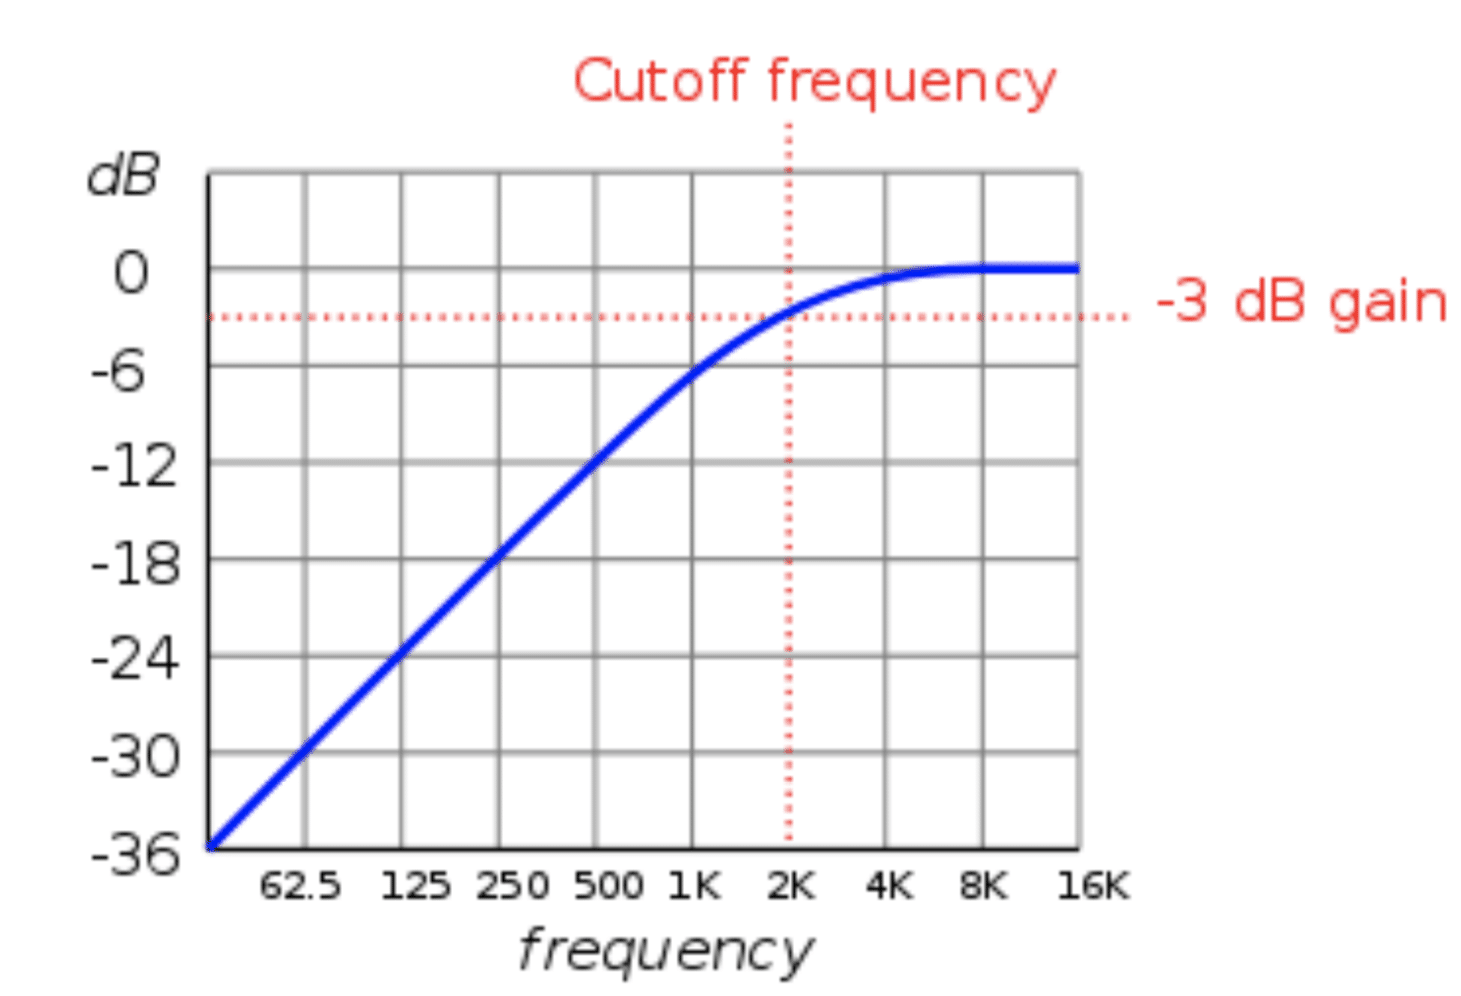
When using a high pass filter, it’s often best to start with a gentle slope (such as 6 or 12 dB per octave).
I say that because it helps to avoid introducing excessive phase shifts or altering the sound’s character too dramatically.
As you become more familiar with the filter’s effect on your audio, you can experiment with steeper slopes for more aggressive filtering when needed.
-
Use Your Ears

While it’s helpful to understand the technical aspects of an ideal high-pass filter, it’s essential to rely on your ears when making decisions about the cutoff frequencies and filter slopes.
Listen carefully to how the filter affects the sound and adjust based on what sounds best for your specific application.
However, it’s important to remember that ear fatigue is a very real thing, so if you listen too long, things can get distorted and altered, just keep that in mind.
-
Automate The Filter Parameters
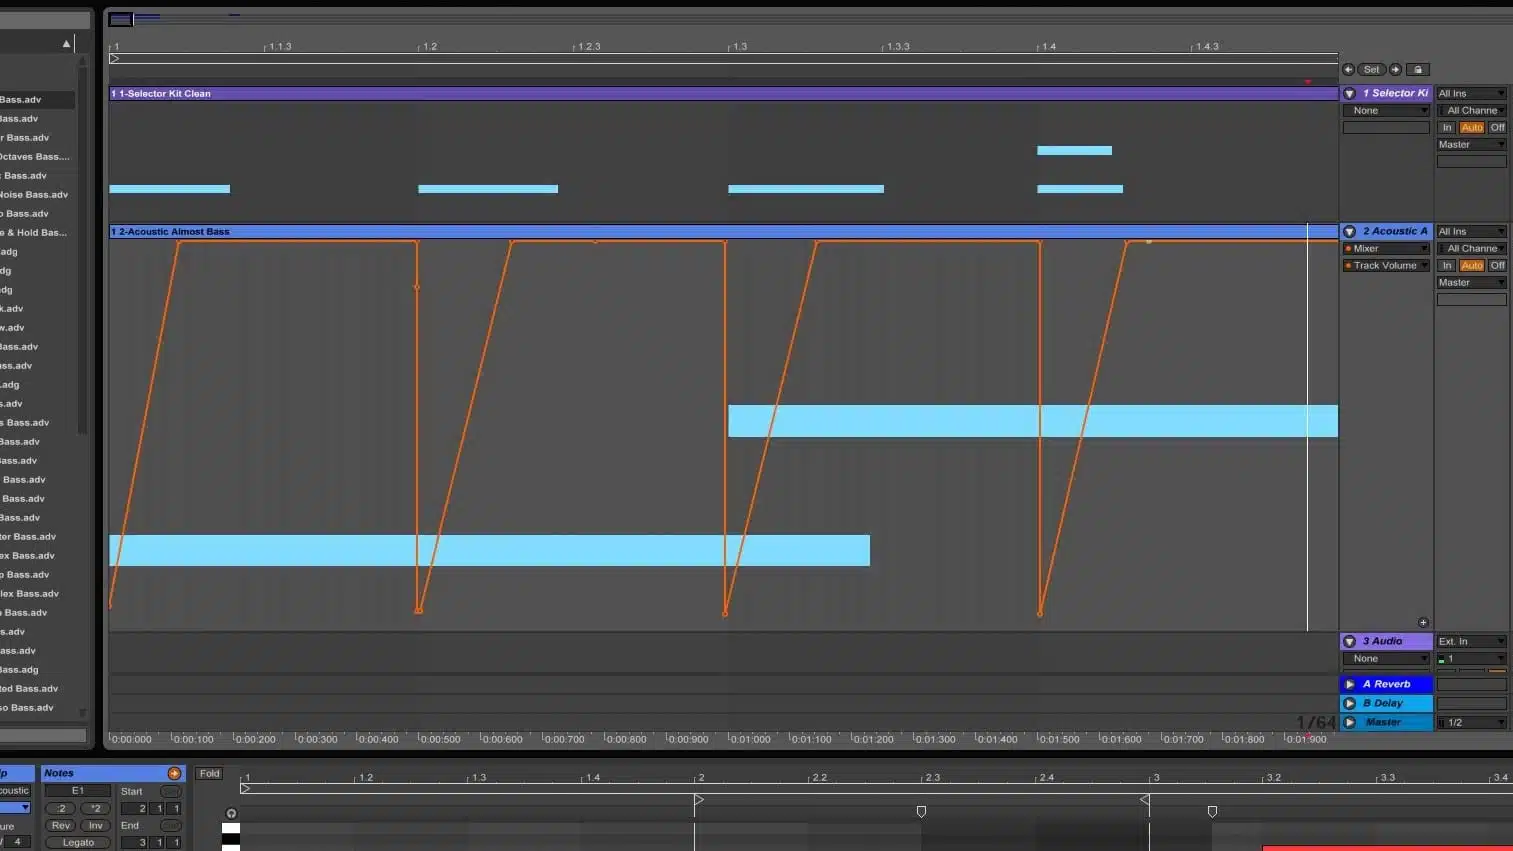
Automation can be a powerful tool when working with high-pass filters, allowing you to create dynamic, evolving effects that change over time.
Experiment with automating the cutoff frequency, filter slope, or other parameters to add interest and movement to your sound.
Don’t forget, when working within your DAW, the lines between automation and modulation can sometimes be blurred.
You can even use your own custom modulation curves through the use of automation in order to automate any parameter as if it was being internally modulated.
Cool, right?
-
Combine With Other EQ Techniques
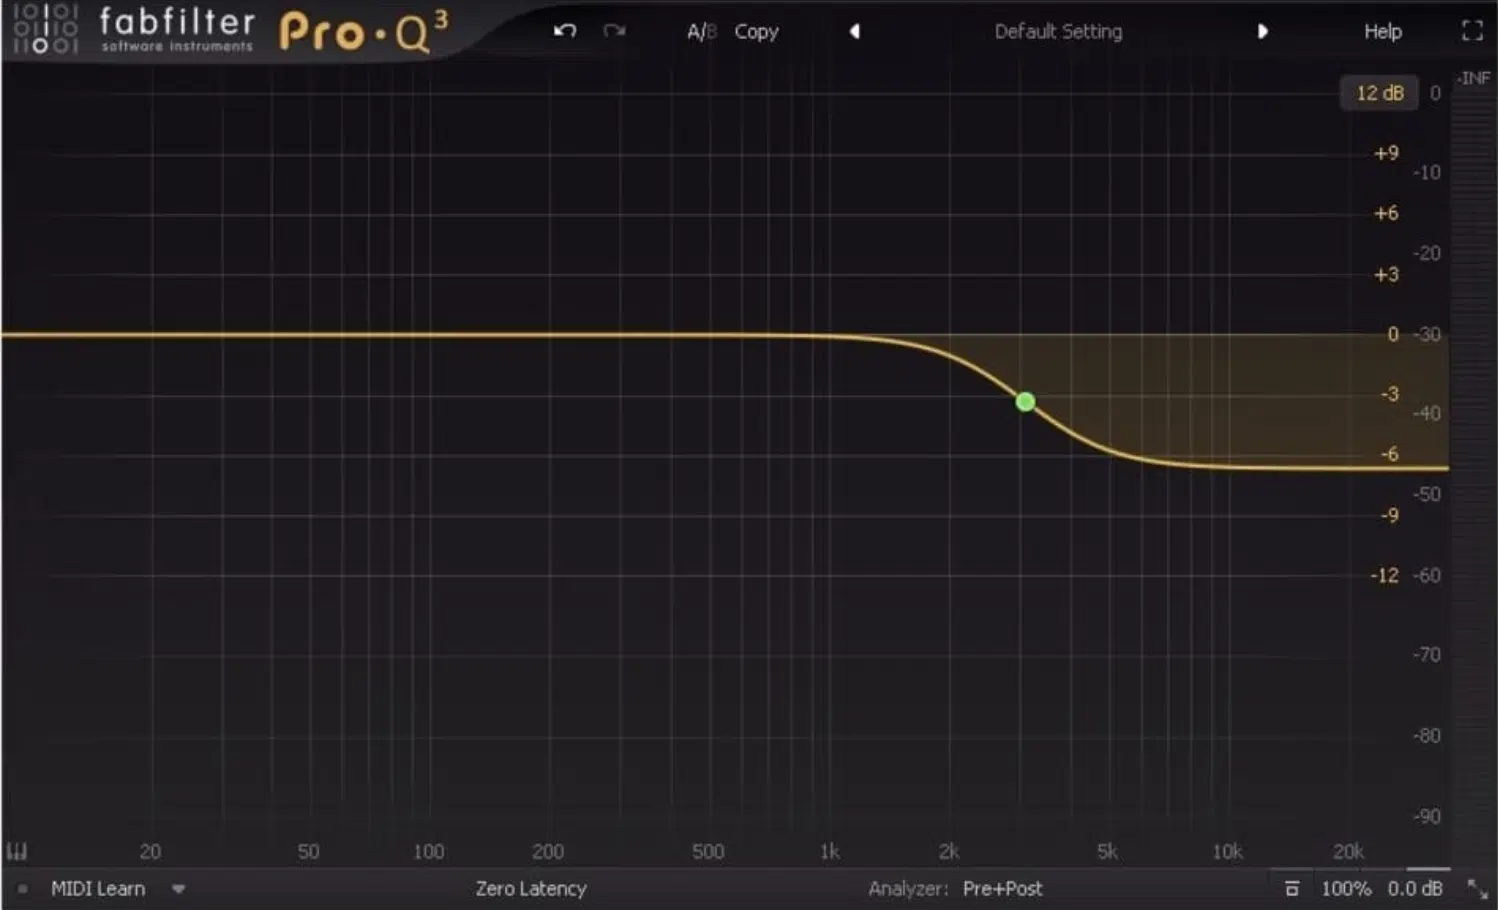
A high-pass filter can be combined with other EQ techniques, such as shelving or peaking filters, to achieve more complex and precise frequency shaping.
For example, you might use a high pass filter to remove low-frequency rumble from a vocal track, followed by a gentle low shelf boost to add warmth and body to the sound.
Speaking of vocals, if you’re curious about the very best vocal effects VST of 2023, you can’t miss this list.
-
Experiment With Different Filter Types
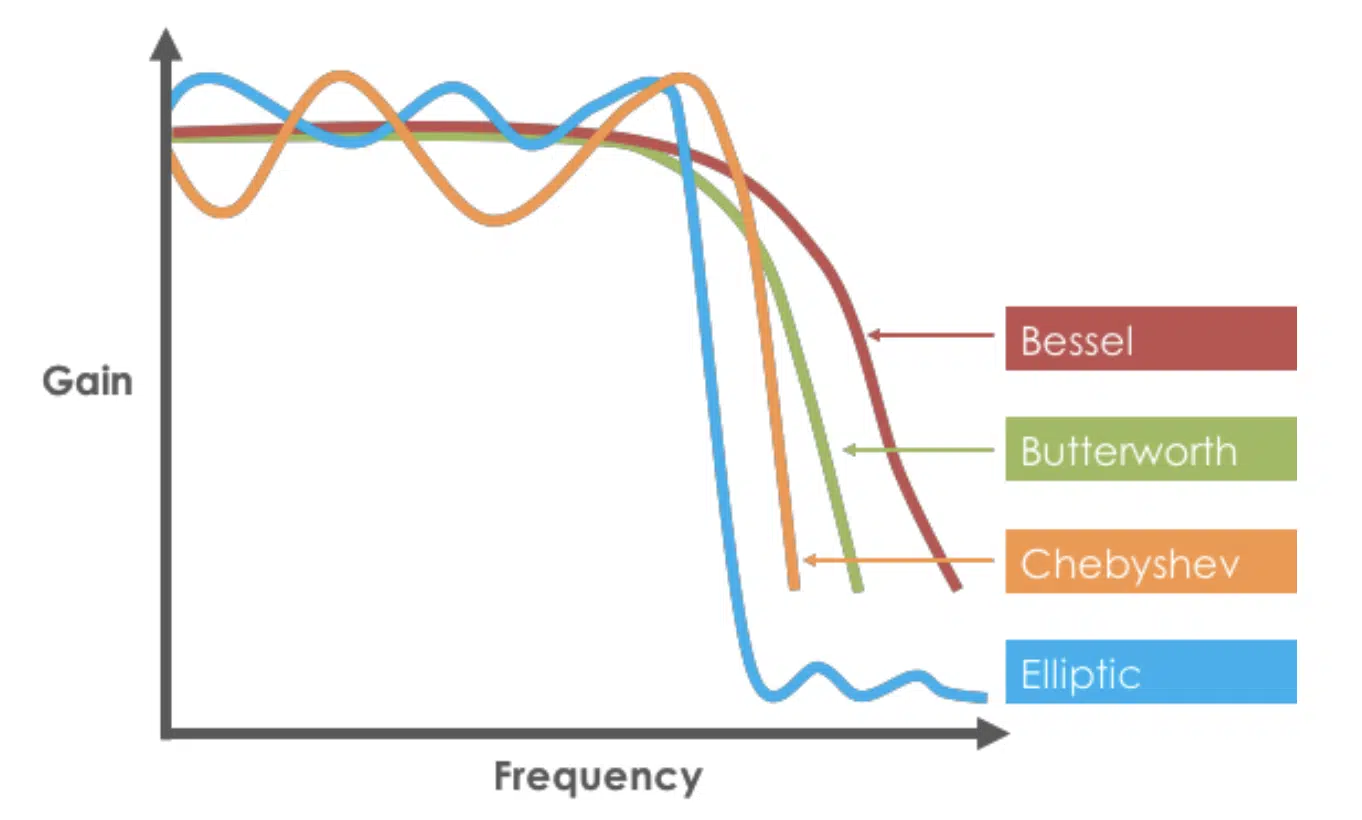
Various high-pass filter types, such as Butterworth, Chebyshev, and Bessel, offer different characteristics regarding phase response, filter steepness, and potential resonances.
Playing around with different filter types can help you achieve the desired effect or sound quality for your specific application.
Don’t be afraid to explore the options provided by your DAW or EQ plugin to find the best filter type for your needs.
NOTE: In an RC high-pass filter, the input voltage is applied across a series combination of a resistor and a capacitor, allowing the filter to attenuate low-frequency signals and pass high-frequency signals.
-
Layer Filtered Sounds With Unfiltered Ones
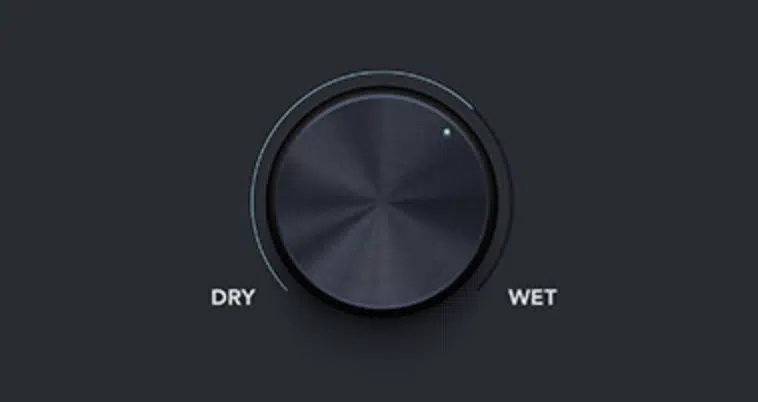
Another creative way to use high-pass filters is to layer a filtered sound (in parallel) with an unfiltered version of the same sound.
By blending the two together, you can create a unique texture that combines the clarity and focus of the filtered sound with the warmth and fullness of the unfiltered sound.
This also allows you to make more drastic moves, as well as balance the effect (or unintended effects) with the original 一 giving you the best of both worlds!
Layering filtered sounds with unfiltered sounds can be particularly effective when working with synthesized sounds, drum samples, or other sound design elements.
Final Thoughts
High-pass filters are essential tools for music producers and audio engineers, offering a wide range of applications in mixing, sound design, synthesis, and mastering.
By understanding the fundamental principles and techniques associated with high-pass filters, you can create cleaner, more focused mixes.
As well as explore new creative possibilities in your tracks, which is what music production is all about.
While you continue to develop your skills with these filters, consider experimenting with automation and layering to create unique, modern effects.
One way to put these techniques into practice is by working with high-quality sample packs, such as these mind-blowing free guitar loops.
This versatile pack includes the most epic, professionally crafted loops in the game (including both electric & acoustic guitar loops).
Automate your high-pass filter on these loops to add aggressive, unique movement and additional modern flare to your productions.
And remember, always experiment, you never know what masterpieces you can create.
Until next time…


Leave a Reply
You must belogged in to post a comment.