VST plugins are the building blocks of any digital audio workstation (DAW).
They’re the tools that give you the sounds and effects that elevate your music production game.
However, if you don’t know how to install VST plugins properly, you’ll never be able to take full advantage of what these plugins have to offer.
Luckily, we’re here to break it down, very easily and simply, so you can unlock the full potential of your DAW.
In today’s article, we’ll be breaking down:
- Understanding VST Plugins ✓
- How to Install VST Plugins ✓
- Different Plugin Formats & Types ✓
- File Locations on Windows & Mac ✓
- Installing Plugins in FL Studio, Ableton Live, and Logic Pro ✓
- So much more ✓
By the end of this article, you’ll have all the knowledge you need to install, arrange, and locate VST plugins like a pro.
Say goodbye to confusing file paths, missing plugins, or setup errors. With this guide, you’ll never have to face those problems again.
So, let’s dive in…
Table of Contents
Preparing to Install VST Plugins
Before we jump in, let’s get the groundwork done first, as a strong foundation makes for a smoother process, trust me.
-
What Exactly is a VST Plugin?
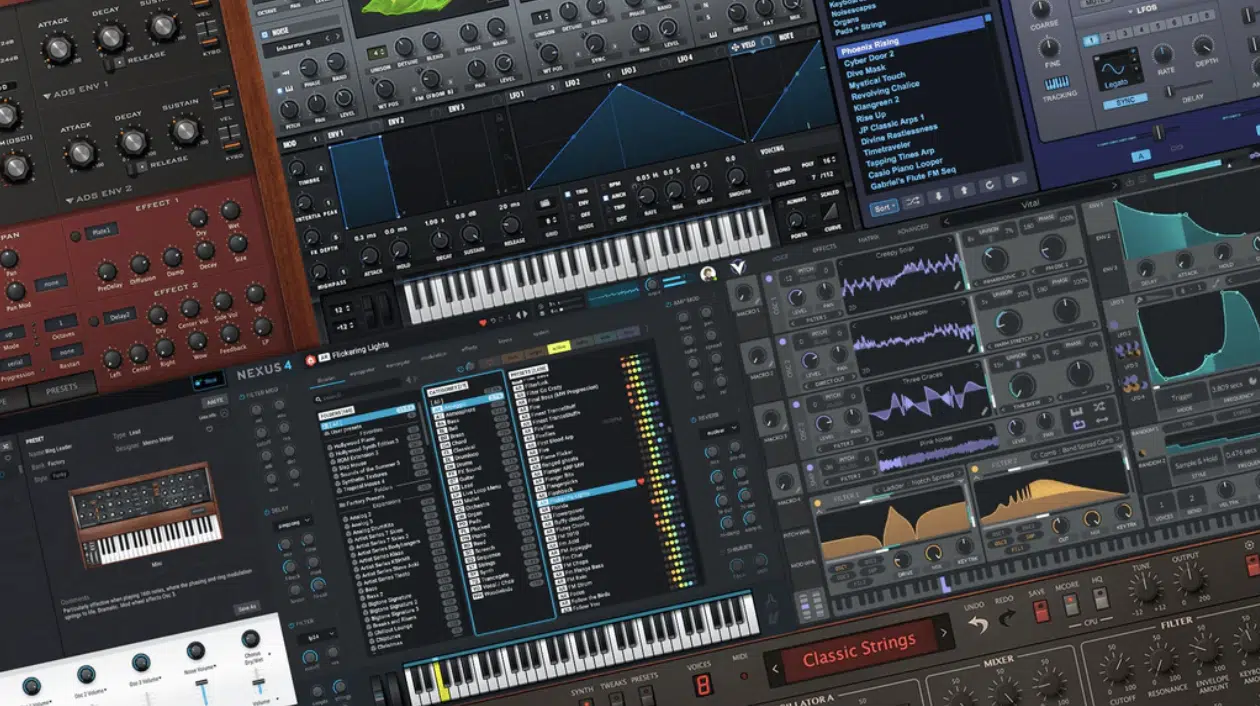
VST stands for Virtual Studio Technology.
It’s basically a software interface that integrates software audio synthesizer and effect plugins with your digital audio workstation (DAW).
VST plugins come in many flavors:
- Instruments
- Effects
- Even some tools for live performance
Whether it’s a vintage compressor, a fire synth, or a drum machine, there’s a VST plugin for it.
VST plug ins make it easier to add different functionalities to your DAW.
Imagine trying to recreate a vintage tube amp sound on your own 一 yeah, it’s pretty much impossible without a specific VST plugin for that.
Most VST plug ins come as .dll files for Windows or AU files for Macintoch.
NOTE: We’ll talk about how to deal with these plugin files later on.
The best part is that there are tons of free VST plugins available.
So, if you’re just starting, you can experiment without burning a hole in your pocket.
Speaking of free VST plugins, if you’re looking for the hottest free VST plugins that you absolutely need in your production arsenal, we’ve got you covered.
-
Importance of Program Files
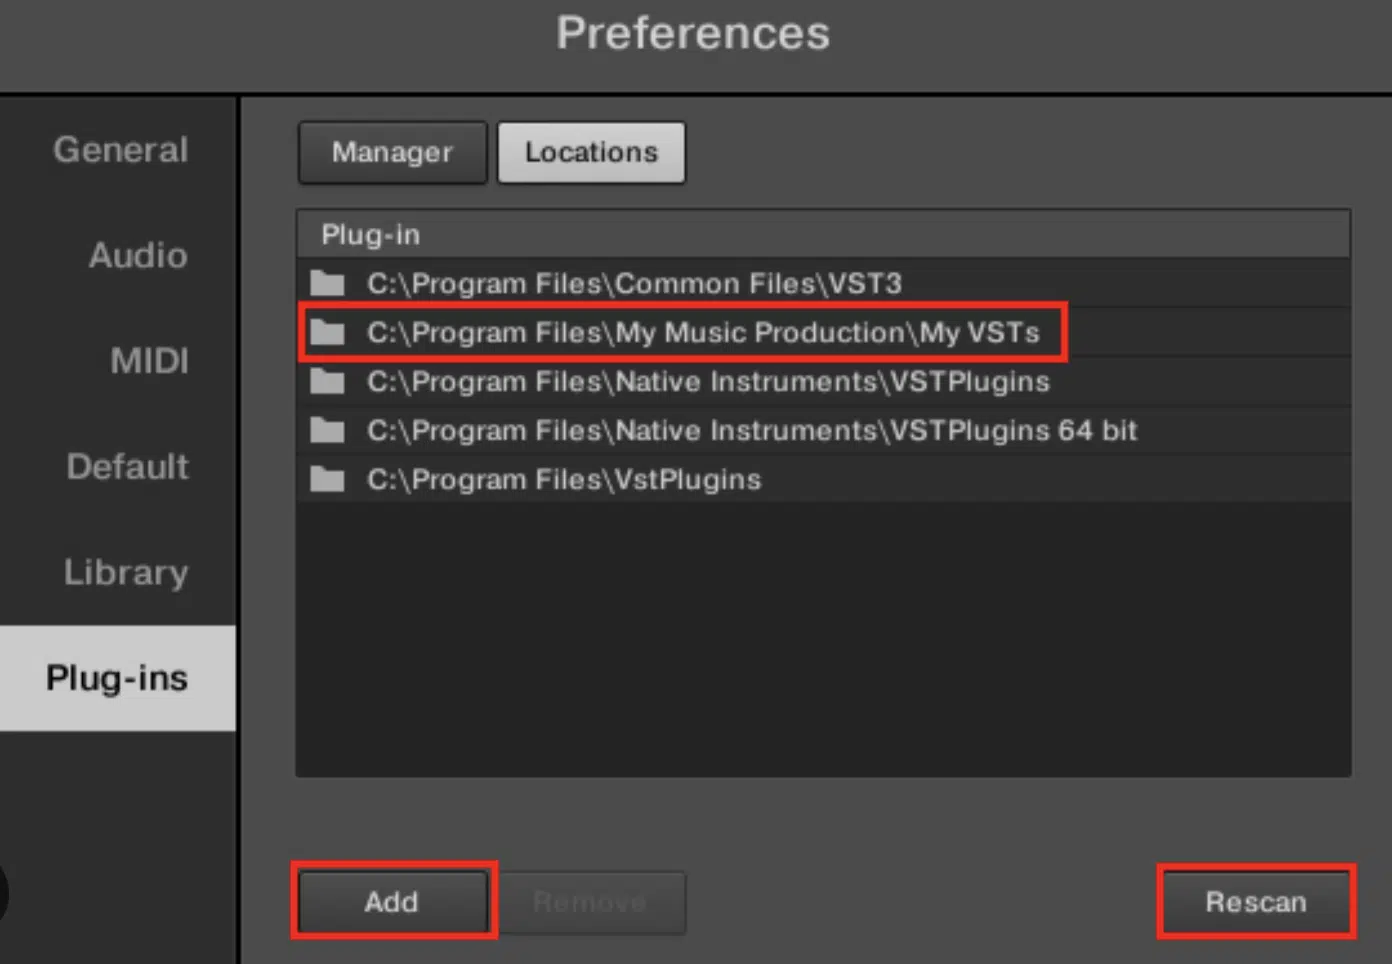
When it comes to installing VST plugins, knowing where your program files are stored is crucial.
This is where you’ll be dropping in your new plugins, so make sure you know your way around.
On a Windows system 一 You’ll generally find these under C Program Files.
The same goes for program files common.
This is the default install location for most software.
If you’re working on a Mac computer 一 Your program files are usually in the Macintosh HD directory.
Just like with C Program Files on Windows, you’ll be putting your new plugins here.
Always make sure to create shortcuts directly to these folders.
You’ll be visiting them a lot, especially when you get addicted to adding new plugins and the most popular plugins, which, let’s be honest, is inevitable.
-
Understanding Your VST Plugin Folder
Alright, so you know what a VST plugin is and where program files are stored.
Next, we need to talk about the VST plugin folder.
The VST plugin folder is a specific folder where your DAW looks for plugins; this folder is usually inside your program files.
Some DAWs (like FL Studio) will have a default VST plugin folder set up for you.
But for others like Logic Pro, you might have to set this up manually.
It’s critical to know the path to your VST plugin folder.
This is the place where all installed plugins live 一 and your DAW will only recognize plugins stored here.
NOTE: Make sure to keep a separate folder for VST plugins that you’re currently testing or those you seldom use.
This way, your main VST plugin folder (the same folder where you’ll spend a lot of time) stays organized.
Knowing these basics makes the actual installation process a breeze.
And, as a producer, it’s important to know about samples, VST plugins, and everything in between.
Plugin Formats & Types
Alright, you’ve decided you want to add some new sonic flavors to your DAW.
But before you go on a VST plugin downloading spree, let’s talk about different plug in formats.
Knowing the format compatibility of your DAW is essential for a smooth VST installation experience.
-
Different Plugin Formats (VST, Audio Units, and AAX)
The three primary plugin formats you’ll encounter are: VST, Audio Unit (AU), and Avid Audio eXtension (AAX).
#1. VST (Virtual Studio Technology)
VST is the most widely-used format.
It’s compatible with most DAWs like FL Studio, Ableton Live, and many more of the most popular DAWs.
You’ll often download it as a DLL file extension for Windows or a .vst file for Mac.
#2. Audio Units (AU)

Audio Units are similar to VSTs, but they’re more macOS-centric, if you know what I’m saying.
If you’re using Logic Pro or GarageBand, this is your go-to format.
While AU plugins and VST plug ins often provide similar functionalities, AU is optimized specifically for macOS and delivers a generally smoother experience on Mac computers.
When you download an AU plug in, it will have a .component file extension.
#3. AAX (Avid Audio eXtension)
AAX is the plugin format you’ll use if you’re working with Pro Tools.
It’s a professional-grade plug in format designed for high-end music production/sound design and offers functionalities within the Pro Tools environment, like Elastic Audio or Seamless Integration.
AAX plugins have a .aaxplugin file extension.
NOTE: Not all plugins are available in all three formats.
Some might only come in VST, especially free VST plugins created by smaller developers.
Others may offer versions for all three 一 allowing you the flexibility to switch between different DAWs.
-
VST Instruments vs VST Effects
Now, within the realm of VST plugins, you have two main categories: VST Instruments and VST Effects.
#1. VST Instruments are:

- The virtual synthesizers
- Drum machines
- Samplers that you play using a MIDI controller
They act like virtual instruments, recreating sounds that would otherwise require expensive hardware.
#2. VST Effects are all about modifying sound, like:
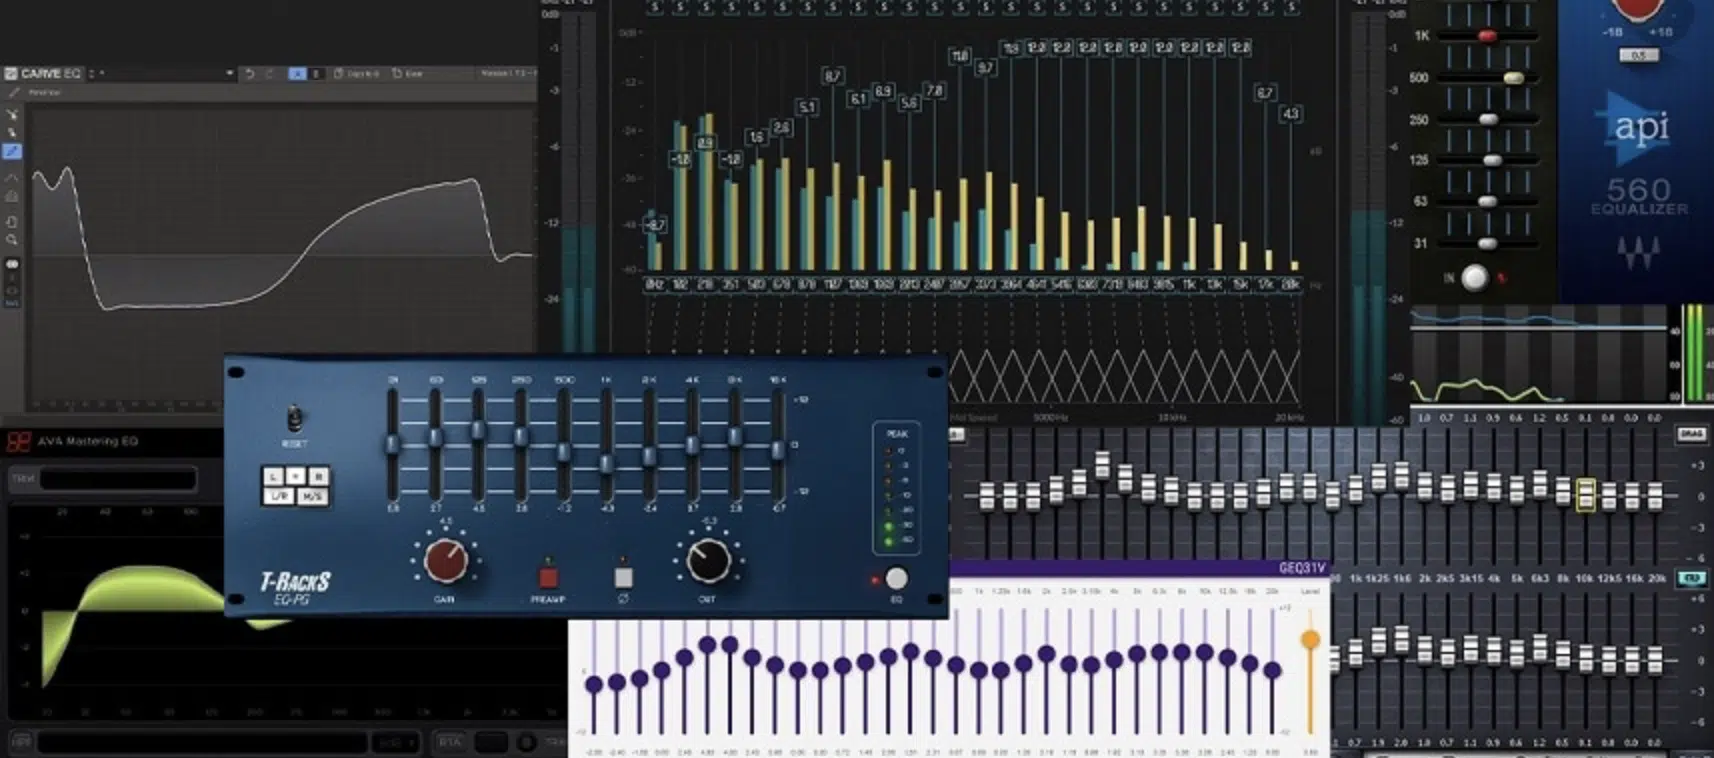
These effects plugins apply audio effects to the audio signals you’ve already recorded or generated via VST Instruments.
If you’re aiming to shape the sound after the initial production stage, you’re looking for VST Effects.
If you’re a music producer, chances are you will (definitely) have a combination of both.
For example, you might use a VST Instrument like Serum to lay down a fat synth line, and then use a VST Effect like Valhalla Vintage Verb to give it some atmospheric depth.
These categories can sometimes blur…
Some VST plugins offer both virtual instruments and effect functionalities.
Take VocalSynth 2 一 it can serve as a voice manipulator and an effect processor for your vocals, essentially acting as both a VST Instrument and a VST Effect.
The Right Path: Understanding File Locations
Now that we’ve talked about the types and formats of plugins, it’s time to get down to the specifics.
Knowing where files are stored can save you a lot of troubleshooting down the line.
-
Program Files & Common Files (Windows)
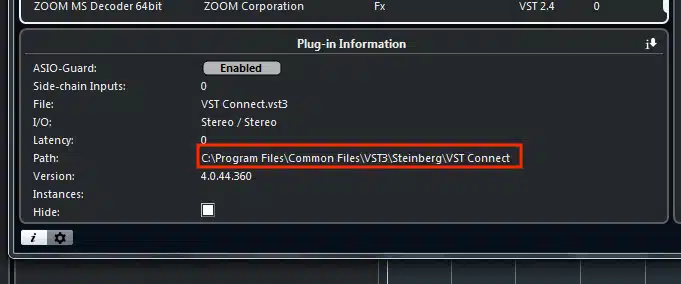
On a Windows computer, your VST plugins typically go into one of two folders:
- C:\Program Files\VSTPlugins (VST2 plugins)
- C:\Program Files\Common Files\VST3 (VST3 plugins)
The difference between VST2 and VST3 plugins is also something you should take into consideration.
VST3 plugins are an updated version 一 providing better CPU efficiency and added features, such as resizing the plug in window.
Make sure you put them in their respective folders to avoid complications.
NOTE: You might be tempted to change these folder paths, but think twice before doing so.
Custom folder paths can sometimes lead to issues, especially during software updates.
Stick to default paths as much as possible.
Make it a habit to periodically backup these folders to an external drive or cloud storage.
This ensures you won’t lose your valuable plugins if something goes wrong with your system (which is always a possibility).
-
Macintosh HD Library Audio (Mac)
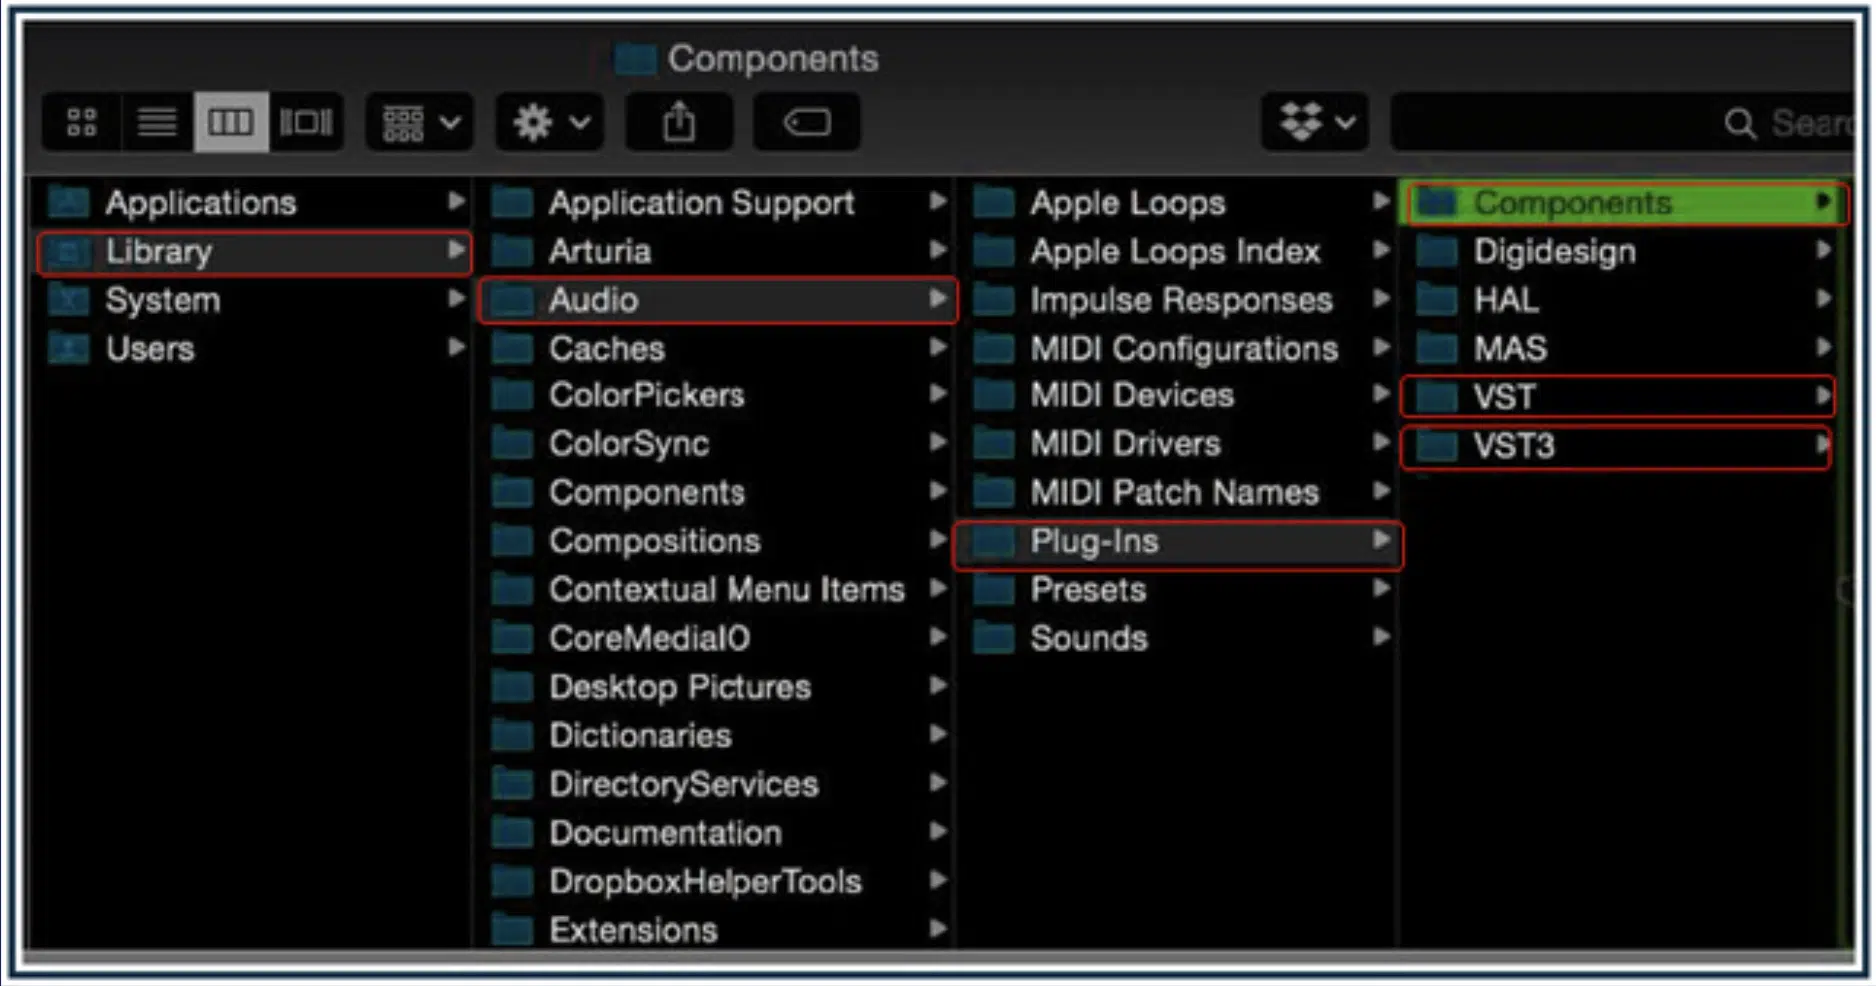
For Mac users, the plugi n files usually go into Macintosh HD/Library/Audio/Plug-Ins (system wide).
Inside this folder, you’ll find different folders for different plugin formats like VST & AU.
Some plugins might also go into ~/Library/Audio/Plug-Ins, with ‘~’ representing your user directory (user-specific).
Unlike Windows, macOS uses different file extensions for plugins:
- .VST 一 For VST2
- .VST3 一 For VST3
- .Component 一 For Audio Units
Make sure you place them in the appropriate subfolders.
While some installation processes are automatic, manual installations may require you to drag & drop the plugin files into these folders.
Always follow the installation guide that comes with your plug in.
NOTE: If you use multiple DAWs, you might find it useful to create aliases (shortcuts) of your plugins in each DAW’s specific plugin folder.
This ensures you don’t have to duplicate the plugin files, saving disk space.
How to Install VST Plugins in FL Studio
Alright, now let’s get specific and practical.
I’ll walk you through the steps of installing VST plugins in some popular DAWs, starting with FL Studio.
-
Accessing Plugin Manager
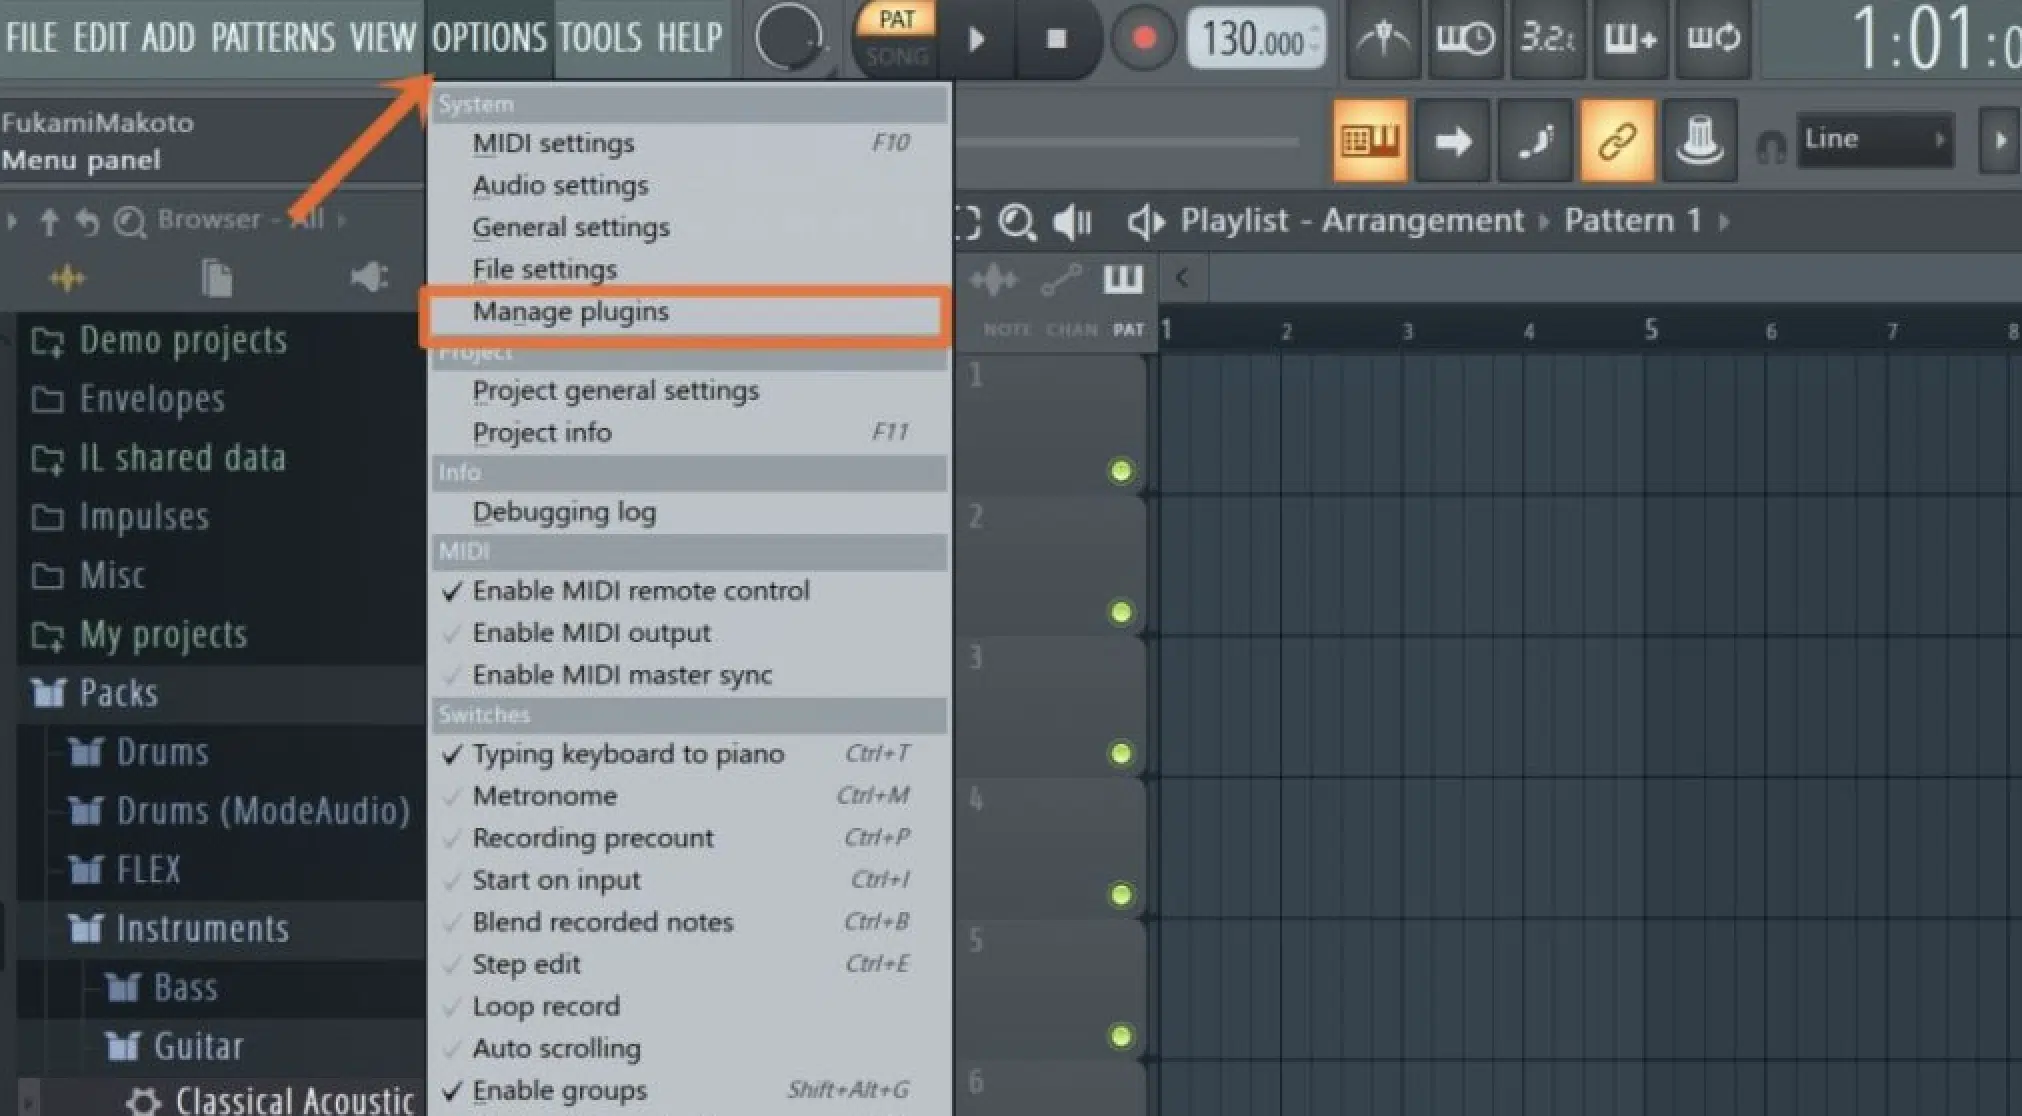
When you’re learning how to install VST plug ins in FL Studio, the Plugin Manager is your best friend for installing VST plugins.
To access it (after you open FL Studio):
- Click on “Options” in the menu bar.
- Choose “Manage plugins.”
Once you open the Plugin Manager, you’ll see a list of all your installed plugins, both VST and native FL Studio ones.
There’s also a ‘Refresh’ button 一 keep an eye on it, you’ll need it later.
The Plugin Manager has a ‘Plugin search paths’ section, which is where you can specify the folders where FL Studio should look for plugins.
It’s a good idea to add your VST plugin folders here.
Advanced users may opt to use the ‘Verified’ and ‘New’ tabs in the Plugin Manager.
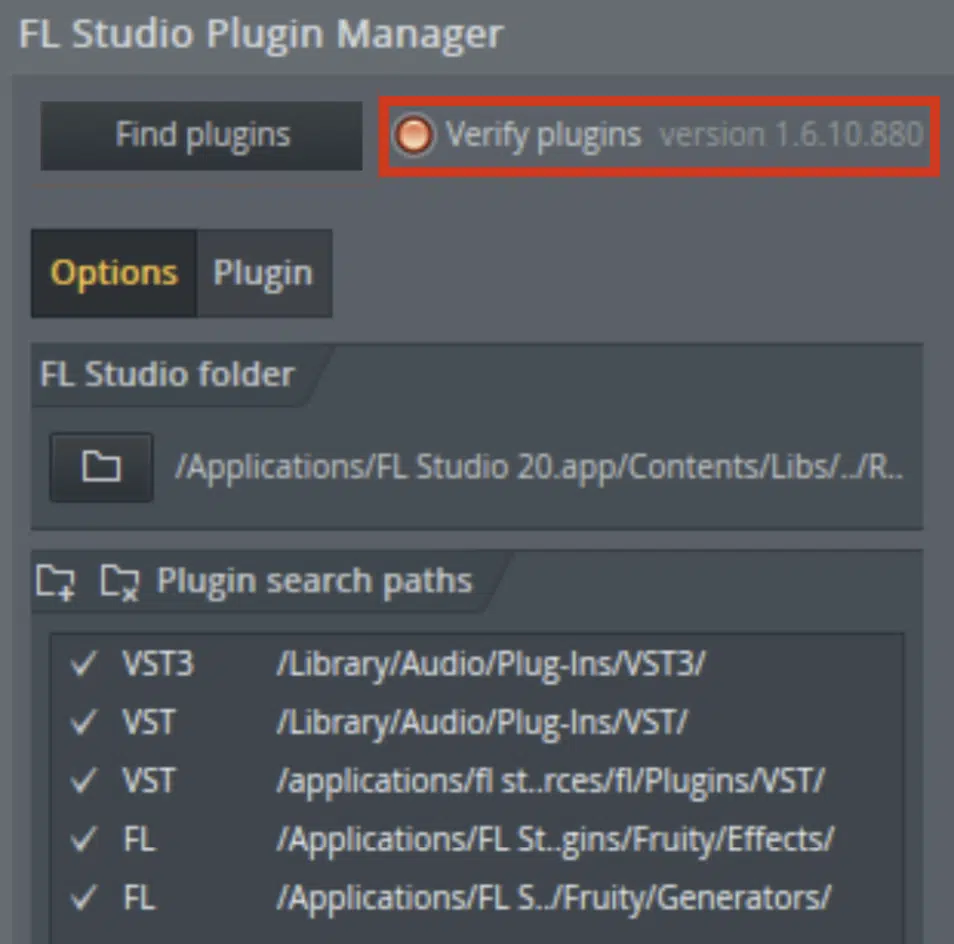
These are super helpful for identifying plugins you’ve recently added or verifying existing ones.
NOTE: If you’re having trouble finding your brand new VST plugin in the list, click the ‘Find more plugins’ button.
FL Studio will automatically scan all folders in the plug in search paths for new/missing plugins.
As a music producer, knowing these little details can seriously help you out when you’re learning how to install VST plugins.
-
Locating the VST Folder
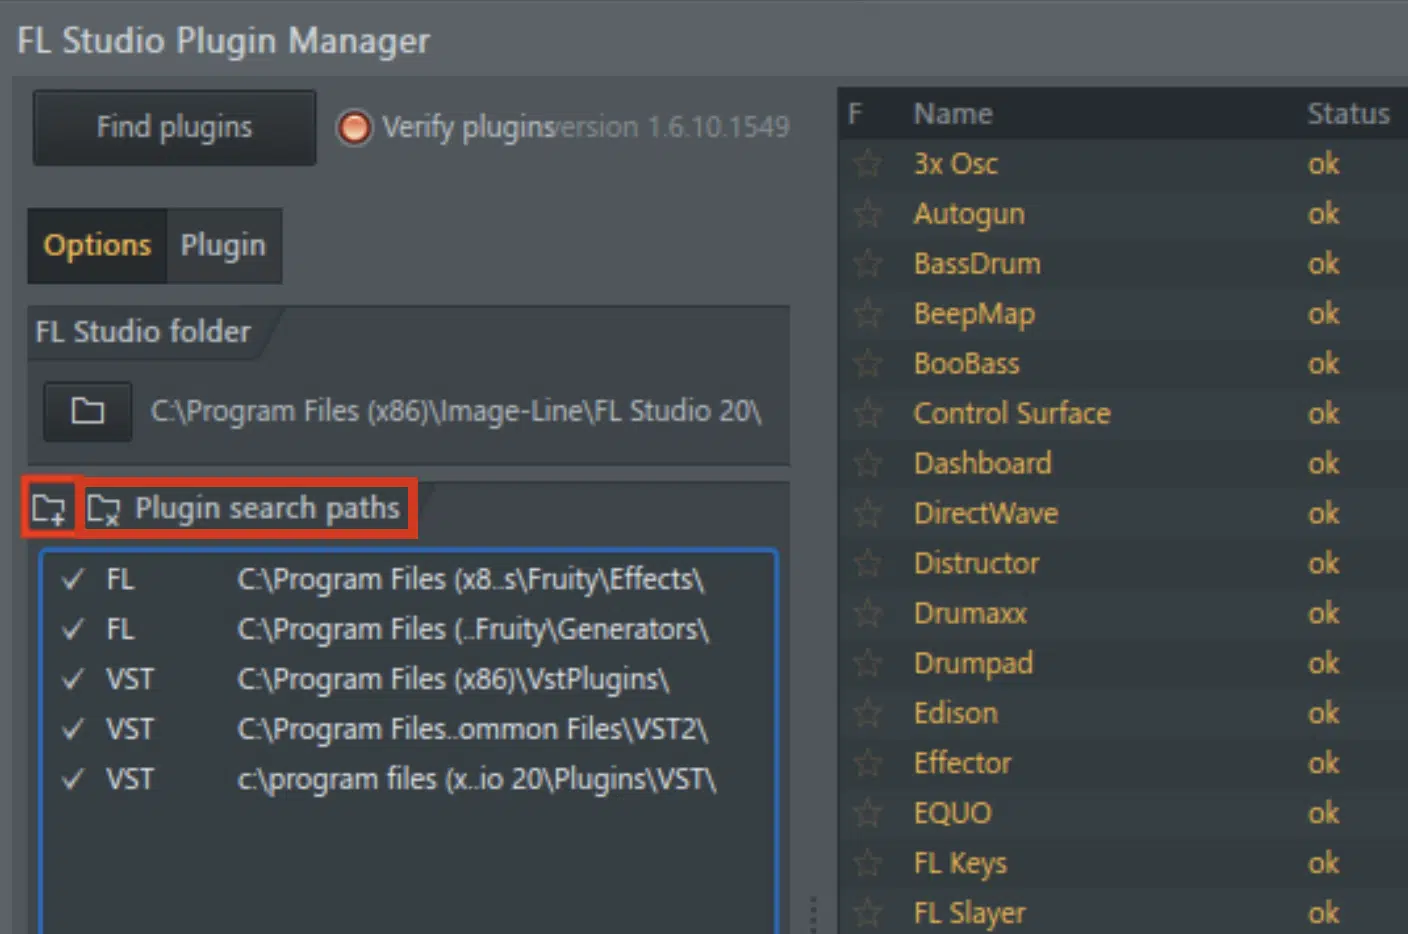
This may sound basic, but knowing exactly where your VST folder is located is crucial.
In most cases, FL Studio will use its default VST folder (C:\Program Files\VSTPlugins for Windows).
However, if you’ve installed plugins elsewhere or are using a custom folder, you need to add this path to the Plugin Manager under ‘Plugin search paths’ (above).
Why is this important?…
Because if FL Studio can’t find your VST plugins, it can’t use them, and you can’t get to making professional beats.
And if you’re in the middle of a creative flow, the last thing you want is to pause to troubleshoot.
Save yourself future headaches by consolidating all your VSTs into one or two folders.
This makes the folder paths easier to manage within FL Studio’s Plugin Manager.
-
Installing VST Plugins to FL Studio Software
After you’ve located and set your VST folder in Plugin Manager, it’s time to actually add the plugins into FL Studio.
To do this, click the ‘Start scan’ button in Plugin Manager.
FL Studio will now scan your designated folders and automatically add any new VST plug ins it finds.
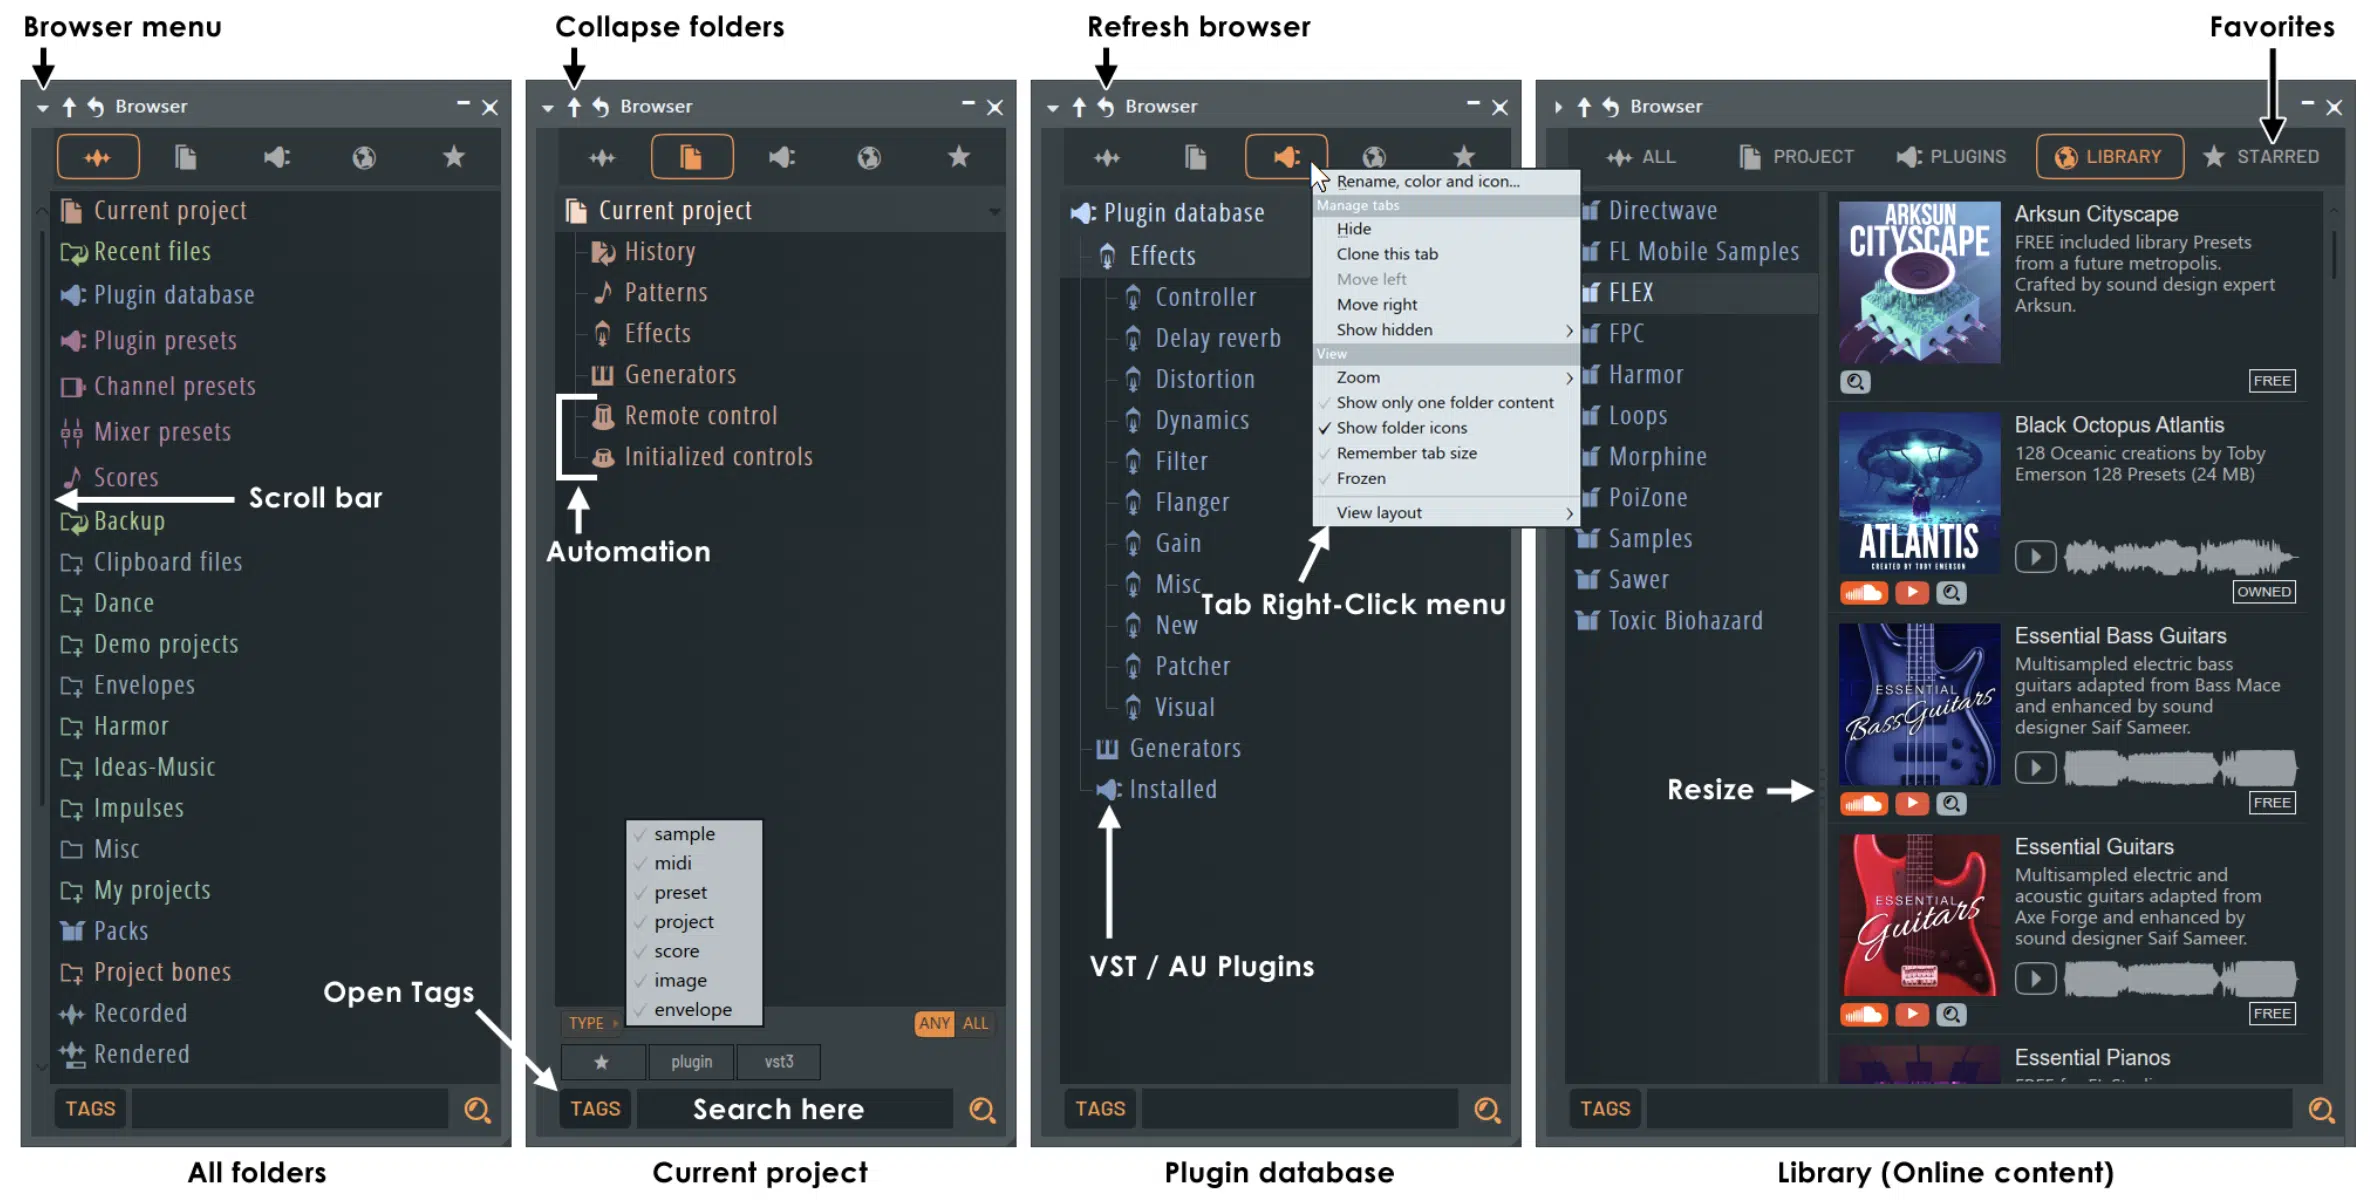
After the scan, new plugins will appear in the ‘Plugin database’ in the Browser panel on the left side of FL Studio’s interface.
You can now drag these into your project.
Remember to also verify your VST plug ins 一 an unverified plugin can cause instability.
To verify, click on the ‘Verified’ tab in Plugin Manager and check the boxes next to your new plugins.
If you’ve got a ton of plugins, FL Studio allows you to create subcategories in your plugin database.
You can sort plugins by type, brand, instruments (drums, pianos, bass, 808, etc.) or whatever else makes sense for your workflow.
How to Install VST Plugins in Ableton Live
As we shift gears, let’s look at Ableton Live, another favorite in the digital audio workstation (DAW) community.
-
Program Files & Install Location
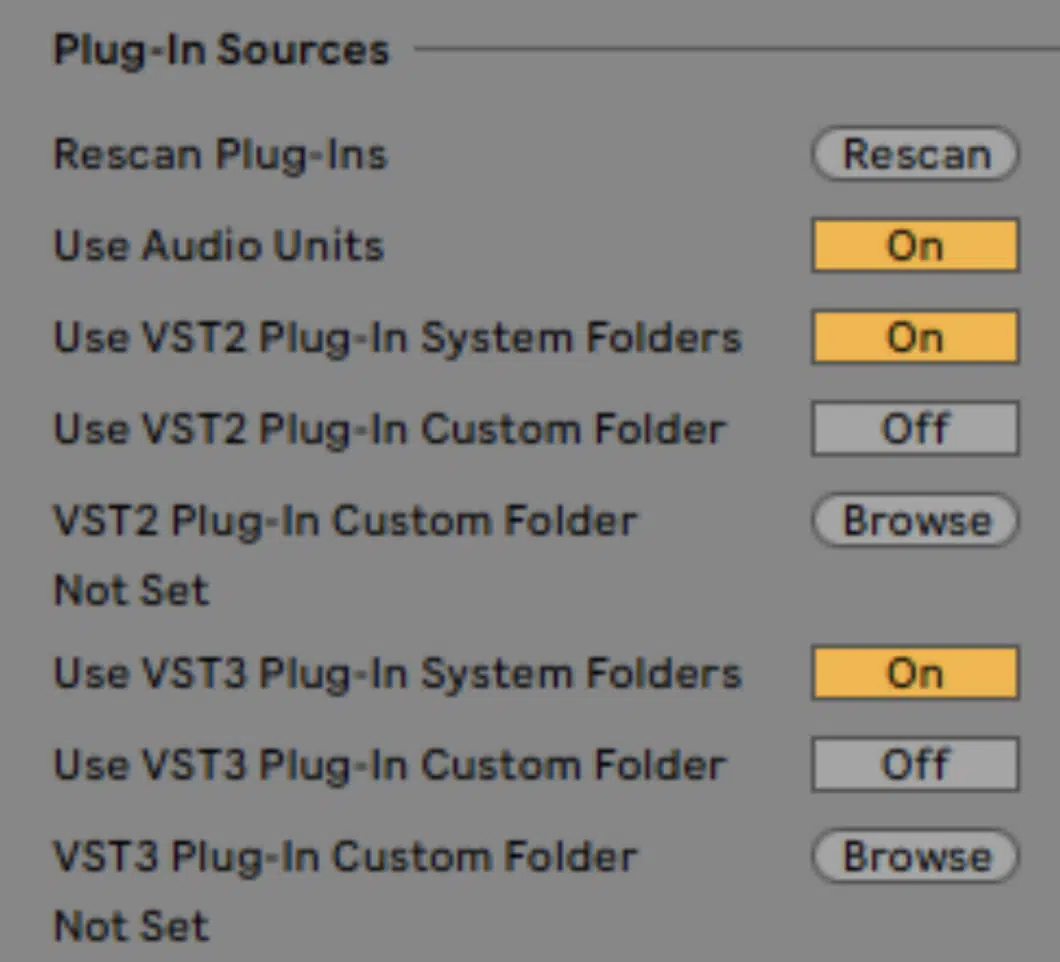
In Ableton Live, plugins usually go in the default VST folder that the DAW scans upon startup.
- On Windows: C:\Program Files\VSTPlugins.
- On macOS: Library/Audio/Plug-ins/VST.
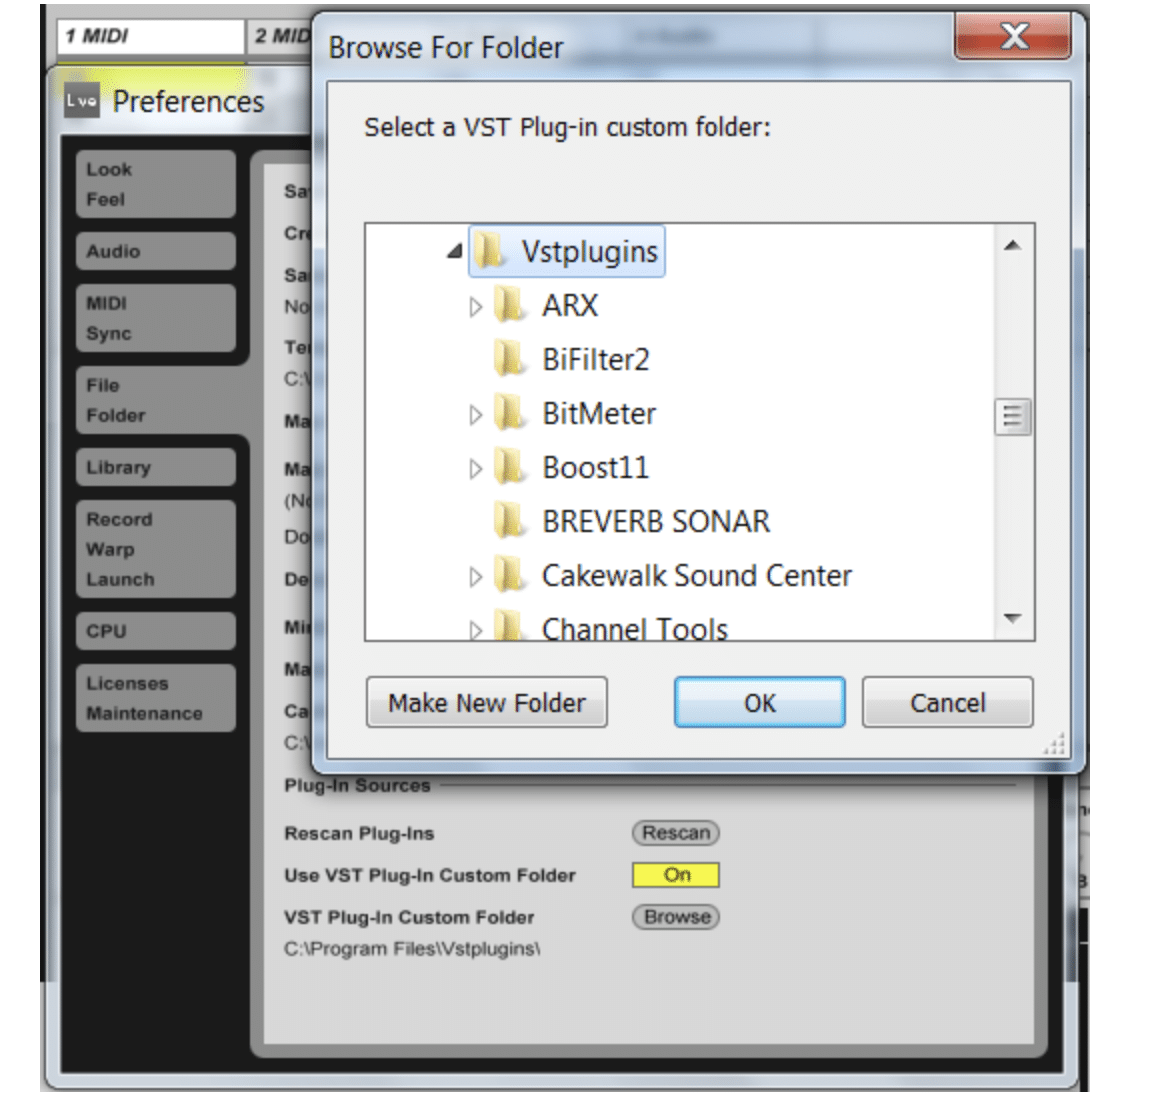
If you’ve installed VST plug ins in a different location, you can point Ableton Live to that plugin directory by going to Preferences > Plug-ins and setting the “Custom Folder” location.
Ableton Live supports both VST2 and VST3 formats.
So, make sure to place the appropriate plugins in their respective folders to avoid any potential conflicts.
If you’ve set a custom folder, ensure you toggle ‘Use VST Plug-In Custom Folder’ on, so Ableton knows to scan that location.
-
Managing Plugins Through Plugin Manager
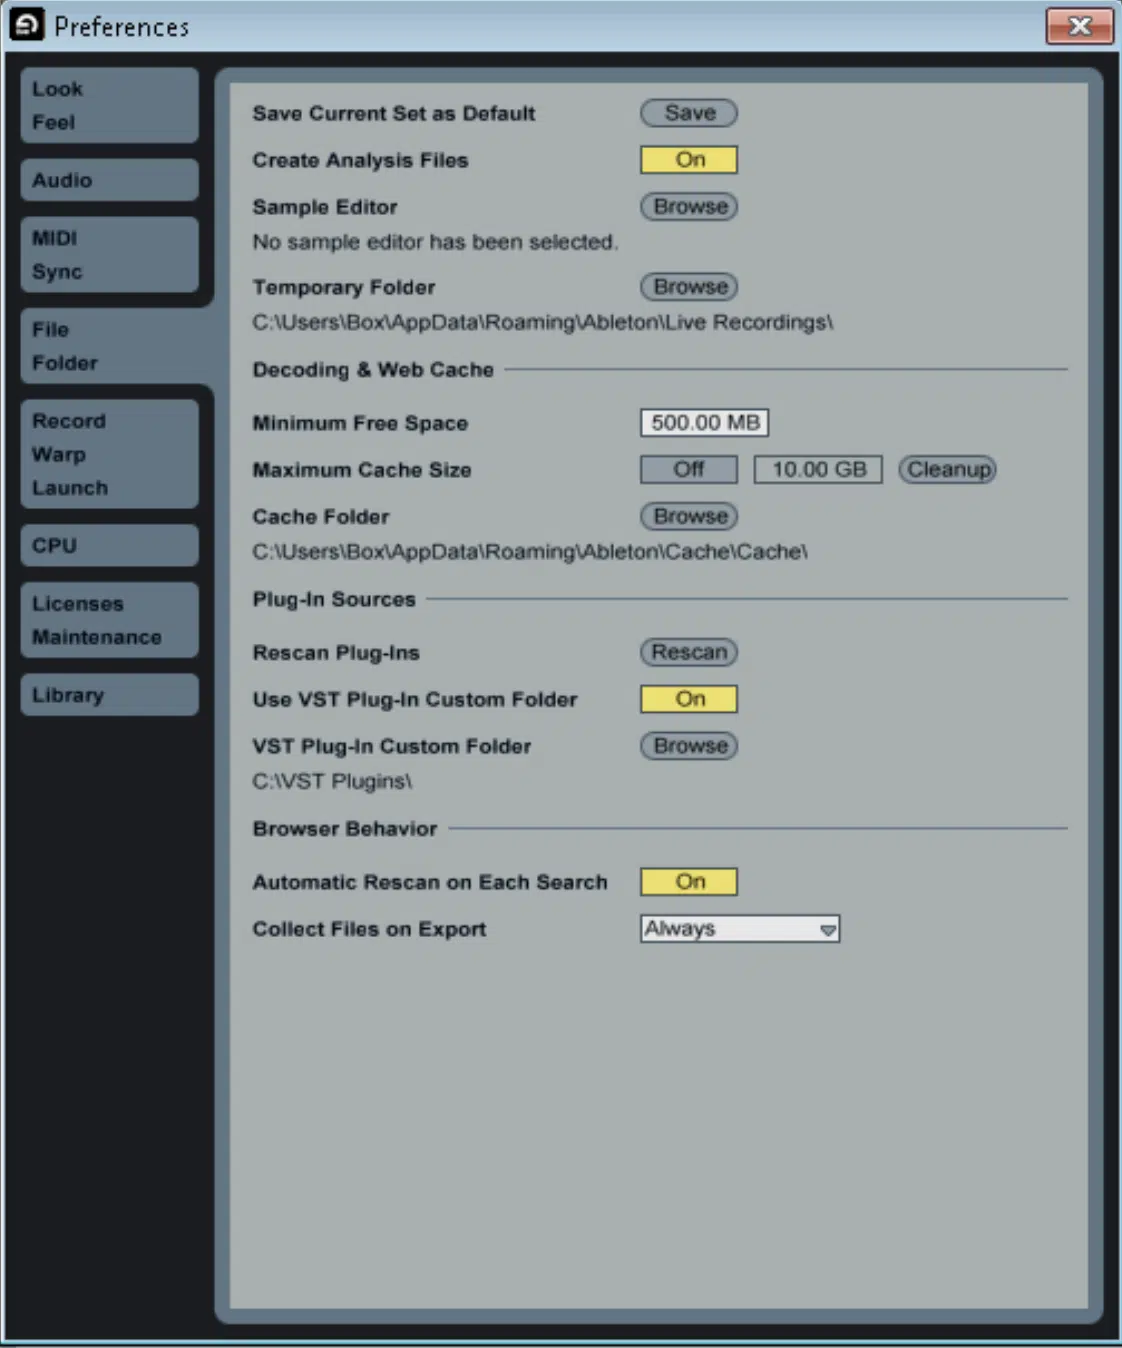
Once you’ve installed your VST plug ins and have your VST plug ins in the correct folders, you can manage them in Ableton Live through the “Plug-Ins” tab in the browser sidebar.
To make your plugins appear in Ableton, you’ll need to scan for new VST plugins.
This usually happens automatically when you start the program 一 but you can also force a rescan through Preferences > Plug-ins by hitting “Rescan” (shown above).
After scanning, your new plugins should appear in the “Plug-Ins” tab.
If they don’t, double-check that you’ve got the right paths and file types set in Preferences.
Ableton Live allows you to enable or disable plugins directly through the browser sidebar, which can help if a certain plug in is causing performance issues.
PRO TIP: Use the “Collections” feature in Ableton to create custom categories for your plugins, such as “Compressors” or “Favorite Synths.”
This can greatly streamline your workflow.
How to Install VST Plugins in Logic Pro
For those of you working on a Mac, let’s cover how to manage, organize, and how to install VST plugins in Logic Pro.
-
Understanding Macintosh HD & Common Files
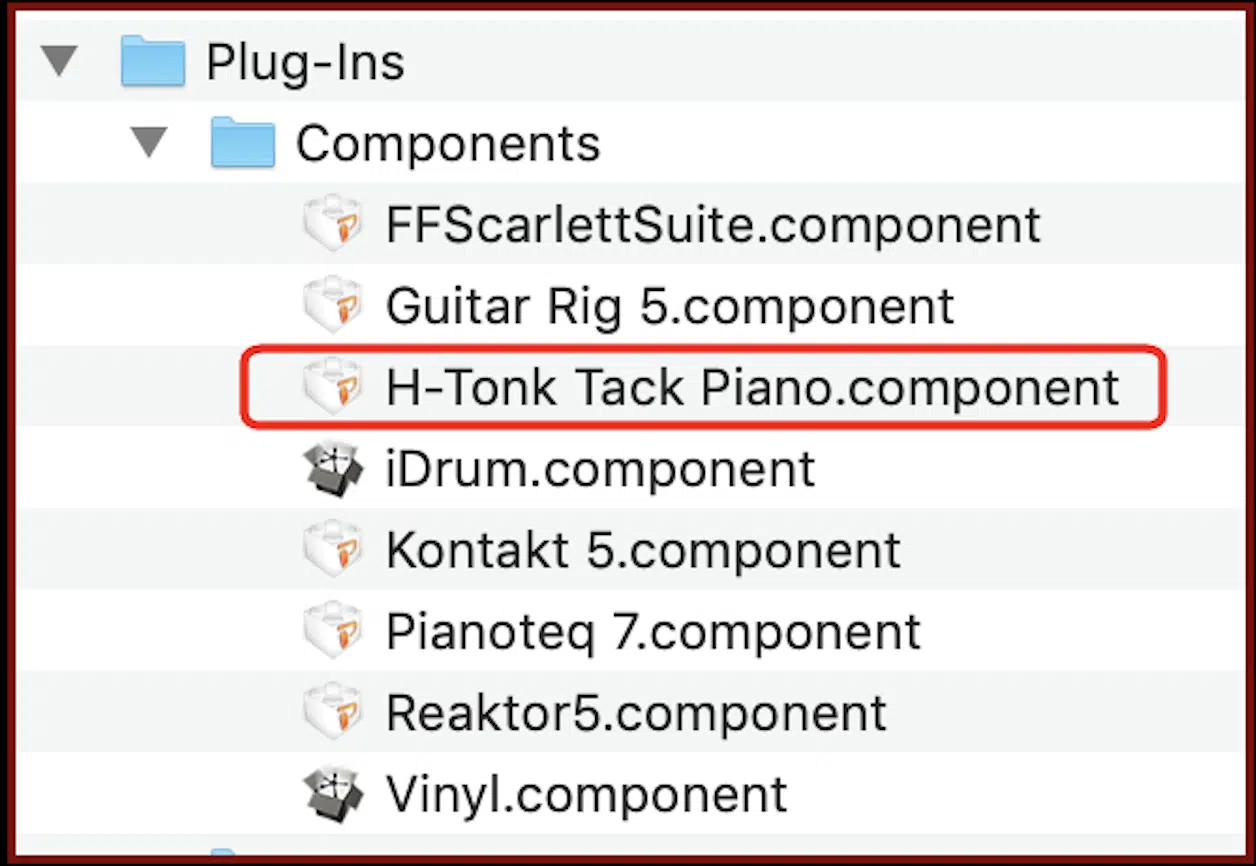
Logic Pro only supports the Audio Units (AU) plugin format, so you’ll need to place your .component files in Library/Audio/Plug-Ins/Components.
If you’re also using another DAW that uses VST formats, remember, these will be in separate folders (Library/Audio/Plug-Ins/VST or VST3).
It’s crucial to remember that installing for Logic Pro will usually not automatically install VST versions of the plugin.
So, make sure you select the correct VST format during the installation process.
Logic Pro scans for new plugins upon startup.
If you’ve added a new plugin while Logic is running, simply restart the DAW to initiate a scan.
-
Setting up Library Audio Plug-ins
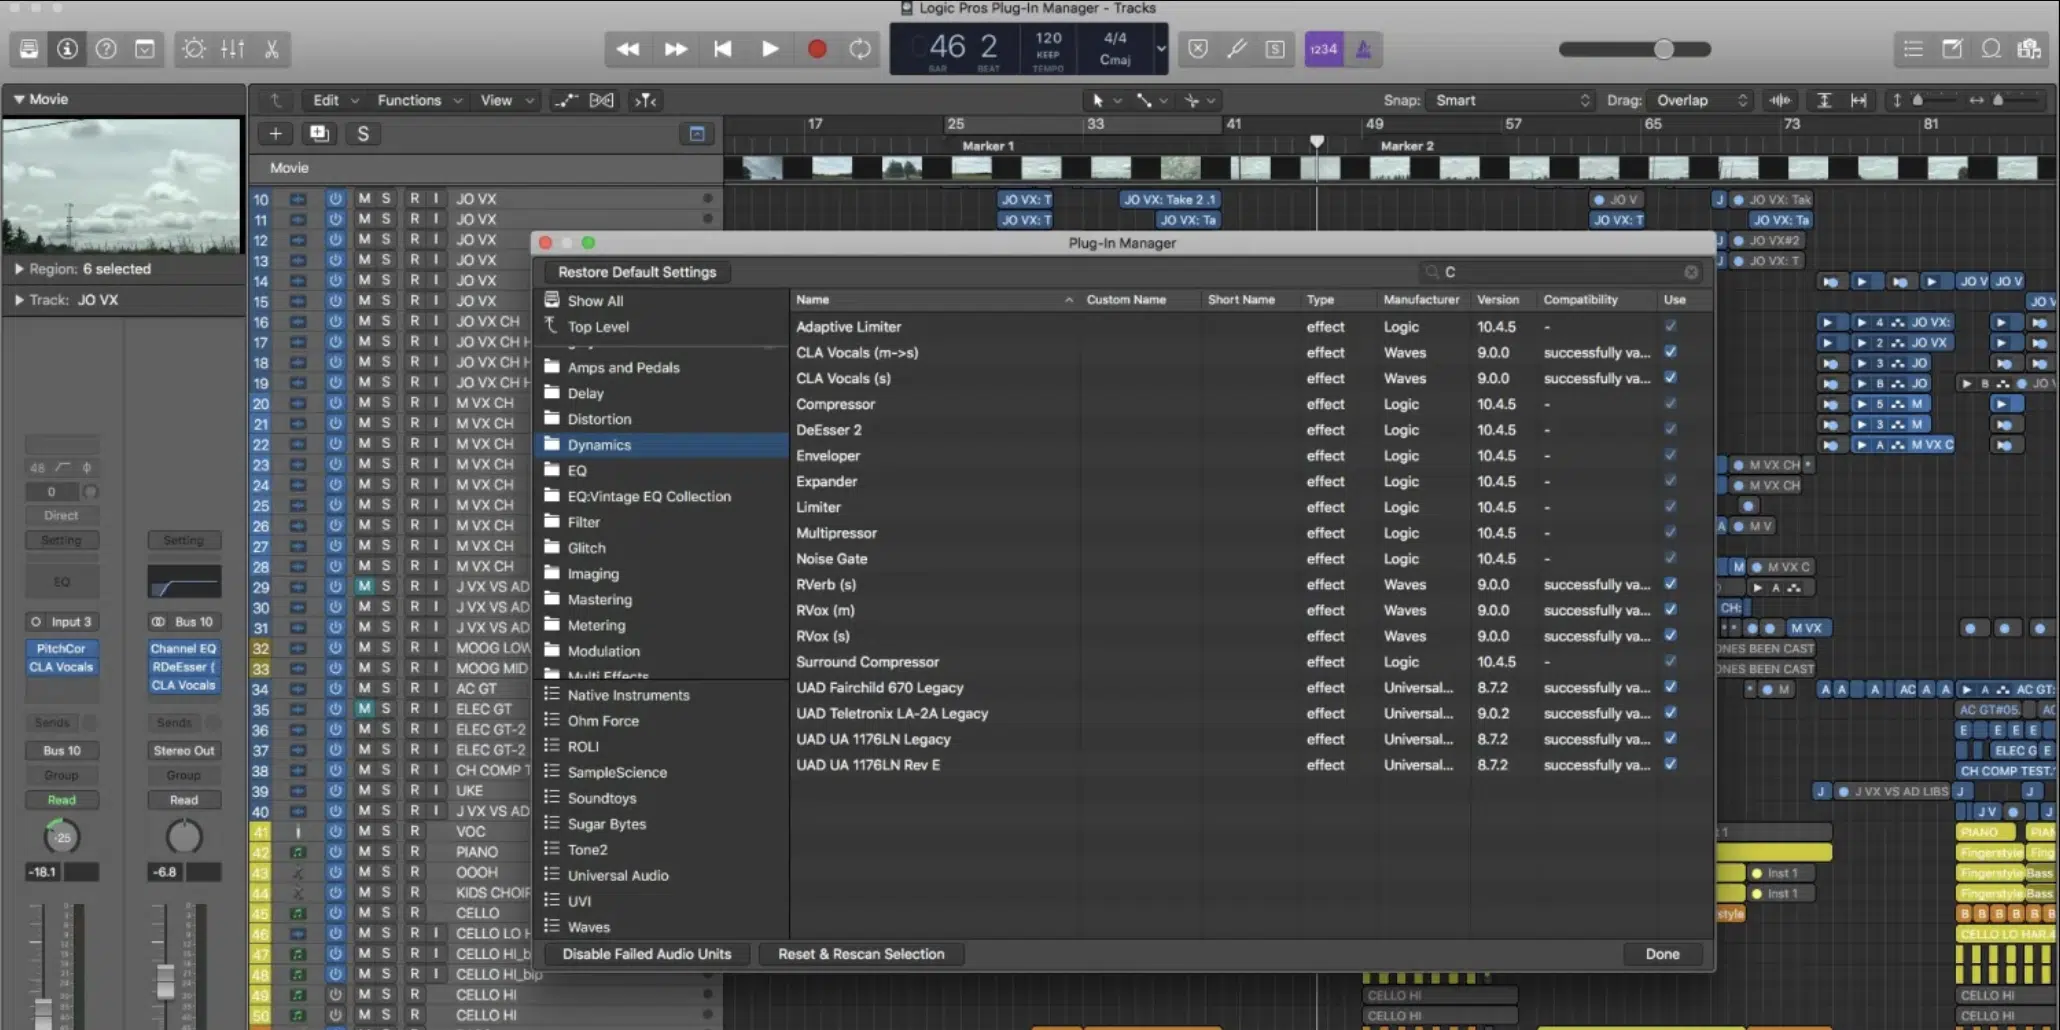
Once you’ve placed your plugins in the correct folder, start Logic Pro to let it scan for new plugins automatically.
You can manage and categorize your plugins within Logic Pro by clicking on “Logic Pro” in the menu bar and selecting Preferences > Plug-In Manager.
The Plug-In Manager displays a list of all installed plugins and allows you to disable/enable them individually.
This is useful for troubleshooting problematic plugins.
PRO TIP: Logic Pro allows you to create “Plugin Groups” in the Plugin Manager.
This is similar to Ableton’s Collections and helps keep your plugins organized.
The Plug-In Manager in Logic also lets you validate plugins, which ensures they’re compatible and stable.
Use this feature regularly to keep your setup as reliable as possible.
If you’re looking for the dopest Logic Pro plugins that can help your tracks shine, we’ve got you covered!
-
BONUS: Managing Plugin Database
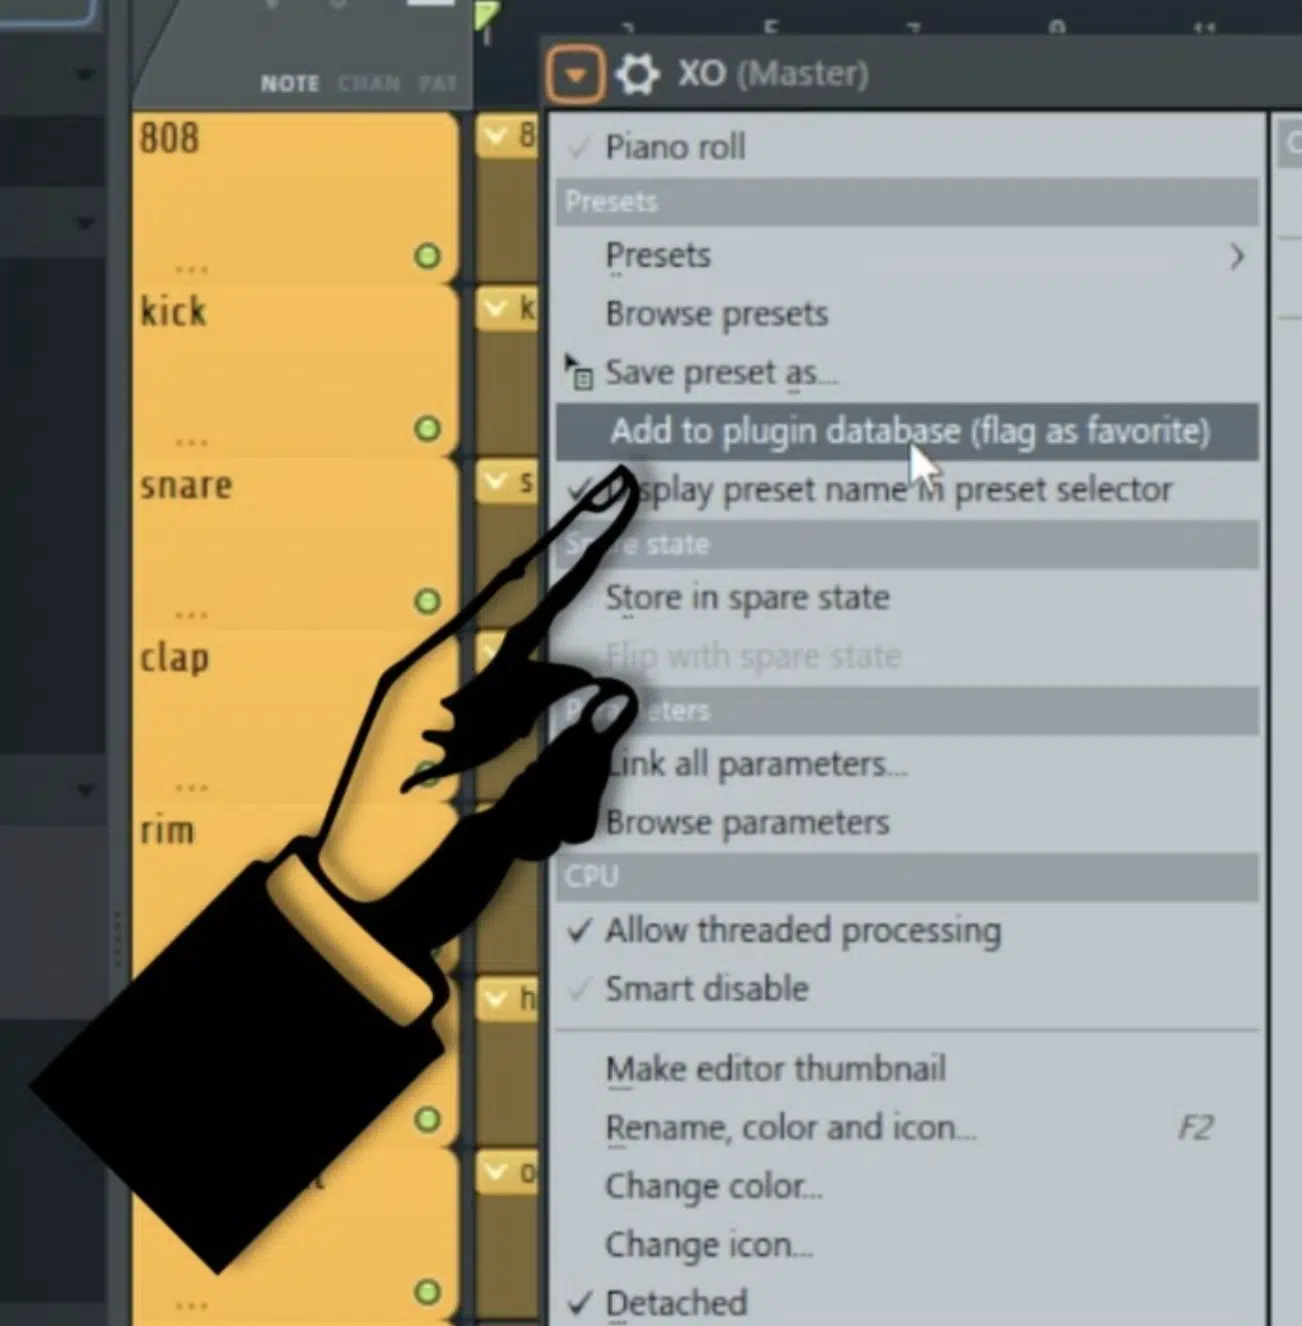
Your DAW usually keeps a database of all your installed plugins.
FL Studio, for example, lists them in the Plugin Database where you can categorize them, as we touched on briefly.
A well-organized plug in database can speed up your workflow dramatically.
Use folders for different types of plugins, like:
- Compressors
- EQs
- Distortion
- Your all-time favorite plugins
Make it a habit to update this database whenever you install VST plugins.
Most DAWs allow you to manually refresh the plugin list without restarting the software.
Always remember to regularly back up your plugin database.
In case something goes wrong or you switch computers, this will save you heaps of time in setting things up all over again.
PRO TIP: Many DAWs, including FL Studio and Ableton Live, allow you to “favorite” or “star” your favorite plugins, making them easier to find (as shown above).
How to Install VST Plugins: Final Thoughts
VST plugins, as you now know, can significantly elevate your music production game.
They offer everything from nuanced virtual instruments to transformative audio effects.
And now, you finally have the resources to install, locate, and arrange VST plugins like an absolute pro.
No more endless searches or confusion 一 you’re fully equipped to streamline your creative workflow.
Now, you’ll never have to ask yourself how to install VST plugins ever again, just refer back to this article if you forget anything.
Before you get lost in your next project, there’s one more tool you shouldn’t overlook: the Free Zen Master VST Plugin.
This fantastic tool can be a game-changer for you and your beats.
The Zen Master plugin is perfect for adding those unique lo-fi vibes instantly to your tracks.
With 5 unique effects that can revitalize your music, it’s pro-level sounds at zero cost.
It doesn’t get much better than that!
So, go ahead and use those VST plugins to create innovative, timeless music for the masses.
Until next time…


Leave a Reply
You must belogged in to post a comment.