The mix bus is the unsung hero of the music production world, and the key to creating rich, dynamic, and balanced mixes.
It is an integral part of the audio production process that takes the diverse elements of your mix and morphs them into a harmonious whole.
Often, it gets confused with the master bus…
However, while they play similar roles, their functions and impacts on the overall sound are distinctively different.
In this comprehensive guide, we delve into the heart of mix bus processing, illuminating its role in music production, and demystifying its operation.
We’ll be breaking down:
- What a mix bus is & the role it plays ✓
- Mix bus vs Master bus ✓
- Setting up your mix bus in your DAW ✓
- Mix bus compression & how to properly apply it ✓
- The signal chain in a mix bus ✓
- Advanced mix bus techniques & pro tips ✓
- Detailed strategies for applying EQ & other effects to your mix bus ✓
- How to achieve a superior mix with balance & dynamic control ✓
- Using side chain filters & crafting the perfect low-end frequencies ✓
By the end of this article, you’ll have a complete understanding of the mix bus and how to optimize its use.
As well as efficiently harnessing its power to elevate the quality of your tracks and take them to the next level.
So, let’s dive in…
Table of Contents
- What is a Mix Bus?
- The Difference Between A Mix Bus & Master Bus
- Creating a Mix Bus in Your DAW
- PRO TIP
- The Art of Mix Bus Processing: How To Use a Mix Bus
- Mix Bus: Things To Remember
- Techniques for Mixing With Mix Buses
- Applying Mix Bus EQ & Other Effects to Your Mix Bus
- BONUS: Advanced Mix Bus Technique
- PRO TIP
- Final Thoughts
What is a Mix Bus?
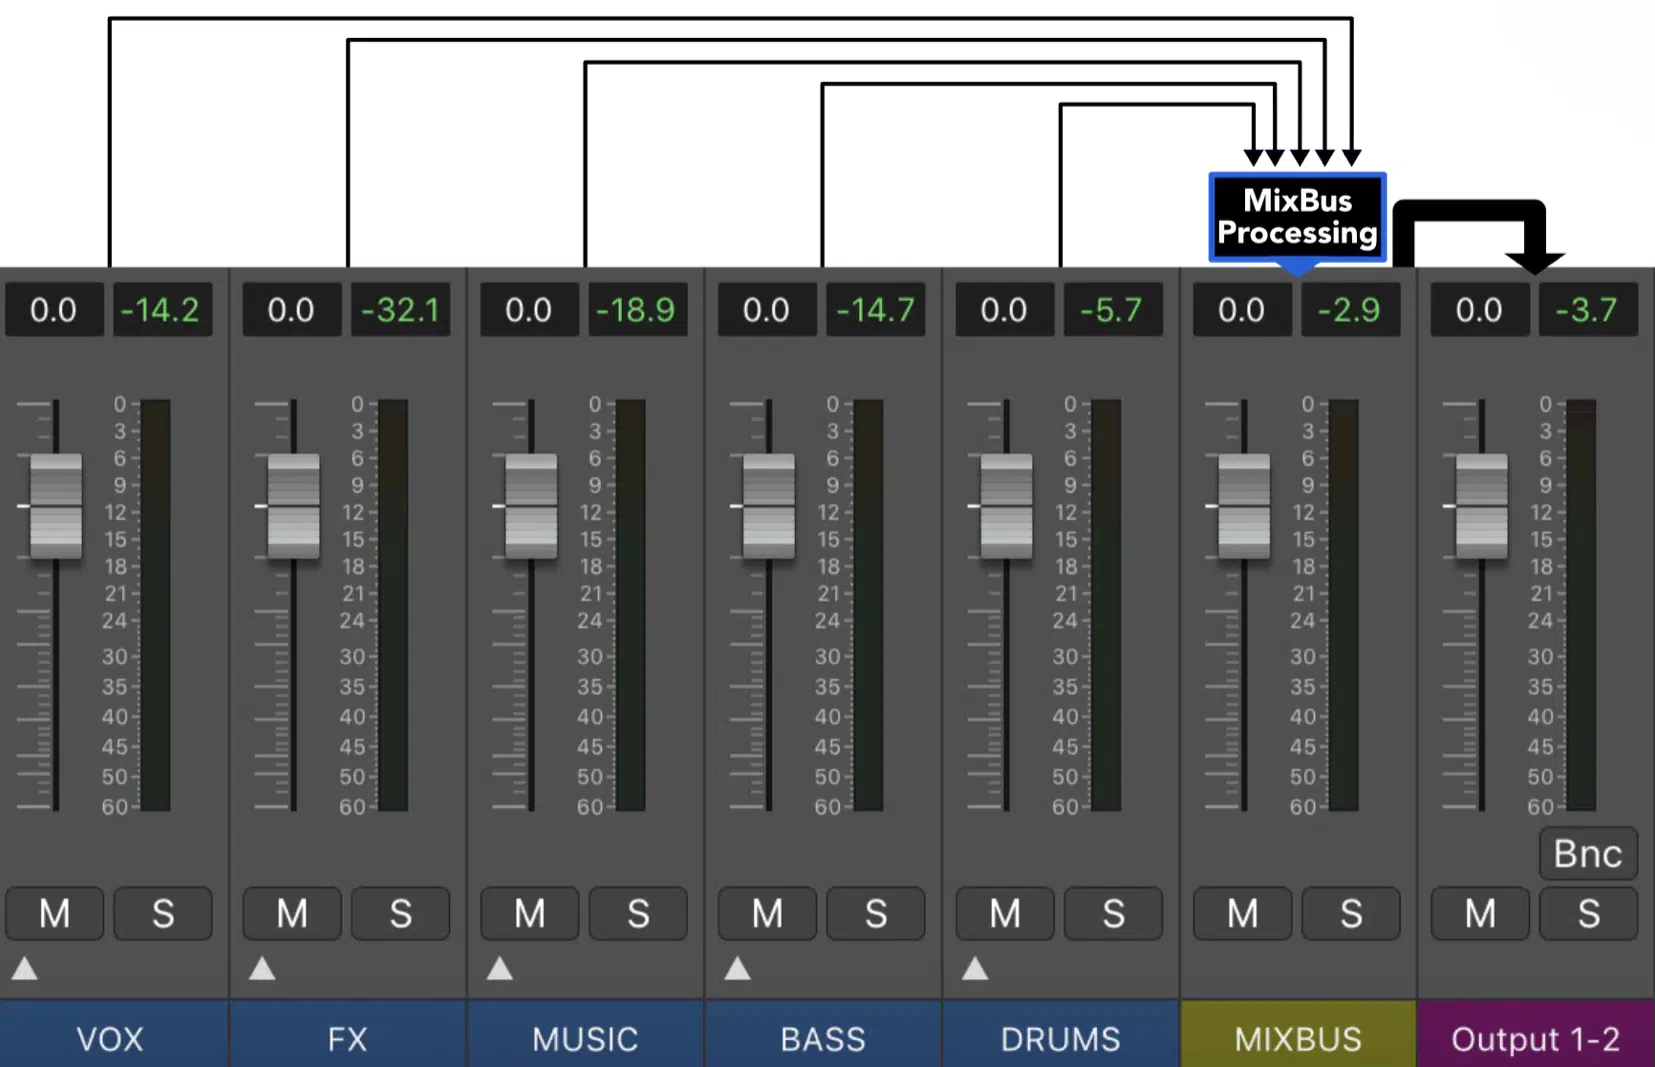
Mastering the mix bus is essential for any digital music producer.
This critical tool enhances your beats, adding that professional touch to your tracks.
The mix bus helps you ensure consistency in your music 一 enabling every beat, transition, and drop to blend seamlessly into one coherent piece.
This cohesion is a direct result of using mix buses to group designated elements within your mix.
It allows for broad adjustments across groups such as the drum mix, once you’ve achieved the ideal volume ratio among individual elements.
Mix buses influence and contain numerous elements, such as:
- Panning left and right channels
- (Broad) group-volume adjustments
- Processing the entire group track
Effective utilization of mix buses enables you to:
- Gently compress and unify elements within your beats
- Refine the stereo field
- Shape the frequency spectrum to craft a sonic masterpiece
Understanding how to use mix buses throughout your track sets you up to master the final and arguably most critical stage in audio production: the mastering process.
This stage gives your music that finished, polished sound, and using a mix bus can significantly streamline this process.
The Difference Between A Mix Bus & Master Bus
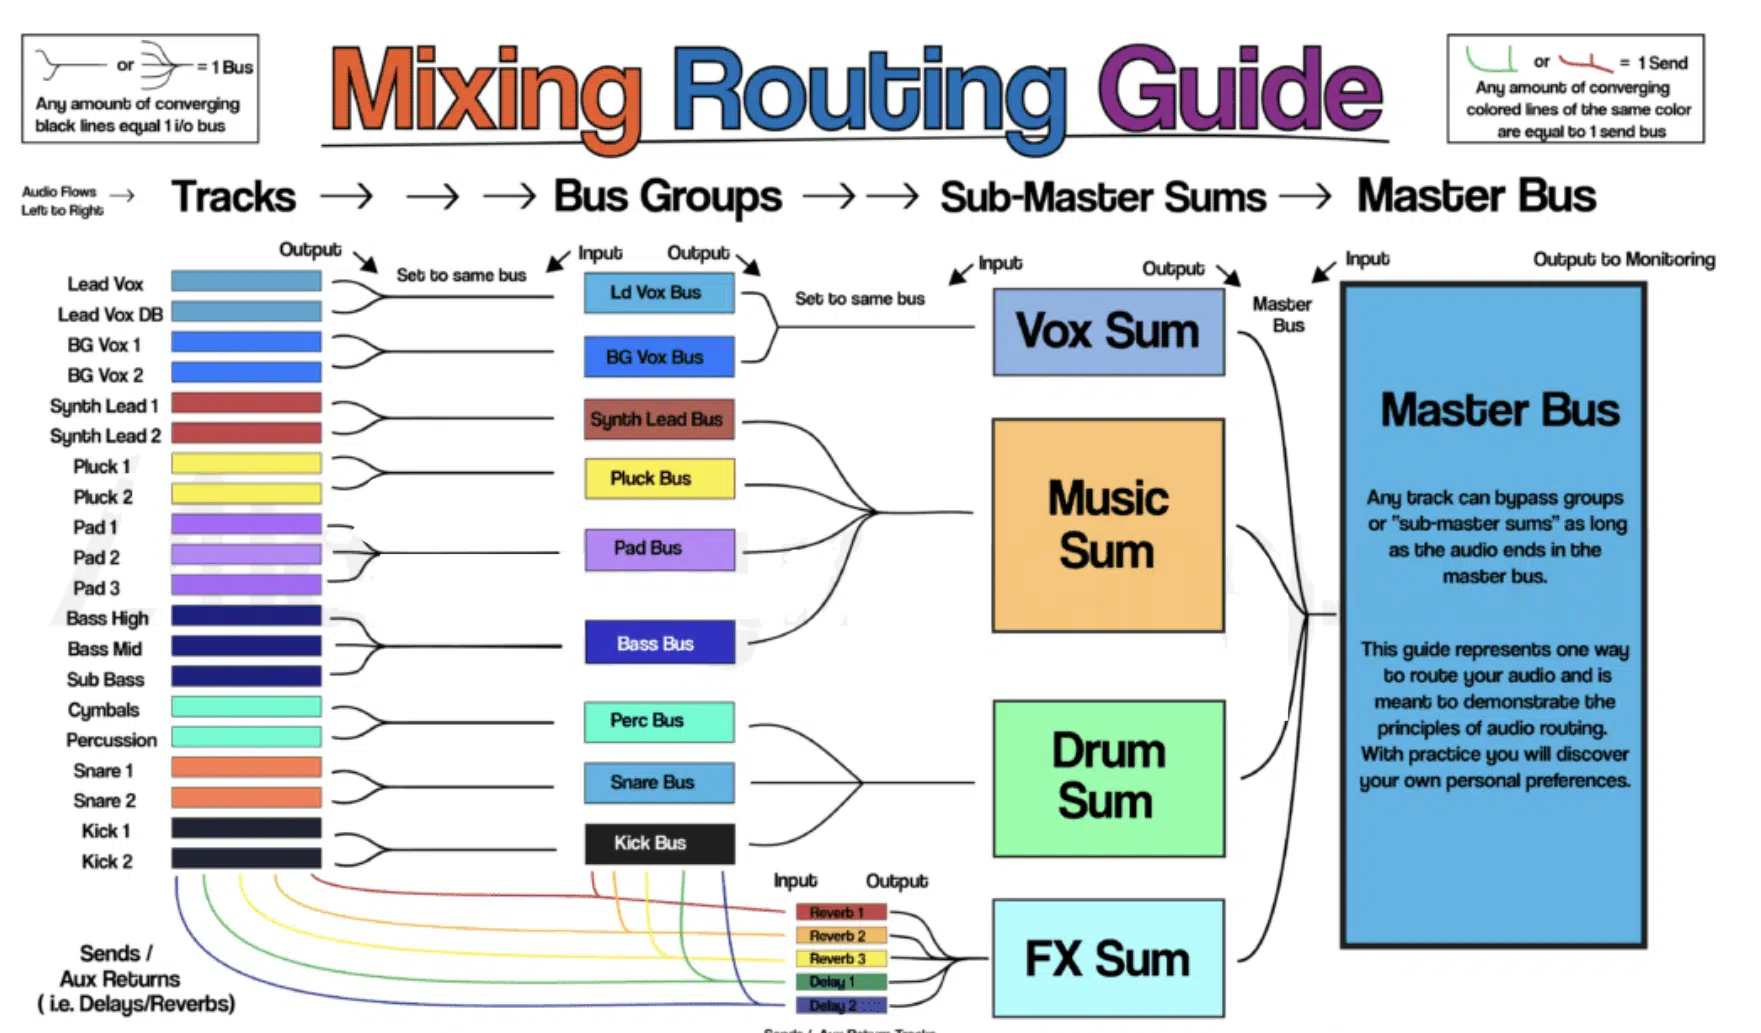
One might wonder about the master bus, and why it’s often confused with a mix bus in your digital audio workstation (DAW).
Just know, in the grand scheme of things, there is a big difference between these two unique entities.
The master bus, or the master track, is the final stage where your mix lands right before exporting.
This channel is the last output and often where mastering effects like compression, limiting, or EQ are applied to finalize the entire mix.
The confusion lies in the fact that the master bus is technically one of the many mix buses within your mix.
It’s like comparing a character bus and a school bus; sort of the same, but traveling down a different road to a different destination.
A Mix Bus
A mix bus processes a group of tracks within your mix.
You use a mix bus to organize your tracks by type, and sometimes frequency content, so you can broadly process them (as a whole).
The Master Bus
The master bus, sometimes referred to as the ‘stereo bus,’ is the final checkpoint for your track and the mix as a whole.
Essentially, the master bus is the last mix bus, used to make final adjustments and subtle changes that fine-tune your track to perfection.
You typically have multiple mix buses within your mix, and even multiple mix buses within others, such as:
- Including one mix bus for your main vocals.
- Another mix bus for your background vocals.
- Perhaps even one more mix bus to sum up the 2 (referred to as the ‘master vocal mix bus’).
This approach also applies to groups such as all the drums, allowing you to apply processing to the sum of these tracks after individual processing.
The master bus is essentially a mix bus, but it is designated for the overall mix instead of a specific group of tracks.
However, note that excessive processing on the master bus could cause phase issues and even compromise your track’s dynamic balance.
Therefore, it’s best used sparingly, with more focus on getting the right sound from your mix bus and individual tracks.
Creating a Mix Bus in Your DAW
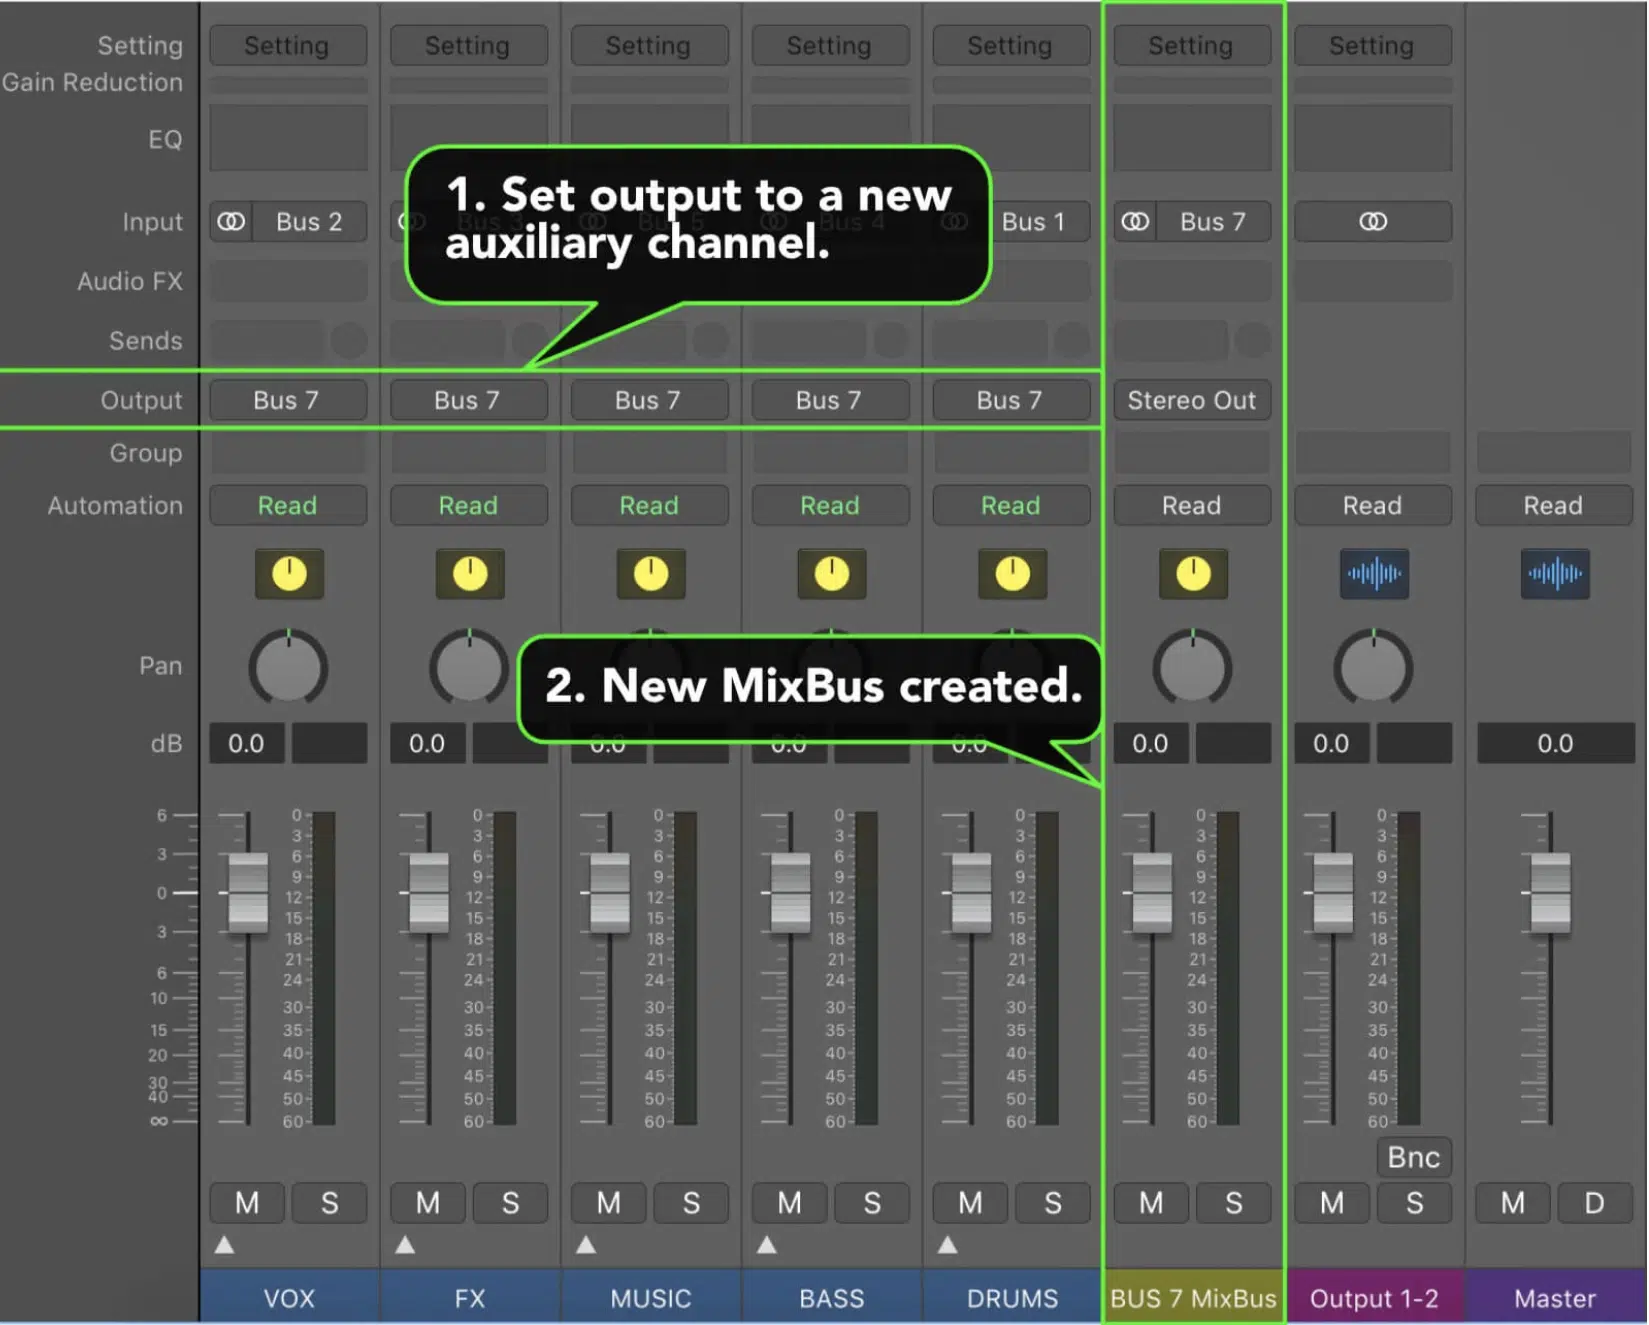
Creating and setting up a mix bus in your DAW starts with routing your desired channels to the mix bus.
Depending on your goals, you might include drums, vocal tracks, and other instruments.
This routing process is crucial for effective and efficient mix bus processing.
When routing channels to the mix bus, ensure you consider the dynamic balance of your mix.
The goal is consistency across all tracks.
So make sure to include tracks that blend well together or belong to common groupings to create a unified sound.
Remember, it’s entirely acceptable and often necessary to create multiple mix buses.
For example, you might route all your drum tracks to one bus and the vocal tracks to another.
This strategy offers more control over the individual elements of your mix while still benefiting from bus processing.
However, for elements like drums and vocals, not all processes can benefit from broad processing without more type-specific processing first.
Hence, it’s vital to create a mix bus group for:
Then, one more mix bus for the sum of the drums & the mix buses (as a whole).
PRO TIP
You can also apply the same process for vocals by separately:
- Grouping the main vocal elements on their own mix bus
- Then the background vocals
- Finally, those more obscure vocal types like harmonies & ad-libs
Then, tie them together with another mix bus (which could be viewed as a “master vocal bus”) while still utilizing mix buses throughout the process.
It could be a reverb bus, aux bus, etc.
This method is employed by every professional in the industry since multitrack mixing and bussing became available.
With the ability to access virtually endless track counts, this process has become increasingly complex.
The Art of Mix Bus Processing: How To Use a Mix Bus
Delving into the art of mix bus processing involves grasping the nuances of audio blending, strategic usage of audio effects, and maintaining dynamic balance.
These are all critical elements in creating a harmoniously unified mix that we’ll break down now.
-
Understanding Mix Bus Compression
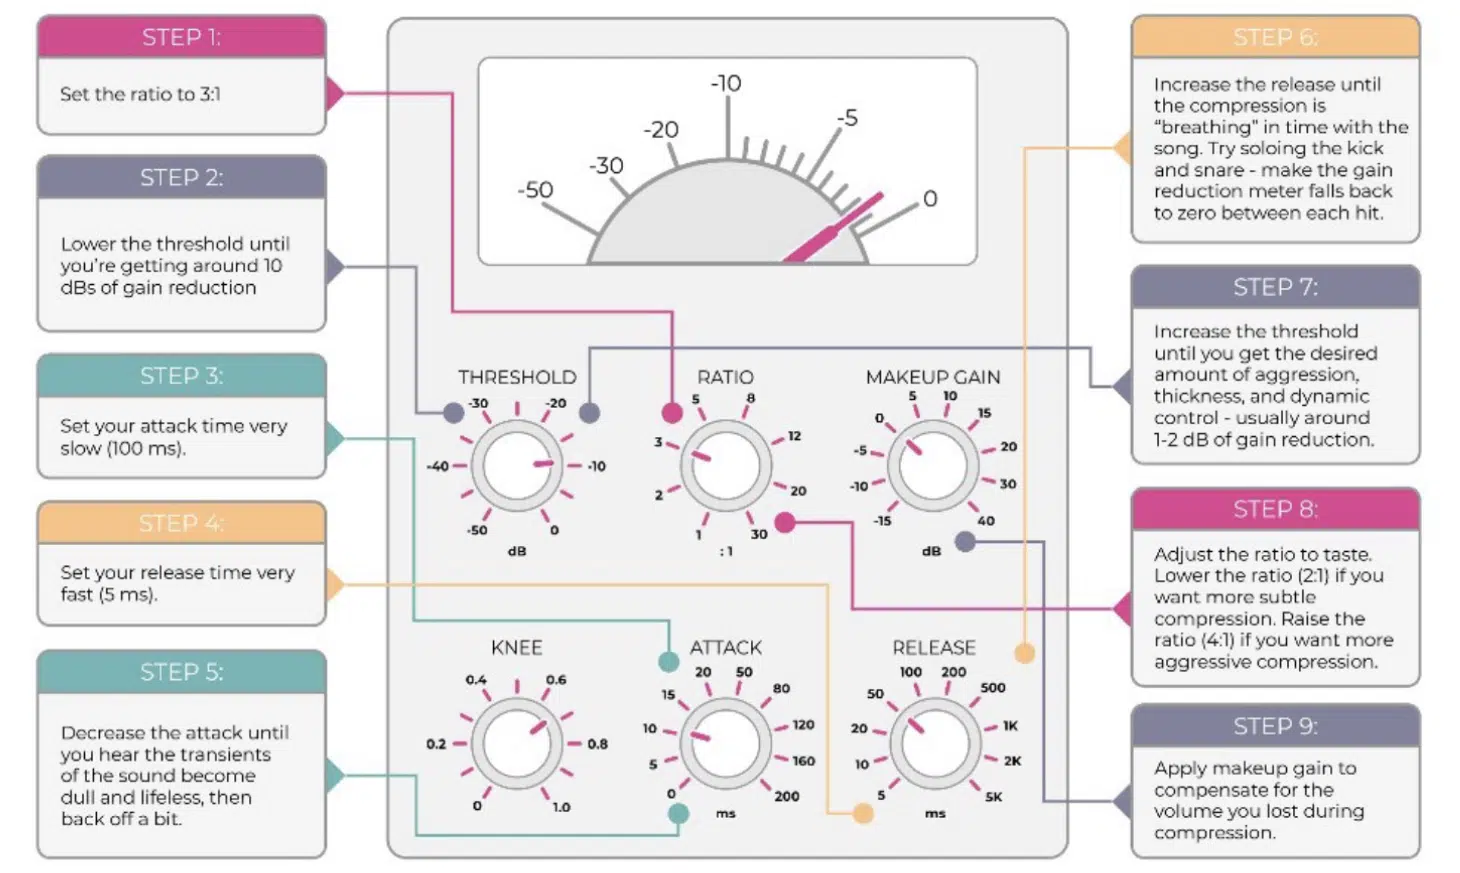
The intricate process of mix bus compression commences once your mix bus is properly set up.
It’s a critical facet of mix bus processing, which aims to gently coalesce your mix and ensure a consistent and dynamically harmonious output.
The key to proficient mix bus compression lies in subtlety.
It’s not about stifling your mix, rather the goal is to employ a slow attack time that permits the transients to propagate prior to the onset of compression.
Combine this with:
- A relatively swift to average release time
- A low ratio for gentle application
- A threshold that is sufficiently high to prevent excessive and unwarranted compression
Adopting this approach retains the dynamic punch in your music, which is quintessential for genres like hip-hop, pop, lo-fi, trap, and much more.
The choice of mix bus compressor is integral to the process, as the selected unit can contribute its unique character to your mix.
While basic digital compressors may not impart significant character, specialized mix bus or analog-modeled compressors often do.
Consider a VCA-style compressor as an example…
It provides a discreet compression that unobtrusively consolidates your mix without altering the tonal balance.
Several advanced compressors currently available feature various modeled algorithms and even provide specific options for mix/master bus applications.
Mix Bus: Things To Remember
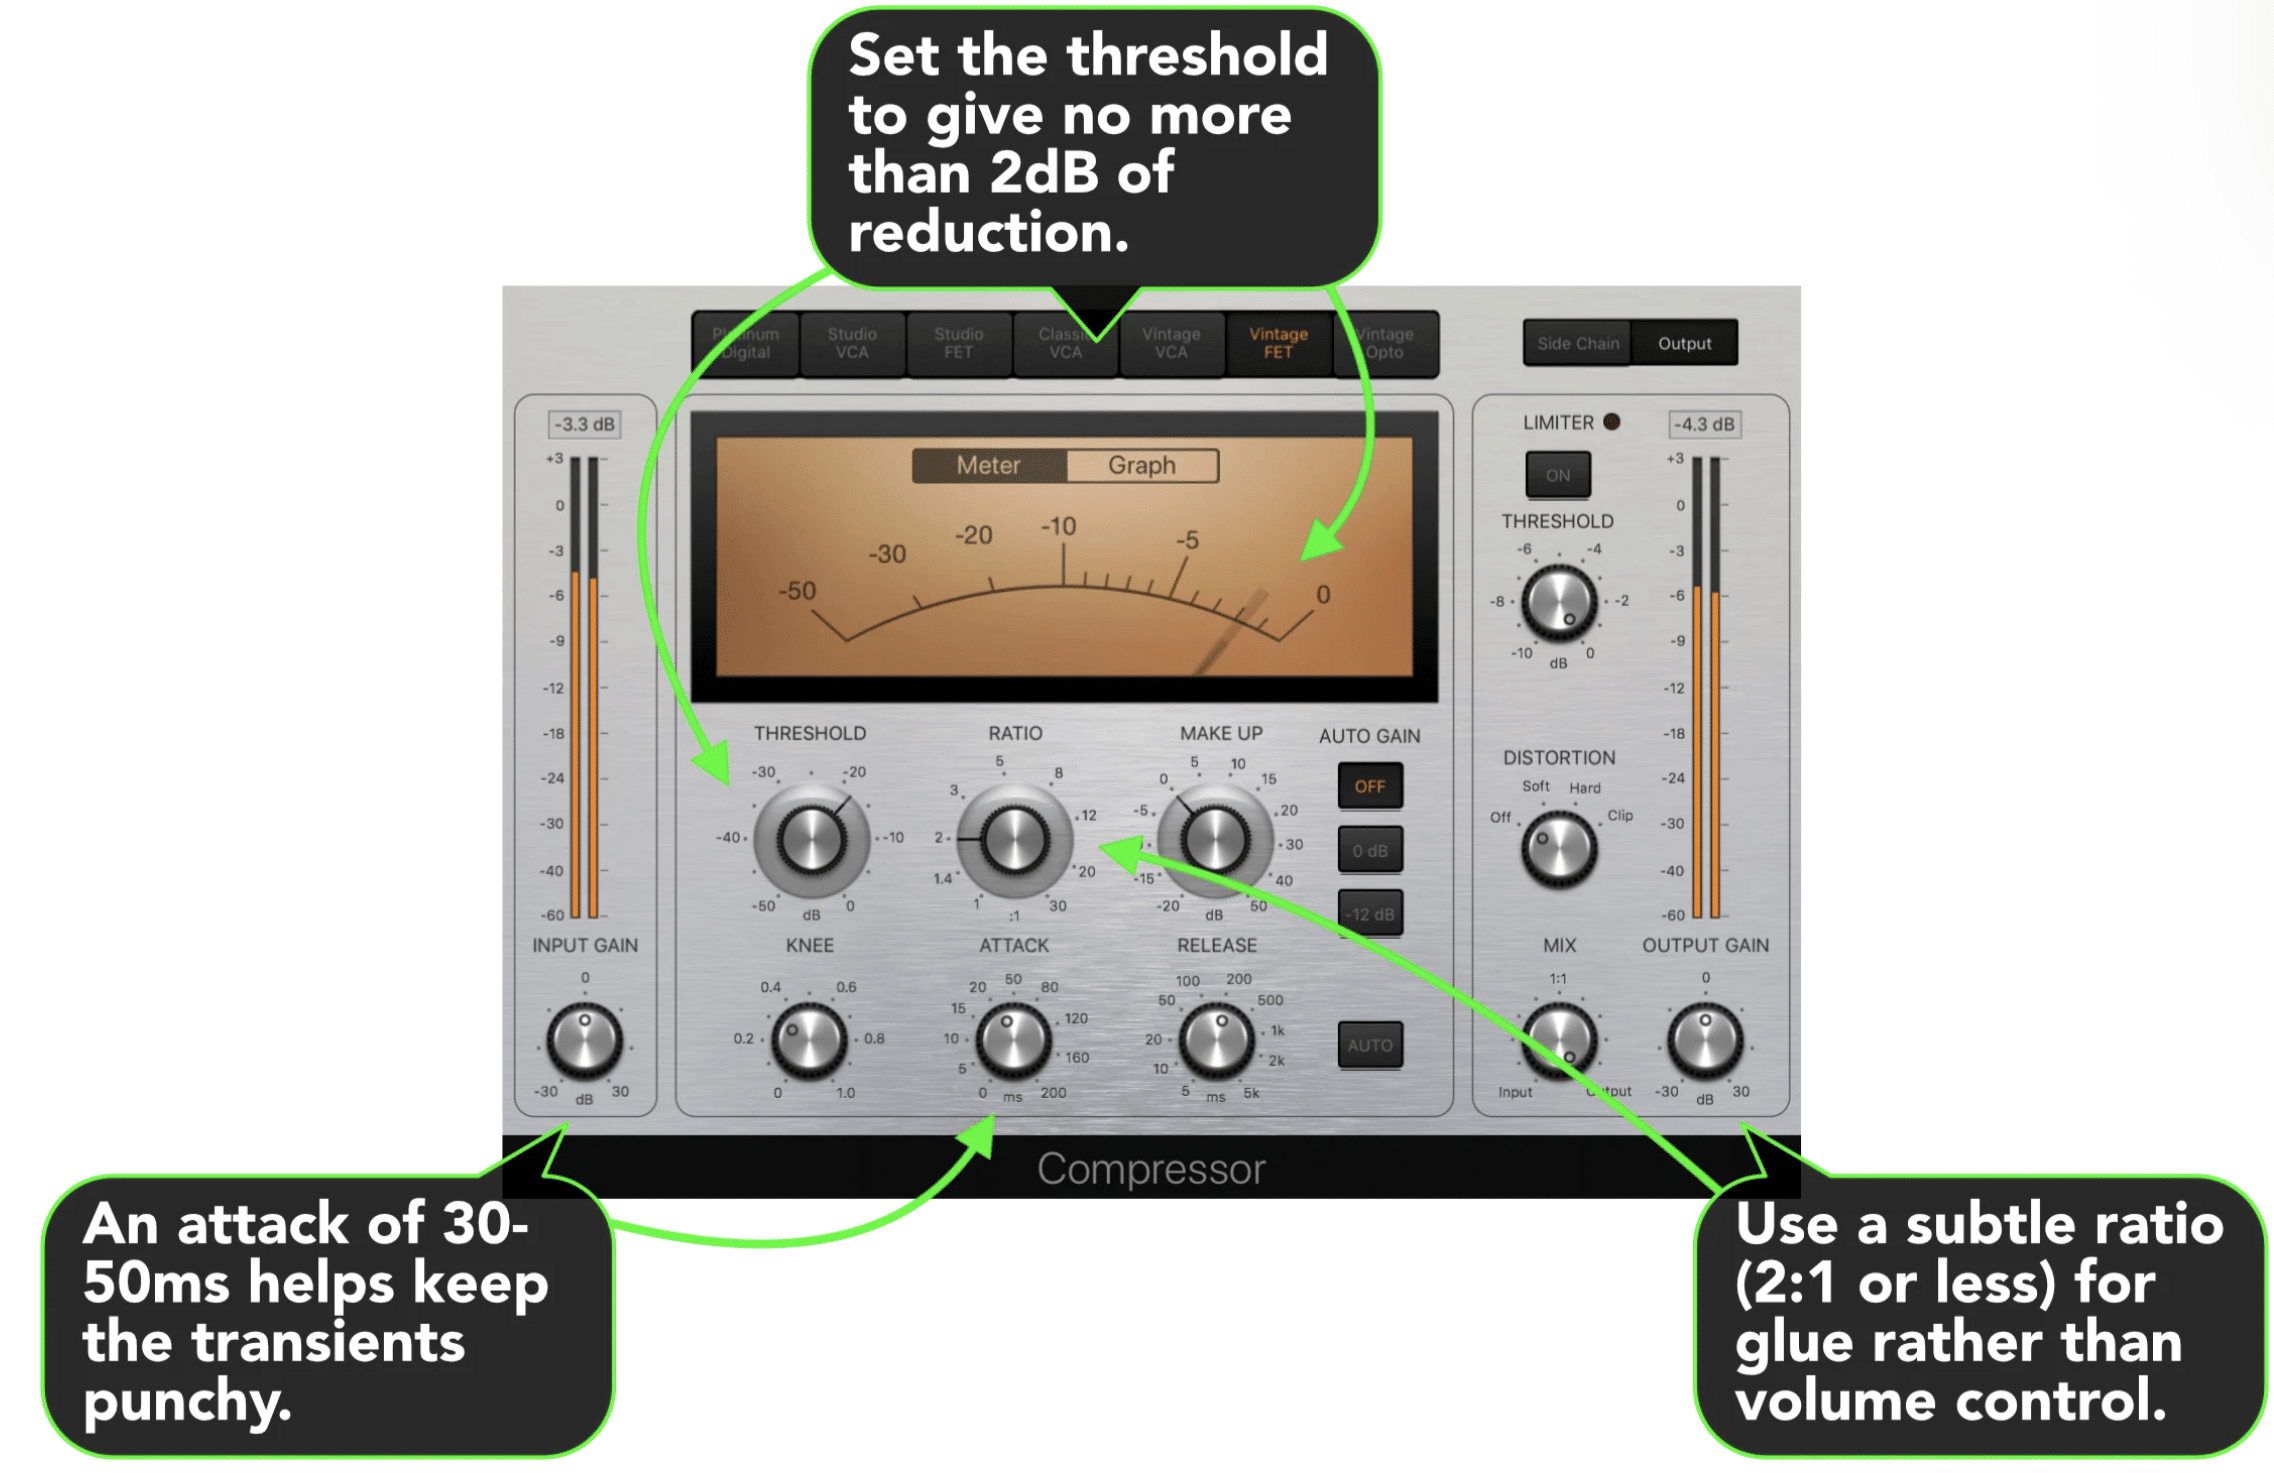
It’s essential to remember that mix bus compression is not about imposing drastic changes; it’s more about minor tweaks and subtle modifications.
Maintain a mindset similar to mastering bus compression as the concepts and thought processes are nearly identical.
Given that multiple compressors will be active throughout the mix, focus on the cumulative impact rather than solely the individual effects.
Though the latter should also be considered, naturally.
The aim is to apply gentle compression to the mix 一 reining in any unruly peaks and fostering a sense of unity across multiple tracks.
Keep in mind that any corrections should be made on an individual level, as this process is more about broad strokes.
Overzealous compression can drain the vitality from your music, rob it of its dynamic range, and render it flat and uninspiring.
Therefore, make sure to:
- Exercise caution with the threshold and ratio settings
- Aim for a moderately slow attack and a swift to medium release
- Always critically listen to the impact your adjustments are making on the entire mix
Finally, always compare (A/B) your mix with and without compression to ensure that the changes are enhancing the sound quality.
Techniques for Mixing With Mix Buses
As we venture into the techniques for mixing with mix buses, we’ll explore the essential steps to initiate the mixing stage with bus processing.
This will include the delicate task of balancing your track elements for a more harmonious and powerful sound.
-
Starting the Mixing Stage with Bus Processing
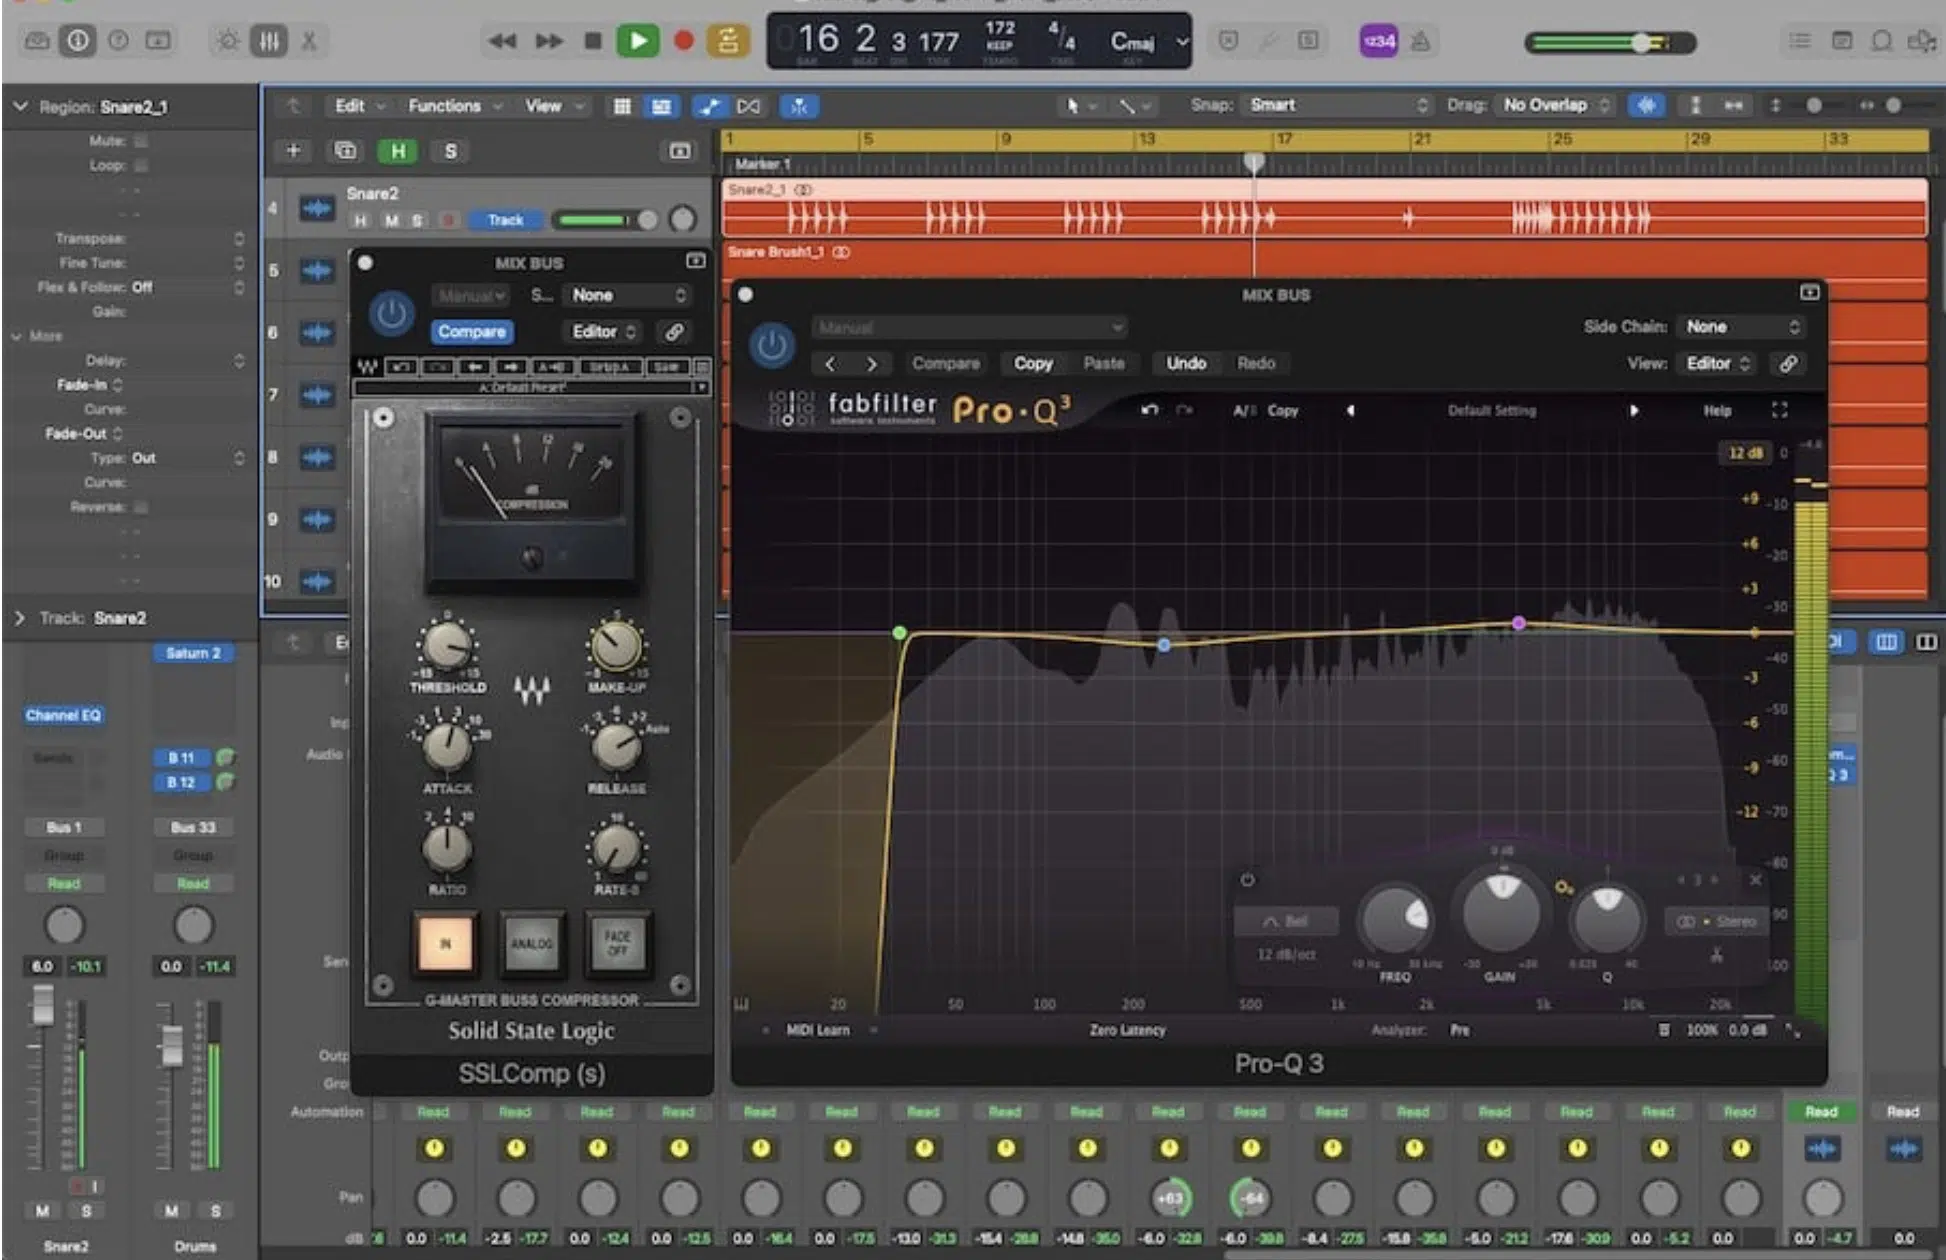
Starting the mixing stage with bus processing can provide a more consistent and unified sound across your mix.
This method, also known as “top-down mixing,” allows you to make broad-stroke adjustments to your mix early in the process.
It ultimately sets the tone for the rest of your mix.
It also enables you to go into individual tracks and manipulate them with the purpose of having to get more of this accomplished in the previous stage.
This is, essentially, the opposite of how you’d traditionally mix and make beats, but it has its strengths.
Especially when trying to get a big job done (with a massive track count) by a certain deadline.
When starting with bus processing, you’re setting a general sonic direction for your mix.
This could involve:
- Light compression to gel your tracks together
- Subtle EQ to shape the overall tonal balance
- Gentle saturation to add some warmth & character
The advantage of this approach is that it saves time.
Instead of tweaking each track individually and then trying to glue them together, you’re starting with a coherent base and then fine-tuning your individual tracks as needed.
However, while starting with bus processing can be a useful technique, it’s crucial not to rely solely on it.
It should serve as a starting point 一 but individual track processing remains vital to achieving a balanced and professional mix.
Applying Mix Bus EQ & Other Effects to Your Mix Bus
Navigating through the world of EQ and its effects on your mix bus opens up a vast realm of possibilities.
This includes mastering powerful tools such as high pass filters and mid/side EQ to craft and refine your sound to perfection.
Using EQ on your mix bus can help quickly correct any overall frequency imbalances in your mix to a group of tracks that may not have individual issues, just collective issues.
NOTE: This doesn’t pertain to clashing within the group, but rather to its other unrelated tracks/groups not within this particular mix buss.
High pass filters and mid/side EQ are two techniques that can be particularly effective when used on the mix bus.
-
High-pass filters

High-pass filters are used to remove unnecessary low frequencies from your mix.
These frequencies can often go unnoticed but can build up over time, causing your mix to sound muddy.
Applying a high pass filter on your mix bus can clean up your mix, leaving room for the essential low frequencies to shine through.
This is often carried out on each track individually.
However, it can be applied just as effectively (and maybe even quicker) without the unnecessary CPU and extra bandwidth, by broadly applying it.
-
Mid/side EQ
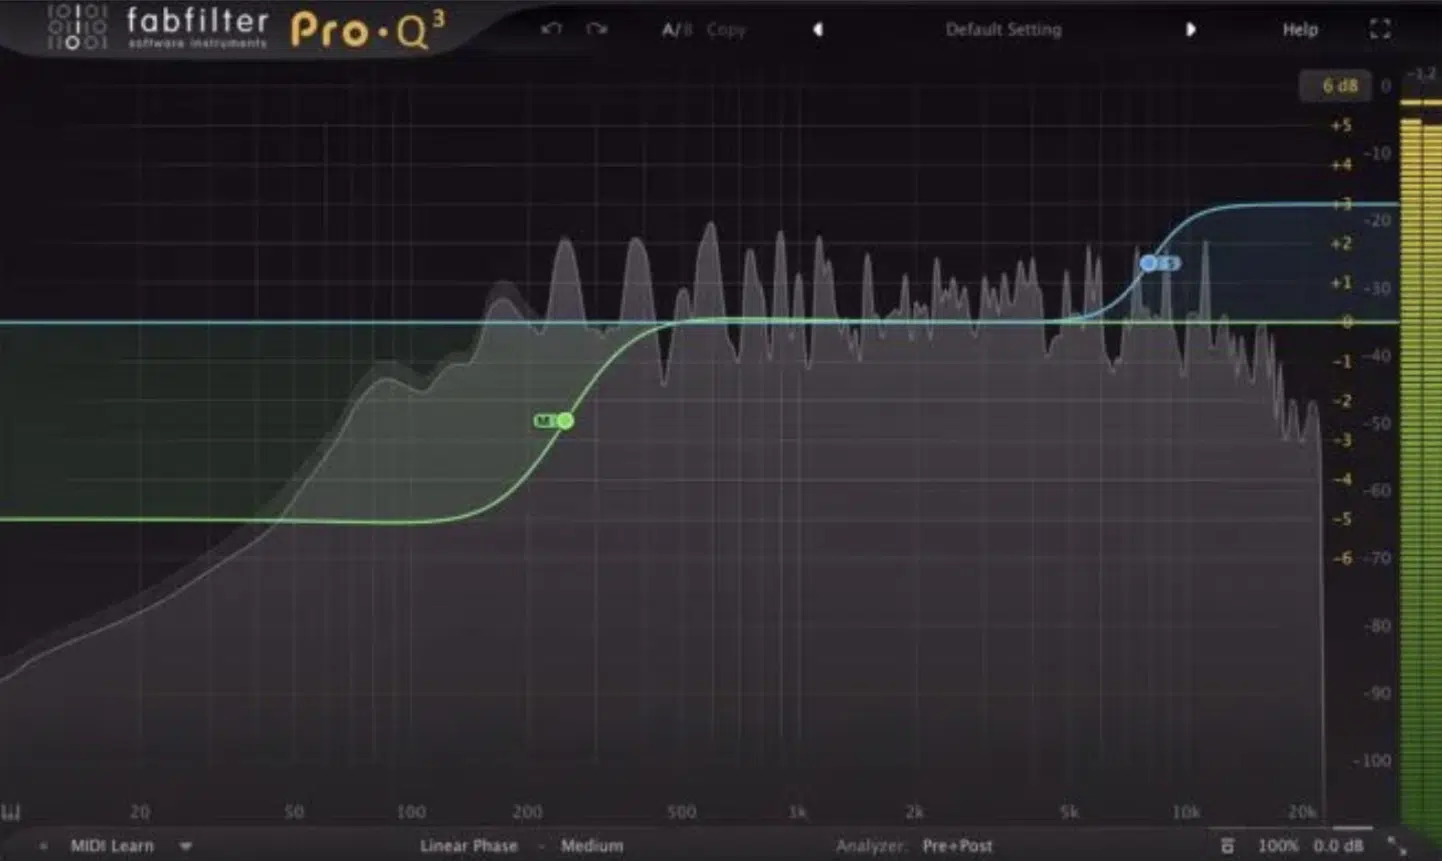
Mid/side EQ, on the other hand, is an advanced EQ technique that lets you EQ your mid (MONO) & side (stereo) signals separately.
This can be useful for controlling the stereo width of your mix 一 enhancing the sense of space, and ensuring compatibility with MONO playback systems.
These techniques, when used appropriately, can enhance the clarity and depth of your mix.
However, as with all mix bus processing, subtlety is key.
Extreme EQ adjustments can lead to an unnatural-sounding mix, so it’s important to use these techniques judiciously.
-
Using Tape Saturation for Harmonic Saturation
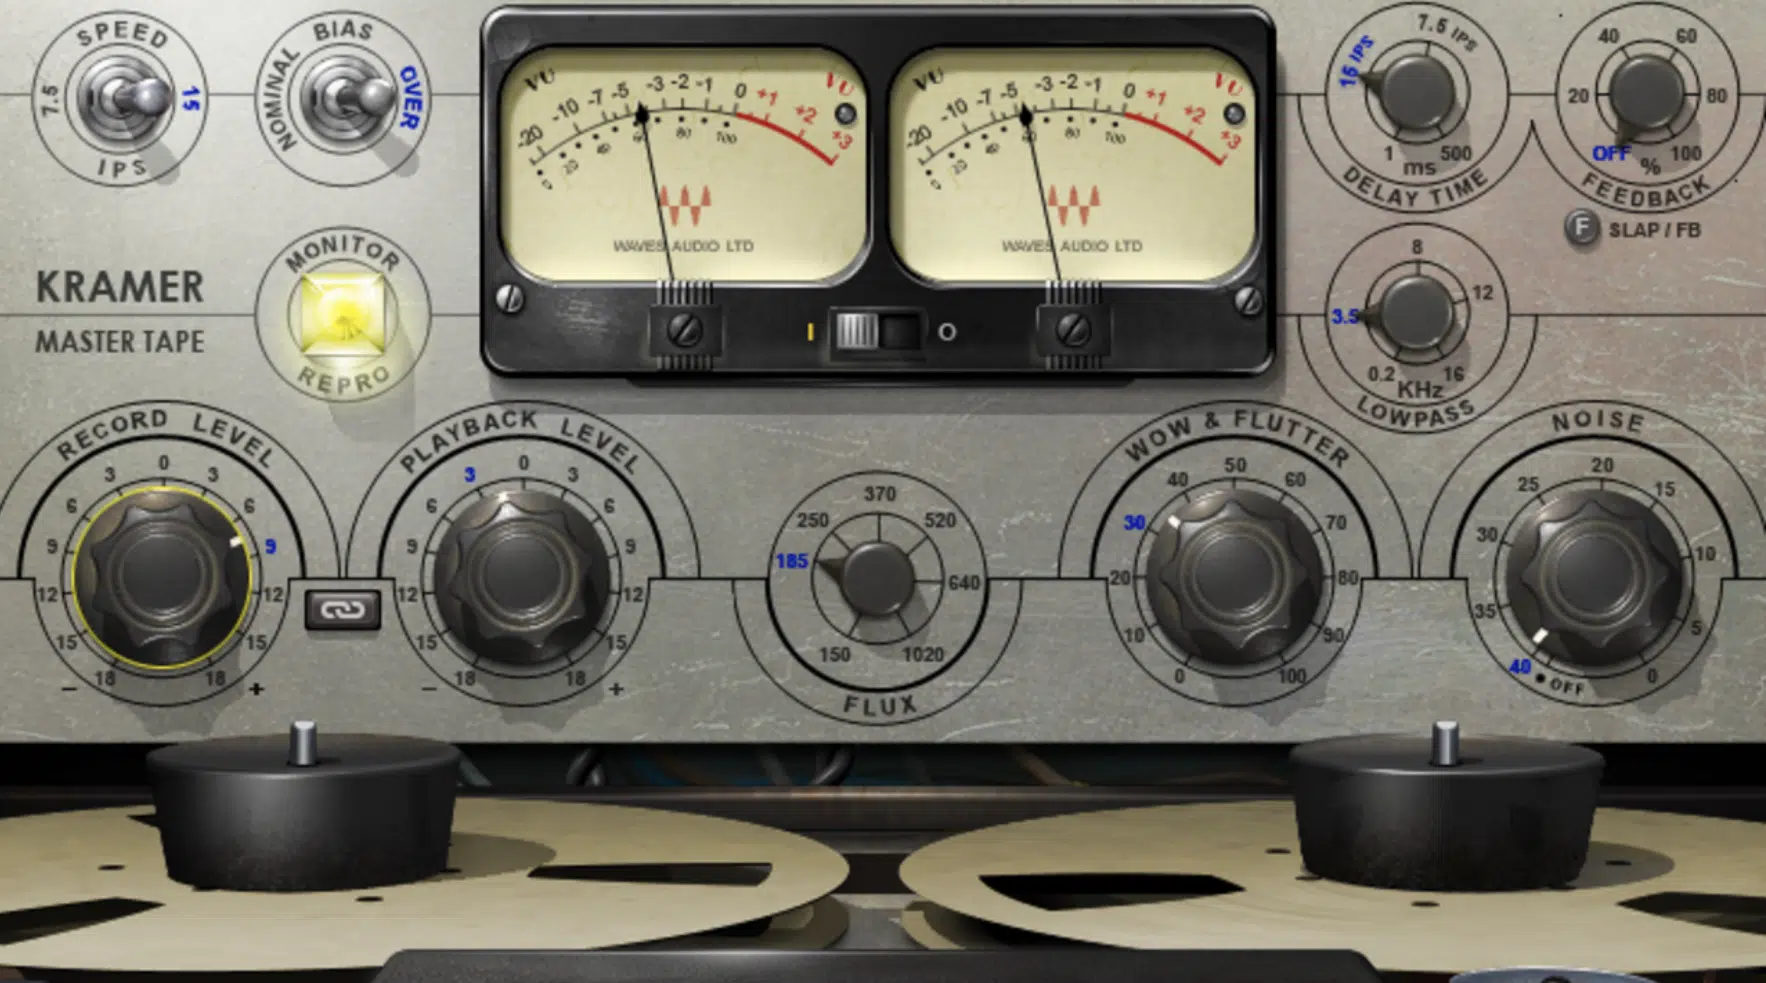
Another technique for enhancing your mix is to use tape saturation for harmonic saturation.
Tape saturation can add warmth/depth to your mix and emulate the sought-after sound of analog tape machines.
By applying tape saturation to your mix buses, you can create a sense of cohesion among your tracks.
This makes them sound like they belong together and adds the cumulative effect otherwise impossible without multiple tape machines on each mix bus track.
It can also add excitement and character to your mix, giving it a highly-renowned vintage vibe.
As always, remember that subtlety is key when using tape saturation.
While it can add a nice touch to your mix, overdoing it can make your whole mix sound distorted and unpleasant, which is a huge mixing mistake.
So use this effect sparingly, and always listen critically to ensure it’s enhancing your mix.
NOTE: 1 tape machine/saturation plug-in (not multiple plug-ins) on each bus is fine, just make sure that the settings are super subtle.
The idea is to barely hear its effect on each individual track; just as the collective sum (the entire track).
-
Increasing Excitement with Stereo Imaging & Stereo Width
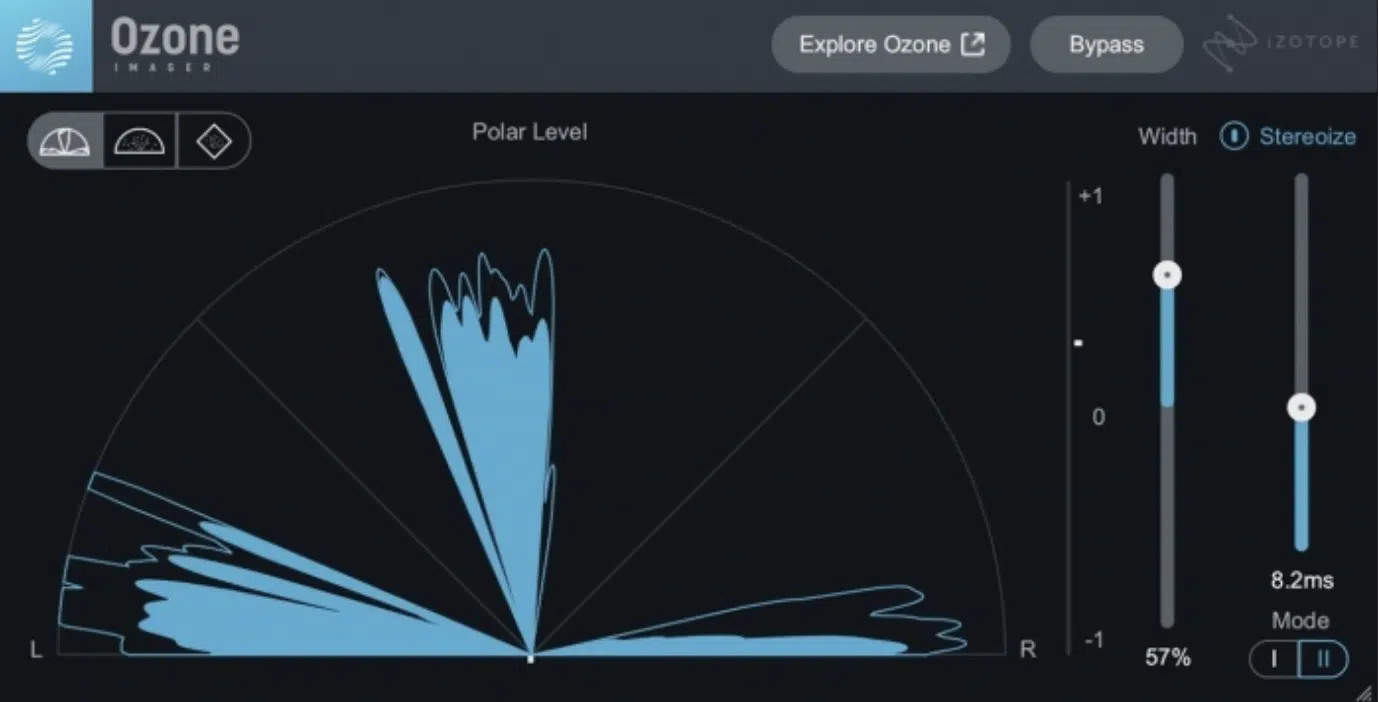
Stereo imaging is another technique that can be used to enhance your mix.
The effect of increasing the stereo width of certain tracks and groups/busses can make your mix sound wider and more immersive, drawing the listener in.
Narrowing the image of certain signals can make room for others, in order to retain width and MONO capability (regardless of the playback system, environment, or format).
It also lets you control the placement of your tracks within the stereo field.
By strategically panning your tracks, you can create a sense of space and depth, making your mix sound more three-dimensional.
Similarly, increasing the stereo width can make your mix sound larger and more open.
However, be careful not to overdo it…
Too much stereo width can cause phase issues and make your mix sound unnatural, especially on MONO-playback systems.
So use these effects judiciously to enhance your mix without compromising its integrity.
BONUS: Advanced Mix Bus Technique
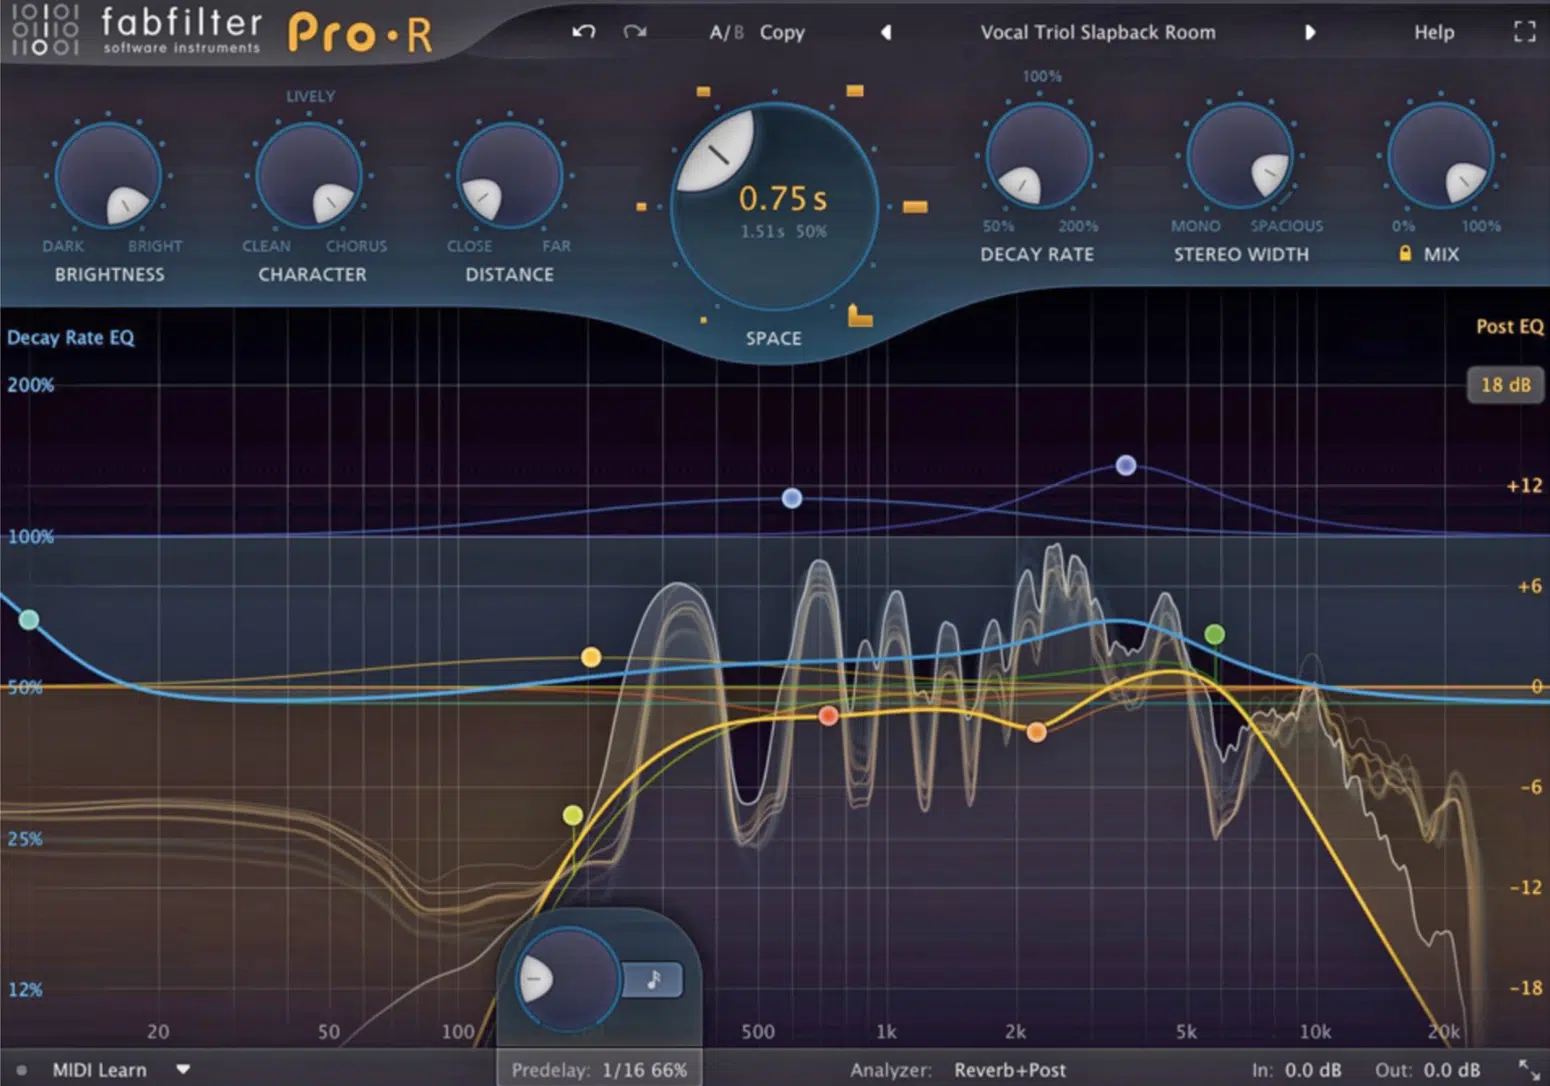
Let’s end this off with one of my favorite advanced mix bus techniques: Side chain filtering.
Side chain filters can be a useful tool in mix bus processing, particularly when you need to avoid specific frequencies from triggering the bus compressor.
This can be especially handy when dealing with low-end frequencies that can cause unwanted pumping effects if they trigger the compressor too much.
By setting up a side chain filter, you can instruct your mix bus compressor to ignore low-end frequencies 一 giving you more control over the compression behavior.
This allows you to ensure that the compressor responds more to the musical elements you want to control, rather than being overly influenced by the powerful low-end elements.
This way, you can start mixing with confidence.
To use a side chain filter on your mix bus, you’d typically:
- Choose the side chain option in your compressor
- Set the filter type (usually a high pass filter as opposed to a low pass filter)
- Set the frequency below which the compressor will ignore
Remember to fine-tune this setting by ear to ensure it benefits the mix in the best possible way.
PRO TIP
Keep in mind that this theory is applicable to, and commonly used in, various types of processors today.
It aids in:
- Omitting a specific frequency range from processing
- Reducing the level of processing
- Increasing and focusing the processing on a particular range
Some advanced processors even include multiple bands that function similarly to a traditional EQ.
This feature allows you to meticulously sculpt not only the specific frequency range where the processing is applied but also the depth of that application.
It may even facilitate creative uses that can elevate the quality and uniqueness of your mix.
Final Thoughts
Becoming proficient in mix bus processing is an integral part of your journey as a music producer.
It’s a potent tool, helping to infuse your tracks with consistency, depth, and professional polish that can set your music apart from the competition.
By understanding the various aspects of the mix bus (from compression and EQ techniques to more advanced methods) you’re laying the groundwork for exceptional tracks.
It’s about tuning into the subtleties, the small adjustments that can transform your beats into sonic masterpieces.
Yet, as is often the case with learning, seeing real-world applications of these techniques can be incredibly beneficial…
That’s where these FREE famous beatmaker templates come into play.
These templates provide a fascinating insight into how professionals use mix buses in their work.
By studying these templates, you can see all the aspects discussed today in action.
These famous templates provide an ideal starting point for exploring the use of mix buses and offer you a direct look into professional setups and processing chains.
They serve as a learning resource, illustrating the practical implementation of the aforementioned techniques.
Whether you’re an aspiring producer or an experienced beatmaker looking to refine your skills, these templates can help you navigate the complex world of mix bus processing.
Ultimately, mastering the mix bus is a journey, one that evolves with your growth as a producer.
So, don’t stop exploring, experimenting, and refining your sound 一 your mix bus mastery could be the magic touch that catapults your beats to the top of the charts.
Until next time…


Leave a Reply
You must belogged in to post a comment.