As a producer, knowing different techniques is an invaluable tool.
You don’t want your beats to be stale or predictable, and that requires being aware of creative opportunities right under your nose.
The following 15 hip-hop production tips won’t only enhance your skills, but make your music stand out from the competition.
From subtle differences to insane (and rare) techniques, these hip-hop production tips will not disappoint.
Plus, they’ll make sure that your listeners never press that skip button again!
Let’s dive in…
Table of Contents
- 1. NEVER BE BORING OR PREDICTABLE
- 2. CREATE A RESONANT PEAK TO GIVE YOUR KICK AN EXTREME PUNCH
- 3. CREATE A ‘DUCKING’ ENVELOPE
- 4. CREATE A PLAYABLE 808 SAMPLE WITH EASY ON/OFF AND ‘GLIDE’ FEATURES
- 5. AUTOMATE VINTAGE-STYLE DELAYS FOR PITCH-SHIFT & TAPE-STOP EFFECTS
- 6. USING WHITE NOISE, EQ, AND AUTOMATION TO CREATE THE ULTIMATE ‘SFX’ SYNTH
- 7. CREATIVE QUANTIZED AUTOMATION
- 8. NON-LINEAR TIME-STRETCHING
- 9. SYNCOPATION, WITH IRREGULAR STEP-LOOPING
- 10. MAKE SURE IT ALL ‘STACKS’ UP
- 11. TRIGGER SERUM FX
- 12. KEEP YOUR BASS IN KEY
- 13. MIDI MADNESS: 3 HIP-HOP PRODUCTION TIPS IN 1
- 14. REVERSE REVERB (AKA REVERSE REGENERATION)
- 15. (BONUS): USING FILTERS CREATIVELY
- HIP-HOP PRODUCTION TIPS: FINAL THOUGHTS
1. NEVER BE BORING OR PREDICTABLE
When a beat is the exact same from start to finish, then there’s a good chance you’ll just get lost in the crowd.
This hip-hop production tip is the ultimate way to guarantee that never happens.
You have to incorporate some ‘wow’ factors, switch-ups, and subtle differences every 2 bars.
By doing this, it will instantly catch the attention of your listeners and ensure that they don’t reach for that skip button.
One thing I suggest is you go into all of your duplicate patterns and tweak tiny intricacies.
For example, on a 1-bar hi-hat loop/pattern:
Go into every (or every other) copy and either add/remove a hi-hat or simply reorder it a tad.
When you’re working with a melody that repeats throughout, try changing the last few notes of every duplicate.
Either to a slightly different, yet still cohesive set of notes or merely adjust their timing/order.
When looking to add variation and unique qualities to your song, it’s not necessarily about introducing a whole new section.
Although there’s nothing wrong with that.
But rather, rearranging, or ‘tweaking’ what you already have in interesting and enchanting ways.

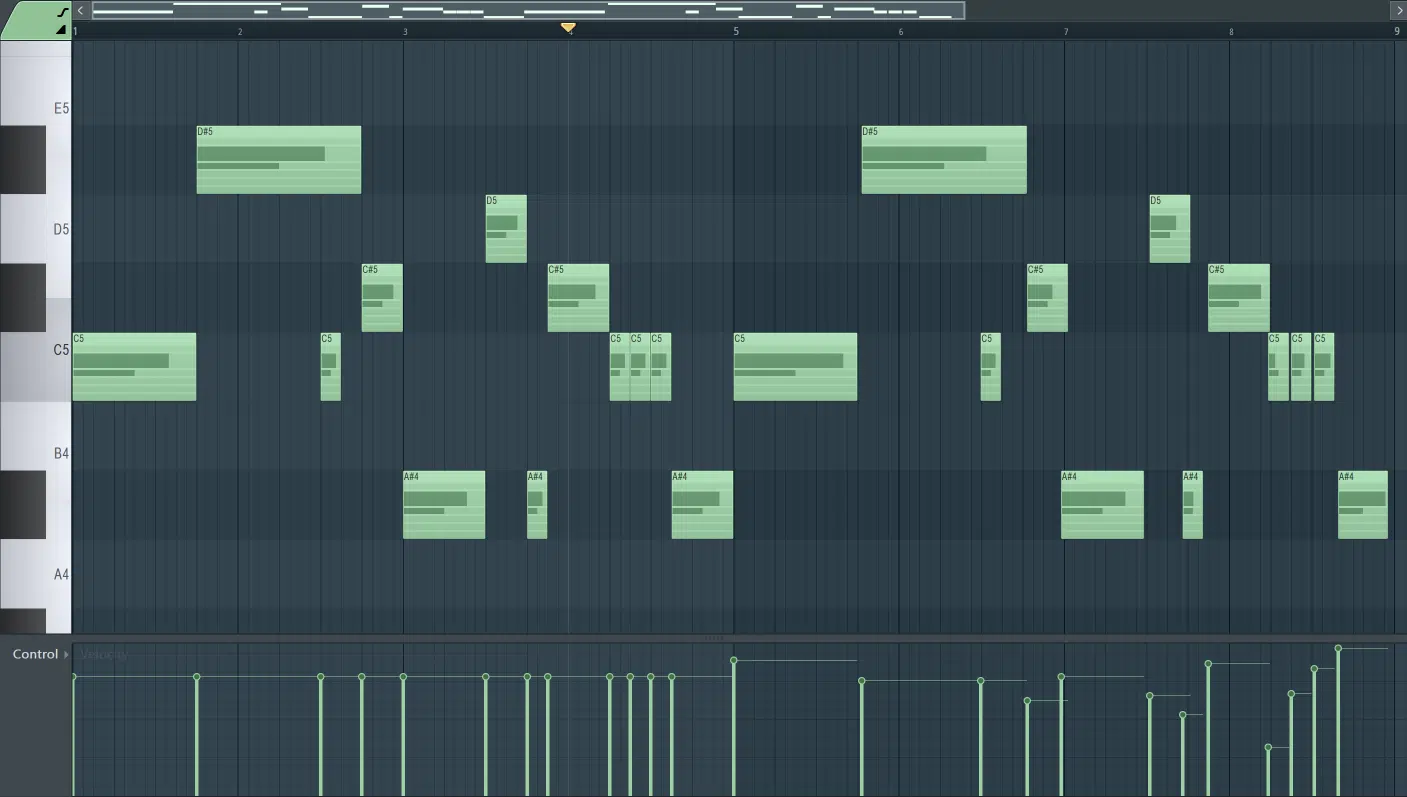
Above, is what your MIDI track should never look like (in your session).
It hinders your creativity and boxes you in.
This will keep your listeners intrigued, satisfied, and tuned in as they’ll excitedly anticipate what you have up your sleeve next.
It’s all about switching it up and keeping things fresh…
While still incorporating your own personal style/signature, of course.
This hip-hop production tip is super beneficial if you’re looking to get a TV placement.
They always look for people who have subtle (or not-so-subtle) differences every 2 bars.
Remember, a commercial is only a minute or so tops, and the music might only be playing for a fraction of it…
So, if it’s not captivating enough or doesn’t contain unique elements, they’re most likely going to pass it over.
Remember this hip-hop production tip along with these valuable secrets, and you’ll definitely get a leg up on your competition.
2. CREATE A RESONANT PEAK TO GIVE YOUR KICK AN EXTREME PUNCH
This hip-hop production tip is not well known, but it will absolutely blow your mind once applied.
I’m sure you spend hours trying to find the perfect kick sample…
Not only to complement the bass but to compensate for where it may be lacking.
Just because your bassline is, indeed, a ‘bass,’ that doesn’t mean your kick cannot play a sub-frequency role as well.
At times, it may even be necessary.
So, in order to instantly get any kick to possess some seriously intense sub-frequencies, here is what you need to do:
STEP 1 一 Load up an EQ onto your kick.
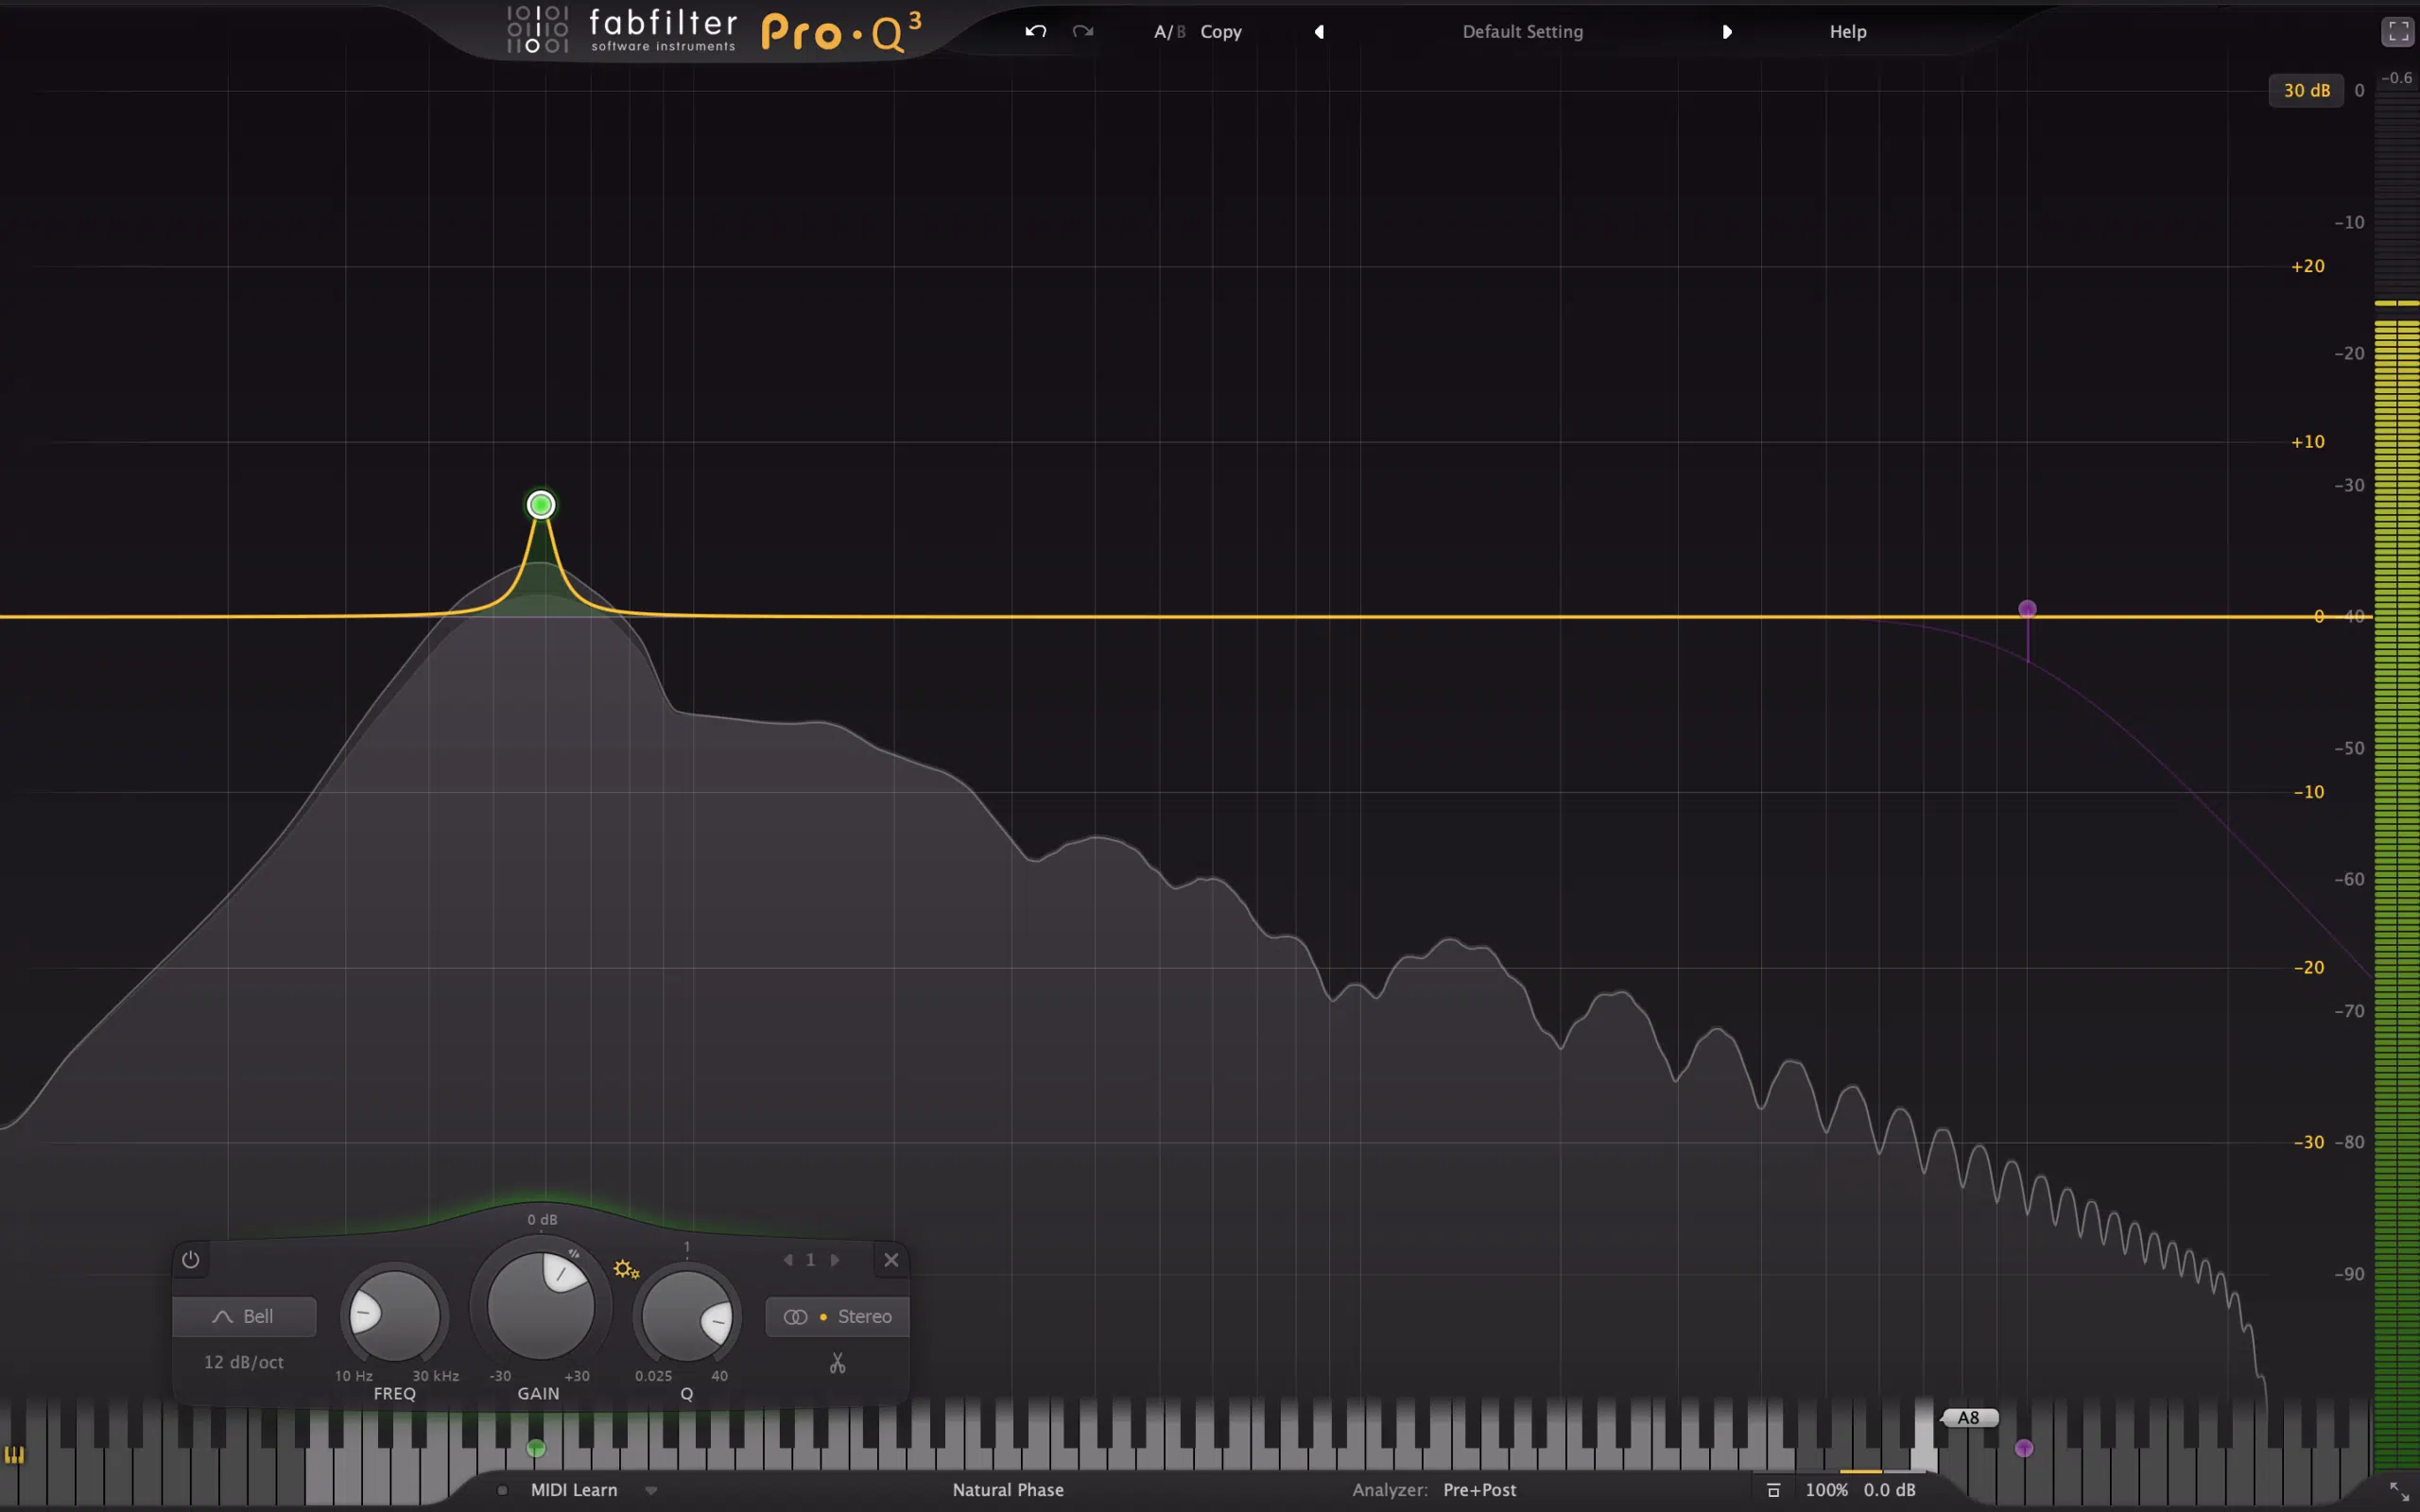
STEP 2 一 Identify the ‘fundamental’ (the frequency that your sample is based around).
For this hip-hop production tip, you’re going to use ‘resonance’ in order to make its lower frequencies more dominant, and appear bigger.
STEP 3 一 Make a bell-shaped boost at the fundamental frequency.
Be sure to start off small, although a large boost may provide better results; just don’t overdo it.
STEP 4 一 Bring down the width of its ‘Q’ (which makes the band tighter).
As soon as it gets really tight, you’ll instantly receive a punch/thump from your kick that was never there before.
It will definitely cause your jaw to drop!
Whereas the steps of this hip-hop production tip are simple, the results are unmatched.
3. CREATE A ‘DUCKING’ ENVELOPE
This hip-hop production tip is used when you’re looking for ultimate control over the effect of a signal.
It will essentially emulate the effects of sidechain compression.
When you automate a signal’s volume, it creates a ‘Ducking’ Envelope of any shape.
You want that to match the pulse of your track.
ide-chaining a signal originally derives from the workings of an actual compressor.
sometimes volume-automation (‘ducking’) is the key.
It gives you way more control, appears more ‘apparent,’ and just sounds tighter overall.
STEP 1 一 Make geometric, or ‘curved’ shapes that are the length of your kick (shown below).
Have it either ‘duck’ or ‘dip’ down (making room for the kick itself).
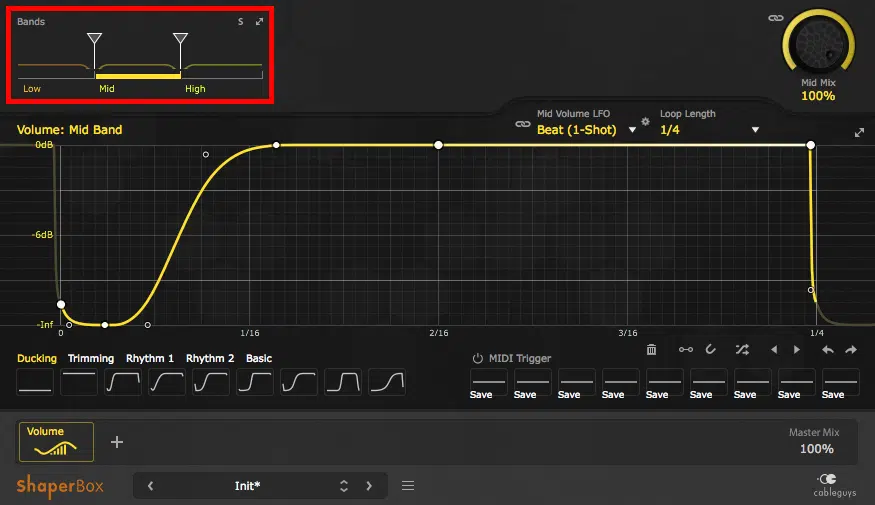
This eliminates the guesswork of Attack and Release times.
STEP 2 一 Copy the automation information
STEP 3 一 Apply it to automate the amplitude/volume of another track or a grouped bus that you want the ‘side chain’ effect to influence.
PRO TIP: The actual destination of the automation track depends on its’ current purpose and future intent.
- If you want the ducking to occur before the effect chain 一 Automate the clip gain.
- If you want it to occur after 一 Select (or add) a designated processor towards the end of the chain that you can use as a volume/ducking control.
Your first instinct will probably be to automate the actual volume level/fader or the Mixer track it belongs to…
However, doing this will render any volume adjustments useless and will reset every single time the automation occurs.
This is one major issue to be aware of within your DAW when planning to modulate the Mix Fader for any reason.
It’s safer just to choose another method in that case.
This hip-hop production tip produces an even more in-your-face pulse and may just become your favorite go-to sidechain effect!
4. CREATE A PLAYABLE 808 SAMPLE WITH EASY ON/OFF AND ‘GLIDE’ FEATURES
In order to gain more control over your 808, it all boils down to your Amplitude (AMP) Envelope and sample settings.
This enables your note to immediately stop when sustained, and ‘glide’ as soon as you release it.
Creating super easy pitch-dives.
NOTE: Depending on your specific DAW, it might even be best to load your 808 samples directly into your favorite sampler.
Especially if you find that you have no control over the sample’s Amp Envelope.
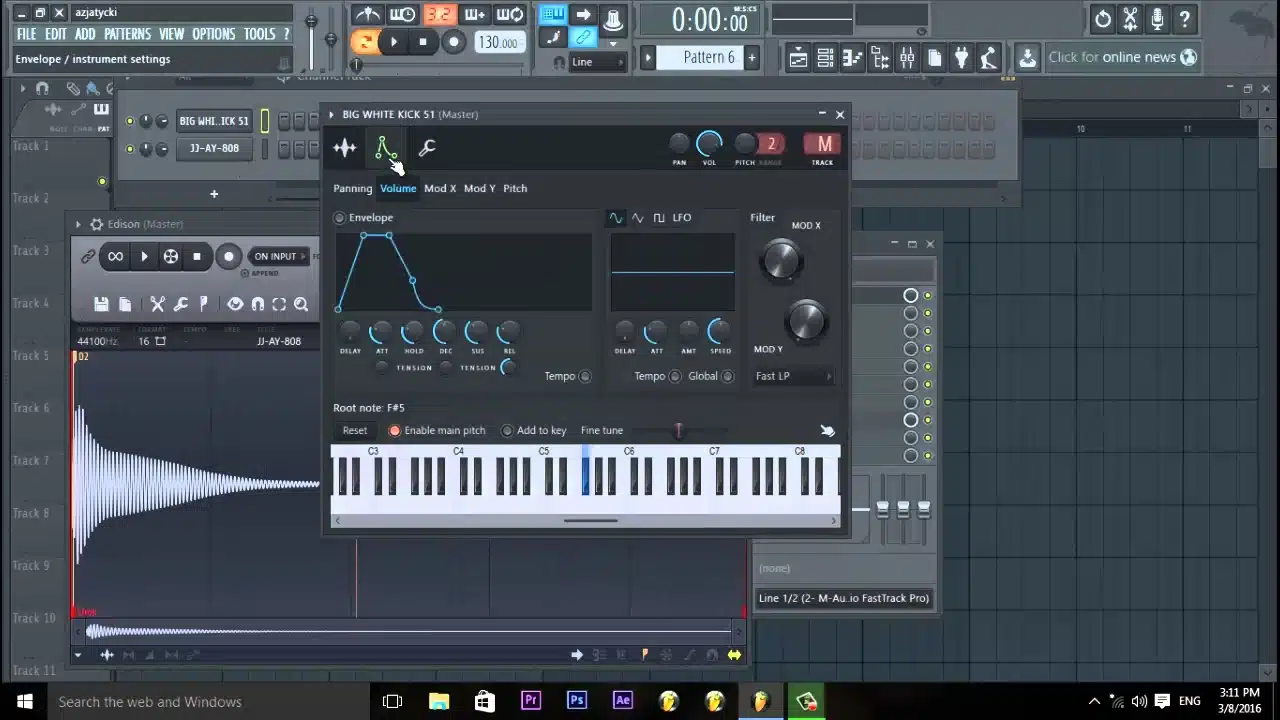
Simply take the ‘AMP’ Envelope, turn the ‘Sustain’ all the way up, and the ADR all the way down to 0.
This will enable you to trigger the 808, and make it so it will stop immediately upon release (of the note).
If you’re experiencing any clicks or pops, you may need to apply a 5-15ms Attack and/or Release time.
Finally, put your sampler in ‘MONO, Legato, and Portamento’ if you wish to do so.
However, don’t forget to set the key/note of your 808, because that could equal disaster.
You can now add glides and pitch dives to your bass line with ease without the sample re-triggering.
To make it sustain infinitely, add some loop points in your sampler or an external audio editor like Audacity if necessary.
NOTE: If you want the complete guide on how to make crazy, mind-blowing 808s, click here.
5. AUTOMATE VINTAGE-STYLE DELAYS FOR PITCH-SHIFT & TAPE-STOP EFFECTS
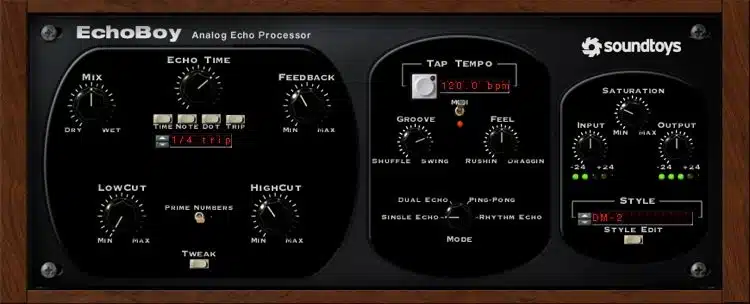
This hip-hop production tip is another perfect example of how some basic automation can provide a wildly popular, highly desired effect.
Except, this time, it’s in the form of intermittent pitch shifts, dives, and rises.
Simply route an automation lane to the ‘delay time’ of your Delay, and draw in some automation.
You will begin to experience/hear the true pitch-modulation magic happen.
You can do this at random, or have a specific curve either rise or fall over an extended period of time.
Try automating the ‘feedback’ and output level…
Even if it doesn’t exactly fit your current track, this technique can (and should) be used on something.
Also, try routing your delay lines into a reverb, for some extra shimmer and to enhance the overall effect.
Now, try applying this hip-hop production tip to a processor like a reverb for a completely different yet equally pleasing and original effect.
6. USING WHITE NOISE, EQ, AND AUTOMATION TO CREATE THE ULTIMATE ‘SFX’ SYNTH
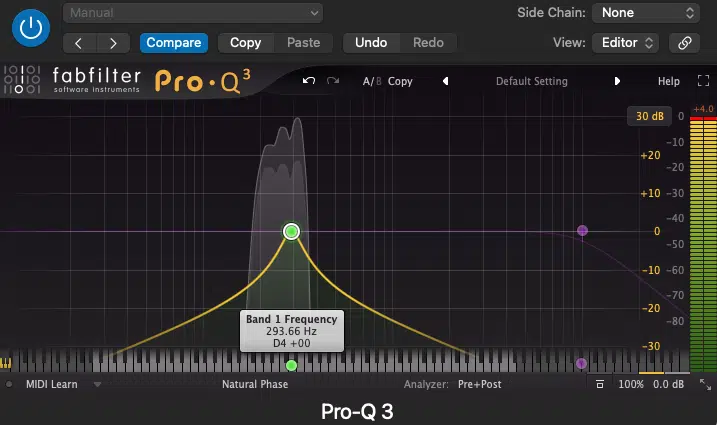
When listening to unfiltered white noise in isolation, it’s fairly hard to fully understand its place or purpose.
White noise is essentially a random signal that touches on every/all combined frequency.
This means it can successfully be sculpted to create and synthesize a wide variety of both natural, and synthetic sounds/instruments alike.
So, it only makes sense that its full potential isn’t unleashed until we hear it in its sculpted (filtered) form.
STEP 1 一 Grab an EQ.
STEP 2 一 Take a high-cut filter.
STEP 3 一 Route it to an automation lane and MIDI controller.
STEP 4 一 Press play and go crazy!
Remember, differently shaped automation curves will result in different effects, so tweak to taste.
Try automating the pitch up or down over a desired period of time along with a filter for riser-like effects.
If you’re not completely happy with the results, just grab a few more bands and repeat the process until you’re satisfied.
You will quickly realize just how beneficial learning to sculpt white noise can be.
It can cater to practically any sound you need or wish to emulate.
7. CREATIVE QUANTIZED AUTOMATION
Is your synth lacking a step sequencer?…
Well, try using your automation lane as one!
STEP 1 一 Simply quantize your automation-input curves, and route them to parameters such as the ‘pitch’ or ‘filter cutoff’.
STEP 2 一 Draw step/geometric/square-shaped curves, as opposed to the standard ‘ramp up,’ or ‘ramp down’ automation data (shown below).
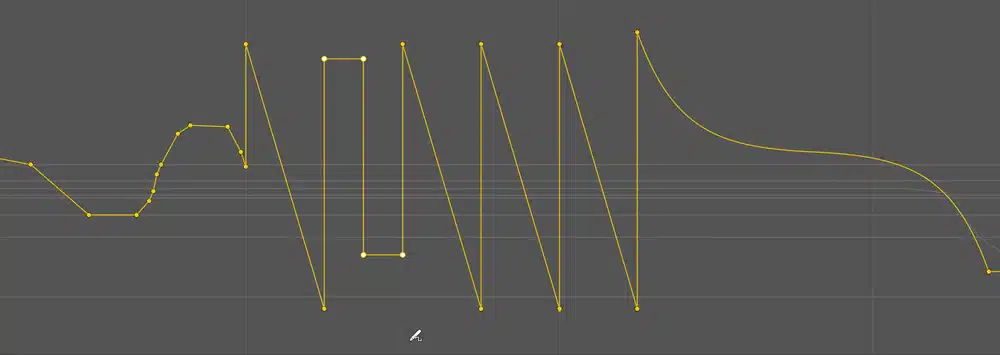
What this does is help you to create rhythmic events that are normally possible only by means of a built-in Step Sequencer or Arpeggiator.
STEP 3 一 Duplicate or route those same rhythmic curves to a few different effects within the chain, to really take things to the next level.
Some DAWs, such as Studio One (above) include ways to make this process less tedious and more precise.
You’re able to draw in pre-made, but fully malleable curves.
8. NON-LINEAR TIME-STRETCHING
Non-linear Time-Stretching is the alteration of a sample’s speed, in a non-consistent manner.
The main reason this hip-hop production tip is beneficial is that, when applying it to epic samples, you can preserve the original Attack and intended vibe.
At the same time, it will be extremely intriguing at the end as well.
Or, mid-way through; preserving the end.
You can even choose to slow it down at the beginning only, and then gradually return to the original sample speed.
This hip-hop production tip also works wonders when creating a dope pad out of vocal vowels,
Or, when you want to extend the length of your trumpet-hit sample!
The creative ways to tweak it are truly endless.
To take it one step further, mix this technique with reverse samples, printed delays, and/or reverb.
Simply import your sample directly into the sequencer timeline, automate the tempo, and export it to your main project…
It’s that easy!
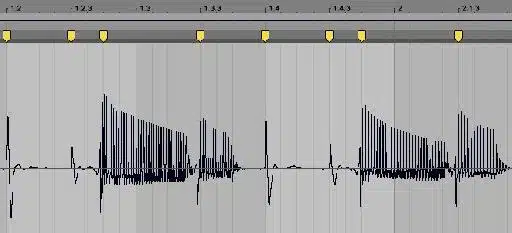
This effect has become ever more popular across the EDM genre, but it is branching out rapidly into others as well.
9. SYNCOPATION, WITH IRREGULAR STEP-LOOPING
Sometimes, the only way to spice up a song, loop, or melody and truly make it your own, is to break the rules.
And this hip-hop production tip certainly does just that.
STEP 1 一 Assign one of your melodies to ‘loop’ 1-bar (before all the rest).
STEP 2 一 Set your drum pattern to ‘6’ beats, instead of ‘8’.
STEP 3 一Listen to how crazy and irregular, yet extremely appealing things appear as time goes on.
This hip-hop production tip may not be ideal for every situation.
However, it’s certainly the front-runner when searching for that ‘oddball’ moment.
Sometimes it’s labeled as ‘Eludcidan’ or, more commonly, ‘Poly Rhythm’ within synths, sequencers, arpeggiators, and MIDI plugins.

10. MAKE SURE IT ALL ‘STACKS’ UP
You can ‘stack’ and layer virtually any element, instrument, or synth within your track to create an entirely new patch/preset configuration.
Doing this can skyrocket your production (and sound design) capabilities, and bring your music to the next level.
Most DAWs come equipped with a layer/stacking function (such as FL Studio’s ‘Layer’ and Ableton Live’s ‘Rack’).
Below, you can see I used the Summing Track Stack option.
This enables me to layer presets, like the dope ones found with our Free Omnisphere Essentials, with my favorite synths.
Then, I paired it along with Drum Monkey for an insane kick/808 and atmospheric pad hybrid.
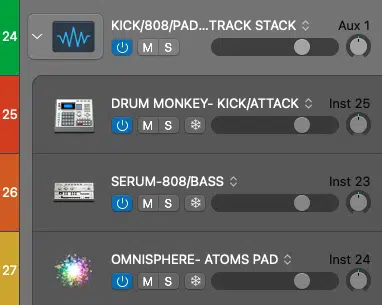
Now, just one note triggers all three instruments.
A hybrid percussive 808 pad will give you the power to create unique instrumental sub-types with just a few simple clicks!
Oftentimes, you even have the ability to assign specific synths/instruments to different keys or ‘zones.’
This allows you to incorporate a patch that contains a ‘sonic blend,’ and lends itself to the desired zone.
This is accomplished in a super complimentary, unique, and convenient fashion.
With that said, outstanding results can be achieved with even easier means…
Make sure every individual instance/layer plays a particular role.
Start with 2-3 layers:
- One playing the low-to-middle end.
- The other, with the higher frequency content.
Allowing you to then have a substantial or ‘full’ instrument/synth which lends itself to the entire spectrum.
This makes it the perfect foundation to build your song around, with the simple programming of a few notes.
The results that this hip-hop production tip produces are truly remarkable.
11. TRIGGER SERUM FX
One of the most invaluable, indispensable tools you have at your disposal is Serum FX.
With Serum FX, not only can you apply all of the FX Rack into Serum, but the filters, LFO’s, Envelopes, and modulators to any signal as well!
The most common issue is that, although there is indeed a ‘LATCH’ mode, it doesn’t automatically sync to the audio you feed it.
NOTE: Latch mode is used to keep the modulation in sync with the project’s tempo.
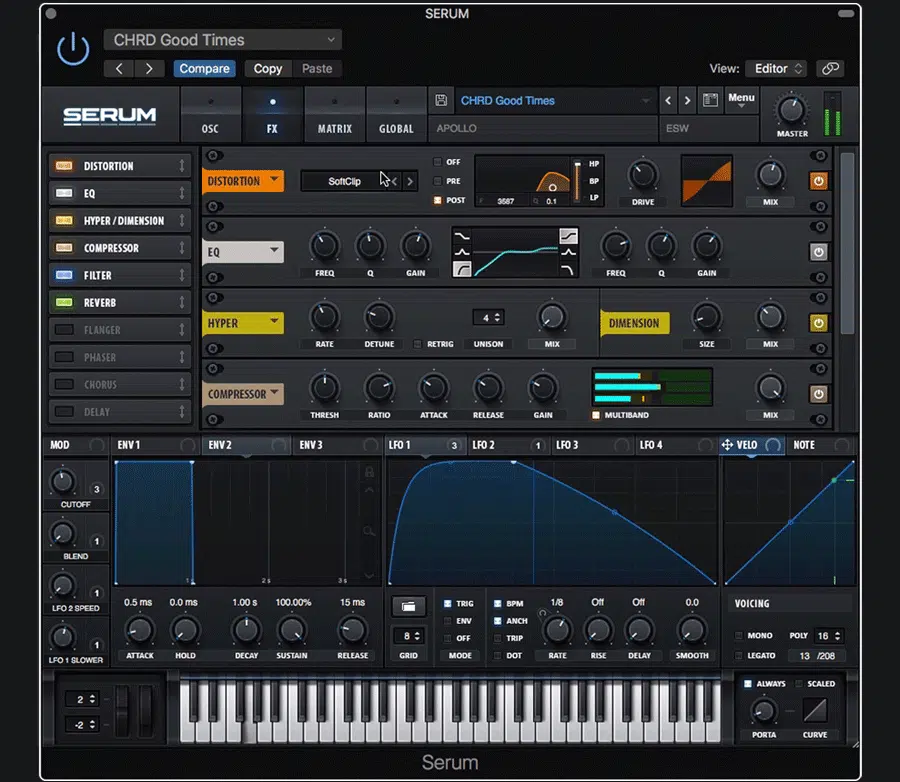
However, the way around that is quite simple…
- If using a synth or instrument part 一 Copy the MIDI information into a new clip.
- If processing an audio track 一 Create a MIDI clip of 1 sustained note (triggering for however long you like) and have it play until you wish for the modulation to restart, or stop altogether.
The way you get the modulation to restart/stop is to either input a new note or input nothing at all.
Make sure you place this clip so it’s aligned with the audio you want Serum FX to process.
Now all you’ll need to do is route the midi clips OUTPUT into Serum FX. Serum will then be aware of when to start, stop, and re-trigger.
That way, all the modulation, LFOs, and goings-on within Serum FX itself will be tempo-synced to the part it’s processing!
If you own Serum, you own Serum FX…
So, if you haven’t already, go download/enable your copy immediately. It’s not to be underestimated on any level.
While you’re at it, download the FREE Unison Serum Essentials pack.
It contains the cleanest, most professional, and most polished Serum presets for every genre!
12. KEEP YOUR BASS IN KEY
The reason why your bass may, at times, seem out of tune is the lack of a proper system.
Other times, it’s your brain playing a trick on you, as it’s harder to hear anything under 20Hz.
At that point, it’s very, very difficult to analyze the tone when it’s strictly being felt and not fully heard.
Especially with no distortion, saturation, or any other method effectively adding any upper harmonics.
The solution to always having an in-tune bass is simple:
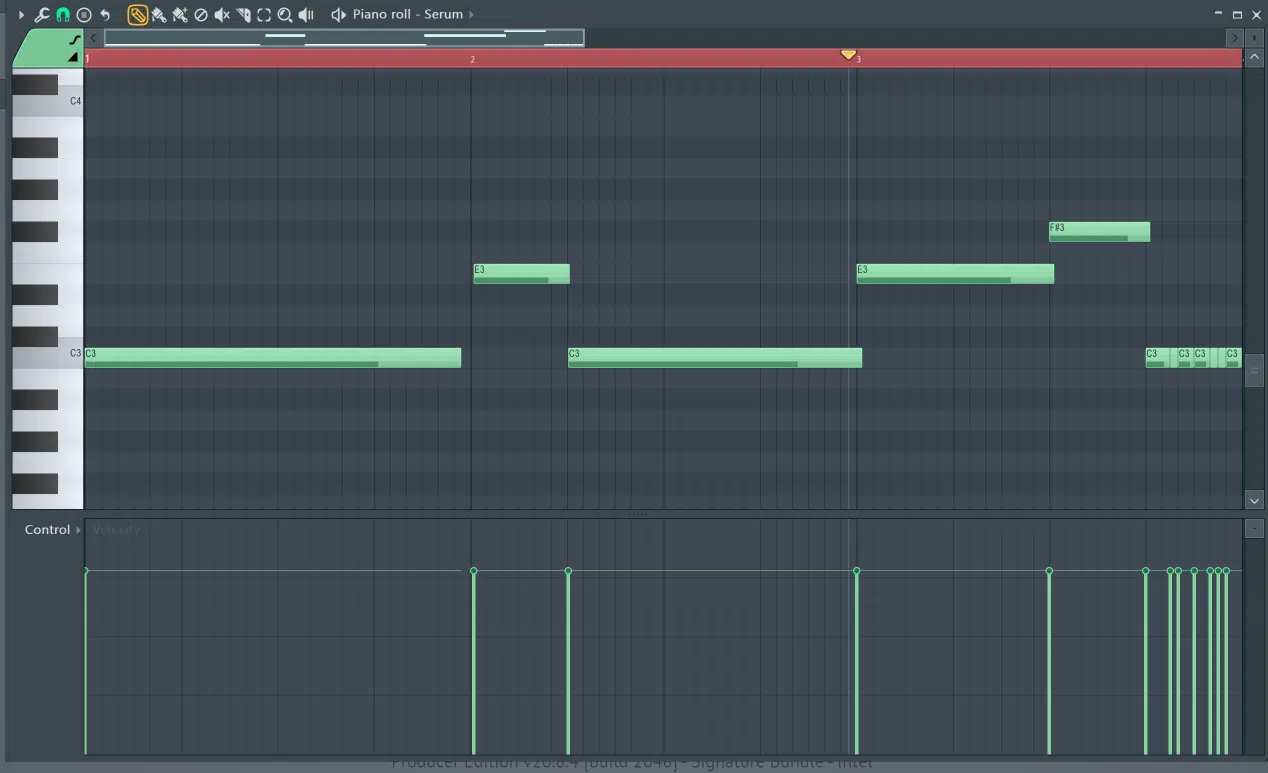
Program your 808s/basslines in a higher octave!
Yes, it’s really that simple.
I recommend programming your bass at least 3-4 octaves higher than it originally was.
Once up in the higher octaves, if it still doesn’t quite match with the song, odds are you’re in the wrong key.
The human ear is tuned, even on a subconscious level, so trust it.
If it now appears to be sounding “off” and it wasn’t before, you’re probably relatively close to the correct key.
If not, It has to be 1 of those 12 notes.
Simply try them all until you find the right one.
A ton of producers (even notable ones) fall victim to this song killer, don’t be one of them!
This hip-hop production tip is an extremely useful one; guaranteed to help you produce insane results every time.
13. MIDI MADNESS: 3 HIP-HOP PRODUCTION TIPS IN 1
- PERFECT ISN’T ALWAYS PERFECT
One of the major reasons your instrumentation ends up sounding fake is because it’s ‘too perfect.’
When you plug in your notes or fully quantize your riff, you’re almost always setting yourself up for a computerized effect.
This is because when a musician is playing a live instrument, they can’t hit the note to fit exactly on the grid every time.
It also relates to the fact that no notes will ever be played identically to one another.
Take advantage of that knowledge and look at the grid as more of a reference, rather than an exact position to lock into.
By doing so, your music won’t sound too perfect or too computerized.
Finding a healthy balance, and mimicking how humans play is key for this hip-hop production tip.
- TRAVELING OUTSIDE OF THE GRID
This hip-hop production tip comes into play for songs/files that have already been successfully laid down and created.
If you have a synth melody but want it to be played like a piano, be sure to shift your notes in either direction randomly.
How ‘off the grid’ you wish to move things depends on the vibe of the track, but I strongly encourage you to experiment.
Highlighting all your notes and shifting them in the same direction may add some “groove” to your drum track.
However, when it comes to instrumentation, it could also throw the entire thing off.
So, just be sure to select random notes and change their values independently.
- ADJUST THE VELOCITY ON A NOTE-TO-NOTE BASIS
Simply go into MIDI and begin making some changes – some notes loud, others soft.
Depending on your DAW, you might have a special feature that already does this for you.
Either way, it’s easy (and necessary) to take just a couple extra minutes to play around with the sound for your music’s sake.
With all things considered, the true key to ‘realism’ is mirroring intricate details relating to the variations of (live) time and velocity.
Remember, experimentation is key in all aspects of production.
14. REVERSE REVERB (AKA REVERSE REGENERATION)
This hip-hop production tip is the most popular and sought-out effect regarding reverb.
Thankfully, it’s also one of the least complicated to set up, regardless of how difficult it sounds.
STEP 1 一Grab the track that you wish to use this effect with (I suggest a drum or vocal track).
You can use 2 separate samples:
- One for the reverse
- The other will be introduced after
Keep in mind, things usually blend more smoothly when using the same track.
STEP 2 一 Load the track into your DAW with absolutely no effects.
STEP 3 一 Set up a ‘Reverb AUX Send’ that your track will be routed to.
Make sure it’s on 100% wet (as it always should be when using Sends).
STEP 4 一 Alter the settings on the reverb to have a substantially long decay time and a big size.
I always prefer to turn the diffusion and the early reflections up, as it adds a little spice to the track when playing in reverse.
The settings are crucially important in determining how this effect is carried out.
STEP 5 一 Once your settings are as desired, bounce only the Reverb Send.
STEP 6 一 Reserve the reverb track you’ve bounced (which should be considerably lengthy).
It should look something like the picture shown below:
.
STEP 7 一 Line up the track that you want to follow the reverse reverb at the end of the reverb track, and you have your effect!
STEP 8 一 Do some tweaking if desired.
There you have it, another simple effect with a huge impact.
15. (BONUS): USING FILTERS CREATIVELY
Filters are the most frequently used, highly-recognizable tools in the production game.
You use them to meticulously sculpt sound in countless ways, such as:
- EQs
- Compressors (essentially the side chain itself)
- Phasers
- Flangers
- Any/every Multiband processor you can think of
And that’s only the start.
Every processing technique you’ve ever applied is built upon a system that relies on some form of filter(s) or filtering.
Now, while you’re undoubtedly aware of filters in the context of removing (subtracting) unwanted/unneeded frequencies, that’s a given.
However, what tends to be frequently overlooked is the character, tone, and frequency its capable of imparting to a sound source (beyond a simple boost).
Try pairing a Formant filter with one of your older analog or subtractive synths to create a choir (as shown below).
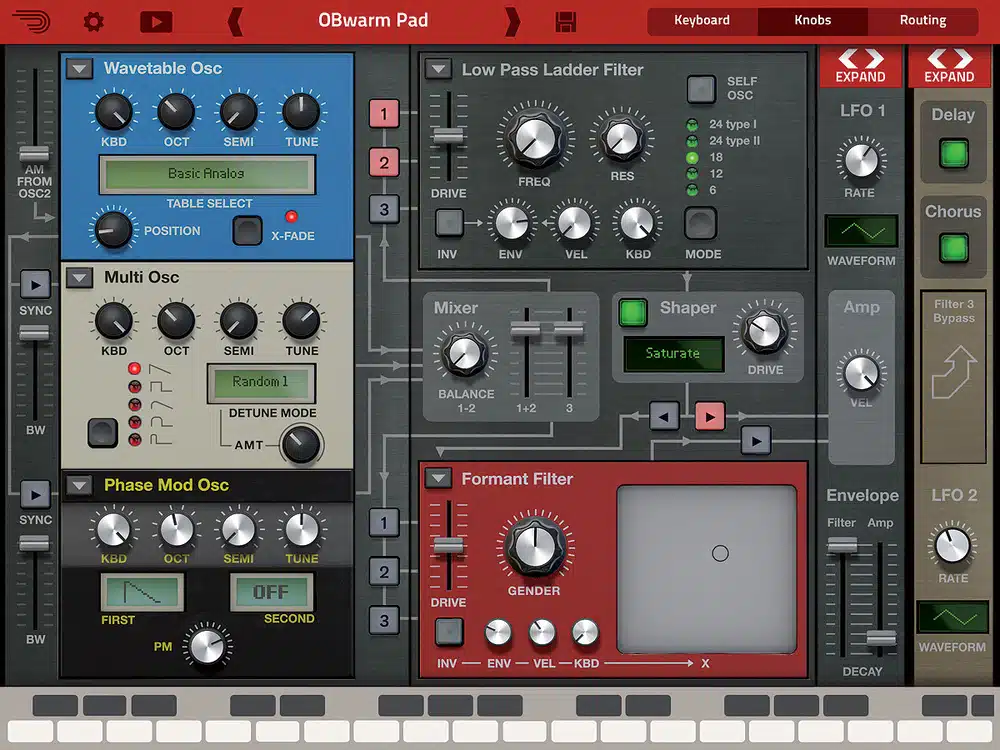
You’ll be able to instantly see (or, should I say, hear) the supreme power a properly implemented filter can possess.
It goes much deeper than just High-Pass, Low-Pass, Band-pass, and Notch filters, that’s for sure.
This hip-hop production tip is all about getting acquainted with filters and filter types in order to enhance your skills and excel in your music.
PRO TIP: In the world of physical modeling and unique effects, unconventional/creative filtering can set you apart from the pack.
It will also help you to create some of the most authentic-sounding synthetic models and creative effects the world has ever heard, no joke.
Never look at a filter as just a means of fixing or controlling a sound or signal’s frequency content, as that’s not all they’re good for.
That’s just the tip of the iceberg!
HIP-HOP PRODUCTION TIPS: FINAL THOUGHTS
As we said earlier, knowledge is power, and these helpful hip-hop production tips contain a lot of power. Now, it’s up to you to actually apply them and always keep them in mind.
When you do, I guarantee that your music will absolutely skyrocket in terms of quality and uniqueness.
You will be blown away by the results each one of these hip-hop production tips produces.
Plus, your beats will thank you big time for it.
If you want to have the absolute best chances of success, without the worry of it sounding whack or amateur?…
Then download the FREE Unison Artist Series Essentials.
It contains the most professional, exclusive signature sounds (by the world’s top producers) that you can’t find anywhere else.
Guaranteed to capture the attention of your listeners and make your tracks pop.
Talk about unique and original!
Until next time…


