Sidechain compression is one of the most powerful techniques in music production (if you know how to do it properly, that is).
It can give your mixes clarity, add punch to your drums, and let your vocals shine through dense arrangements.
Plus, it helps you achieve that signature “pumping” effect heard in countless EDM and pop tracks that people really love.
As a producer, learning how to use sidechain compression can completely transform the way your music sounds and feels.
That’s why we’re breaking down everything you need to know about side chain compression/the sidechaining process, including:
- Understanding sidechain compression basics ✓
- Setting the ideal threshold ✓
- Determining the right ratio ✓
- Adjusting attack and release times ✓
- Using sidechain filters for precision ✓
- Creative sidechain applications ✓
- Multiband sidechain compression ✓
- Frequency range essentials & all the important elements
- Avoiding common side chain compression mistakes ✓
- Advanced techniques for professionals ✓
- Using a compressor/many compressors like a boss ✓
- Perfecting the entire process, from start to finish
- Much more about side chain compression ✓
After this article, you’ll know everything about sidechain compression to add groove, control dynamics, and bring a polished, professional edge to your tracks.
This way, your mixes will always be clear, balanced, and impactful, so you’ll be sidechaining like a true professional in no time.
So, let’s dive in…
Table of Contents
What is Side Chain Compression? Breaking it Down
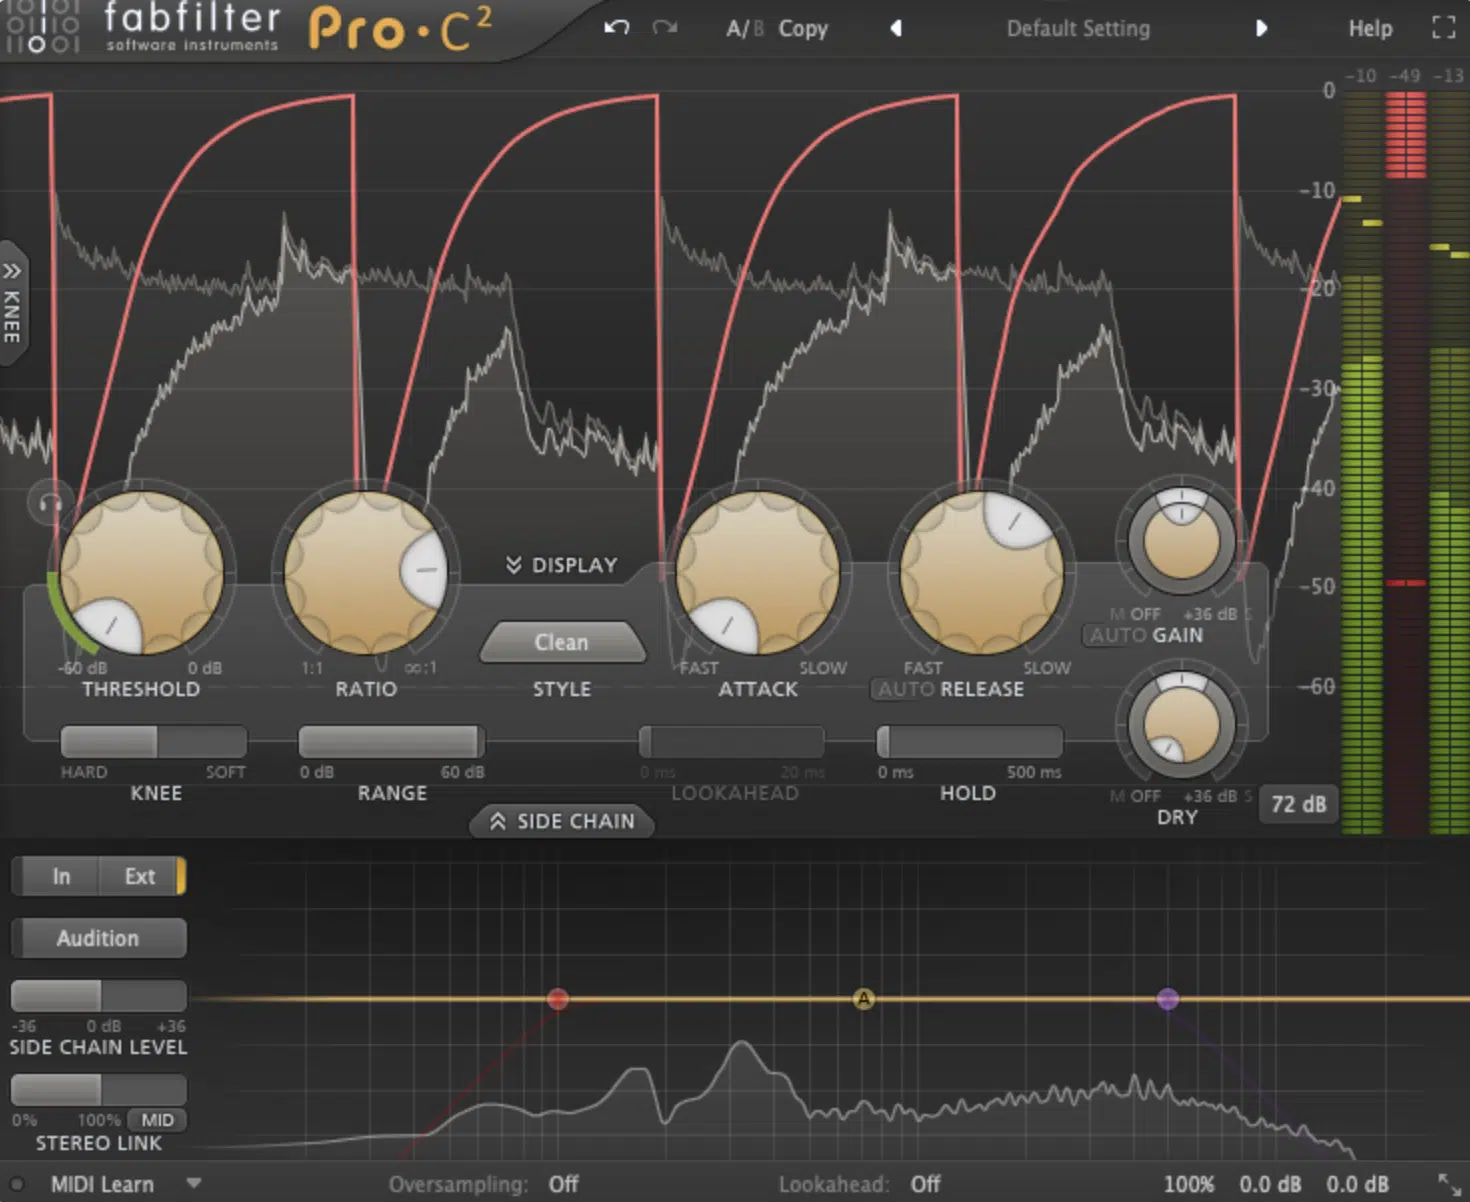
Sidechain compression is a technique in music production where the compressor on one audio track is triggered by the audio signal from another track.
Many producers like yourself and myself use it to create space in the mix, especially between the kick drum and bass.
This allows the kick to punch through by lowering the bass level when the kick hits.
By using a compressor’s sidechain input, I can manipulate audio dynamics to create the classic “pumping” effect commonly heard in electronic dance music.
Sidechain compression is versatile, serving functions beyond bass ducking 一 like rhythmic vocal effects or giving synths more groove.
In the music production world, you’ve got to know all about sidechain compression to really sound professional and stand out, which is why we’re breaking it all down today.
And yes, we’ll be including everything you’ll need to know to really have a solid understanding, starting with the key parameters of side chain compression.
Key Parameters of Side Chain Compression
Mastering sidechain compression requires understanding its essential parameters. These settings define the interaction between your kick drum and bass, shaping your track’s rhythmic flow. So, let’s get into it.
-
Setting the Threshold for Side Chain Compression
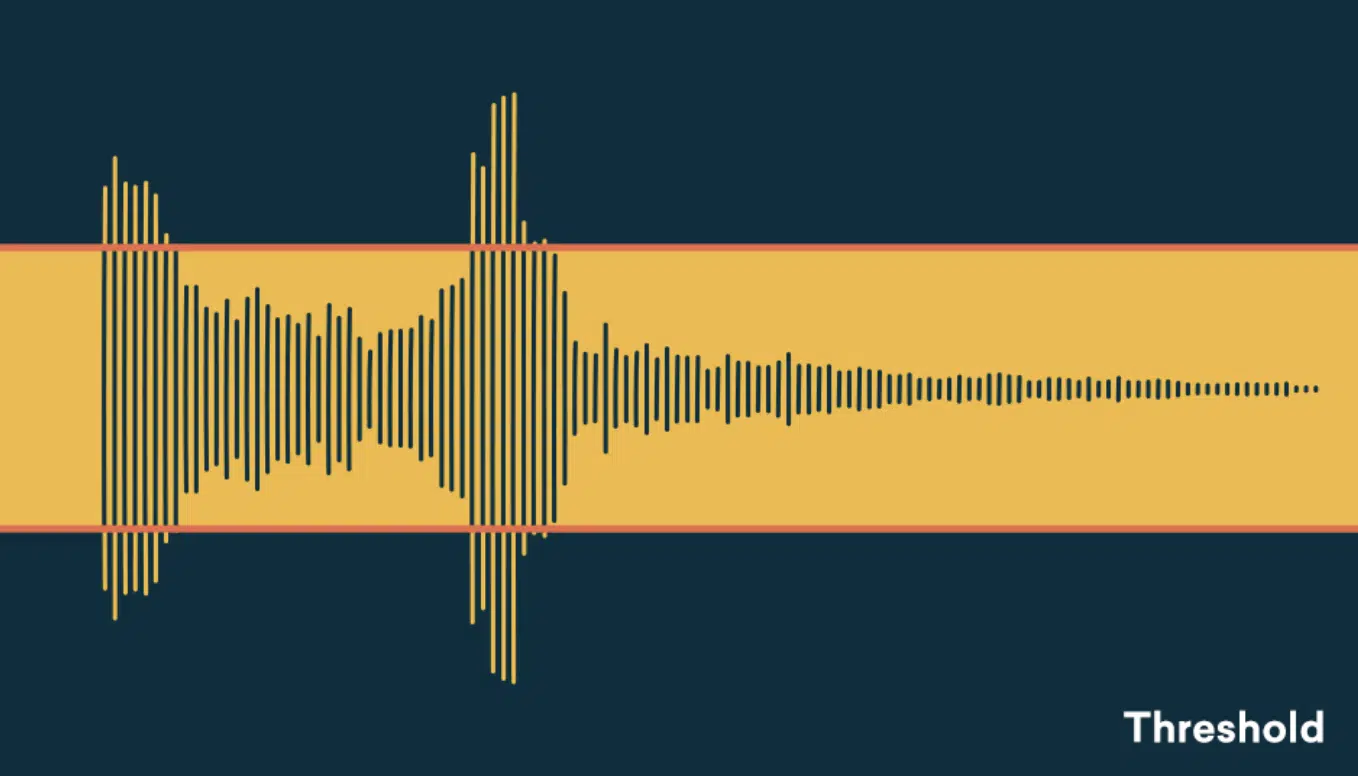
The threshold is where sidechain compression really comes alive… it’s the point at which the compressor starts to kick in, reacting to the sidechain input.
When you set a lower threshold, the compressor engages more frequently, making each kick hit cut through by ducking the bass more aggressively.
However, if you go too low, the audio track can end up sounding over-compressed, losing natural dynamics (which you certainly don’t want).
For smooth ducking effects, try setting the threshold to just under the average bass volume, so the kick hits stand out without overwhelming the rest of the mix.
A good rule of thumb: start with a mid-range threshold and adjust as needed.
Pro Tip: If your bass peaks at around -6 dB, set the threshold a bit lower, around -10 dB, to make sure it reacts to each kick drum hit effectively.
Lowering the threshold further to -15 dB will intensify the effect 一 making the bass duck way more dramatically.
In genres like EDM, where a prominent pumping effect is desirable, a low threshold (around -20 dB) paired with a kick will create more audible gain reduction.
This will successfully enhance the mix’s rhythmic pulse.
Remember to experiment, as different tracks may need unique settings to balance the sidechain signal precisely.
Side note, if you want to learn all about gain reduction, we got you covered.
-
Ratio: Determining the Amount of Compression
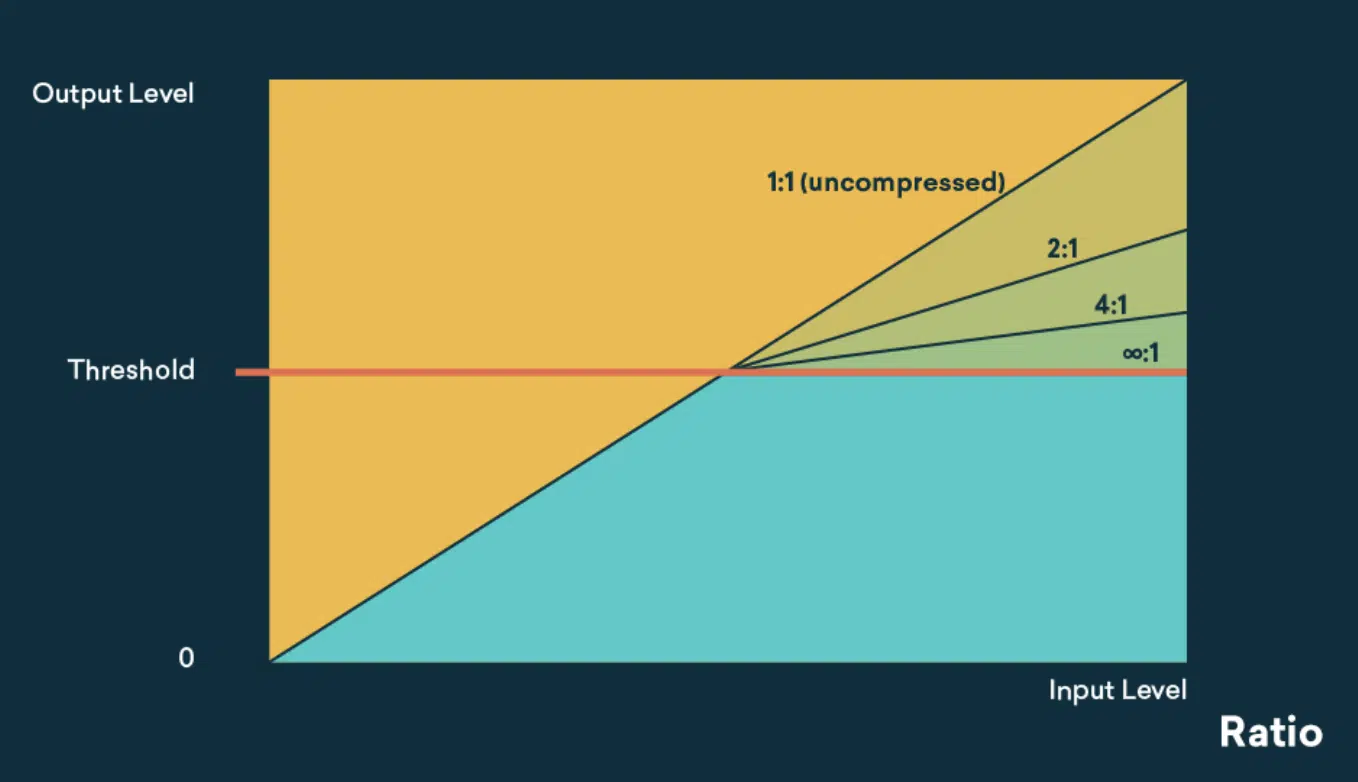
When it comes to sidechain compression, the ratio controls how much the audio signal is reduced when the kick drum hits.
For subtle ducking/mixing, you should use a ratio of 2:1, which slightly lowers the bass level whenever the kick comes in.
For a stronger effect, commonly used in electronic dance music like we talked about before, you should increase it to around 4:1 or even 6:1.
With a higher ratio (like 10:1) the bass completely ducks under each kick hit which creates an intense pumping effect.
Just make sure to adjust the ratio based on the genre 一 lower for smoother styles like pop, and higher for harder genres like EDM and trap (like 6:1 or higher).
This ratio setting drastically reduces the bass when the kick hits, emphasizing the kick drum’s impact in the best way.
-
Attack and Release Times
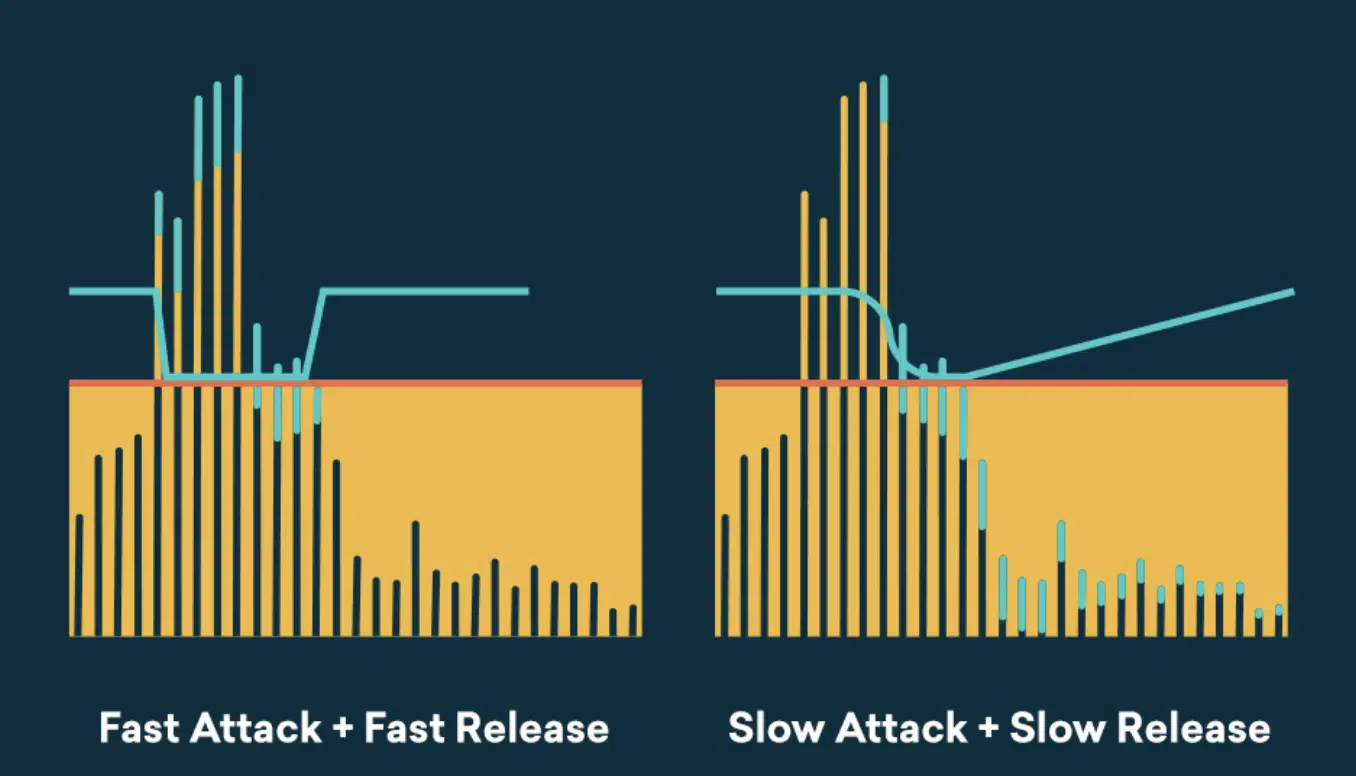
Attack and release times in sidechain compression dictate how quickly the compressor engages and disengages in response to the sidechain input.
If you set a fast attack time, around 1-5 milliseconds, the compressor responds instantly to each kick hit 一 this will give you a sharper ducking effect.
For a more natural sound, you can increase the attack to 10-20 milliseconds, which lets a bit of the bass transients come through before ducking.
Release time is just as critical, of course…
Set it to 100-150 ms to ensure the bass returns smoothly, syncing well with the track’s tempo, because that will guarantee things are fluid and on point.
Too fast (e.g., under 50 ms), and the bass can sound unnatural or jittery, while too slow (over 200 ms) results in a longer duck, which can make the track feel sluggish.
Typically, you should aim for a release around 100-150 milliseconds for balanced, rhythmic pumping.
Just remember, when it comes to side chain compression, matching these settings to your track’s rhythm is key to maintaining a cohesive mix.
Essential Side Chain Compression Techniques
Now that we’ve covered the basics of sidechain compression, let’s dive into the techniques that bring out the best in sidechain compression. They’ll help you add more groove, clarity, and excitement to your mix.
-
Sidechaining Vocals for Clarity
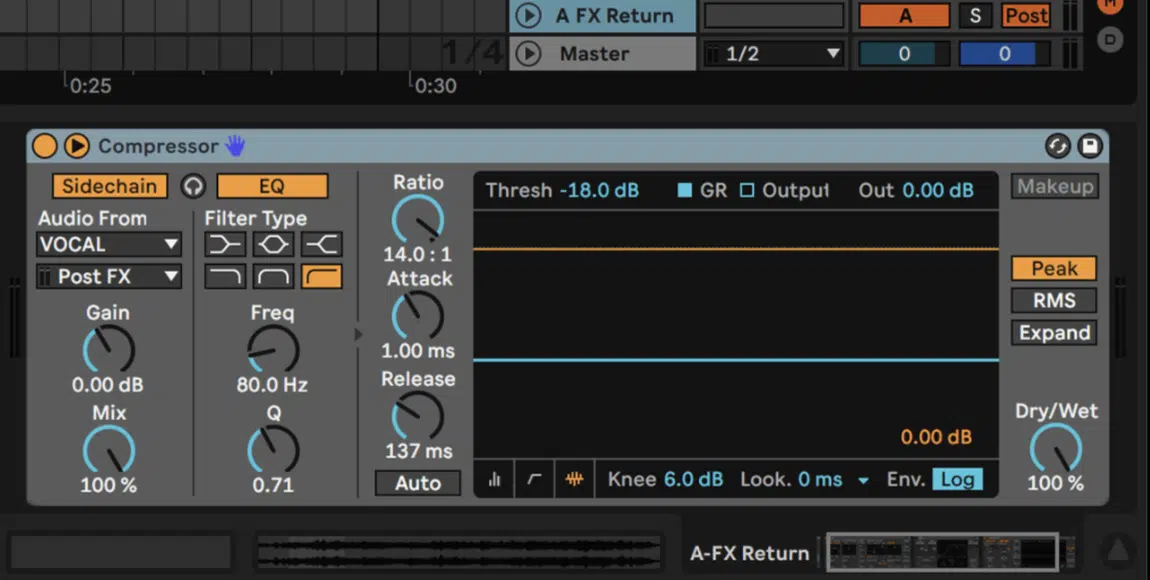
Sidechaining vocals can help maintain vocal clarity, especially when they compete with other instruments like pads or synths.
For example, if you’re sidechaining a synth pad against a vocal, set the threshold around -10 dB with a ratio of 3:1.
This sidechain compression setting allows the synth to subtly duck in volume whenever the vocals come in 一 giving the voice more space in the mix.
Using a quick attack of about 2-5 ms ensures the effect happens right when the vocal starts, while a release of around 100 ms keeps the flow natural.
This technique can make your vocals cut through and stand out without overpowering the rest of the track or compromising your track’s fullness.
-
Creating Rhythmic Effects with a MIDI Trigger
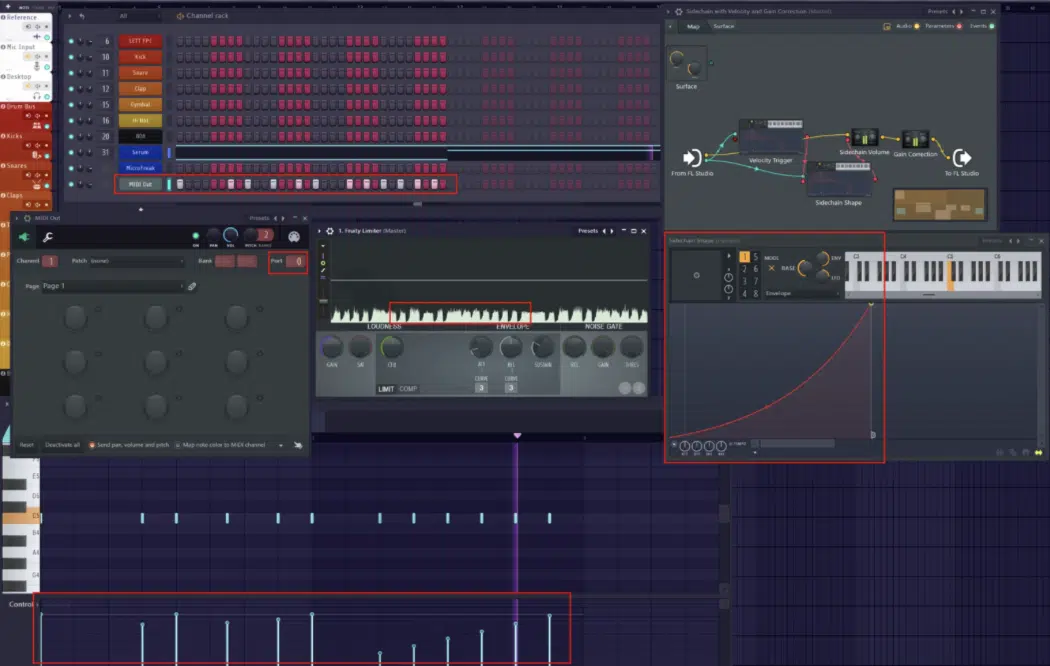
To create rhythmic effects, use MIDI to trigger sidechain compression in time with specific elements like hi-hats, snares, or other elements.
For example, you can route a MIDI track to a sidechain compressor on a bass synth, allowing the synth to duck whenever the hi-hats hit.
Set the threshold around -8 to -12 dB and a ratio of about 4:1 for a prominent effect.
Adjust the attack and release to match the tempo of the track 一 for faster rhythms, try an attack of 1 ms and a release under 100 ms for a sick sound.
This technique can add syncopation and groove which will make the bass and drums feel tightly connected.
Advanced Side Chain Compression Techniques
Once you’ve mastered the basics, you can take things to the next level with more advanced sidechain compression techniques. This will give you even more control and precision so you can manipulate specific frequency ranges, stereo width, and effects sends for a polished, professional sound.
-
Multiband Side Chain Compression
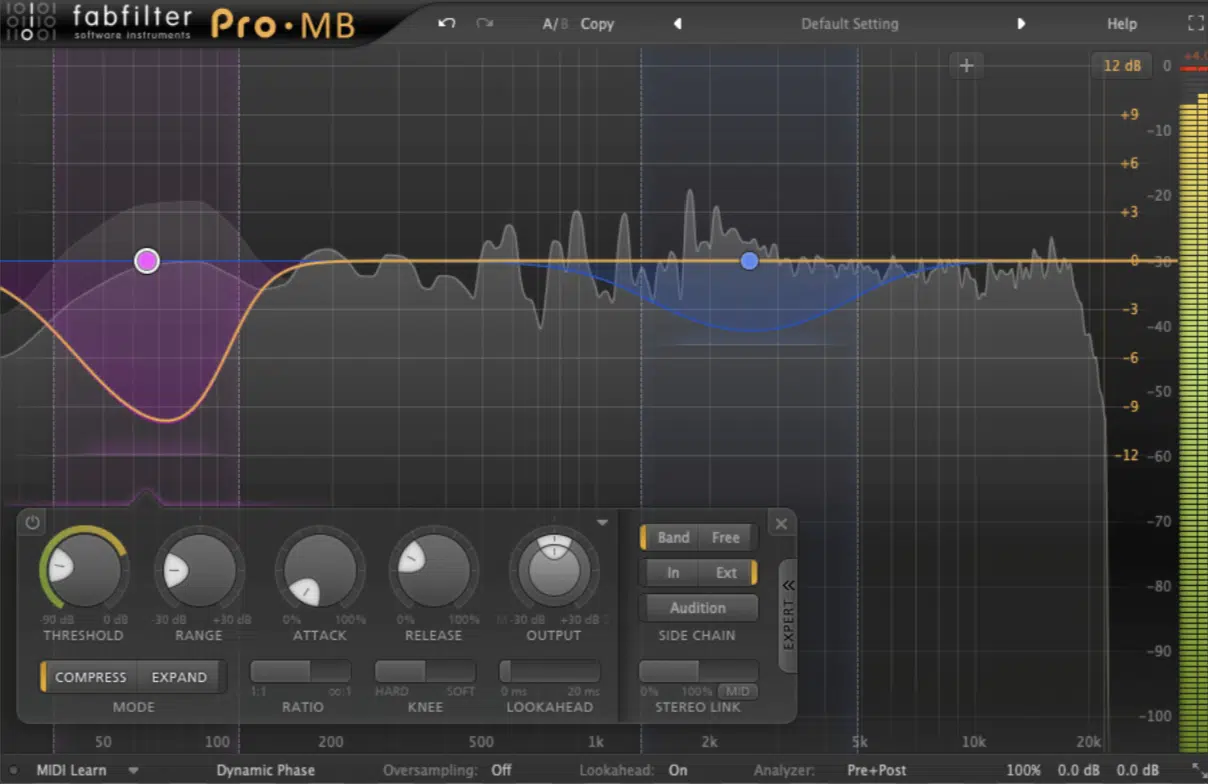
Multiband sidechain compression allows you to target specific frequency bands instead of the entire audio signal.
Let’s say you’re sidechaining a bass track against a kick… you can set the sidechain compressor to only react to certain frequencies below 100 Hz.
Use a higher ratio, like 5:1, on this low-frequency band to keep the kick and bass from muddying up the low-end, which is something you never want.
This way, higher frequencies in the bass remain untouched, preserving clarity while the lows duck to make space for the kick.
Multiband sidechain compression works super well for genres with dense, layered mixes because only the necessary frequencies are adjusted.
Another example would be if your bass has mid-range harmonics that interfere with the kick, isolate the lower band (e.g., 0-120 Hz) on the sidechain compressor and apply a 4:1 ratio with a threshold of around -12 dB.
This technique/setting allows the bass’s low-end frequencies to duck 一 making room for the kick, while the mids remain unaffected.
A fast attack of 5 ms and a release around 120 ms will keep the rhythm tight for a super clean low-end.
-
Stereo Imaging & Mid/Side Processing
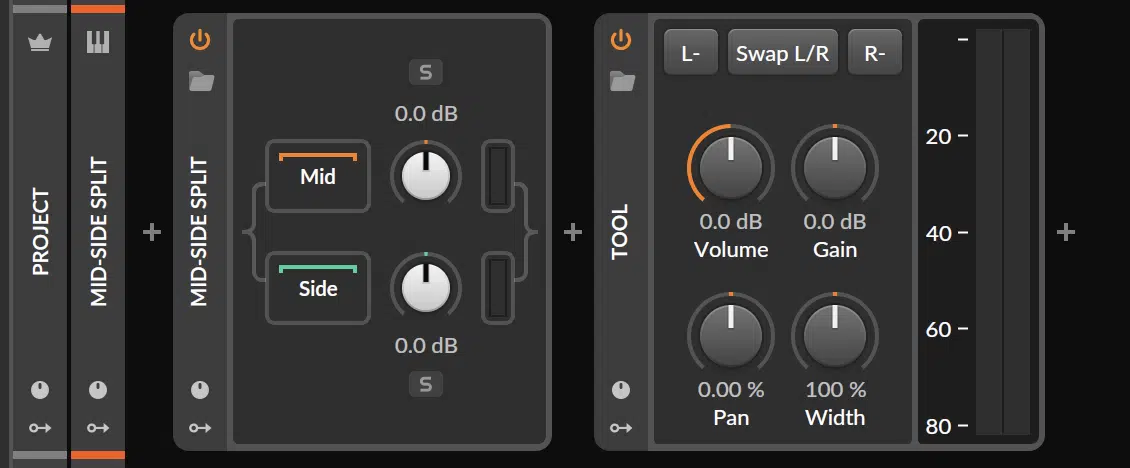
Sidechaining with mid/side processing allows you to control stereo width and balance in your mix so everything is on point.
You can, for example, sidechain only the mid-channel of a stereo pad to a vocal, keeping the sides unaffected and retaining a sense of width.
Set the compressor’s sidechain input to respond only to the mid signal, using a ratio of around 3:1 and an attack of 10 ms.
For subtle widening effects, apply a release time of around 150 ms, so the pad gradually returns as the vocal fades.
This technique helps you maintain clarity in the center of your mix while preserving depth and atmosphere in the stereo field.
-
Sidechaining Reverb and Delay Sends

Sidechaining reverb and delay sends can help prevent these effects from completely cluttering the mix, especially during vocal passages or kick hits.
You can place a sidechain compressor on the reverb or delay return channel, then route the vocal or kick track as the key input.
Set the threshold around -10 dB and a ratio of 3:1 for subtle ducking, using a fast attack (1-2 ms) so the compressor engages immediately.
With a release of around 150 ms, the effect fades smoothly, ensuring the reverb or delay comes back in gradually when the vocal or kick subsides.
-
Using Automation for Dynamic Control
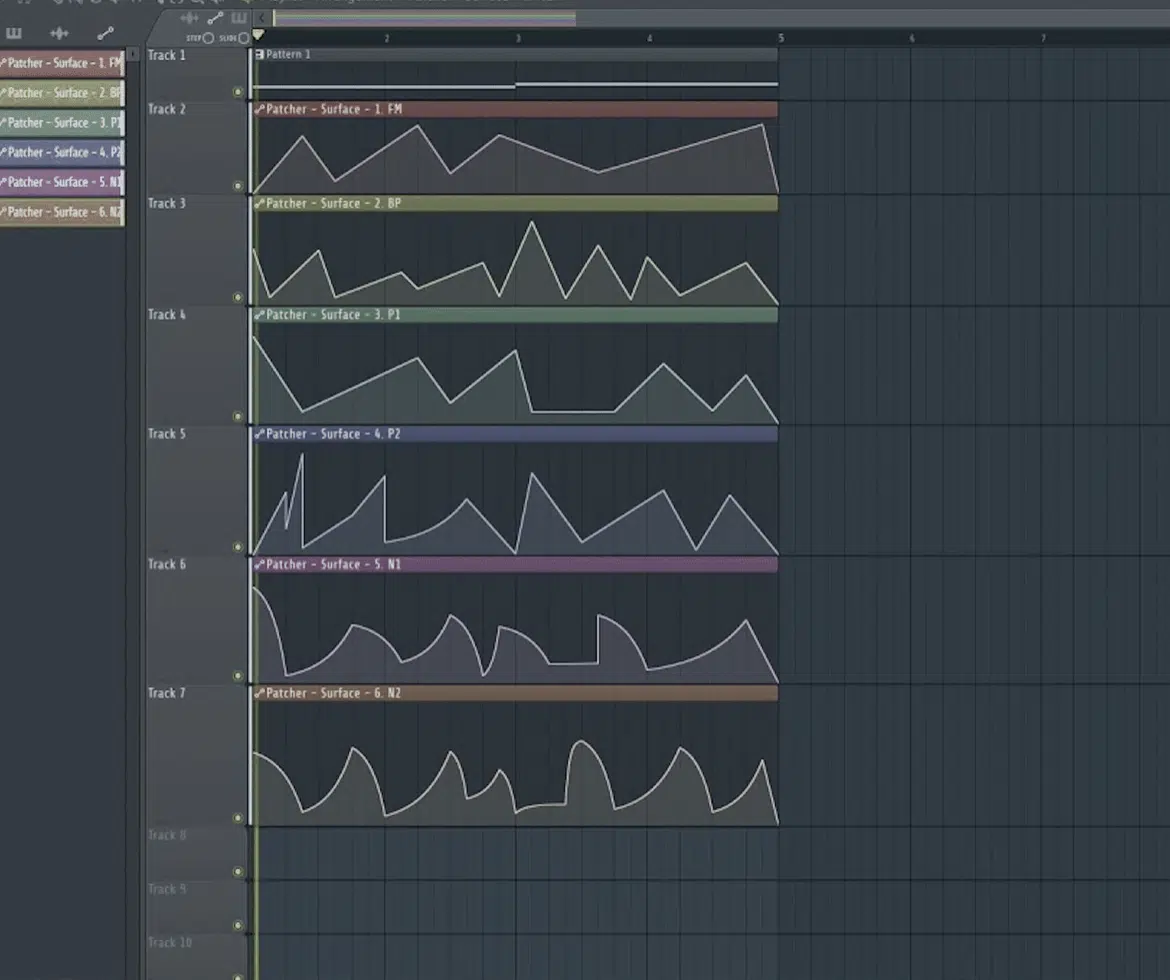
Automation can bring added versatility to the sidechain compression process so you can adjust parameters over time, like:
- Threshold
- Ratio
- Release
- Etc.
For example, during a breakdown section, automate the threshold to be higher (around -6 dB) so the sidechain effect is subtler.
Then, gradually lower it to -12 dB as the track builds up to the drop.
You can also automate the release time from a short 100 ms to a slower 300 ms during a buildup for added tension, which will really get your listeners invested.
By automating these parameters, you maintain dynamic control over the mix 一 adapting the sidechain effect to fit different sections of your song like a boss.
-
Pro Tip: Setting Sidechain Filters for Frequency Precision

Sidechain filters allow you to target a specific frequency range in your sidechain input, making the compression more precise.
For example, when sidechaining a bass to a kick drum, you can apply a high-pass filter on the sidechain input to focus only on certain frequencies above 100 Hz.
This setting keeps the compressor from reacting to low-end rumble, letting the kick and bass occupy the sub frequencies without any annoying interference.
A ratio of 1:3 and a threshold around -10 dB can work well so the sidechain signal/main signal can cut through while preserving clarity in the low-end.
Common Side Chain Compression Mistakes/Problems
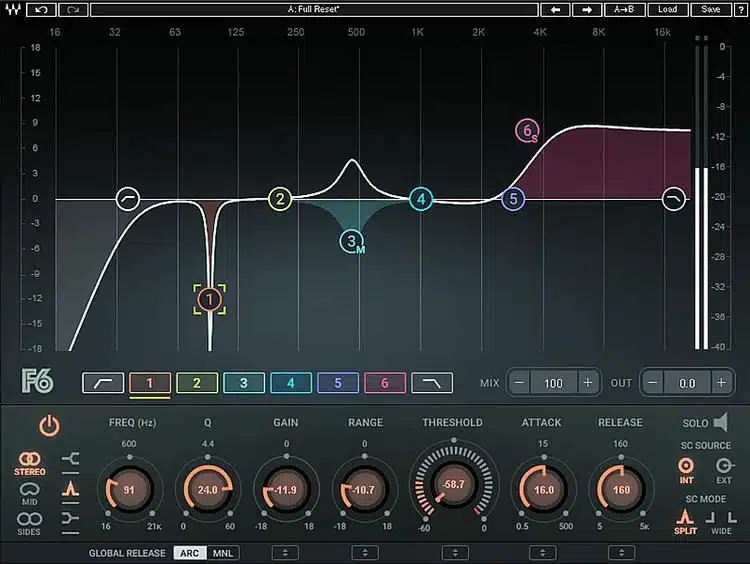
#1. One common issue with sidechain compression is over-compression, which can lead to mixing that feels unnatural or strained.
If your threshold is set too low, like around -20 dB, it can cause excessive gain reduction, making the track one sound overly compressed and robbing it of dynamic range.
To prevent this, start with a moderate ratio of 2:1 or 3:1 and increase gradually 一 making sure to test the effect each and every time.
#2. Another problem is phase issues between the kick and bass, which causes unwanted artifacts and frequency cancellations.
So, try slightly offsetting the kick channel by a few milliseconds (ms) or adjust the polarity of the bass to achieve better alignment.
#3. Over-reliance on compression can also rob your mix of dynamics, so avoid setting the threshold too low.
#4. Finally, make sure that you’re not sidechaining everything to the same input, as it can muddy the mix and really blur the impact of each individual element.
When it comes to side chain compression, just remember balance and precision are key to keeping your mix clear and punchy.
-
Pro Tip: Ducking Bass with Kick for a Tight Low-End
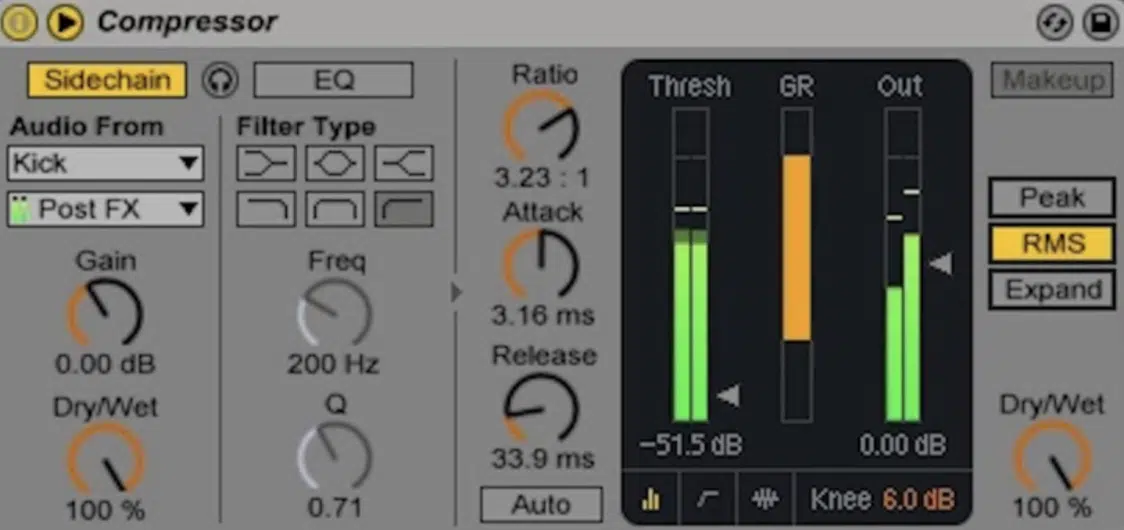
Sidechain the kick to the bass to create a tight, controlled low-end… Start by placing a sidechain compressor on the bass and routing the kick to its sidechain input.
Use a threshold of around -12 dB, a 4:1 ratio, and set the attack time to about 2-5 ms for a quick response.
With a release of around 100 ms, you can achieve that rhythmic pumping feel.
This makes sure the actual kick cuts through while avoiding frequency range clashes and phase issues in the low-end.
That’s what side chain compression is all about, people!
Side Chain Compression: Final Thoughts
Side chain compression is all about control, rhythm, and clarity, giving your mixes depth and space so each element can sit perfectly together.
Plus, it can add groove and movement, making your tracks come alive.
Now, using the tips, tricks, techniques, and knowledge we covered here today, you’ll be able to master sidechain compression like a pro.
You’ll never have to worry about muddy mixes or buried vocals again.
And, if you’re looking for firsthand, professional insight into this subject, you’ve got to check out these world-renowned Free Project Files.
It contains 3 project templates in popular DAWs that show you exactly how to create professional beats from start to finish, with all effects and processes laid out.
And yes, this includes everything you need to know about side chain compression, too.
It’s like having all the ultimate cheat codes, so it’s invaluable for producers of all genres and styles looking to enhance their skills fast.
With the secrets of side chain compression now at your disposal, your mixes will sound cleaner, tighter, and more polished.
Make sure to always get creative, experiment, and let side chain compression bring your music to the next level.
Until next time…


Leave a Reply
You must belogged in to post a comment.