Understanding the audio frequency range is a vital part of music production.
It’s a complex spectrum that, when fully grasped, can transform your tracks in powerful ways.
This comprehensive guide will provide key insights into the hidden world of audio frequencies, enabling you to step up your production game.
In today’s article, we’ll be breaking exploring:
- An in-depth answer to “What is the frequency range?” & its impact ✓
- A detailed discussion on fundamental frequencies & their significance ✓
- A clear breakdown of frequency response & the role of various audio components ✓
- Different frequency ranges & their influences on a mix ✓
- Managing harmonic & resonant frequencies ✓
- Unwanted harmonics, better mixes & achieving the right frequency response ✓
- Professional tips & tricks to help you master the frequency spectrum ✓
So, prepare yourself for a sonic journey that promises to refine your understanding and elevate your music production expertise.
Let’s dive in…
Table of Contents
- What Exactly is the Frequency Range?
- The Fundamental Frequency
- Riding the Waves: Frequency Response & Why It Matters
- Breaking Down Different Frequency Audio Ranges
- Ensuring a Balanced Frequency Spectrum: Tips & Tricks
- How CUI Devices Handle Different Frequency Ranges
- The Art of Frequency Management in Music Production
- Frequency Range: Final Thoughts
What Exactly is the Frequency Range?
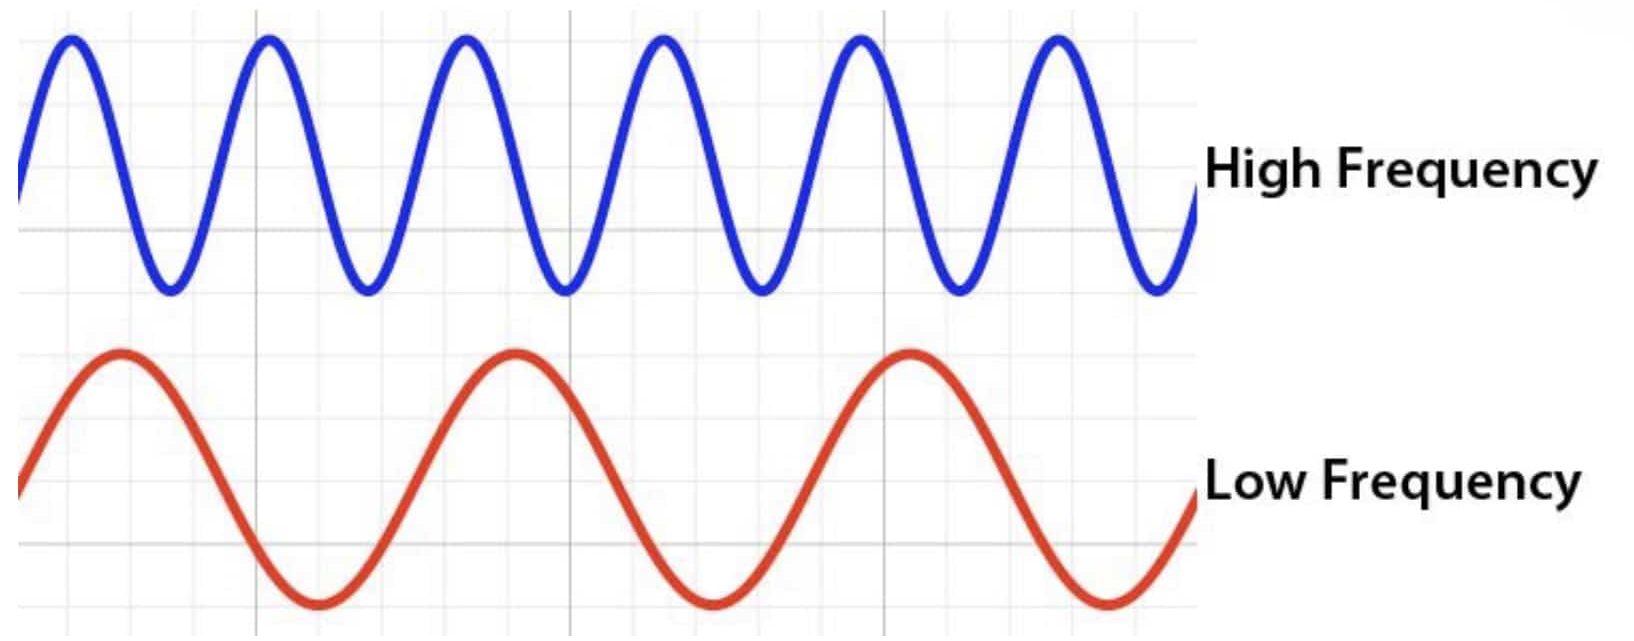
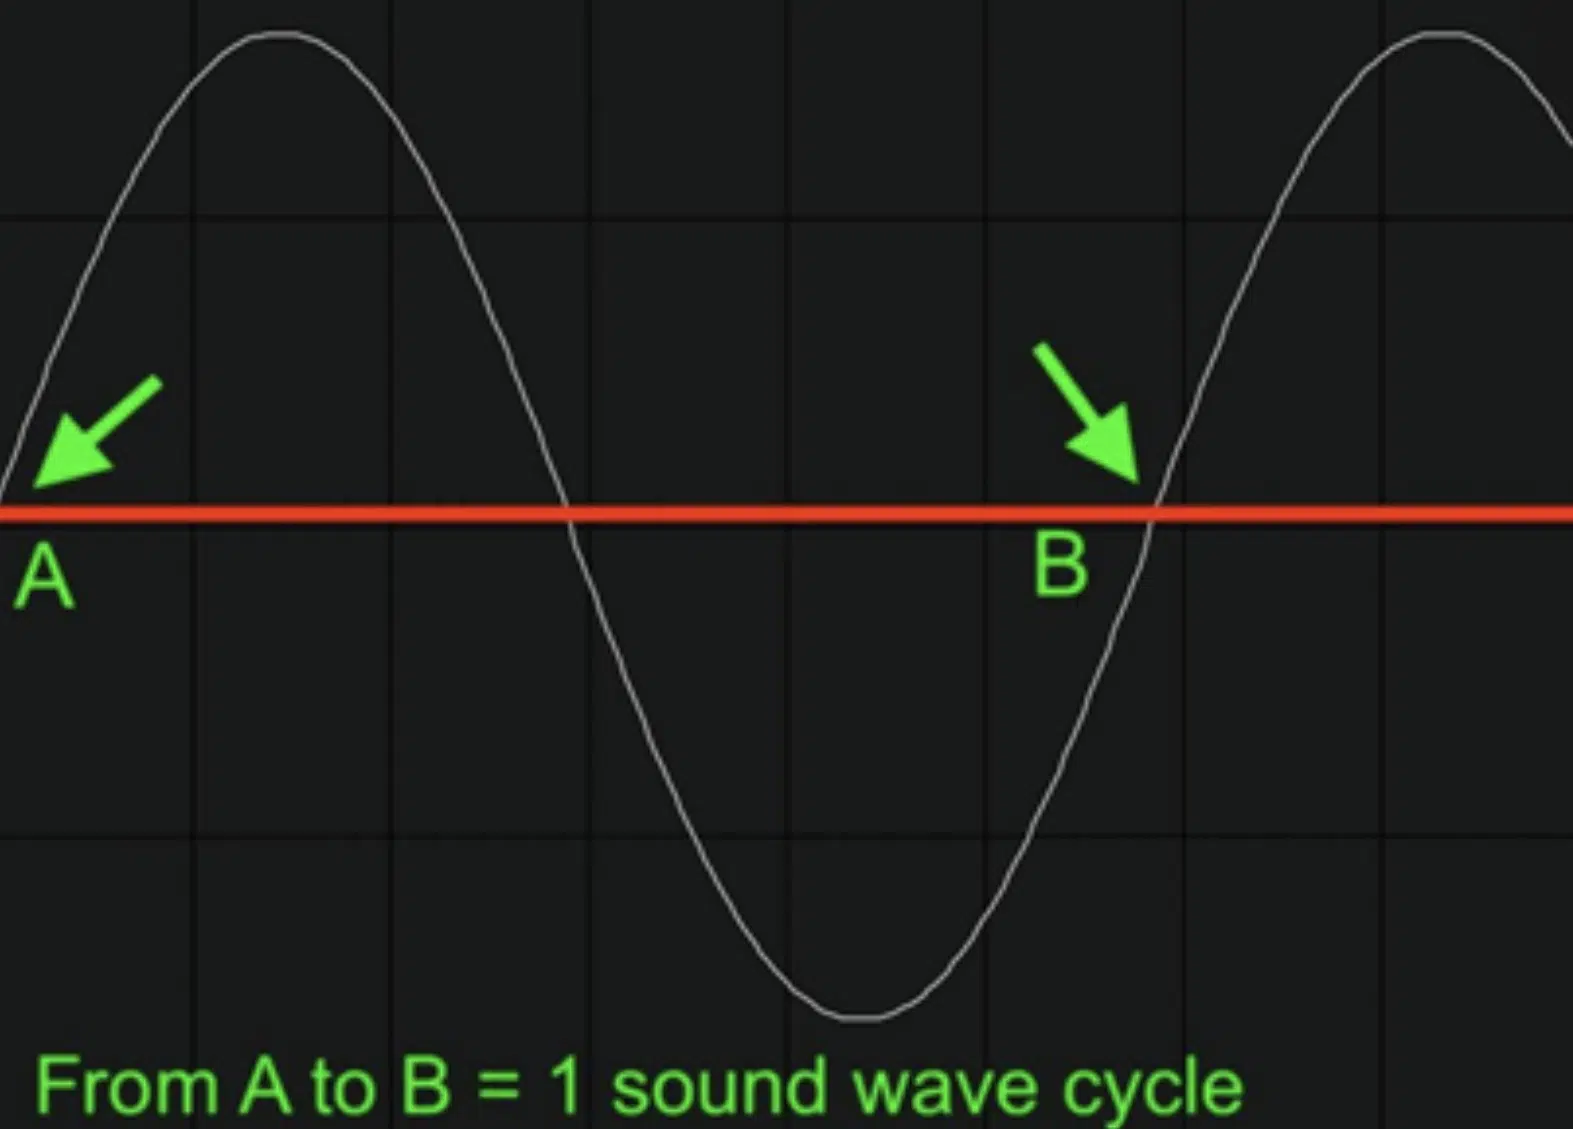
The frequency range (often also referred to as the audio frequency range) is the range of frequencies that can be heard by humans.
It generally spans from 20 Hz to 20,000 Hz, although this can vary from person to person.
Frequencies are measured in Hertz (Hz), and each frequency represents a specific pitch or tone.
- The lower the frequency 一 the lower the pitch of the sound.
- The higher the frequency 一 the higher the pitch.
For instance, think of the deep rumble of a bass guitar, which resides in the lower frequencies.
Then, contrast that with the high-pitched shimmer of a crash cymbal, which is in the higher frequencies.
The frequency range is divided into several segments, each with its own unique sonic characteristics, including:
- The sub-bass range
- The bass range
- The mid-range
- The high-end (which itself can be divided into the presence & brilliance ranges)
These different frequency ranges play distinct roles in the way we perceive and interpret sound.
As a music producer, it’s your job to understand and manipulate them to create the best possible mixes.
Whether you’re sculpting the perfect bass tone, crafting a crisp snare sound, or polishing the shimmering high end of a vocal track 一 you’re working within the parameters of the frequency range.
It’s not just about knowing that bass lives in the low end and cymbals in the high end, though.
It’s all about understanding how different frequencies interact.
For example, how to balance them for clarity and depth and how to manipulate them to create the mood and impact you want in your music.
Once you got that down, nothing will be able to stop you from producing killer beats.
-
What Does the Audio Frequency Range Entail?
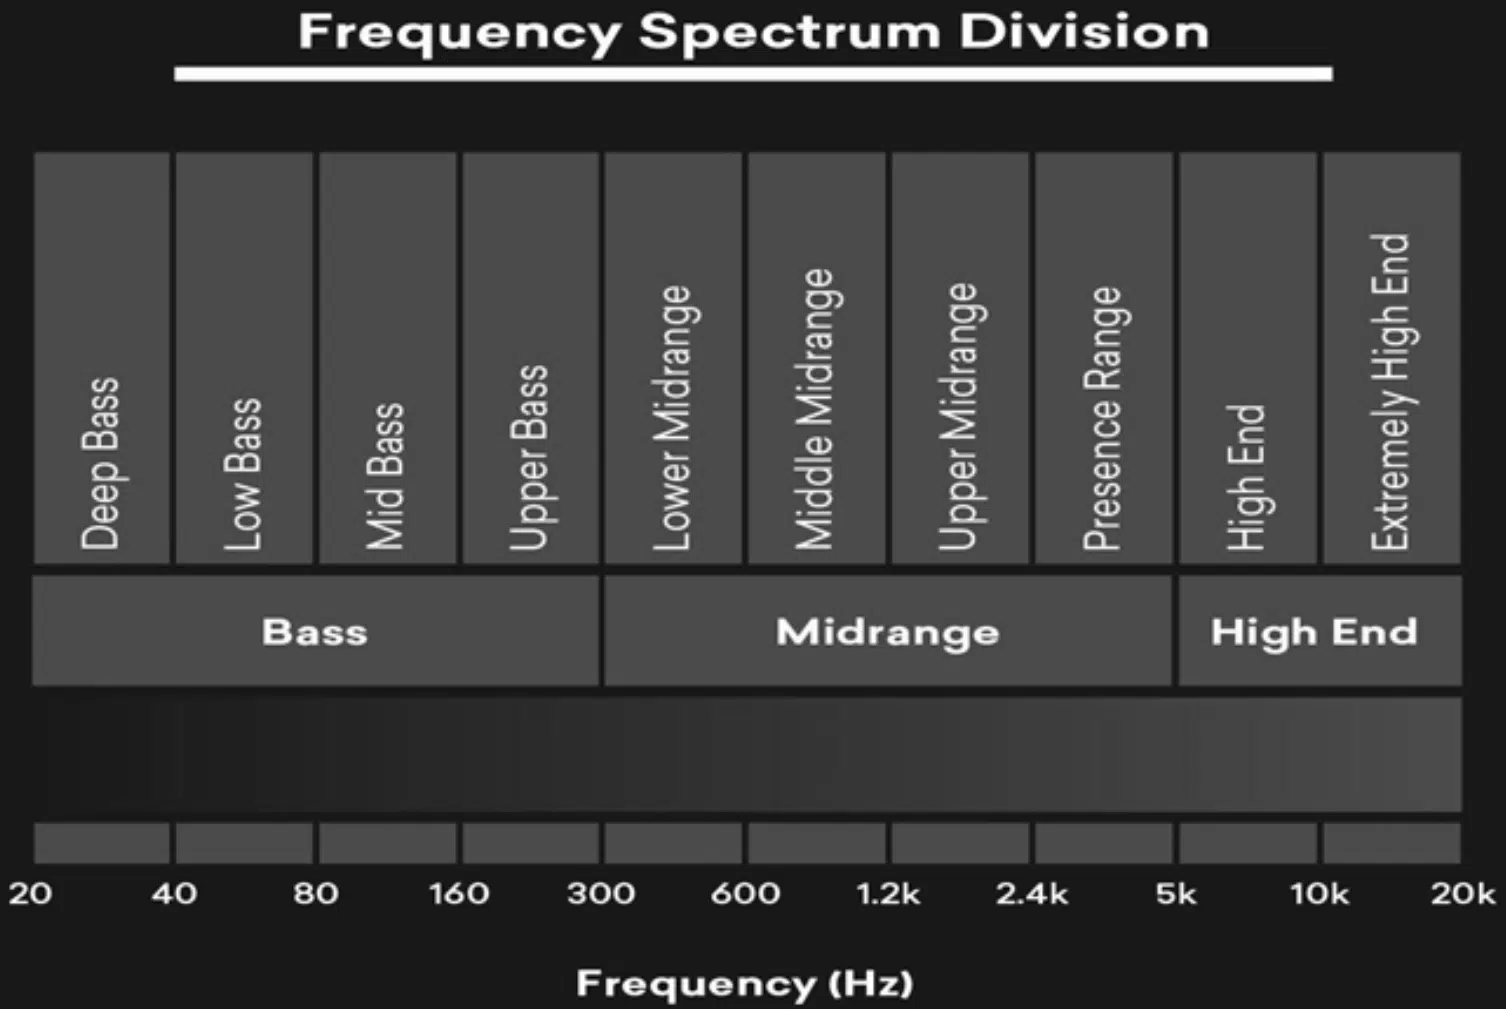
So, you might ask, “What’s this audio frequency range all about?”
Well, the audio frequency range for us humans typically falls between 20 Hz and 20,000 Hz (or 20 kHz).
Now that’s quite a stretch, right?
Well, within this range, there are different frequency ranges each with their unique characteristics and effects on the sound we hear.
When you’re making music and songs, especially as a digital music producer, understanding these different frequencies is crucial.
You’ve got the sub-bass range, the bass range, the middle range, the presence range, and the brilliance range.
Each range contributes differently to your mix.
For example:
- Lower frequencies, often found in the sub-bass and bass range, give the ‘thickness’ and ‘weight’ to the sound.
- Mid-range frequencies add clarity.
- Higher frequencies bring the ‘sparkle’ and ‘airiness’ to the mix.
It’s all about finding that ideal balance.
However, keep in mind, not all sounds are created equal…
Some sounds have more than just a single frequency; they have a fundamental frequency and multiple harmonic frequencies.
Don’t worry, we’re going to cover that later on.
-
The Audible Frequency Range: How Human Hearing Defines Our Sonic Universe
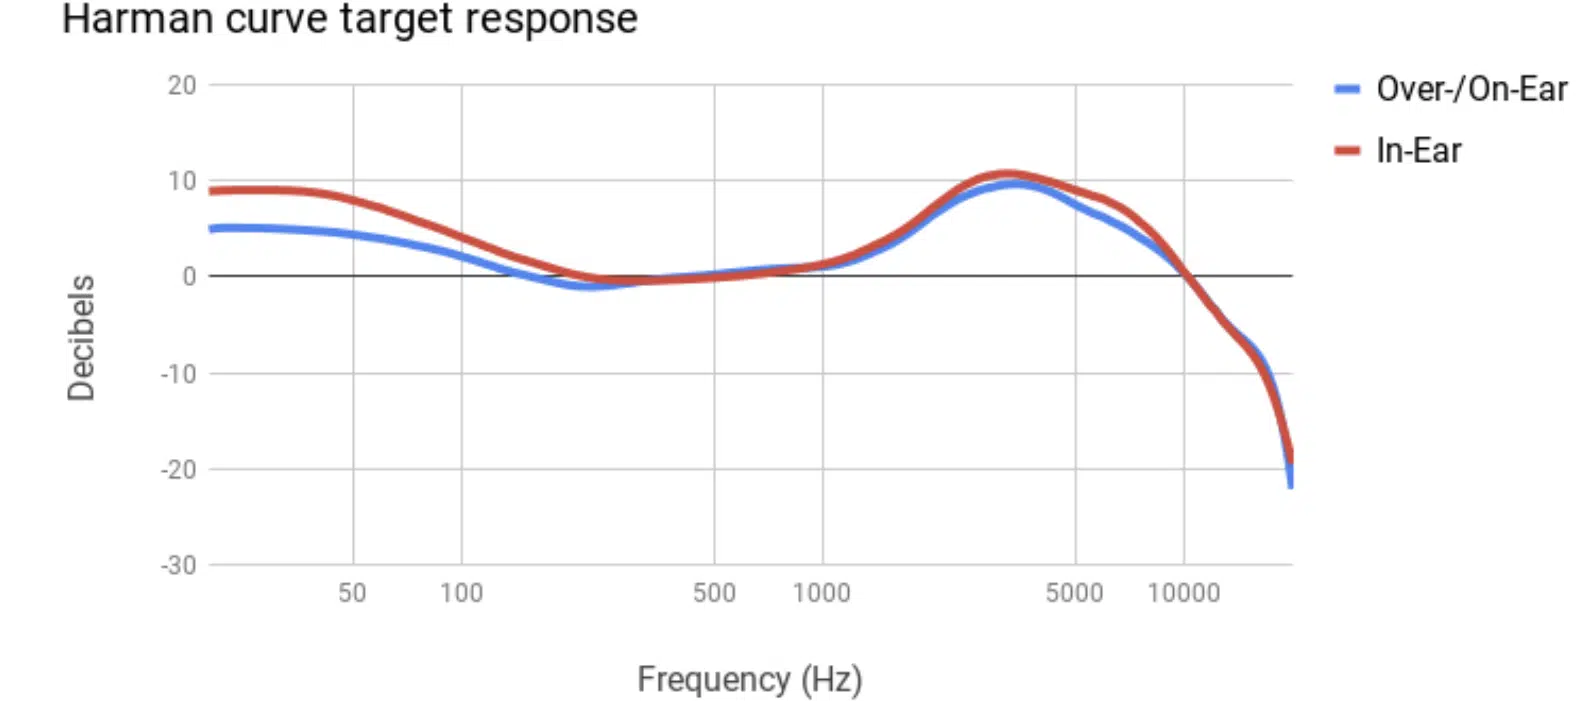
When it comes to the audio spectrum, we need to remember that it’s bounded by our human hearing.
The average human ear can hear frequencies from around 20 Hz to 20,000 Hz, also known as the audible range.
Anything below or above is typically inaudible to us.
However, we don’t hear all frequencies equally well, there are indeed levels to it.
The human ear is extremely sensitive in the mid-range frequencies 一 around 2 kHz to 5 kHz.
This is where the majority of audible content lies, including most musical instruments and, importantly, human speech.
NOTE: That said, don’t neglect the lower and higher ends of your mix.
They bring the ‘body’ and ‘sparkle’ to your music, respectively.
As a hip-hop digital music producer, this understanding can be your secret weapon.
The Fundamental Frequency
Now, let’s venture deeper into the sonic spectrum.
You’ve probably come across the term ‘fundamental frequencies’ as well in your music production journey.
It’s one of those terms that can seem daunting, but it’s actually pretty straightforward.
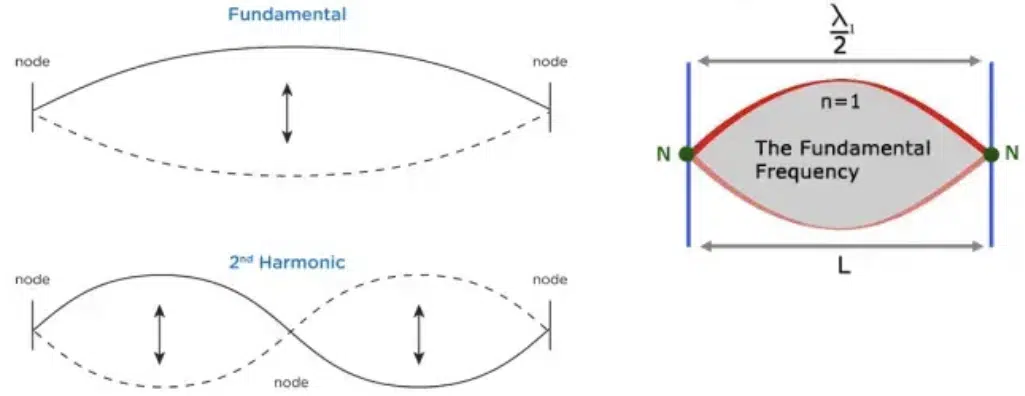
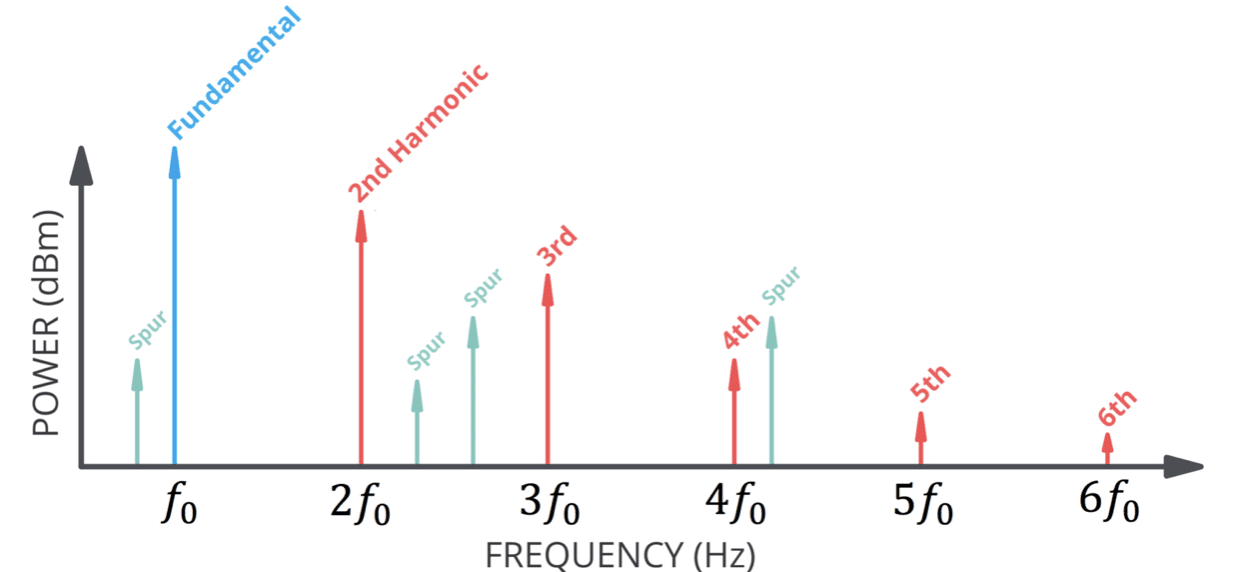
The fundamental frequency is simply the lowest frequency of a periodic waveform.
It’s like the root note of your sound, so to speak.
When you play a note on your bass guitar, the fundamental frequency is the first frequency you hear, the actual note you’re playing.
These fundamental frequencies created other frequencies known as harmonic frequencies.
These are whole number multiples of the fundamental frequency.
Together, these frequencies give a sound its unique timbre or color.
Without them, every note from every instrument would sound identical (could you imagine?).
Riding the Waves: Frequency Response & Why It Matters
Let’s take a turn now and talk about another crucial concept in music production: frequency response.
So, what is it?…
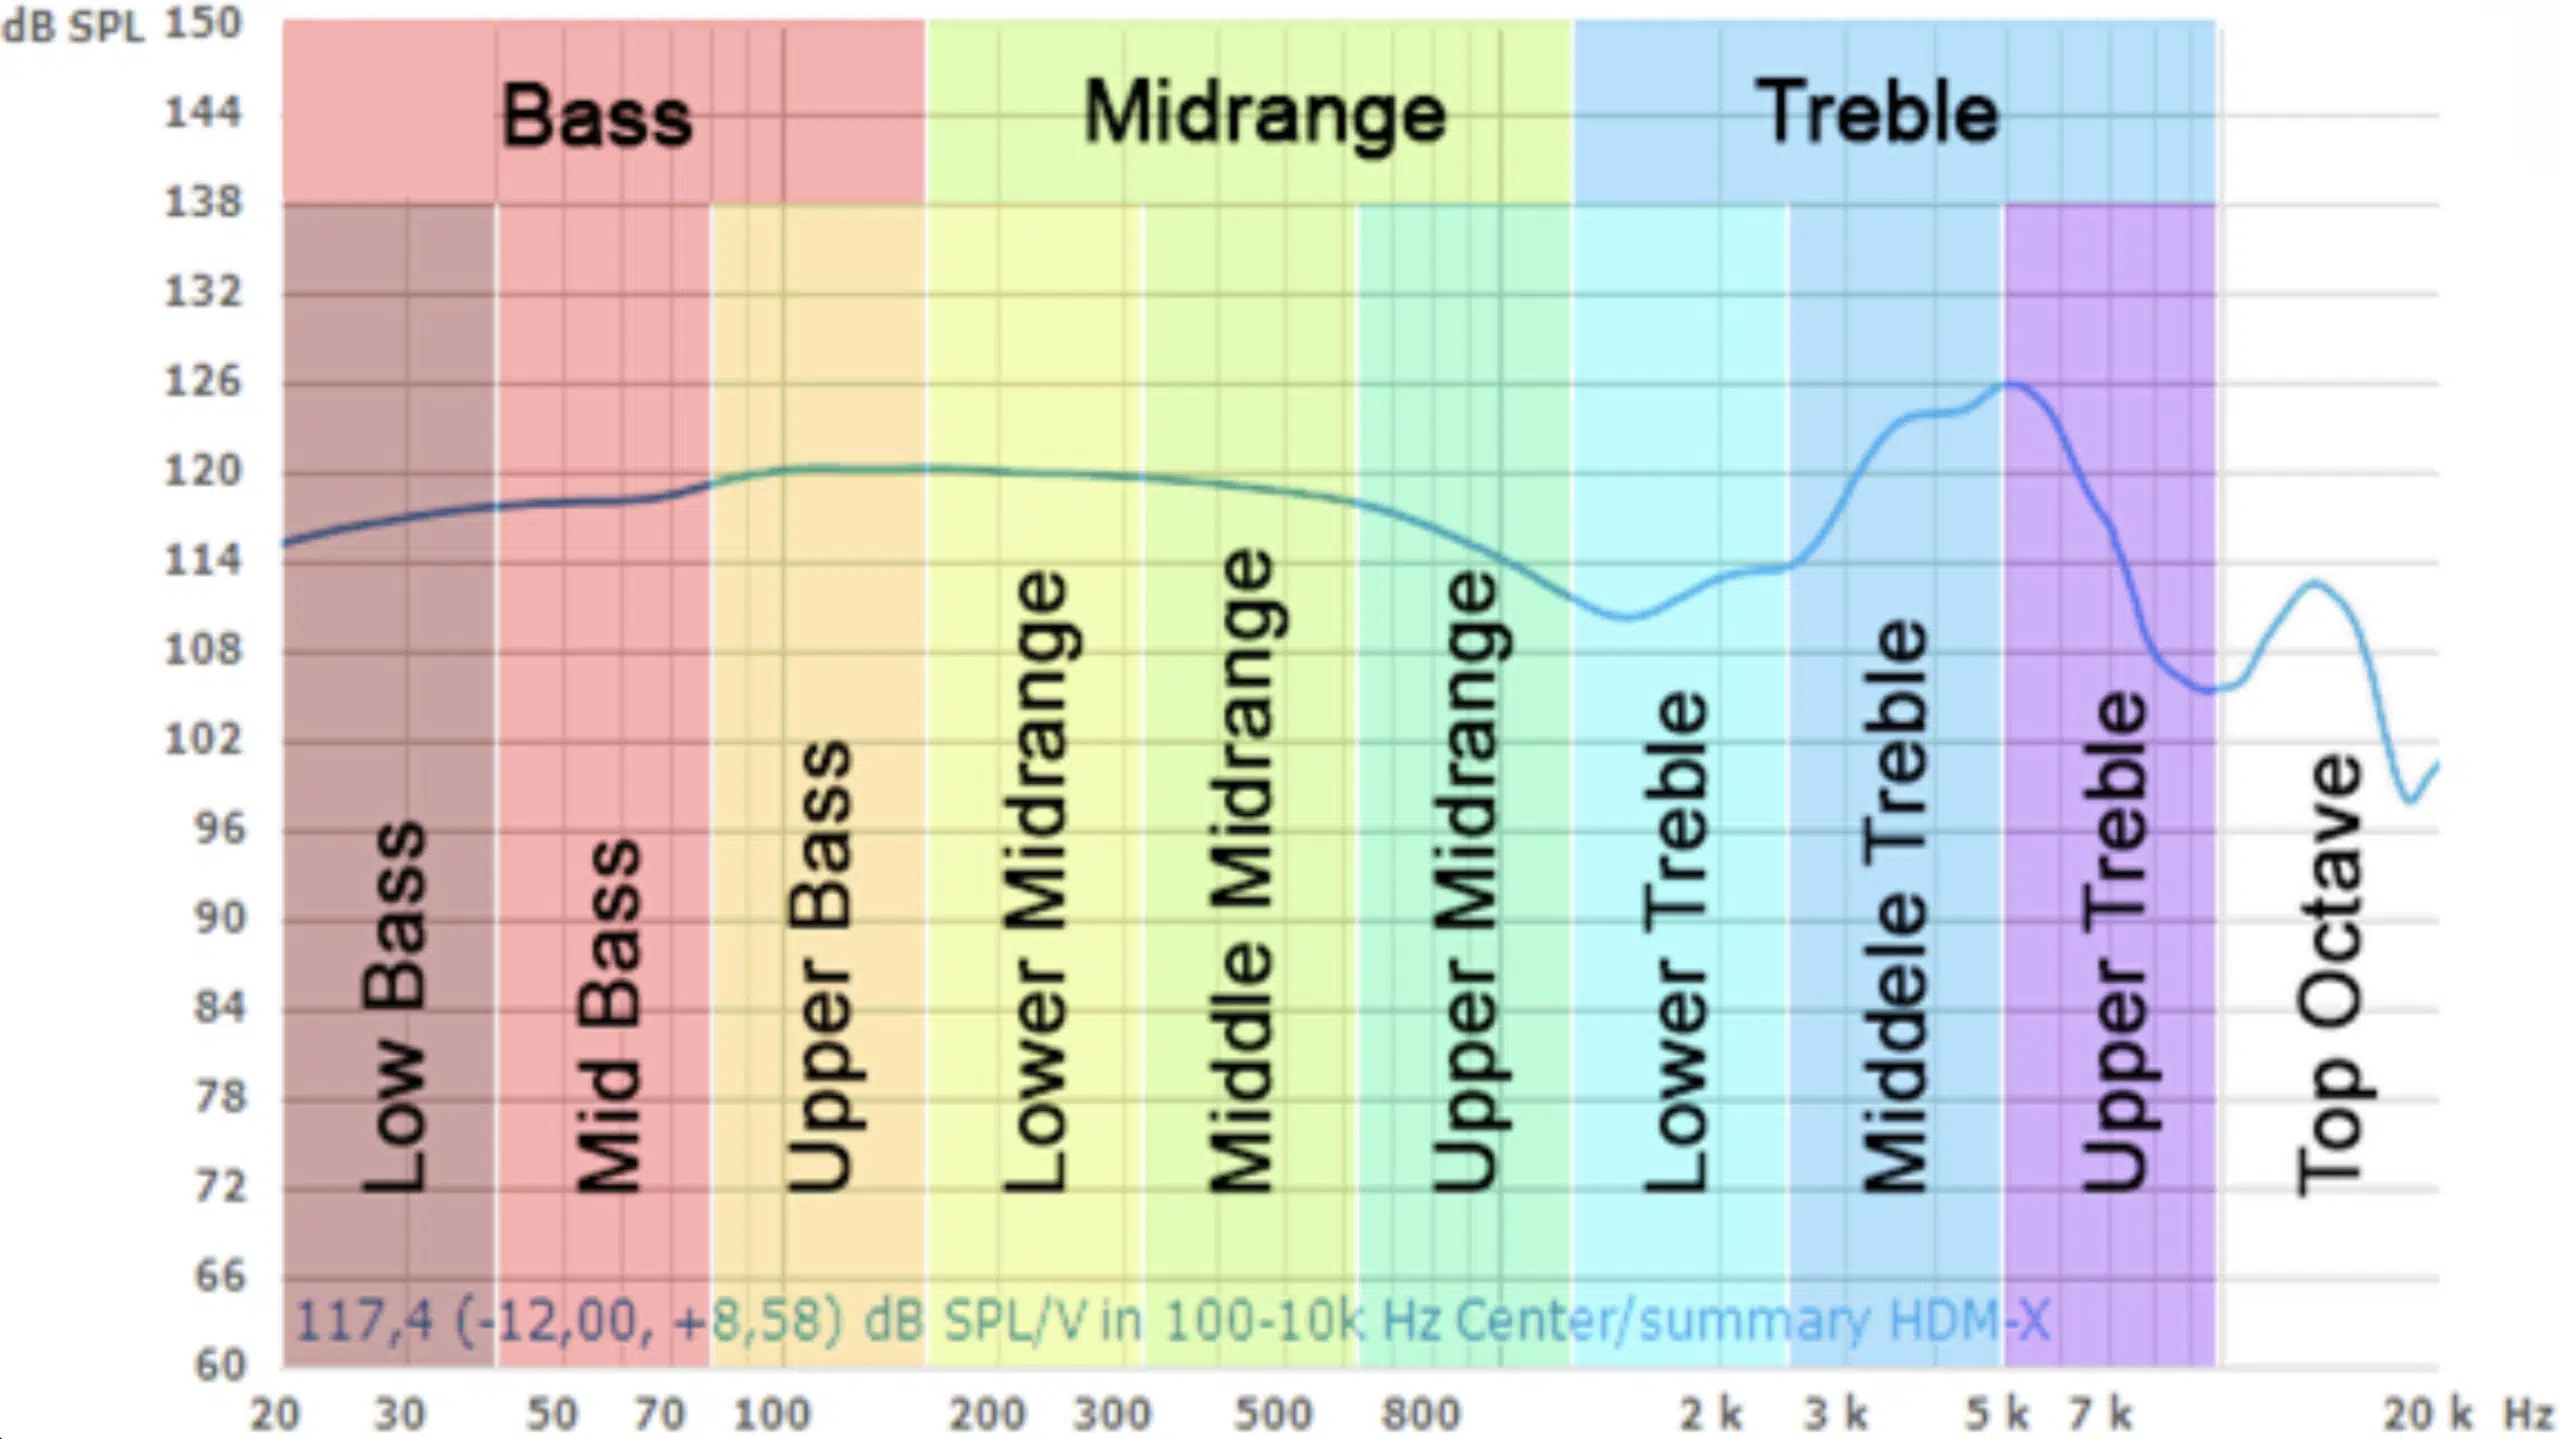
Simply put, frequency response is the measure of an audio system’s output (such as a speaker or headphones) in response to an input signal over the audio frequency range.
A frequency response chart or frequency response graph gives you a visual representation of this.
On these graphs:
- The X-axis 一 Represents the frequency (from low to high, typically 20 Hz to 20,000 Hz).
- The Y-axis 一 Represents the amplitude or volume.
Ideally, you’d want a flat frequency response, meaning that all frequencies are reproduced at the same volume for the same input power.
However, in reality, most output devices, including CUI devices, have a more typical speaker profile where certain frequencies are emphasized or reduced.
Reading Frequency Response Graphs
Reading a frequency response graph can be a bit daunting at first, but it’s not that complicated.
Looking at the Y-axis, you’ll see the output level of the audio device.
- A higher point means that frequency is played louder.
- A lower point means it’s played quieter.
Let’s say your frequency response graph shows a peak at 60 Hz and a dip at 4 kHz.
This tells you that your output device plays back the 60 Hz frequency louder than the average, and the 4 kHz frequency quieter.
This kind of knowledge can be incredibly helpful when you’re mixing.
If you’re using CUI device speakers, for example, you might notice that they struggle to reproduce the sub-bass range accurately.
Having a frequency response graph for your CUI device speakers can help you compensate for this in your mix.
How Frequency Response Influences Your Mix
Understanding frequency response is vital for your mix.
If you know how your speakers or headphones respond to different frequencies, you can adjust your mix accordingly.
This way, your mix will translate better to other systems.
For example, if you know that your output device boosts the bass range 一 you might want to be cautious about adding too much bass in your mix, as it might sound boomy or muddy on other systems.
On the other hand, if your output device has a dip in the presence range (roughly 4 kHz to 6 kHz), you might be tempted to push these frequencies too hard in your mix.
However, this will cause it to sound harsh on other systems.
It’s all about understanding your gear and compensating for its strengths and weaknesses.
Breaking Down Different Frequency Audio Ranges
Navigating the diverse landscape of audio frequencies and audio components can feel like an adventure.
With each range offering its unique sonic traits, it’s akin to exploring different terrains of a vast continent.
Let’s start with our first destination: the lower frequencies.
-
The Lower Frequencies: Sub-Bass & Bass Range
Let’s start at the bottom end of the audio spectrum: the sub-bass and bass range.
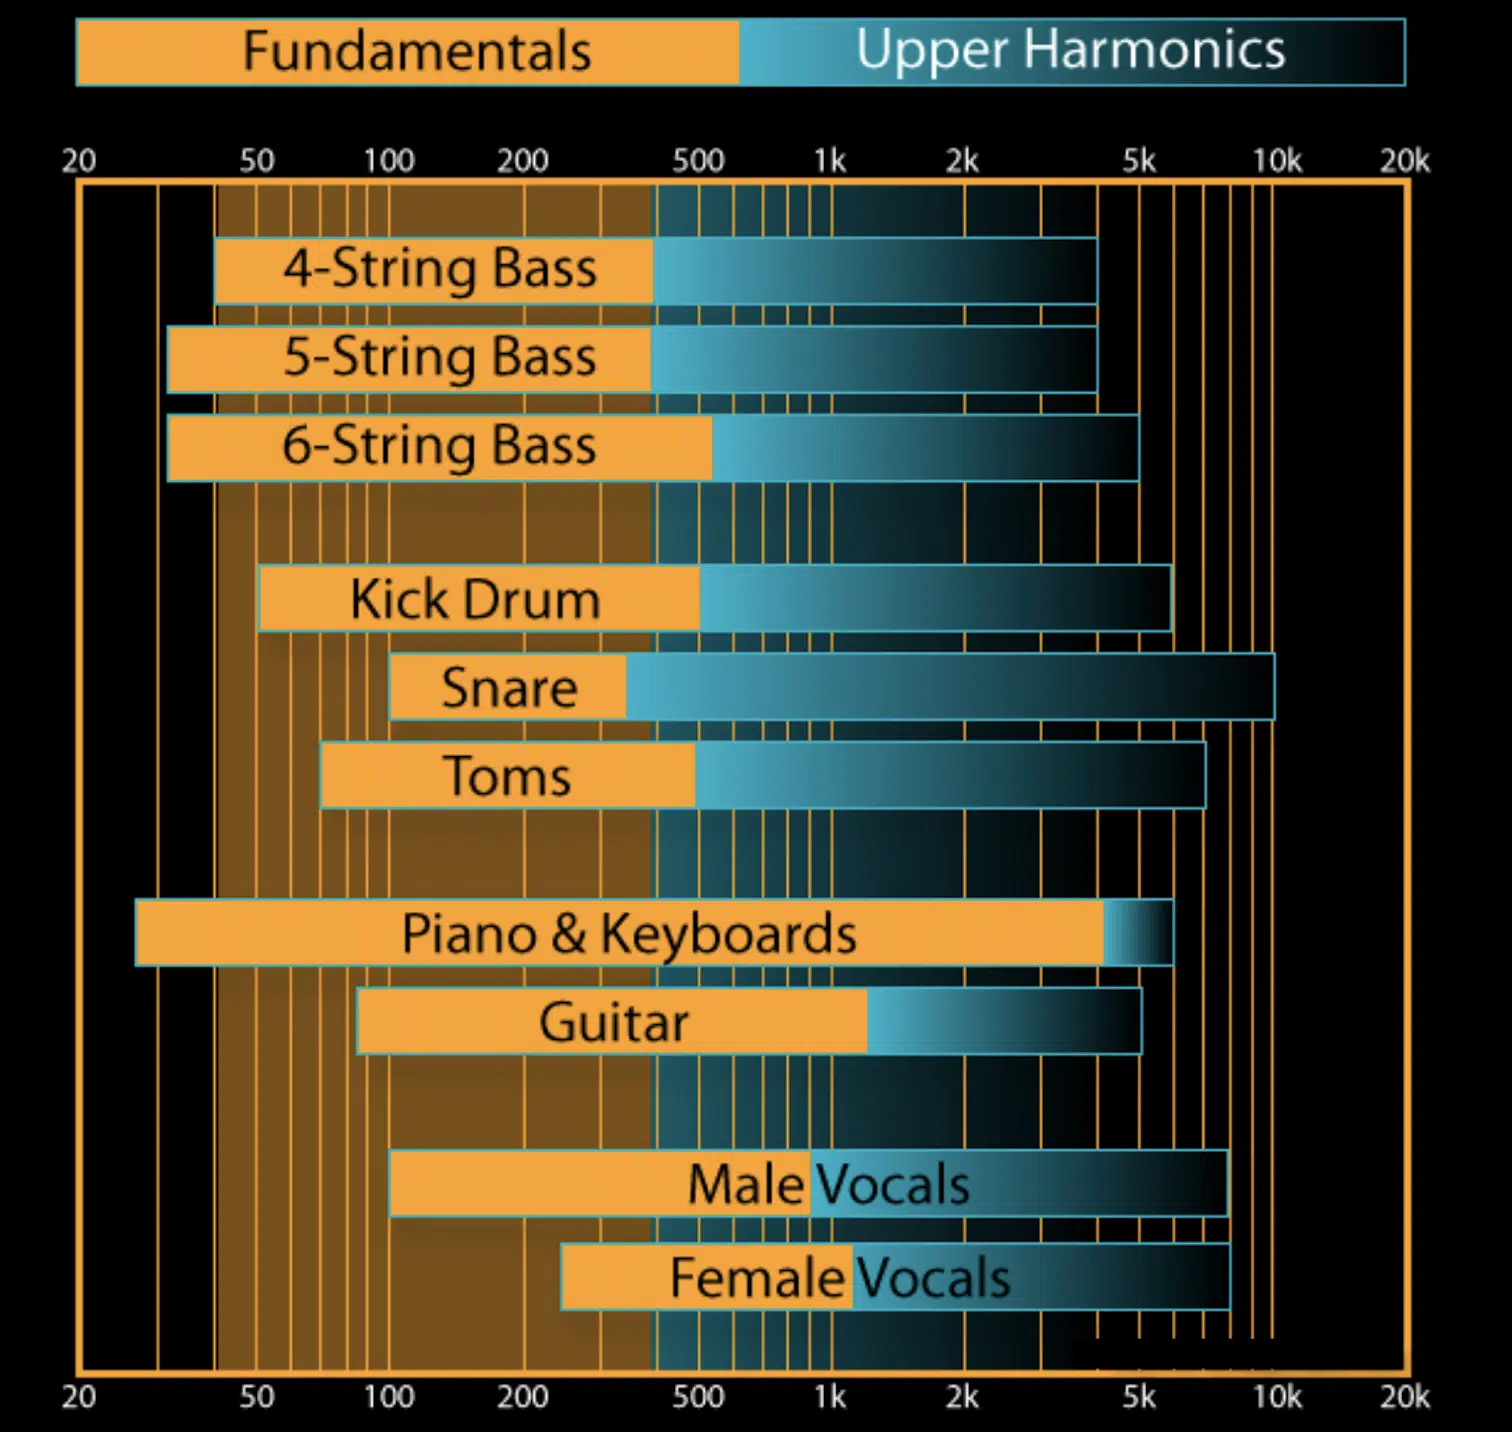
The frequencies found in this range (approximately 20 Hz to 250 Hz) often lay the groundwork for a song 一 providing the rhythmic and harmonic foundation upon which other elements are built.
This is where the bass instruments like bass guitars, bass synths, and kick drums reside.
These low-frequency instruments create the thump and rhythm that often drive a track, particularly in rhythm-centric genres like hip-hop and trap.
The bass range, in particular, contributes significantly to the groove and vibe of your music.
A well-designed bass line can induce foot-tapping and head-bobbing, compelling listeners to move along with the rhythm.
The challenge in this range, however, lies in ensuring clarity and definition.
Overlapping low frequencies can easily become muddy and indistinct.
This is where good frequency management, EQ, and side-chain compression techniques come in handy.
-
The Mid-Range: Balancing the Audio Spectrum
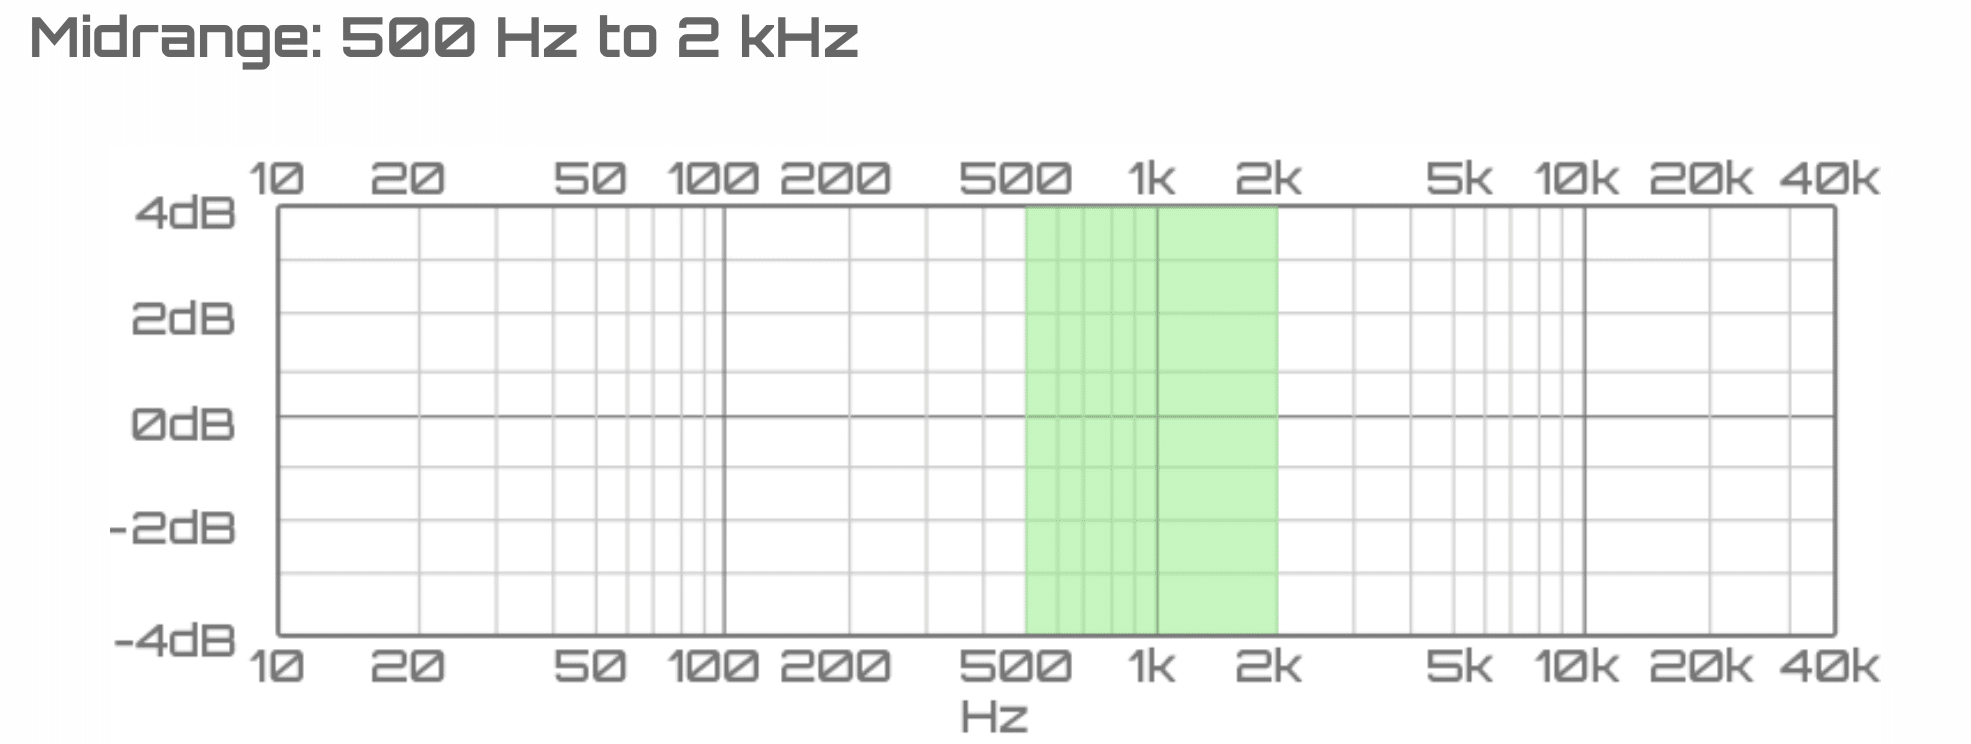
Moving up the frequency spectrum, we reach the middle range.
This is the heart of the sonic spectrum, usually categorized into:
- Low-mids (250 Hz to 500 Hz)
- Mids (500 Hz to 2 kHz)
- High-mids (2 kHz to 4 kHz)
The midrange is where most of the ‘meat’ of the music lies.
It is where the main harmonic content of most musical instruments is found, and it is also the most sensitive area for human hearing.
This is where the melody, the harmony, the emotion, and the lyrical content usually live.
A well-balanced midrange can make your mix sound full and rich.
However, too much midrange can make your mix sound thin, boxy and cluttered.
It’s a delicate balancing act that requires careful listening and adjustment.
That’s why good frequency management in the midrange is crucial.
Audio effects like EQ and multiband compression can be used to balance the different elements in your mix 一 ensuring clarity and depth without causing muddiness or masking.
-
The Highs: Presence & Brilliance Range
Lastly, at the top end of the audio spectrum, we have the presence range (4 kHz to 6 kHz) and the brilliance range (6 kHz to 20 kHz).
This is where the ‘sparkle’ and ‘air’ in your mix comes from.
These sound frequencies are very important to understand for a supreme mix, especially when it comes to percussive instruments.
The presence range brings forward the details that make your mix sound vibrant and lively.
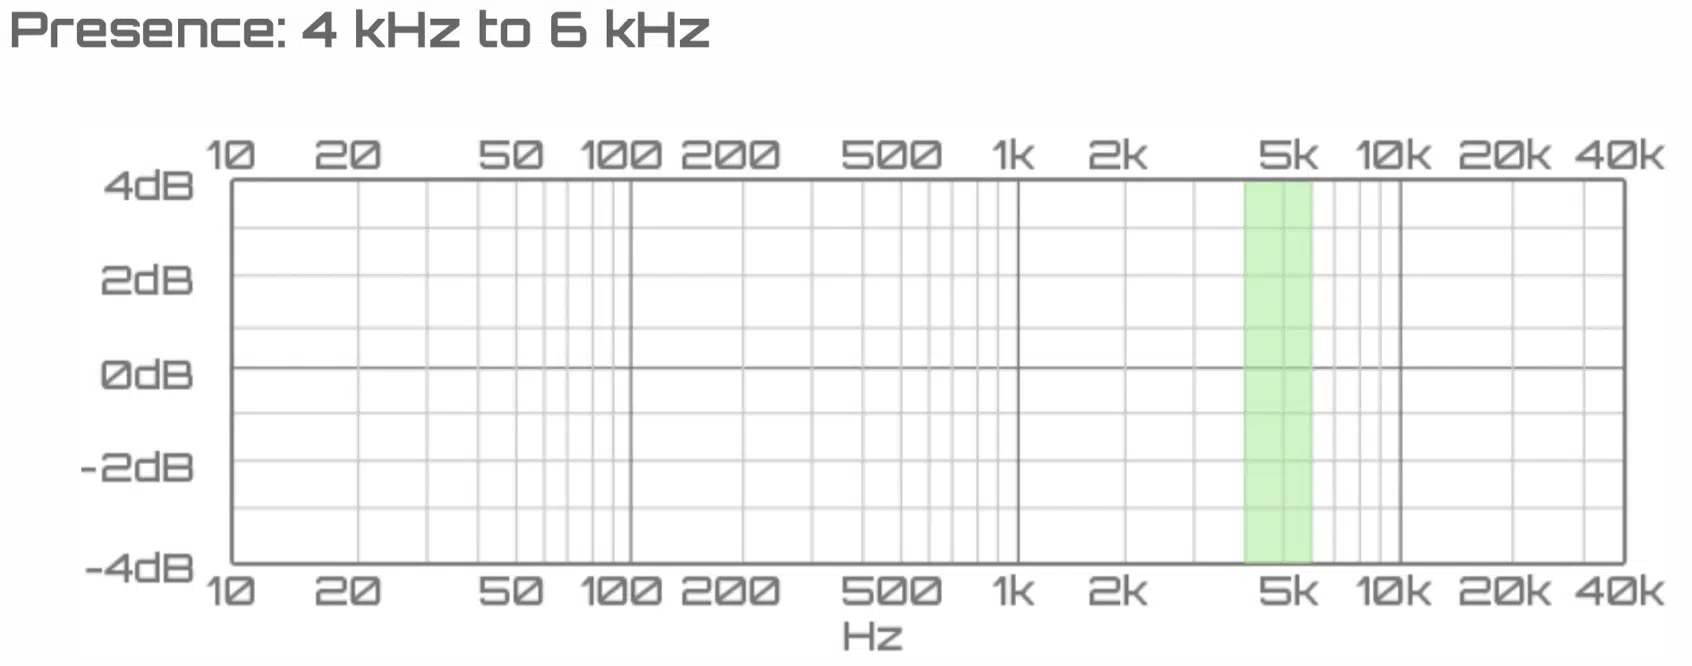
This is where the bite of a guitar, the attack of a snare drum, and the sibilance in vocals live.
The brilliance range, on the other hand, adds sheen and brightness to your mix.
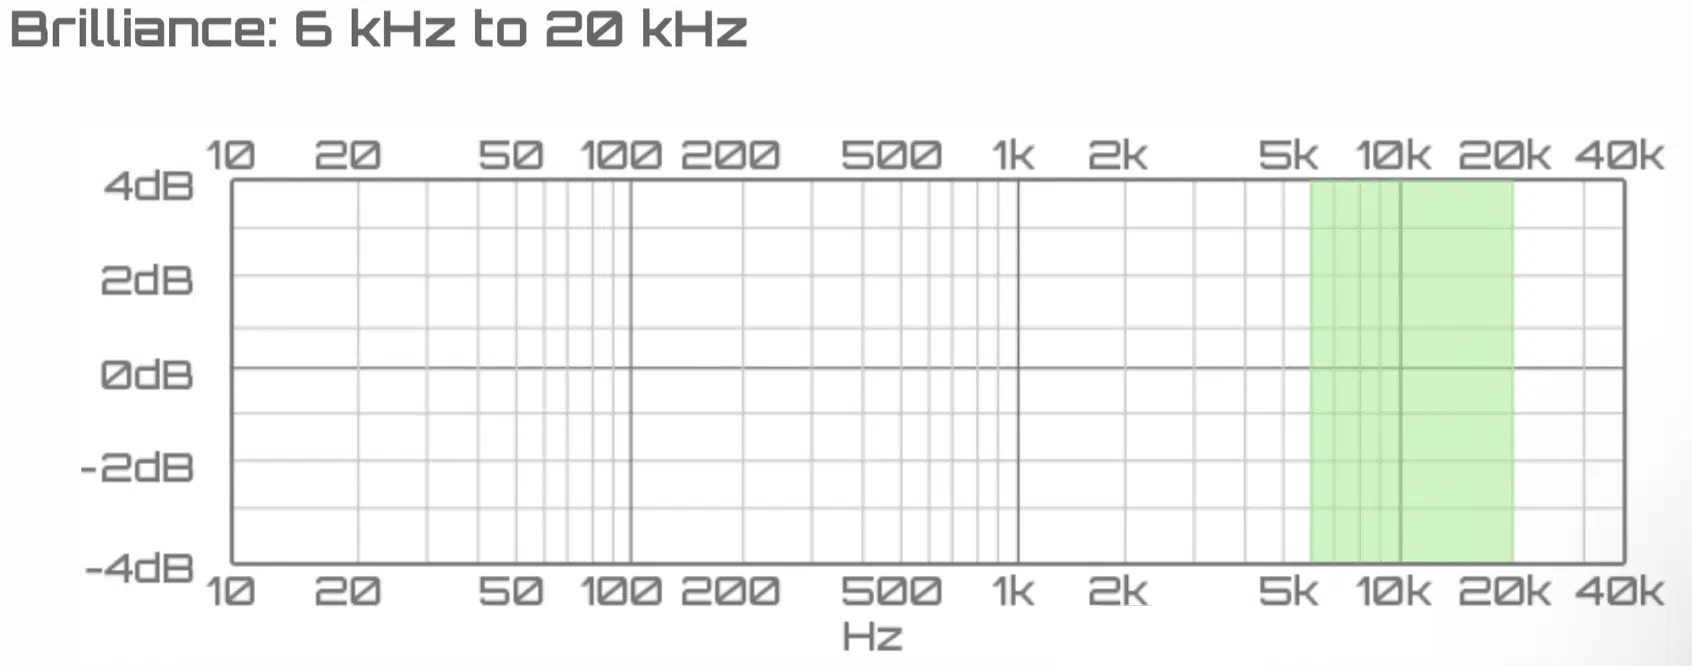
It provides a sense of space and openness that can make a mix sound polished and professional.
The high frequencies are just as crucial as the lows and mids.
- Too much high frequencies 一 Can make your mix sound tinny, harsh and fatiguing
- Too few high frequencies 一 Can make it sound dull and lifeless
It doesn’t matter if you have high-fidelity speaker systems, or listening on an iPhone, balanced frequencies are key.
Good EQing and the use of high-pass and low-pass filters can help balance these frequencies effectively.
Ensuring a Balanced Frequency Spectrum: Tips & Tricks
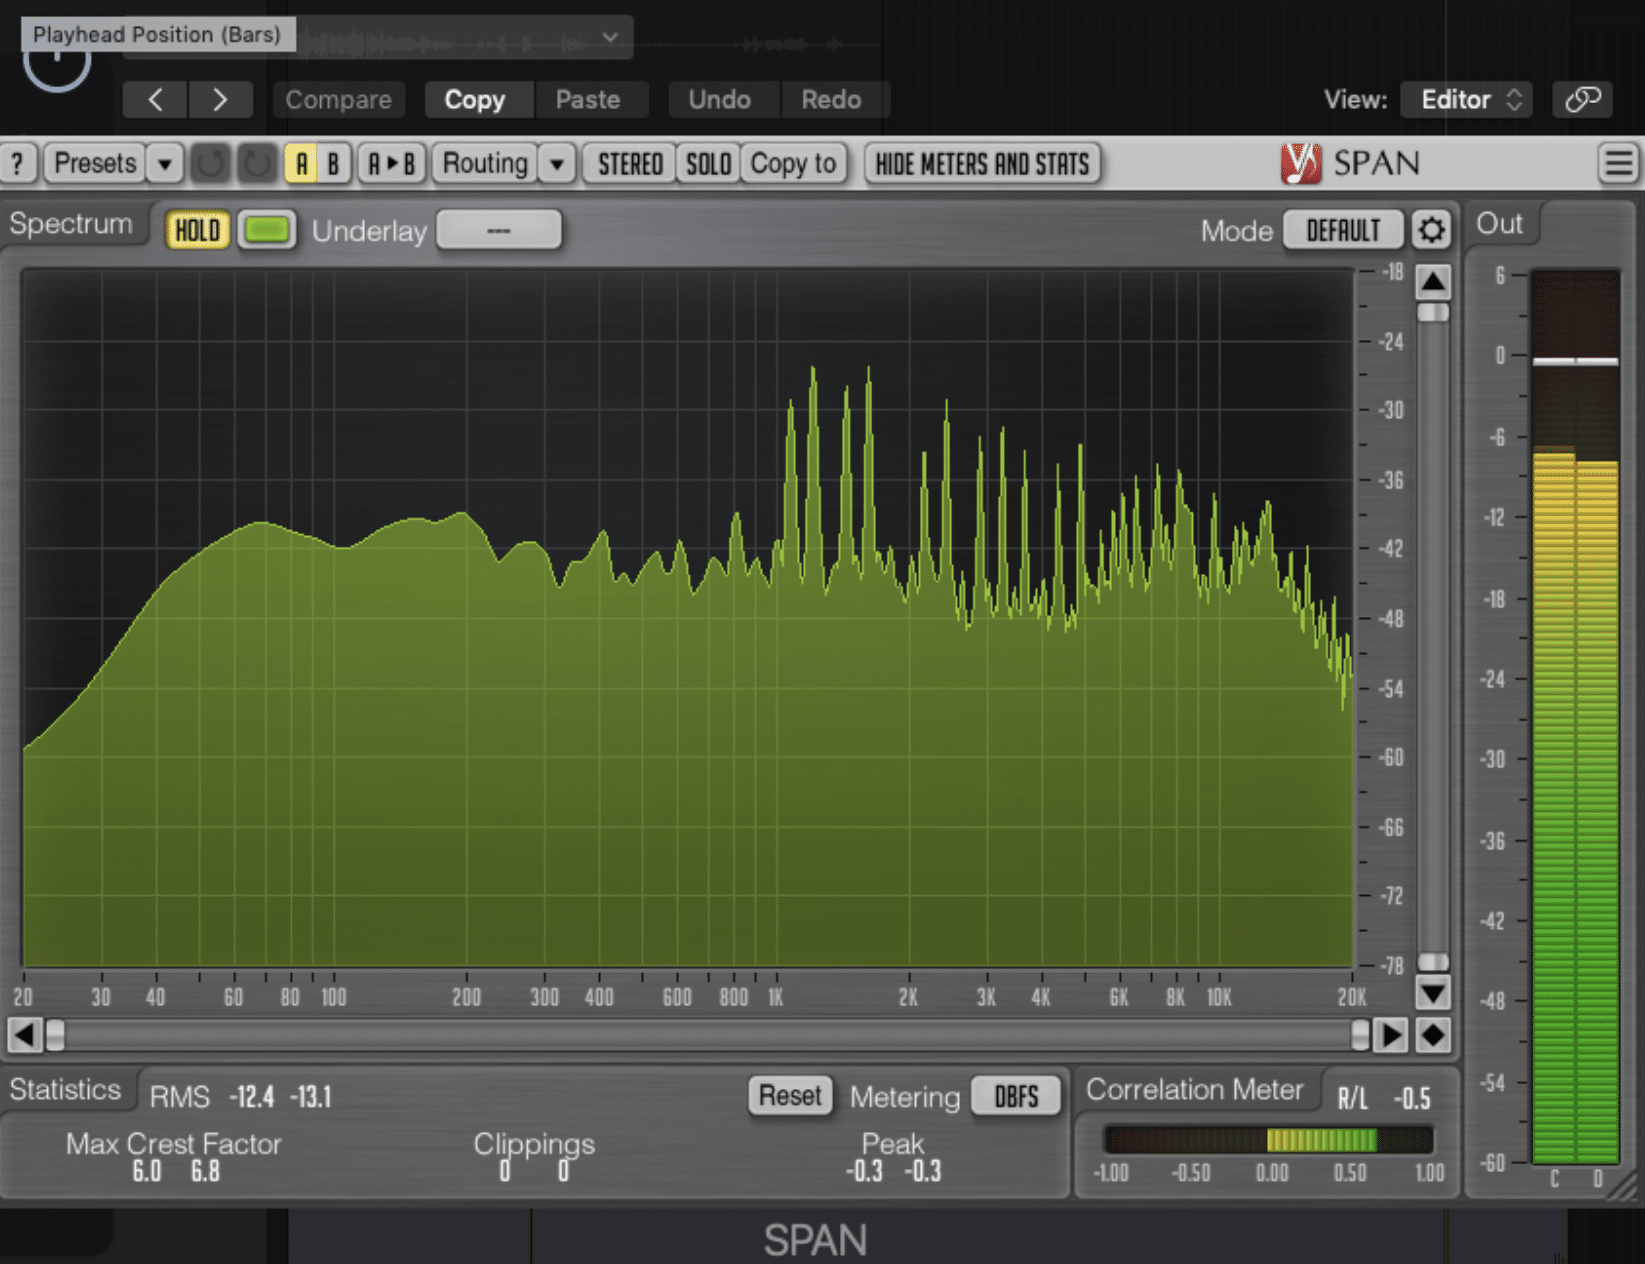
Ensuring a balanced frequency spectrum in your mix can be quite a challenge, but with the right knowledge and tools, it’s definitely achievable.
The first tip is to listen to your mix on different sound systems – from studio monitors to headphones, car speakers, and even your phone’s speaker.
This can give you a better idea of how your mix translates across different systems.
Secondly, learn to use your EQ effectively.
This includes not only cutting troublesome frequencies but also gently boosting the frequencies that add richness and character to your mix.
NOTE: Drastic EQ changes can often do more harm than good.
Use tools like spectrum analyzers and metering plugins.
These can provide a visual representation of your mix’s frequency balance, making it easier to spot any potential issues.
However, while these tools can be helpful, always trust your ears first.
Lastly, don’t be afraid to take a break and come back to your mix with fresh ears.
Our ears can become fatigued after long mixing sessions, affecting our ability to accurately judge frequency balance.
A little break can often make a big difference.
If you’re looking for other mixing mistakes to avoid for a better mix, we’ve got you covered.
How CUI Devices Handle Different Frequency Ranges
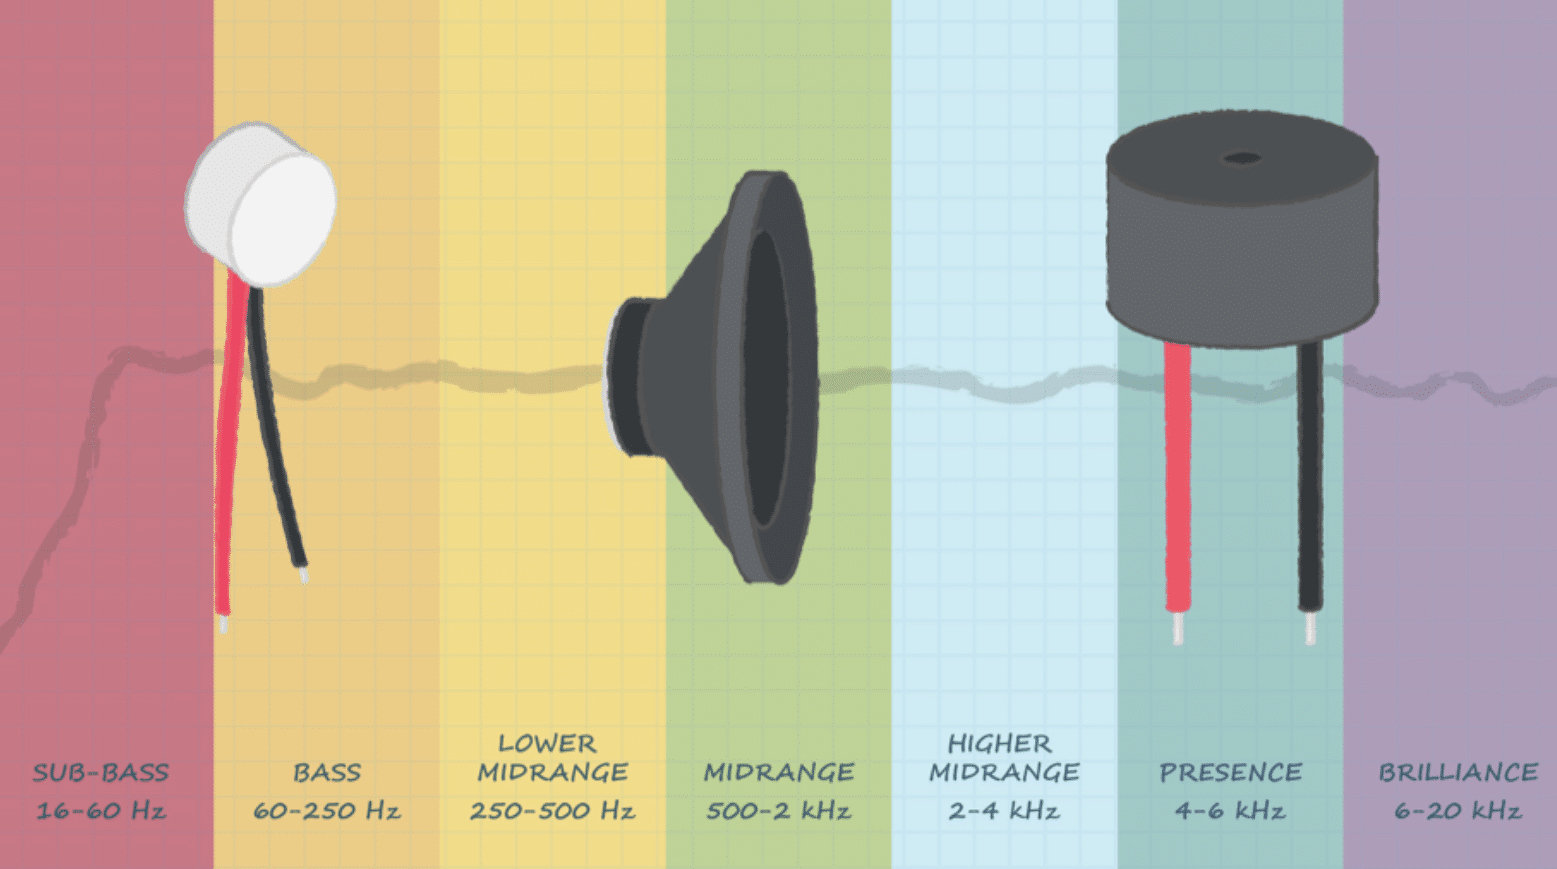
As a digital music producer, it’s important to understand how your audio devices handle different frequency ranges.
In the case of CUI devices, their frequency response can vary greatly depending on their design and components.
For example, CUI device speakers are typically small in size, which can limit their ability to reproduce lower frequencies (such as those in the sub-bass range) effectively.
This can result in a mix that sounds thin or lacks power on these devices.
Conversely, CUI devices can often handle the mid and high frequencies quite well, resulting in a clear and detailed sound in these ranges.
However, due to their small size and other design constraints, they may not offer the same level of accuracy and depth that larger speakers or headphones can provide.
Furthermore, the specific components used in CUI devices 一 such as the speaker driver, the amplifier, and even the housing material 一 can all affect the frequency response.
For instance, a high-quality speaker driver may provide a more balanced and accurate frequency response, while a poor-quality driver may have peaks and dips in certain frequencies.
PRO TIP: Understanding Non-Linear Output in CUI Devices
Another aspect to consider when working with CUI devices is their non-linear output.
This means that the output of the device is not a direct, linear representation of its input.
Instead, it may have variations in amplitude or frequency response due to various factors.
One of these factors is distortion, which occurs when the device’s amplifier or driver cannot accurately reproduce the input signal.
This can cause the output signal to become altered or ‘distorted’ 一 resulting in a sound that is different from the original.
Distortion can be particularly problematic in the lower and higher frequency ranges, where CUI devices often struggle.
The Art of Frequency Management in Music Production
Now let’s break down how to successfully manage your frequencies for an all-around better mix and more professional sound.
-
Dealing with Unwanted Harmonics
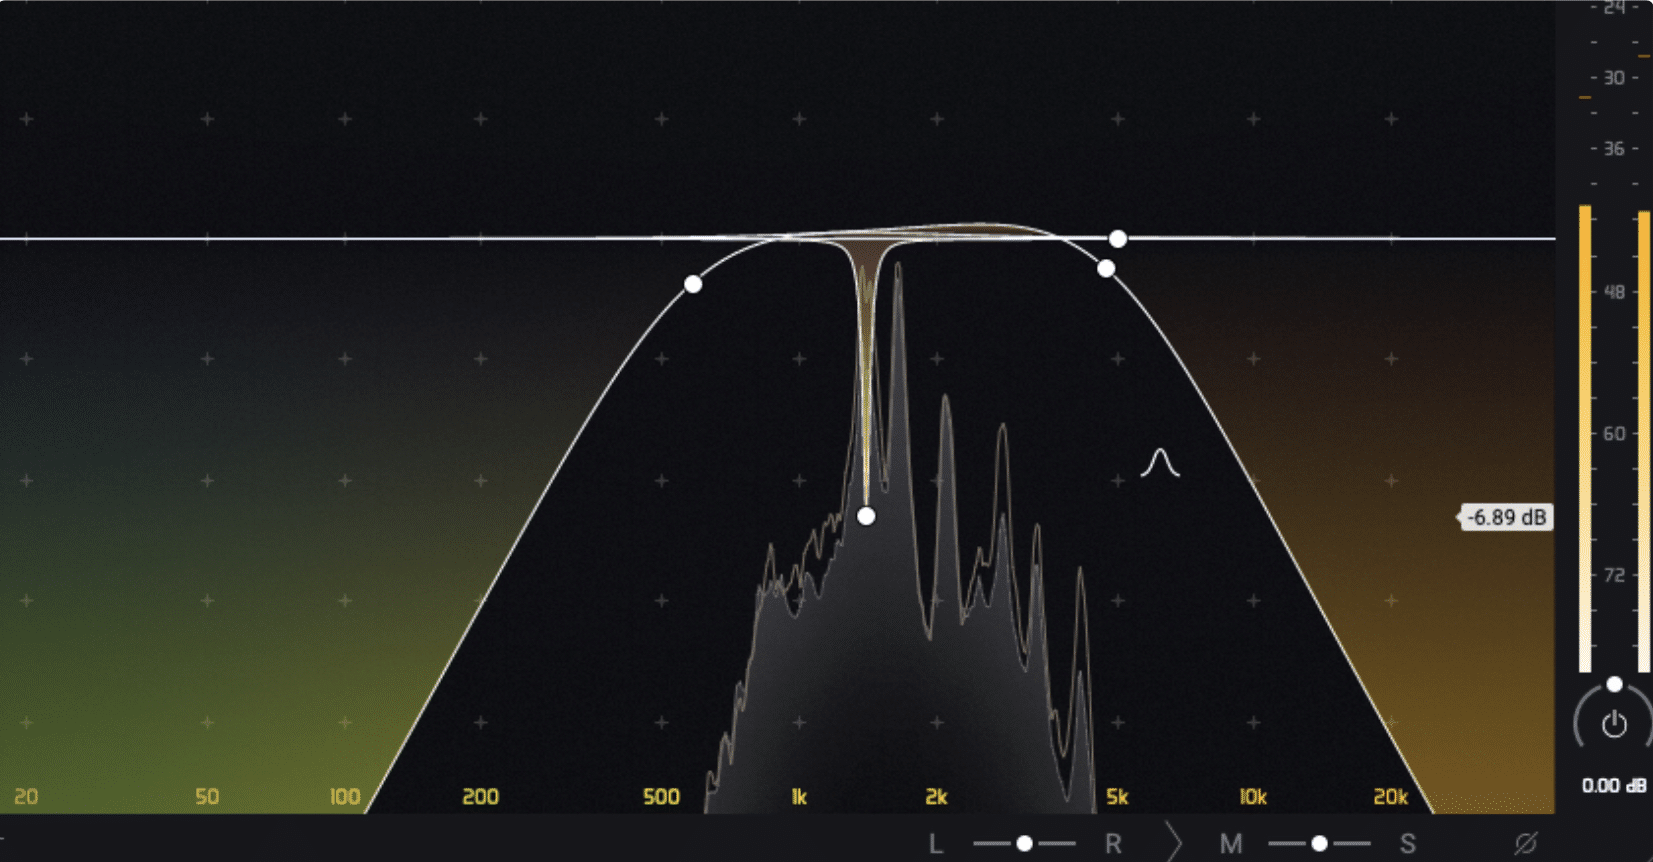
Unwanted harmonics can be fairly challenging to master.
These are additional frequencies that are produced when an instrument is played, which can sometimes clash with other elements in your mix.
For instance, a bass guitar might produce harmonic frequencies that compete with the frequencies of a kick drum or a vocal track.
If these are not carefully managed, your mix can sound muddy or cluttered, making it less enjoyable to listen to.
To deal with unwanted harmonics, you can use a technique called Subtractive EQ.
This involves using an equalizer to reduce the volume of the specific frequencies where the unwanted harmonics occur.
By doing this, you can make room for other elements in your mix and prevent frequency clashes.
Also, effects like compressors and limiters can help control the dynamic range of the offending elements and keep them from overwhelming your mix.
It’s a delicate balancing act but, when done correctly, it can significantly enhance the clarity and impact of your music.
-
Using Frequency Bands for Better Mixes
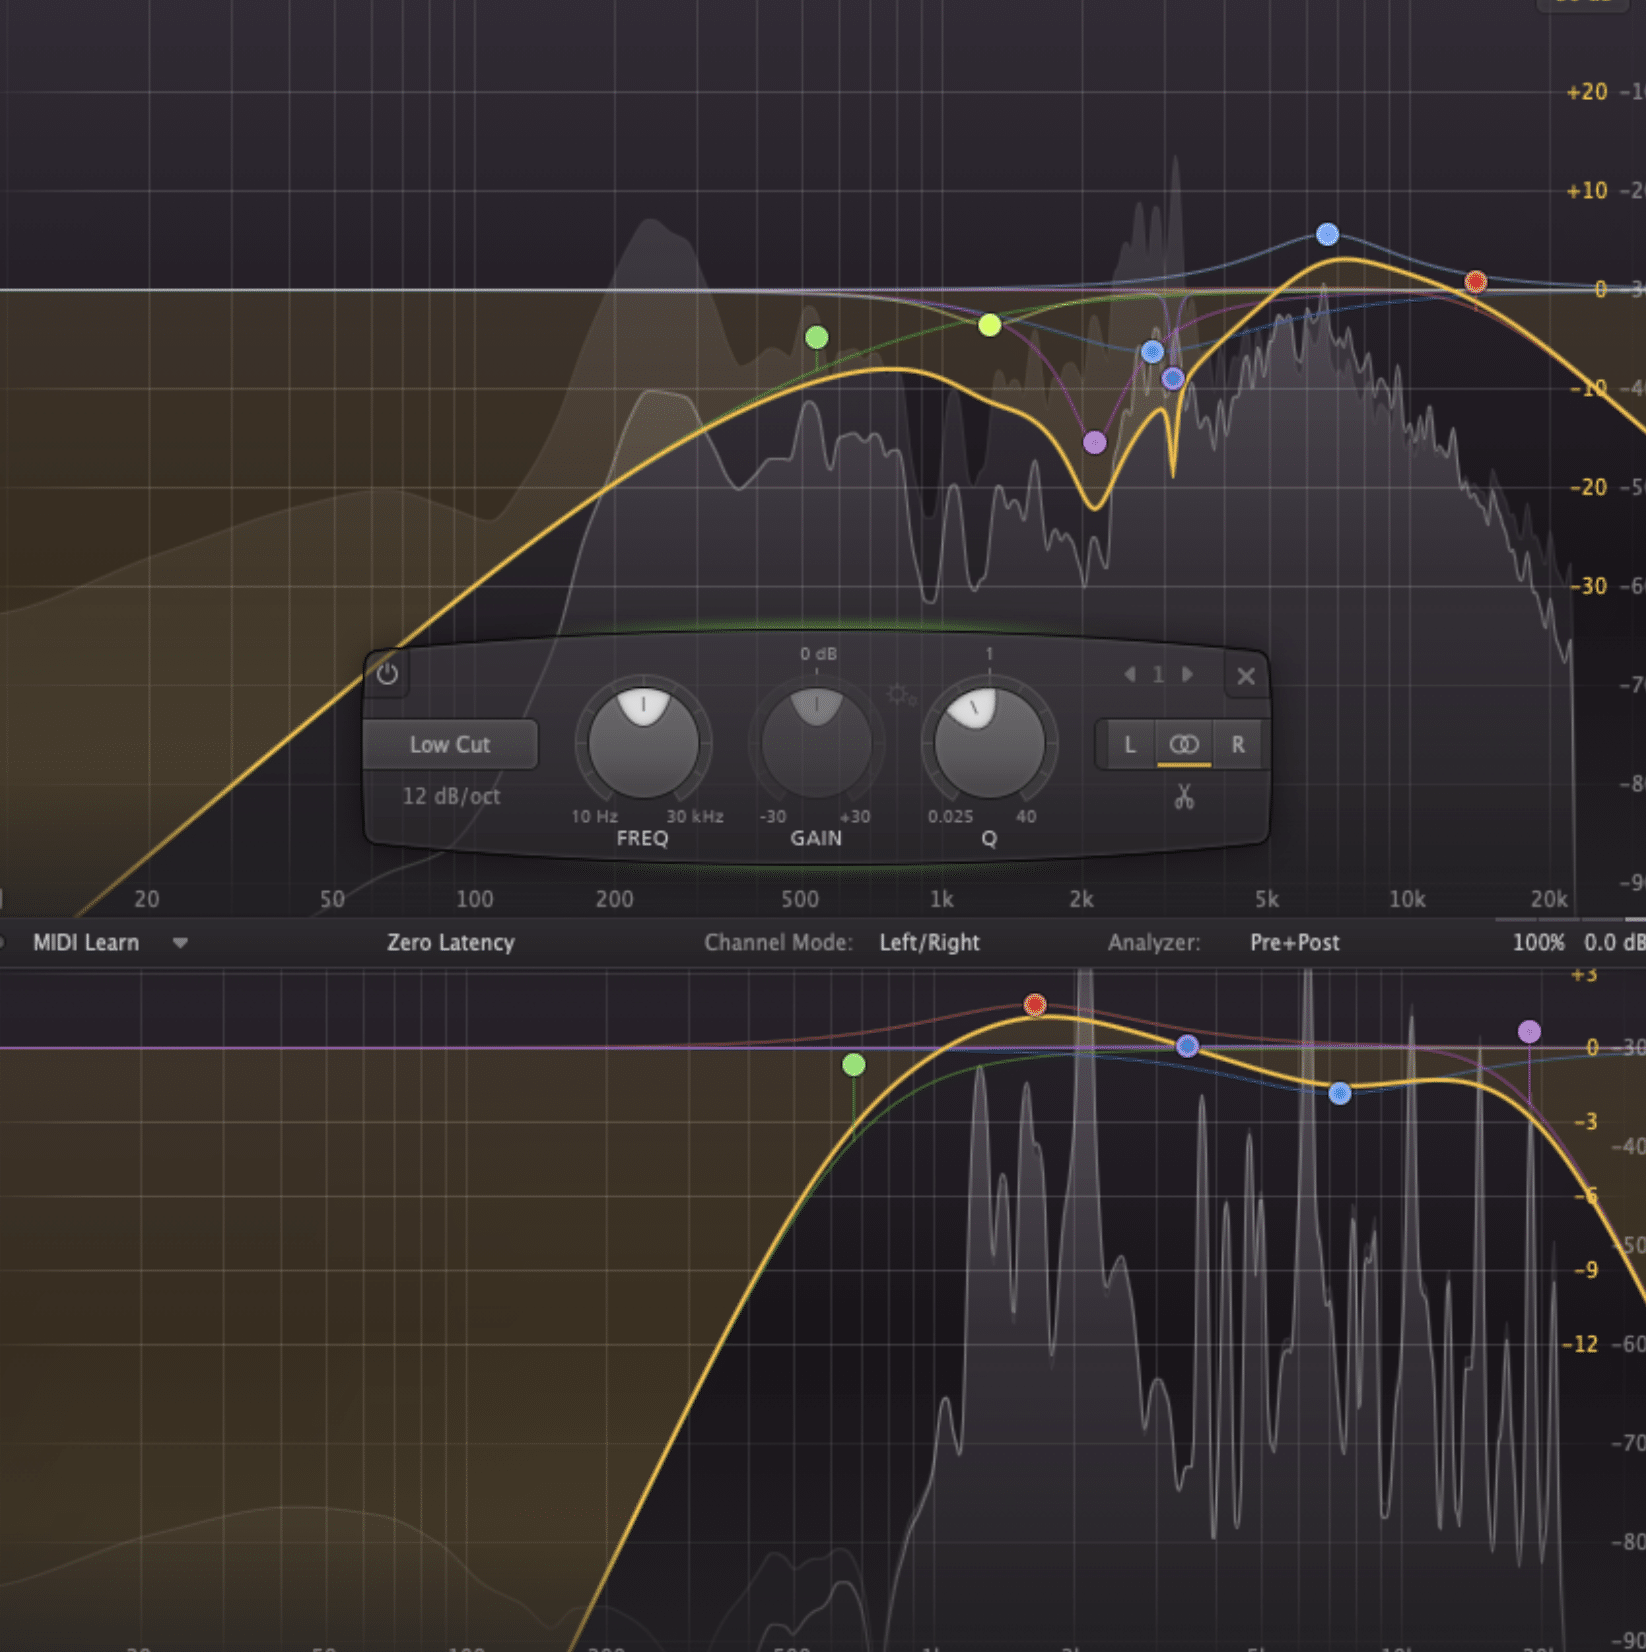
As a music producer, especially in the realm of hip-hop, understanding and utilizing frequency bands can be a game-changer.
These are ranges of frequencies that you can adjust to shape the sound of your mix.
For instance, boosting the lower frequencies can give your track a powerful, deep bass that’s characteristic of many hip-hop tracks.
On the flip side, careful manipulation of the higher frequencies can add brightness and clarity to your mix 一 helping elements like vocals or snare drums cut through.
But remember, it’s not just about boosting frequencies…
Sometimes, cutting certain frequencies can be just as, if not more, effective.
For example, cutting some lower frequencies from a vocal track can help it sound less muddy and more clear, allowing the bass instruments to dominate this frequency range.
-
Achieving the Right Frequency Response for a Balanced Mix

Achieving a balanced mix is all about understanding and manipulating your track’s frequency response.
This involves paying close attention to the audio frequency response graph or frequency response chart of your mix and making adjustments as necessary.
When examining your frequency response graph, be on the lookout for any drastic peaks or valleys.
These could indicate that certain frequencies are too loud or quiet.
You’ll want to aim for a relatively even frequency response.
However, keep in mind that some variation is natural and can even be desirable for certain musical styles and genres, like rock, hip hop, rap, r&b, reggaeton, etc.
Finally, don’t forget to consider the output device that your music will be played on.
Different devices can have vastly different frequency responses, so it’s a good idea to test your mix on a variety of speakers and headphones.
This can help ensure that your mix sounds great no matter where it’s played.
NOTE: Constant power input to an audio device is crucial to maintain the device’s performance, ensuring a smooth and steady audio output.
-
Frequency Spectrum Management
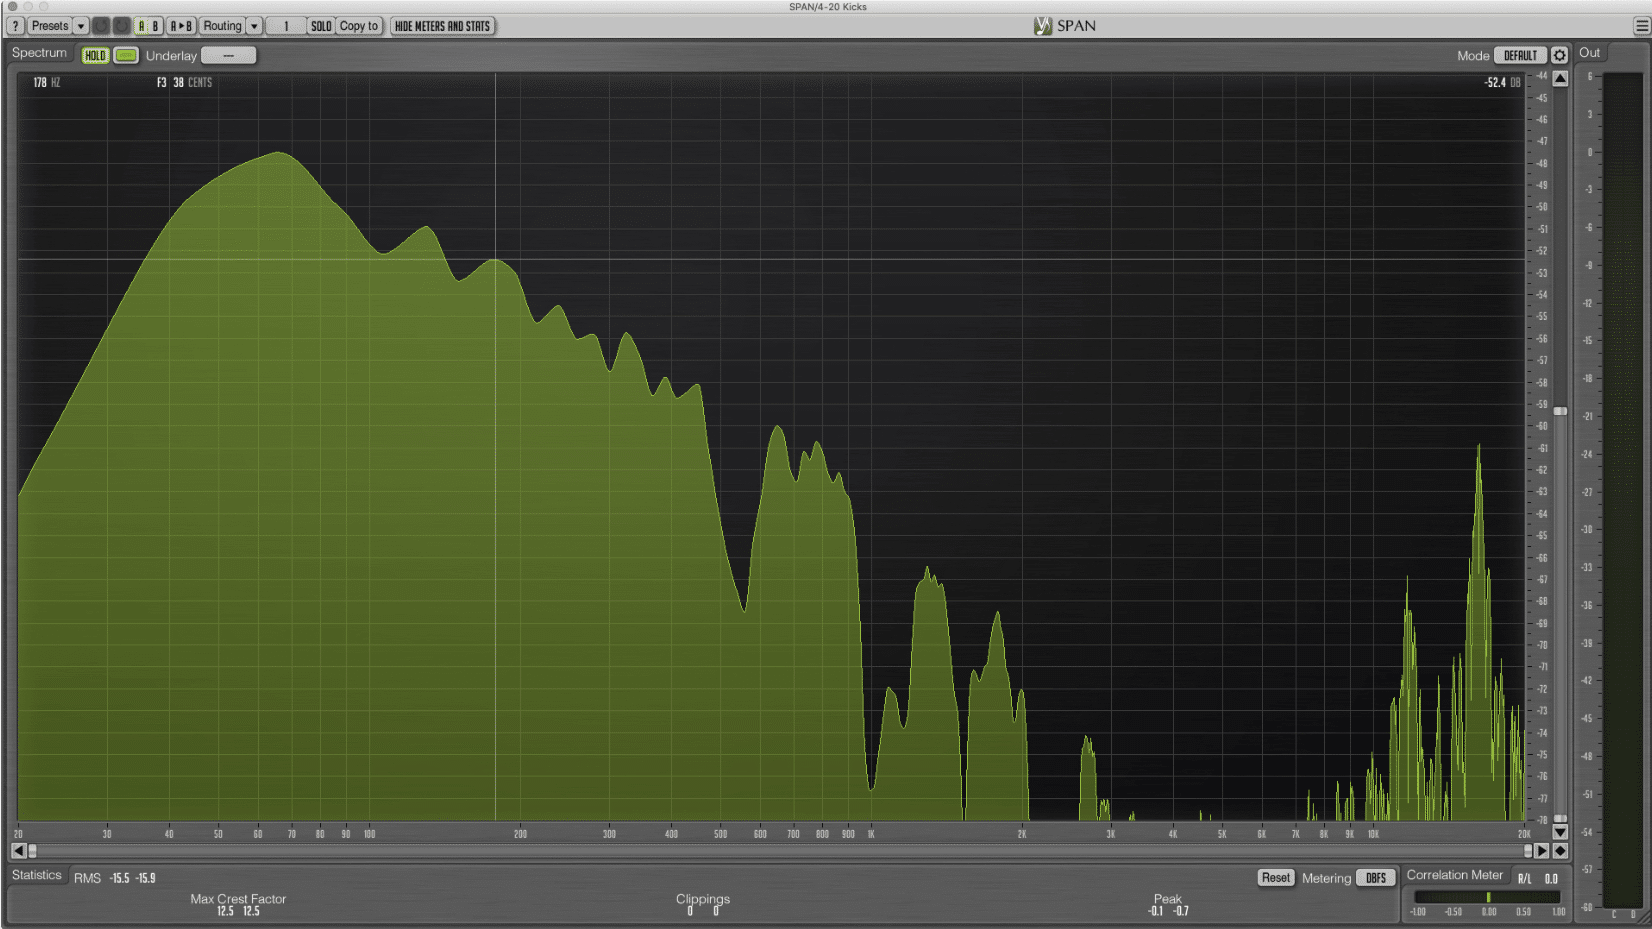
The secret to a great mix often lies in effective frequency spectrum management.
This involves understanding and controlling the distribution of frequencies within your mix to create a balanced, clear, and sonically pleasing end product.
For example, to avoid a boomy or muddy mix, you could carefully carve out a space in the lower frequencies for your kick drum and bass guitar, ensuring they don’t clash.
On the other hand, to prevent your mix from sounding thin or harsh, you could gently roll off some of the high frequencies using a high shelf filter.
Besides, using tools like a spectrum analyzer can provide a visual representation of your mix’s frequency content 一 making it easier to identify and address any issues.
Combined with your ears, these tools can be incredibly powerful in shaping your mix.
Remember, every decision you make while mixing, from the level of each track to the settings on your EQ and compressors, impacts the frequency spectrum of your mix.
By approaching these decisions with an understanding of the frequency spectrum, you can make more informed choices that enhance the quality of your mix.
-
Harmonic Frequencies & Resonant Frequencies: A Double-Edged Sword
Finally, let’s talk about two critical aspects of frequency management: harmonic frequencies and resonant frequencies.
These are both double-edged swords that can add richness and complexity to your sound, but if not handled properly, they can also cause problems.
Harmonic frequencies (as discussed earlier) are the multiple frequencies that accompany the fundamental frequency of a note.
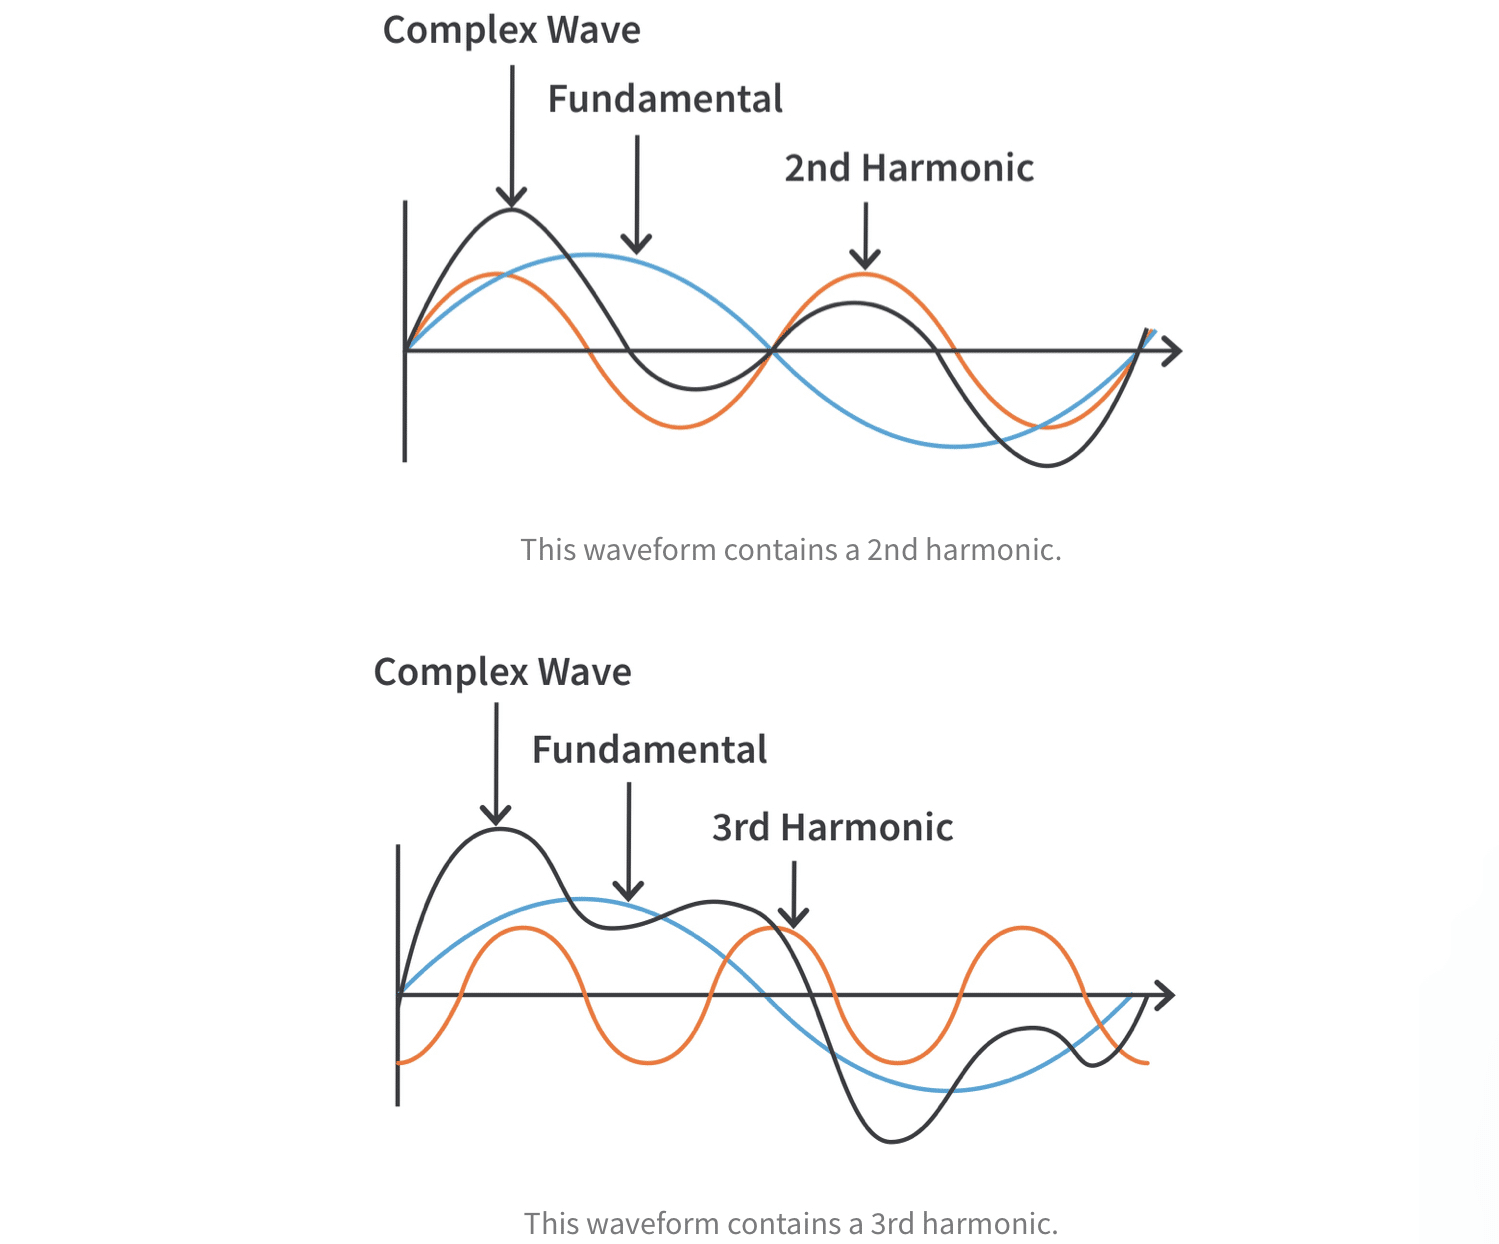
They contribute to the timbre of an instrument, making a guitar sound like a guitar and a piano sound like a piano.
However, when you have multiple instruments playing together, their harmonic frequencies can overlap and interact.
This causes certain frequencies to become too prominent or masked.
This can also result in a muddy or unbalanced mix, which is why it’s important to pay attention to the harmonic content of your instruments and use EQ to carve out space for each instrument.
Resonant frequencies are frequencies at which an object naturally vibrates.
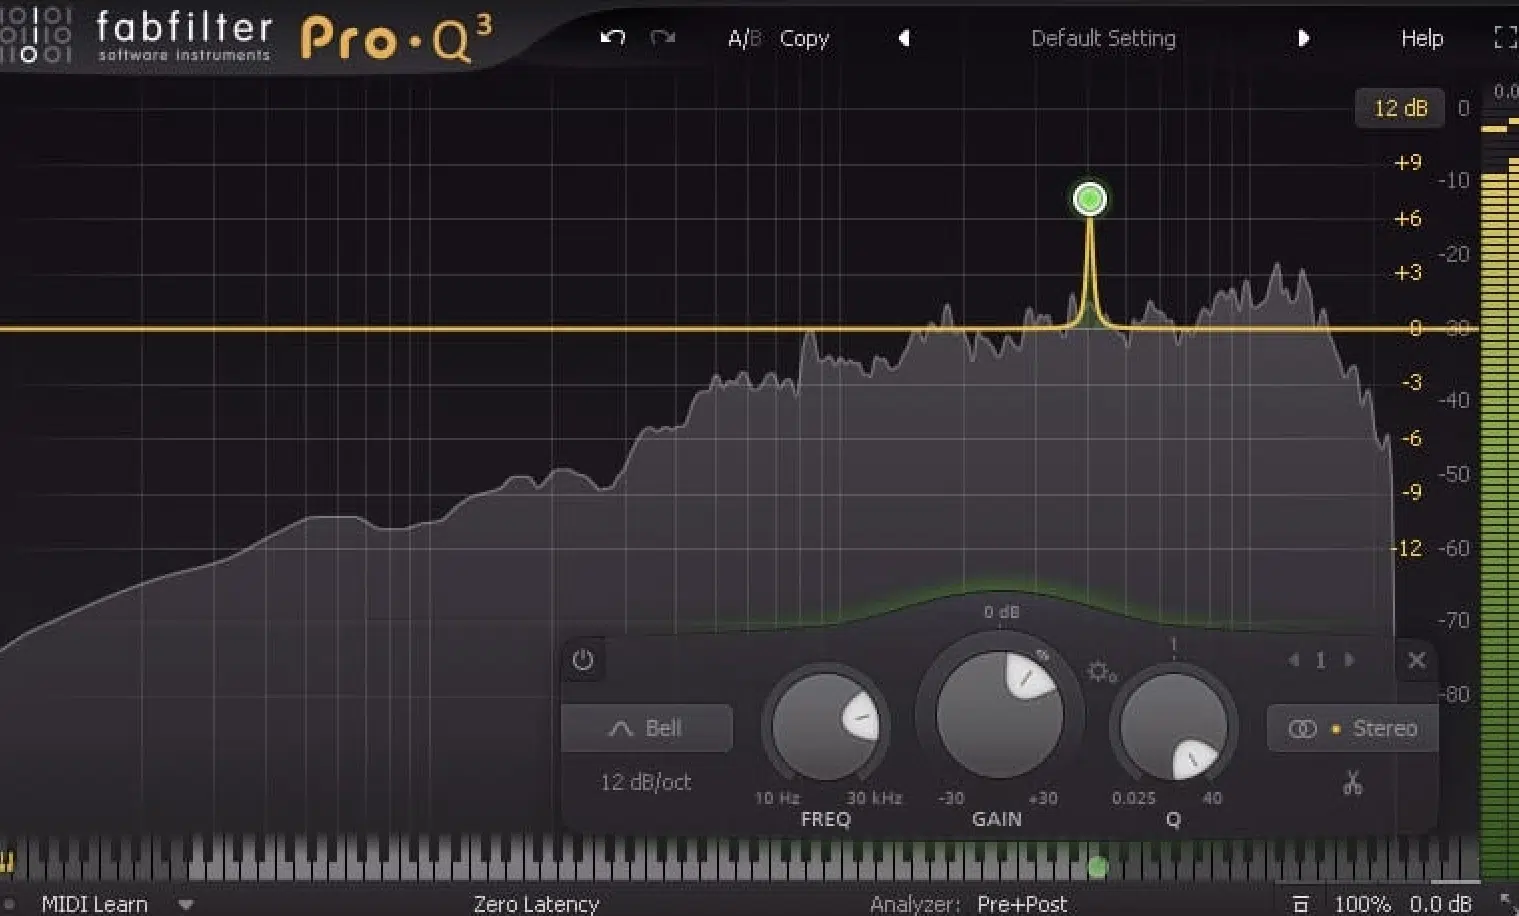
Every object, including the components of your CUI devices, has resonant frequencies.
Natural resonant frequency is the frequency at which a system naturally oscillates, and in music, it significantly influences the tone and character of an instrument.
These can enhance the sound of your music, adding depth and resonance.
But, they can also cause certain frequencies to be overly emphasized, leading to a skewed frequency response.
That’s why it’s crucial to understand the resonant frequencies of your devices and manage them effectively.
Frequency Range: Final Thoughts
In this sonic journey, we’ve explored different audio frequencies and their importance in our music production process.
But this exploration isn’t just an exercise in theory; it’s about elevating our real-world music production skills.
And speaking of real-world application, let’s talk about something that can help you apply what you’ve learned today: these intricate, beautifully-crafted free guitar loops.
While these loops are already mixed to perfection, the true beauty of music production is that it doesn’t have to stop there.
Armed with your newfound knowledge of the audio frequency range, you can take these polished loops and mold them even further.
Experiment with EQ; play around with notch and bandpass filters to carve out your unique sounds.
Try taking out certain frequencies to create space for other elements of your track, or add resonant peaks to accentuate certain aspects that you want to shine.
These free guitar loops provide a fantastic canvas on which you can apply your mastery over the frequency spectrum.
As you adjust the EQ and focus on different spectrum areas, you’re essentially painting with sound, shaping your track’s mood, texture, and character.
The world of audio frequency is rich and infinitely fascinating, full of potential for unique musical expression.
As you journey deeper, remember the power you hold as a music producer.
So, take these tools, this knowledge, and go create something absolutely mind-blowing.
Until next time…


Leave a Reply
You must belogged in to post a comment.