If you’re looking for a comprehensive guide on how to use Logic Pro X, you’ve come to the right place.
As a professional music producer myself, I understand the challenges that come with mastering a DAW as extensive and comprehensive as Logic Pro X.
That’s why I’m going to walk you through the ins & outs of this powerhouse software (version 10.7) so you’ll be confident from the second you open it up.
Whether you’re a beginner just starting out or a seasoned professional looking for new Logic secrets, this guide is designed to provide useful insights for everyone.
In today’s article, we’ll be breaking down:
- The secrets to setting up a killer workspace ✓
- Track basics that make your music shine ✓
- Recording techniques to blow your mind ✓
- Audio editing tips for pristine sound ✓
- Everything you need to know about the Piano Roll & Step Editor ✓
- How to enhance tracks like a Logic Pro master ✓
- MIDI techniques to elevate your sound ✓
- Apple loops, drum kits, plugins, etc. ✓
- Key commands for lightning-fast workflows ✓
Plus, we’ll be including expert tips, tricks, and techniques throughout to help you truly master Logic Pro X.
So, let’s dive in…
Table of Contents
- The Power of Logic Pro X
- Setting Up Logic Pro X for Your First Project
- Navigating the Logic Pro X Interface
- Understanding & Working with Tracks
- Recording Audio: Techniques for Enhanced Sound Quality
- Advanced Recording Techniques
- Input Monitoring & Multiple Track Recording
- Editing Audio for Pristine Sound Quality
- Enhancing Your Tracks with Logic Pro Tools
- The Piano Roll Editor
- Exploring the Step Editor
- BONUS: Basic Key Commands
- How to Use Logic Pro X: Final Thoughts
The Power of Logic Pro X
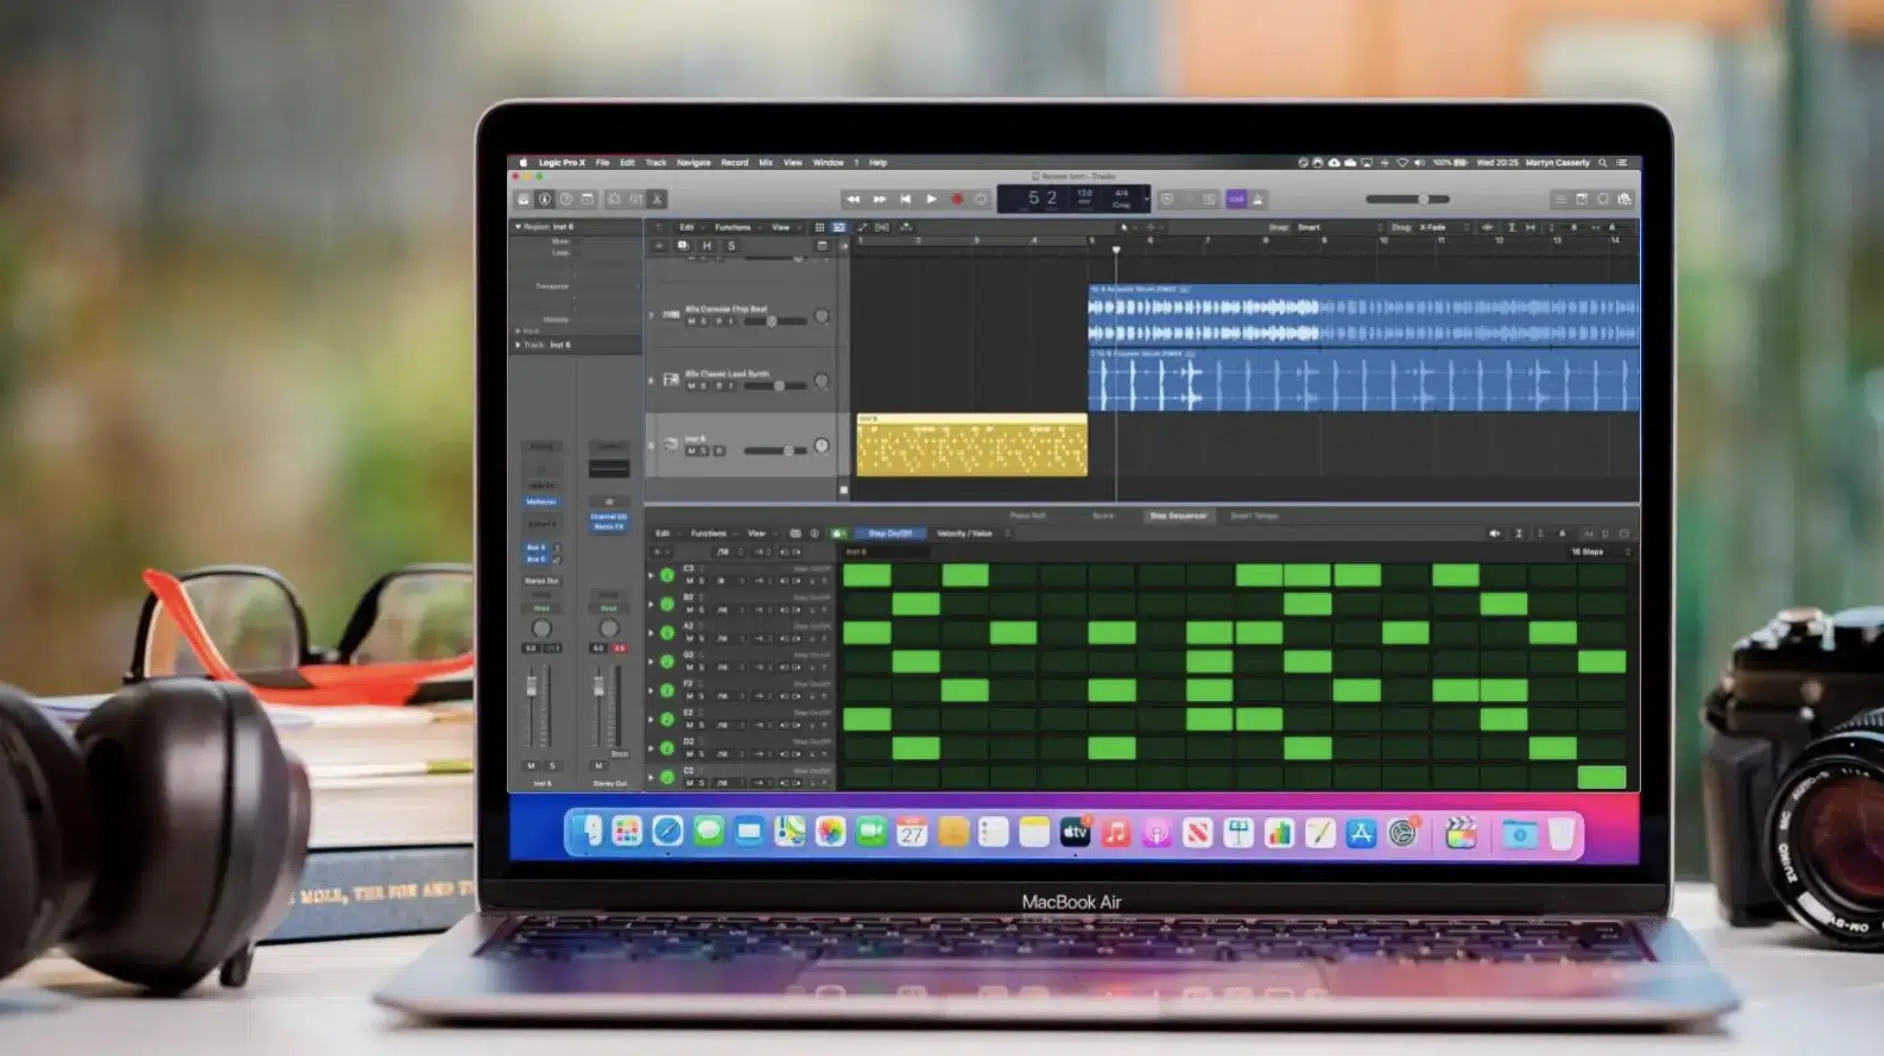
Welcome to the vibrant world of Logic Pro X.
It’s not just another music production tool, it’s a comprehensive digital audio workstation that’s designed to cater to all your musical needs.
From crafting soulful melodies to producing mind-blowing beats, Logic Pro X is your ultimate companion in this journey of sound exploration.
Having been in the music production scene for over two decades, I can confidently say Logic Pro X is a game-changer.
This powerful platform is highly intuitive and packed with numerous features.
The latest version, Logic Pro X 10.7, comes with an arsenal of new and improved features that make the music production process even smoother.
Some updates are subtle refinements, while others can drastically enhance your workflow.
This guide is designed to walk you through each step, revealing some insider tips along the way.
In version 10.7, Apple has introduced:
- New MIDI capabilities
- Refined the Piano Roll Editor
- Added new plug-ins
- Even improved the user interface
We’ll dive into all these features in detail as we go along.
From setting up your project to exporting your final mix, this Logic Pro X tutorial aims to help you unlock your full potential as a digital music producer.
Setting Up Logic Pro X for Your First Project
Let’s start off by discussing how to set up Logic Pro X for your first project.
-
Understanding Input & Output Devices
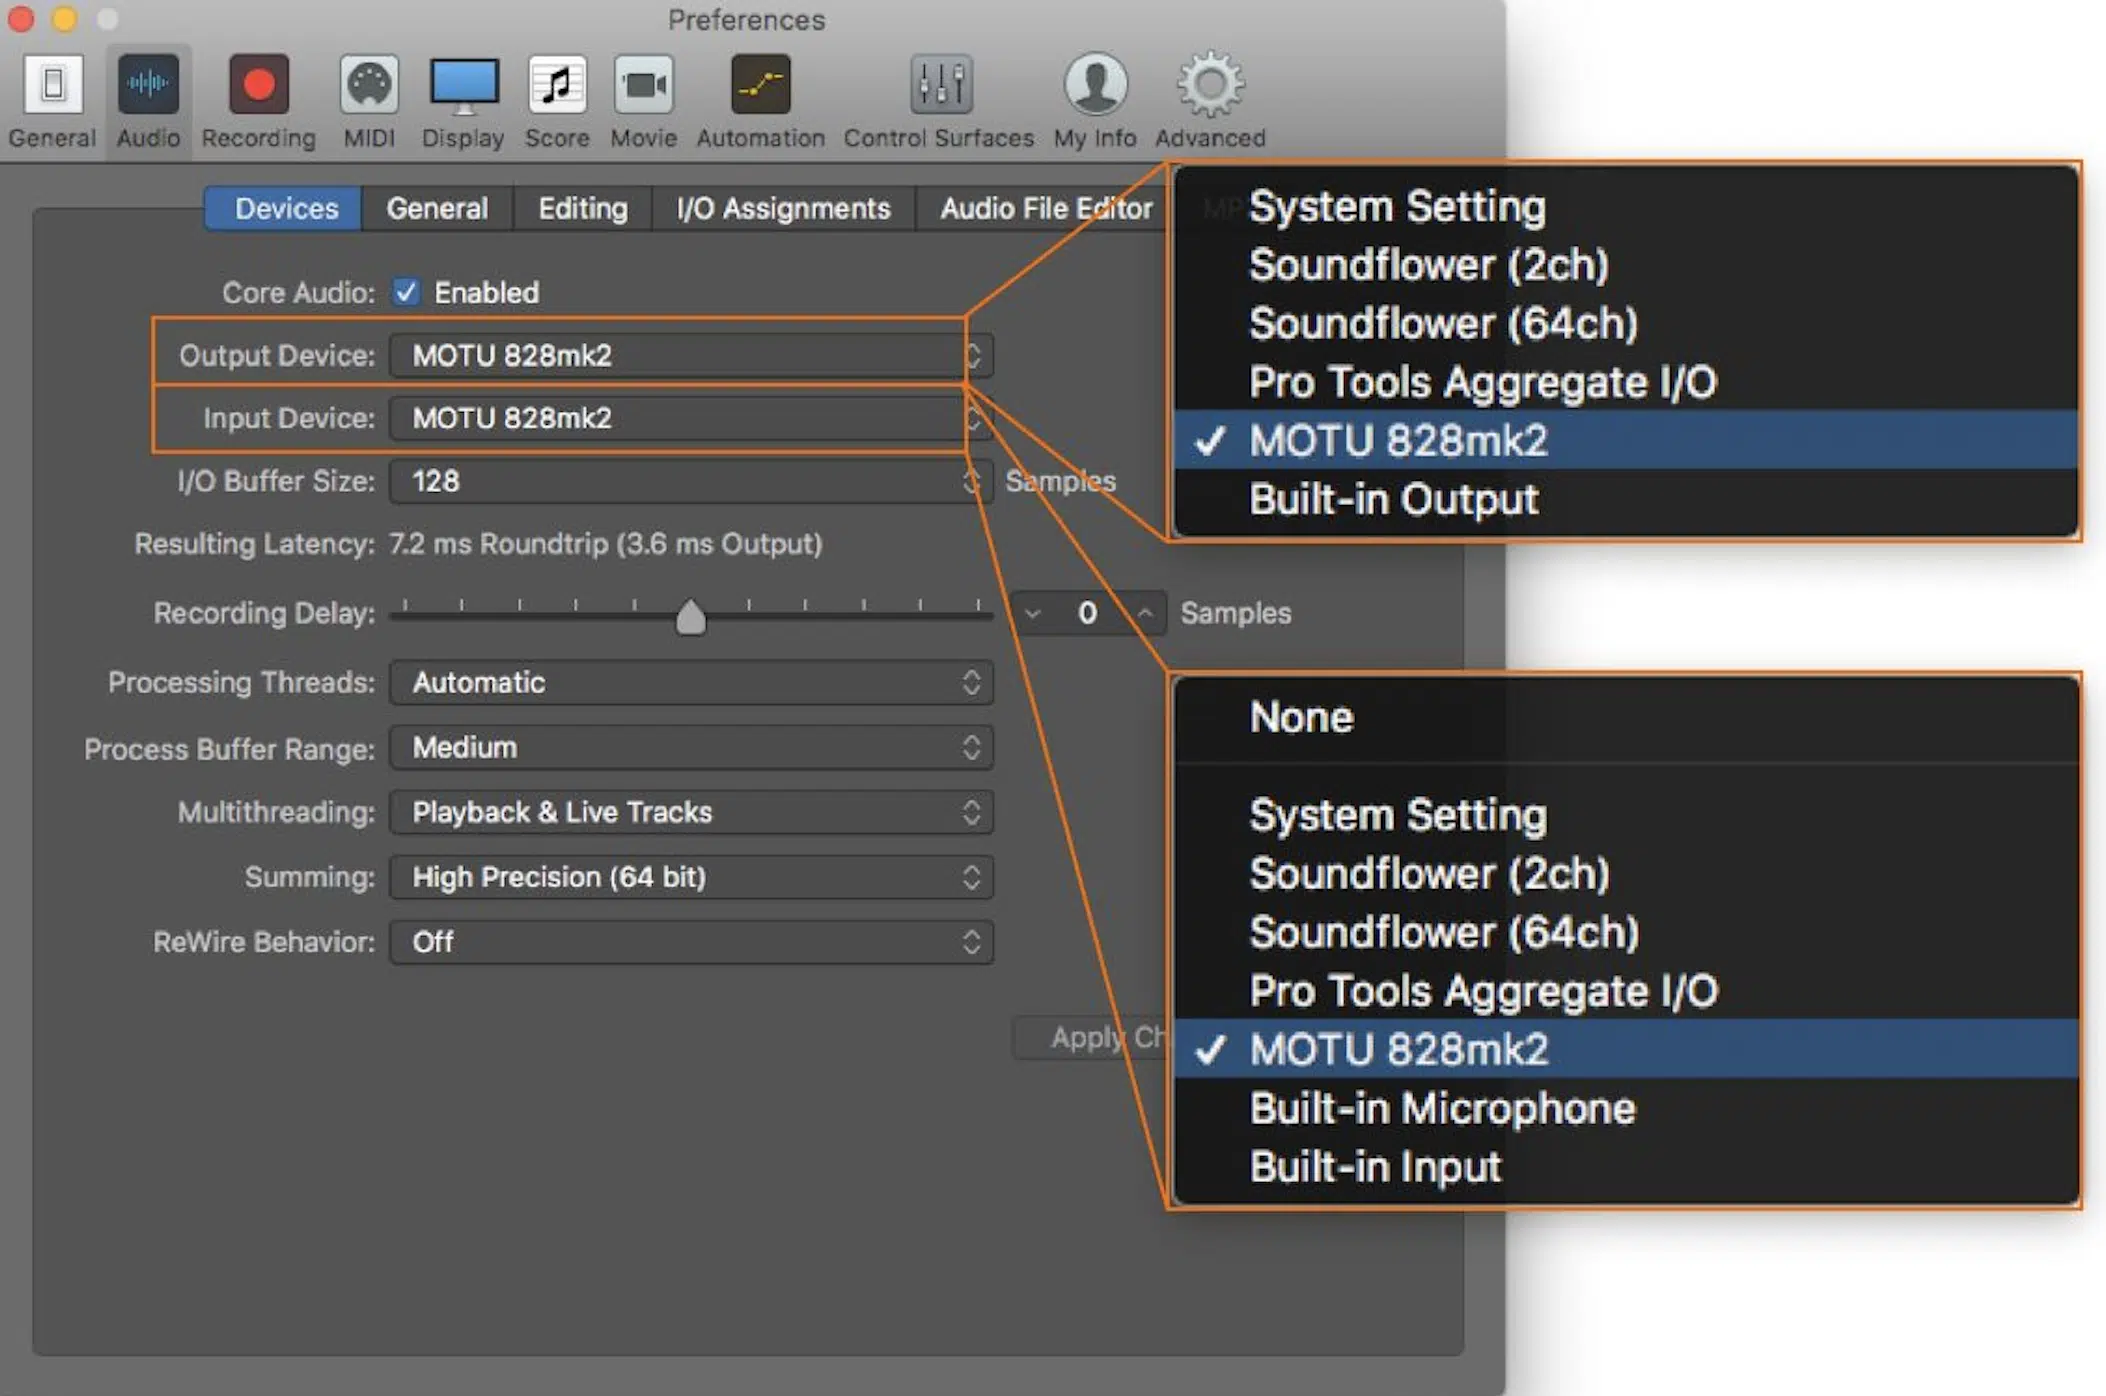
Setting up your audio interface with Logic Pro X is a breeze.
Start by going to the Logic Pro X menu and selecting ‘Preferences’, and then ‘Audio’.
Under the ‘Devices’ tab, you’ll see options for your input and output device 一 select your audio interface for both.
This step ensures that Logic Pro X uses your audio interface for all audio inputs and outputs.
Remember to check the ‘Input Monitoring’ option in the ‘Audio’ tab as well.
This enables you to hear the audio being played from your connected device in real-time, which is crucial for effective recording/editing.
-
Creating a New Project
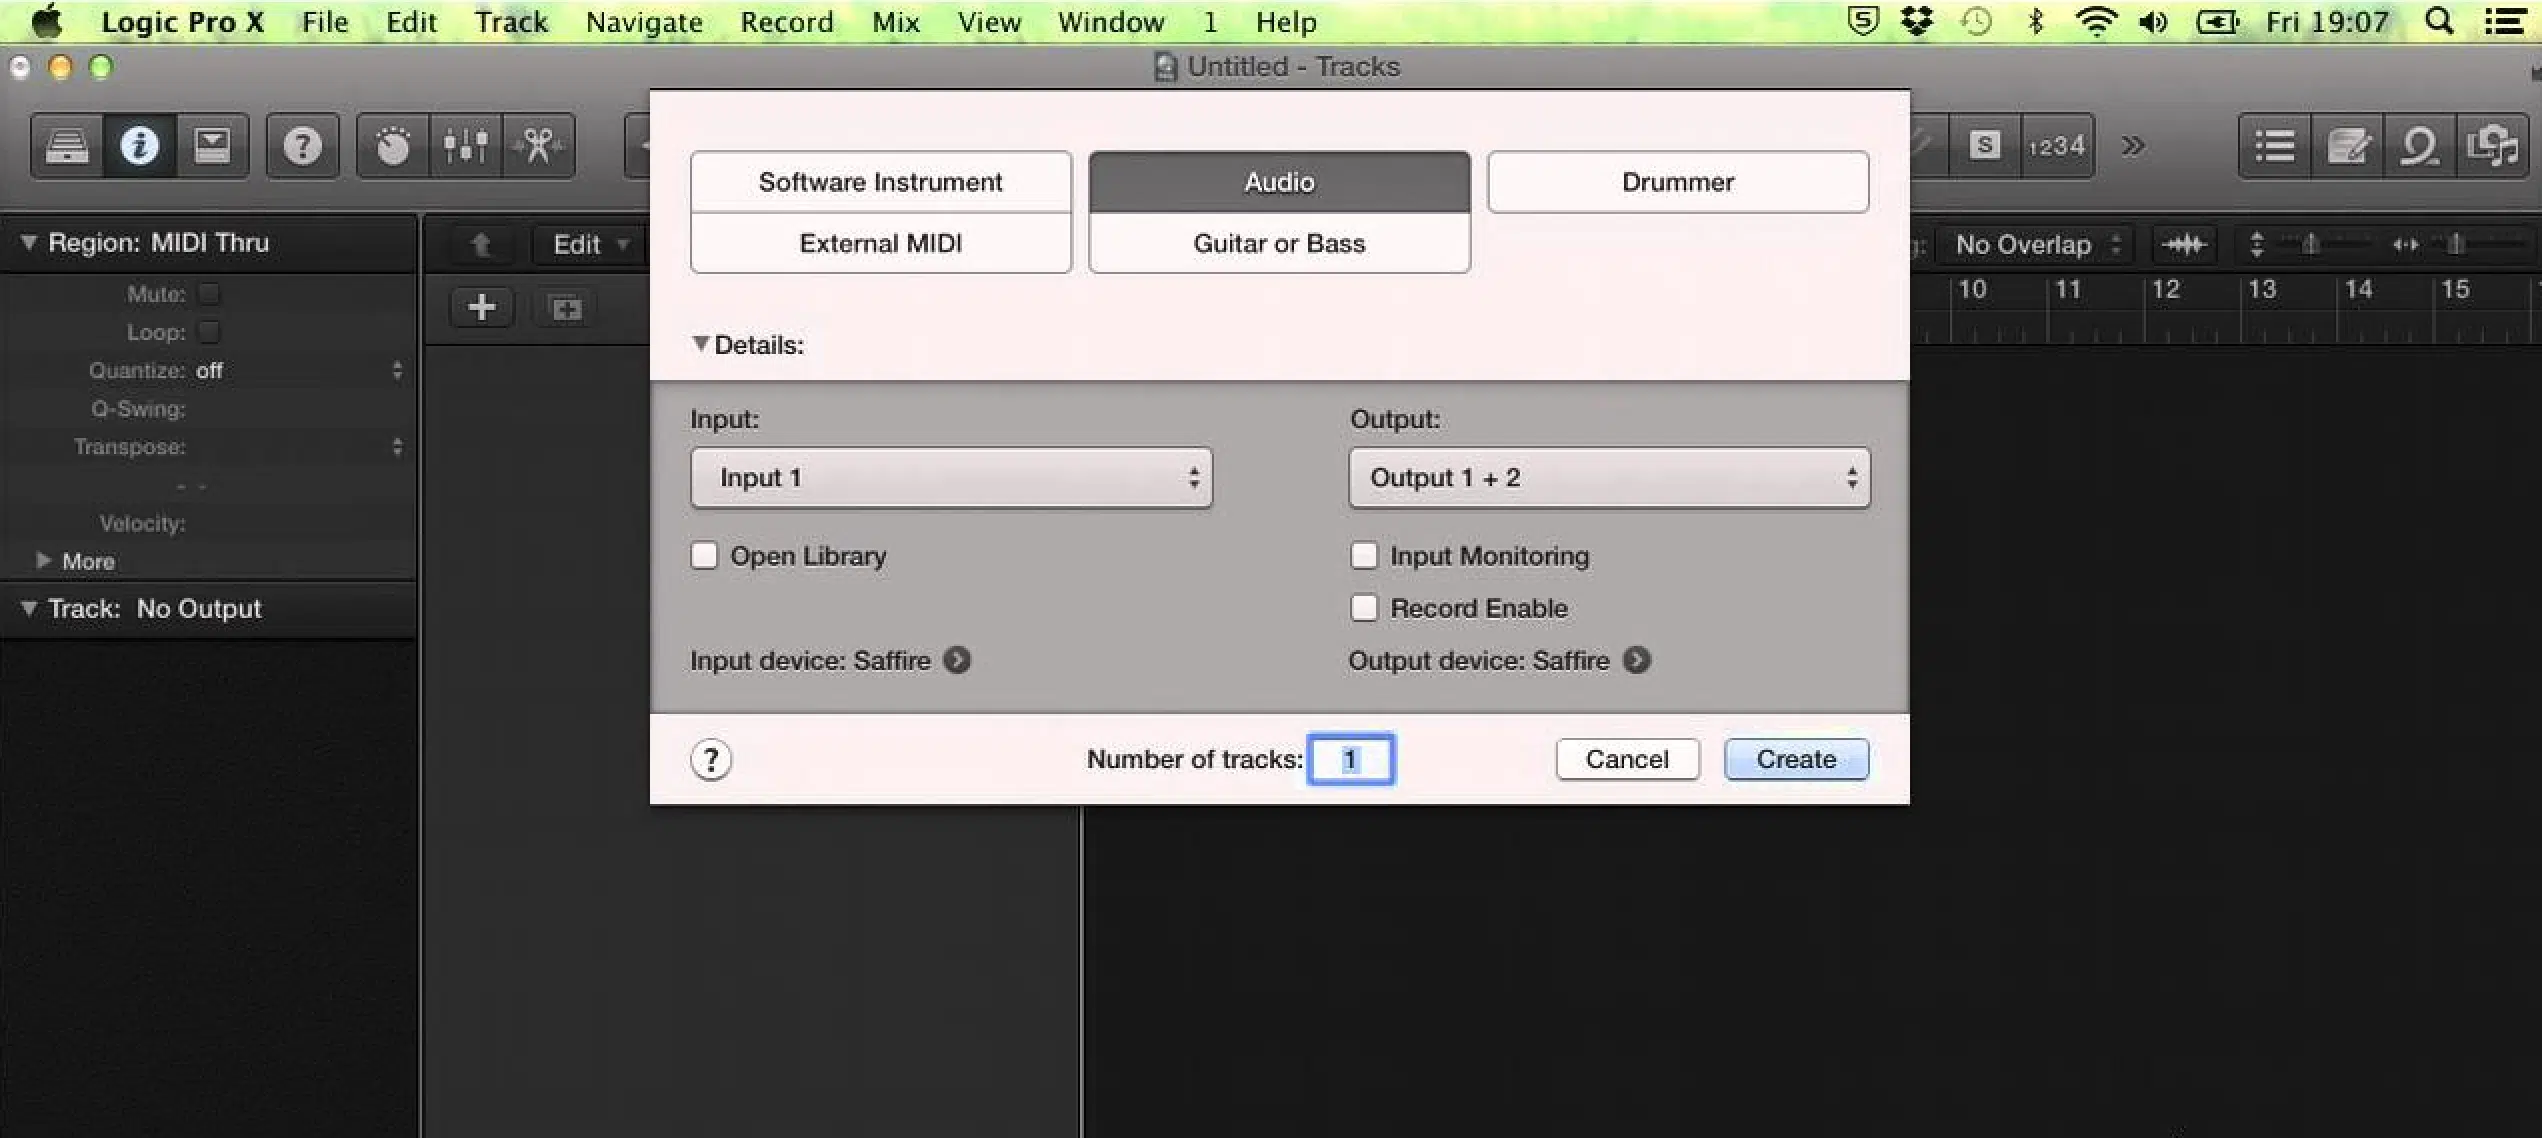
Now that your audio interface is set up, let’s jump into creating your first project in Logic Pro X.
Navigate to the ‘File’ menu, and select ‘New’ 一 here, you’ll be presented with various project templates.
Choose one that suits your needs or select ‘Empty Project’ to start from scratch.
After choosing a template or ‘Empty Project’, Logic Pro X will prompt you to add a new track.
You can choose between:
- An audio track
- A software instrument track
- A drummer track
For the sake of convenience, let’s say you’ve selected an ‘Audio Track’.
Once you’ve added an audio track, you’re ready to start your music production journey.
But before you hit that ‘Record’ button, it’s essential to familiarize yourself with the interface of Logic Pro X, which we’ll break down in the following section.
It’s crucial that you get familiar with Logic’s interface, as that’s where you’ll be spending most of your time.
-
Understanding the Control Bar & Tracks Area
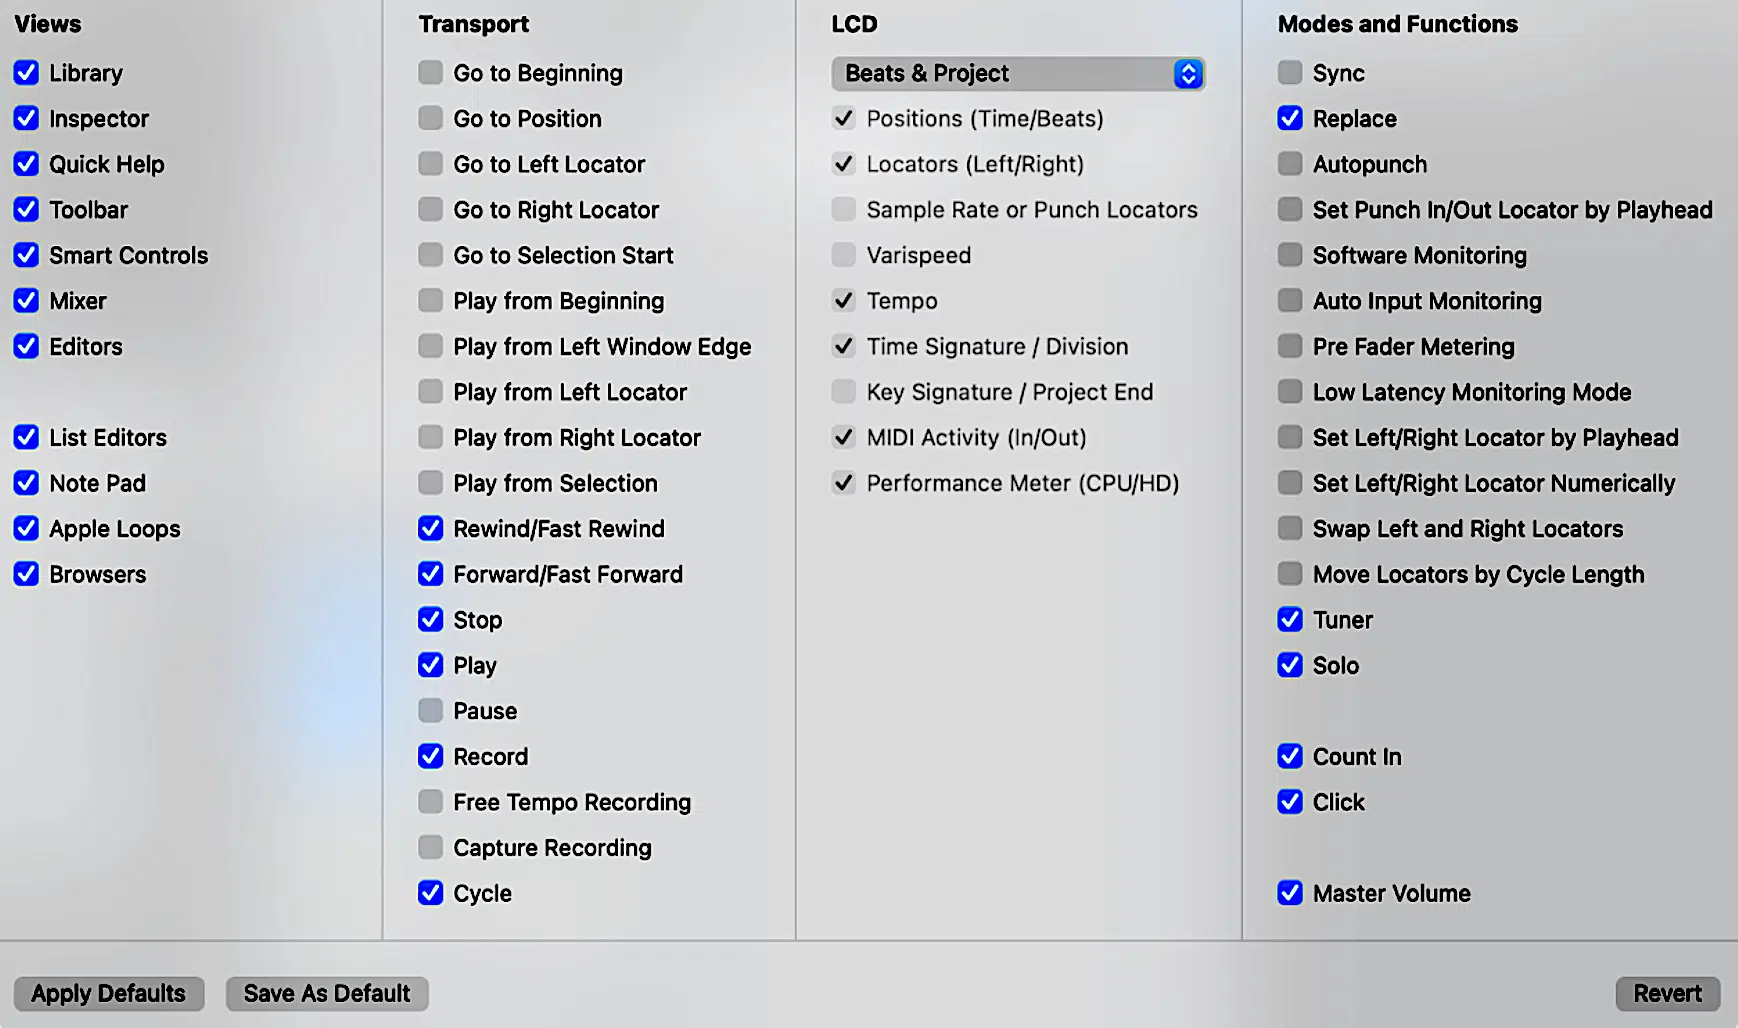
The Control Bar at the top of the Logic Pro X interface is the nerve center of your project.
It houses essential tools and features like:
- Transport controls
- LCD
- Library
- Smart controls
- Editors
- Etc.
Right below the Control Bar is the Tracks Area.
This is where all your audio tracks, MIDI tracks, and software instrument tracks live.
Each track in this area has a corresponding channel strip where you can control volume, pan, and add effects.
The Tracks Area also displays the waveforms or MIDI data for each track 一 providing a visual representation of your project.
It’s in this area where you’ll spend most of your time recording, editing, and arranging your masterpiece.
Familiarizing yourself with the Control Bar and Tracks Area will make your workflow smoother and more efficient.
So take some time to explore these areas and get comfortable with them.
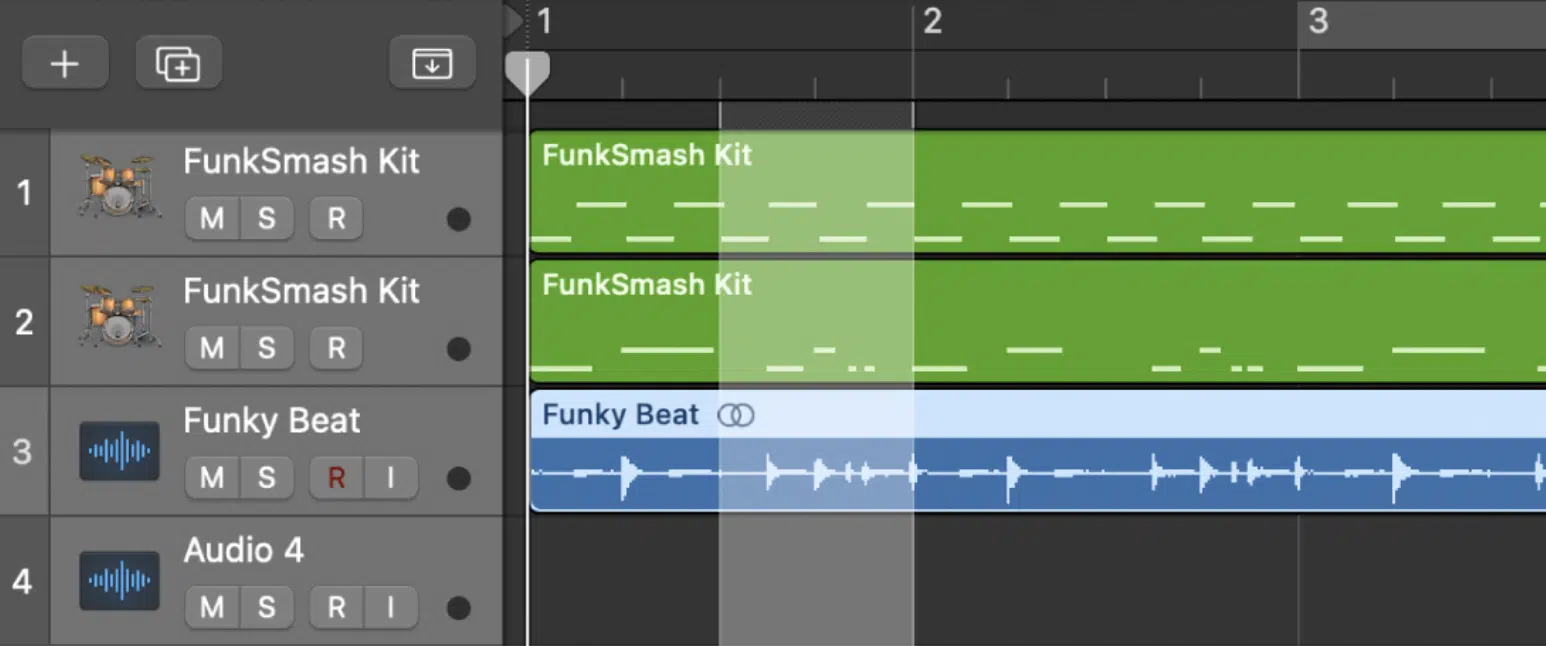
NOTE: Double-clicking any region in the Tracks Area will open up the editors in the lower part of the screen.
This is where you can fine-tune your audio or MIDI data (more on that later).
-
Exploring the File Menu & Project Properties
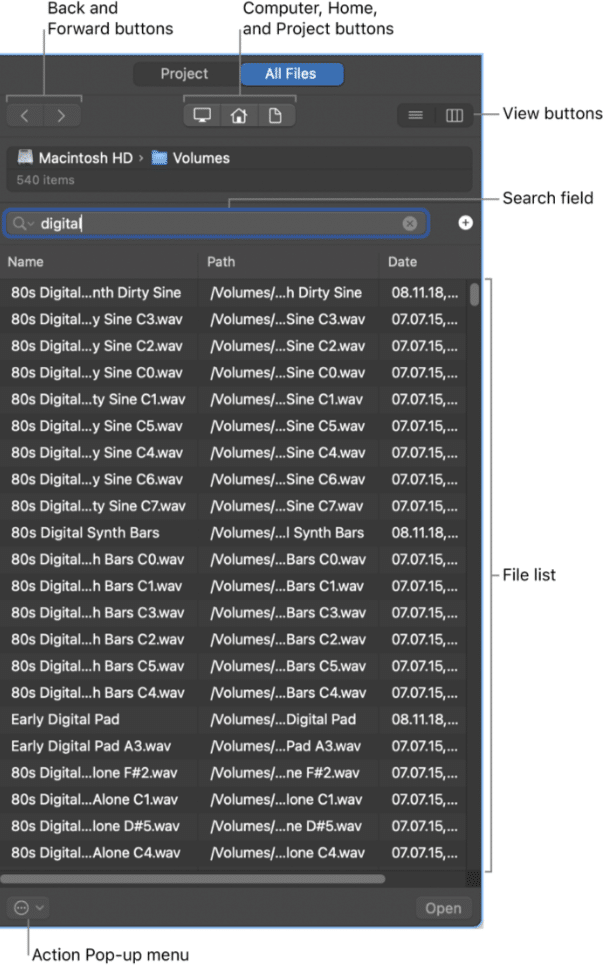
The File Menu, accessible at the top of your screen, houses various project management options.
From here, you can:
- Create a new project
- Open an existing one
- Save your current project
One often-overlooked part of the File Menu is the ‘Project Settings’.
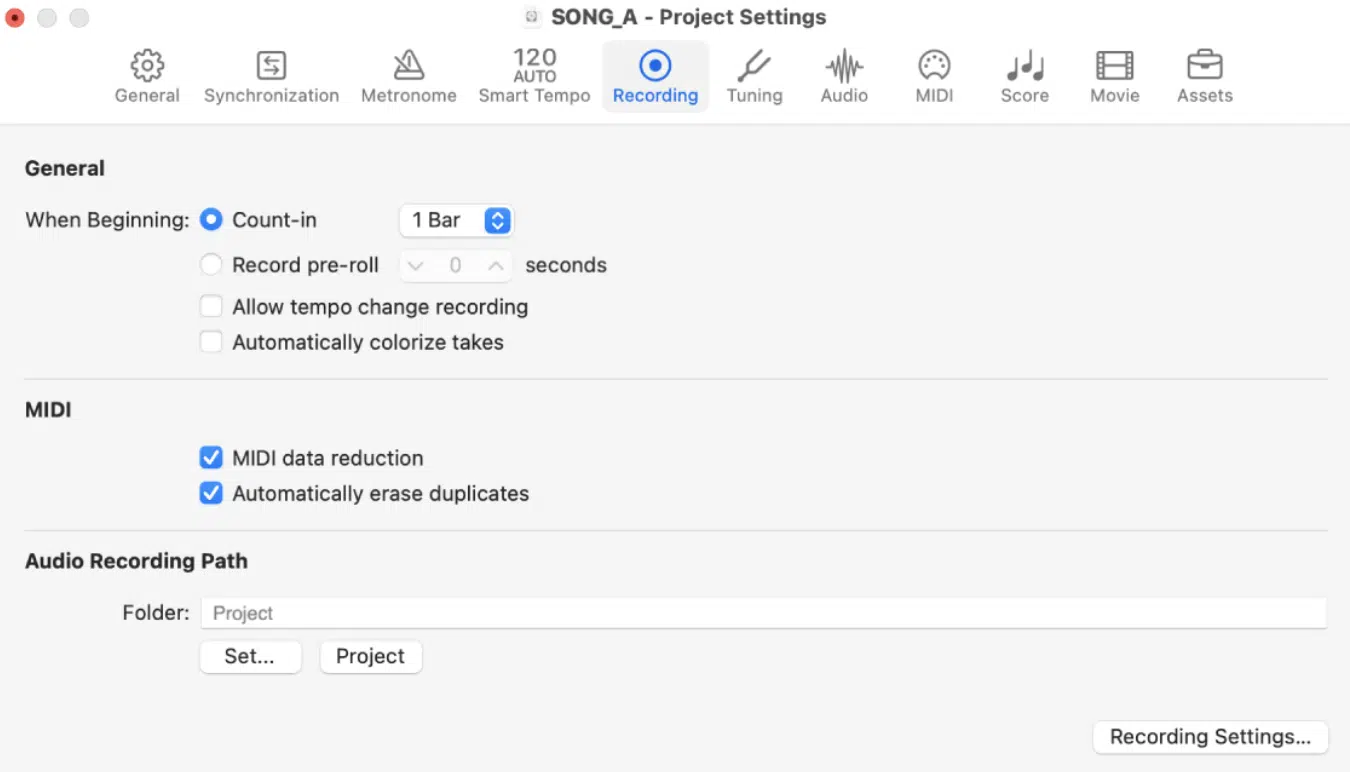
Here you can control project properties like tempo, key signature, and more.
These settings form the backbone of your project, so it’s crucial to set them correctly right from the start.
Take some time to explore the other options available in the File Menu, like:
- Bouncing (exporting) your project
- Importing audio files
- Accessing project backups
Don’t worry, after a few sessions, you’ll know it like the back of your hand.
-
Audio Preferences & Setting Up Your MIDI Keyboard
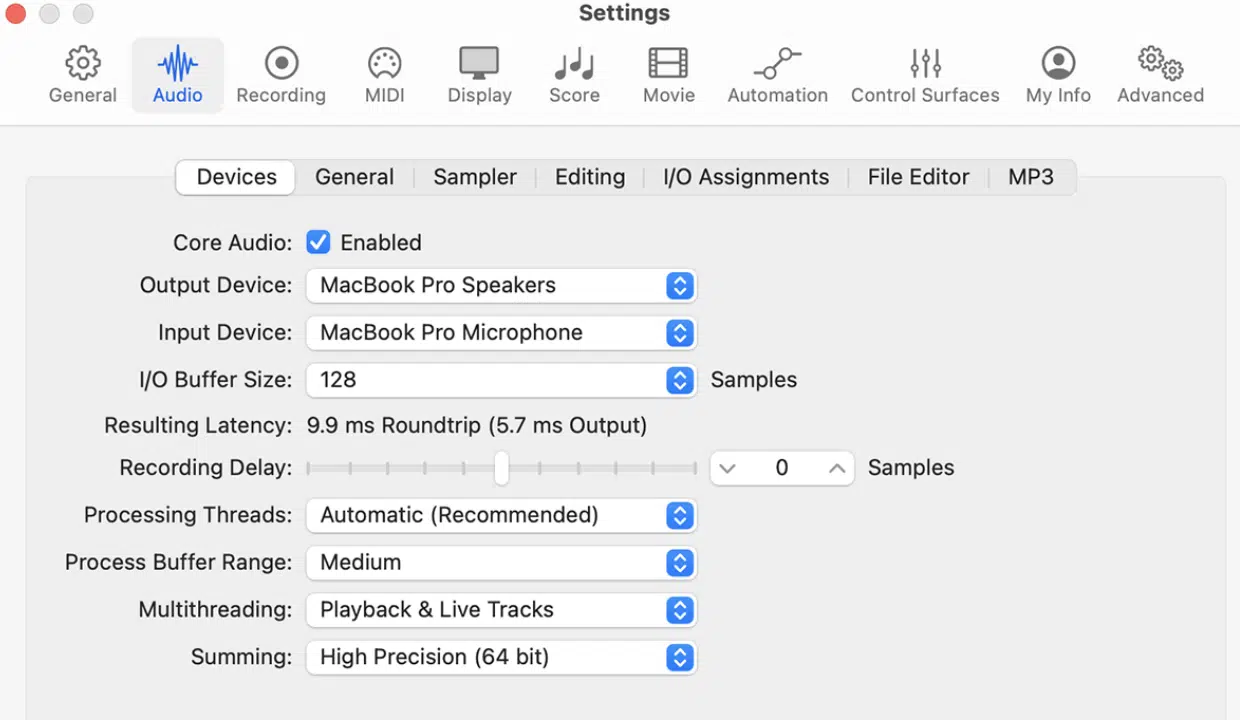
Before we start recording, it’s important to understand the ‘Audio Preferences’ in Logic Pro X.
Accessible from the ‘Preferences’ option in the Logic Pro X menu, here you can control:
- The input and output devices
- Buffer size
- Sample rate
- Etc.
For the best sound quality and minimum latency, I recommend setting the buffer size as low as possible during recording.
You can increase it while mixing to handle the additional processing load.
If you’re planning to use a MIDI keyboard or controller with Logic Pro X, you’ll need to set it up under ‘MIDI Preferences’.
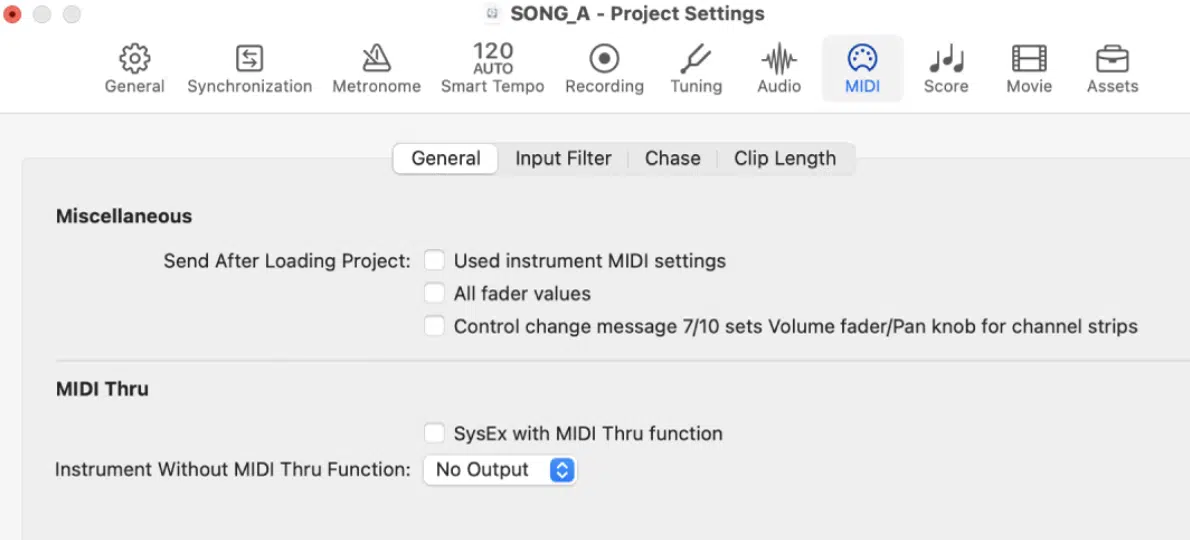
Simply ensure your MIDI device is connected to your Mac OS and select it from the list of available devices.
Once you’ve done this, you’re all set to play and record MIDI data in Logic Pro X.
Understanding & Working with Tracks

Now that we’ve got the basics covered, lets dig deeper into the heart of Logic Pro X 一 the tracks.
There are several track types in Logic Pro X, such as:
- Audio Tracks 一 Used for recording audio directly into Logic Pro X
- Software Instrument Tracks 一 Used for recording MIDI data that can be played back using any of the software instruments available in Logic Pro X
- Drummer Tracks 一 Automatically generate drum patterns that can be customized to your liking
- Auxiliary Tracks 一 Used to route audio signals for parallel processing or grouping tracks together
Understanding the function of each track type is crucial as it directly affects your workflow and the creative possibilities available to you in Logic Pro X.
-
Creating Audio Tracks
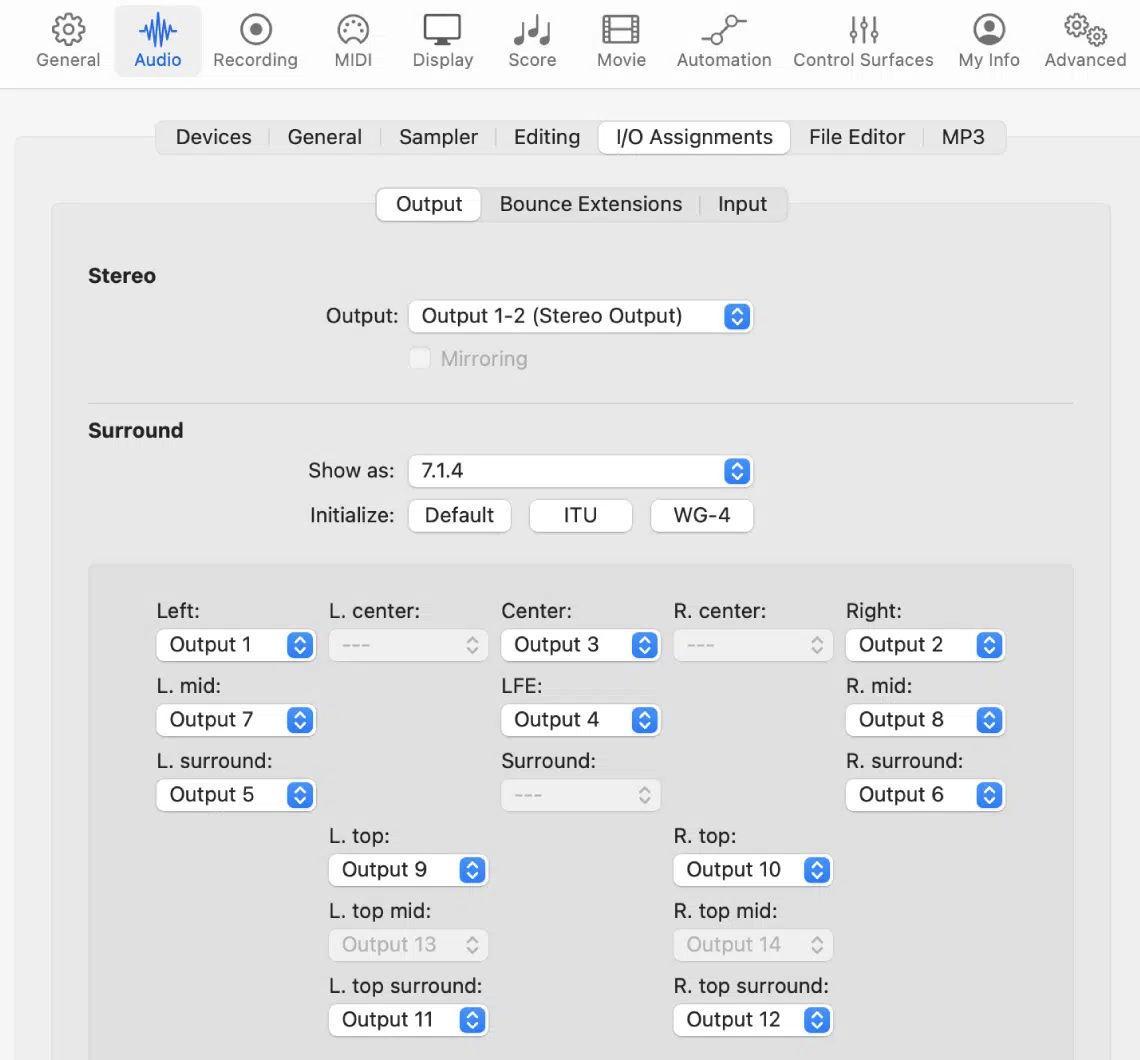
When you’re ready to lay down your first melody or record a rhythm section, creating an audio track is your first step.
To do this, go to ‘Track’ from the main menu and select ‘New Audio Track’ 一 or simply use the key command ‘Option + Command + A’.
When creating a stereo audio track, you’ll be asked to define its input and output.
- The input will generally be the interface channel you’re using to record your audio.
- The output (above) will be your stereo output.
Unless you’re routing the track elsewhere for more advanced processing, of course.
It’s worth noting that each audio track comes with a series of controls and features, including volume and pan sliders, mute and solo buttons, and space to add plugins.
These will be crucial in shaping the sound of each track as you move into the mixing process.
-
Understanding MIDI Tracks & MIDI Data
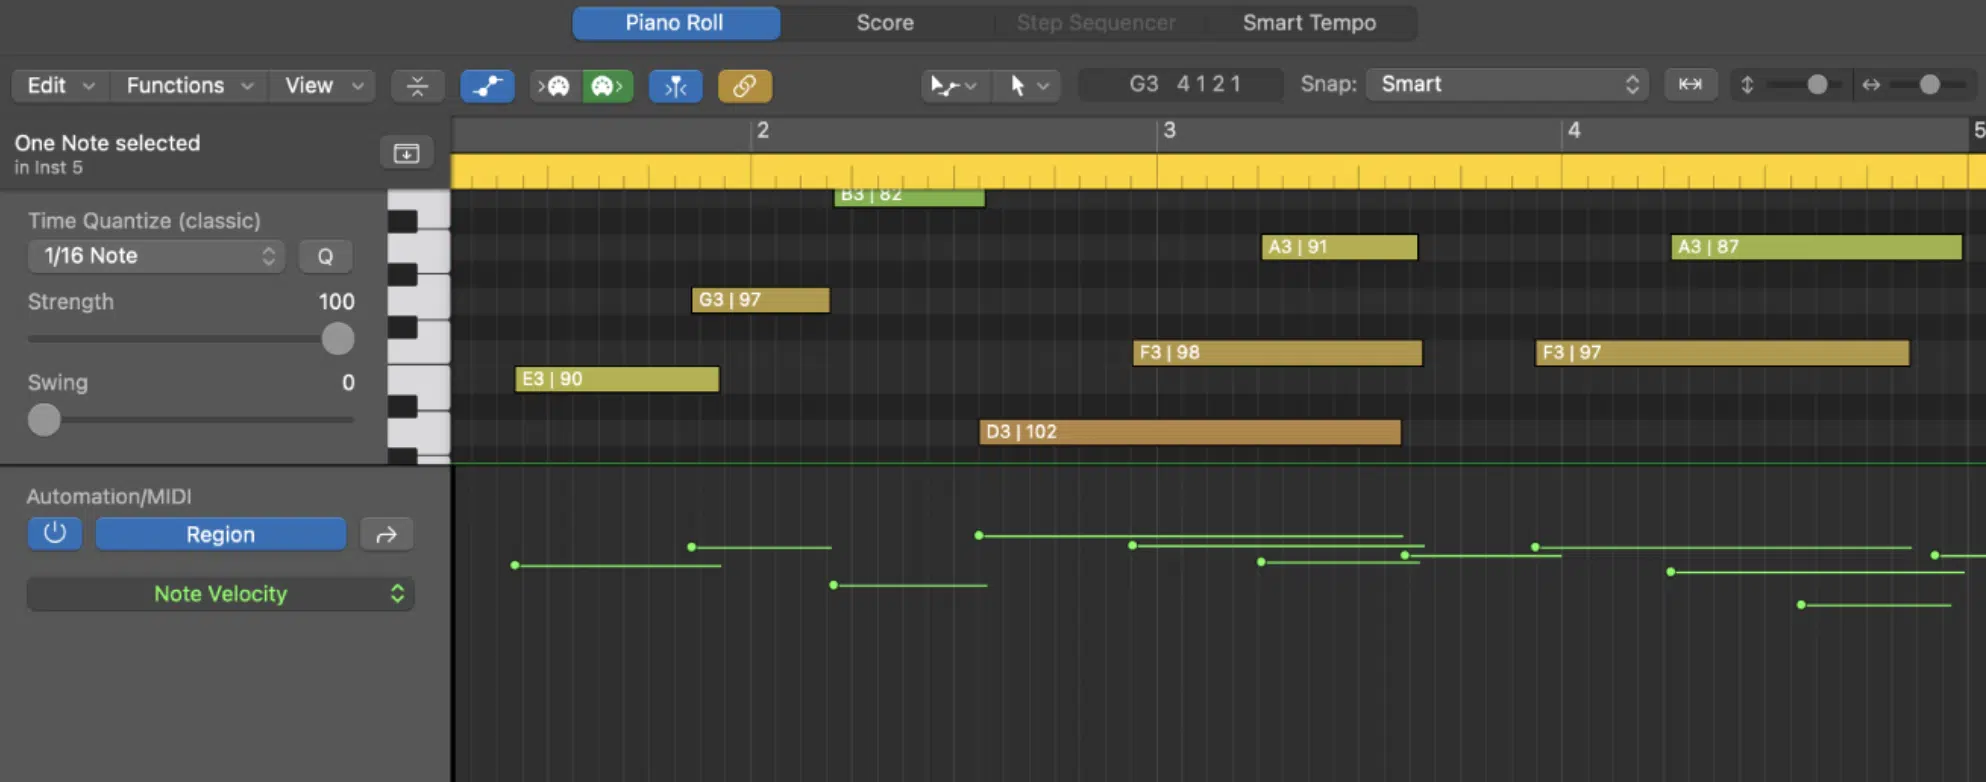
MIDI (Musical Instrument Digital Interface) is a powerful tool in Logic Pro X.
It allows you to control virtual instruments and make precise adjustments to performances.
To create a MIDI track, select ‘New Software Instrument Track’ from the ‘Track’ menu or use the key command ‘Option + Command + S’.
Unlike audio tracks, MIDI tracks record performance data rather than actual audio.
This data includes information about:
- Pitch
- Velocity (how hard a note is played)
- Duration
- Other parameters
One of the great advantages of working with MIDI in Logic Pro X is the level of control you have over the performance after it’s recorded.
Using the Piano Roll Editor, you can move notes around, change their length, adjust their velocity, and even alter their pitch, all with a few clicks of the mouse.
It’s also important to note that MIDI tracks in Logic Pro X are intrinsically linked with software instruments.
Meaning, when you create a MIDI track, you’ll be prompted to choose a software instrument from the Library that will generate the sounds for your MIDI data.
-
Working with Software Instruments & Basic Functions
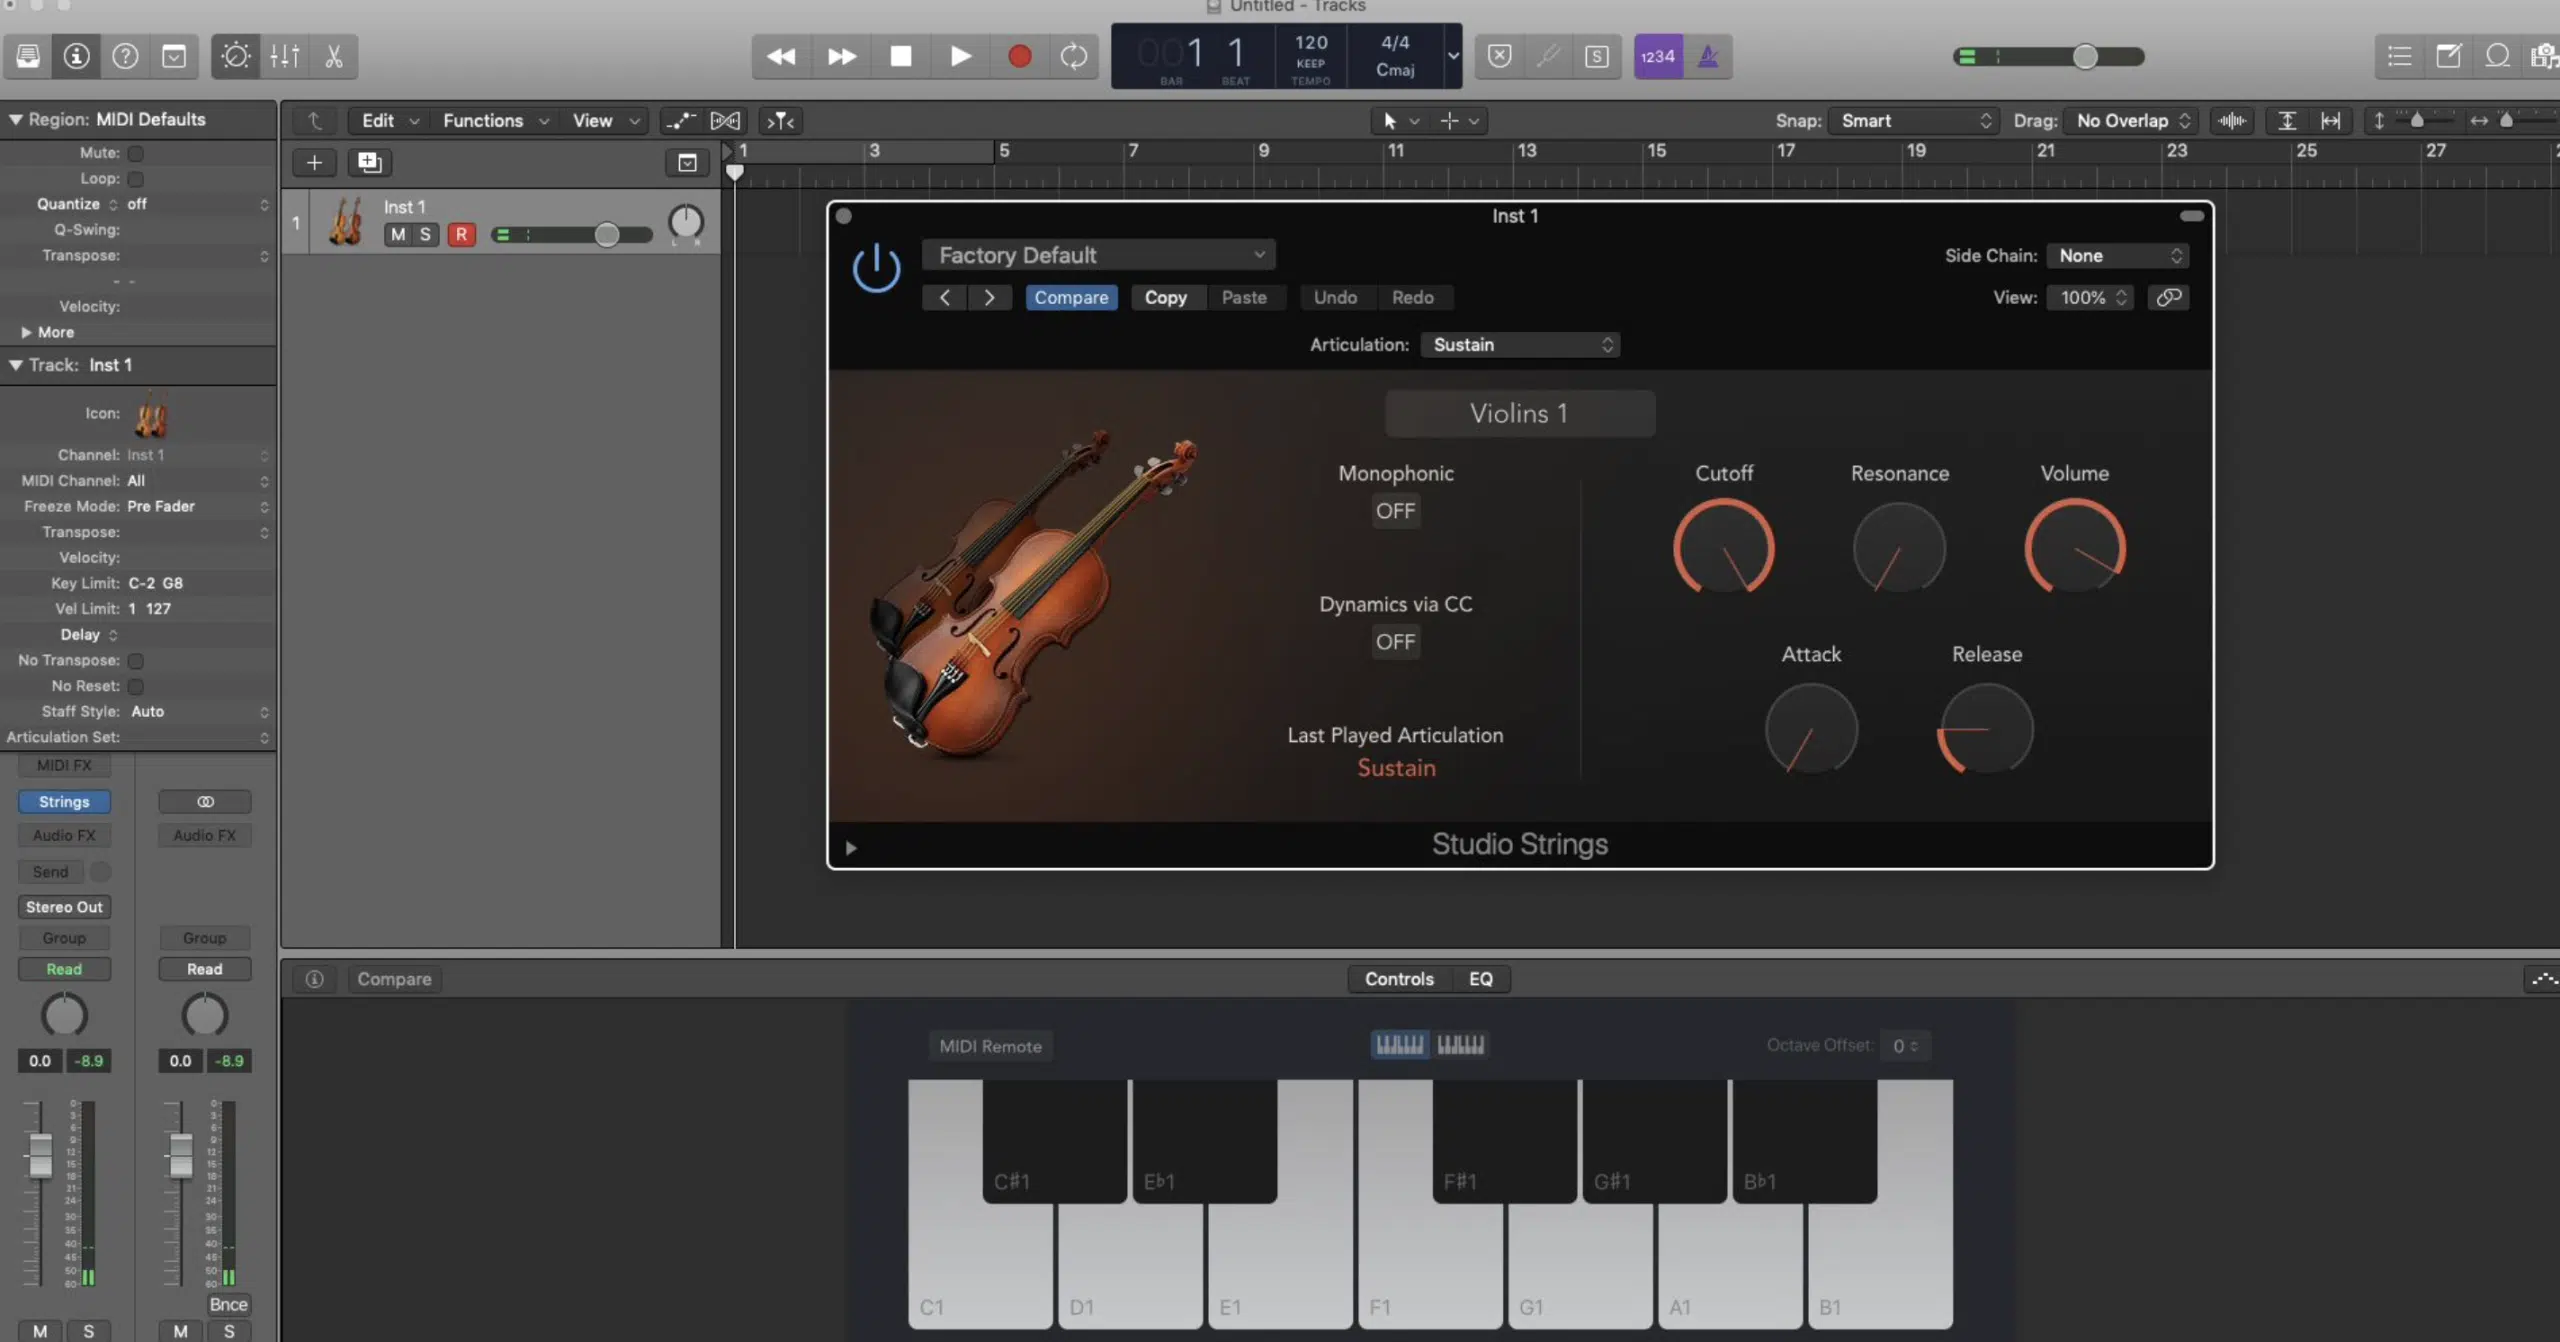
Logic Pro X comes packed with a vast array of software instruments 一 from realistic grand pianos, violins, and powerful synthesizers, to intricate drum machines and worldly instruments.
Once you’ve selected a software instrument for your MIDI track, you can play it using your connected MIDI keyboard.
If you don’t have a MIDI keyboard, you can use the ‘Musical Typing’ feature of Logic Pro X (which turns your computer keyboard into a MIDI controller).
In addition to playing and recording software instruments, Logic Pro X also offers extensive sound-shaping controls for each instrument.
By selecting your MIDI track and opening the Smart Controls (key command ‘B’), you can adjust the parameters of your software instrument to create the perfect sound for your track.

Also, many software instruments in Logic Pro X come with a collection of presets, providing you with a quick way to explore different sounds.
You can also save your custom settings as user presets for future projects, which I highly recommend.
The combination of MIDI tracks and software instruments is a powerful one, allowing for endless creativity.
Whether you’re composing an orchestral piece or producing a modern electronic track, Logic Pro X’s software instruments have you covered.
Recording Audio: Techniques for Enhanced Sound Quality
Now that you have a solid understanding of Logic Pro X and creating/working with tracks, let’s cover some basic & advanced recording techniques.
-
Basic Recording Techniques
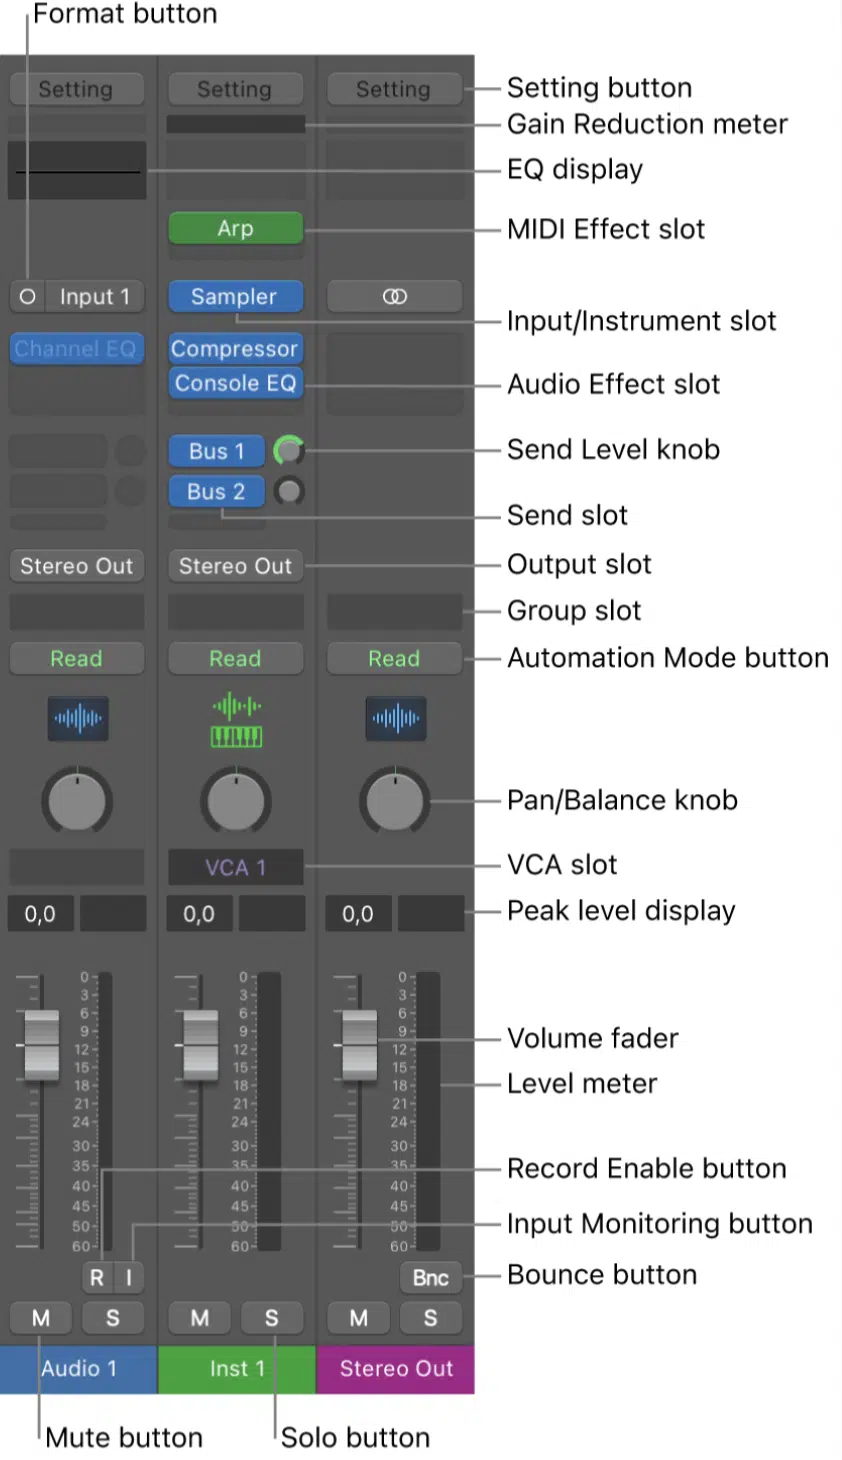
Recording in Logic Pro X is as straightforward as hitting the ‘Record’ button (or ‘R’ key)…
However, to achieve a high-quality recording, there are a few fundamental techniques you should know.
The first step to achieving a great recording is setting the correct level for your audio interface.
You want the level to be as high as possible without clipping (which can result in distortion).
This is typically indicated by a red light or bar on your interface or within Logic Pro X’s level meters.
It’s also crucial to monitor your recording with a good pair of headphones.
This allows you to hear exactly what’s being recorded and catch any potential issues early on.
Logic Pro X has a ‘Solo’ button on each track to help with this 一 enabling you to isolate and listen to individual tracks during playback.
NOTE: Take advantage of Logic Pro X’s ‘Count-In’ feature, which gives you a specified number of beats before recording begins.
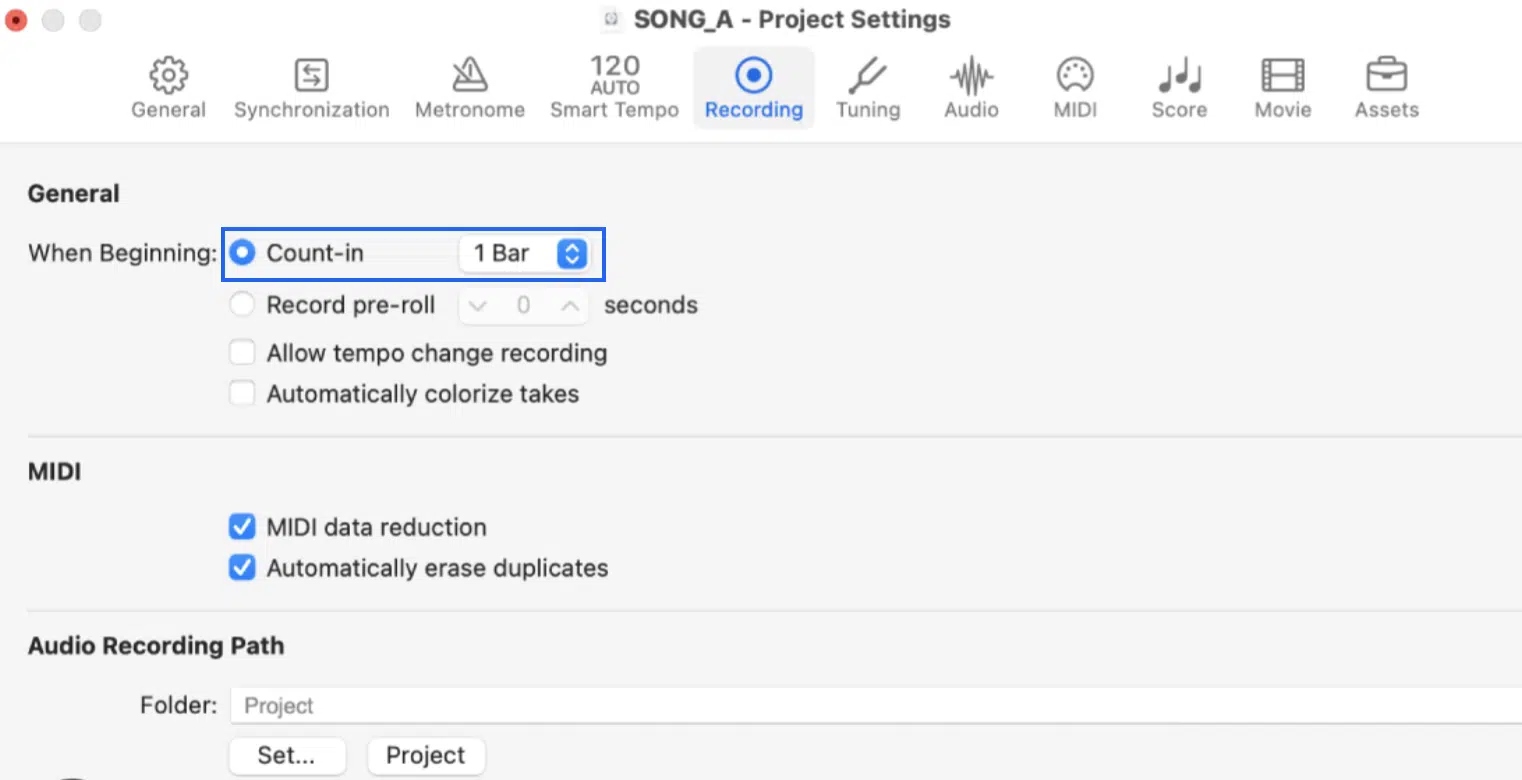
This can help you start your performance at the right time and with the right rhythm.
Advanced Recording Techniques
As you become more comfortable with Logic Pro X’s recording process, you can start exploring some advanced techniques to further improve your audio quality.
This techniques include:
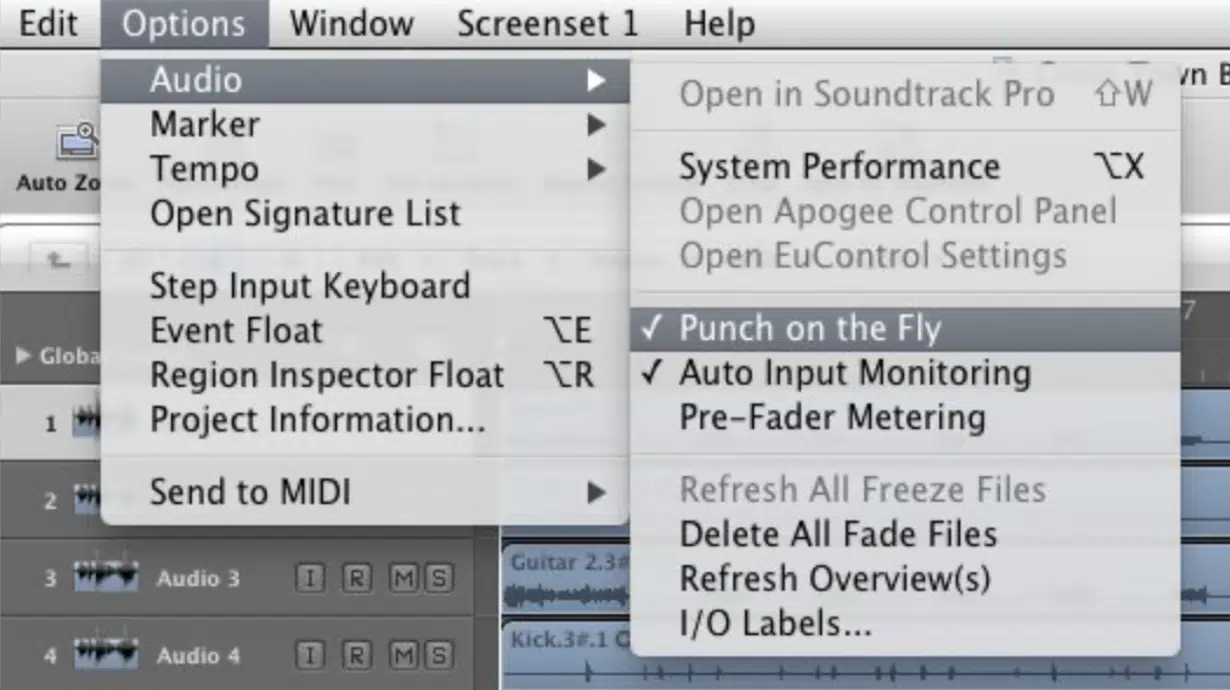
- Punch Recording 一 Lets you seamlessly overwrite a portion of your recording while it’s playing back.
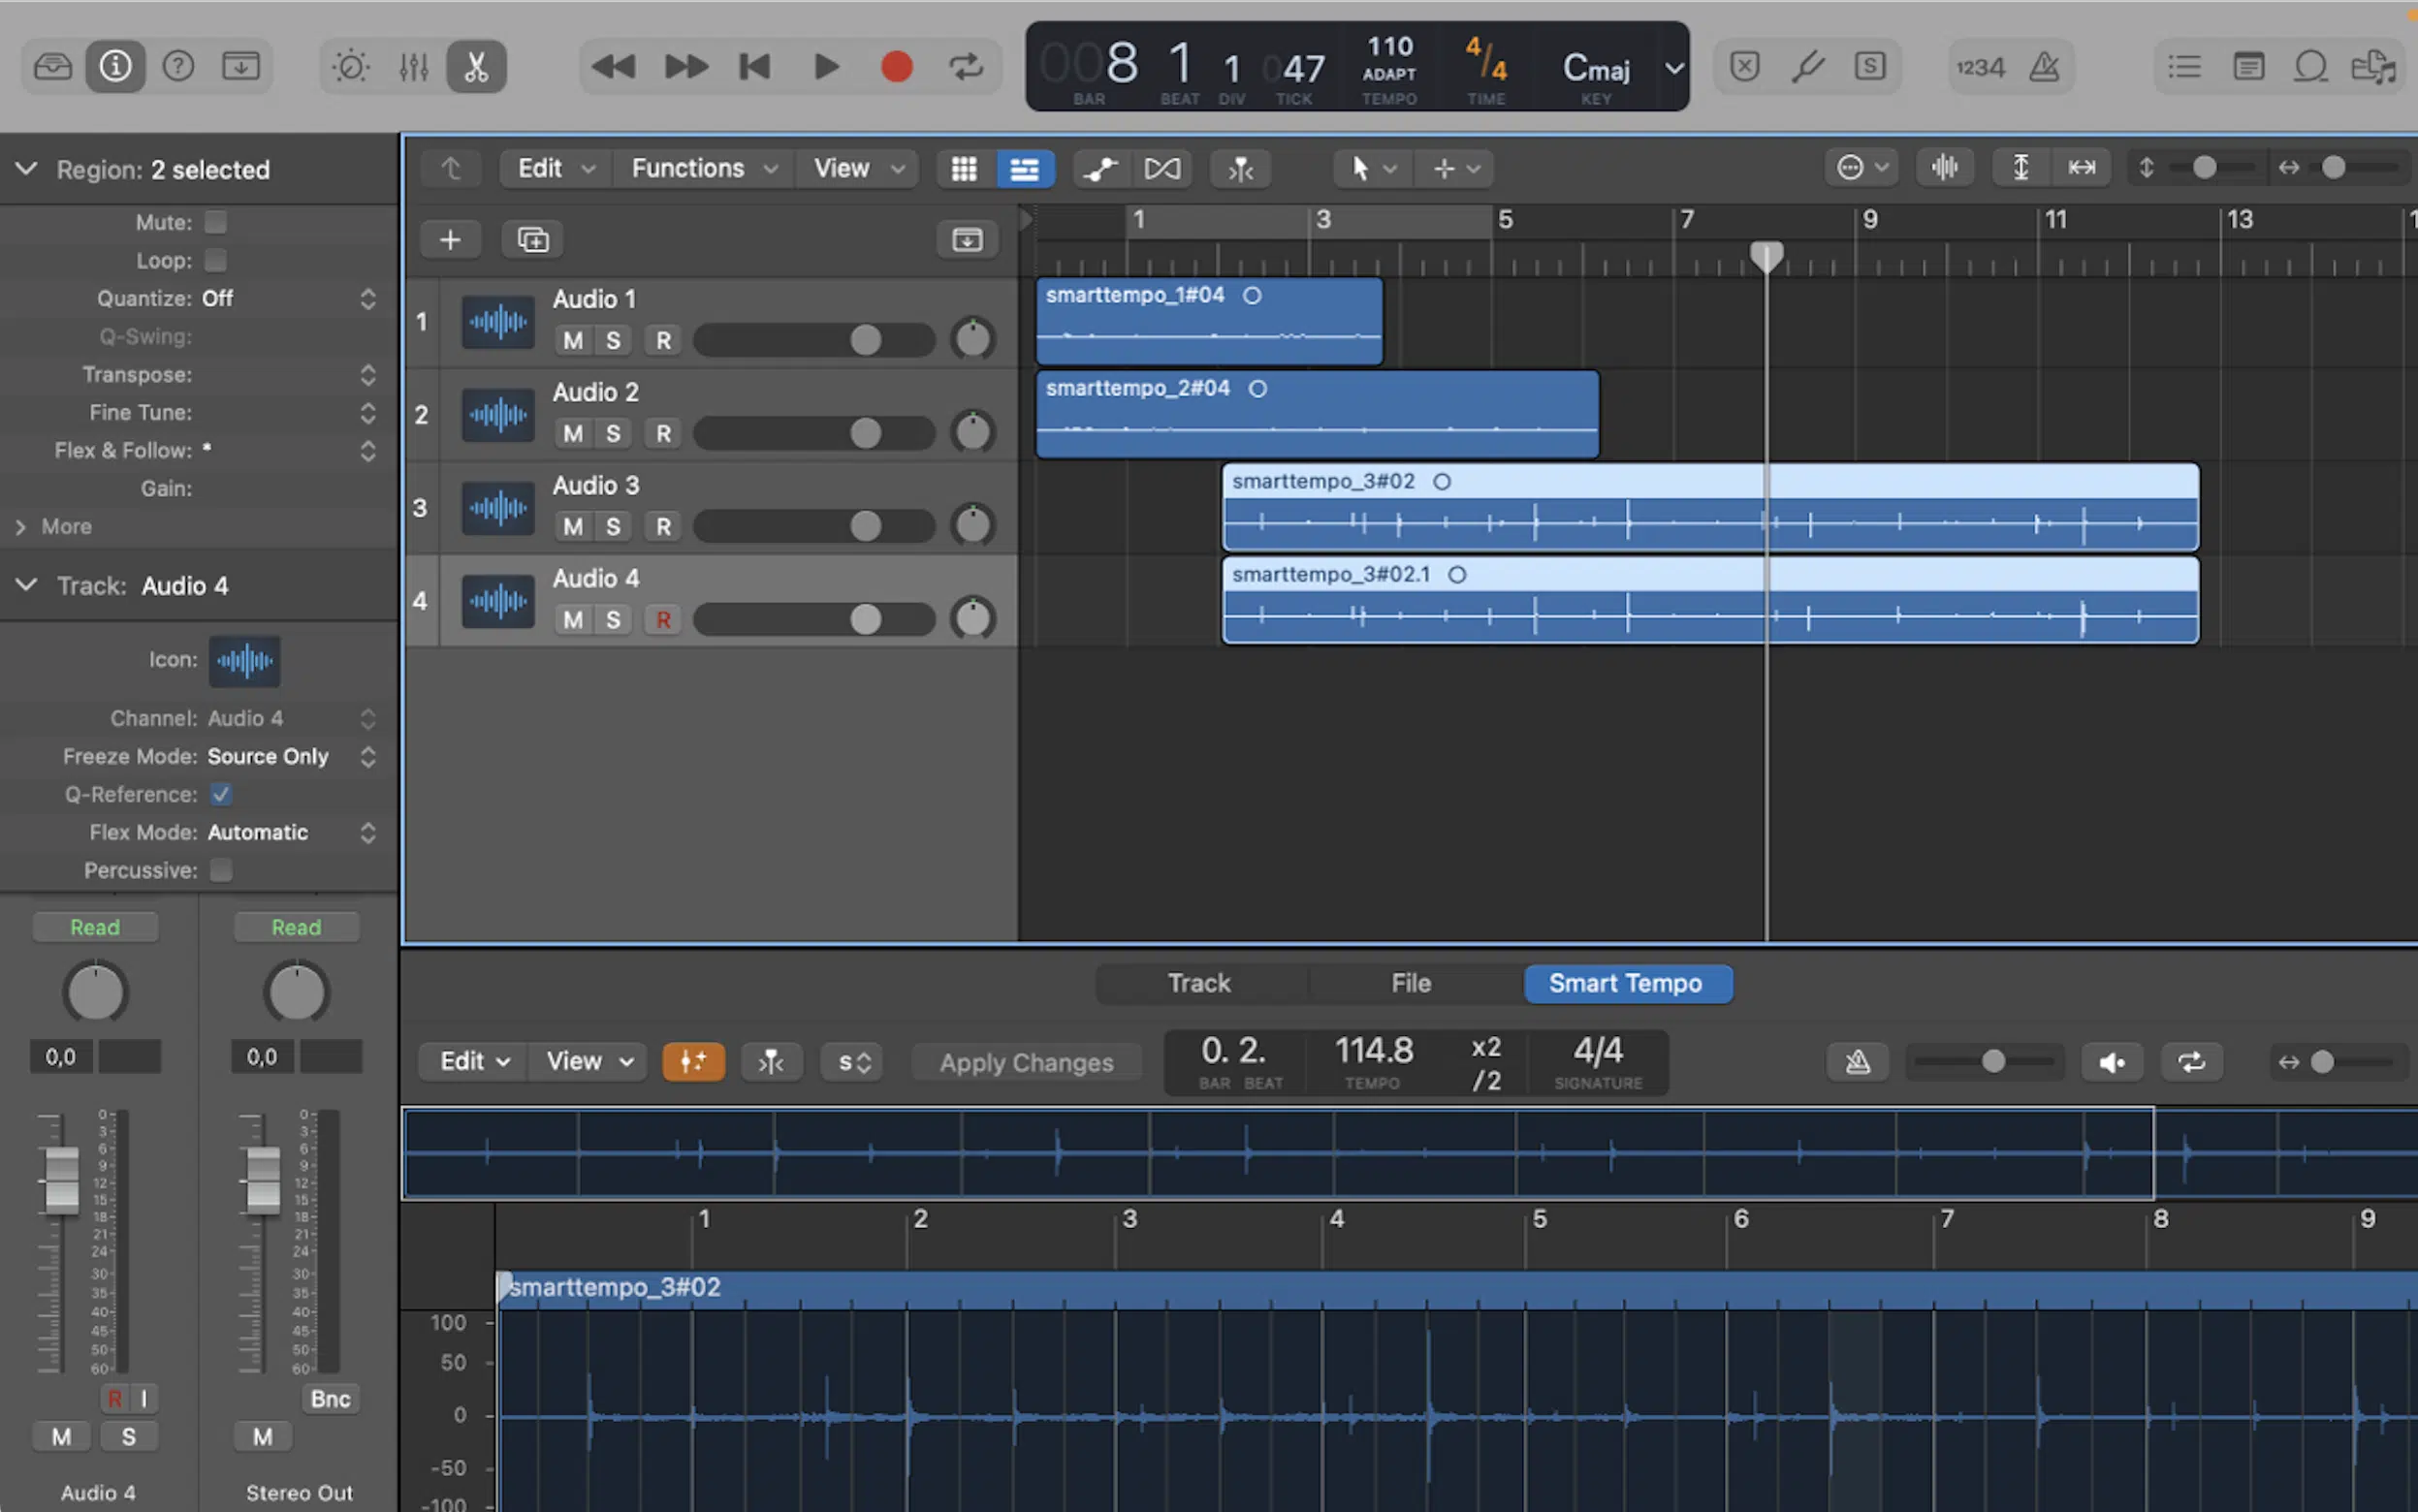
- Multitake Recording 一 Enables you to record multiple takes of a performance and choose the best one later.
- Auto-Punch 一 Automatically starts and stops recording at specific points. This is great for focusing on a difficult section of your performance without having to manually start & stop the recording.
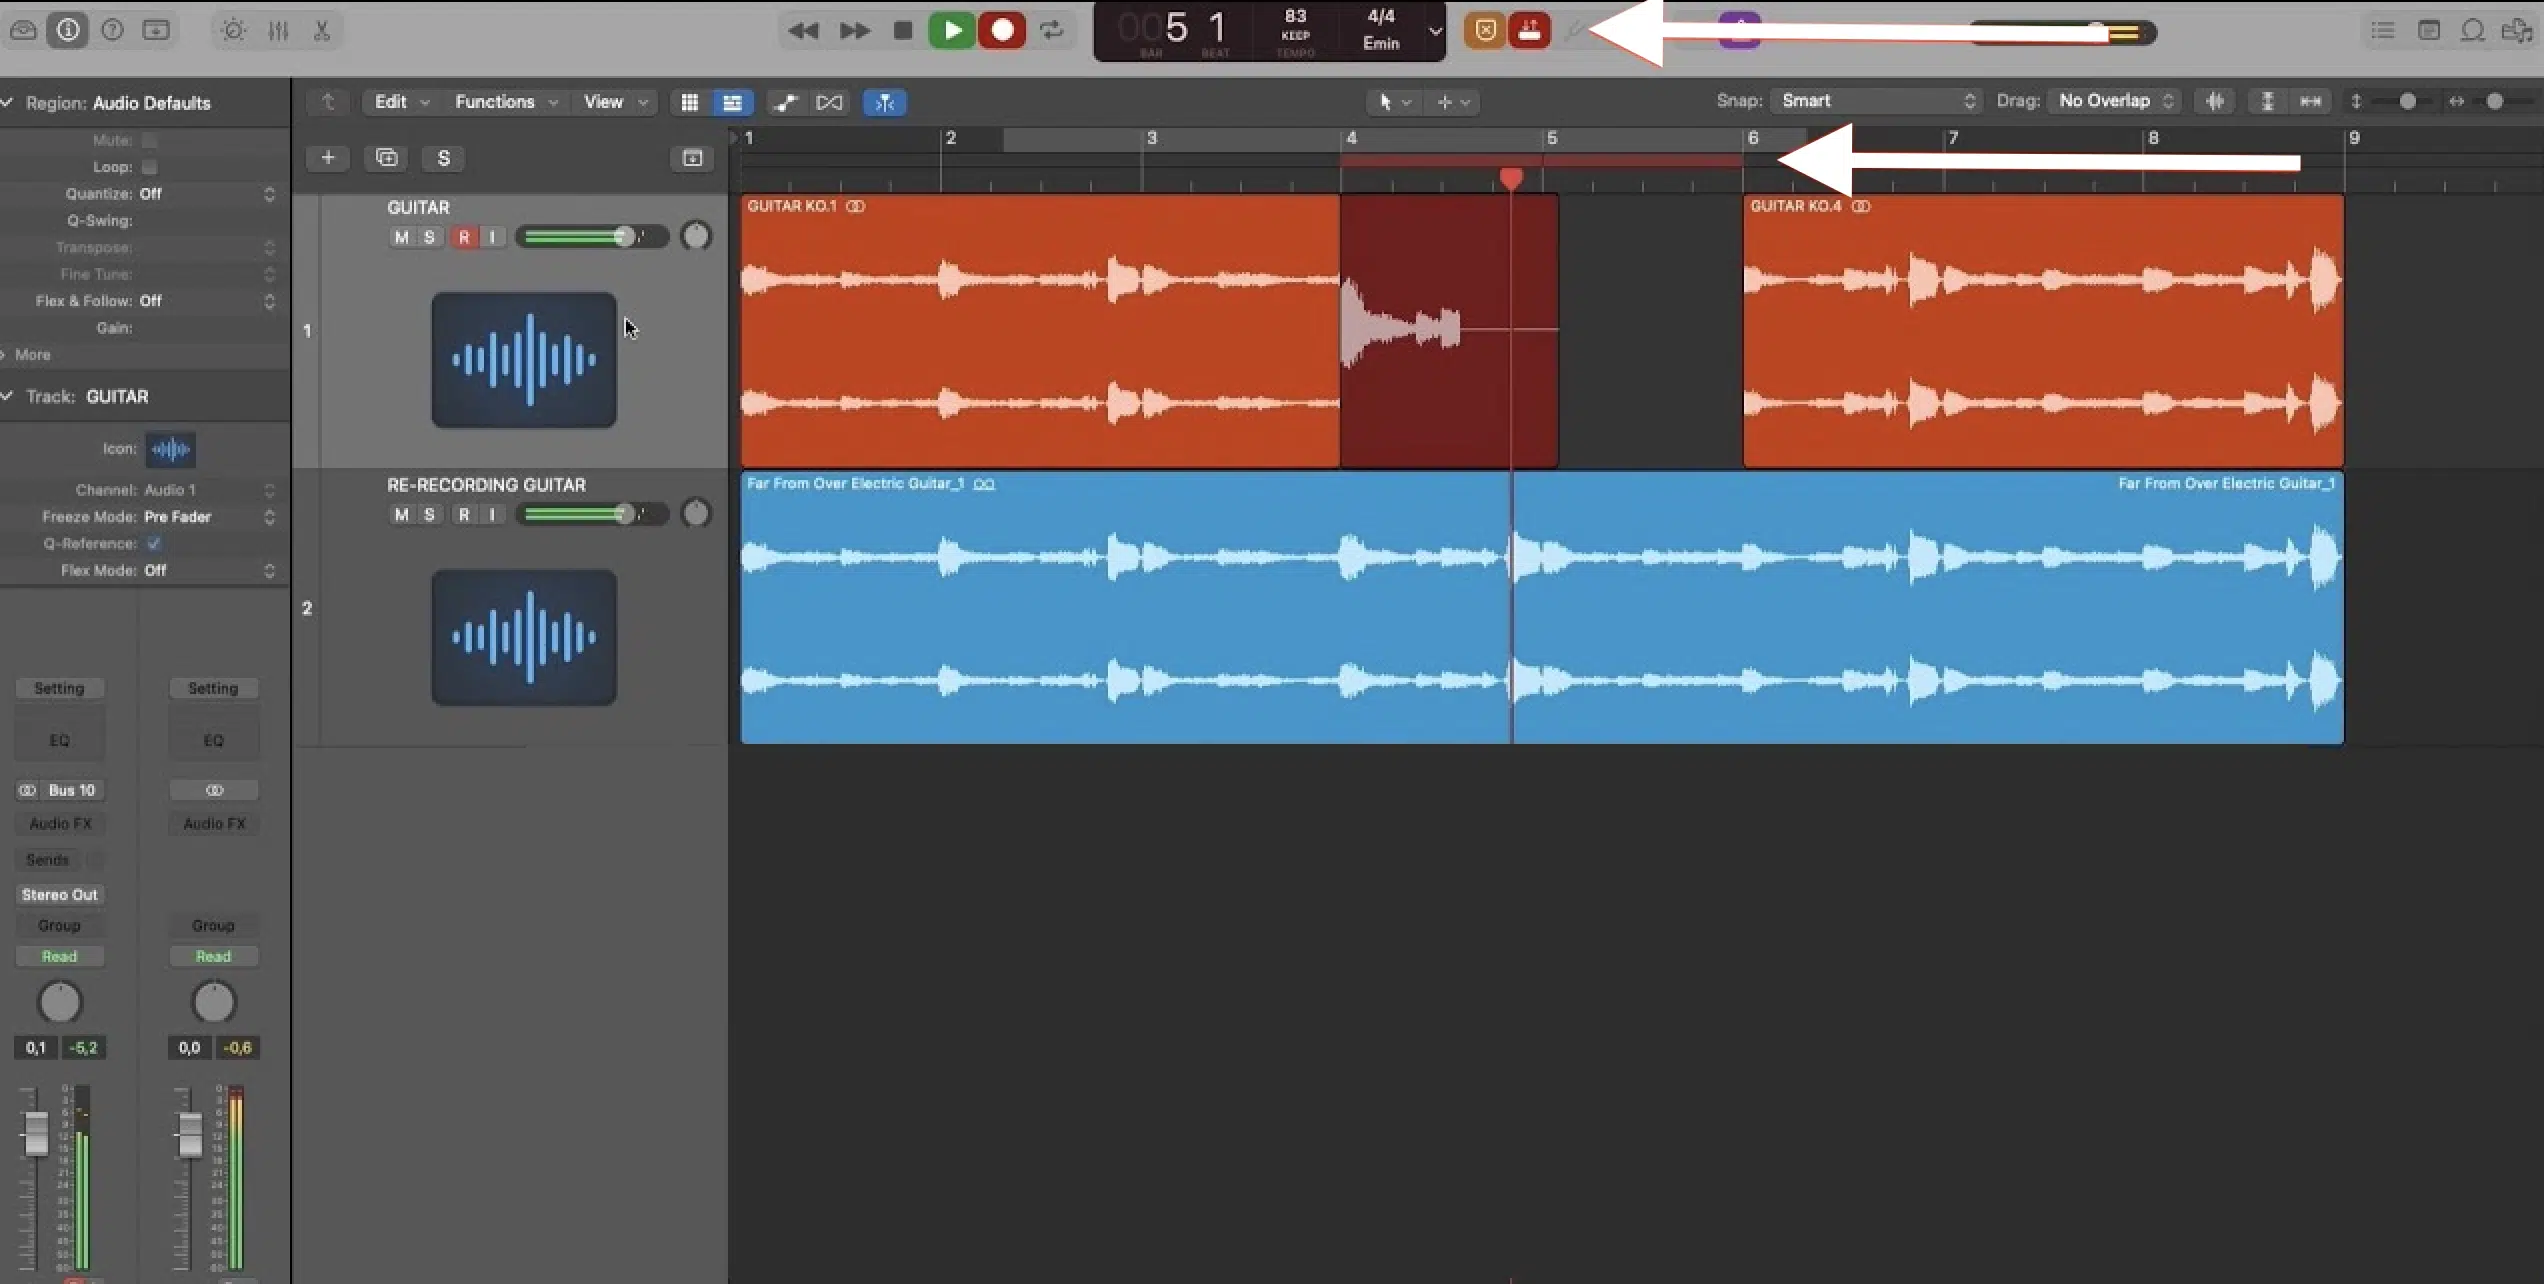
Make sure to take advantage of these epic features, as they can greatly improve your workflow.
Input Monitoring & Multiple Track Recording
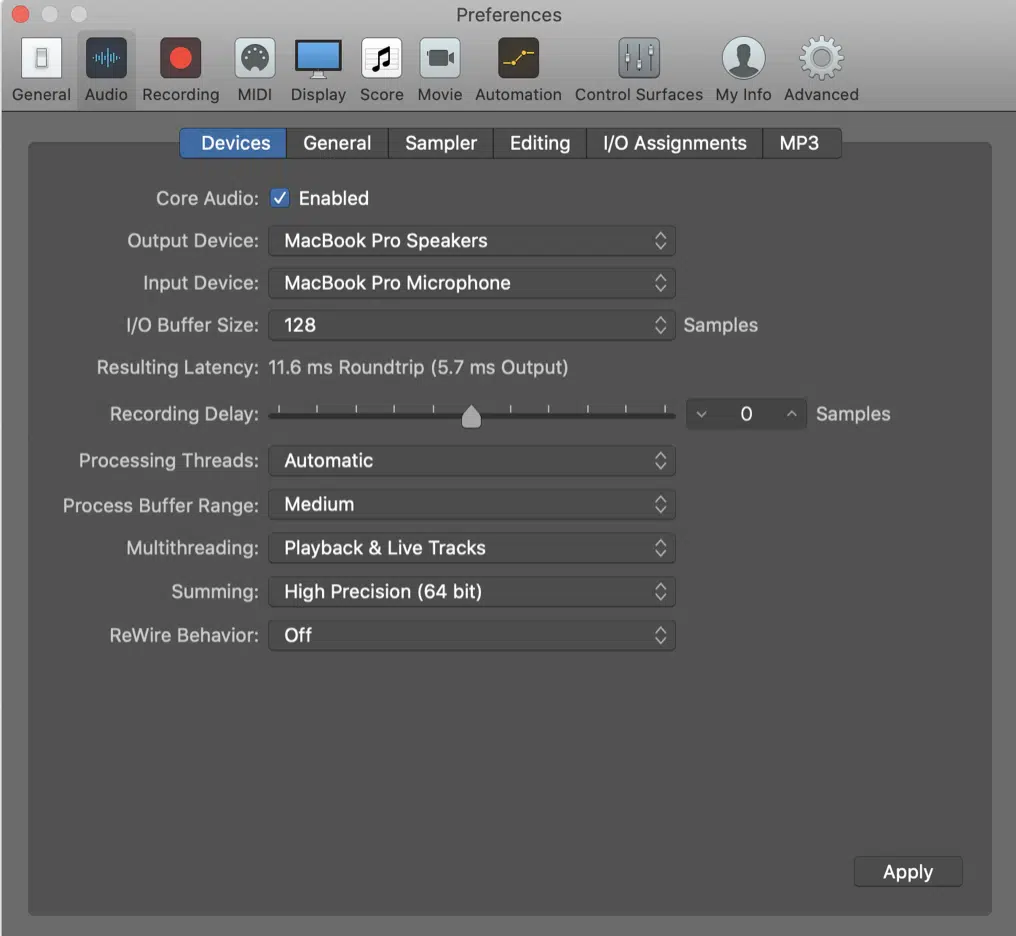
Input monitoring allows you to hear the audio input in real time as you play your instrument 一 providing immediate feedback on your performance.
In Logic Pro X, you can enable input monitoring by clicking the ‘I’ button on each track’s control bar.
For recording more complex arrangements, Logic Pro X supports multiple track recording.
This allows you to record multiple audio sources simultaneously, each on a separate track.
For example, you can record a drum kit with multiple microphones or a band with several instruments.
To set up multiple track recording:
- Create the number of audio tracks you need
- Set the correct inputs for each track
- Prepare them for recording by clicking the ‘R’ button on each track’s control bar
While multiple track recording can be a powerful tool, it’s essential to ensure your computer can handle the increased processing load.
NOTE: It’s often a good idea to increase your audio buffer size in Logic Pro X’s ‘Audio Preferences’ when recording multiple tracks to prevent any potential issues.
With these techniques at your disposal, you’re well-equipped to capture high-quality recordings in Logic Pro X.
Remember, the quality of your recording can significantly impact the final product, so it’s worth spending the extra time to get it right.
Editing Audio for Pristine Sound Quality
Once you’ve recorded your audio and MIDI performances, the next step in your Logic Pro X journey is editing.
This involves working with audio and MIDI regions, which are the building blocks of your tracks, so let’s break it down.
-
Working with Audio Regions & MIDI Regions
In Logic Pro X, any recorded audio or MIDI data is encapsulated in ‘regions.’
These regions can easily be moved, copied, looped, split, and even joined in the Tracks area using simple click & drag operations.
1. Audio Regions 一 Represent the actual waveform of your recorded audio and can be edited in numerous ways.
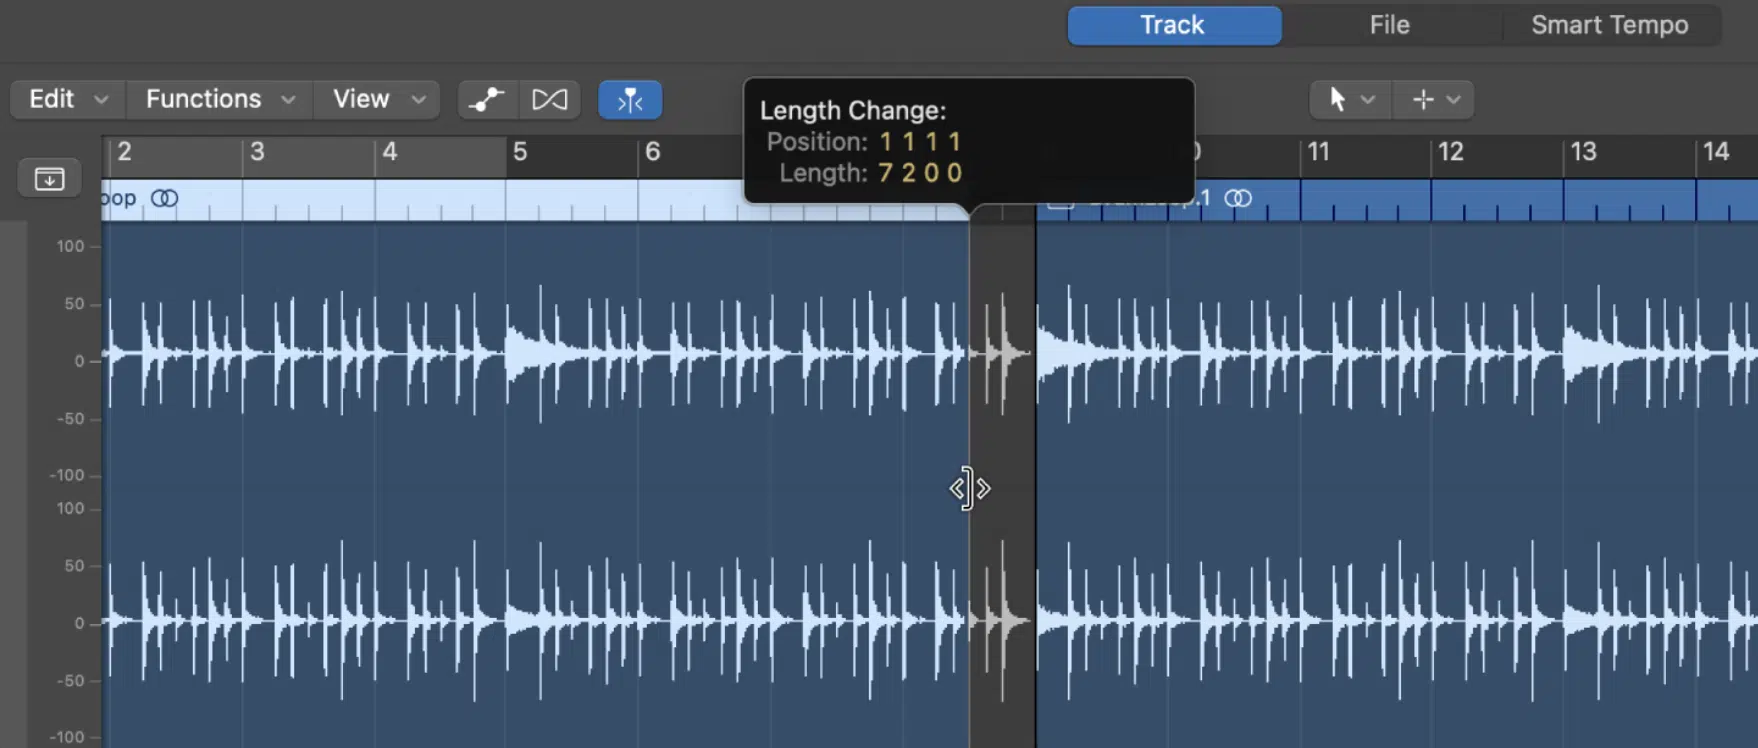
For instance, you can trim the start and end points of an audio region to remove unwanted noise, or split a region to isolate a particular part of your recording.
2. MIDI Regions 一 Contain MIDI data, which can be visualized and edited in the Piano Roll Editor.
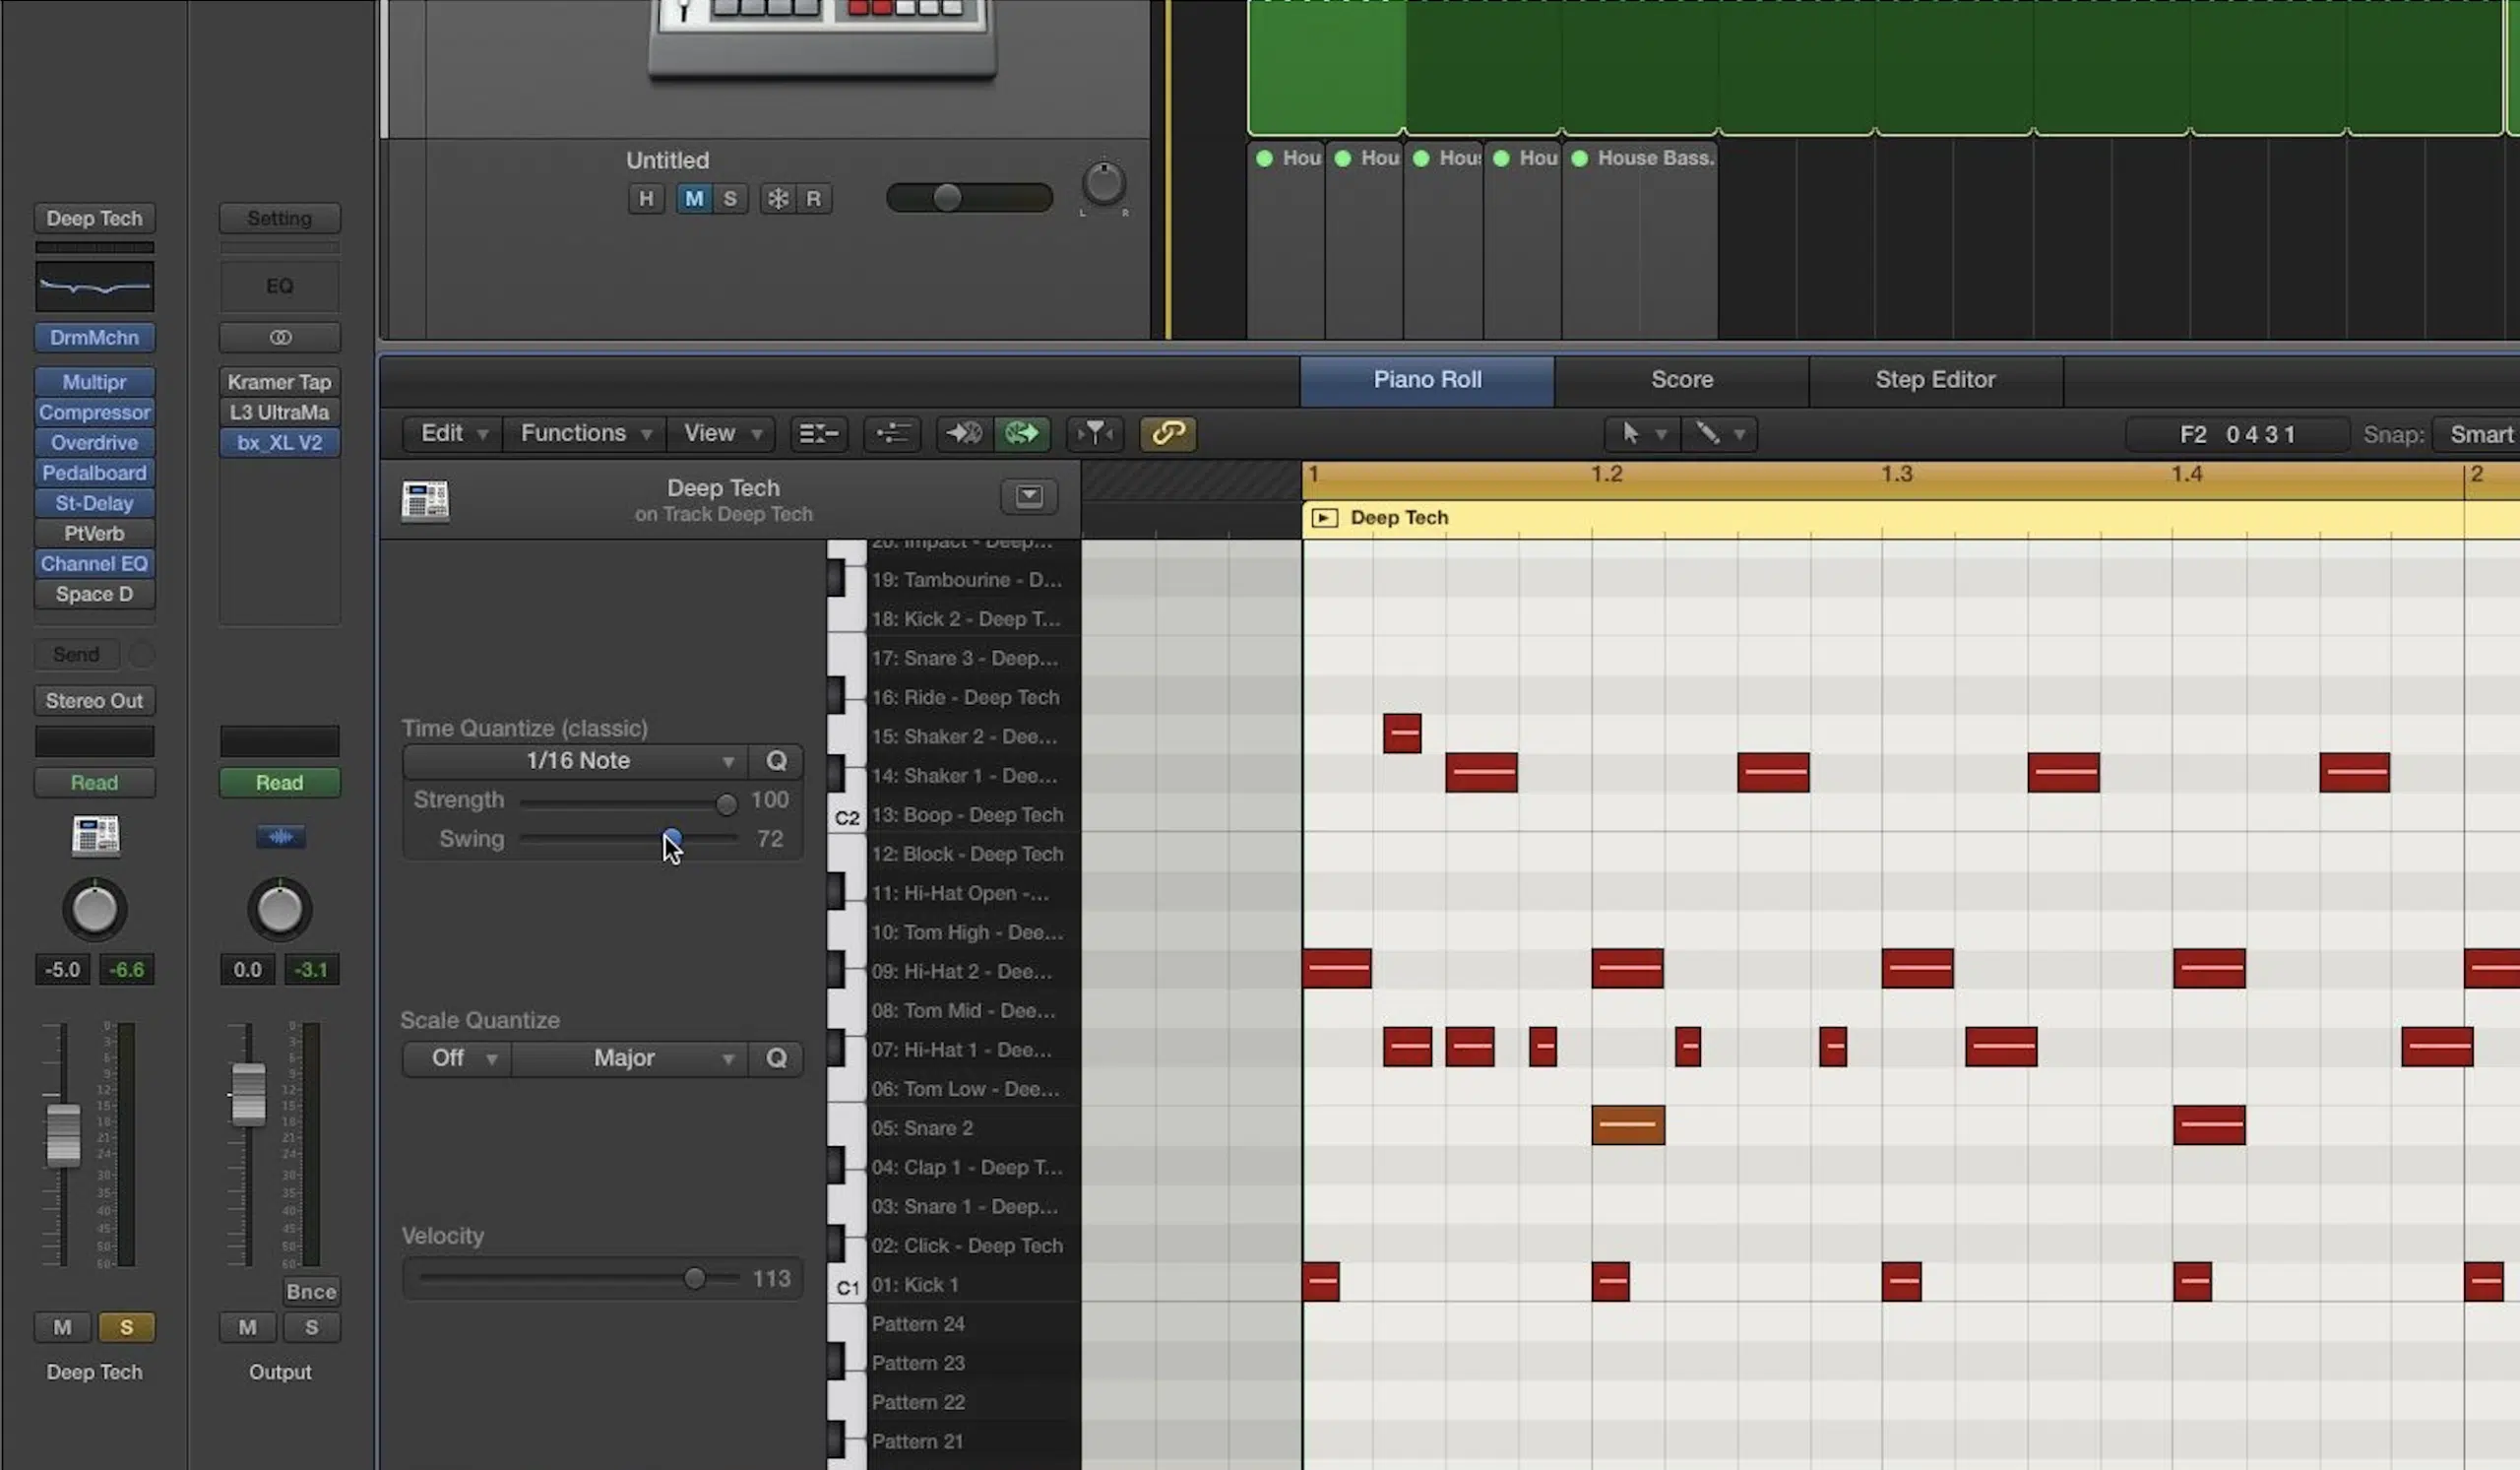
Here, you can alter the pitch, timing, and velocity of individual MIDI notes; giving you immense control over your MIDI performance.
Whether you’re working with Audio or MIDI regions, it’s crucial to remember that ANY edits you make are non-destructive.
This means that your original recordings are never permanently altered, and you can always undo your edits if needed.
-
The Power of Audio Files & Audio Editing
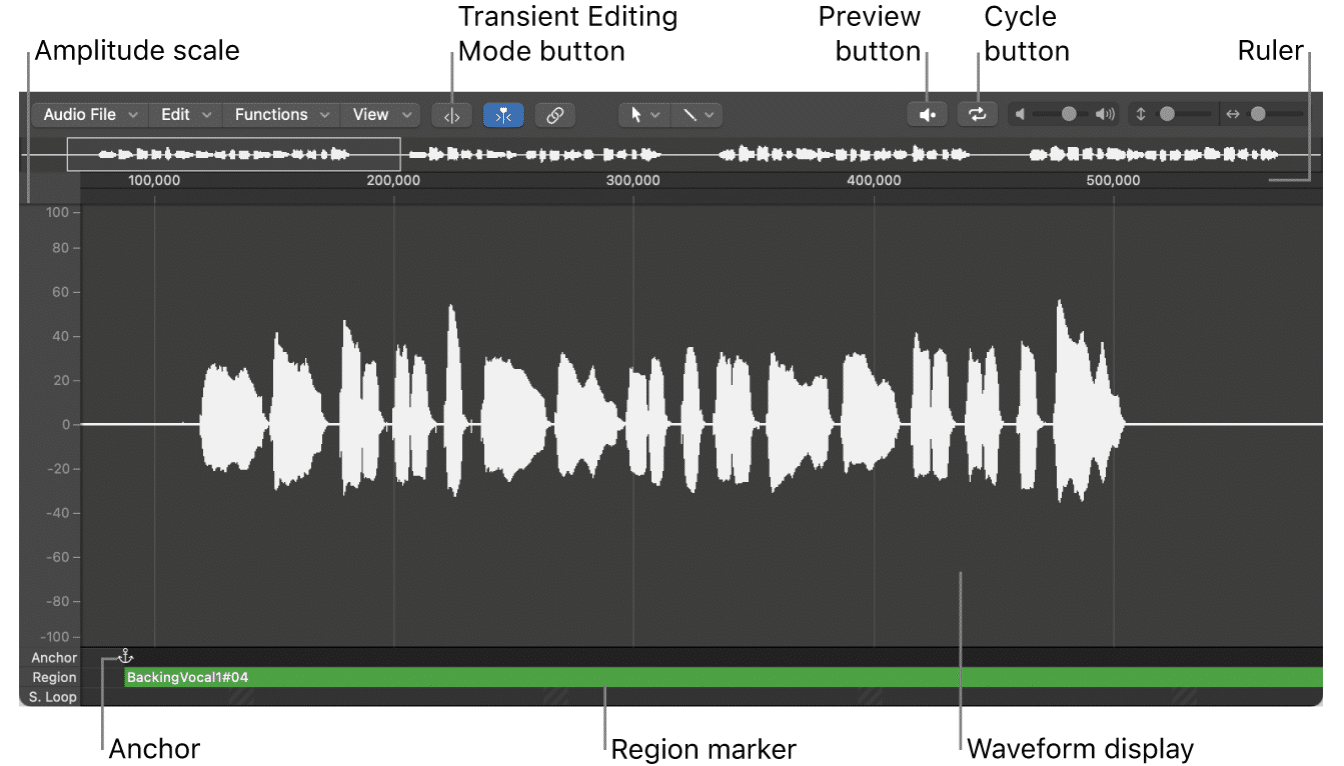
Audio Files in Logic Pro X refer to the actual audio recordings stored on your hard drive.
Every time you record audio, a new audio file is created 一 which can be accessed and managed in the Project Audio Browser.
While most of your editing will likely be done at the region level, Logic Pro X provides powerful tools for editing the actual audio files.
These tools, available in the Audio File Editor, allow you to perform sample-accurate edits, such as removing clicks or pops, and even repairing clipped audio using the Repair Tool.
One standout feature of Logic Pro X’s audio editing toolkit is Flex Time.
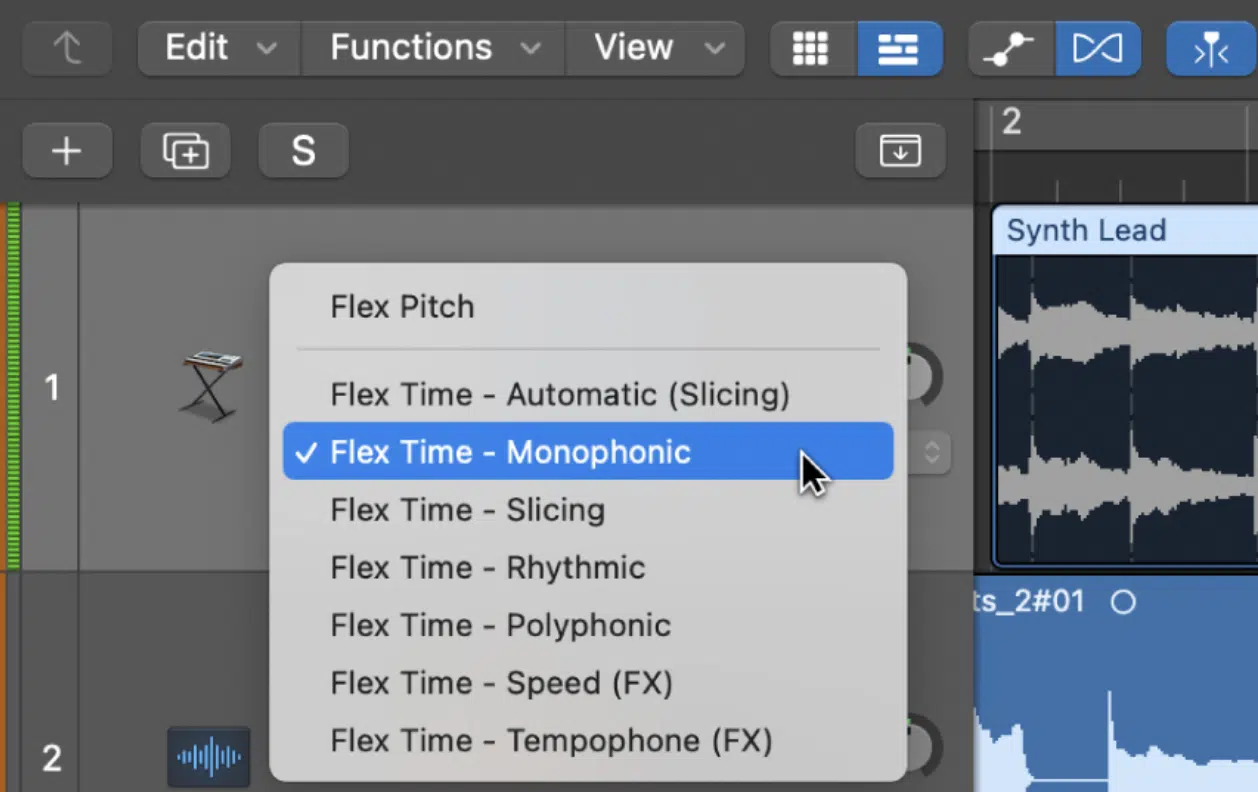
This lets you manipulate the timing of your audio without affecting its pitch.
It’s perfect for fixing timing issues in your recordings or for creative time-stretching effects.
NOTE: Changes made in the Audio File Editor are destructive, meaning they permanently alter the original audio file.
It’s a good practice to make a backup of your original audio files before performing any destructive edits.
-
The Art of Editing MIDI Notes
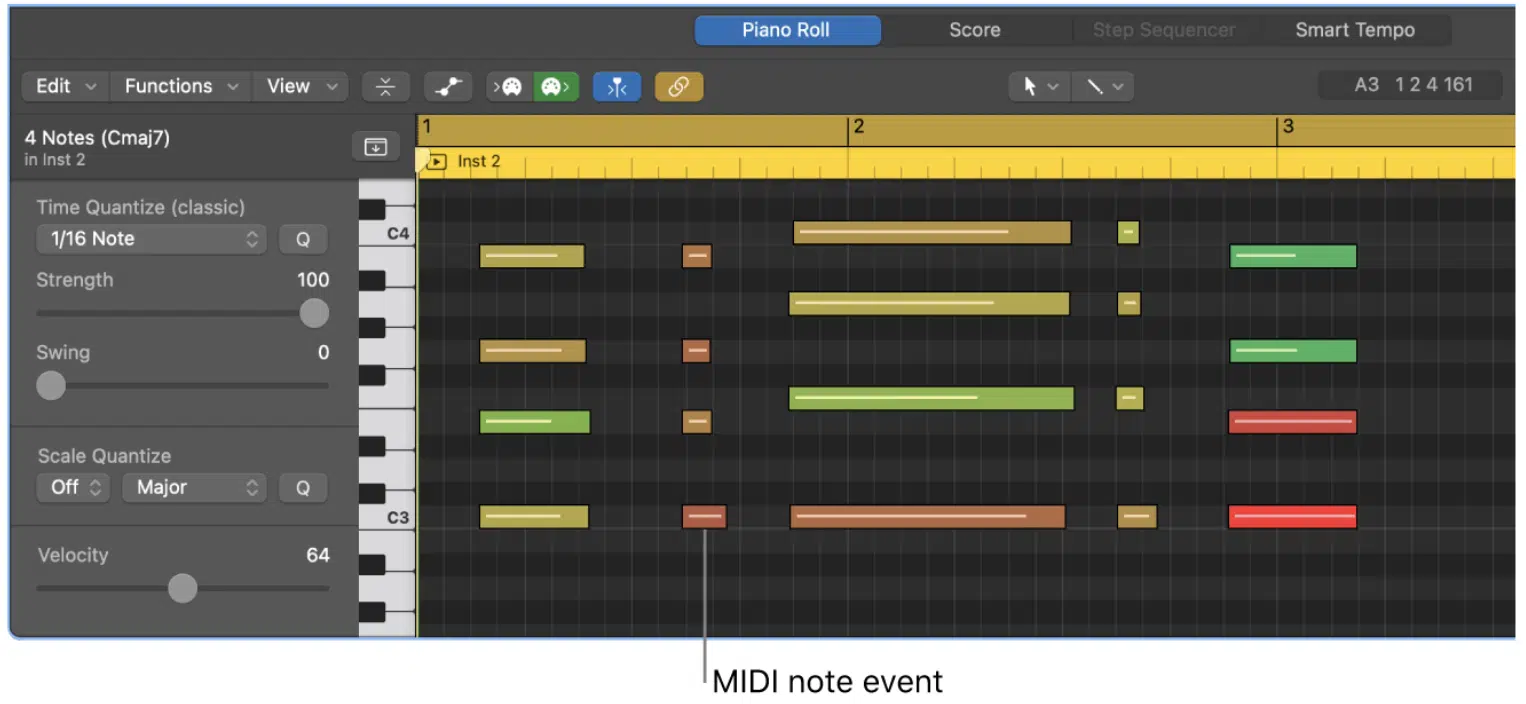
MIDI editing in Logic Pro X is a versatile and creative process.
Using the Piano Roll Editor, you can precisely adjust the pitch, timing, and velocity of individual MIDI notes.
This level of control is part of what makes working with MIDI so powerful.
For instance, if a particular note in your MIDI performance is off-beat, you can simply click and drag it to the correct position.
Similarly, you can adjust the velocity of a note by changing the color of the note bar 一 allowing you to control the dynamics of your performance.
The Piano Roll Editor also allows you to add and remove notes, which is perfect for when you want to change a melody or chord progression.
Plus, with the Brush Tool, you can ‘paint’ notes onto the Piano Roll, making it a breeze to create complex drum patterns or rapid arpeggios.
Another powerful feature of the Piano Roll Editor is the ability to quantize your MIDI notes.
Quantization automatically aligns your notes to the grid, ensuring that they’re ‘in time’ with your project’s tempo.
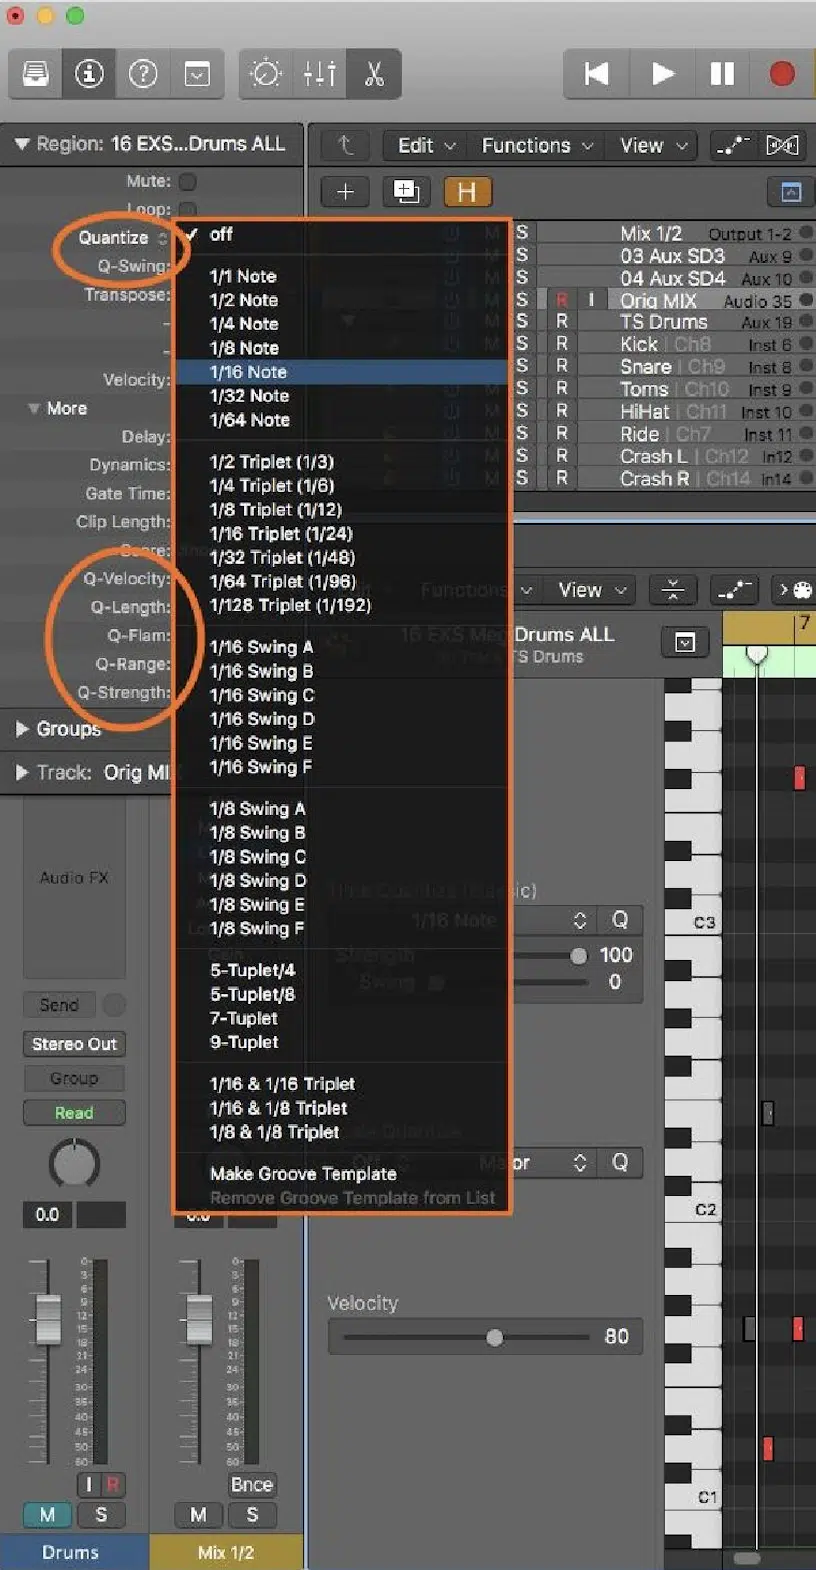
This is great for tidying up performances and adding a sense of rhythmic precision to your tracks.
With a solid understanding of MIDI editing, you’ll be well-equipped to sculpt your performances and bring your music to life in Logic Pro X.
Enhancing Your Tracks with Logic Pro Tools
Now, let’s dive into some unique features of Logic Pro X that can add some serious flavor to your productions.
-
Apple Loops & Drum Kits
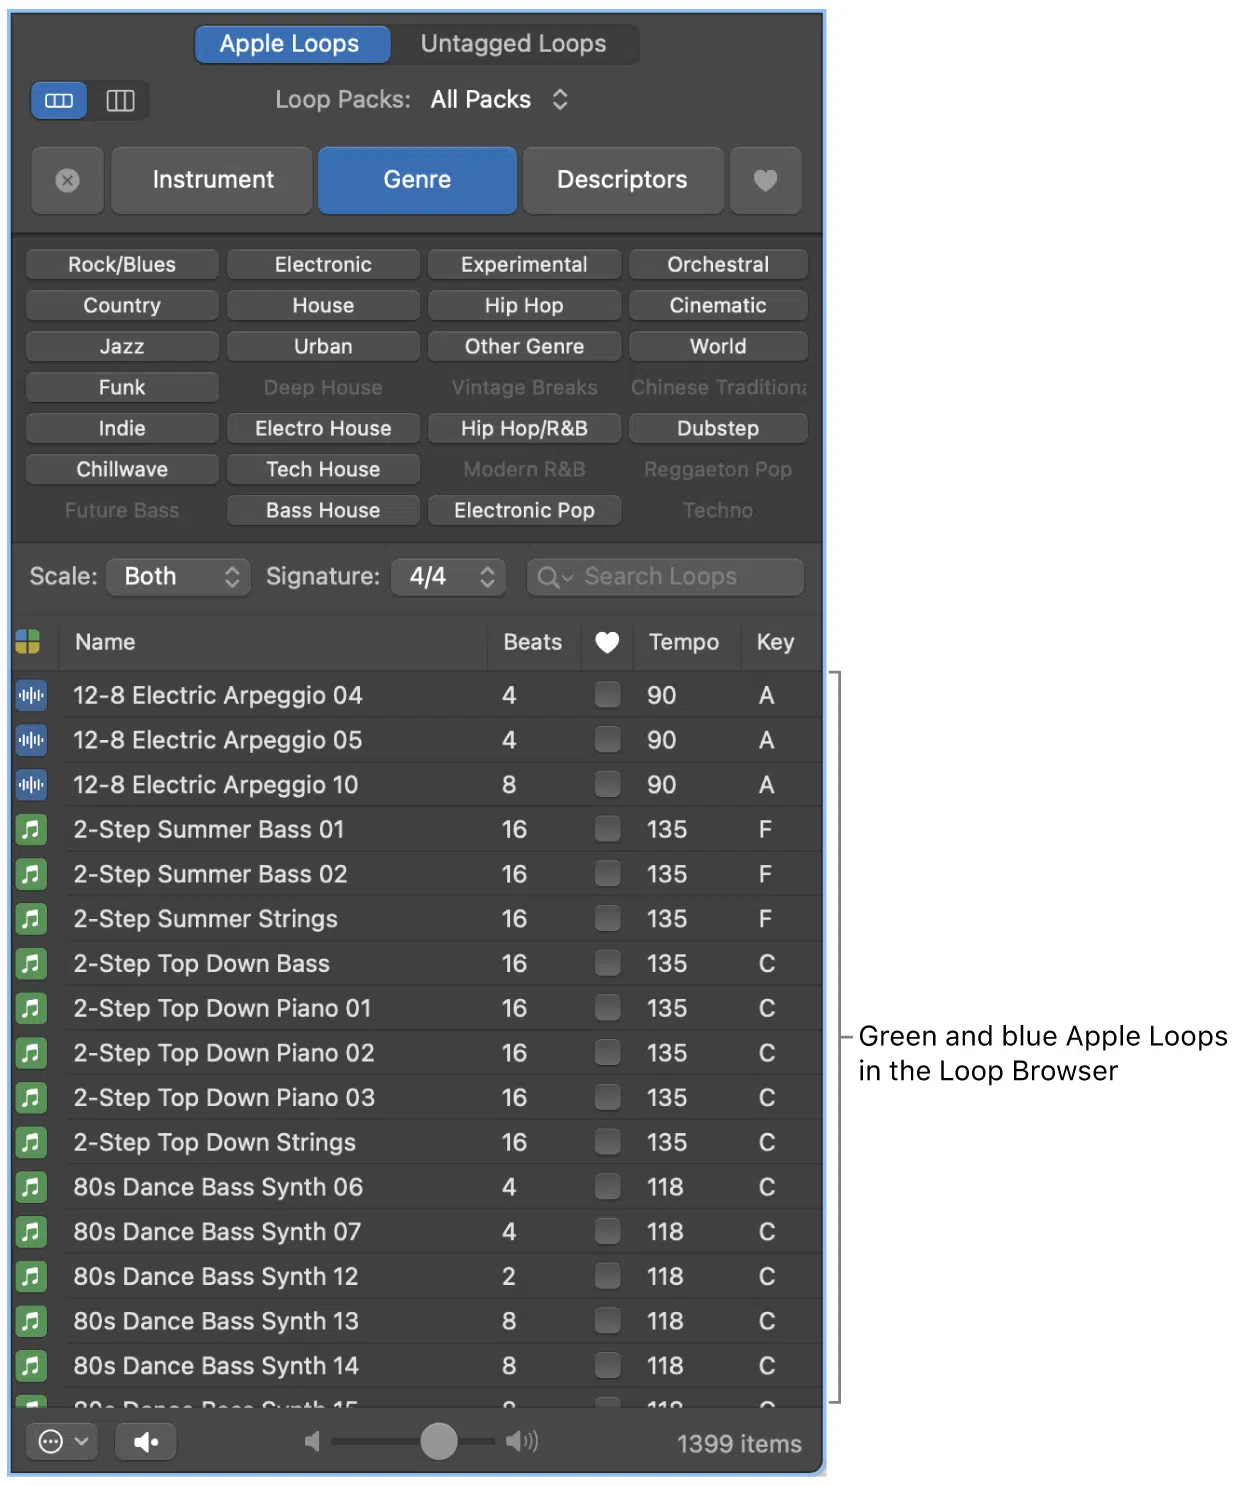
Apple loops are pre-recorded snippets of audio or MIDI are a goldmine of musical ideas, and can be seamlessly integrated into your projects.
They come in a variety of styles and instruments 一 from drum loops and guitar riffs to synth lines and sound effects.
The beauty of these loops is that they automatically match the tempo and key of your project.
This ensures that they always sound in-sync with your track.
To add an Apple Loop to your project, simply:
- Open the Loop Browser
- Find a loop you like
- Drag it onto the Tracks area
It’s an effortless way to kickstart a new track or add a little extra something to your existing compositions.
Next up are Drum Kits.
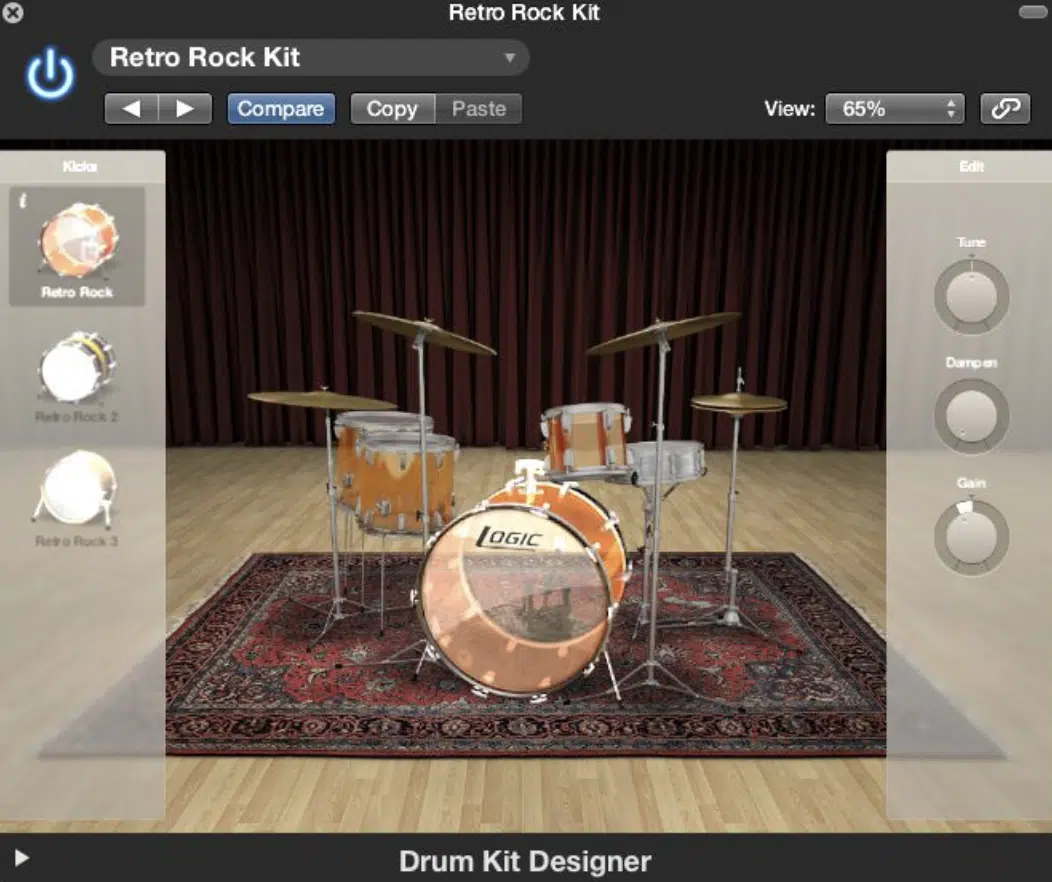
Logic Pro X comes packed with a vast array of virtual drum kits 一 all meticulously sampled and programmed for maximum authenticity.
Whether you’re after the thud of a vintage kick drum or the crisp snap of a modern snare, you’re sure to find the perfect kit in Logic’s library.
Go explore its vast options and see which gems you can find for your projects.
-
Using Track Stacks
Track Stacks in Logic Pro X allow you to combine multiple tracks into one. There are 2 types of Track Stacks:
1. Folder Stacks 一 Great for organization purposes.
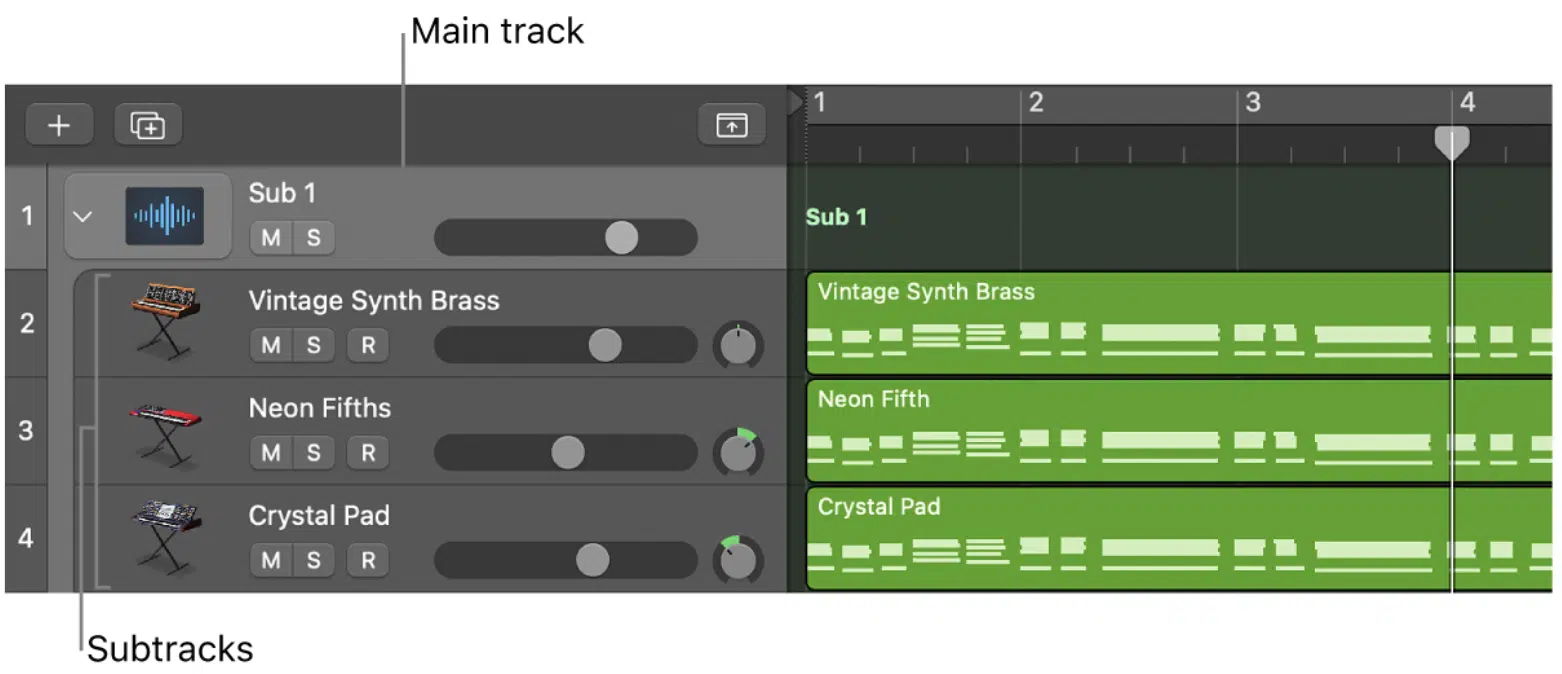
2. Summing Stacks 一 Great for grouping & processing similar tracks together.

These are super beneficial for streamlining your workflow and opening up new creative possibilities.
Plus, Auxiliary tracks can be used to route audio from one or more tracks to a common output.
This is incredibly useful when you want to apply the same effects to multiple tracks, such as reverb or delay.
By utilizing Track Stacks and Auxiliary Tracks, you can efficiently manage complex projects and achieve a more cohesive mix in Logic Pro X.
-
The Beauty of Plug-Ins
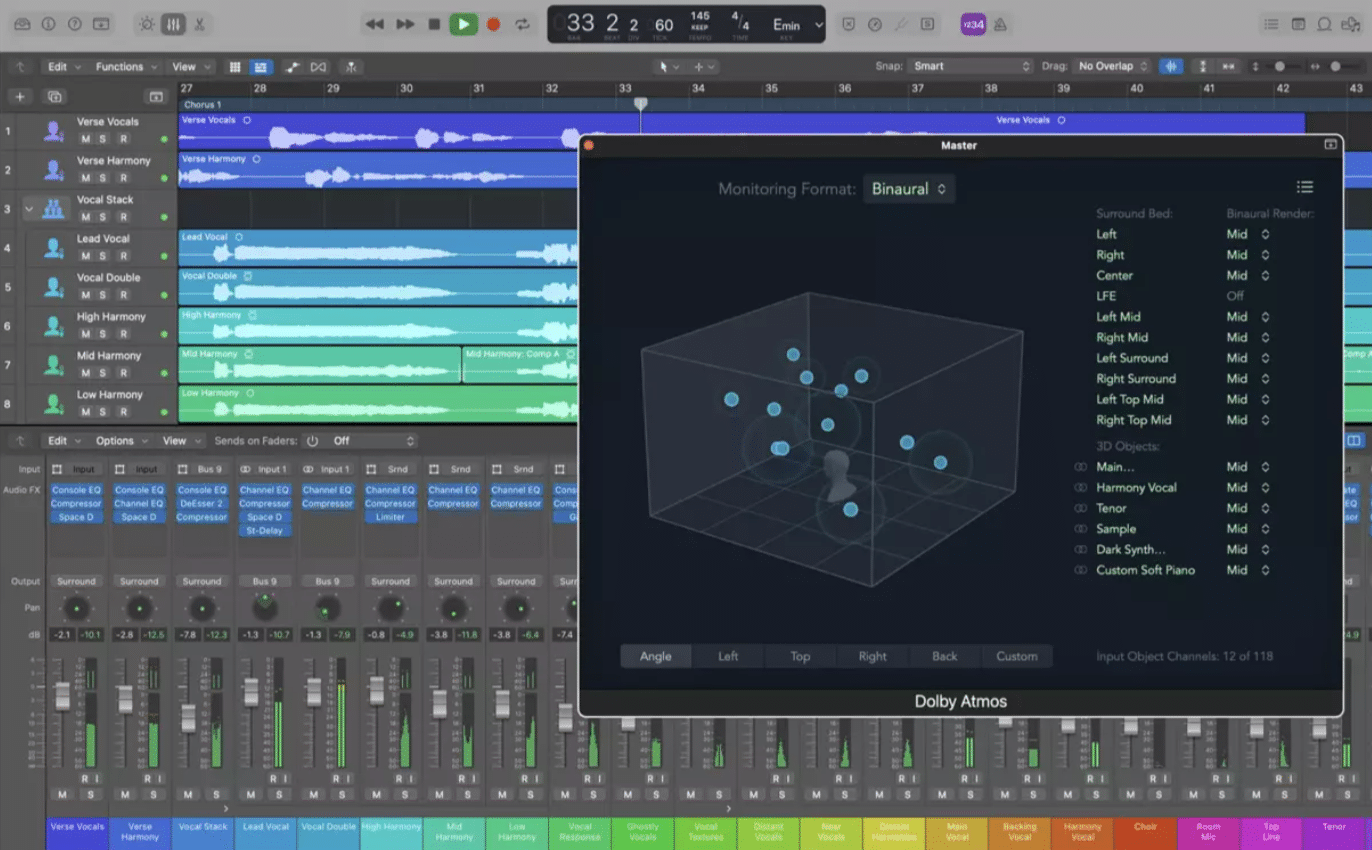
One of the most powerful tools in any DAW is the plug-in, and Logic Pro X is no exception.
With a diverse range of plug-ins 一 from vintage EQs and compressors to cutting-edge synths and samplers 一 Logic Pro X provides everything you need to sculpt your sound.
As you navigate through Logic’s plug-in library, you’ll find tools to fulfill every part of the music production process.
Need to add some warmth to a sterile recording?… Try Logic’s Tape Delay.
Looking for a lush reverb to create a sense of space?… The Space Designer Reverb has you covered.
And let’s not forget Logic’s impressive array of software instruments.
Whether you’re crafting a soaring lead with the Retro Synth or programming complex drum patterns with the Drum Machine Designer, Logic’s software instruments offer unparalleled depth/flexibility.
Lastly, it’s important to remember that Logic’s plug-ins and instruments can be controlled and automated using Smart Controls and the Automation function.
These features give you the power to bring unmatched movement and life to your tracks.
But the true beauty of plug-ins lies not just in their individual capabilities, but in how they can be combined and routed in endless ways.
By chaining plug-ins together and exploring different signal paths, you can stumble upon entirely new sounds and textures.
The possibilities are only limited by your imagination.
So, go ahead, experiment with different plug-ins, tweak their settings, and create sounds that are uniquely yours.
The Piano Roll Editor
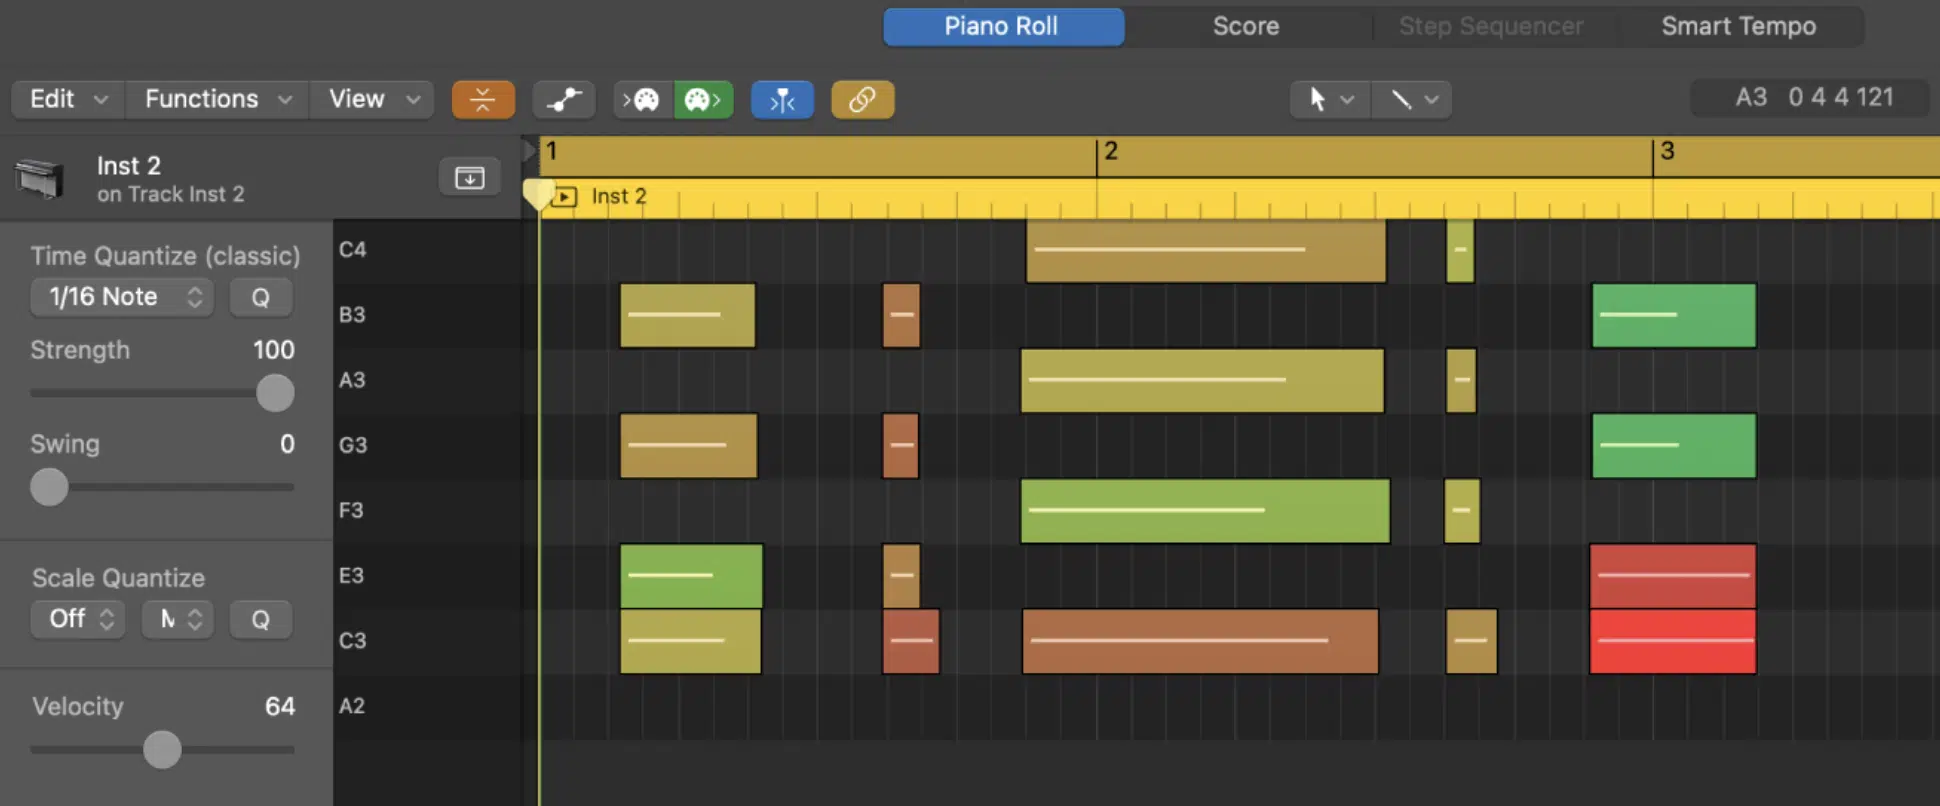
The Piano Roll Editor in Logic Pro X, as we touched upon earlier, is where you can view and edit MIDI notes and controller data.
It provides a visual representation of your music:
- Time 一 Represented horizontally
- Pitch 一 Represented vertically
You can select multiple MIDI notes and move, resize, or delete them as you please.
You can also draw in new notes using the Pencil tool, and adjust their velocity (i.e., volume) using the Velocity tool.
The Piano Roll Editor also includes a number of advanced editing features.
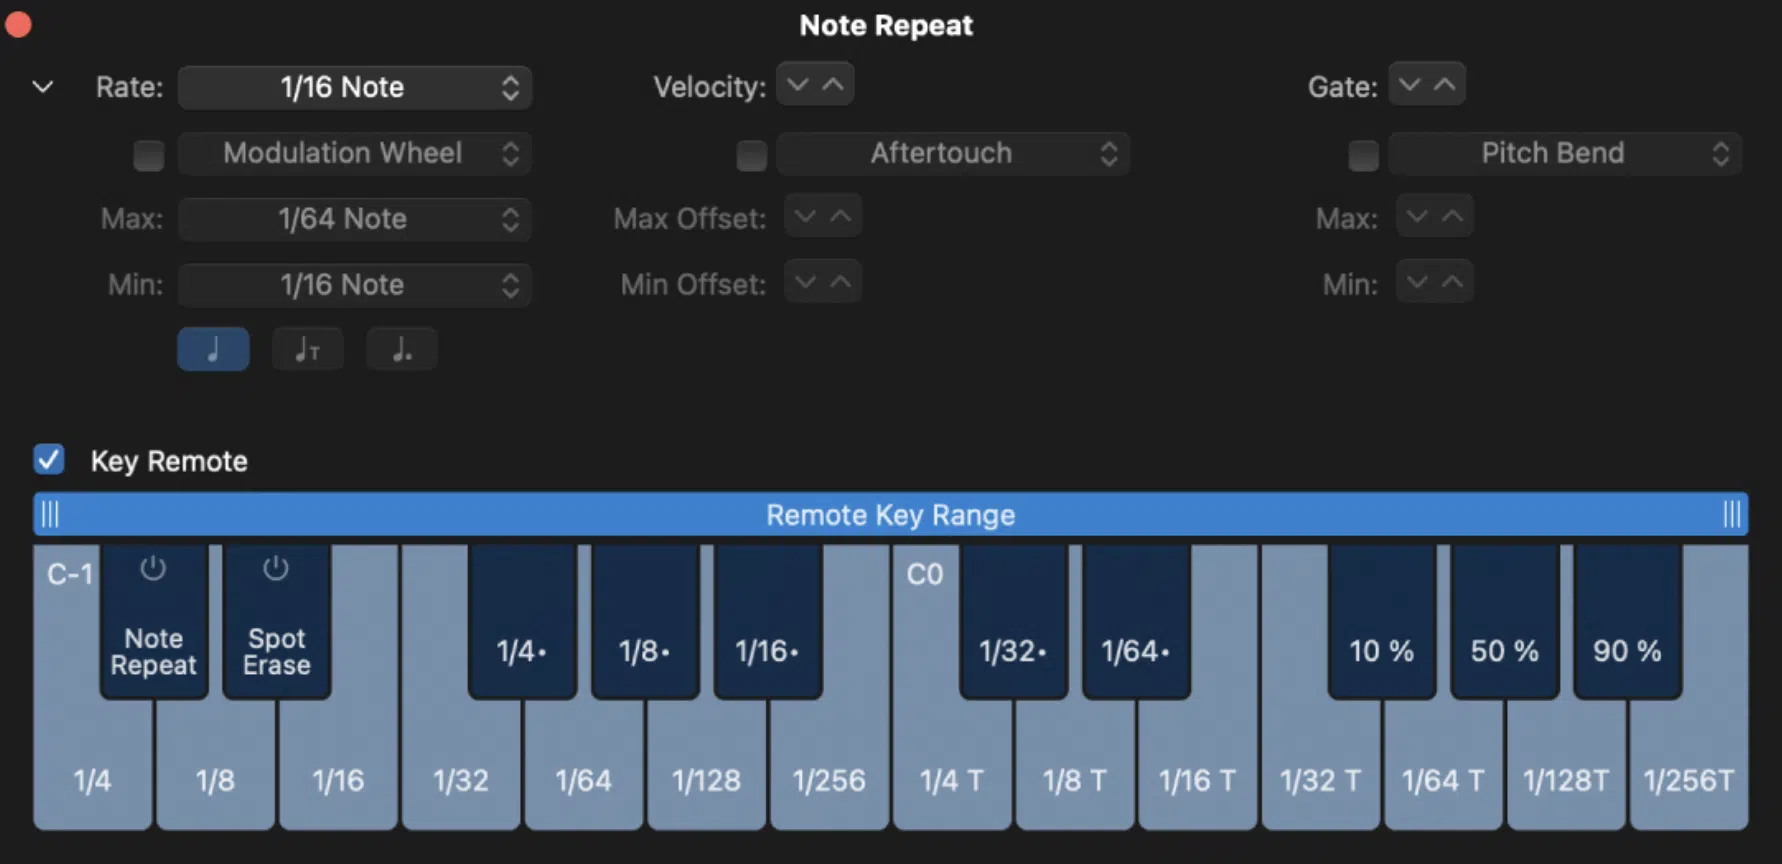
For instance, the ‘Note Repeat’ tool allows you to quickly create repeating patterns.
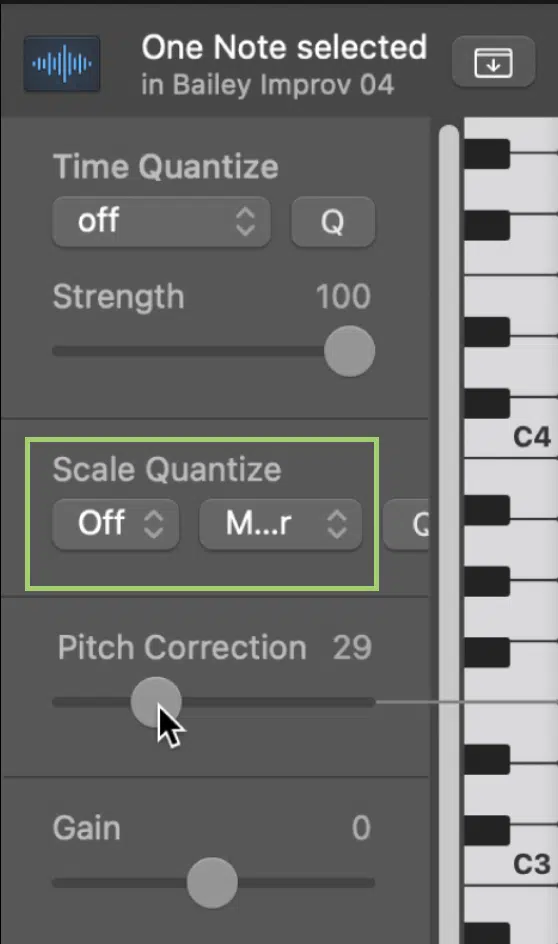
The ‘Scale Quantize’ function can automatically correct your notes to a specific musical scale.
As a music producer or artist, learning to navigate and utilize the Piano Roll Editor efficiently can massively speed up your workflow.
As well as allow you to translate your musical ideas into reality more easily.
Remember to experiment and explore all the tools within the Piano Roll Editor as these can significantly enhance your MIDI note manipulation capabilities in Logic Pro X.
Exploring the Step Editor
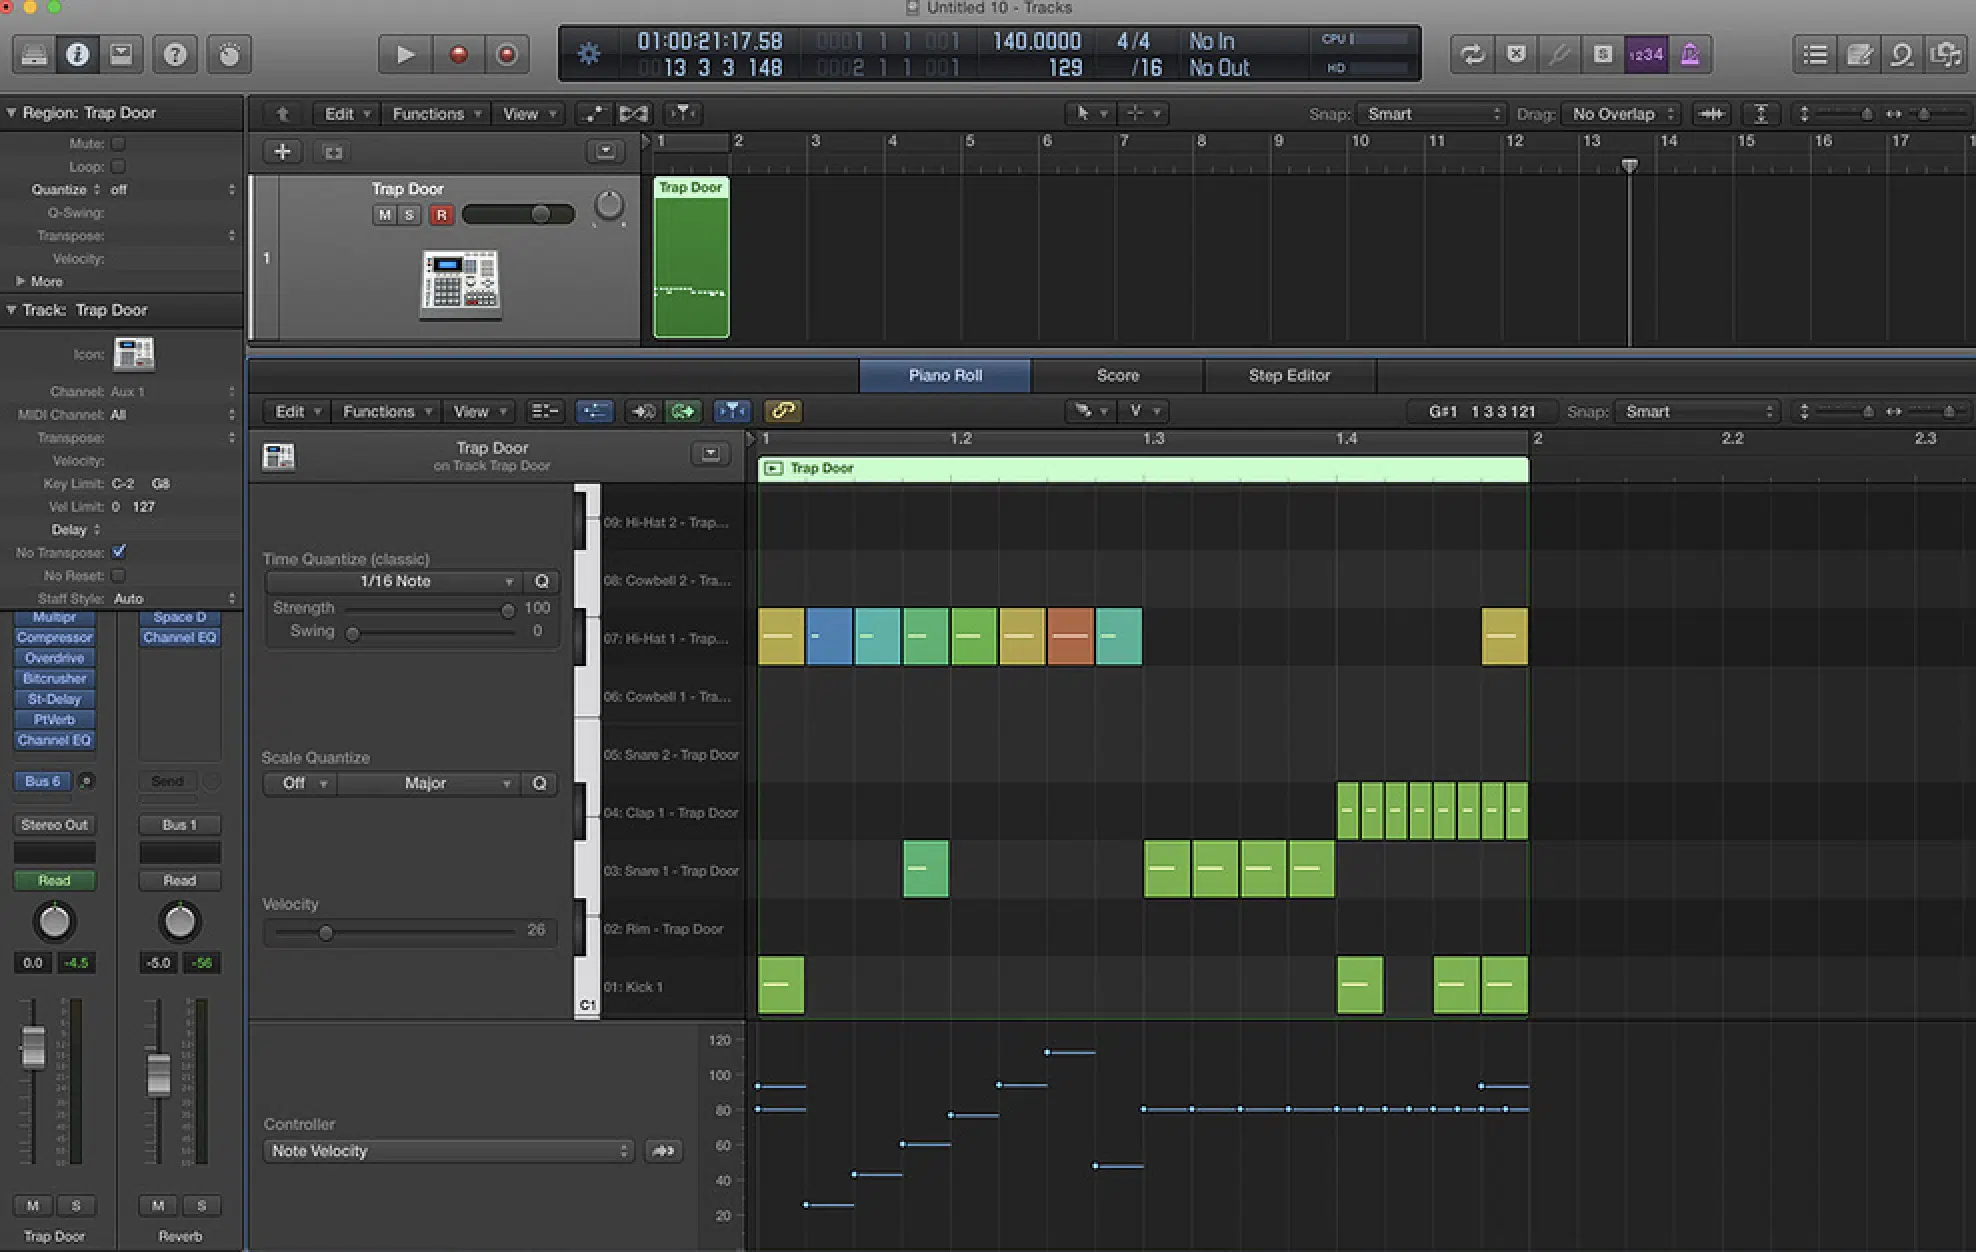
The Step Editor in Logic Pro X offers a different way to view and edit MIDI data.
It presents your MIDI regions as a series of vertical lines 一 with each line representing a MIDI event (such as a note or a controller message).
The Step Editor is especially useful when working with rhythmic or repetitive patterns, as it allows you to precisely control the timing and dynamics of each event.
To start using the Step Editor:
- Double-click a MIDI region in the Tracks area
- Choose Step Editor from the pop-up menu
- From there, you can add, delete, and modify events as needed
As with the Piano Roll Editor, mastering the Step Editor can greatly enhance your efficiency and creative potential in Logic Pro X.
Remember to use MIDI keyboards and MIDI controllers, they can give you even more control and precision.
BONUS: Basic Key Commands
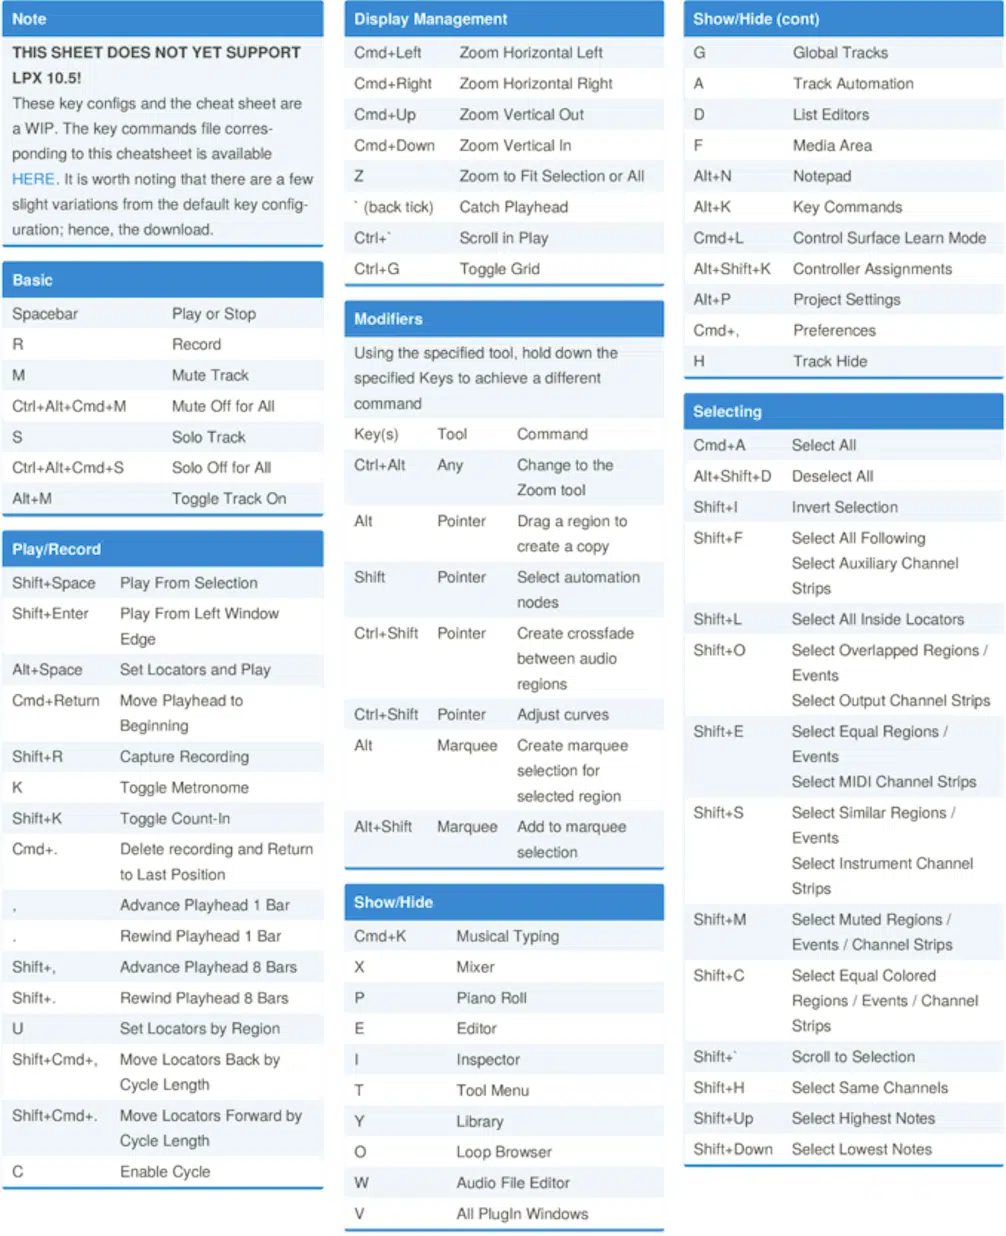
As any seasoned Logic Pro X user will tell you, mastering key commands is a surefire way to speed up your workflow.
These shortcuts allow you to quickly perform common tasks without having to navigate through menus or click on buttons.
Here are some of the most useful key commands for music production in Logic Pro X:
- “R” for Record
- “C” for Cycle
- “Spacebar” for Play/Stop
- “Command + S” for Save
- “T” to open the Tool menu
- “I” to open the Inspector
- “P” to open the Piano Roll Editor
Learning these commands will allow you to switch between tools and windows with ease, enabling a more seamless creative process.
Moreover, Logic Pro X allows you to customize key commands according to your comfort.
Simply navigate to the Key Commands window through Logic Pro X > Key Commands > Edit.
Here, you can assign any command to any key, helping you to create a workflow that best suits you.
Beyond the actual music production process, key commands can also significantly streamline the editing process.
Basic commands such as “Command + Z” for Undo, “Command + X” for Cut, “Command + C” for Copy, and “Command + V” for Paste are just the start.
Logic Pro X also offers more advanced key commands for precise editing tasks.
For instance, “Command + T” will Split the selected region at the Playhead 一 while pressing “Control + Option + Command + F” will open the Fade tool for fading in and out audio.
Once you become comfortable with these commands, editing becomes quicker and more intuitive; allowing you to focus more on the creative aspects of your audio project.
Navigating your project efficiently is crucial to a smooth music production process.
Key commands such as “Return” to move the Playhead to the beginning and “Option + Command + Left/Right Arrow” to select the next or previous track can drastically reduce your navigation time.
Commands like “Spacebar” for Play/Stop, “L” for Loop Playback, and “Command + Left/Right Arrow” to fast-forward or rewind can make your workflow more efficient and seamless.
Also, use “.” (period) and “,” (comma) to nudge the Playhead forward and backward by one division, respectively.
This is particularly handy for precise editing and quick auditioning of changes.
For navigating within the mixer, use “Command + 2” to open the Mixer and “Control + Left/Right Arrow” to move to the next or previous channel strip.
All these key commands will have a dramatic effect on your speed and efficiency in Logic Pro X, and let you to focus more energy on crafting your music.
How to Use Logic Pro X: Final Thoughts
There you have it, the wonderful world of how to use Logic Pro X.
We’ve dived into the depths of this powerhouse software and covered all the features that make it a favorite amongst professionals and amateurs alike.
However, you can’t stop at simply understanding how to use Logic Pro X, you’ve got to push your creative boundaries and put your newfound knowledge to good use!
And that’s where these professionally quality, epic free templates come into play.
This collection is a treasure trove of professionally-crafted templates tailored specifically for Logic Pro X.
They mirror the structures of hit tracks that have made a huge impact on the music scene.
It’s like having the blueprint of your favorite tracks at your fingertips.
You can reverse engineer these templates, which will provide you with a detailed peek into the meticulous crafting that goes into creating a hit track.
It’s an amazing tool to outline your own potential hits, giving you a solid foundation upon which to build and create your masterpiece.
This way, you can dive into your next project with confidence and creativity.
Until next time…


Leave a Reply
You must belogged in to post a comment.