Compression in music production is a delicate art.
When done right, it can bring balance, clarity, and punch to your tracks, taking them from good to great.
However, when handled incorrectly, it can completely destroy your beats and make them sound flat or lifeless.
That’s why understanding compressor ratios and applying them correctly is an essential skill for any music producer.
It’s not just about turning knobs 一 it’s about doing so with knowledge and precision.
In this comprehensive guide, we’re going to demystify the concept of compressor ratios and delve deep into how they can be used effectively in music production.
We’ll be covering:
- What the correct compressor ratio setting is ✓
- The importance of compressor ratios in music production ✓
- A deep dive into understanding compression ratios ✓
- Compression parameters and controls ✓
- Practical tips & tricks in using compressor ratios ✓
- Common mistakes in setting compressor ratios ✓
- Everything in between ✓
By the end of this article, you’ll be equipped with all the knowledge you need to master compression ratios.
You’ll understand how to apply them creatively and technically to improve your music, and, most importantly, avoid the common pitfalls that can ruin your sound.
So, let’s dive in…
Table of Contents
What is a Compressor Ratio?
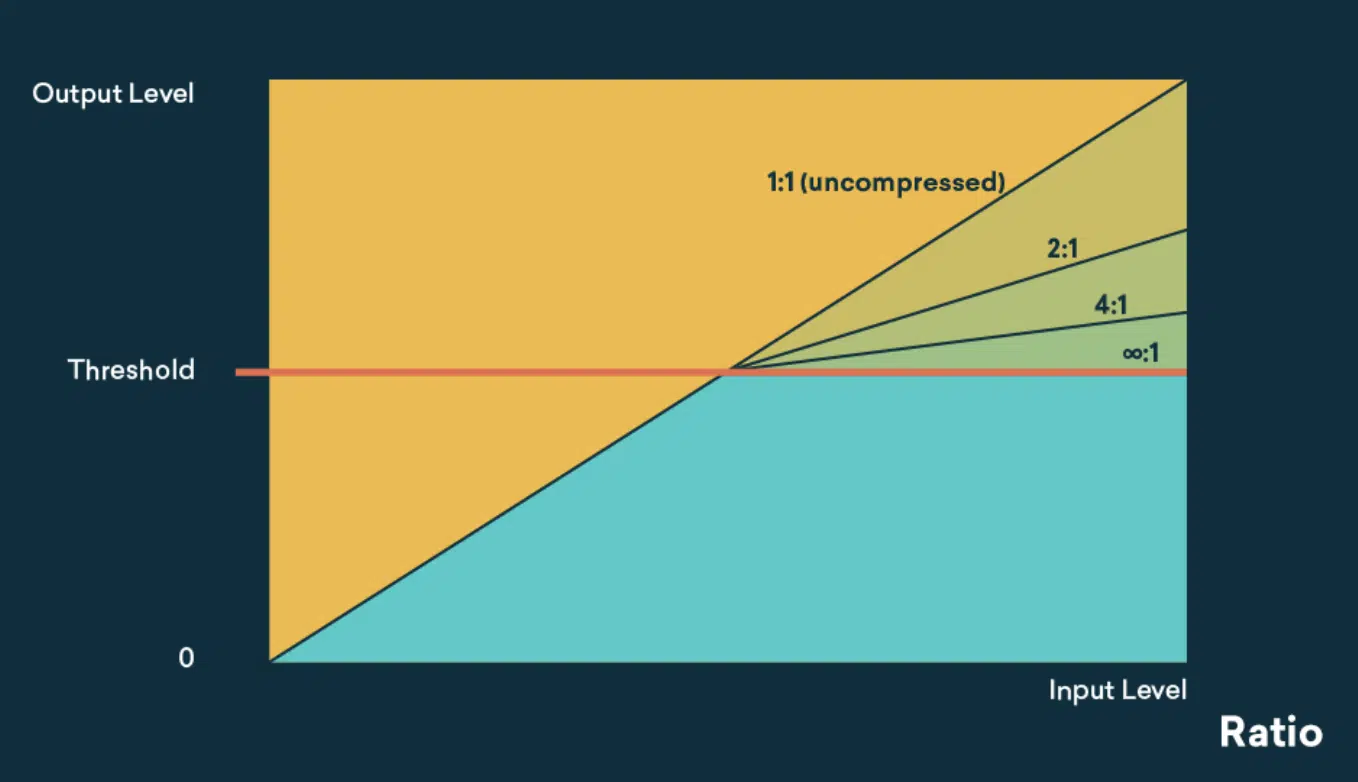
A compressor ratio (or compression ratio) is a fundamental concept in music production.
It’s the backbone of dynamic control 一 crucial for achieving that polished, professional sound in your tracks.
To put it simply, the compressor ratio is the relationship between the input signal you feed into your compressor and the output it produces.
So, how exactly does it work?…
Well, imagine you set your audio compressor ratio at 4:1.
This means that for every 4dB increase in the input signal that exceeds the threshold level, the output will increase by just 1dB.
It’s the compressor turning a higher input level into a lesser output level, which gives you more control over the loudness and dynamic range of your music.
For example, if your input signal is 8dB over the threshold, a compressor with a 4:1 ratio will only allow an increase of 2dB in the output signal.
This is how the compressor ratio influences the dynamics of your mix, allowing you to maintain consistency in volume levels.
Why Compressor Ratios are Crucial in Music Production
In music production, having a handle on your compression ratios is essential for managing the dynamic range of your tracks.
The dynamic range is the difference between the loudest and quietest parts of your track.
Controlling it allows you to create a solid foundation for your mix.
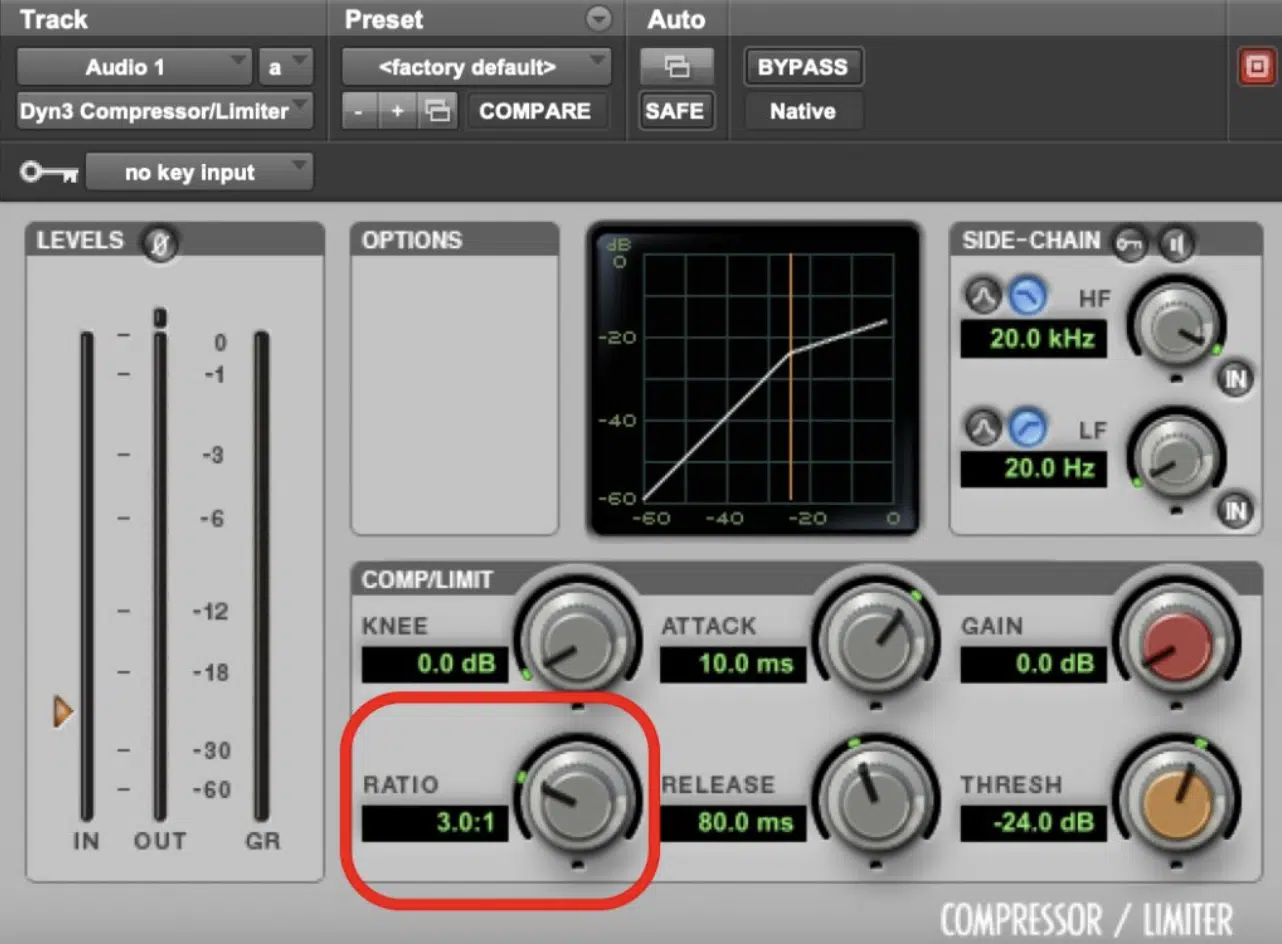
By adjusting your compressor ratio with the ratio knob, you can choose to apply light, moderate, or heavy compression to your tracks.
- Lighter compression with lower ratios (like 2:1) 一 Keeps your dynamics relatively natural.
- Higher compression ratios (like 10:1) 一 A high compression ratio offers tighter control, reduce dynamic range and make your output levels remain more consistent.
Knowing the different between lighter compression vs heavier compression is the key to determining the correct ratio setting and becoming a compression master.
Have a light hand when dealing with the ratio knob, as you don’t want to overdo it (or under-do it), and be sure to get familiar with the nuances.
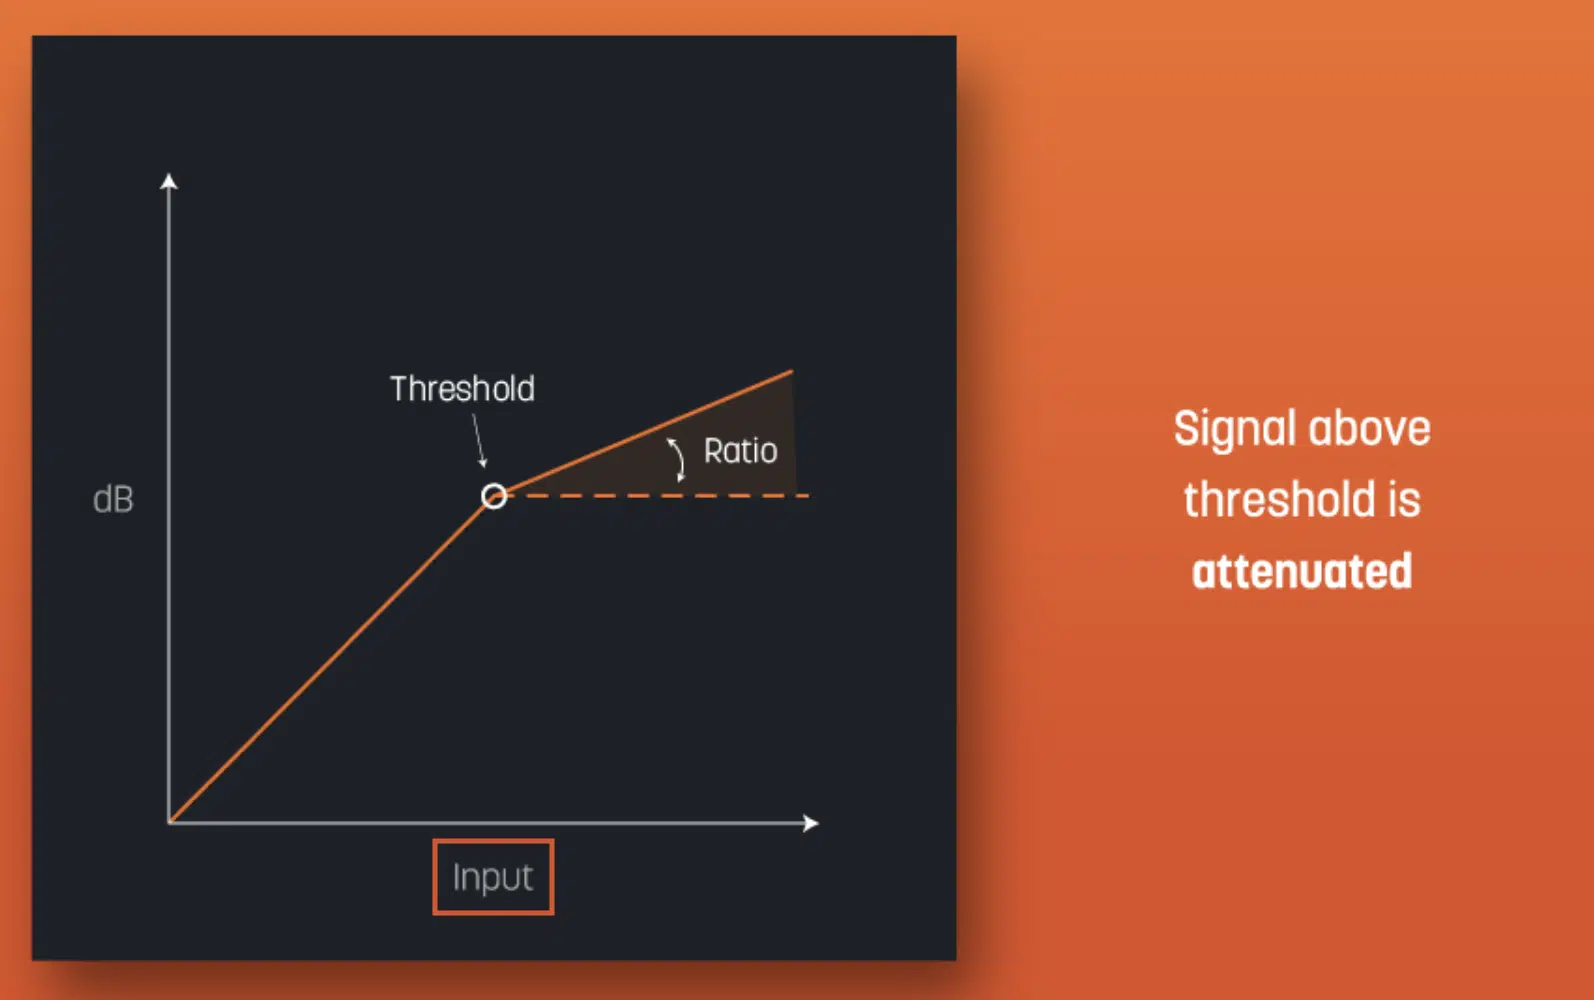
The important thing to remember is that the compressor only starts working when the input level crosses the threshold.
Anything below the threshold is unaffected by the compressor’s ratio settings, which gives you the flexibility to control the dynamics of your track.
Understanding The Compressor Ratio
Understanding the correct compressor’s ratio setting requires a bit more comprehension of the actual mechanics, so let’s get into it.
-
The Impact of Input Signal on Compression
Your input signal plays a key role in how your compression ratio functions.
For example, if you have a high input level that significantly exceeds the threshold, even a low ratio can result in a good amount of gain reduction.
However, if your input level barely crosses the threshold, a high ratio might not have much effect.
This shows that the relationship between your input signal and your compressor ratio is crucial in determining the final output.
Essentially, by manipulating your input and output levels, you can craft the exact sound you want and achieve the right ratio.
With a good understanding of your compressor’s threshold and ratio settings, you can create the right balance between:
- Preserving natural dynamics
- Achieving the control you need
Having this balance helps to keep the musicality of your track intact.
While simultaneously providing that tight, polished sound that comes with well-managed dynamics, of course.
It’s all about fine-tuning your settings to serve the unique needs of your mix and ensuring every element shines through as it should.
-
Higher Ratios vs Lower Ratios
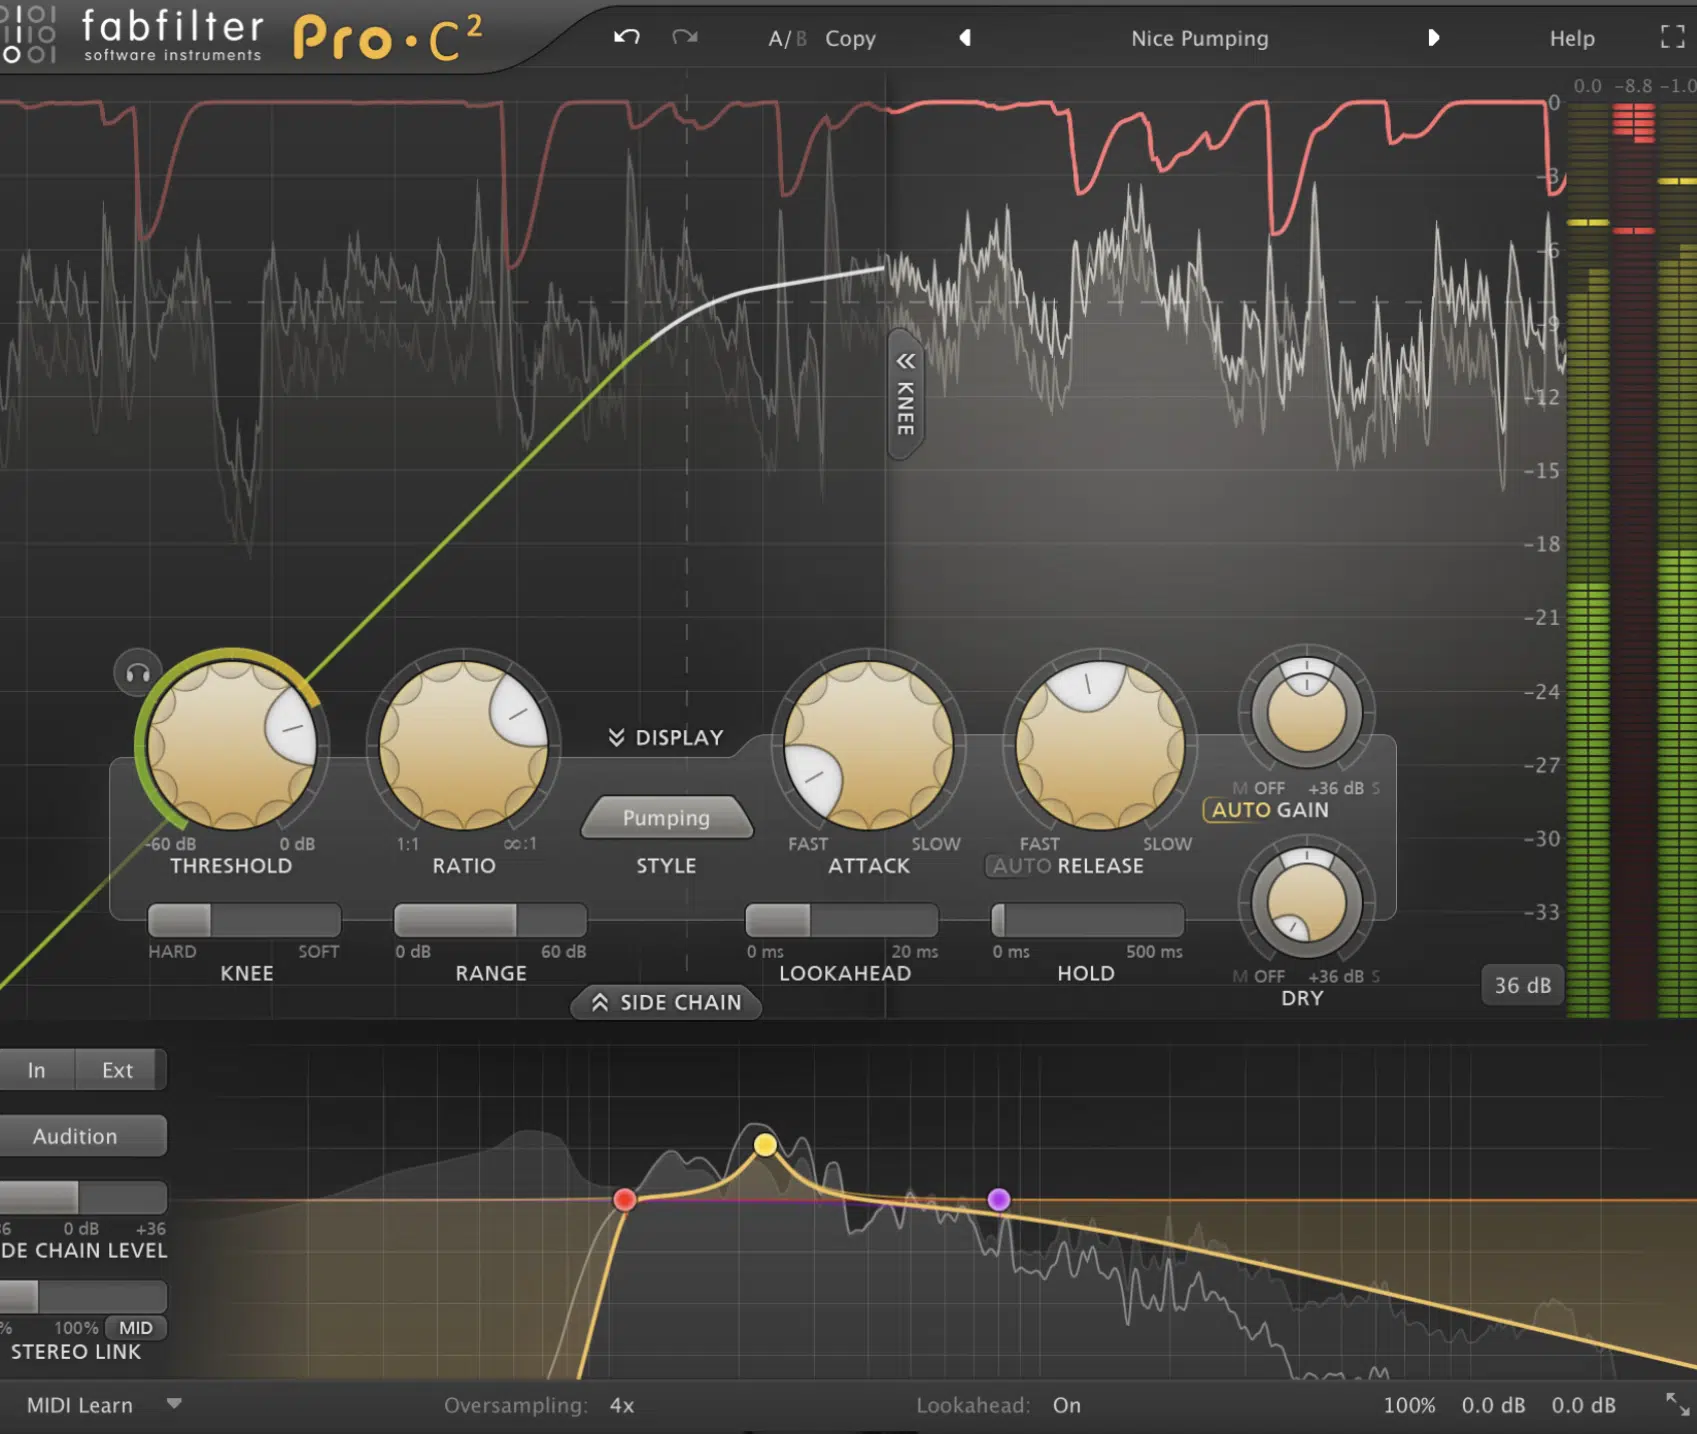
The choice between higher ratios and lower ratios depends on the desired effect.
Higher ratios result in higher compression.
High-ratio compression can be useful for creating a more consistent sound 一 particularly in genres like hip-hop or trap, where a punchy, in-your-face sound is often desired.
Lower ratios, on the other hand, provide less compression, allowing for more dynamic variance.
This can create a more natural, transparent compression, preserving the expressive nuances of performances.
This is ideal for more dynamic styles or elements like vocals or acoustic instruments.
While we’ve talked about higher and lower ratios, it’s also worth mentioning medium compression settings (aka moderate compression).
With a ratio around 4:1 or 5:1, medium compression offers a balance between dynamic control and natural sound preservation.
It’s less noticeable than high compression but provides more control than low compression.
This makes it a versatile choice for a wide range of applications in your mix.
Compression Parameters & Controls
Let’s take a look at the other elements of a compressor that work together with the ratio, as understanding these inclusions is how you’re going to become an expert at compression.
-
Threshold and Ratio Settings
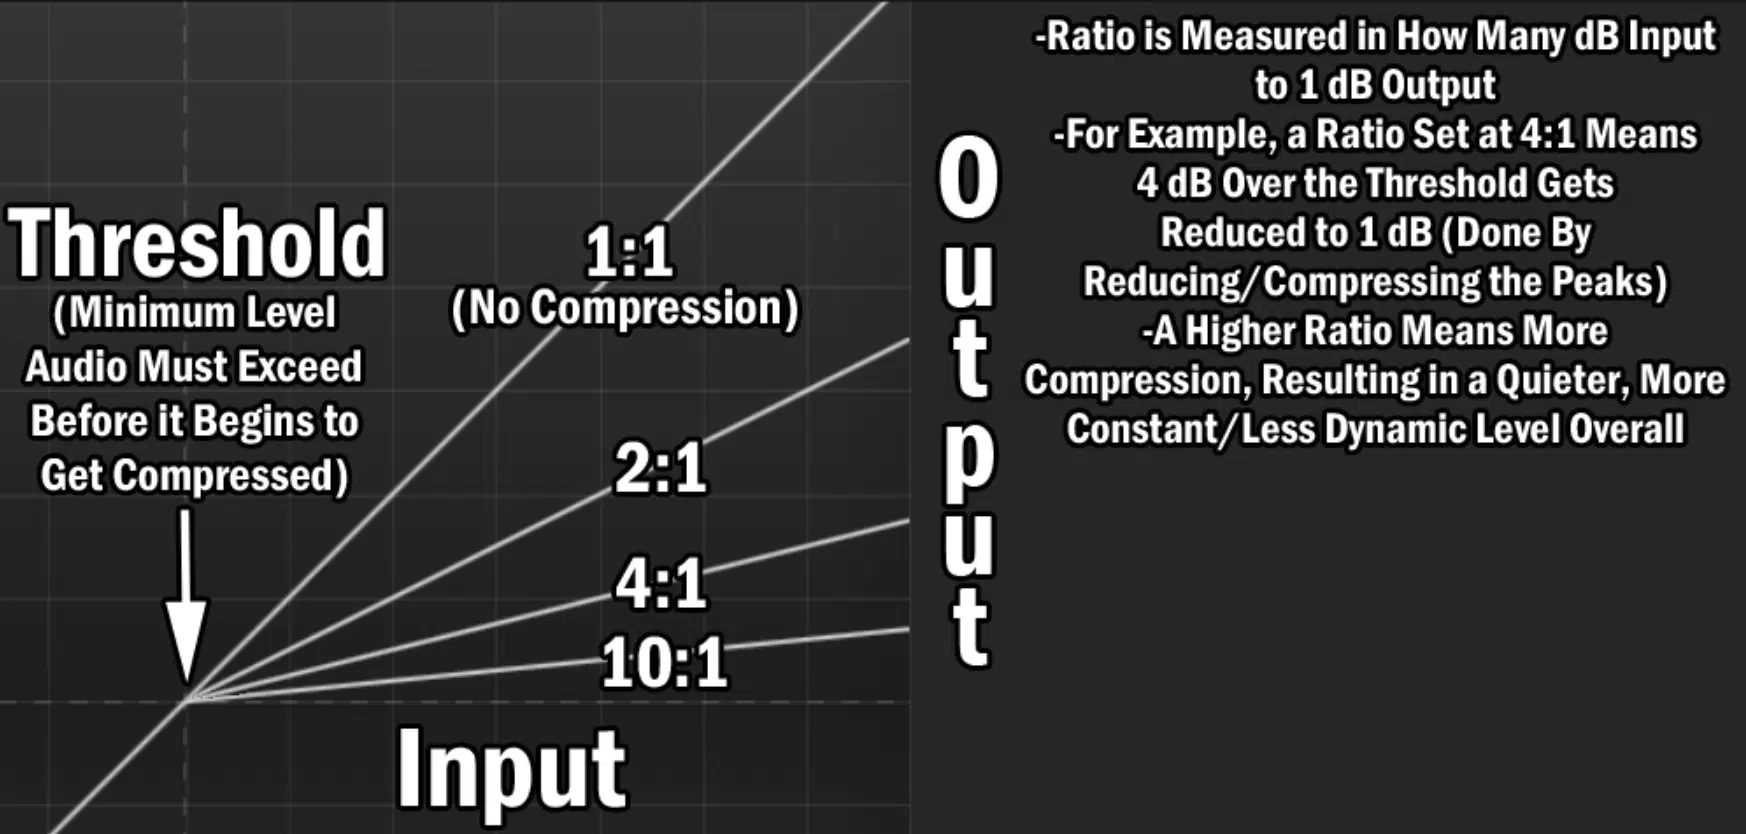
The threshold and ratio settings on your compressor are closely linked.
They work together to control how much compression is applied to your signal.
- The threshold 一 Determines the level at which your compressor starts to work.
- The ratio 一 Determines how hard it works once the threshold is crossed.
For example, setting a high threshold with a high ratio will only apply heavy compression to the loudest parts of your track.
While a low threshold with a low ratio will apply light compression to almost the entire track.
Getting the right balance between your threshold and ratio settings is key to achieving the desired sound.
It involves a good deal of trial and error, as well as listening carefully to how the compression is affecting your track.
NOTE: Choosing the best ratio settings for optimal output levels is mostly a matter of personal taste and the requirements of the track.
However, a general rule of thumb is to start with a moderate ratio (around 4:1) and then adjust to taste from there.
Keep in mind, it’s easy to over-compress a track, so make sure to periodically bypass the compressor to compare the compressed and uncompressed sound.
This can help you avoid over-compression and maintain the natural dynamics of the track.
As a music producer, you should always be A/B’ing anyway, so you should be somewhat familiar with this process already.
-
The Role of Attack and Release Time
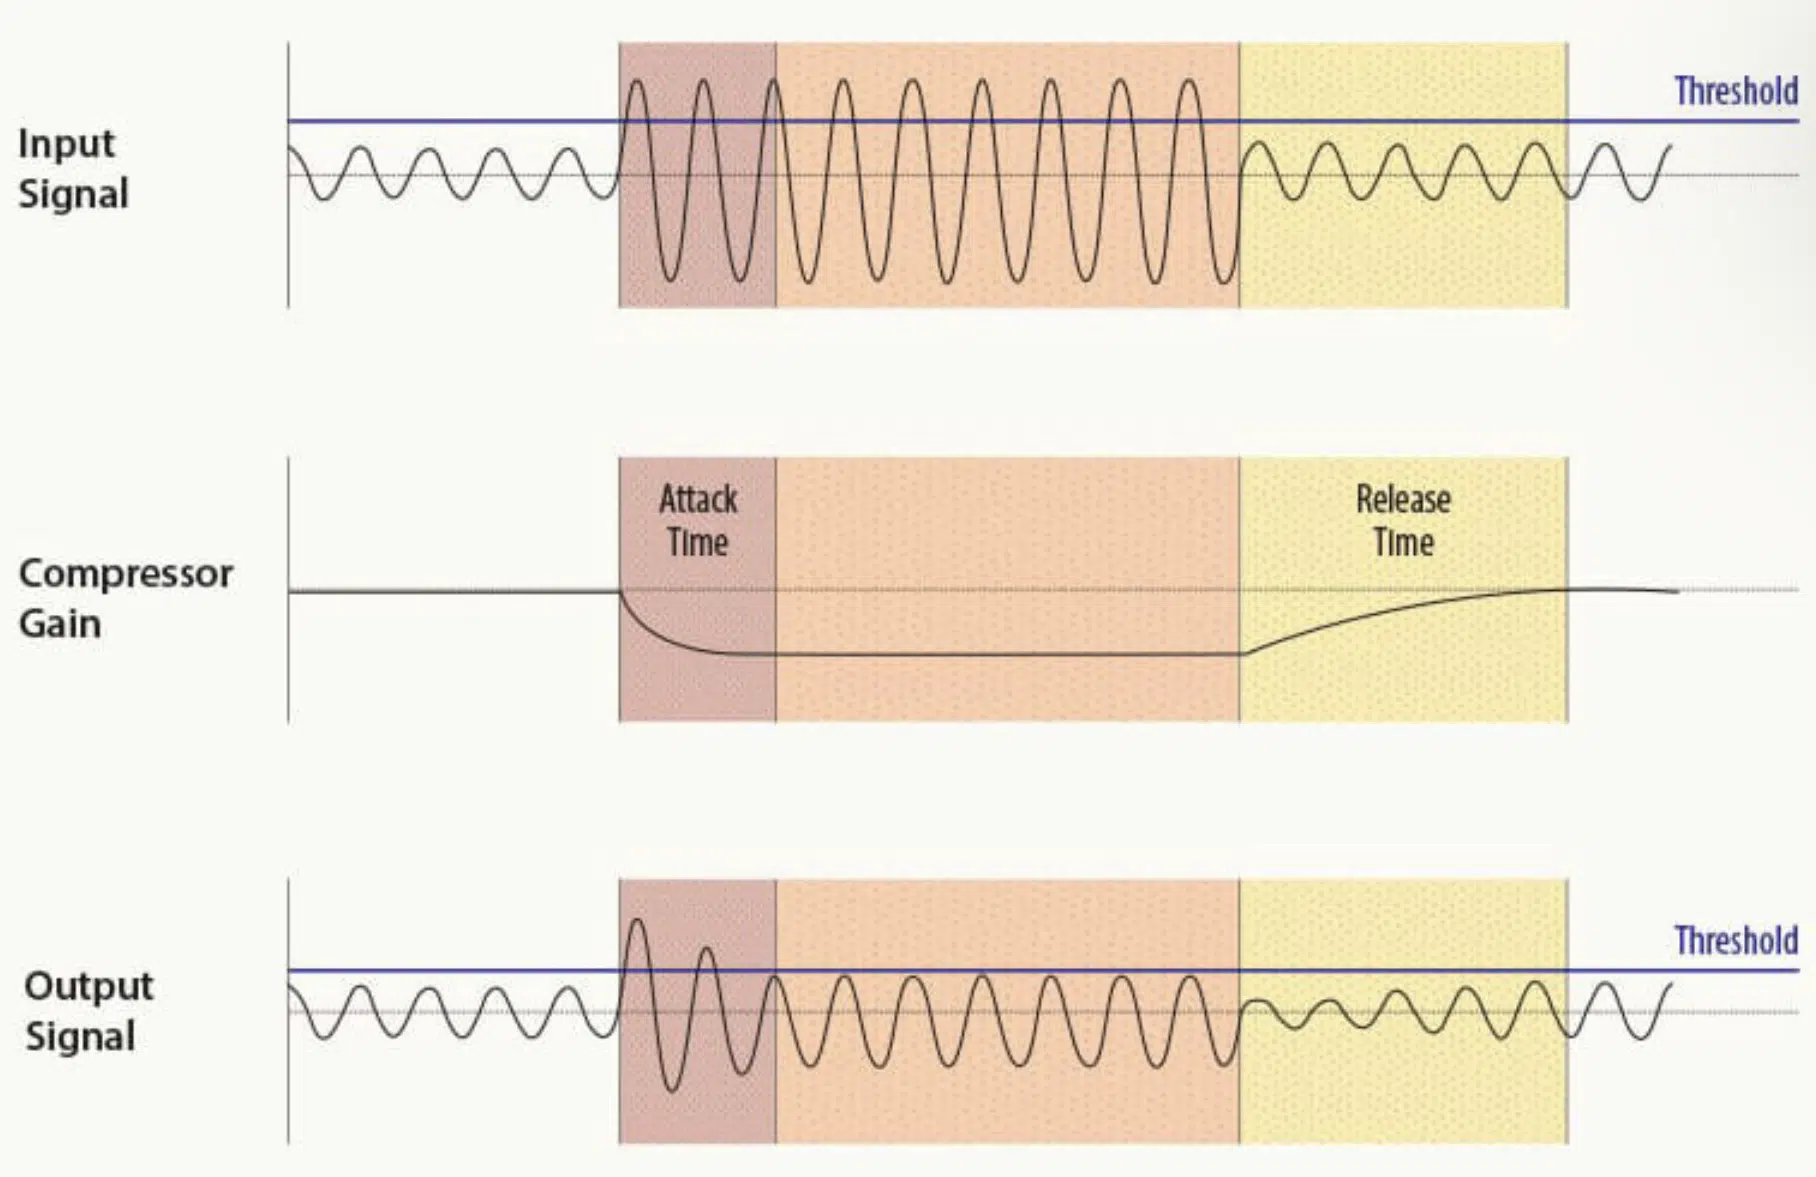
Your attack and release times also play a crucial role in how your compressor behaves.
Knowing when and how to adjust these parameters can drastically impact your mix’s outcome.
As well as allow you to retain the raw energy of your track or apply a tighter dynamic control when needed.
- The attack time 一 Determines how quickly the compressor responds once the input signal exceeds the threshold.
- The release time 一 Determines how quickly the compressor stops compressing after the audio signal drops below the threshold.
A fast attack time can make the compression more noticeable, while a slow attack can preserve more of the natural dynamics of the input signal.
Similarly, a fast release time can make the compressor responsive to short, loud sounds.
While a slow release time can provide a smoother, less noticeable compression.
Mastering the interplay between attack and release times truly elevates your ability to shape your sound effectively.
-
The Importance of Makeup Gain in Compression
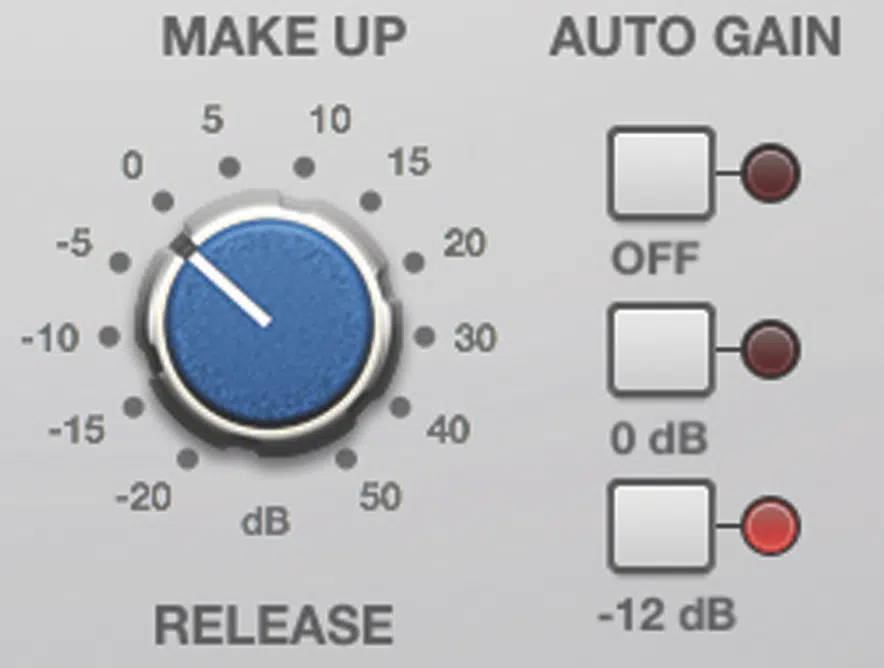
Makeup gain, an essential part of the compressor’s arsenal, comes into play after compression has taken place.
Its main role is to boost the output level after gain reduction has been applied by the compressor.
This allows you to maintain a consistent output level, irrespective of the compression applied.
Here’s where “how much gain reduction” comes into play.
Say you’re applying a fair amount of compression to a snare drum in your hip-hop track, and you’ve dialed in a high ratio to achieve a solid, punchy hit.
This compression will, inevitably, reduce the overall level of the snare.
To compensate for this gain reduction, you’ll apply makeup gain to bring the level of the snare back up, making sure it cuts through in the mix.
It’s important to keep a close eye on the gain reduction meter while doing this.
If your gain reduction is showing a decrease of 5dB, for example, you’ll want to boost your makeup gain by a similar amount to compensate.
This ensures you maintain a consistent level in your mix, while still enjoying the benefits of compression.
-
Understanding Soft Knee Compression
When it comes to the audio compressor ratio, understanding the distinction between hard knee and soft knee compression can truly elevate your mixing skills.
Hard knee compression
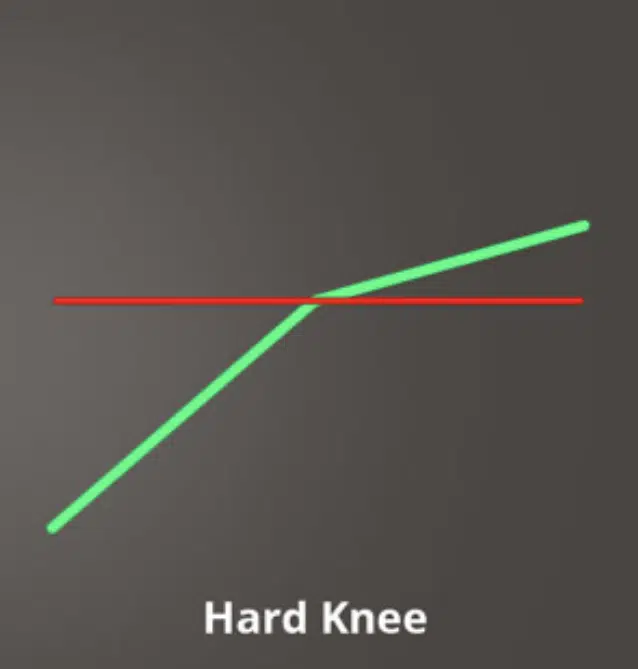
Hard knee compression means that the compression kicks in immediately once the input signal surpasses the threshold.
This abrupt onset of compression can be ideal for scenarios where you want a tighter grip on your dynamics.
An example being when you’re dealing with transient-heavy material or need a heavily controlled sound.
However, the abrupt nature of hard knee compression can make the compression more noticeable and may not always serve the music’s subtleties.
Soft knee compression
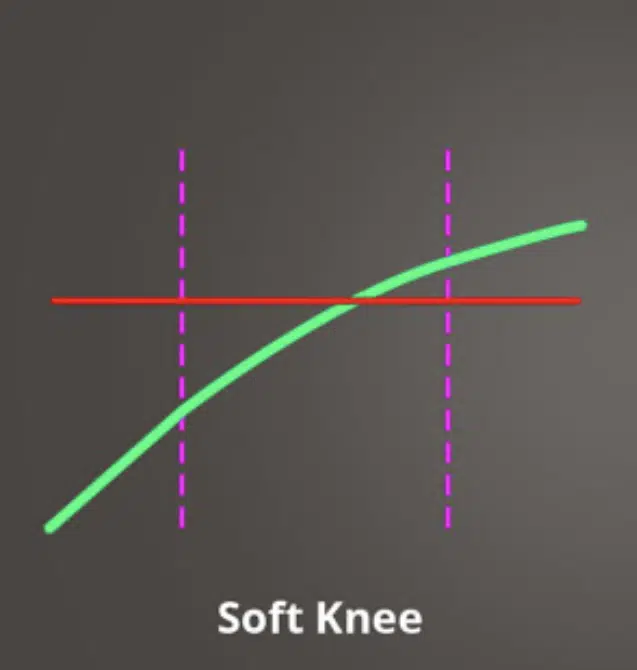
Soft knee compression offers a gentler approach.
Instead of applying full compression the moment the input level exceeds the threshold, soft knee compression gradually increases the compression ratio as the input level approaches and then exceeds the threshold.
This results in a smoother, less perceptible form of compression.
It’s an excellent choice when you want to preserve the natural feel of the music, especially for more dynamic and expressive parts like vocals or solo instruments.
Both hard and soft knee compression have their unique roles in the world of music production.
- Hard knee 一 Might be your go-to for tight, punchy drum sounds.
- Soft knee 一 Could be the perfect solution for a natural-sounding vocal performance.
The key is to understand the requirements of your mix and make a choice that serves your unique music.
As with all things in music production, it’s all about making informed decisions and maintaining a healthy balance.
Compressor Ratio: Useful Tips & Tricks
Now, let’s get practical…
Here are some ways you can use compression ratios effectively in your music.
-
Manipulating Dynamic Range with Compressor Ratio
Your compressor ratio is one of your main tools for manipulating the dynamic range of your music.
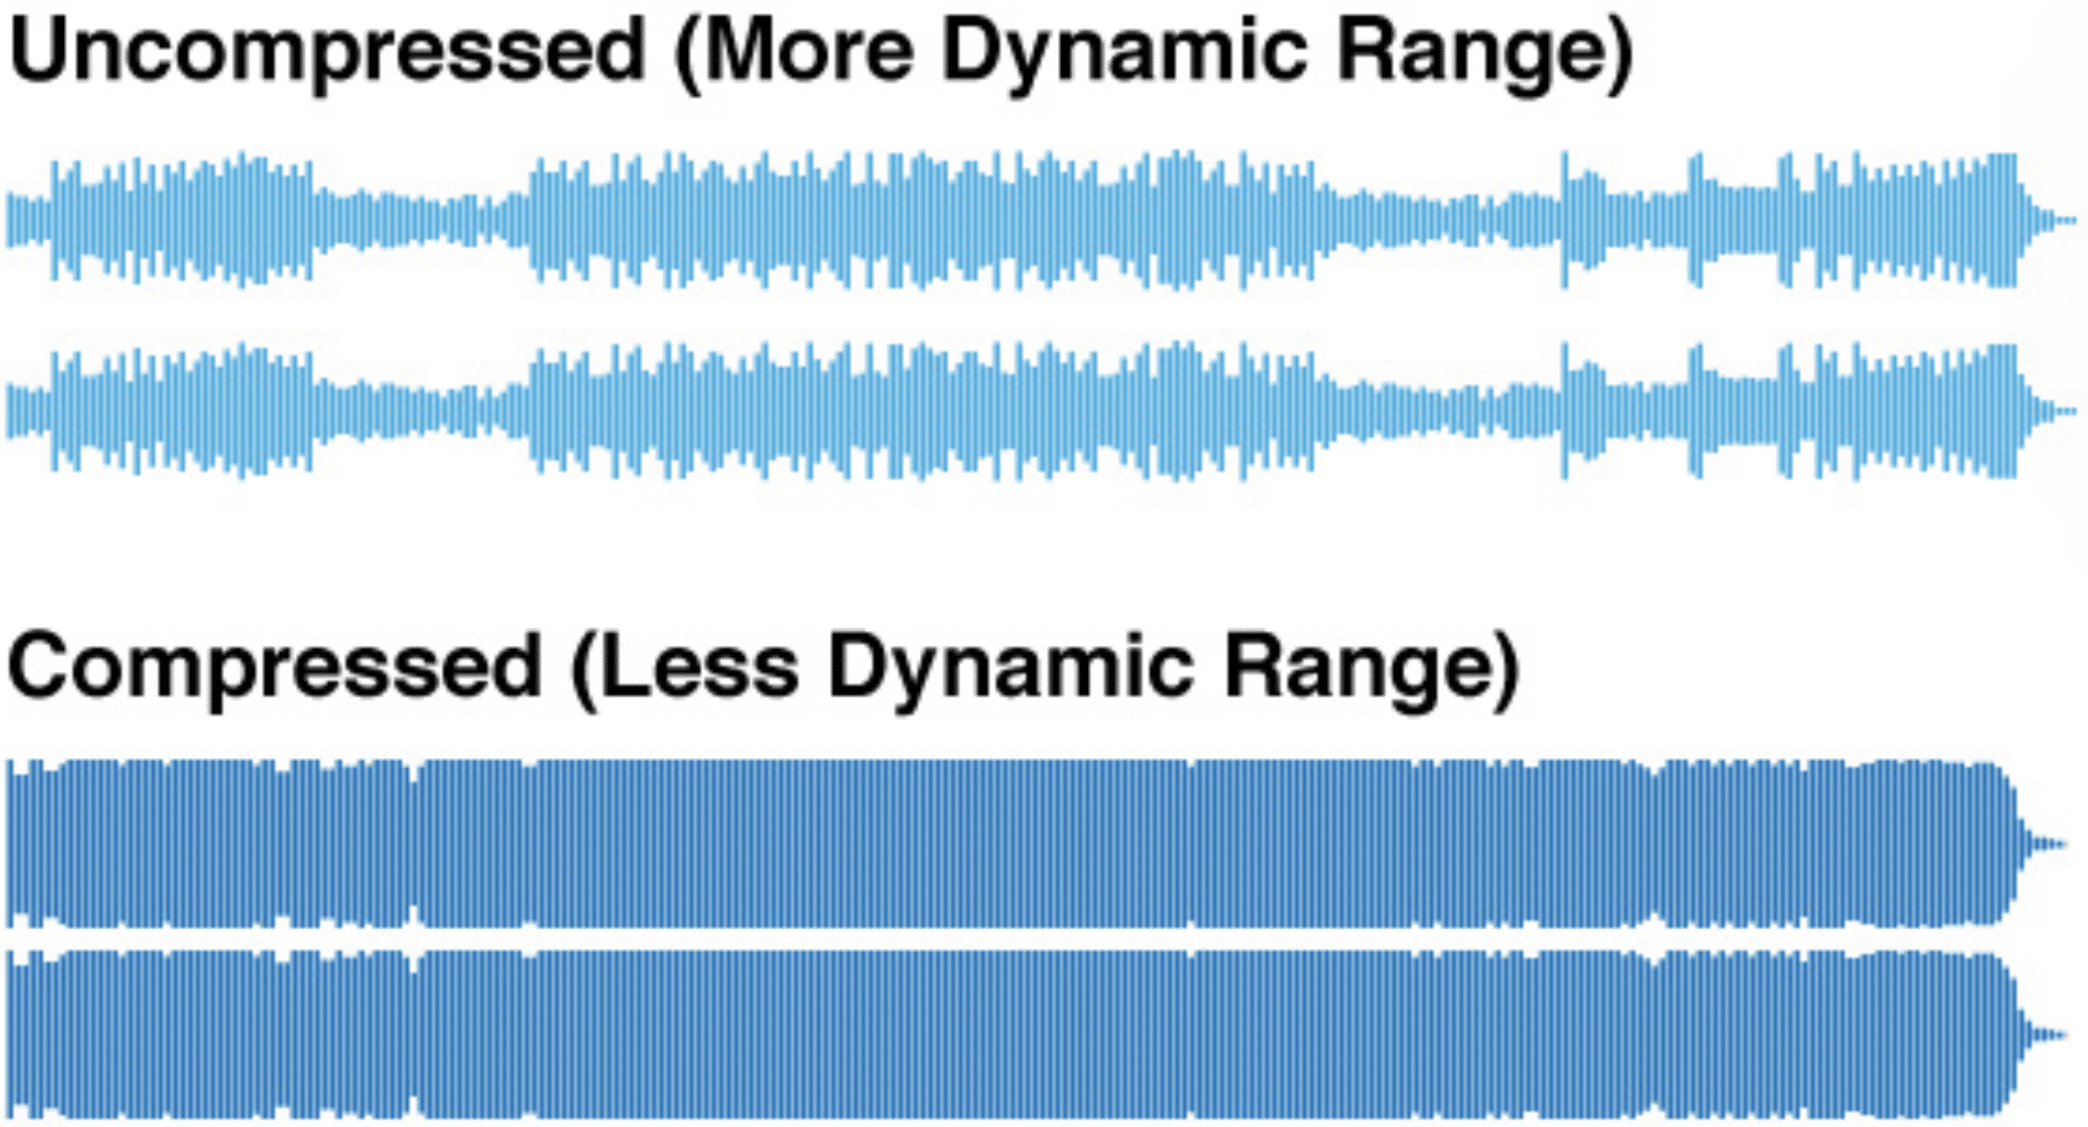
By applying more compression with a higher ratio, you can reduce the dynamic range 一 making the loud parts less loud and the quiet parts less quiet.
This can create a more balanced, cohesive mix (particularly in music styles where consistency in volume is important).
However, remember that using high compression ratios can also rob your track’s dynamics and liveliness.
So, consider the genre (lo-fi, r&b, hip-hop, trap, techno, etc.) and mood of your track before deciding on the compression.
For example, in a lo-fi hip hop track where you want to keep things smooth and relaxed, you might want to allow a larger dynamic range as opposed to reducing dynamic range.
Therefore, you’re going to opt for a lower compression ratio.
-
Perfecting Your Drum Kit Sound: Compressor Ratio Applications

When it comes to percussive elements like drums, compressor ratios can be your secret weapon.
Drum hits can vary greatly in volume 一 from the subtle ghost notes to powerful crashes.
By applying compression, you can control these dynamic fluctuations and make your drum kit sound more balanced and punchy.
For instance, a higher compression ratio can be used on the kick drum and snare to add punch and consistency.
On the other hand, overheads and room mics may benefit from a lower compression ratio to preserve the natural dynamics and ambience of the drum kit.
Remember, the perfect compressor ratio for drums often requires a blend of different settings.
Your goal is to enhance the natural rhythm and energy of the drums, without squashing the life out of them.
-
Excessive Compression: When Too Much is Not Good
One of the most common mistakes in setting compressor ratios is using way too much compression.
Over-compression can:
- Suck the life out of your track
- Reduce its dynamic range too much
- Make it sound dull, flat, and lifeless
Remember, compression is a tool to control dynamics, not eliminate them.
Too much compression can also result in distortion and other undesirable audio artifacts.
Always use your ears and aim for a balance between controlling dynamics and preserving the natural expressiveness of your music.
Compressor Ratio: Final Thoughts
From the basics to the nitty-gritty details, you know can successfully manipulate the compressor ratio like a true professional.
Compressors are an essential tool in your music production arsenal, and mastering their use can elevate your tracks from good to downright fantastic.
Remember, practice is the key…
The more you play around with your compressor settings and the more you listen to the effects on your mixes, the better you’ll understand this dynamic tool.
To wrap things up, we’re going to let you in on a secret weapon that could take your production to the next level.
If you want to see how the pros do it and learn from the best, be sure to check out the free Famous Beatmaker Template Essentials.
These templates are golden 一 allowing you to dig deep into the structures of hit tracks.
You can customize these templates with your own sounds and really make each track your own.
The best part is, these templates include professional compressor ratio settings that you can experiment with and learn from.
By exploring these settings, you’ll get a feel for how professionals harness the power of compression to achieve hard-hitting, impactful mixes.
Armed with your newfound knowledge and the Famous Beatmaker Template Essentials, the sky’s the limit.
Until next time…


Leave a Reply
You must belogged in to post a comment.