Ableton Live is a titan among music production software, that’s a give in.
It’s a powerful, versatile, and inspiring tool that’s great for crafting intricate beats, composing rich melodies, and even for performing live.
But how do you use it like an absolute pro?
Well, in this in-depth guide, we will unlock all the secrets of Ableton Live 11 and answer any questions you may have.
Whether you’re an absolute beginner or a seasoned producer looking to switch to Ableton, this article is for you.
In this ultimate beginner’s guide, we’ll breakdown:
- How to set up and navigate the Ableton Live interface ✓
- The ins & outs of Session View & Arrangement View ✓
- How to master the mighty MIDI in Ableton Live ✓
- The essentials of recording and editing your music ✓
- Tips & tricks for mastering Ableton Live’s instruments & effects ✓
- How to take your skills to the next level with Ableton Live features ✓
By the end of this guide, you’ll be armed with the knowledge you need to start making music with one of the most powerful tools in the music production world.
Therefore, you’ll never have to ask yourself how to use Ableton again.
Let’s dive in…
Table of Contents
- Getting Started with Ableton Live
- The Session View
- The Arrangement View
- Editing and Refining Your Music
- Unleashing Musical Ideas with MIDI Instruments & effects (MIDI FX)
- Understanding MIDI Channels, MIDI Notes, and MIDI Controllers
- Editing MIDI Clips & Audio Clips
- Advancing Your Ableton Live Skills
- How To Use Ableton: Final Thoughts
Getting Started with Ableton Live
So, to kick it off, let’s dive into the different sections of Ableton’s interface.
-
Exploring the Ableton Live Interface
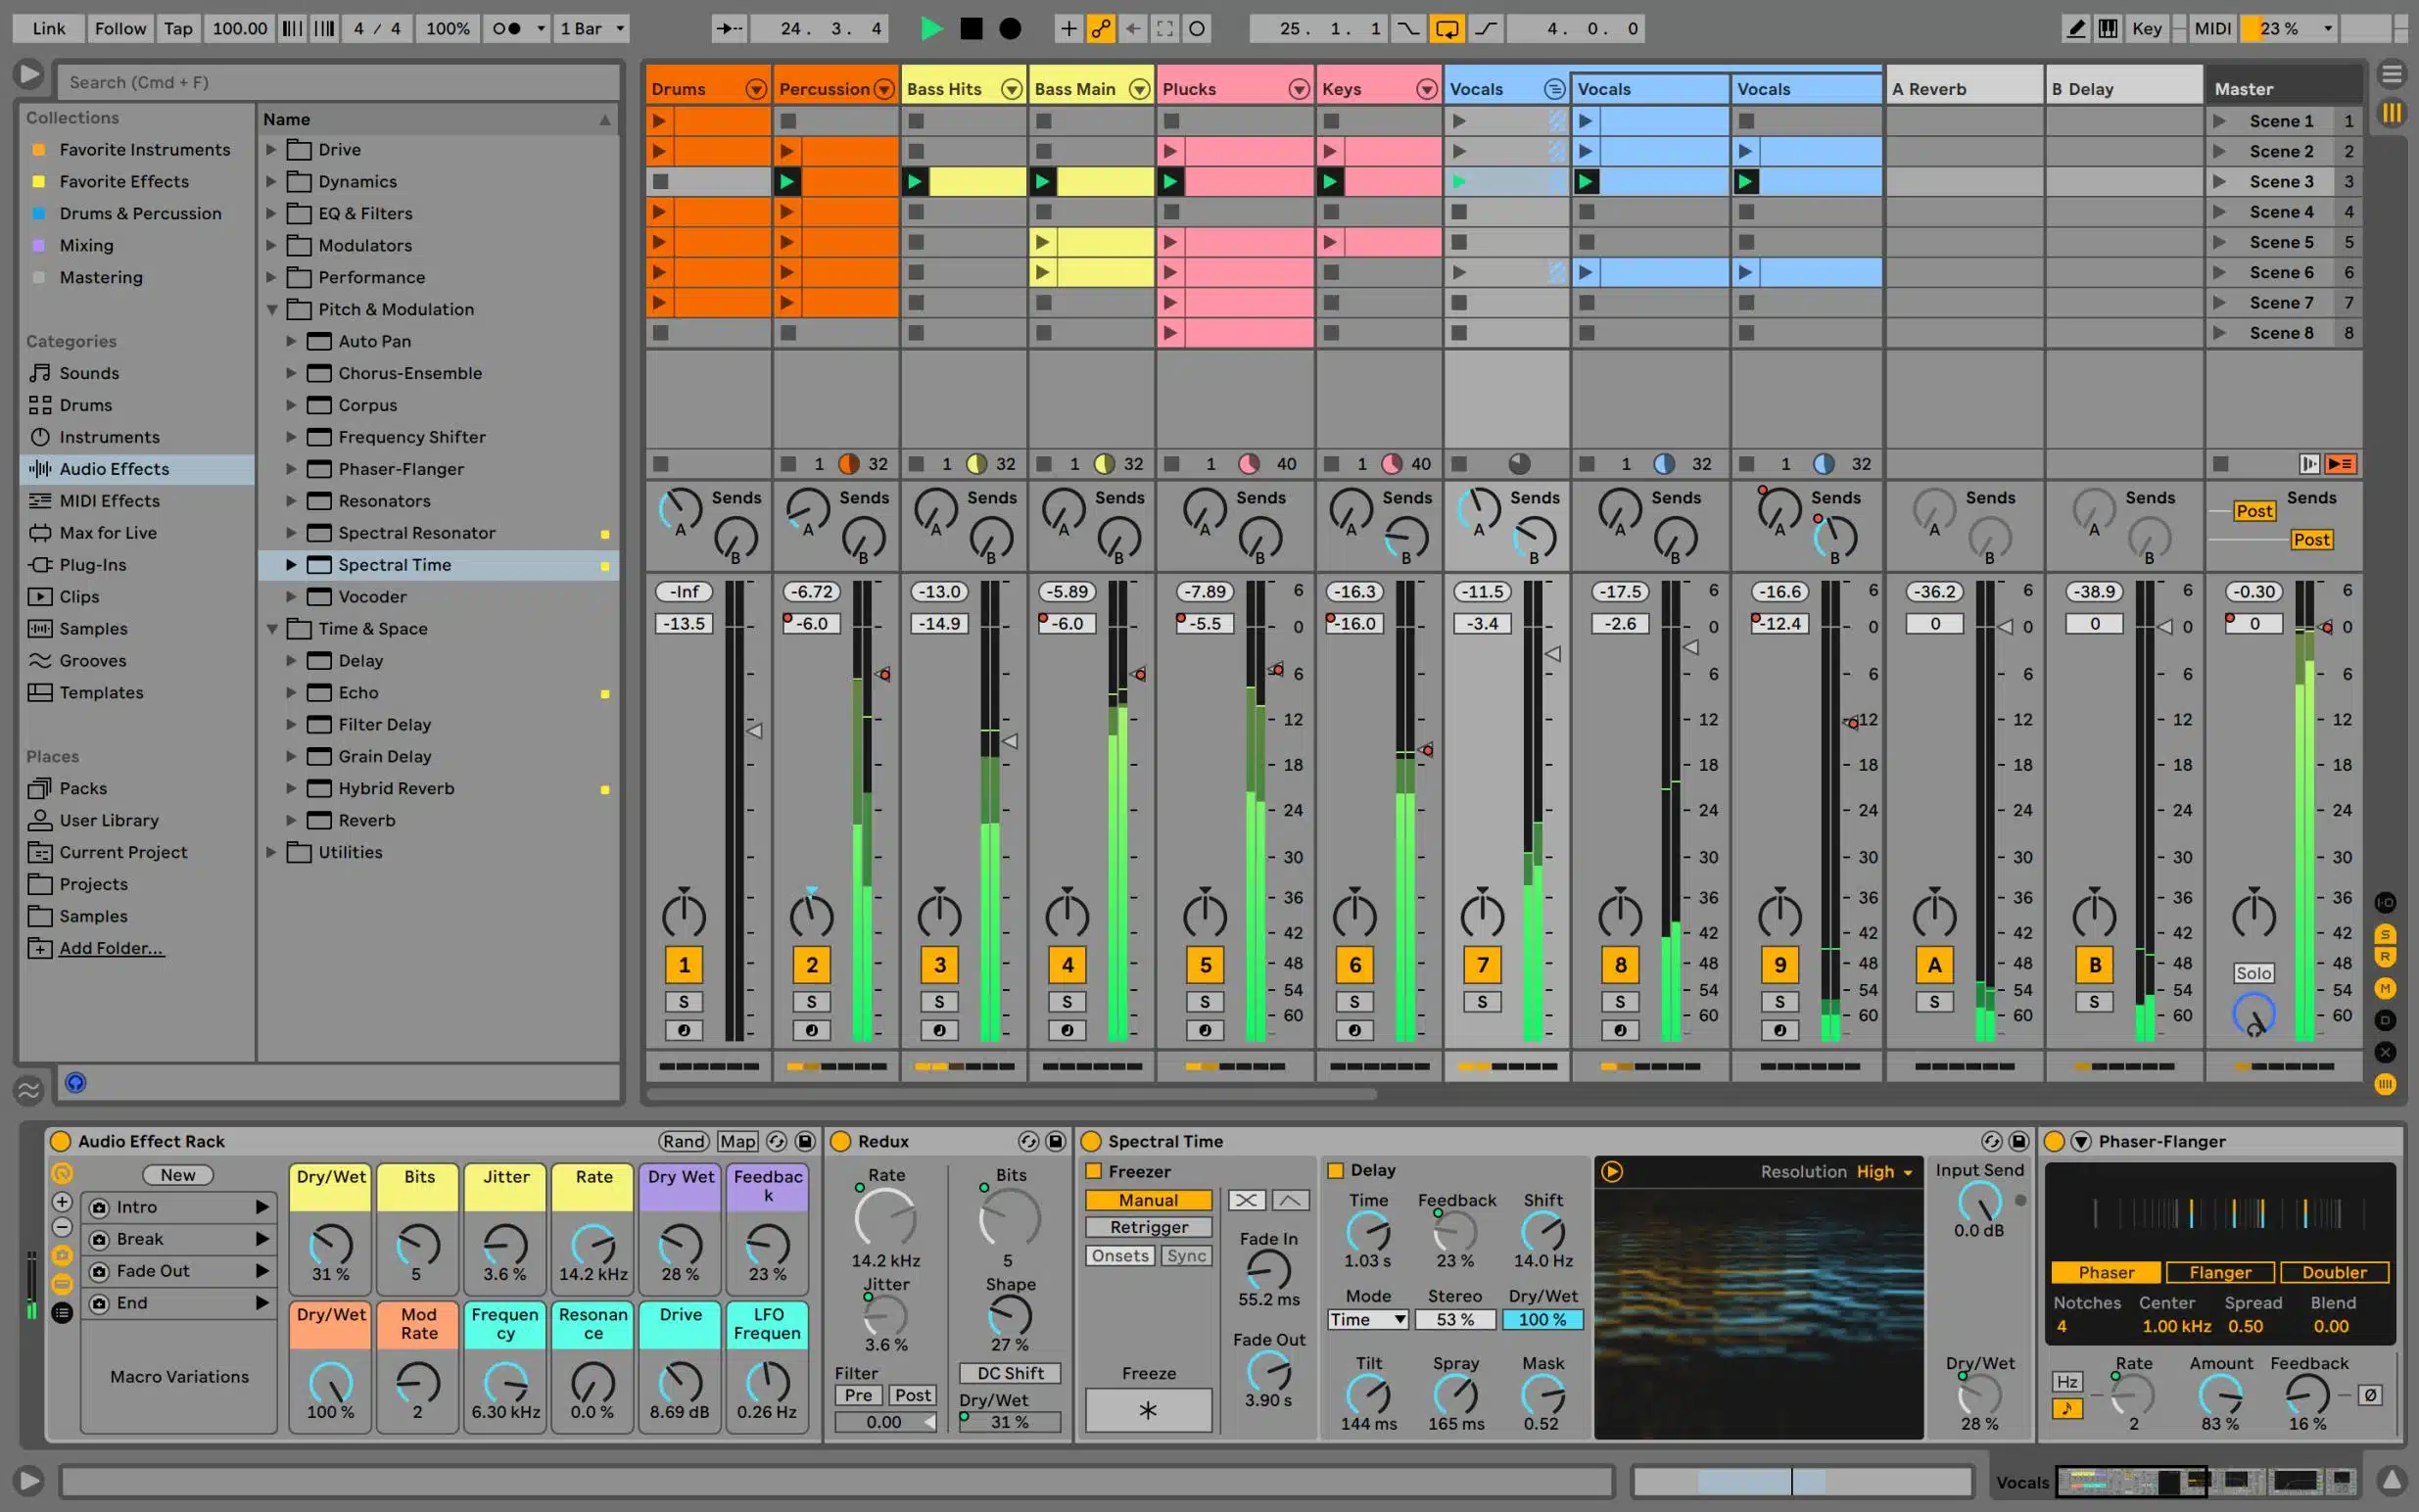
Now that your audio interface is all set up, it’s time to explore Ableton Live’s unique interface.
First things first, when you open Ableton Live, you’ll find yourself in the ‘Session View’.
This view is all about experimentation and improvisation.
It’s like a musical sketchpad where you can jot down your musical ideas as they come.
The Session View is structured as a grid.
The vertical columns in this grid are your tracks, and these could be:
- Audio tracks 一 where you can record sounds from the real world.
- MIDI tracks 一 where you can create and manipulate your music digitally.
Each cell within these columns is called a ‘clip slot’, and this is where your ‘clips’ live.
You can consider it a giant, complex looper.
Clips are the fundamental units of sound in Ableton Live (think of them as chunks of audio or MIDI that you can play, loop, edit, and manipulate).
At the bottom of the Session View, you’ll find the ‘Detail View’.

Here’s where you can see and edit the specifics of your clips and tracks.
For instance, if you’ve got a MIDI clip selected, you’ll see the MIDI Note Editor in the Detail View.
This is a powerful tool where you can add, delete, or move individual MIDI notes within your clip.
On the left side of the screen, you’ll find the ‘Browser’.
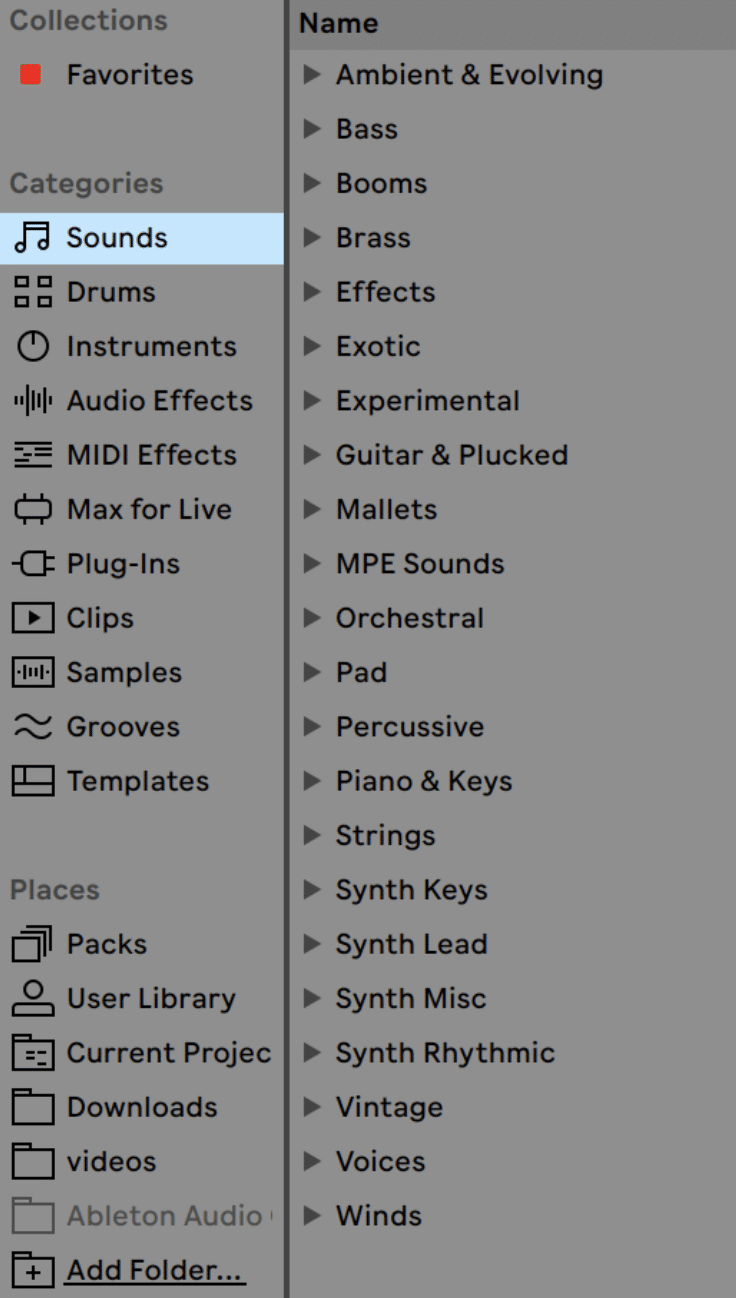
This is your library of sounds, samples, effects, and instruments.
Speaking of samples, if you’re looking for the best free sample packs of 2023, look no further.
It also houses all your saved projects or ‘Live Sets’.
The Browser is a treasure trove of sound, and exploring it can spark some great musical ideas and improve your workflow tenfold.
The Session View
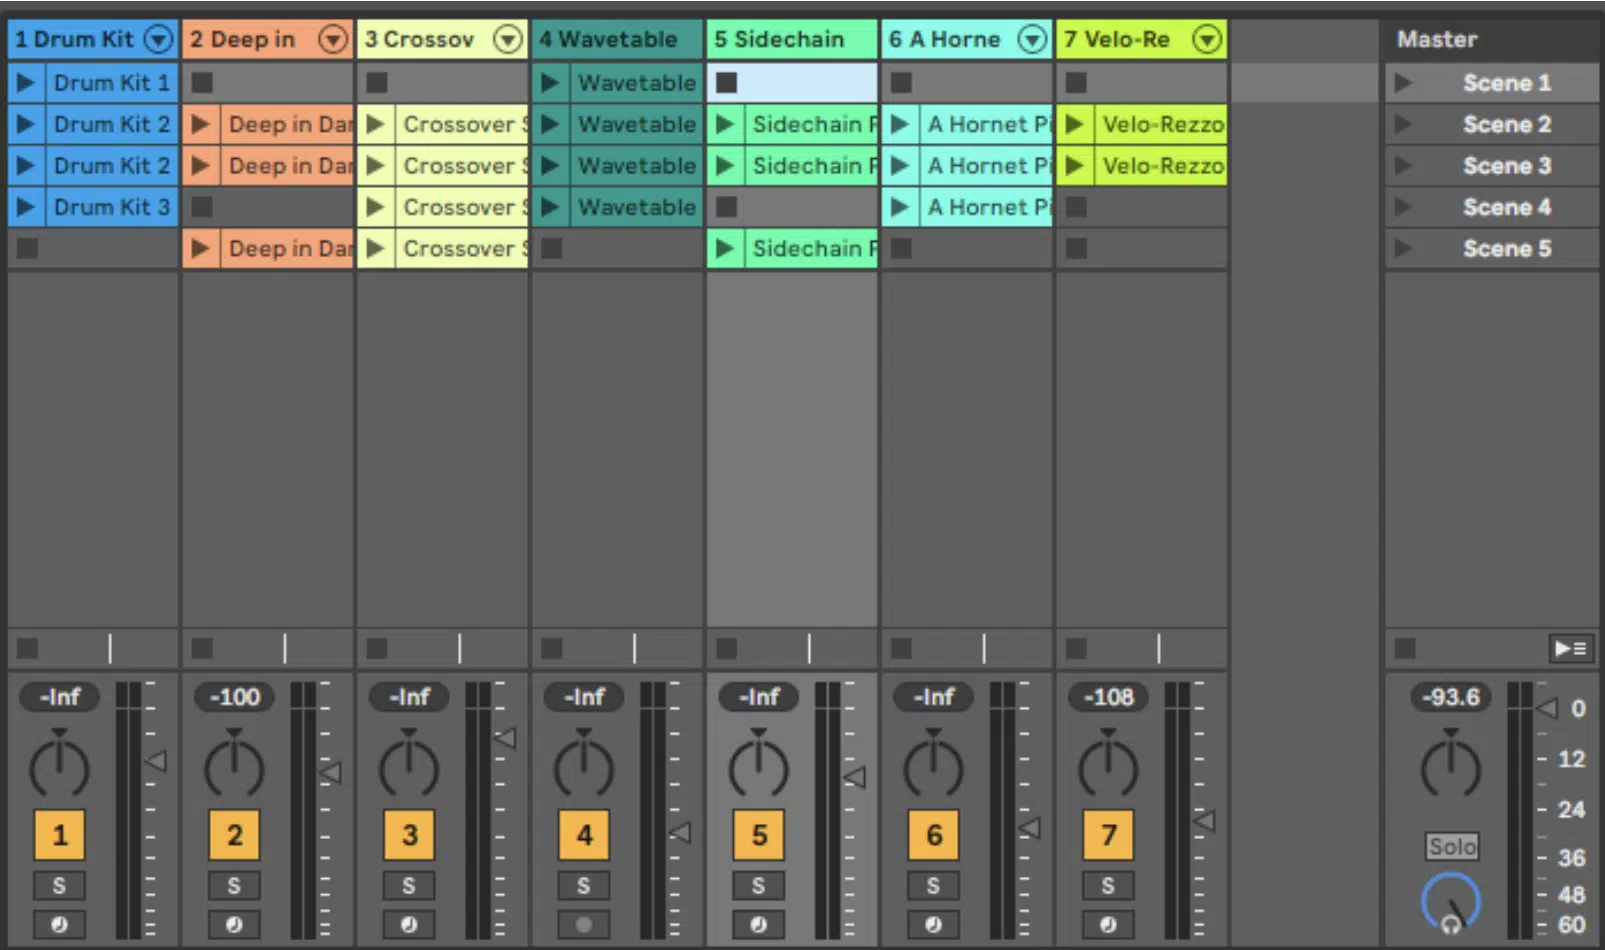
The Session view is where the magic happens in Ableton Live.
It allows you to create and manipulate your tracks in a non-linear way.
- The vertical columns 一 Are your tracks (either MIDI or audio).
- The horizontal rows 一 Are your scenes.
Scenes are a powerful tool in Ableton Live; each scene is a row of clips that you can launch simultaneously.
This means you can group together a set of clips that make up a part of your song, like a verse or chorus, and launch them all at once.
It’s a great way to try out different arrangements of your song on the fly.
One thing you’ll notice in the Session view is the ‘Master’ track (above) which is the far-right column.
This is where you control your scenes. Each cell in the Master track corresponds to a scene.
To play a scene, you simply click the ‘play’ button next to it in the Master track.
-
Working with MIDI Tracks & Clips
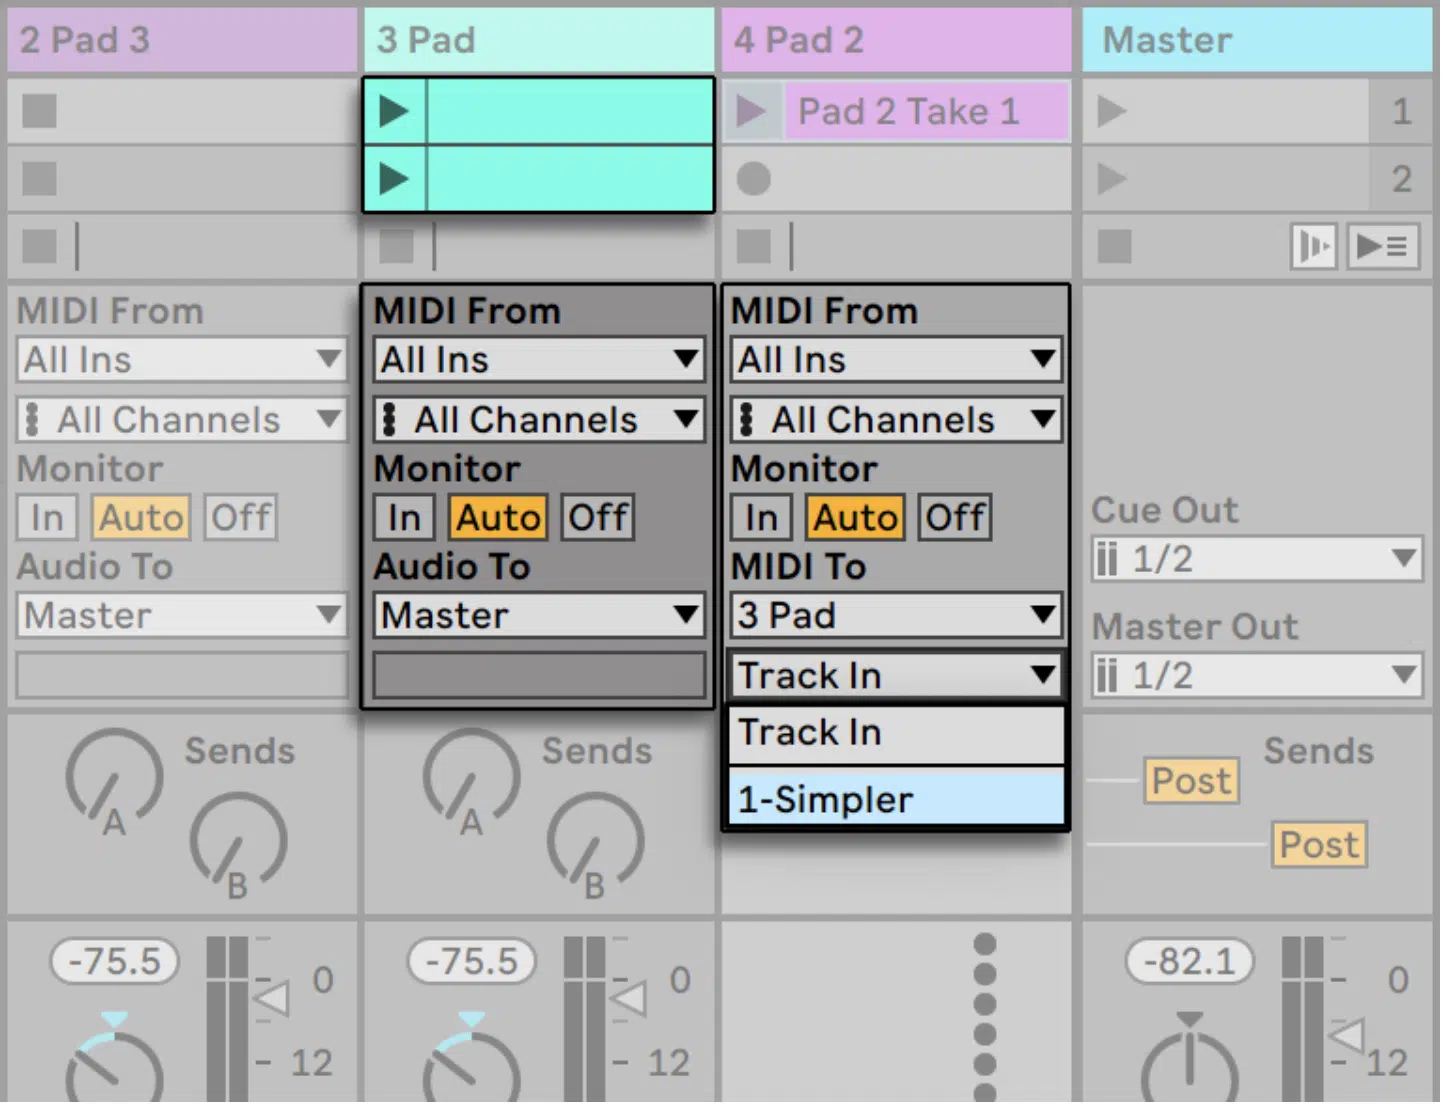
Now let’s delve into the heart of Ableton Live: working with MIDI.
A MIDI track is where you can create and edit MIDI clips.
These clips contain MIDI notes 一 which can be any sound you want, depending on the instrument or sample you’ve loaded onto the track.
Creating a new MIDI track is easy.
Just go to the ‘Create’ menu and select ‘Insert MIDI Track’, or use the shortcut ‘Ctrl+Shift+T’ (or ‘Cmd+Shift+T’ on a Mac).
Once your MIDI track is created, you can load an instrument onto it from the Browser.
Simply drag & drop your chosen instrument onto the track, and you’re ready to start making music.
Creating a MIDI clip is just as straightforward.
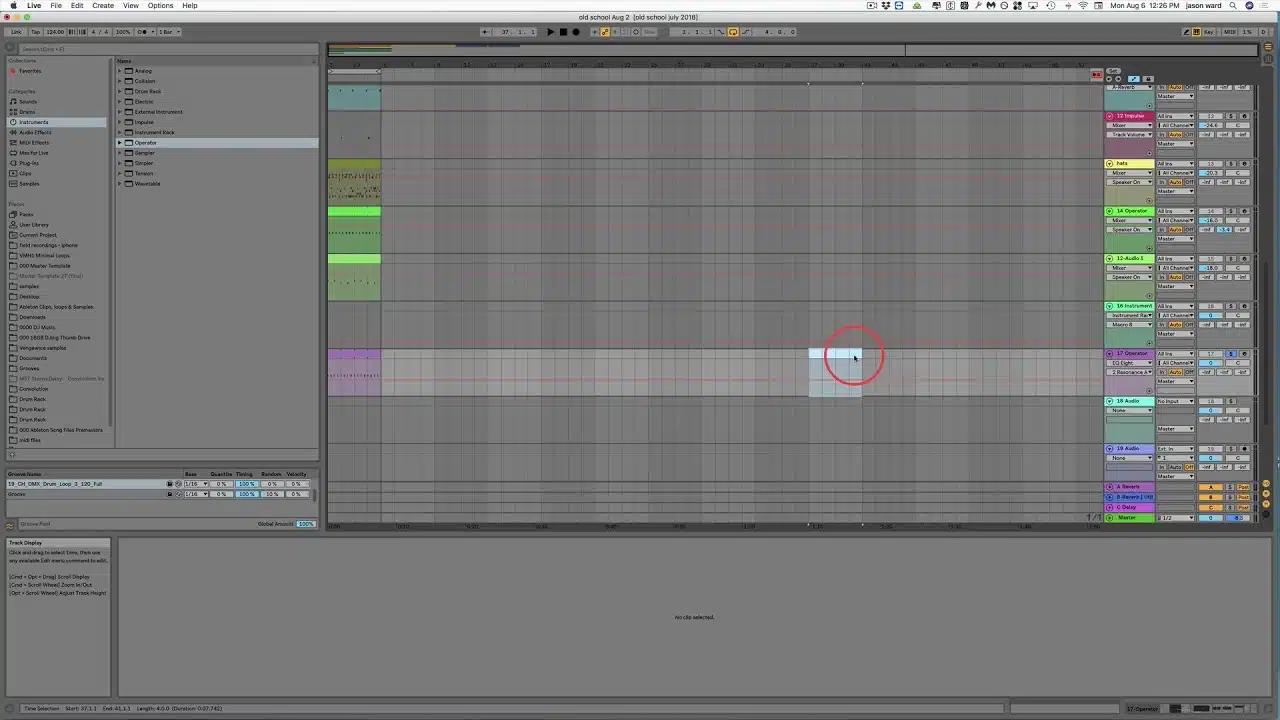
Simply double-click in a clip slot in your MIDI track, and a new, empty MIDI clip will be created.
This clip will appear in the Detail view, where you can use the MIDI Note Editor to add, delete, or move notes.
-
Playing with Audio Tracks & Clip Slots

In addition to MIDI tracks, Ableton Live also lets you work with audio tracks.
These are the tracks where you can record sounds from the real world or samples (your voice, a guitar, a drum kit, etc.).
You can create a new audio track from the ‘Create’ menu.
Just like MIDI tracks, audio tracks contain clip slots… but instead of MIDI clips, these slots hold audio clips play (chunks of recorded audio or imported audio).
You can create an audio clip by:
- Recording audio directly into a clip slot.
- By dragging and dropping an audio file from the Browser or your computer’s file system.
Once you’ve created an audio clip, it will appear in the Detail View.
Here you can do all sorts of things to manipulate your audio, like trim the clip, change its speed without affecting its pitch (or vice versa), and adjust its volume & panning.
You can also add audio effects to enhance or alter the sound, amongst many other features and functionalities.
Some you’d expect to see in your DAW’s Audio Editor section, and other more advanced/unique options found only within Ableton.
The Arrangement View
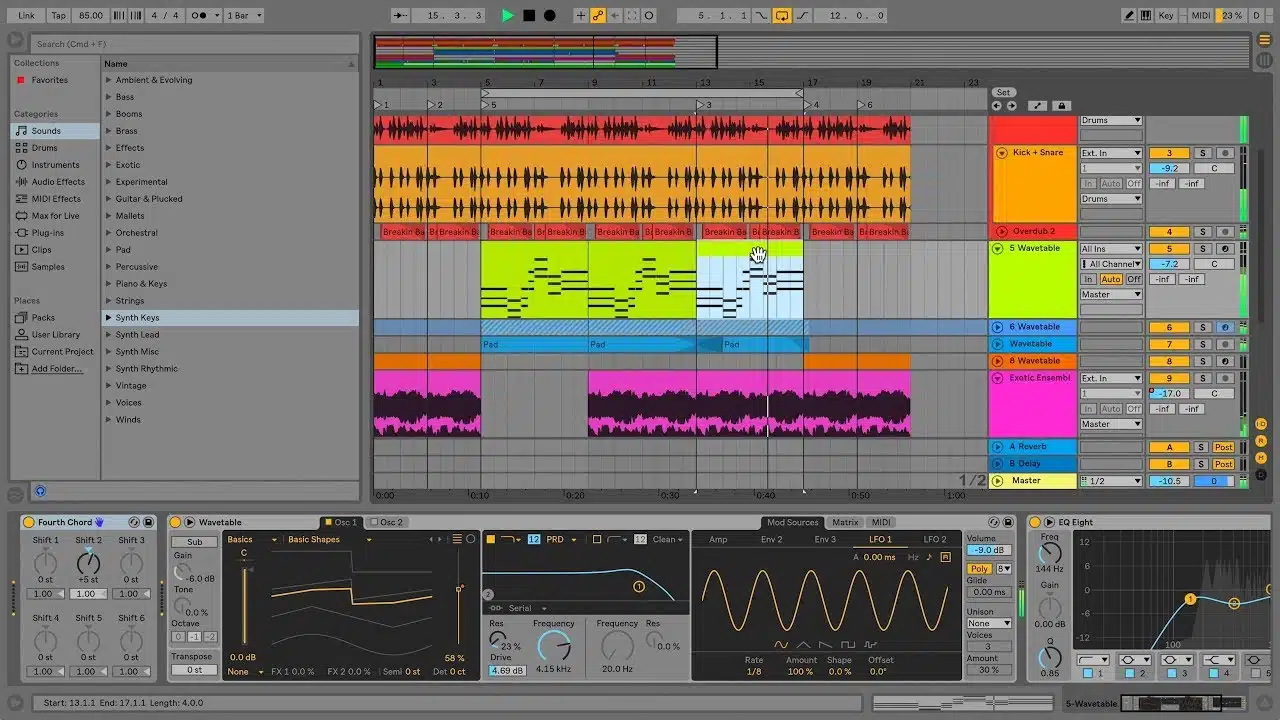
Transitioning from the Session View to the Arrangement View in Ableton Live is an integral part of the music creation process.
While the Session View is fantastic for improvisation and creating musical ideas, the Arrangement View is where these ideas are structured and sequenced over time.
It’s the traditional timeline you might see in other DAWs, often referred to as a Linear view/workflow, and it’s where your song truly comes to life.
To switch from the Session View to the Arrangement View, simply press the ‘Tab’ key.
Then, you’ll immediately notice that your tracks are now laid out horizontally from left to right.
Each track corresponds to the ones you’ve created in the Session View, but instead of launching clips independently, they’re now placed on a timeline.
The Arrangement View allows you to see the overall picture of your song.
You can arrange your clips along the timeline and edit them as a whole.
It’s particularly useful when you’re ready to build your song’s structure 一 arranging verses, choruses, bridges, and more.
-
Crafting your Music with MIDI Note Editor
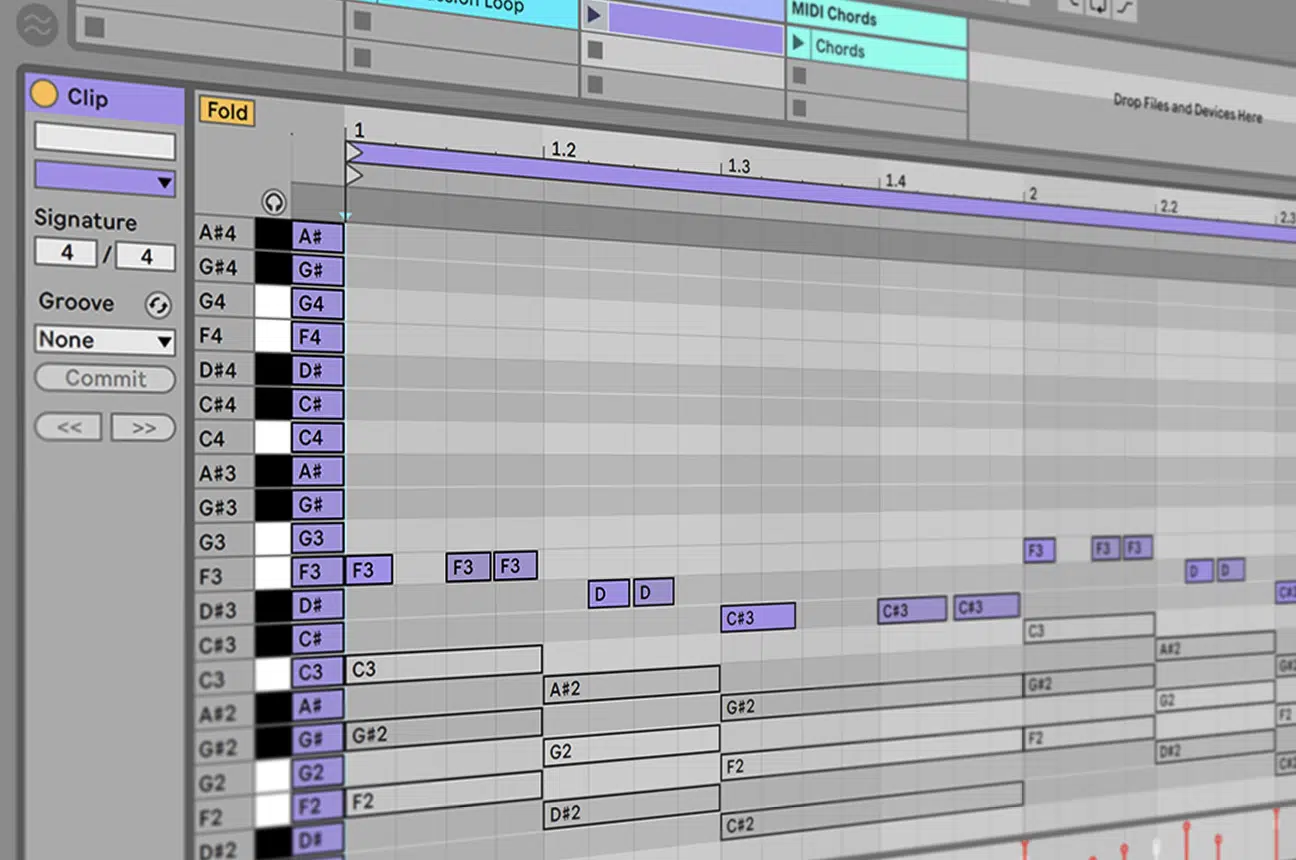
The MIDI Note Editor in Ableton Live is a versatile and flexible tool that allows you to add, delete, or move individual MIDI notes within your clips.
You probably know this function as the Piano Roll view (in DAWs).
To access it, simply double-click on a MIDI clip in the Arrangement View.
The clip’s contents will appear in the Detail View at the bottom of the screen.
Each line on the grid corresponds to a note on the piano roll, and the horizontal position of the notes represents their position in time.
You can add a note by double-clicking on the grid, change its pitch by dragging it up or down, and adjust its length by dragging its edges left or right.
The beauty of the MIDI Note Editor is that it gives you complete control over your music.
You can:
- Change a note’s velocity (how hard it’s played)
- Duplicate notes or entire sections
- Change the grid size to adjust the note’s timing and feel
Make sure, especially if you’re learning how to use Ableton Live, to get super familiar with this section, it’s very important.
To the left of the piano roll itself you’ll find more advanced or exclusive features such as the ‘Scale’ function.
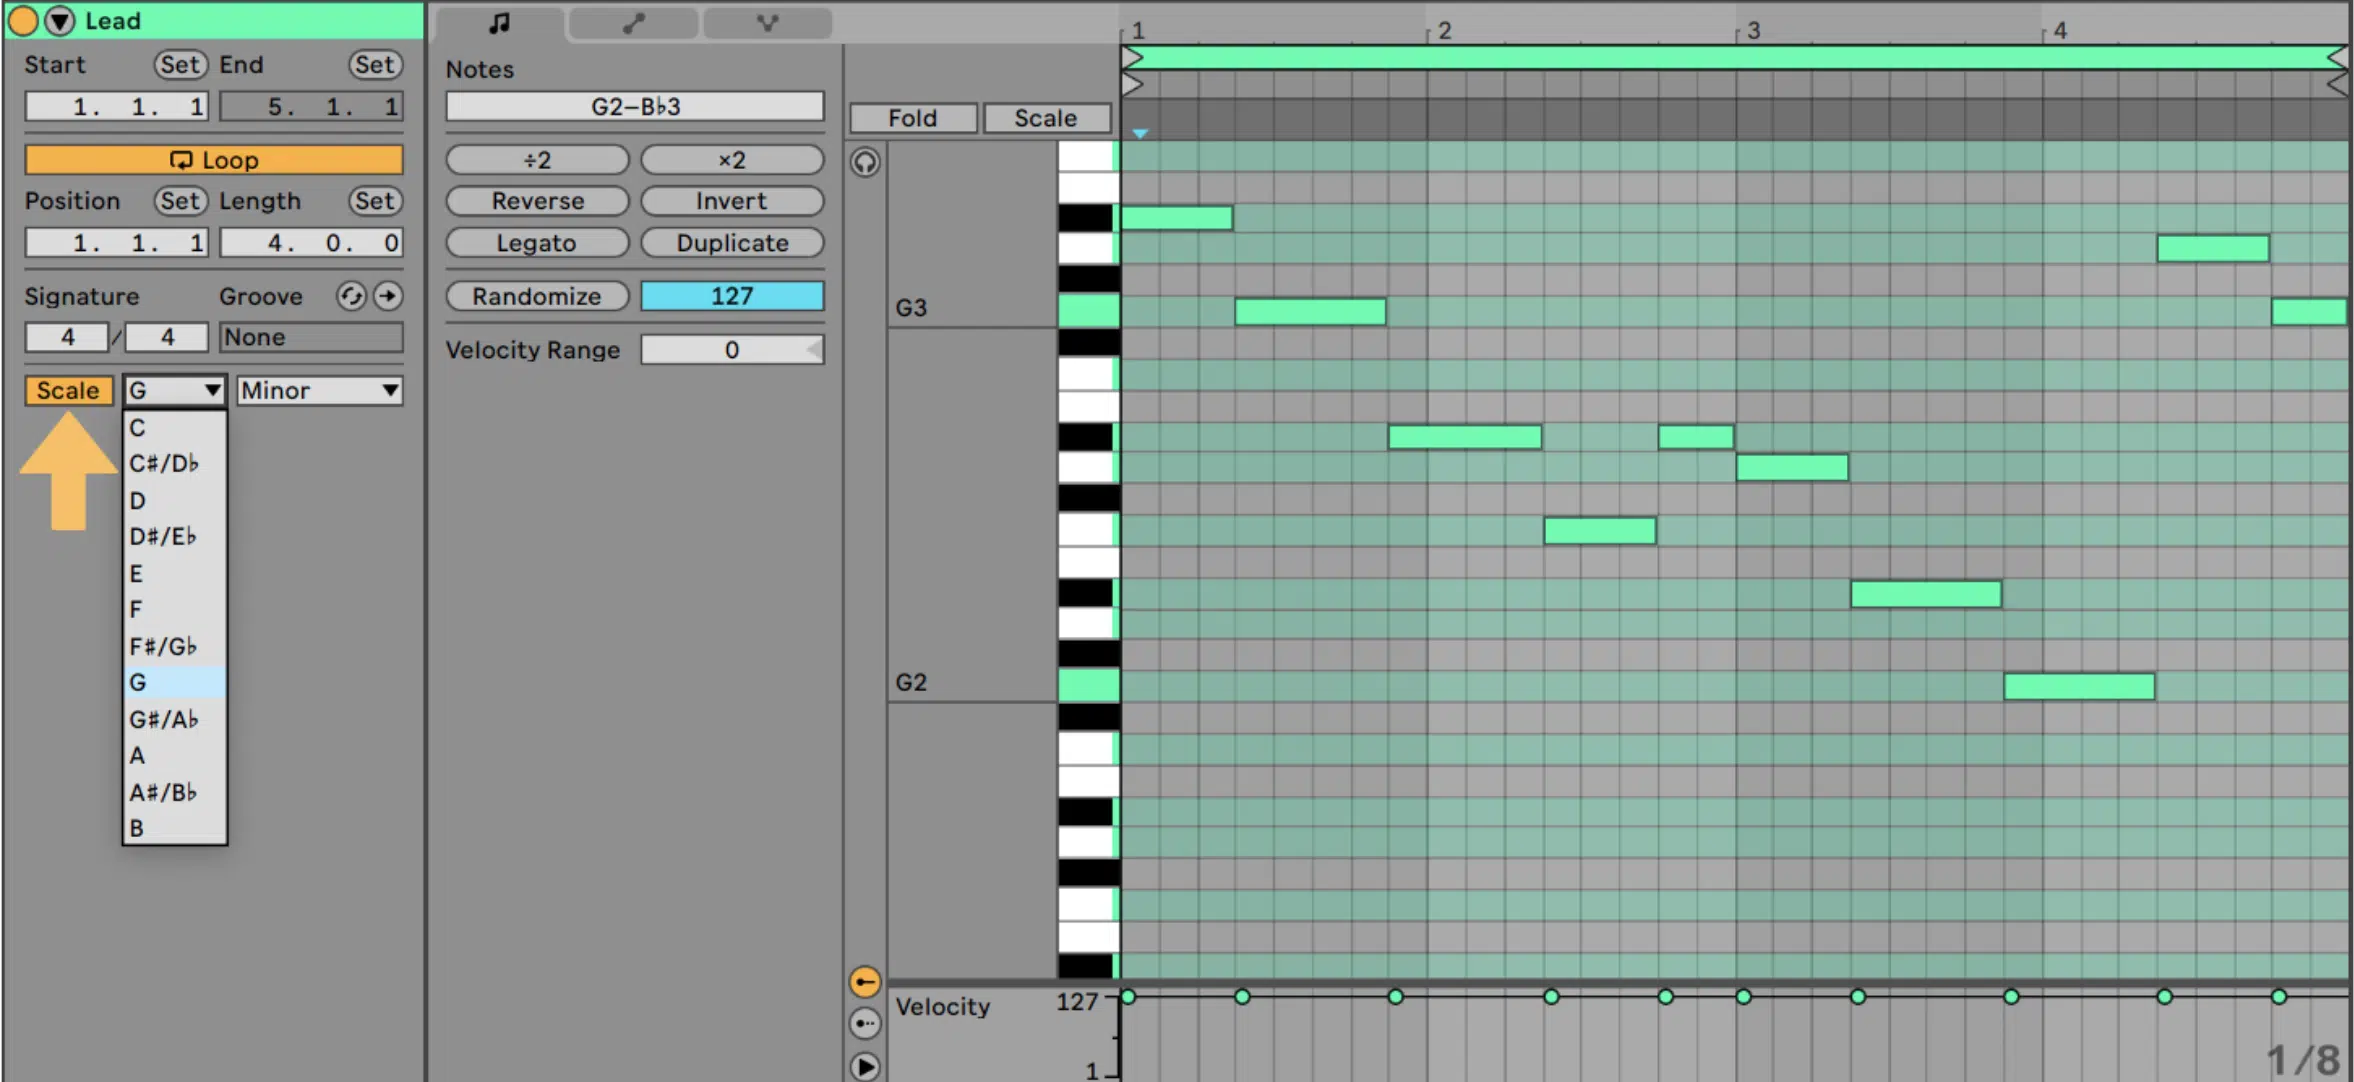
As the name suggests, this function allows you to lock into a particular scale.
When you’re learning how to use Ableton, this function is super beneficial.
Side note, if you’re curious about different scales, like the major scale or minor scale, we break it all down (in detail).
Editing and Refining Your Music
Now that you’ve got your ideas down, it’s time to fine tune them into a complete track, and Ableton Live’s Arrangement View is perfect for this stage of the process.
Here, you’ll learn how to make detailed edits to your clips and really perfect your music.
Let’s break down each vital section, step-by-step:
-
Automation
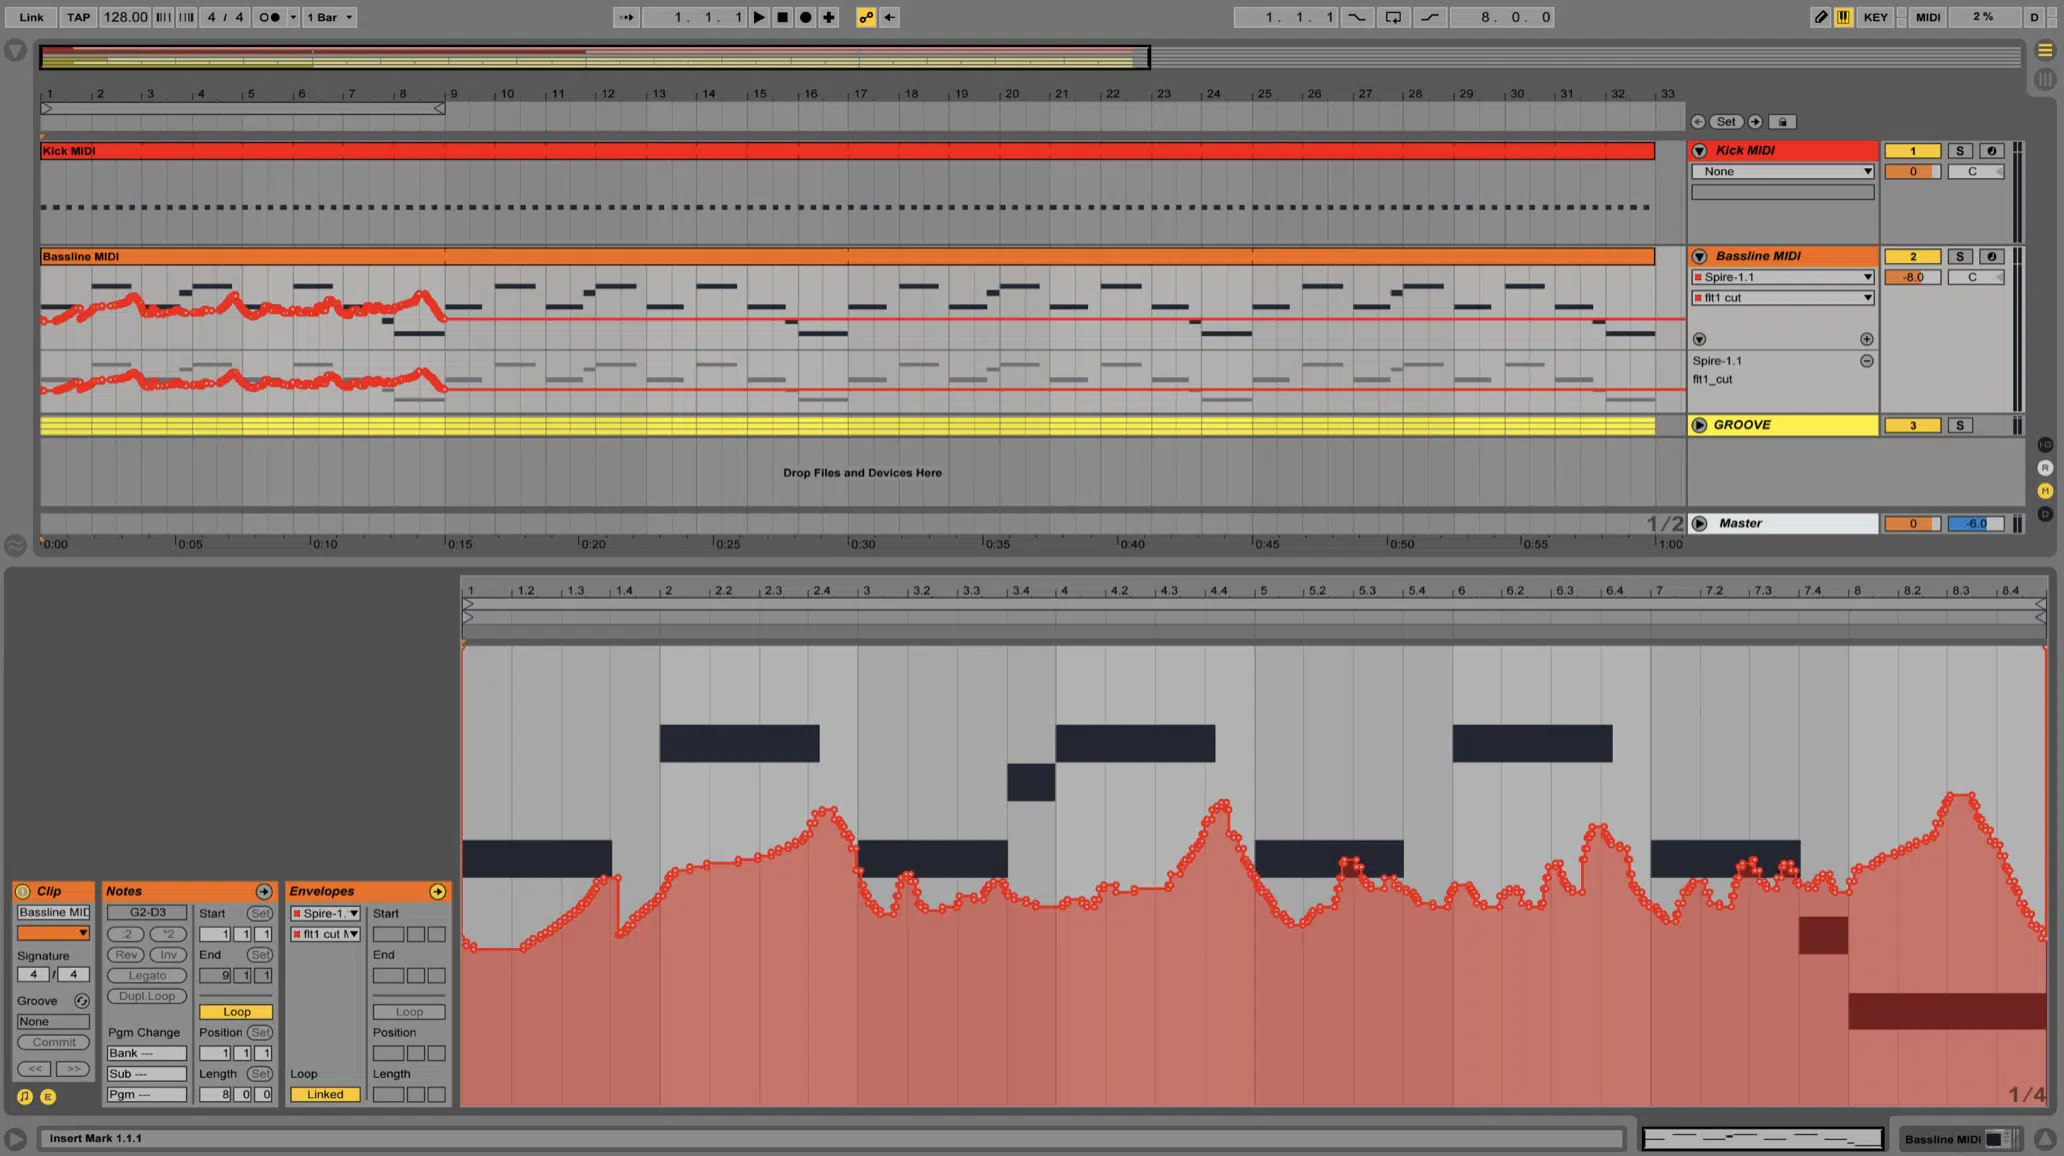
Automation in Ableton Live is a powerful tool that allows you to dynamically change the parameters of your tracks over time.
This includes:
- Volume
- Pan
- Send levels
- Specific parameters of your instruments & effects
By clicking on the ‘Automation Mode’ button, you can draw in automation curves directly onto your tracks.
For example, if you’re attempting to make your synth louder during the chorus or add filter modulation during a particular section, or even automate a filter sweep on a synth, Automation Mode has got you covered.
I like to say, when referring to a DAW: Automation = Modulation.
It allows you to apply modulation to parameters that you may not have access to and modulate/add modulation.
You can even incorporate custom curves to plugins and parameters with limited/no modulation capabilities.
It’s a great way to add movement and interest in your track, and create refined mixes and masters.
Make sure to play around with these parameters when you’re learning how to use Ableton.
-
Warping
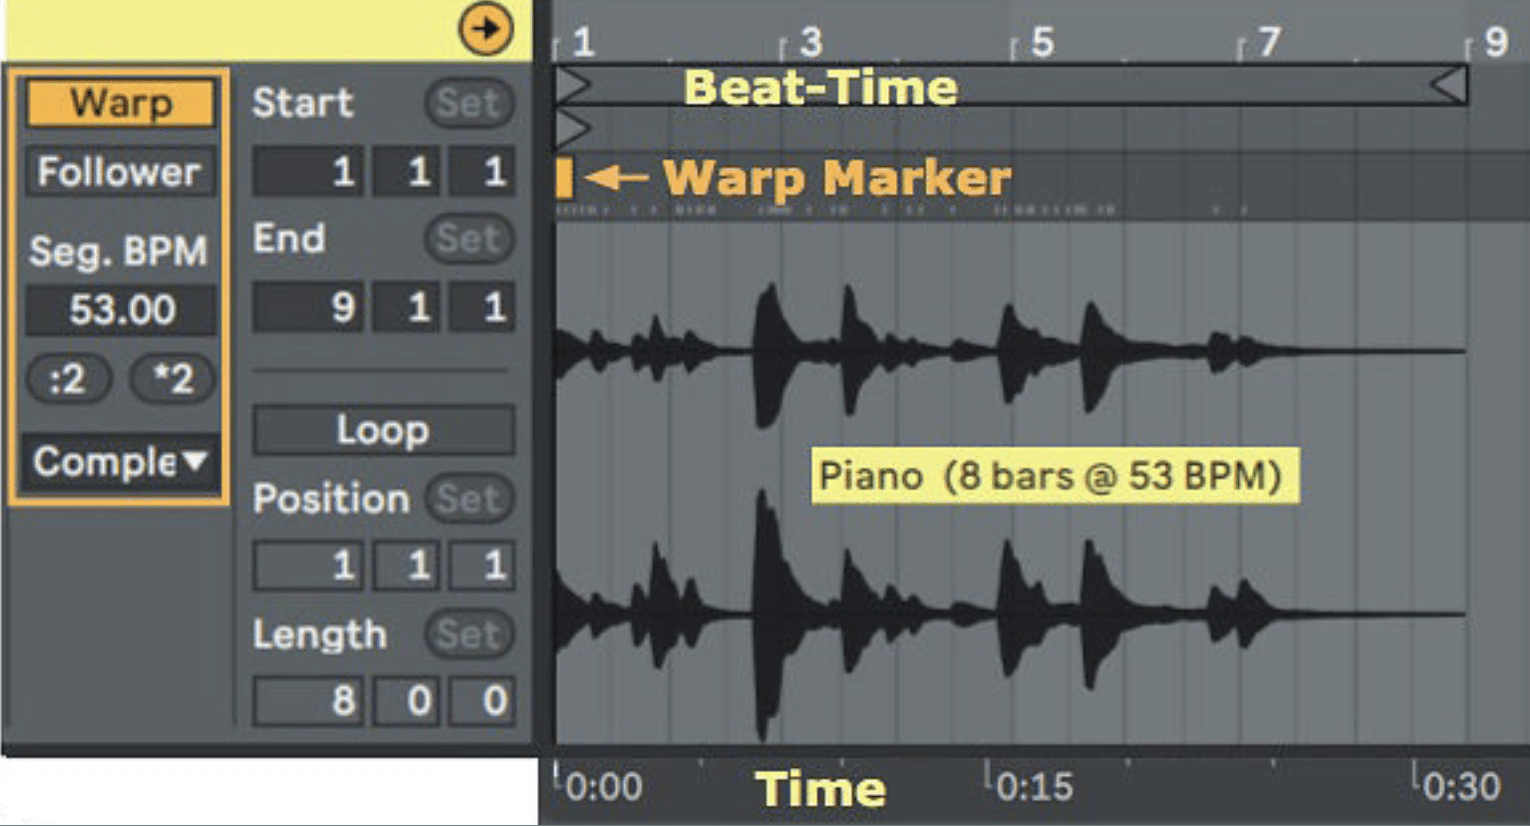
The “Warping” function is a unique (advanced) Ableton Live feature that lets you manipulate the timing of your audio clips without changing their pitch.
Plus, so much more, thanks to the versatile warping envelopes.
Say you’ve recorded a guitar part, but certain parts are just not quite in time with the rest of your track.
With warping, you can move the beats of your audio clip around until they’re perfectly locked in time, or use it for basic, quick audio quantization.
You can also use warping to change the tempo of your clips, which is perfect for remixing or DJing, amongst other things.
NOTE: There aren’t just different warping algorithms, but multiple ways to apply it as well. This includes warp envelopes and warp markers.
Be sure to look beneath the surface when you’re learning how to use Ableton, as that’s where the true magic happens.
It offers super creative possibilities that you can apply to your production and sound design; way beyond corrective and utilitarian purposes.
-
Clip Envelopes
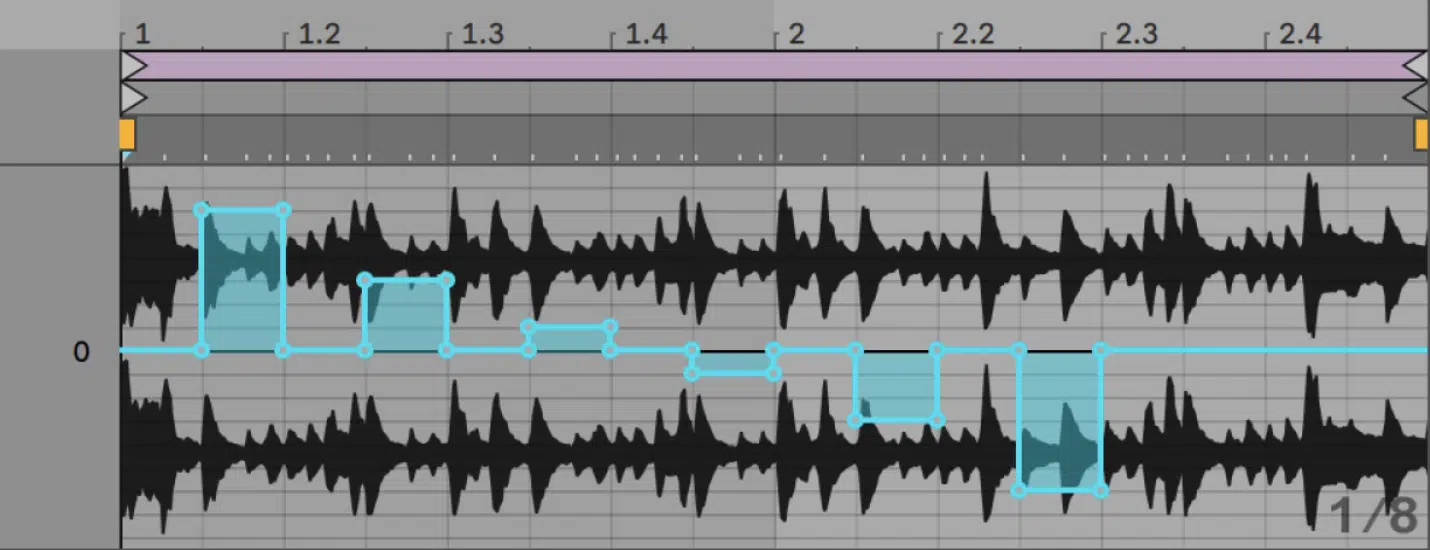
Another essential editing feature in Ableton Live is ‘Clip Envelopes.’
These allow you to apply automation to data in individual clips & clip parameters of all types, for ultimate flexibility.
With them, you can quickly make changes to various clip parameters over time, such as transposition and gain.
For example, you can use a clip envelope to gradually transpose a synth clip upward during a build-up.
NOTE: To access clip envelopes, simply click on the ‘E’ button in the Clip View.
-
Group Tracks
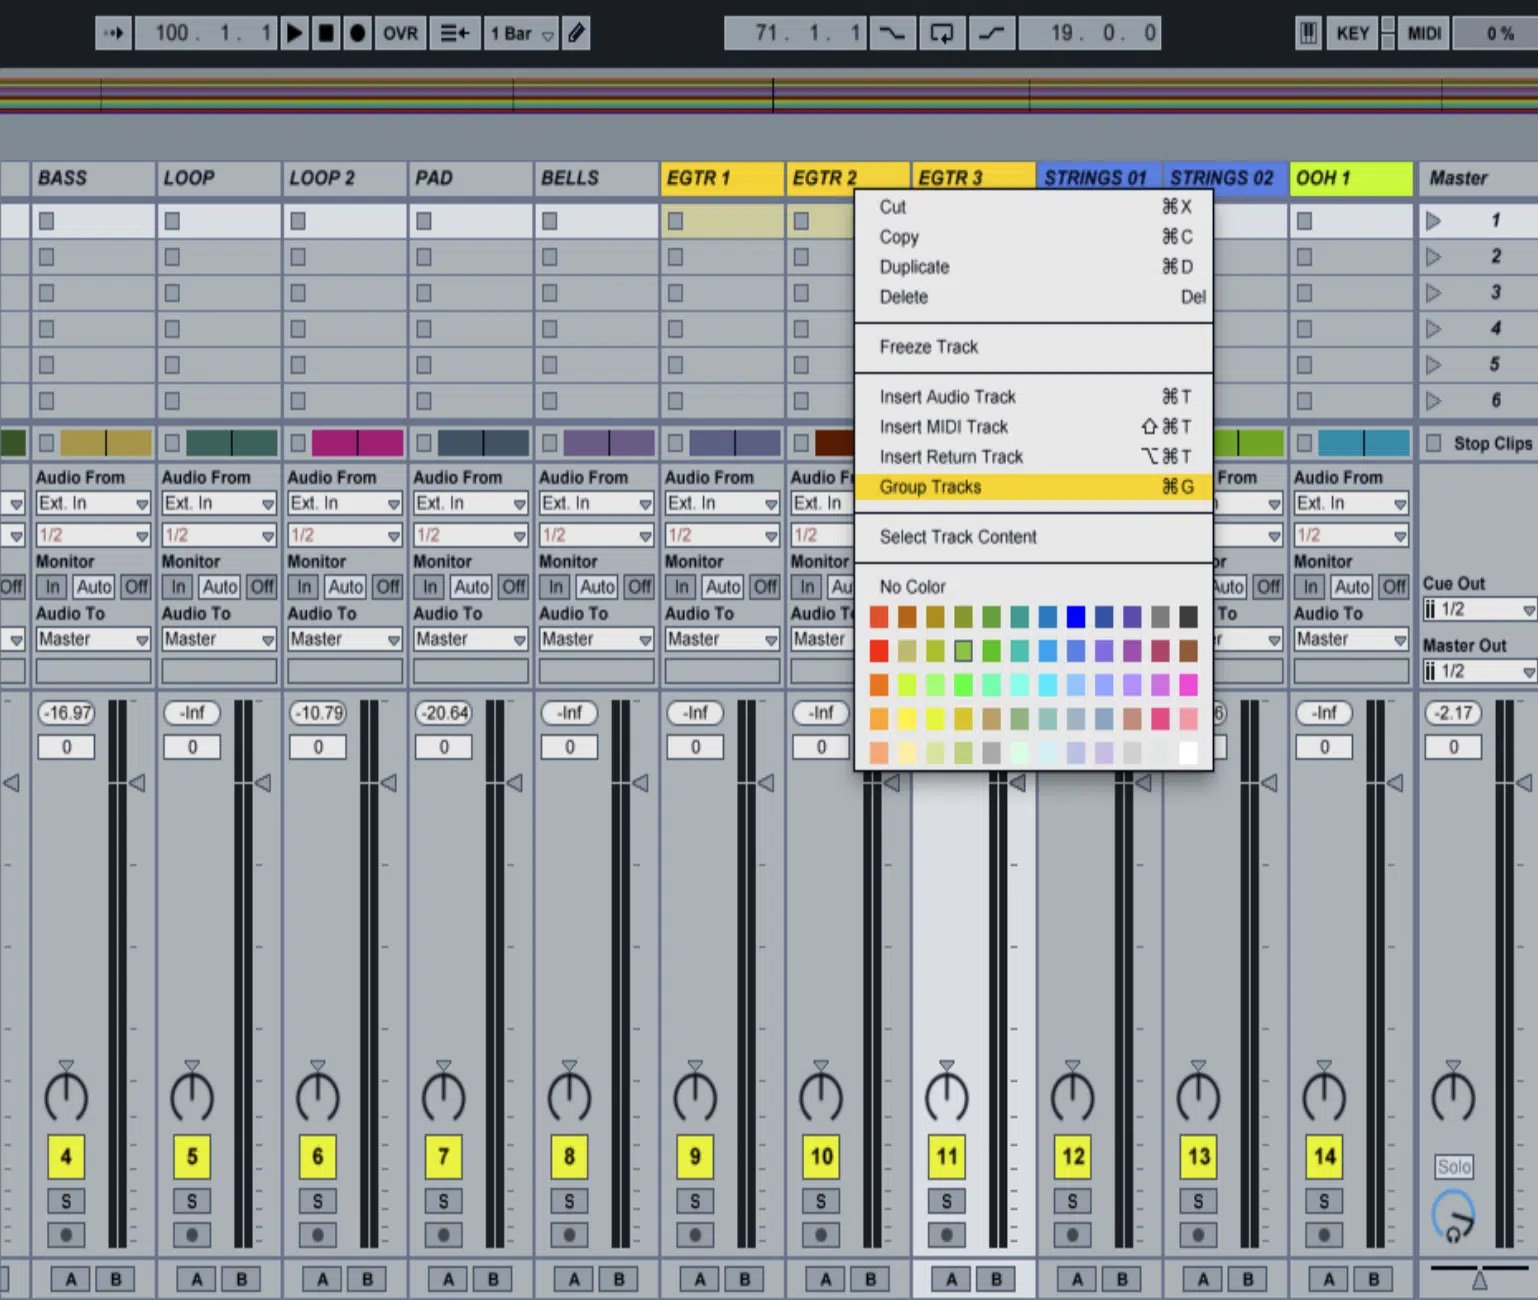
Last but not least, let’s talk about ‘Group Tracks.’
This feature allows you to group related tracks together, making your project more organized and easier to mix.
For example, you can group all your drum tracks together and adjust their collective volume with a single fader.
To create a group track, select the tracks you want to group, right-click, and choose ‘Group Tracks.’
All these features give you detailed control over your music, allowing you to refine your ideas into a polished, complete track.
Take the time to experiment with them and see how they can improve your music.
Unleashing Musical Ideas with MIDI Instruments & effects (MIDI FX)

Ableton Live comes packed with a vast array of MIDI instruments and effects that you can use to create your music.
To add an MIDI instrument to a MIDI track, simply go to the Browser, select the ‘Instruments’ tab, and drag and drop your chosen instrument onto your track.
Each instrument in Ableton Live has its own unique sound and set of parameters that you can adjust to create your desired tone.
From realistic piano and string sounds to synthetic leads and pads, Ableton Live’s instruments offer a world of sonic possibilities.
In addition to all the instruments, Ableton Live offers a range of MIDI effects.
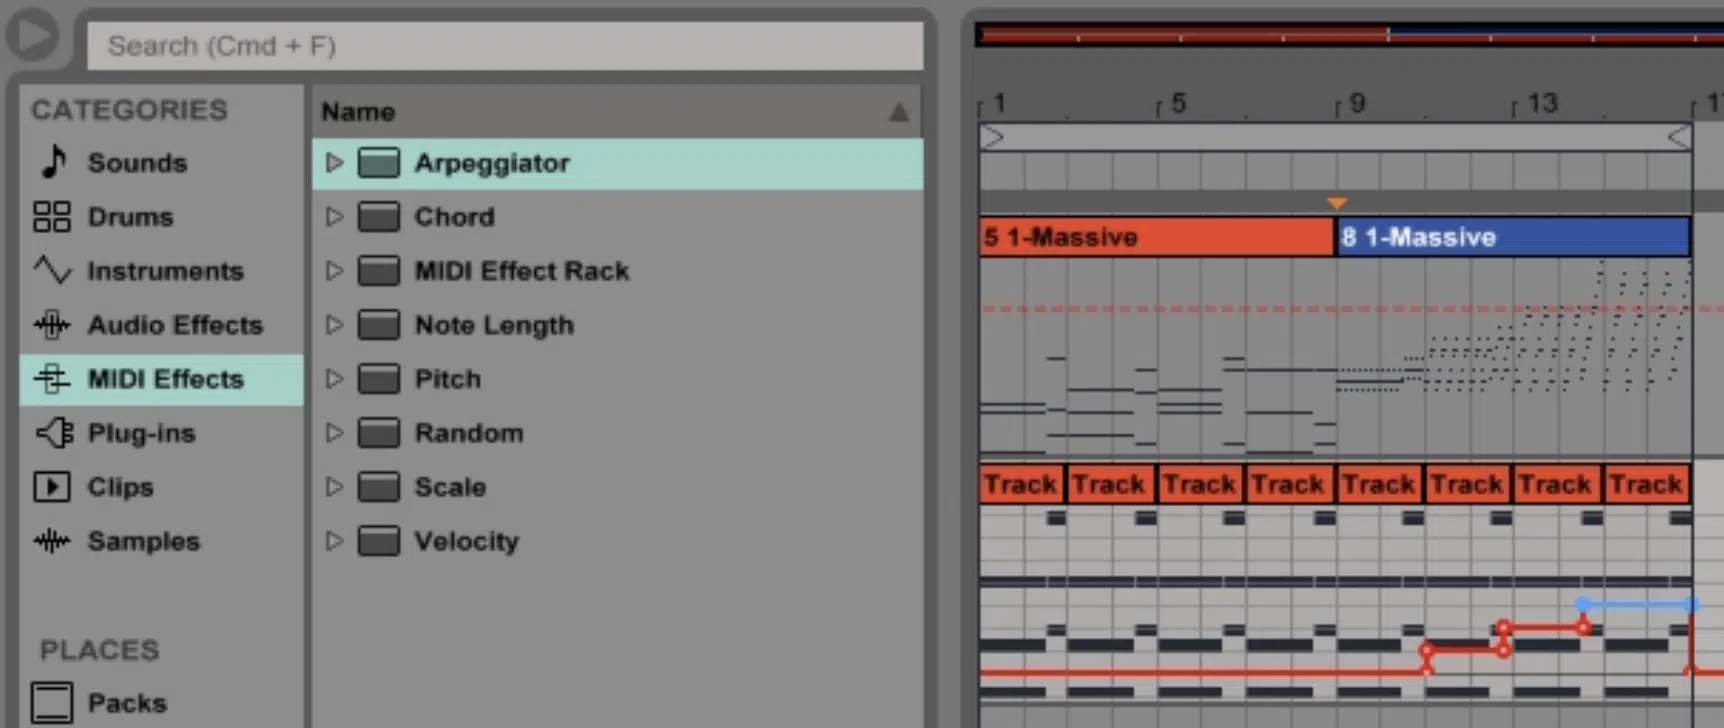
These can be added to your MIDI tracks to manipulate your MIDI data in super creative ways.
For instance, you can use the ‘Arpeggiator’ effect to automatically create arpeggios from your MIDI notes, or the ‘Chord’ effect to create complex chords with a single note.
NOTE: MIDI effects differ from traditional Effects plugins as they take the MIDI Input and affect the actual MIDI Output data in a wide variety of different ways, unique to the MIDI FX plugin in use.
Understanding MIDI Channels, MIDI Notes, and MIDI Controllers
MIDI (Musical Instrument Digital Interface) is a protocol that allows musical devices to communicate with each other.
Understanding how it works is crucial for making the most of Ableton Live.
Let’s break down some key MIDI concepts
- MIDI channels
- MIDI notes
- MIDI controllers
-
MIDI Channels
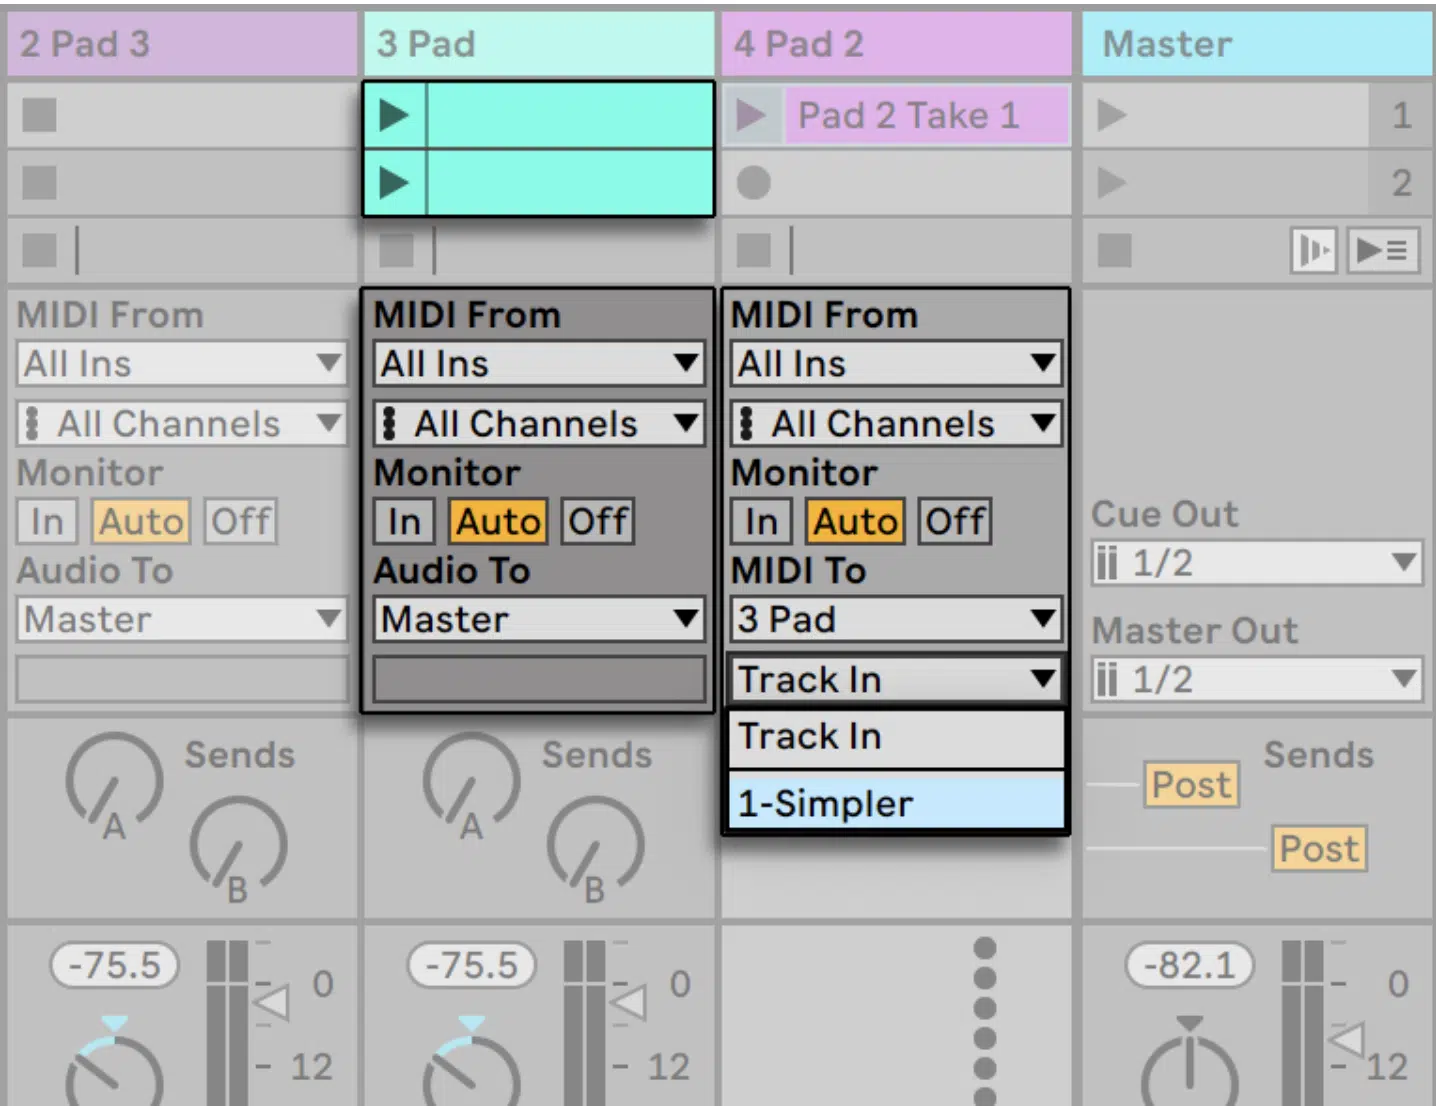
In MIDI, a ‘channel’ is a path over which information can be sent.
There are 16 MIDI channels available, and you can think of them as different lanes on a highway.
When using multiple MIDI devices or instruments in a project, each one can be assigned to a separate MIDI channel.
This allows you to send specific instructions to each device without them interfering with each other.
For example, you could have a drum machine on MIDI channel 1, a synthesizer on channel 2, and so on.
In Ableton Live, you can specify the MIDI channel for each track in the I/O (Input/Output) section.
-
MIDI Notes

A MIDI note is a piece of data that represents a musical note.
When you play a note on a MIDI keyboard, it sends a MIDI note message to your computer or MIDI device.
This message contains information about the pitch of the note, how hard it was played (velocity), and when it was released.
In Ableton Live’s MIDI note editor, you can draw, move, resize, and delete MIDI notes to create your musical ideas.
When learning how to use Ableton Live, playing around with MIDI notes is a beneficial way to further understand it.
-
MIDI Controllers
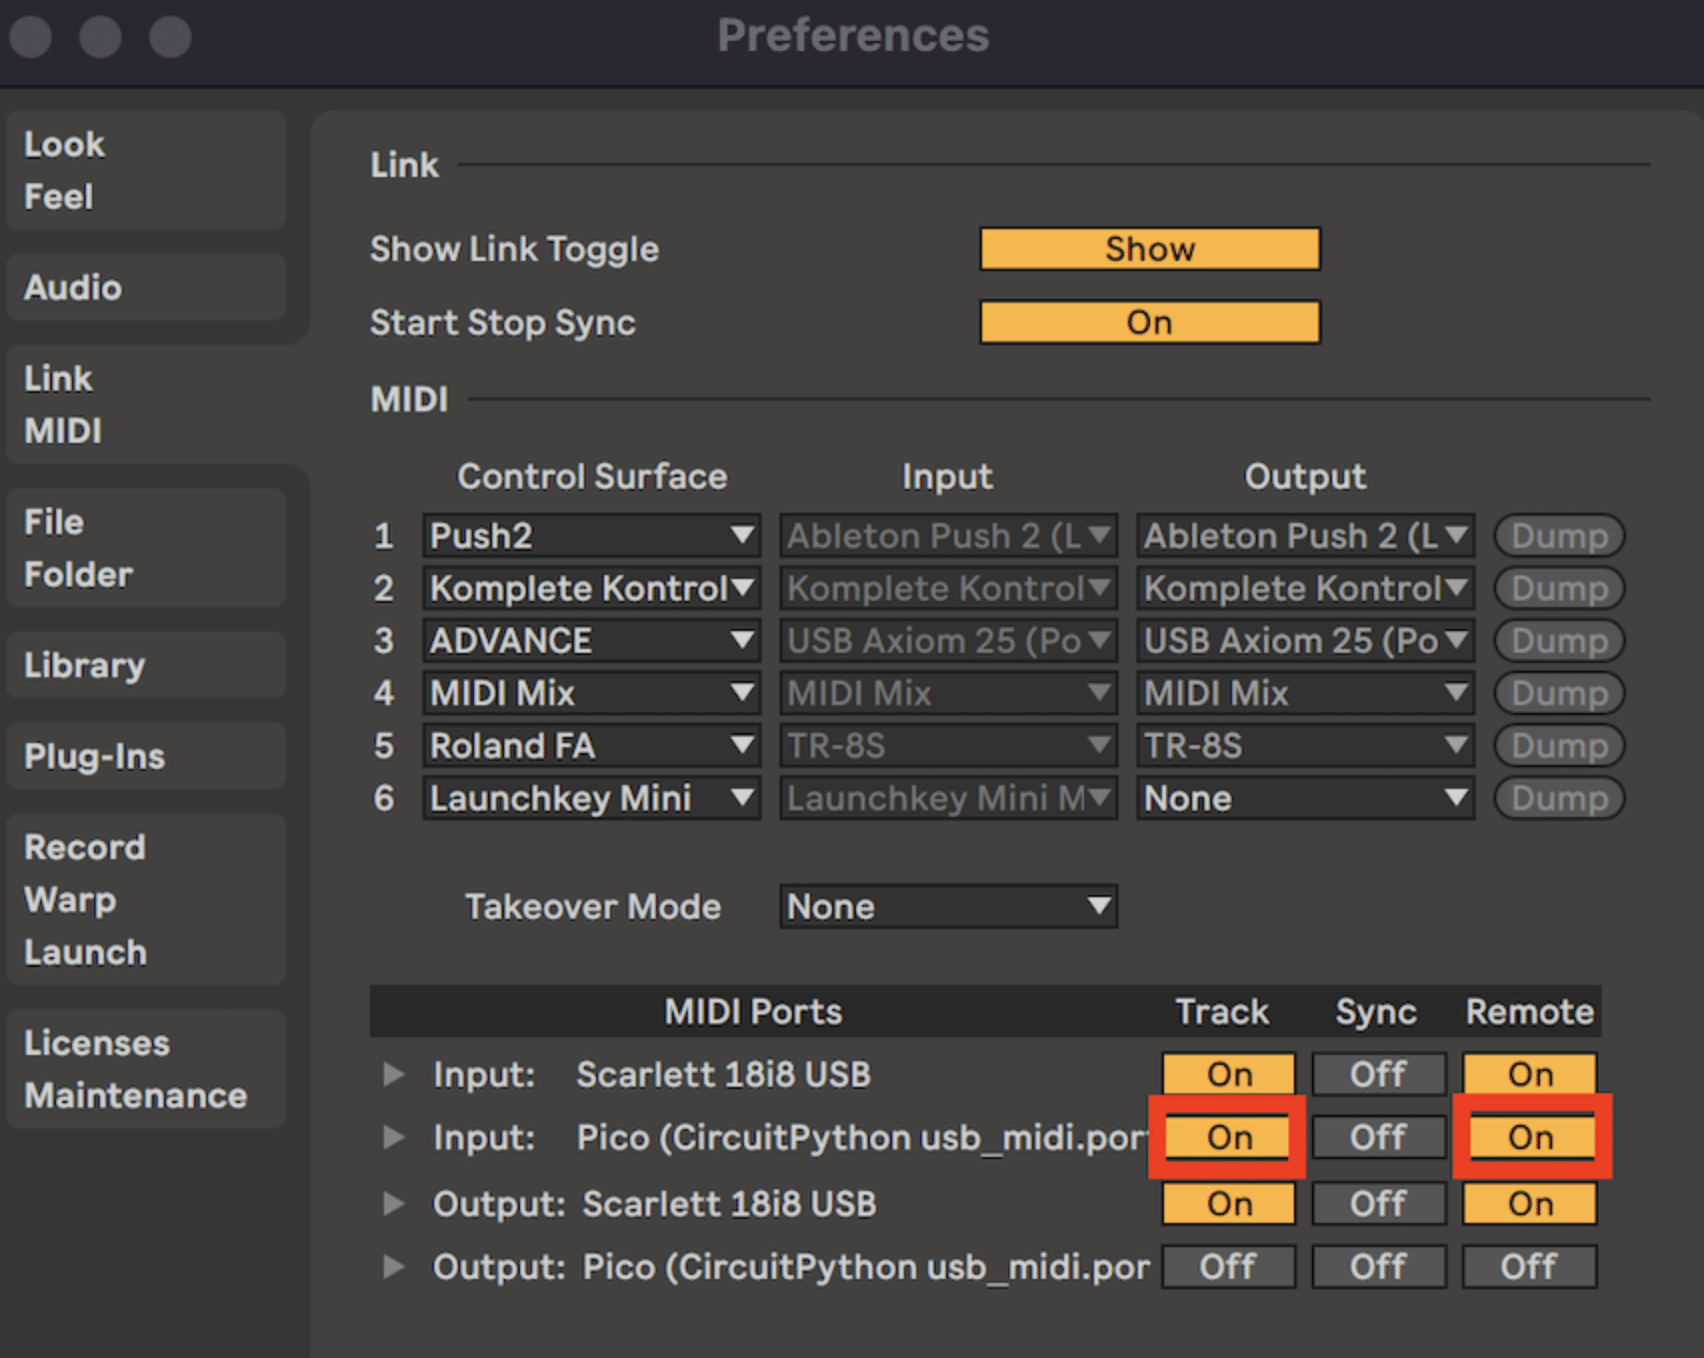
A MIDI controller is a piece of hardware that sends MIDI data to your computer or MIDI device.
This could be a keyboard, a pad controller, a knob controller, or even a wind instrument.
MIDI controllers allow you to play your virtual instruments in a more tactile way, and many also allow you to control other aspects of Ableton Live 一 like the mixer or transport controls.
Ableton Live is designed to work seamlessly with a wide range of MIDI controllers.
To use one, simply connect it to your computer, go to Ableton Live’s ‘Preferences’ menu, and select your controller under the ‘Link/MIDI’ tab.
Understanding these concepts will give you a solid foundation in MIDI, which is a key part of music production.
It allows you to tweak your music in a more detailed and expressive way, bringing your musical ideas to life.
Editing MIDI Clips & Audio Clips
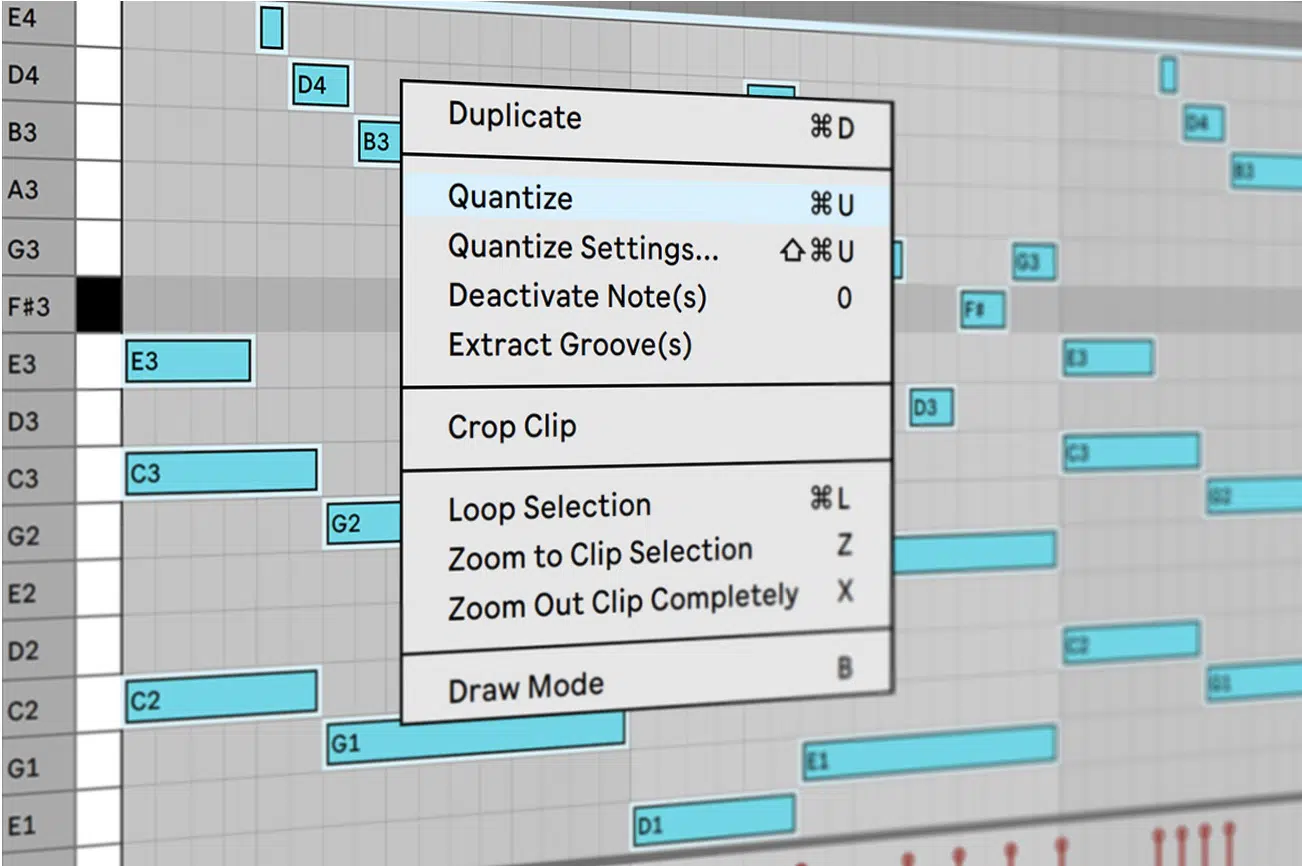
Once you’ve recorded your MIDI or audio clips, you can edit them to perfection in Ableton Live.
Double-clicking on a clip brings up the Detail View 一 where you can see all the notes or waveforms in your clip and make changes as needed.
In the MIDI Note Editor, you can add, delete, or move notes, change their velocity, and adjust their duration.
You can also quantize your notes to correct any timing errors.
To do this, select the notes you want to quantize, then go to the ‘Edit’ menu and select ‘Quantize’ or use the shortcut ‘Ctrl+U’ (or ‘Cmd+U’ on a Mac).
For audio clips, you can adjust the start and end markers to:
- Trim the clip
- Move the warp markers to change the timing of specific parts of the clip
- Transpose the clip to change its pitch
Additionally, you can adjust the clip’s gain and panning, and even reverse the clip for creative effect.
This music software really offers everything.
-
Making Use of Ableton Live’s Powerful Automation Features
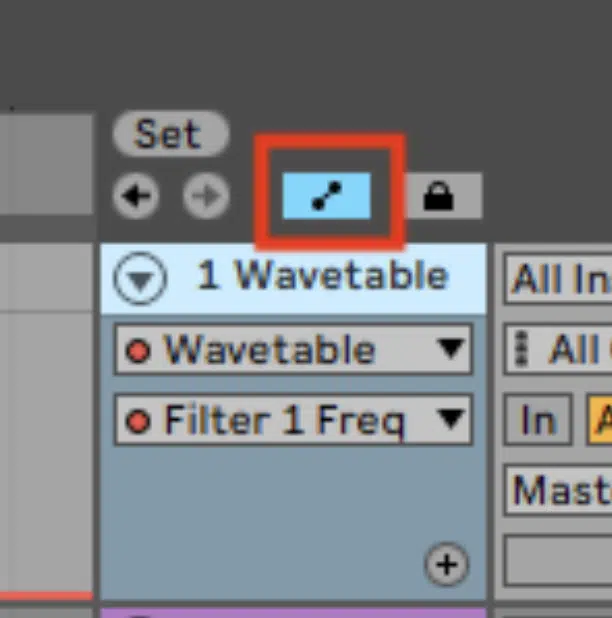
Automation in Ableton Live is a powerful feature that allows you to create dynamic changes in track parameters over time.
You can automate almost any parameter in Ableton Live 一 from track volume and panning to individual parameters of instruments and effects.
To create an automation, first, select the parameter you want to automate.
Then, in the Arrangement View, click on the ‘Automation Mode’ button at the top right of the screen (or use the shortcut ‘A’).
This will reveal the automation lanes in each track.
Here, you can draw or edit automation curves that control how your selected parameter changes over time.
Automation can bring your music to life, adding movement and interest to your tracks.
For example, you can automate the cutoff frequency of a filter to create a sweeping effect, or automate the volume of a track to create a fade-in or fade-out.
Advancing Your Ableton Live Skills
Now that you have a grasp of Ableton’s basic outlay, let’s get to the fun stuff: how to up your skills!
-
Instruments

One of the standout features of Ableton Live is its wide array of virtual instruments and audio effects.
These tools are essential for crafting your unique sound, and mastering them can greatly enhance your music production abilities.
First, let’s talk about Ableton Live’s instruments, which range from synthesizers to samplers (each offering unique sonic capabilities).
One of my favorite instrument examples is ‘Operator.’
It’s an advanced frequency modulation synthesizer capable of creating a wide range of sounds, from pure sine waves to complex modulated sounds.
By adjusting its various parameters, you can create everything from deep basses to shimmering leads.
Another standout is ‘Sampler,’ Ableton Live’s advanced sampling instrument.

It allows you to manipulate and transform samples in creative ways, such as adjusting pitch, envelope, and filters, to create completely new sounds (your very own sounds).
You can also apply FM to the samples, which is a very rare feature to find in any Sampler.
Ableton Live also includes a variety of drum instruments like ‘Drum Rack,’ allowing you to create custom drum kits.
You can load individual drum samples into the Drum Rack’s cells and trigger them using MIDI notes, perfect for crafting your unique drum patterns.
-
Effects

On the effects side, Ableton Live offers a plethora of options to shape and color your sound.
Take ‘Reverb,’ for instance 一 it simulates the acoustic environment, adding a sense of space to your tracks.
By adjusting parameters like decay time, pre-delay, and room size, you can make your tracks sound like they’re in everything from a small room to a large cathedral.
‘Compressor’ is another essential tool in the Ableton Live audio effects arsenal.
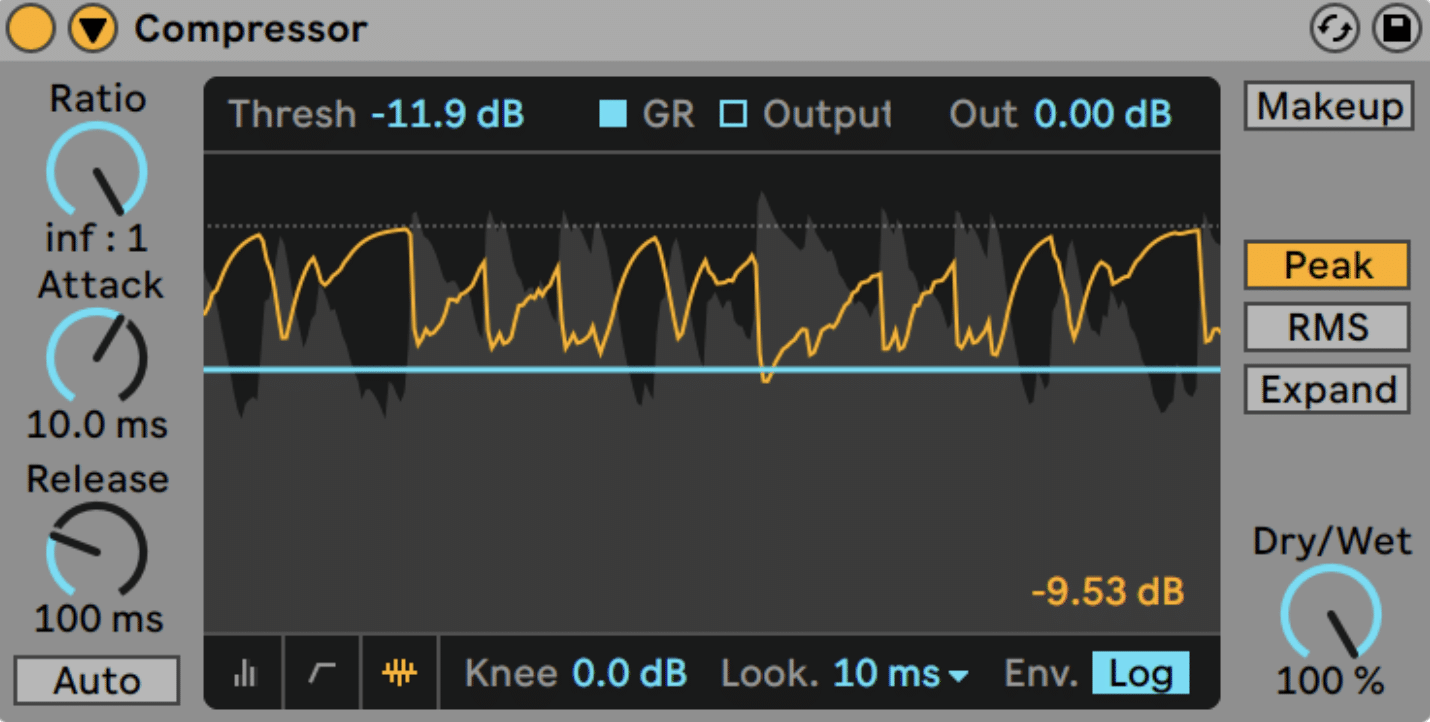
It helps to balance the dynamic range of your audio, ensuring that no part of your track is too loud or too soft.
This is especially useful for making your mixes sound louder and more polished.
Then there’s ‘Echo,’ a creative tool that’s more than just a delay effect.
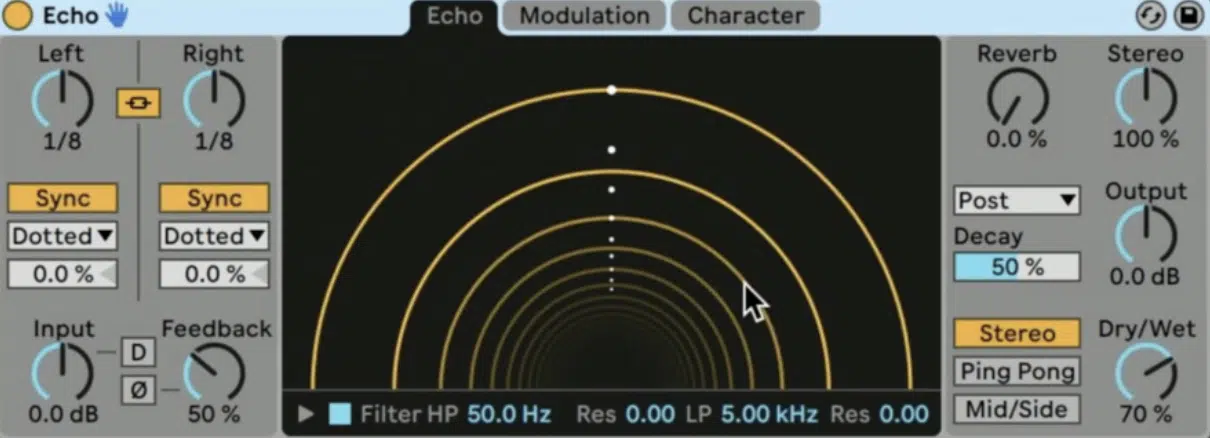
It not only lets you create echo effects, but also comes with modulation and reverb sections.
Therefore, you can create everything from vintage tape echo sounds to complex soundscapes.
Mastering these instruments and effects in Ableton Live can give you a greater command over your music production, giving you more precision and creativity.
Don’t be afraid to dive deep into each tool, experiment with their parameters, and see how they can transform your sound, there are no limits.
-
Managing Return Tracks
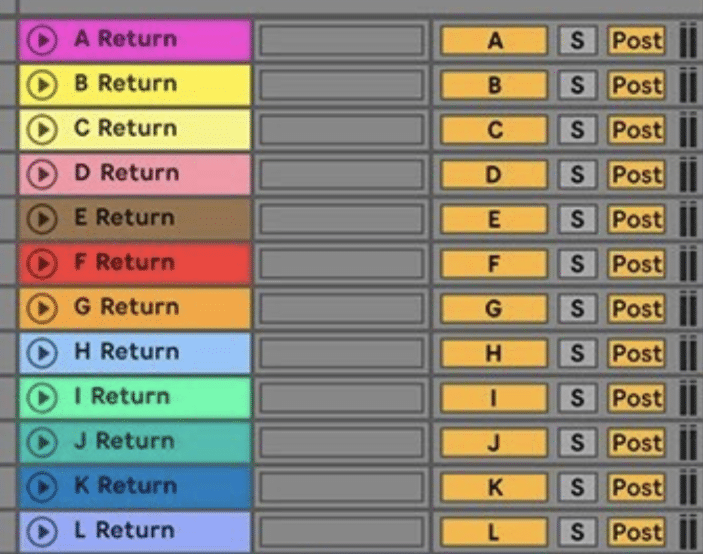
Return Tracks in Ableton Live are used to apply effects to multiple tracks simultaneously.
These are also known as “Sends,” and a typical Ableton default session has 2 of these set up for reverb & delay signals so they’re easily routable.
This can be useful for adding a consistent reverb to all your tracks, for instance, or for applying a compressor to a group of tracks to glue them together.
To create a return track: go to the ‘Create’ menu and select ‘Insert Return Track’. A new return track will appear in the Session and Arrangement Views.
You can then add audio effects to the return track just like you would to a regular track.
To send audio from a track to a return track, use the send knobs in the track header.
The amount of audio sent to the return track is determined by the position of the send knob 一 the more you turn it up, the more audio is sent.
Managing return tracks effectively can help you achieve a more balanced and cohesive mix.
For instance, by sending all your tracks to a reverb return track, you can ensure that they all have the same ‘space’ around them (creating unity in your mix).
-
Processing Audio with Audio Effects
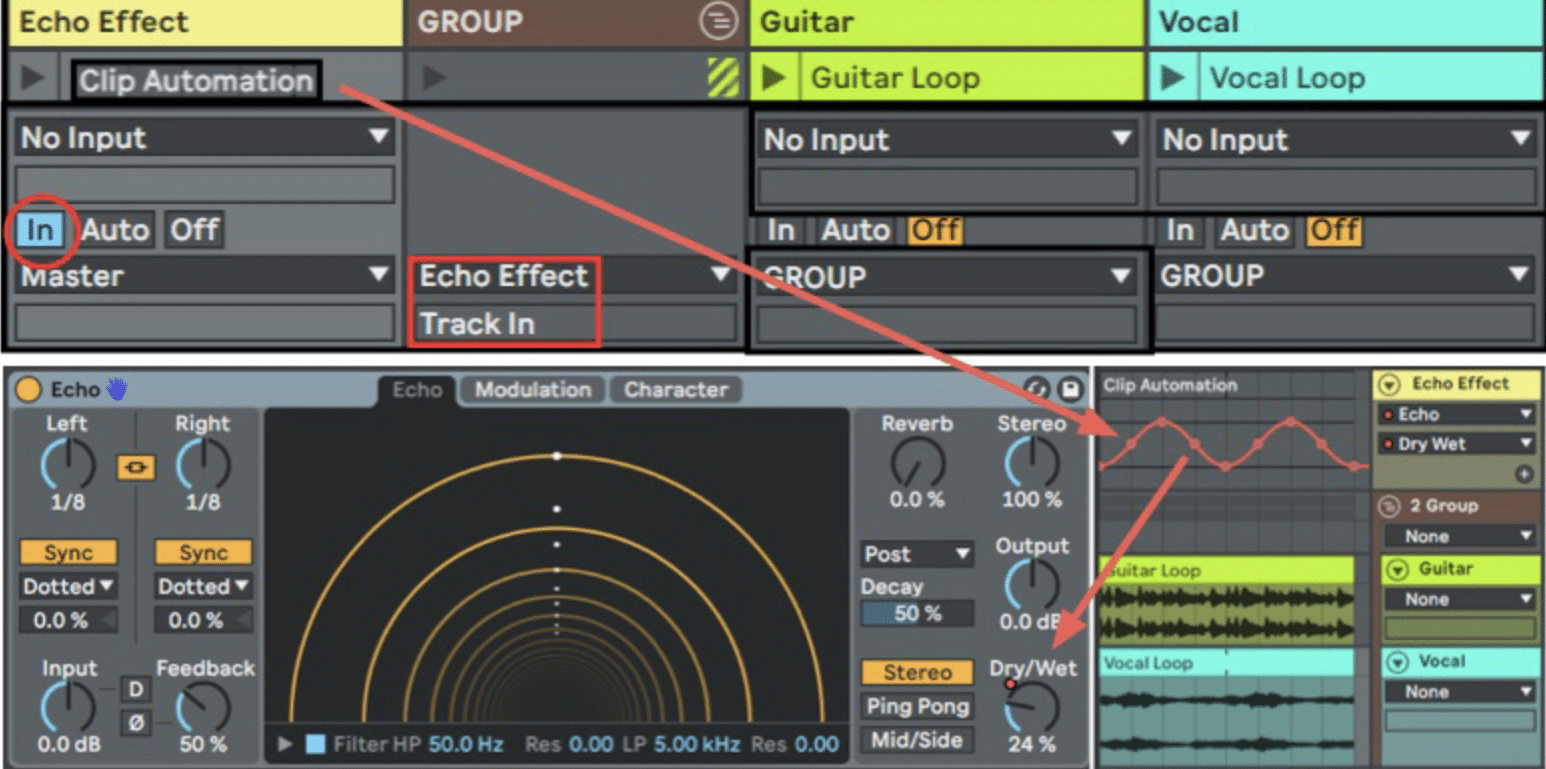
Processing audio with effects is a key part of music production in Ableton Live.
With a wide range of audio effects at your disposal, you can shape and manipulate your sound in countless ways.
To apply an effect to a track simply drag & drop it from the Browser onto the track.
The effect will appear in the track’s device chain, and you can adjust its parameters to suit your needs.
Different effects will have different impacts on your sound.
For instance, a reverb effect can add a sense of space and depth to your track.
While a compressor can help balance the dynamics and make your track sound louder and more polished.
Remember, though, that less is often more when it comes to audio effects.
NOTE: Overusing effects can make your mix sound cluttered and unbalanced, so it’s important to use them with good judgement.
How To Use Ableton: Final Thoughts
By now, you’ve got a solid grasp on the interface, Session and Arrangement Views, MIDI operations, recording & editing, and many other features.
You’ve learned about the powerful instruments and effects at your disposal, and how to bring your music to life in a live performance.
But remember, this is just the beginning of your journey.
Music production is a lifelong learning process, and there’s always something new to discover in Ableton Live.
I encourage you to explore further, experiment freely, and never stop making music!
In fact, here’s a little tip for you: try using these unique, incredibly crafted free one-shots in Ableton to create your own instruments and kits.
Ableton’s Sampler and Simpler are perfect for turning any 1 shot sample into instantly playable patches.
Add some FM magic in Sampler to the one shots, start tweaking, and watch as they transform into something completely new.
Don’t forget to save your creation so you can recall it in any session at any time.
The world of Ableton Live is full of endless possibilities, and you’ve just taken the first step.
Keep exploring, keep creating, and most importantly, keep enjoying the music.
Until next time…


Leave a Reply
You must belogged in to post a comment.