FL Studio (previously known as Fruity Loops) is a true titan in the realm of digital music production.
It can be your key to transforming musical ideas into full-blown masterpieces.
In this comprehensive blueprint, we will dive deep into the world of FL Studio and divulge all its secrets, features, and functions.
As well as answer all your questions about how to use FL Studio like a professional.
Whether you’re a new beatmaker or a seasoned producer, there’s something for everyone here.
Here’s a taste of what you’ll discover:
- Navigating the FL Studio Interface (in depth) ✓
- Mastering the Piano Roll ✓
- Unleashing the Power of the Channel Rack ✓
- Using the Step Sequencer & Playlist Track ✓
- Mixer Tracks & Mixer Channels ✓
- The Instrument Channel & Volume Fader ✓
- Automation Clips in FL Studio ✓
- Insider secrets, tips & techniques to unlock your full potential in FL Studio ✓
Plus, we’ll go over how to craft vibrant melodies, pulsating beats, and immersive soundscapes to make your tracks truly shine.
So, without further ado, let’s dive in…
Table of Contents
- A Rundown of FL Studio’s Interface
- Navigating FL Studio’s Interface
- How To Use FL Studio: A Step-By-Step Guide
- The Power of the Piano Roll
- The Channel Rack
- The Playlist
- Mixer Tracks & Mixer Channels
- FL Studio Expert Tips & Techniques
- 1. Using FL’s Patcher to Chain Multiple Instruments & Effects Together
- 2. Using Wave Candy for Audio Analyzation
- 3. Using Maximus as a Limiter on Your Master
- 4. Using Fruity Peak Controller For Side-chain Compression Type Effects
- 5. Creating Complex Chord Progressions In FL Studio Using the Built-In Chords (“Stamps”)
- How To Use FL Studio: Final Thoughts
A Rundown of FL Studio’s Interface
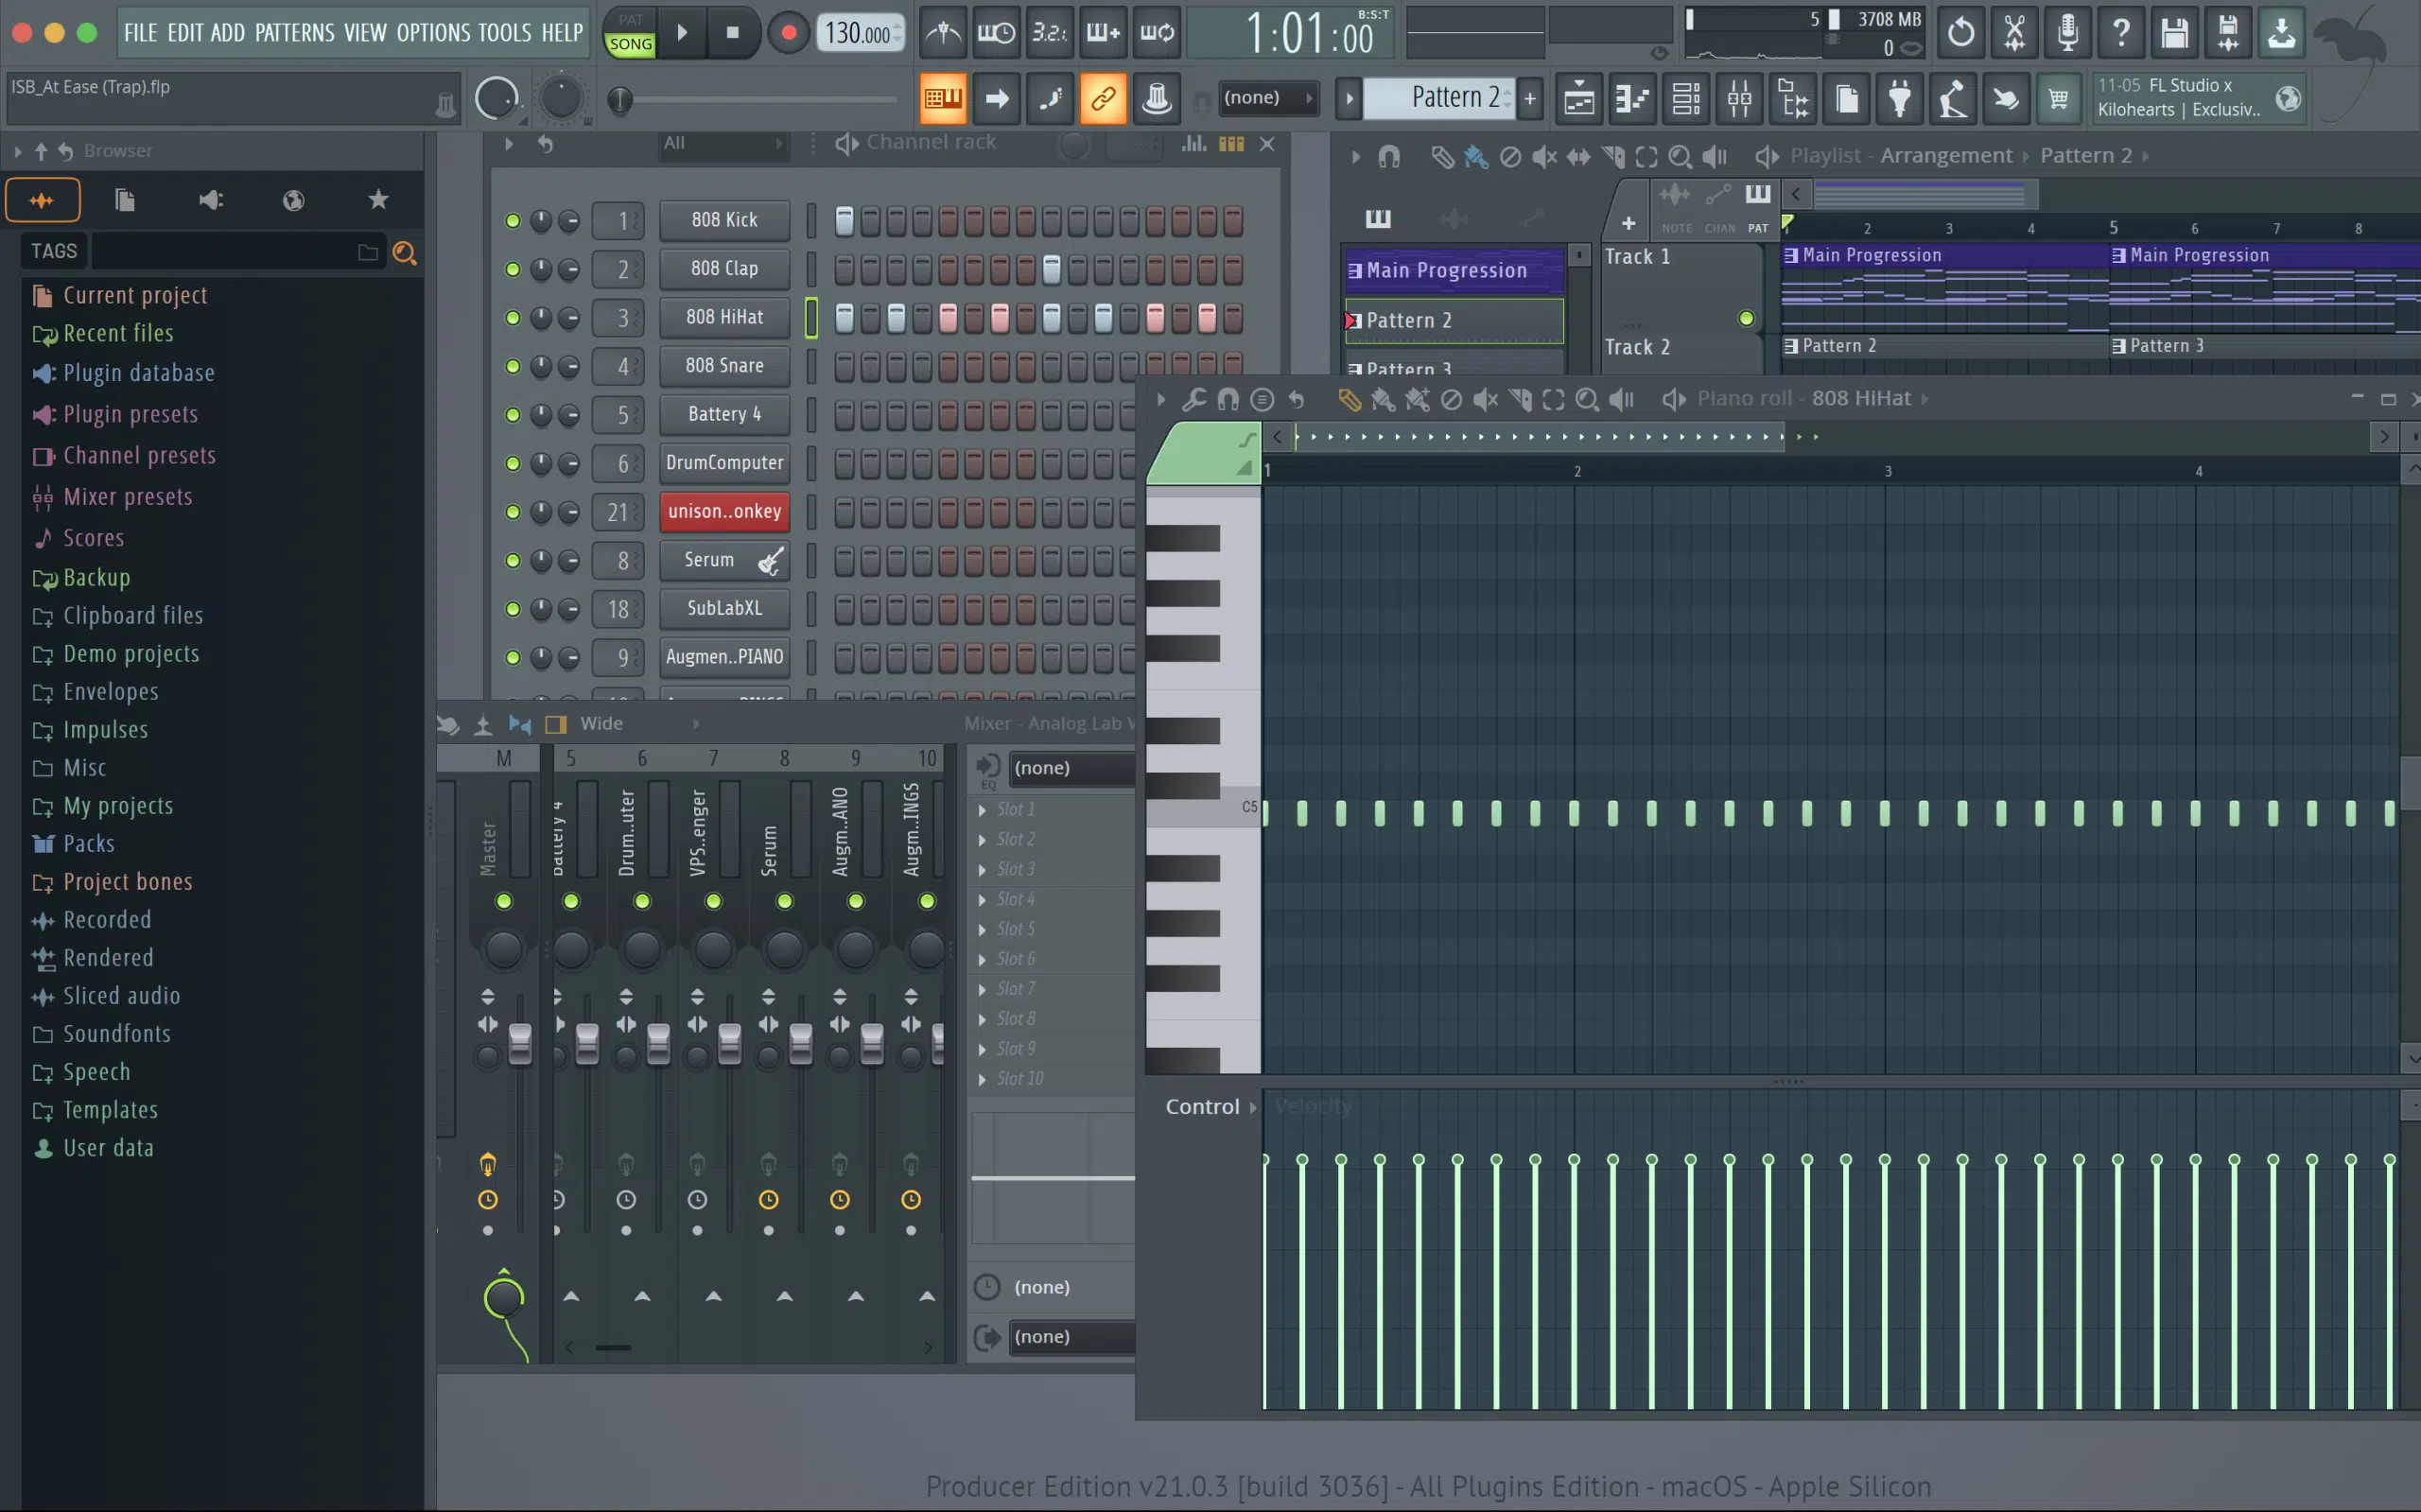
FL Studio’s interface might seem complex at first, but once you get the hang of it, it becomes your playground.
It’s perfect for those just learning how to produce and experts alike.
When you open up FL Studio, it’s like walking into a well-equipped music studio.
Each tool, each menu, each window serves a purpose, and knowing what they do is crucial to creating a unique, captivating track.
The first thing you’ll notice is the various windows and panels, including:
- The Channel Rack
- The Piano Roll
- The Mixer
- The Playlist
Each one of these is a critical component of the entire channel (essentially a track, but before it reaches the mixer).
The Channel Rack is like the heart of your song; it’s where all your instruments, beats, and sounds reside.
Each channel in the Channel Rack can host an instrument channel, an audio clip, or an automation clip.
The Piano Roll, on the other hand, is where you’ll spend a lot of your time crafting melodies and chords.
It allows you to create and edit your MIDI notes with precision. It’s like having a digital piano right at your fingertips.
The Mixer is your audio lab. It’s where you balance your sounds, add effects, adjust the volume faders, and fine-tune your track to perfection.
Finally, the Playlist is your canvas, and it’s where you arrange all your patterns, beats, and clips to create your full song.
This is just the tip of the iceberg, though.
We’ll be diving into each of these sections in more detail later in the article.
Navigating FL Studio’s interface is a breeze once you understand what each window and tool does.
The top panel, for example, holds transport controls, tools, and shortcuts to various windows.
The transport controls are essential for playing, stopping, or recording your track and help you interact with elements in different windows.
For instance, the draw tool lets you draw notes in the Piano Roll, while the paint tool helps you create patterns in the Playlist.
-
The left panel
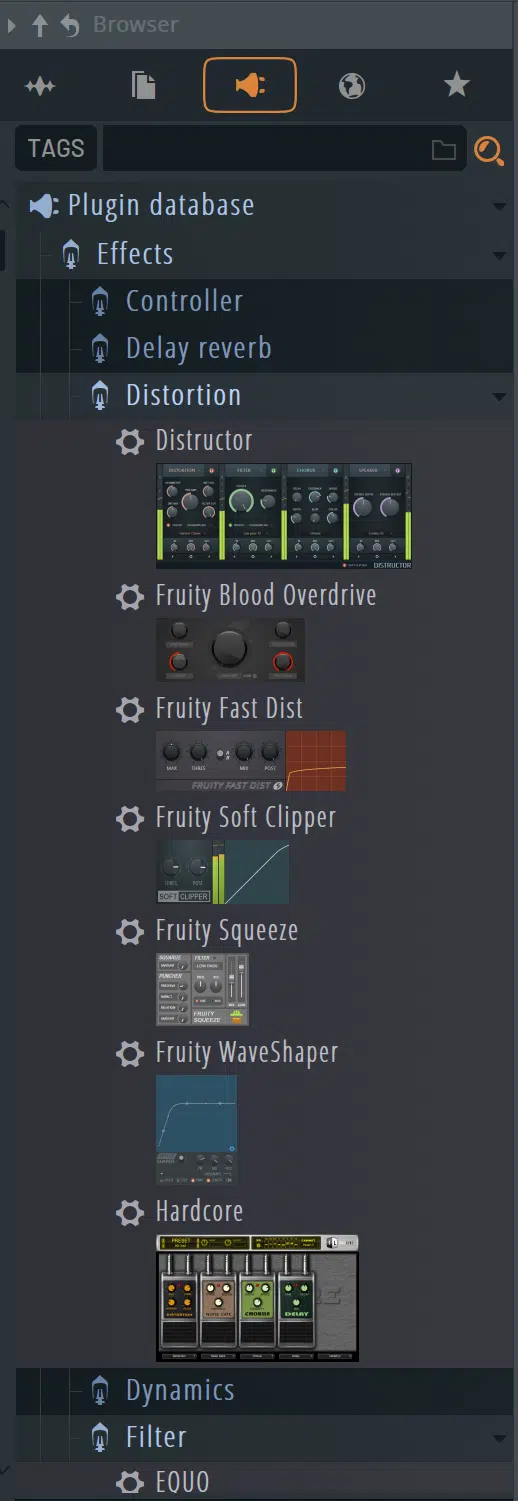
Hosts the (new & improved) Browser, holding your library of samples, presets, and plugins.
Simply drag and drop from the browser to the Channel Rack or Playlist to add elements to your track.
-
The rest of the interface
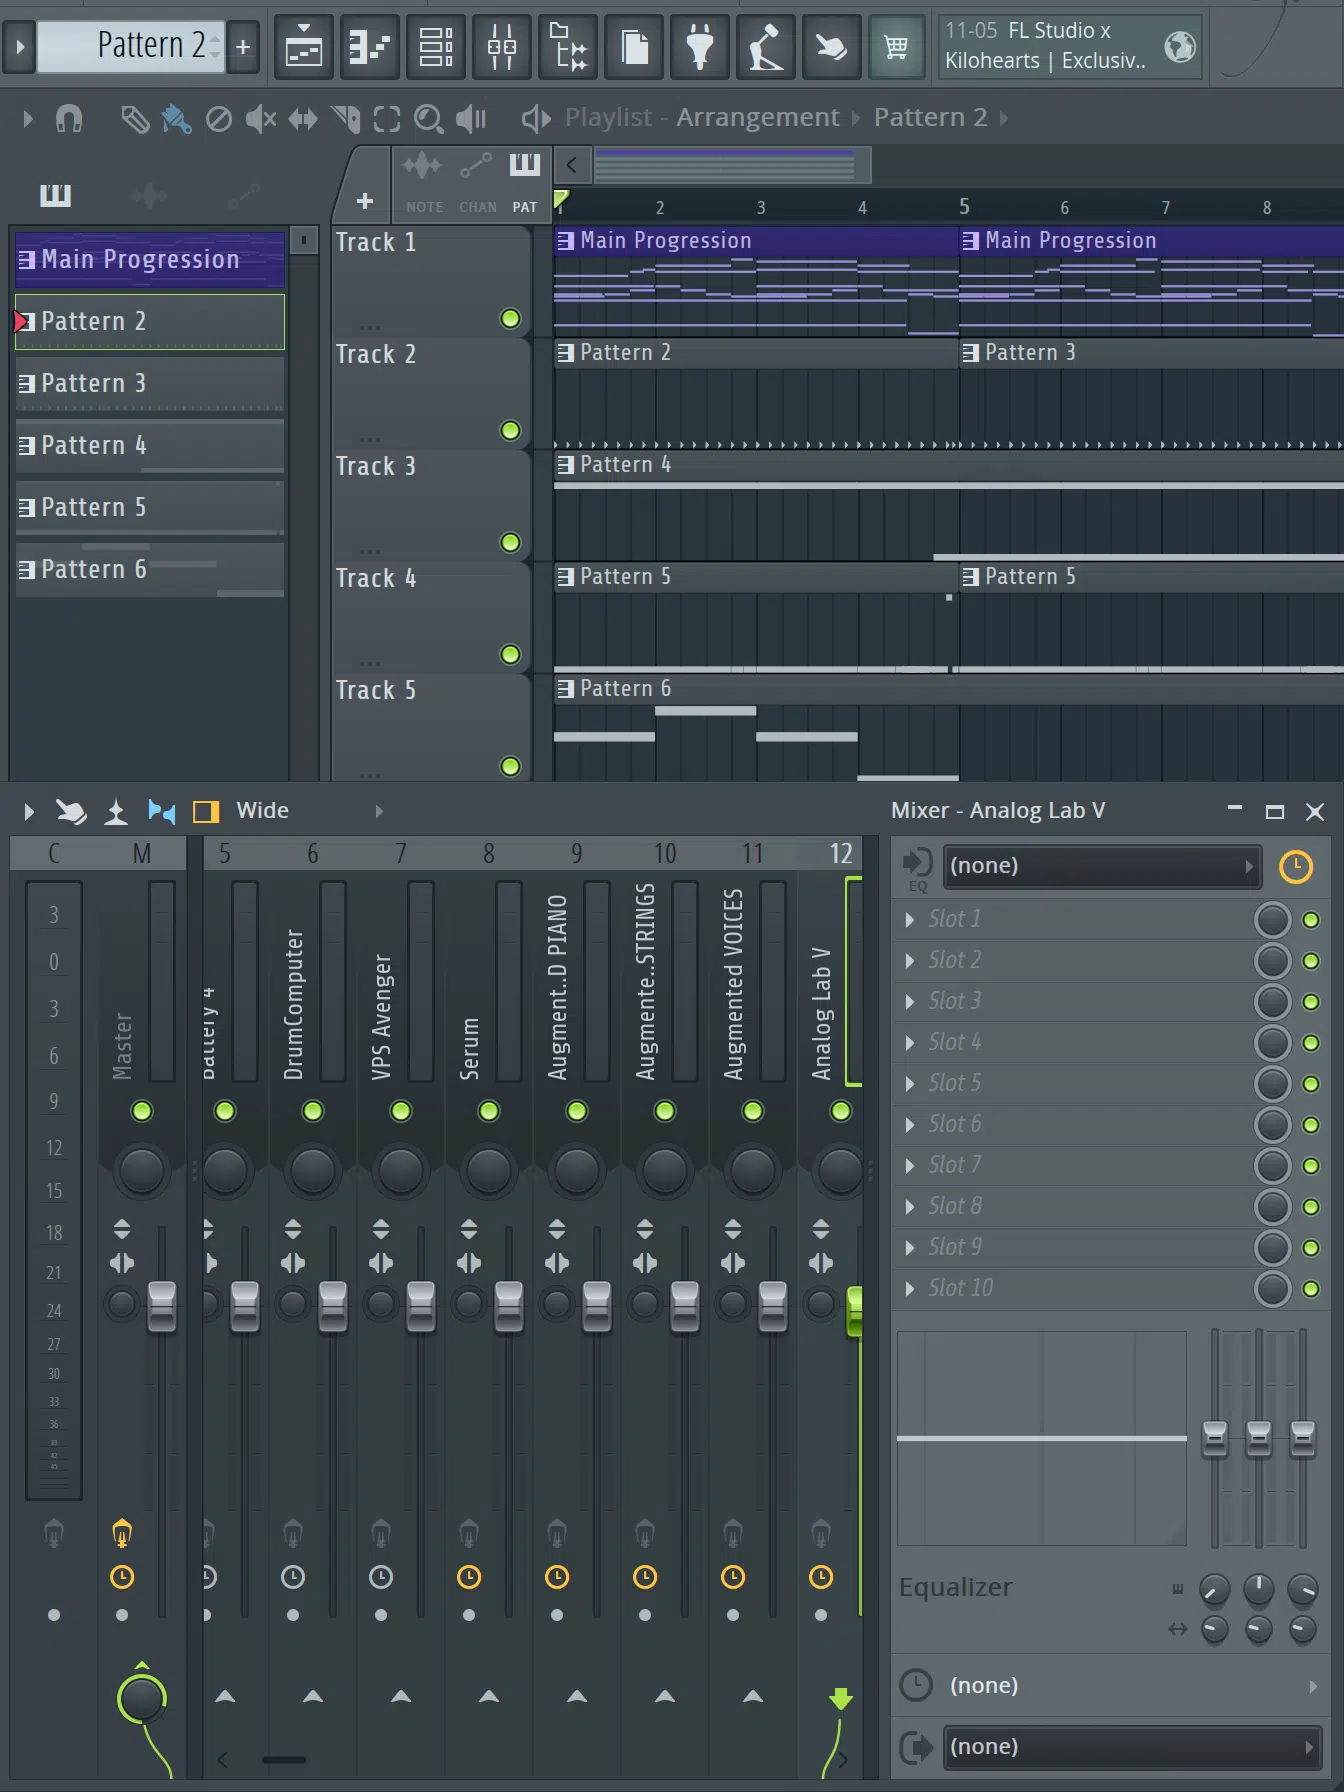
Is occupied by the Channel Rack, Piano Roll, Mixer, and Playlist.
You can open or close these windows as needed, giving you flexibility in how you work.
Each window in FL Studio can be moved, resized, or even closed to suit your workflow.
You might prefer to have the Piano Roll on your left and the Mixer on your right, or you might want to focus only on the Playlist.
FL Studio’s interface is designed to adapt to your workflow, making it a super flexible and customizable digital audio workstation (DAW).
NOTE: There’s no ‘correct’ way to arrange your windows; it’s all about what works best for you.
You’ll also notice a set of numbers along the top of the window 一 these are your mixer tracks.
You can assign any channel to any mixer track, including multiple (different) channels, which gives you control over the individual volume levels and effects for each channel.
This is critical when you’re trying to balance different elements of your track during the final mix.
Experiment with different layouts, try out different tools, and don’t be afraid to dive into the menus.
Remember, the interface is your playground, and mastering it is your first step to mastering FL Studio and making music that is unique.
How To Use FL Studio: A Step-By-Step Guide
Now that you’re familiar with the FL Studio interface, let’s get into the nitty gritty of this FL Studio tutorial: how to use FL Studio to create music.
-
STEP 1

You’ll want to add some elements to your Channel Rack, like plugins, samples, or even record your own sounds.
You can do this by simply dragging and dropping from the Browser onto the Rack.
As previously mentioned, each audio channel in the Rack can be an instrument channel, an audio clip, or an automation clip.
-
STEP 2
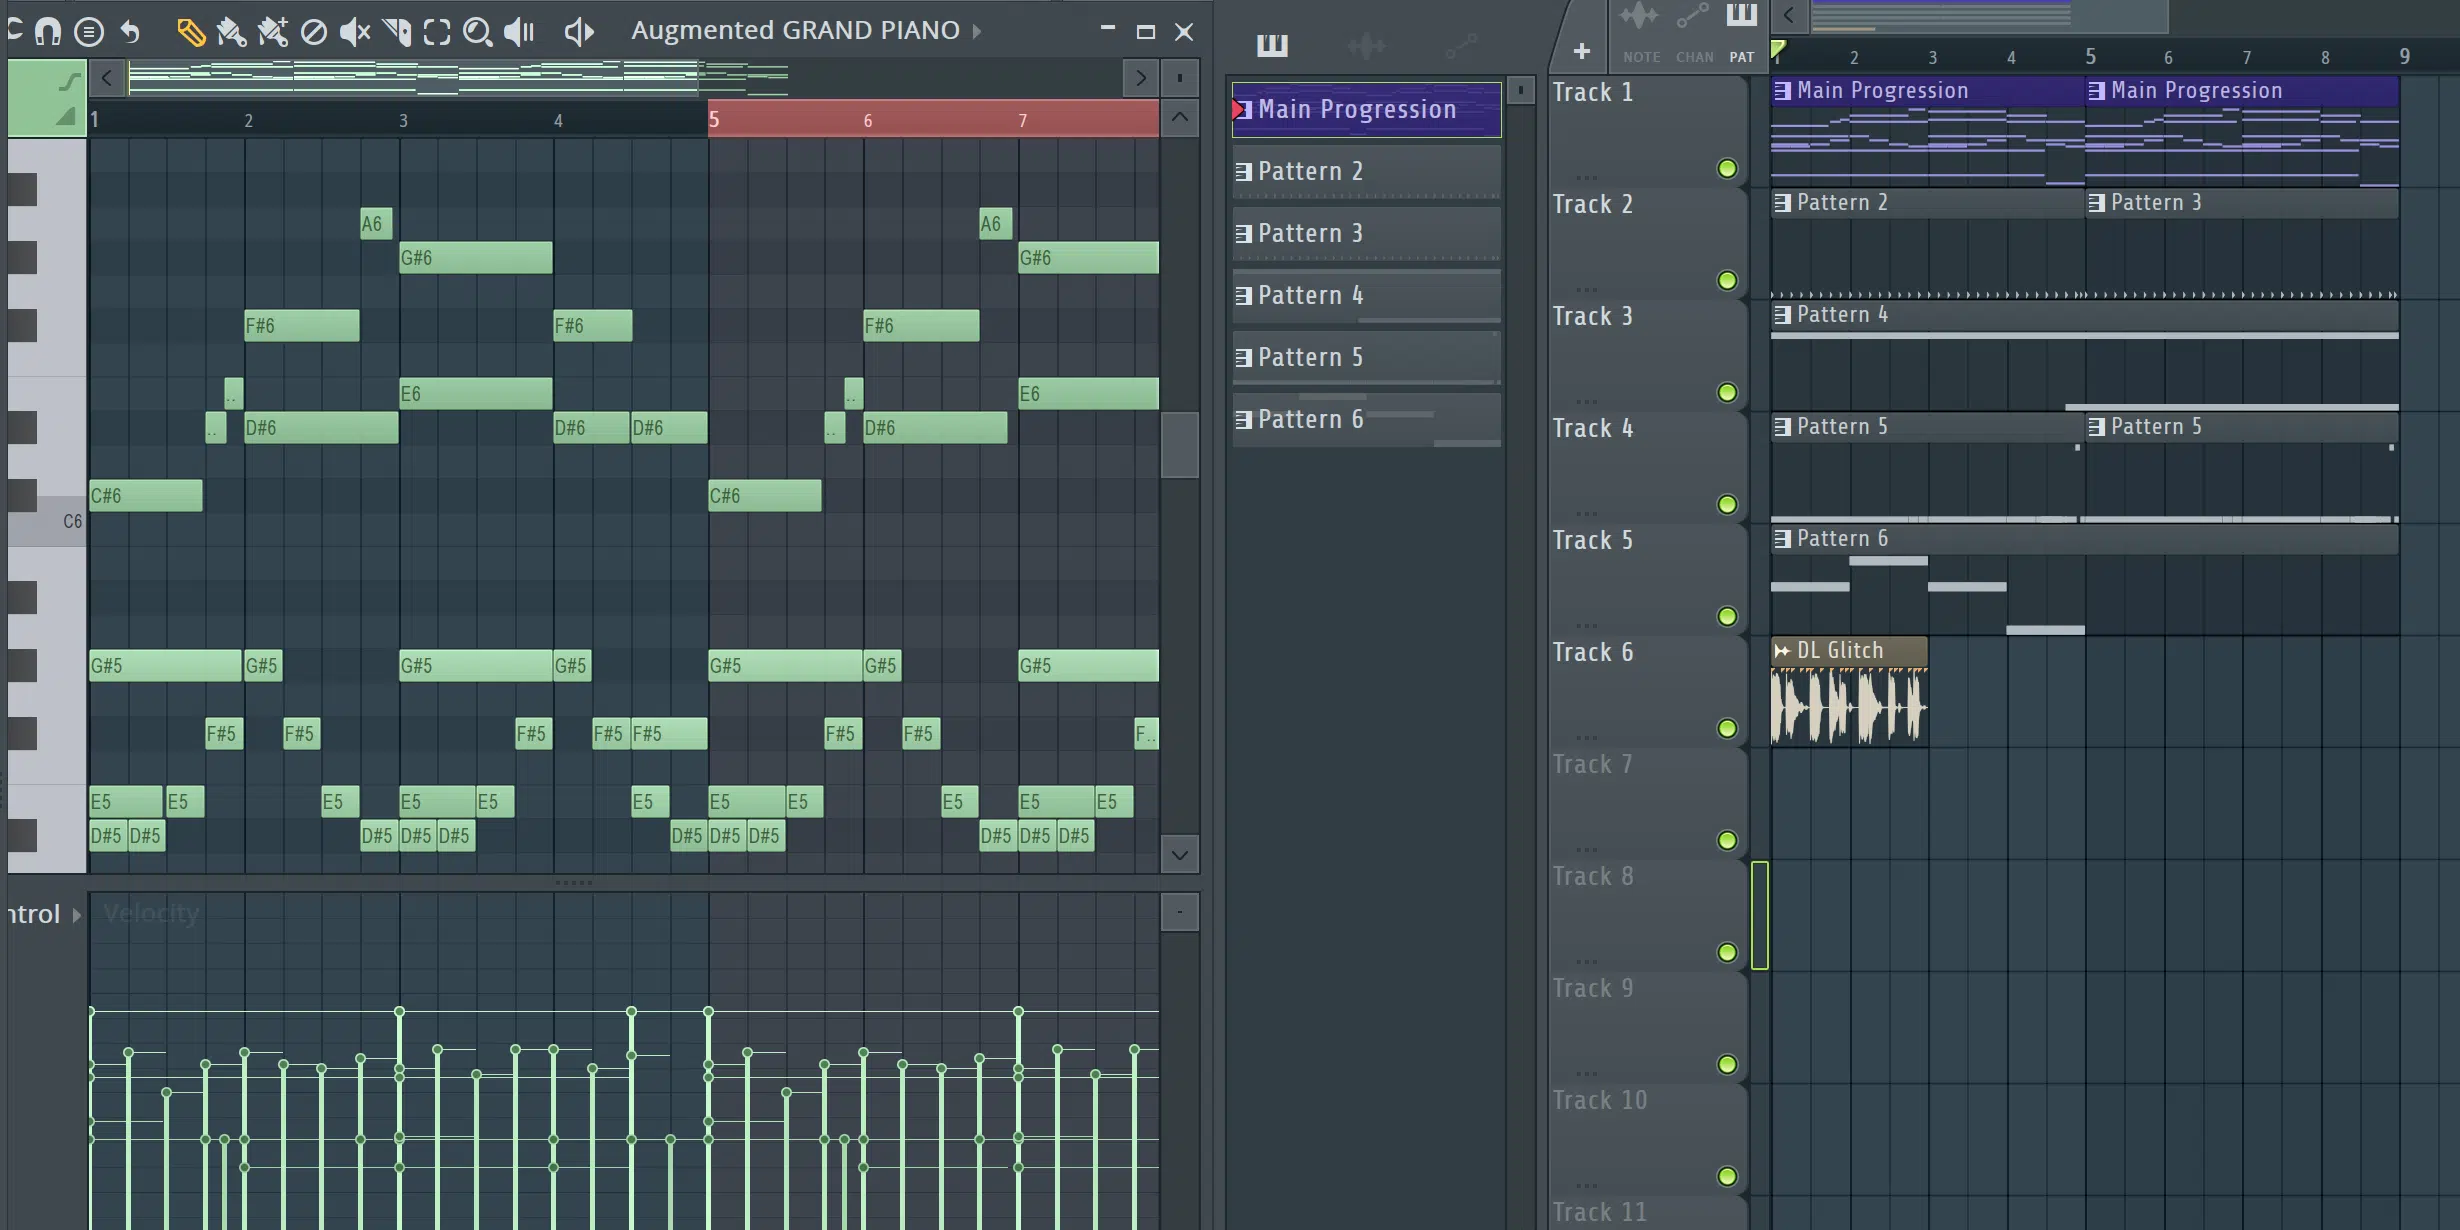
Now it’s time to create some mind-blowing patterns.
You can create a new pattern by selecting the ‘add’ button on the transport controls.
Each pattern is like a mini song 一 it can have its own instruments, its own melody, and its own rhythm.
You can create as many patterns as you like, and you can even clone existing patterns to make variations.
This is one area where FL Studio by Image Line truly shines.
It allows you to quickly come up with ideas and flush out a 2-bar MIDI clip or drum pattern in order to transform it into an entire song in minutes.
-
STEP 3
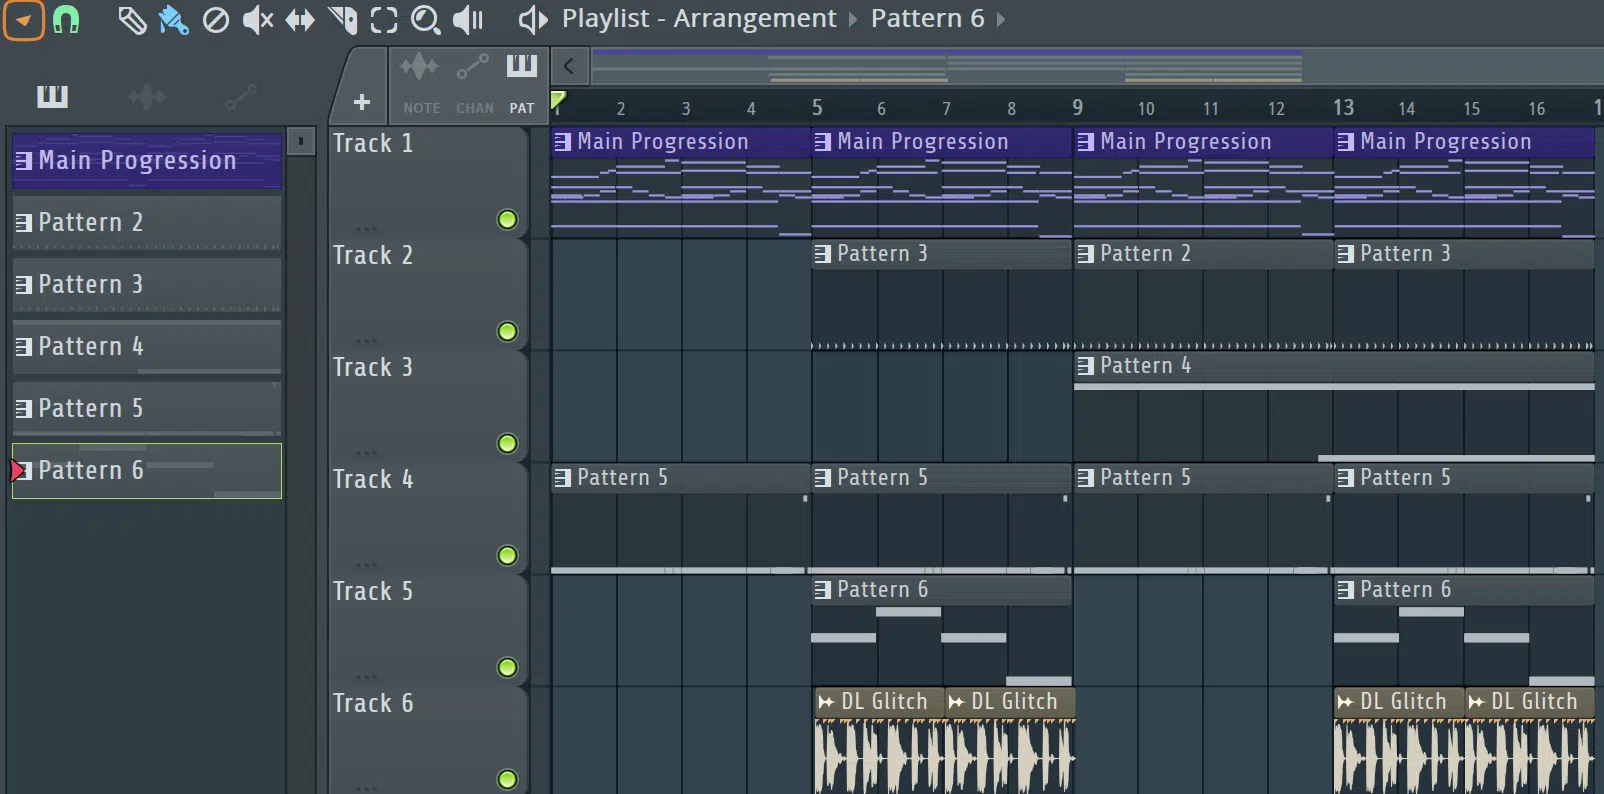
Then you’re going to arrange your patterns into a complete song.
Go to the Playlist window, and start painting your patterns onto the track.
You can move, resize, and rearrange your patterns until you’re happy with the structure of your song.
The possibilities are truly endless when it comes to FL Studio, so tweak as much as you’d like.
-
STEP 4
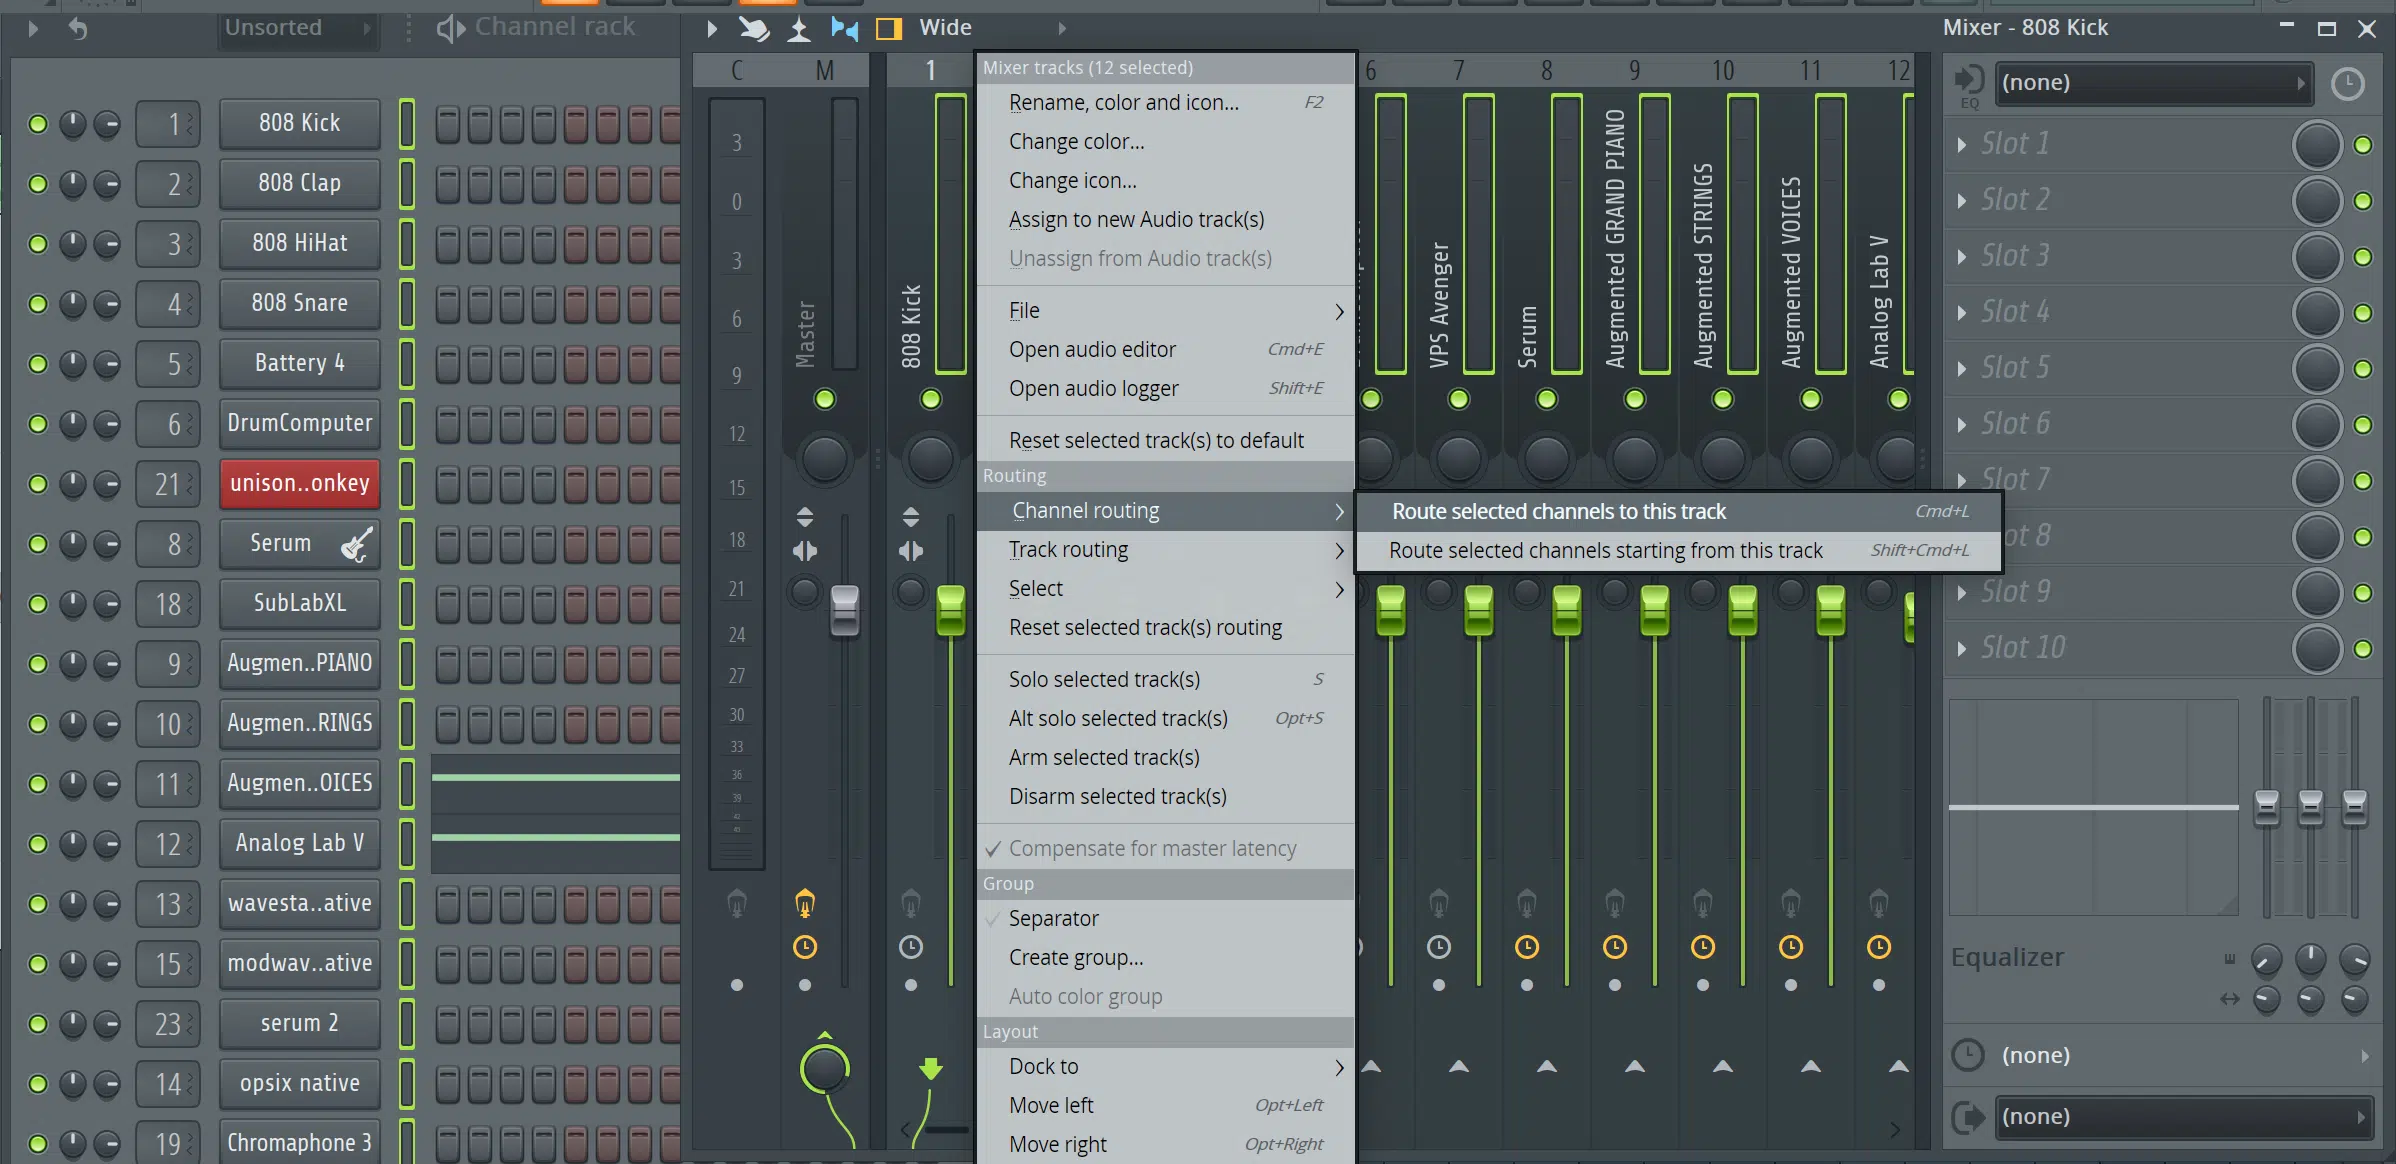
Finally, you’ll want to mix your track.
Go to the Mixer window, and assign each channel to a mixer track.
This allows you to control the volume, pan, and effects for each channel independently.
Remember to keep an eye on the Master Channel 一 this is where you control the overall volume of your song (and it’s important not to let it clip).
The Power of the Piano Roll
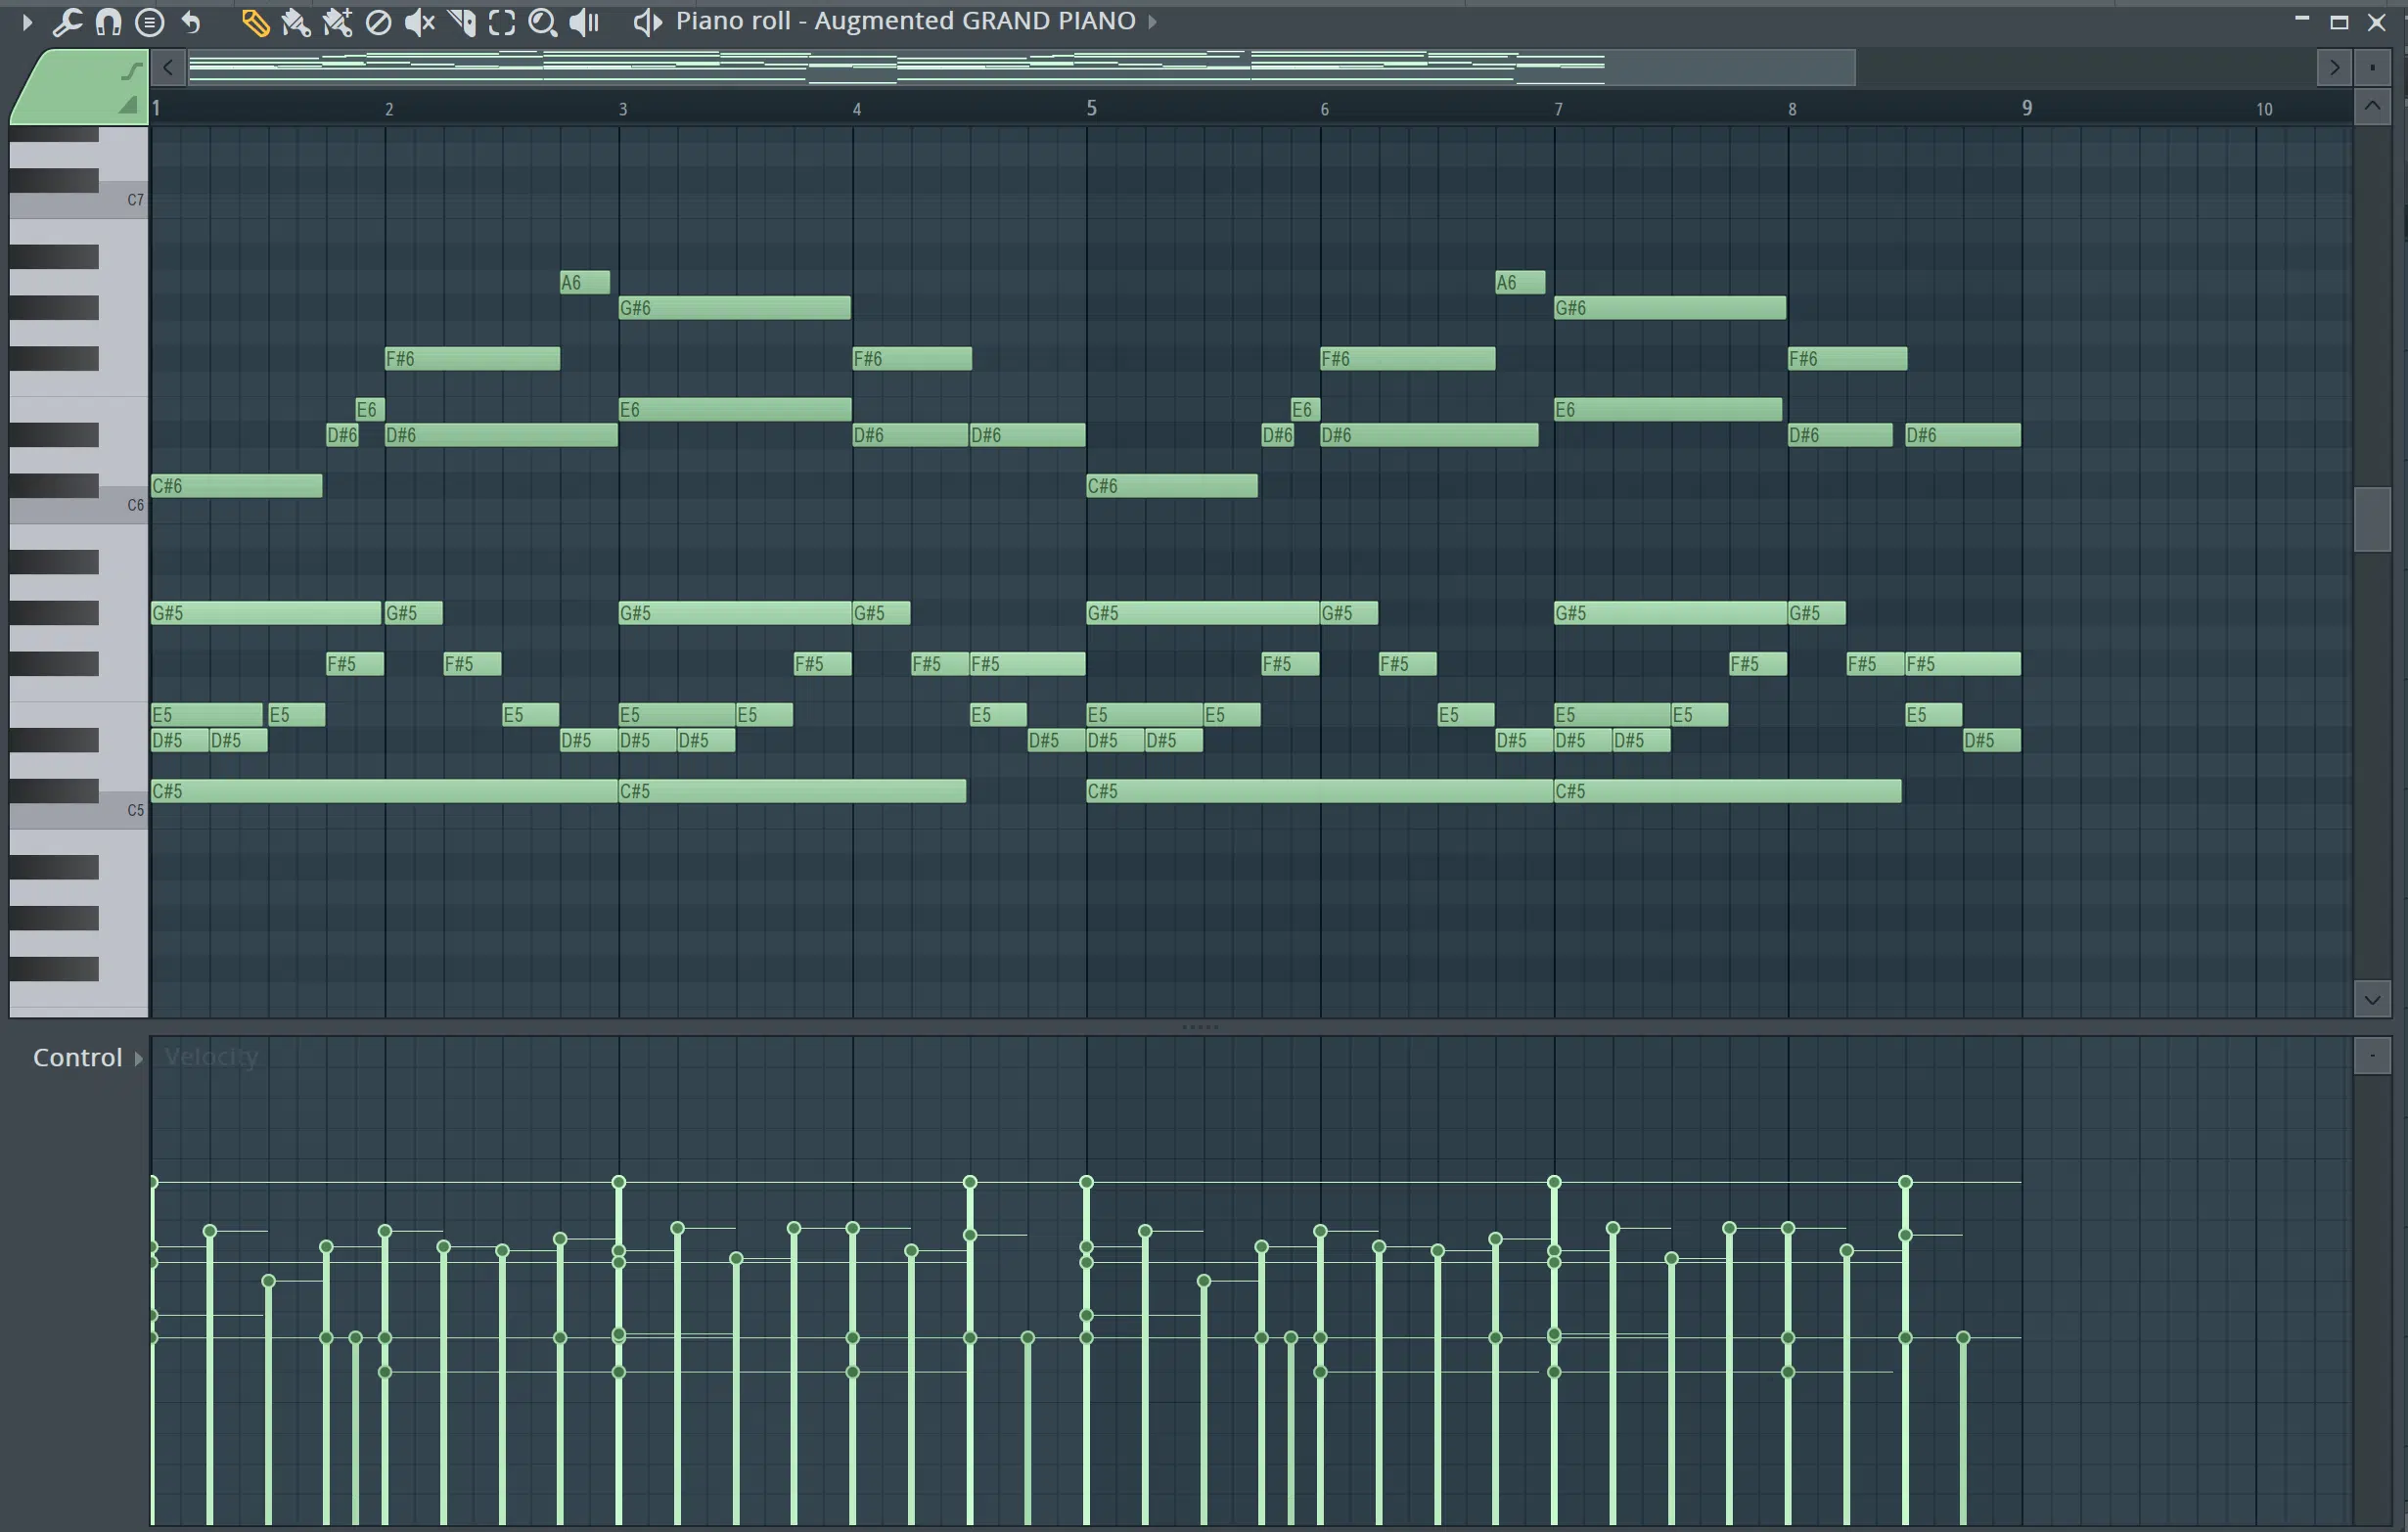
One of the key features of FL Studio that sets it apart from other DAWs is its powerful Piano Roll.
The Piano Roll is where you’ll be spending a lot of your time, crafting melodies, rhythms, and chords.
It also allows you to input and manipulate MIDI notes with ease.
The Piano Roll window displays note data for each instrument channel in your project.
You can easily add, delete, or move notes around to create your desired melody.
Adjusting the length of each note, which is crucial for creating different rhythms, is super easy.
Another cool feature of the Piano Roll is its variety of tools that can help you manipulate your notes.
There’s the ‘scale’ function, which can automatically correct your notes to a specific musical scale.
You’ll also have the ability to use “stamps,” which are essentially pre-made chords for you to integrate in your track.
Naturally, there’s also many MIDI effects that allow you to instantly create arps (amongst other factors).
You can even have it instantly print directly as MIDI data!
-
Diving Deeper Into The Piano Roll
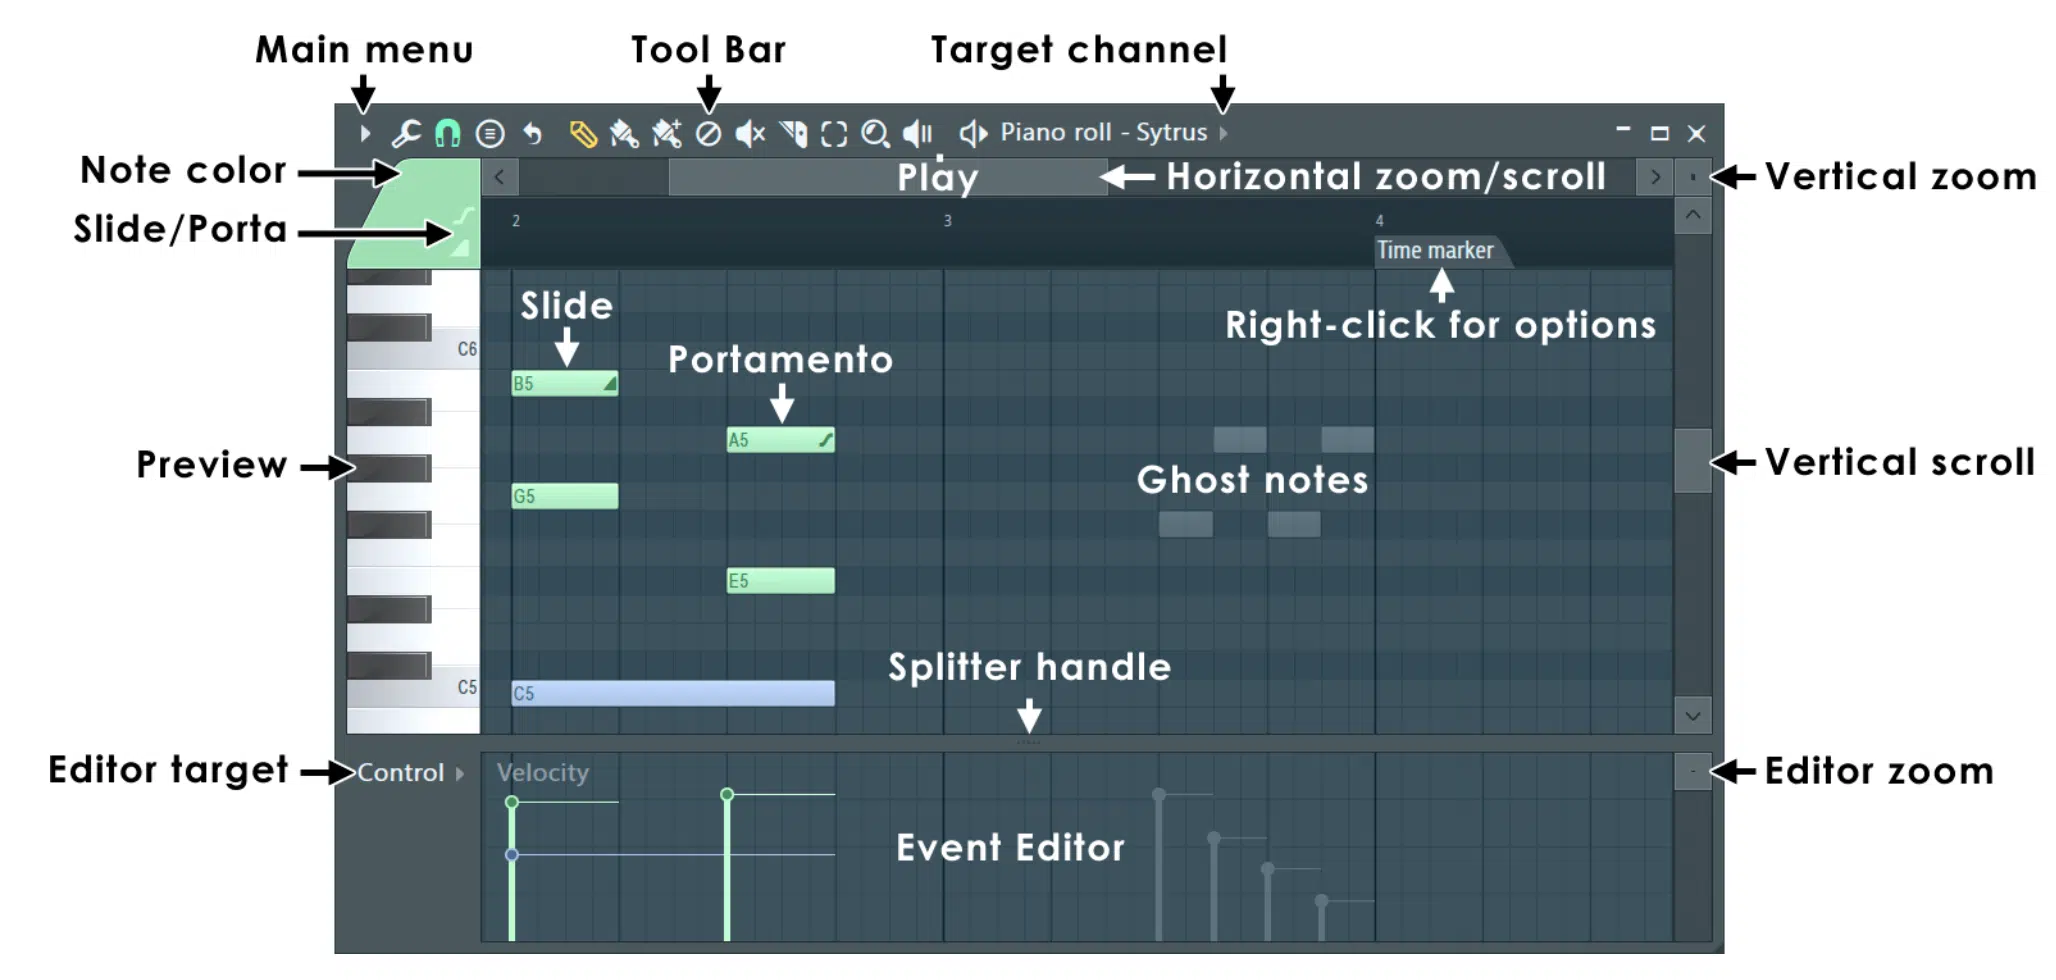
Diving deeper into the Piano Roll, it’s important to note that FL Studio’s Piano Roll is widely regarded as one of the best in the industry.
It’s not only a tool for entering notes but also a comprehensive suite for complex melody and rhythm editing.
One of the most powerful features of the Piano Roll is the ability to manipulate note properties beyond just pitch and duration.
By clicking on the “Control” dropdown menu at the bottom, you can adjust various properties of each note, such as its:
- Panning (left or right bias)
- Velocity (volume)
- Even pitch bend or vibrato
The Piano Roll also includes a variety of tools for editing your notes.
There’s a tool for every need – slicing, quantizing, strumming, cloning, and more.
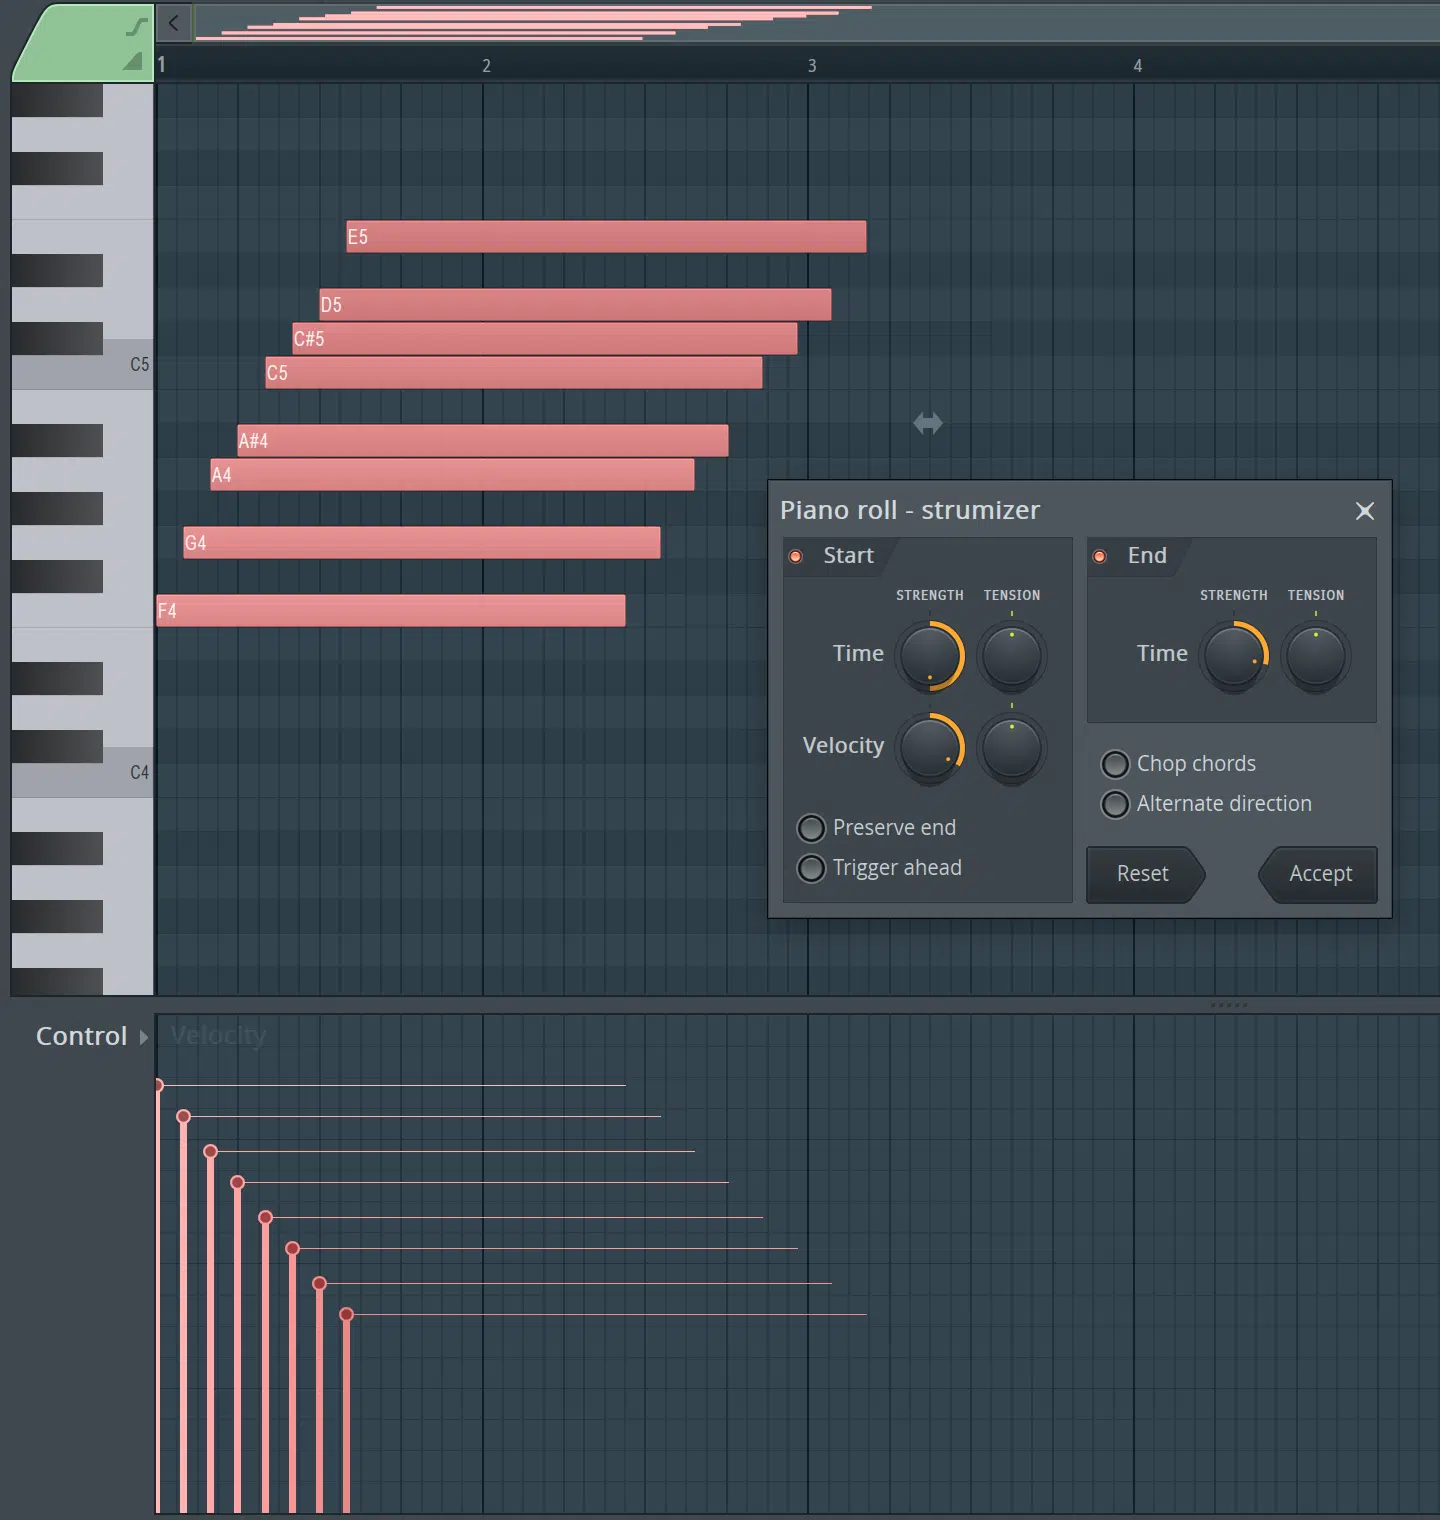
- The ‘Strum’ Tool 一 Can stagger the start times and velocities of a chord, creating a strummed guitar effect.
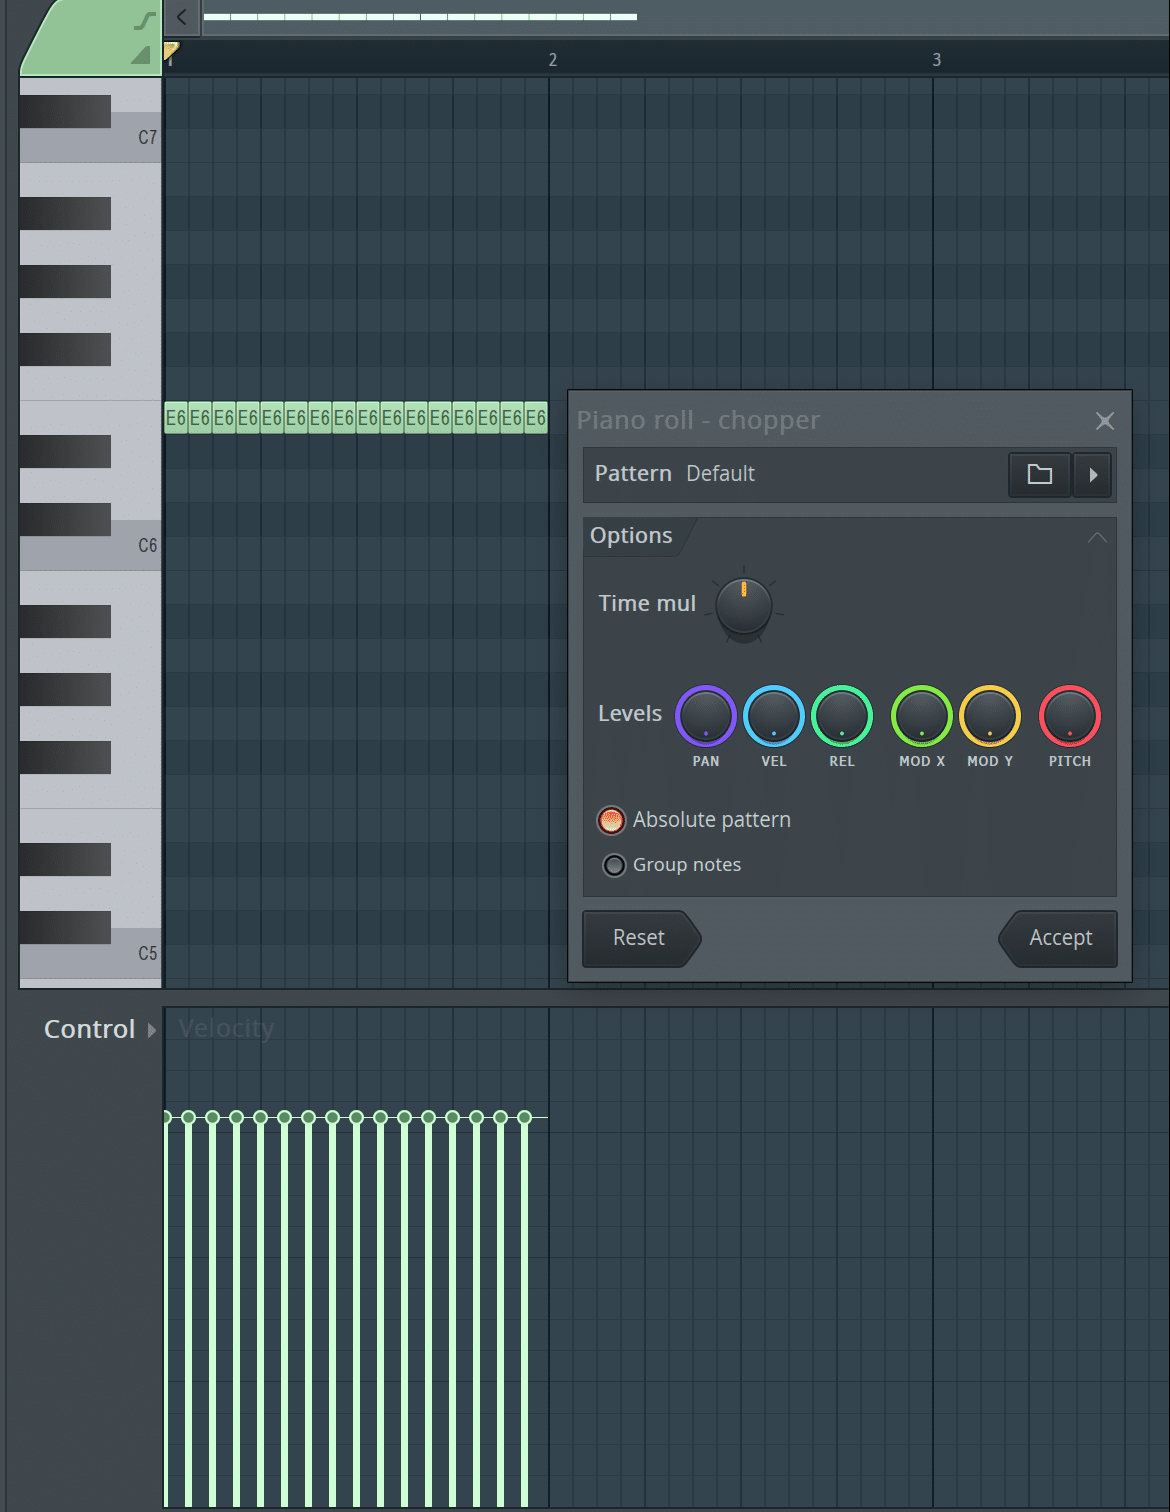
- The ‘Chop’ Tool 一 Can slice long notes into shorter, rhythmic pieces.
These options can add a level of complexity and realism to your music that’s hard to achieve otherwise.
- The ‘Ghost Notes’ Option 一 When activated, this feature displays a translucent view of notes from other channels in the background.
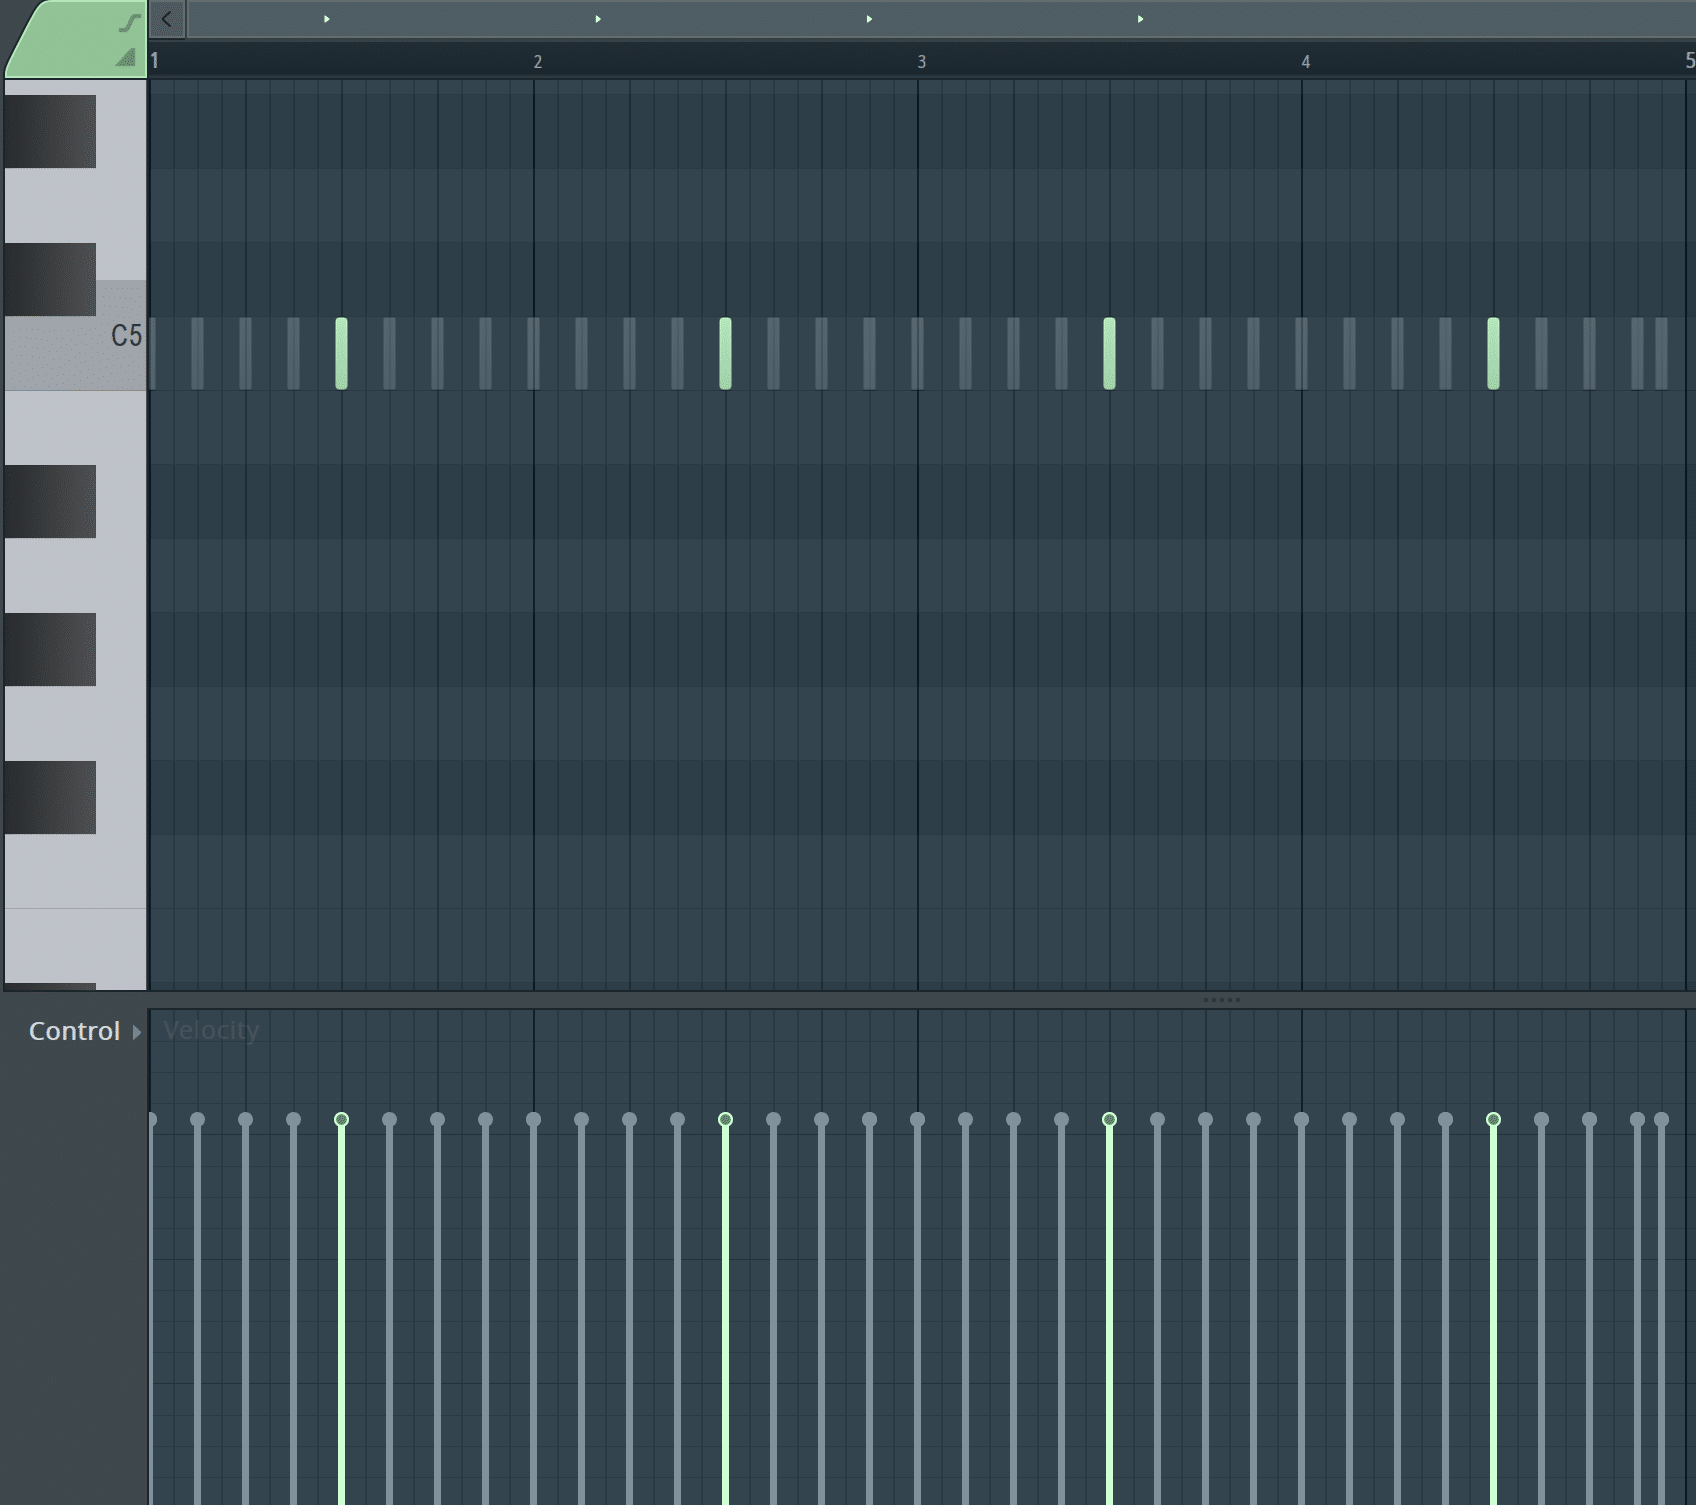
This can be incredibly helpful for composing harmonies or counter-melodies.
The more time you spend exploring its features and experimenting with its tools, the more you’ll be able to express your creativity in your music (and find your personal workflow).
The Channel Rack
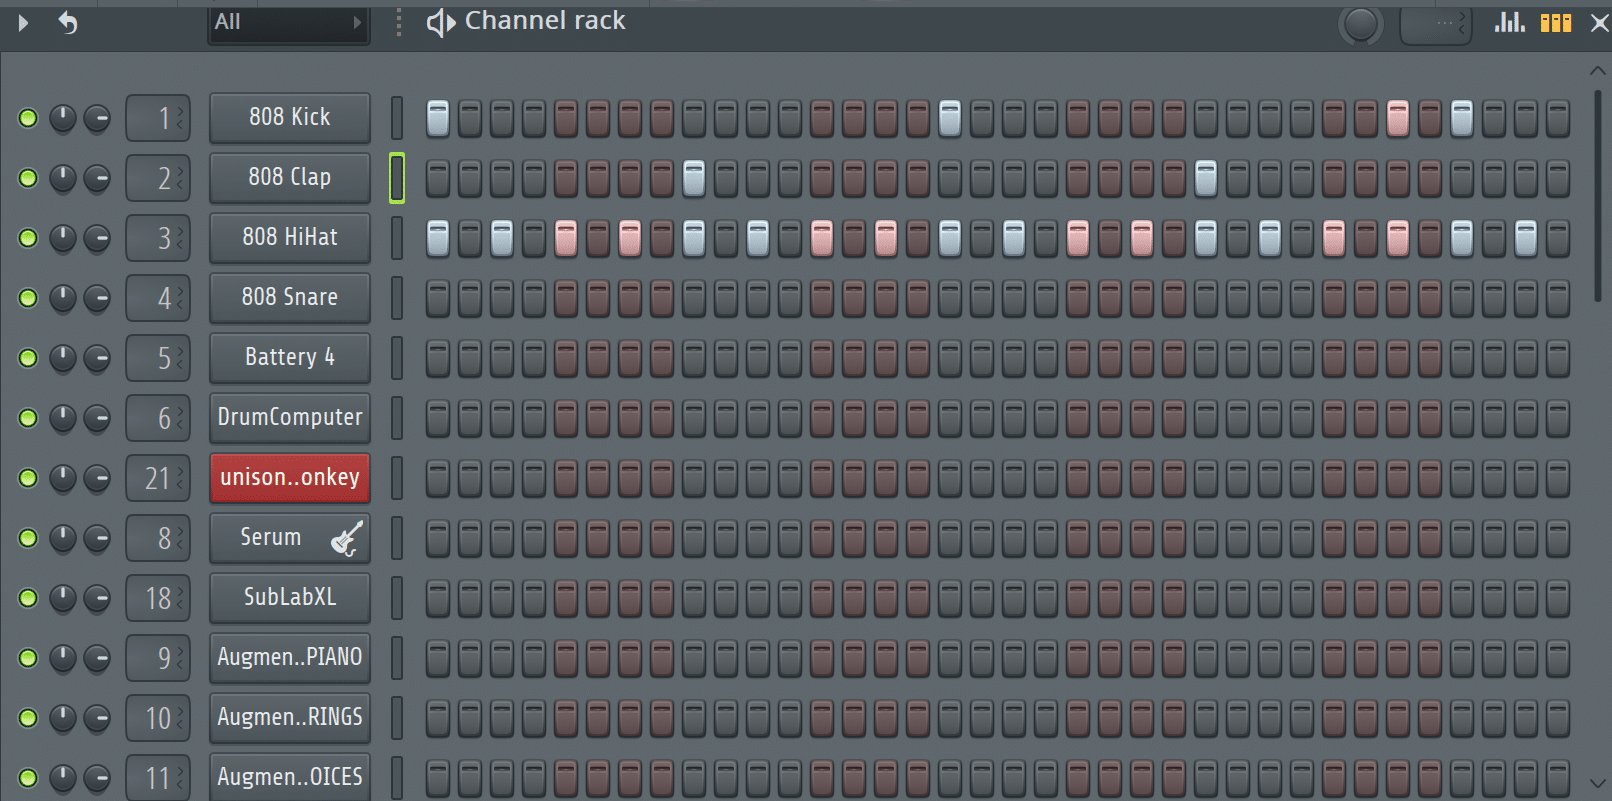
The Channel Rack is a core component of FL Studio design and workflow.
It’s essentially the center of your music production process, where your instruments, samples, and automation clips live.
Each channel you add gives life to your project, whether it’s a bass line, a snare drum, a melody, or an effect to add depth to your mix.
In the Channel Rack, you’ll find each channel listed vertically on the left, and its corresponding Step Sequencer to the right.
This grid of buttons allows you to create and edit patterns for each channel simply by clicking to activate or deactivate steps.
Each channel within the Channel Rack has a few quick control options available:
- The mute/solo button to the left of the channel’s name
- The volume and panning controls to the right
This allows for quick adjustments on the fly, making the Channel Rack a dynamic tool for both the creation & the basic mixing stages.
-
The Channel Rack: Expanded
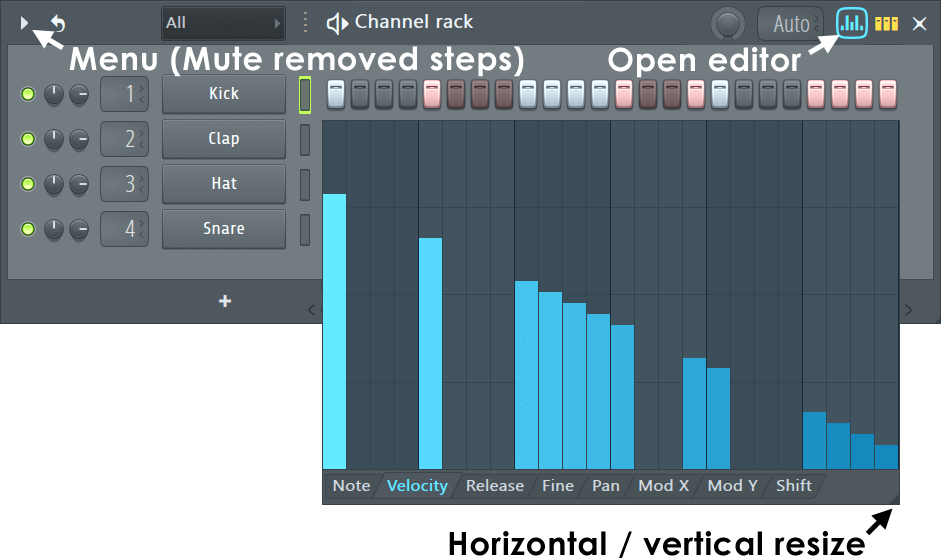
Adding channels to the Channel Rack is as easy as clicking the ‘+’ button at the bottom and selecting from the list of available plugins and sounds.
But FL Studio’s Channel Rack isn’t limited to just the inbuilt sounds.
You can import your own audio samples, create a channel for external audio input, or add an automation clip channel to control various parameters over time.
However, the versatility of the Channel Rack in FL Studio doesn’t stop there.
By using the Graph Editor, you can manipulate the properties of each note in your pattern.
You can modify the velocity, pitch, panning, and even release time of each note, all from within the Channel Rack.
Plus, of course, the ability for it to famously double as step-sequencer (described below).
-
How to Make the Most Out of the Channel Rack
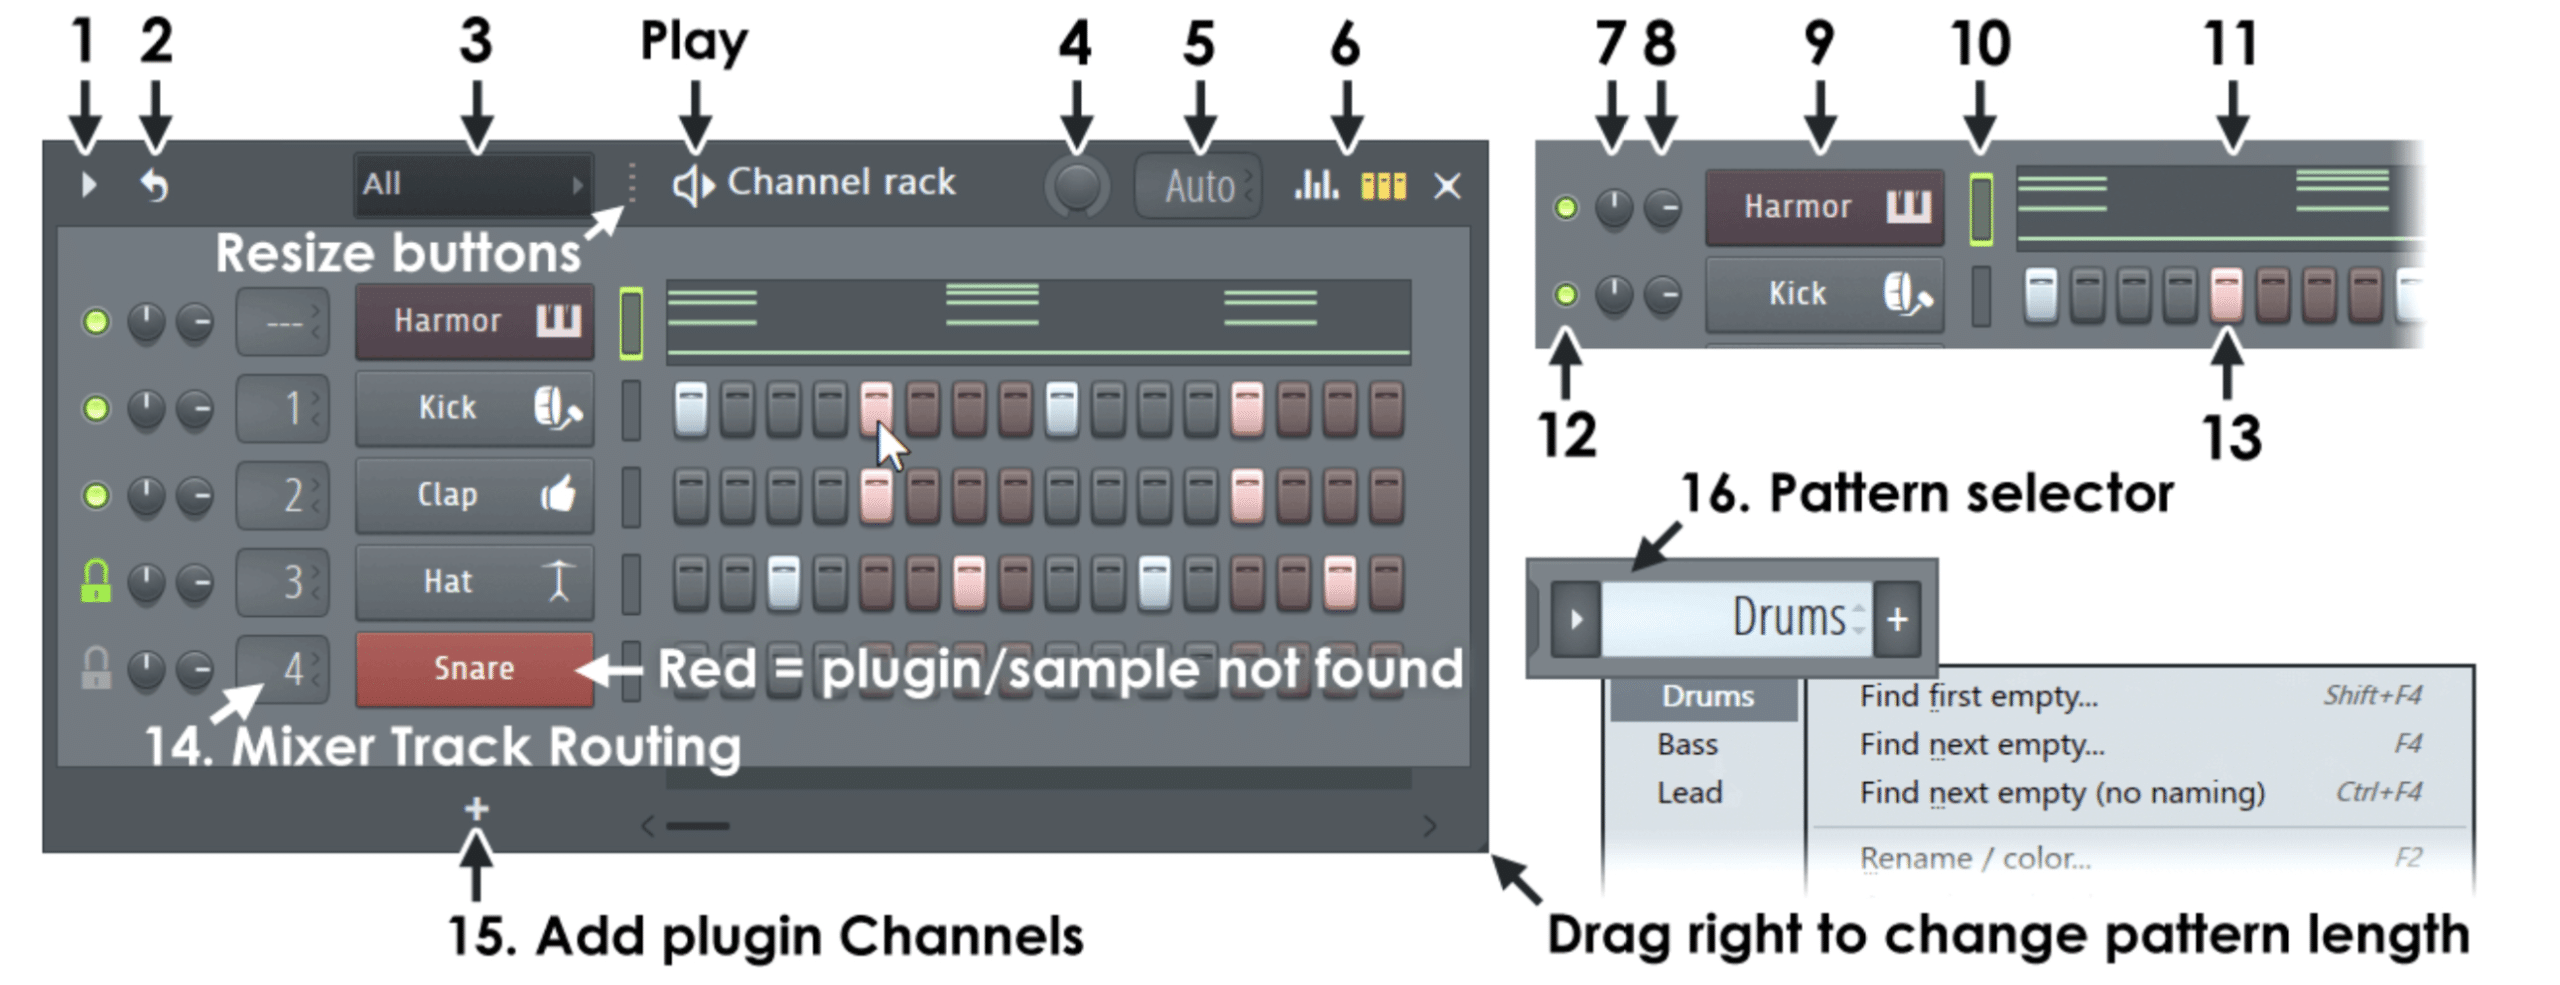
The Channel Rack is like a Swiss Army knife; the more you explore its functions, the more you realize how complex it can be.
One of the ways to get the most out of the Channel Rack is through meticulous organization.
If your project has dozens of channels, it can quickly become overwhelming… that’s where color coding and renaming channels come in handy.
By giving each channel a distinct color and descriptive name, you can find what you’re looking for much more quickly.
In FL Studio, you can also group channels together to further enhance your organization.
Simply right-click on a channel, select “Group selected” and name your group.
This allows you to collapse or expand groups of channels with a single click, making navigation in complex projects super easy.
Another feature of the Channel Rack is the aforementioned Step Sequencer.
By default, it’s a 16-step grid, but you can easily extend it by clicking & dragging to the right of the grid.
This allows you to create longer, more complex patterns without having to duplicate channels.
Finally, don’t forget that the Channel Rack is not just for instruments and samples 一 you can also add automation clips to control various parameters over time.
Whether you want to automate a filter sweep, a volume fade, or a pitch bend, the Channel Rack is the place to do it.
The Playlist
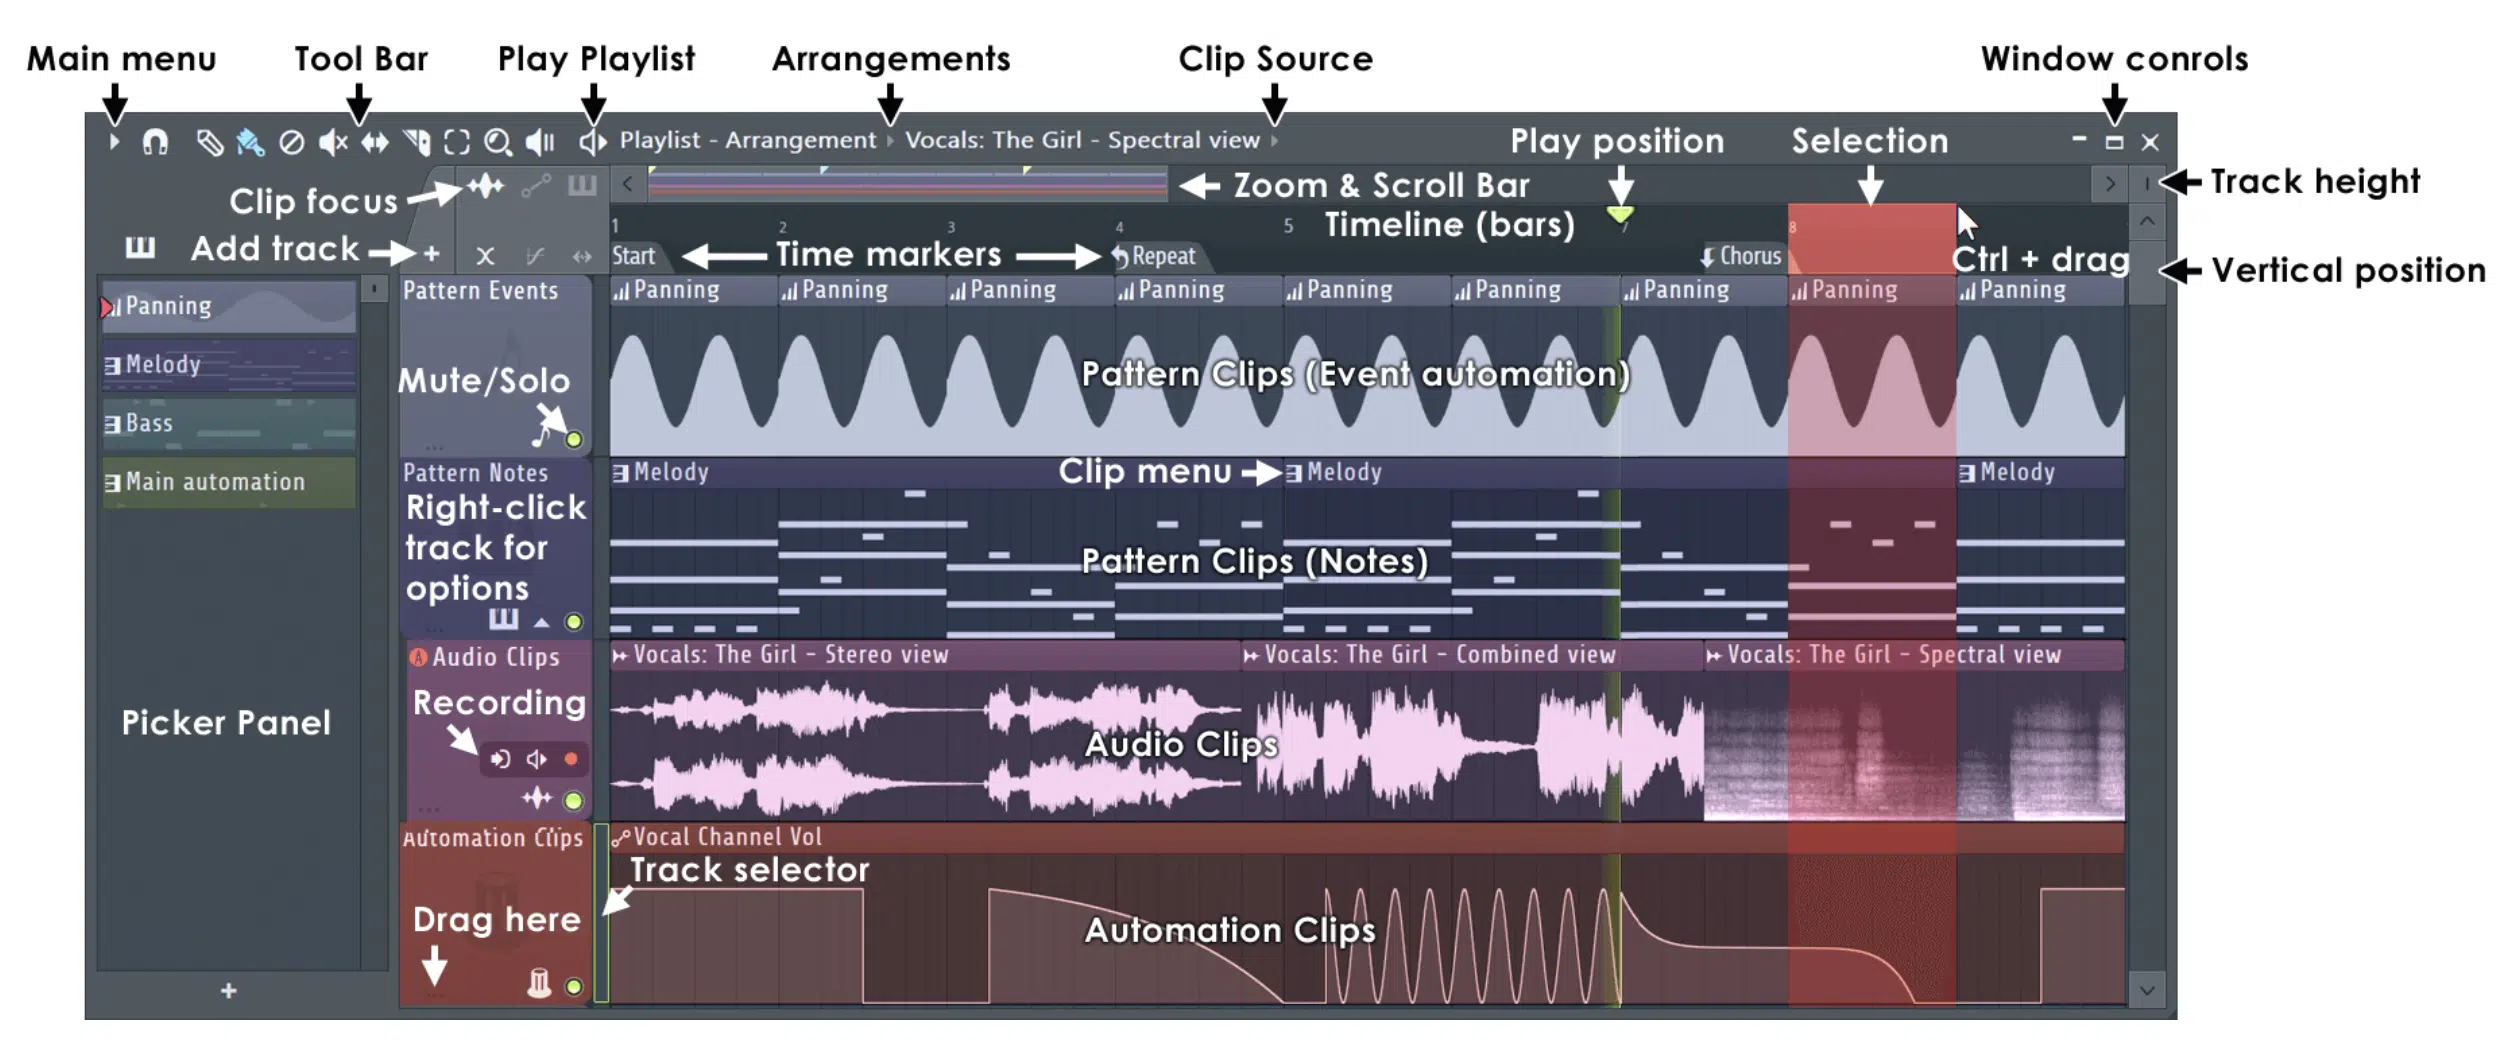
The Playlist is another crucial component in FL Studio, serving as the musical canvas where you arrange your patterns and audio clips to create a full song.
When you open the Playlist window, you’ll see a series of tracks running horizontally.
You can drag and drop patterns from the Channel Rack directly into the Playlist, as well as paint patterns onto the track using the Brush tool.
The Playlist will automatically create a new instance of the pattern each time you paint (dope, right?).
-
Pattern Clips
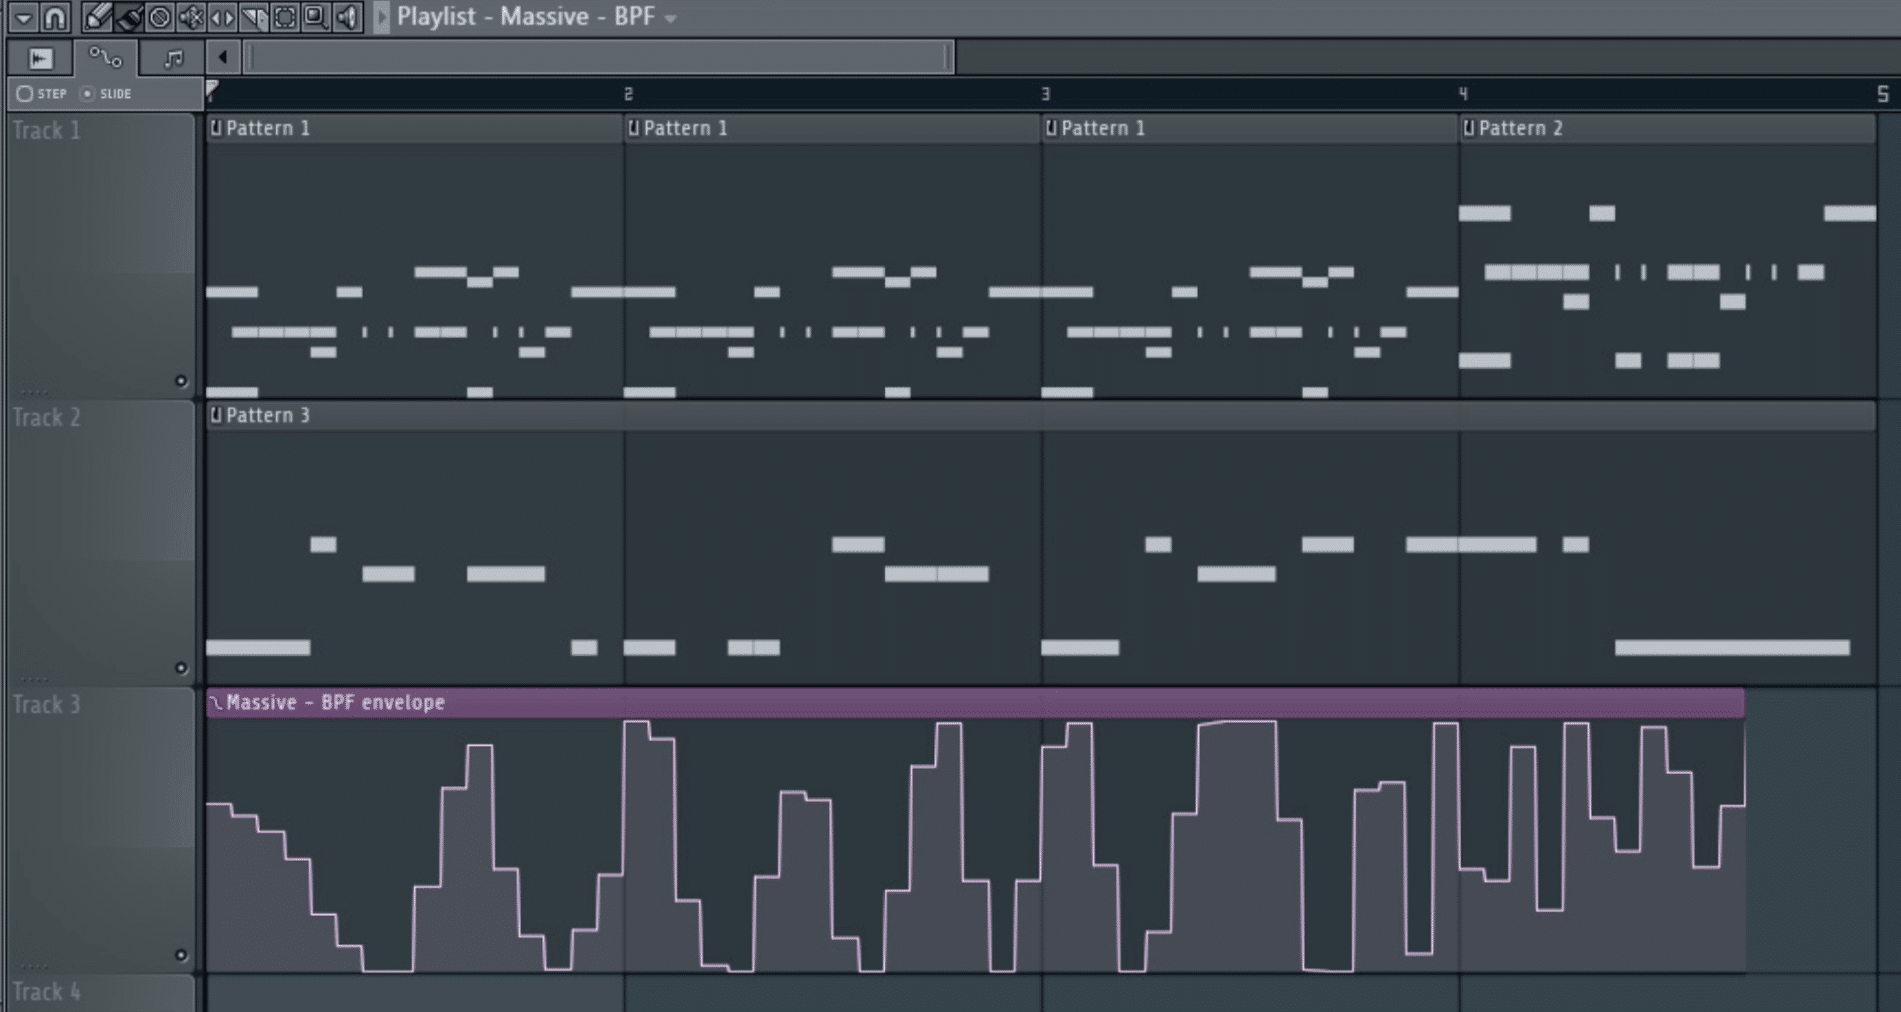
One of the most important tips for using the Playlist when you’re learning how to use FL Studio is to make good use of its pattern clips feature.
Each instance of a pattern in the Playlist is a pattern clip.
You can change the color and name of pattern clips to keep your project organized.
This is especially useful when your project starts to grow, and you have multiple instances of various patterns.
Another key feature of FL Studio is the “Make Unique” function, which can be accessed from the small drop-down of each clip.
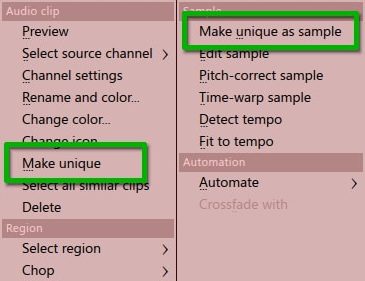
It allows you to effortlessly paint, for example, multiple 4-bar drum clips and create a variation of every other one.
This way, you can quickly incorporate variations, and break out of “Loop Block.”
You’ll also have the freedom to use automation clips, which are special types of clips that you can use to automatically control various parameters over time.
You can create an automation clip for virtually any parameter in FL Studio, such as:
- Volume
- Panning
- Pitch
- Plugin parameters
This can help you create dynamic changes in your track, adding a new layer of depth and complexity to your music.
Mixer Tracks & Mixer Channels
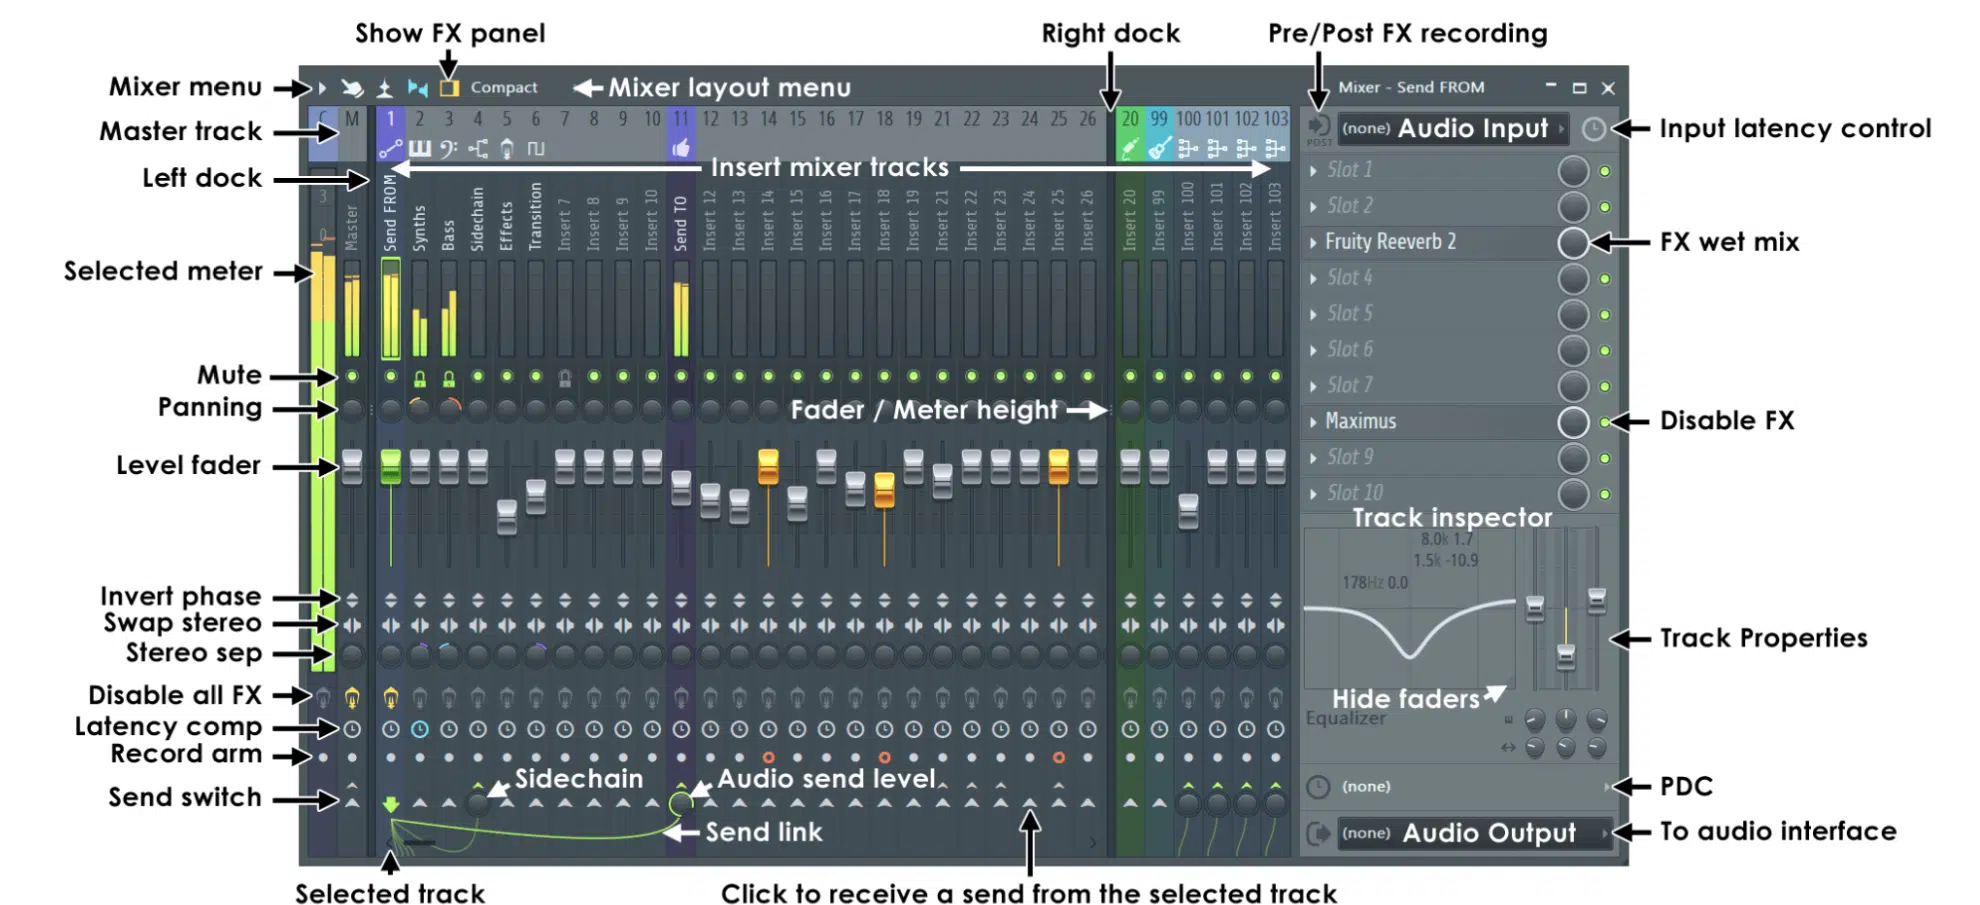
Mixer Tracks and Mixer Channels are two integral parts of FL Studio’s audio engine, especially when you’re first learning how to use FL Studio.
They are the tools you use to mix your audio and shape the overall sound of your track.
- Mixer Tracks 一 Individual tracks in the Mixer, where you can route your audio channels and apply effects.
- Mixer Channels 一 The sources of audio that you route to Mixer Tracks, like audio clips, instrument channels, and even other Mixer Tracks.
The Mixer in FL Studio is a powerful tool, capable of hosting up to 125 Mixer Tracks.
Each Mixer Track has:
- A fader for adjusting volume
- A pan knob for controlling stereo positioning
- An EQ for shaping the frequency response (built in)
- Slots for adding insert effects
You can route any Mixer Channel to any Mixer Track (and even multiple mixer channels to mixer tracks), giving you a high degree of flexibility in your mix.
Moreover, each Mixer Track has a set of controls that allow you to tweak your sound further.
These include:
- A polarity switch
- A stereo width/separation knob
- A mono Switch/button
With these controls, you can ensure your mix sounds great on a variety of playback systems, from mono speakers to high-end stereo systems.
-
Audio Recording
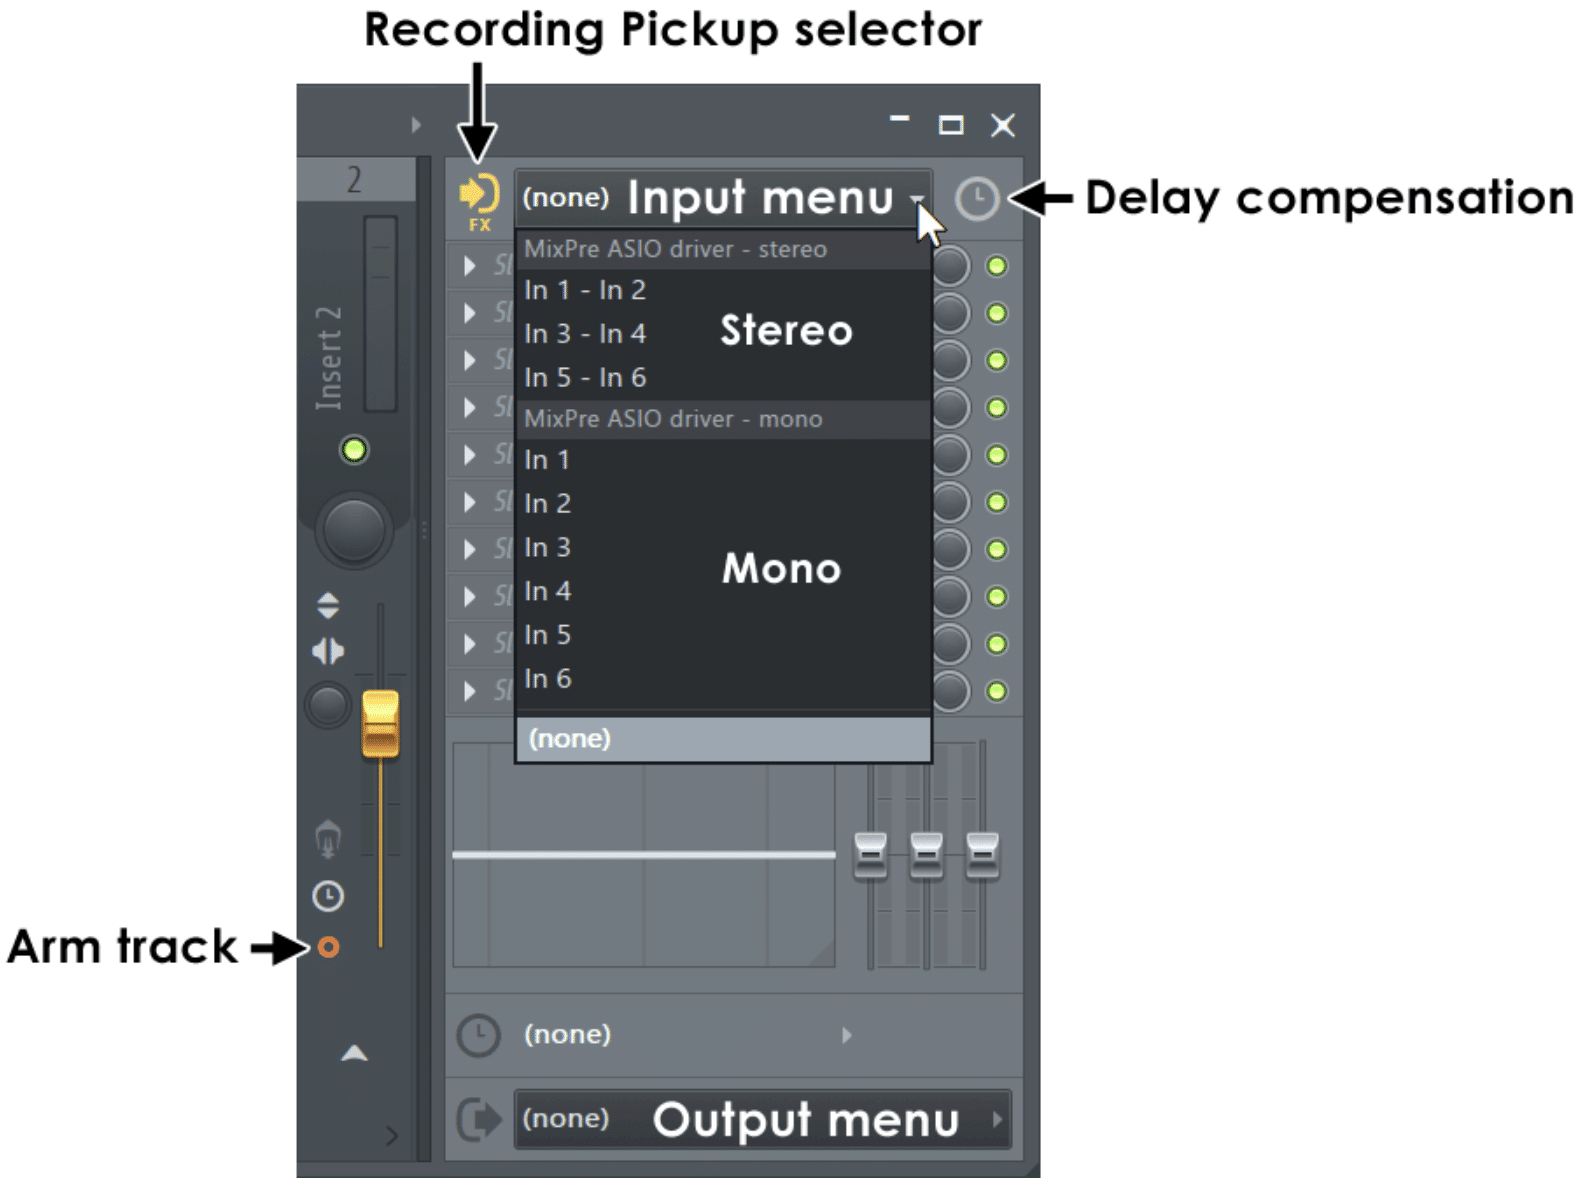
Mixer Tracks and Mixer Channels support audio recording.
When you record audio in FL Studio, whether it’s vocals, guitars, or external synths, the audio is captured as an Audio Clip and automatically assigned to a Mixer Channel.
From here, you can route the audio to a Mixer Track, where you can adjust the volume, pan the audio, and apply effects.
For instance, you might want to add reverb to a vocal track to give it a sense of space, or you might want to apply EQ to a guitar track to help it fit better in the mix.
NOTE: Audio recording in FL Studio by Image Line is well-known as its weak spot, and it’s honestly the truth.
But the Mixer isn’t just for post-recording tweaks 一 it also plays a role in the recording process itself.
For example, you can use the Mixer to set up a headphone mix for the performer.
You can also create a submix of the backing tracks, apply EQ and effects to make it sound more pleasing to the performer, and route it to the headphone output.
-
Signal Flow
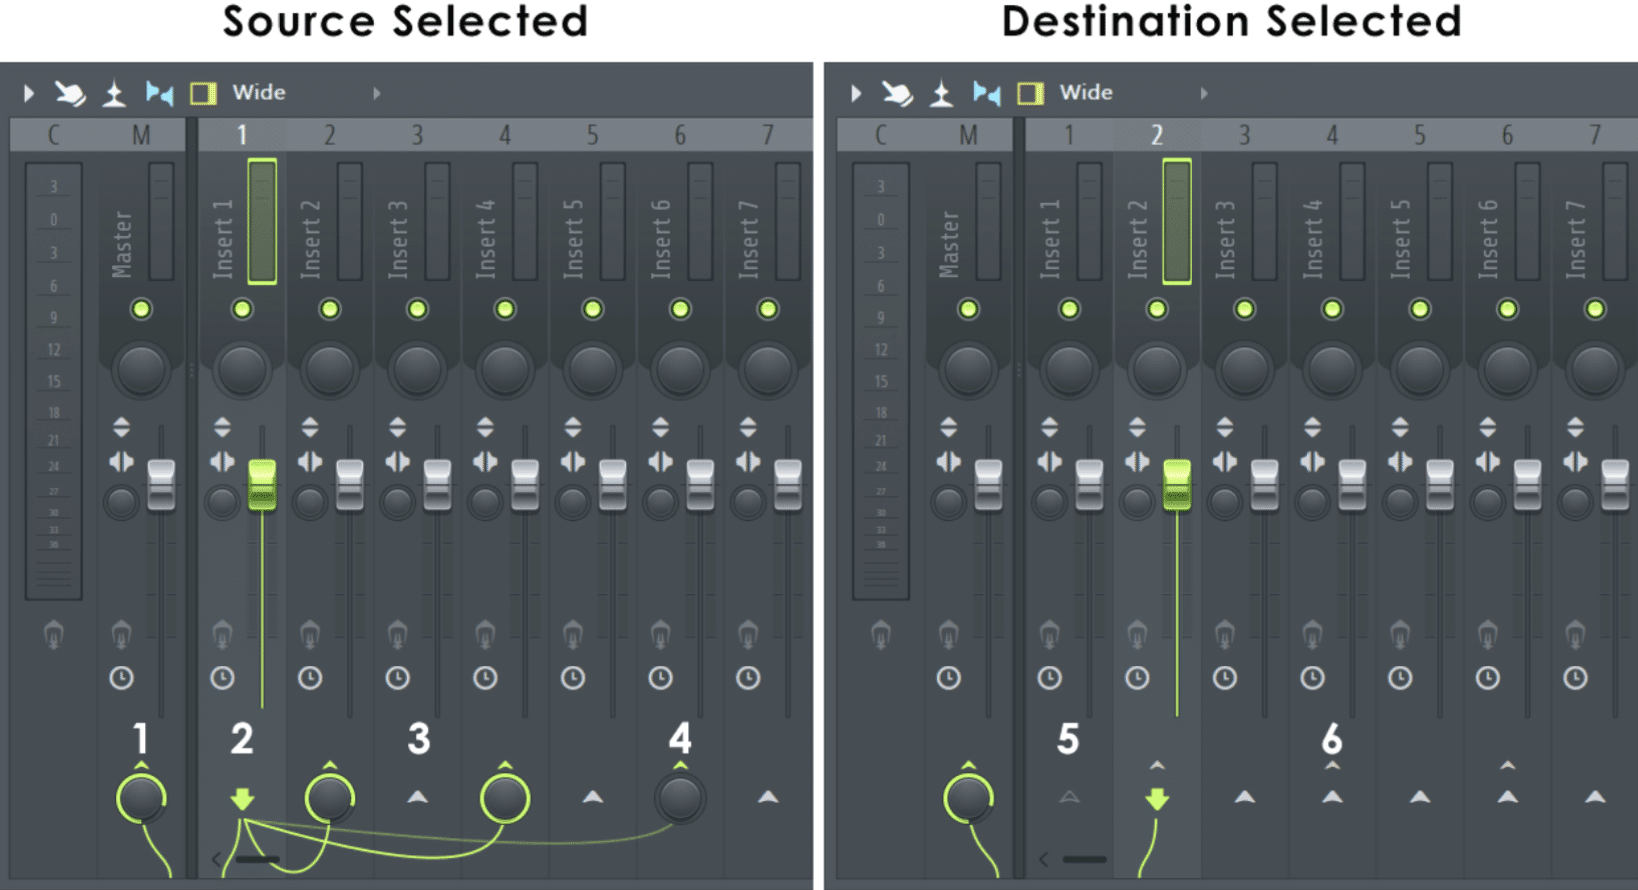
The key to getting the most out of Mixer Tracks & Mixer Channels is understanding the signal flow.
Knowing how audio travels from the Channel Rack, through the Mixer, and out to the master channel can help you master routing and processing.
One strategy is to make use of FL Studio’s flexible routing options 一 you’re able to route multiple Mixer Channels to a single Mixer Track, allowing you to process them together.
This is useful for grouping similar sounds, like a drum kit or backing vocals, and applying the same effects to them.
Another strategy is to take advantage of the Mixer’s send tracks.
These are special Mixer Tracks that allow you to apply the same effect to multiple channels without having to duplicate the effect.
This is a great way to save CPU and maintain a consistent sound across different channels.
Also, any track in FL’s Mixer can become a “send” or a “bus,” as any track has full flexibility to become any type you’d like.
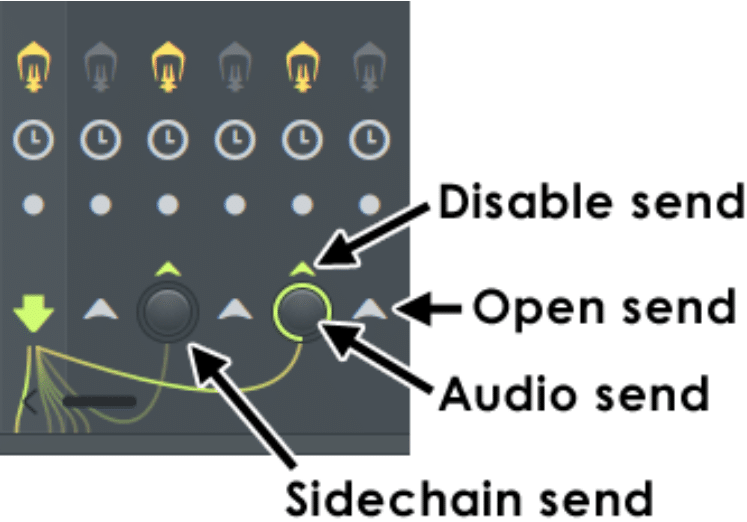
Lastly, don’t forget about automation 一 you’re able to automate almost every parameter in the Mixer, allowing you to create dynamic changes in the mix over time.
You can automate volume faders to create fades, pan knobs to create stereo movement, and effect parameters to create sweeping soundscapes.
Automation can add a new layer of depth and interest to your mix, so don’t be afraid to play around with it.
-
The Role of Note Data in the Piano Roll & Channel Rack
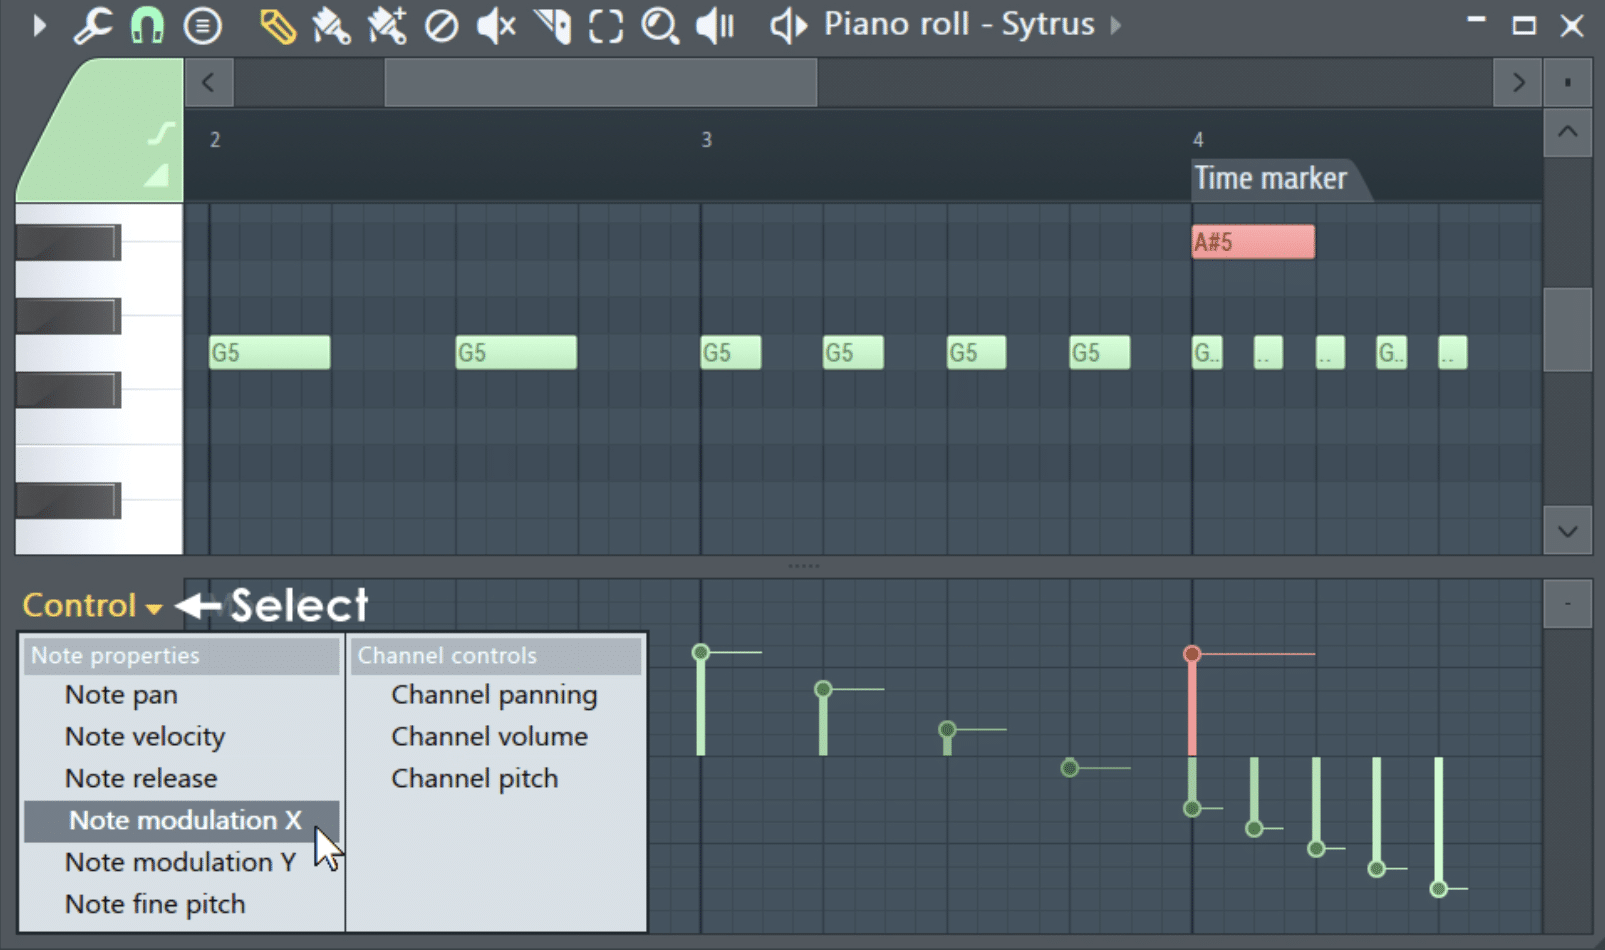
Note data is the driving force behind the Piano Roll and the Channel Rack.
Without note data, these tools would be useless.
In the Piano Roll, note data is used to create melodies and harmonies.
You can draw notes directly onto the Piano Roll grid, and you can adjust their pitch and duration by dragging them up/down and stretching their edges.
You can also use the Piano Roll’s built-in tools to edit note data in more advanced ways, such as creating arpeggios or strumming effects.
In the Channel Rack, note data is used to create rhythms and patterns.
Each channel in the Channel Rack corresponds to an instrument or a sample, and you can use the Step Sequencer to create a pattern of notes for that channel.
Also, you’re able use the Channel Rack’s Graph Editor to adjust parameters like velocity and pitch on a per-step basis.
By understanding how to manipulate note data in the Piano Roll and the Channel Rack, you can create a wide range of musical elements.
This ranges from simple beats to complex melodies complex melodies & harmonies.
FL Studio Expert Tips & Techniques
In this section, we’ll delve into some advanced techniques that can help you make the most of your time with FL Studio.
When you’re learning how to use FL Studio, these tips, tricks, and techniques can really help excel your workflow.
Each of these tips venture into some of the more advanced (or lesser-known) features of FL Studio 一 providing you with tools & techniques that can take your productions to the next level.
1. Using FL’s Patcher to Chain Multiple Instruments & Effects Together
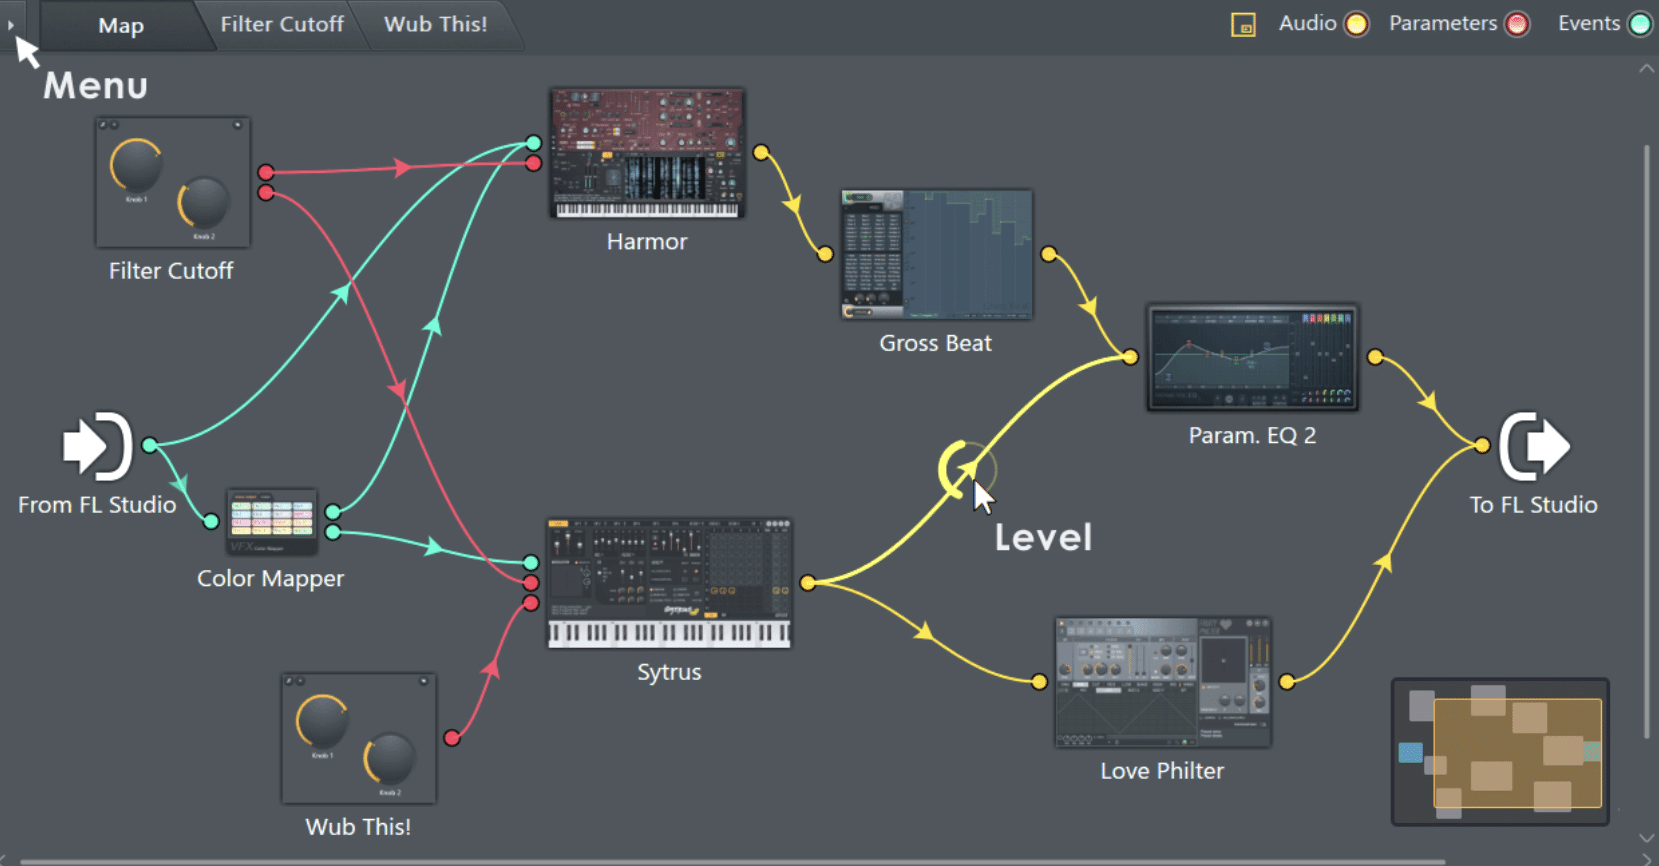
FL Studio Patcher is a powerful tool that allows you to chain multiple instruments and effects together in a single channel.
This can be useful for creating complex sounds, or for applying a chain of effects to a single audio signal (treating it as one device).
To use Patcher, add it to a channel in the Channel Rack.
Next, right-click in the Patcher window and select “Add plugin…” to add an instrument or effect.
You can then drag and drop plugins onto the Patcher surface, and connect them together by dragging from the output of one plugin to the input of another.
By chaining together multiple instruments and effects in Patcher, you can create mind-blowing sounds that would be difficult to achieve with a traditional mixer routing setup.
This makes Patcher a valuable tool for sound design & mixing.
NOTE: You can even download Image Line free VST/AU plugin version of Patcher, called IL’s Minihost Modulator, to use in “Standalone” with your favorite plugins (or in any DAW you’d like!).
2. Using Wave Candy for Audio Analyzation
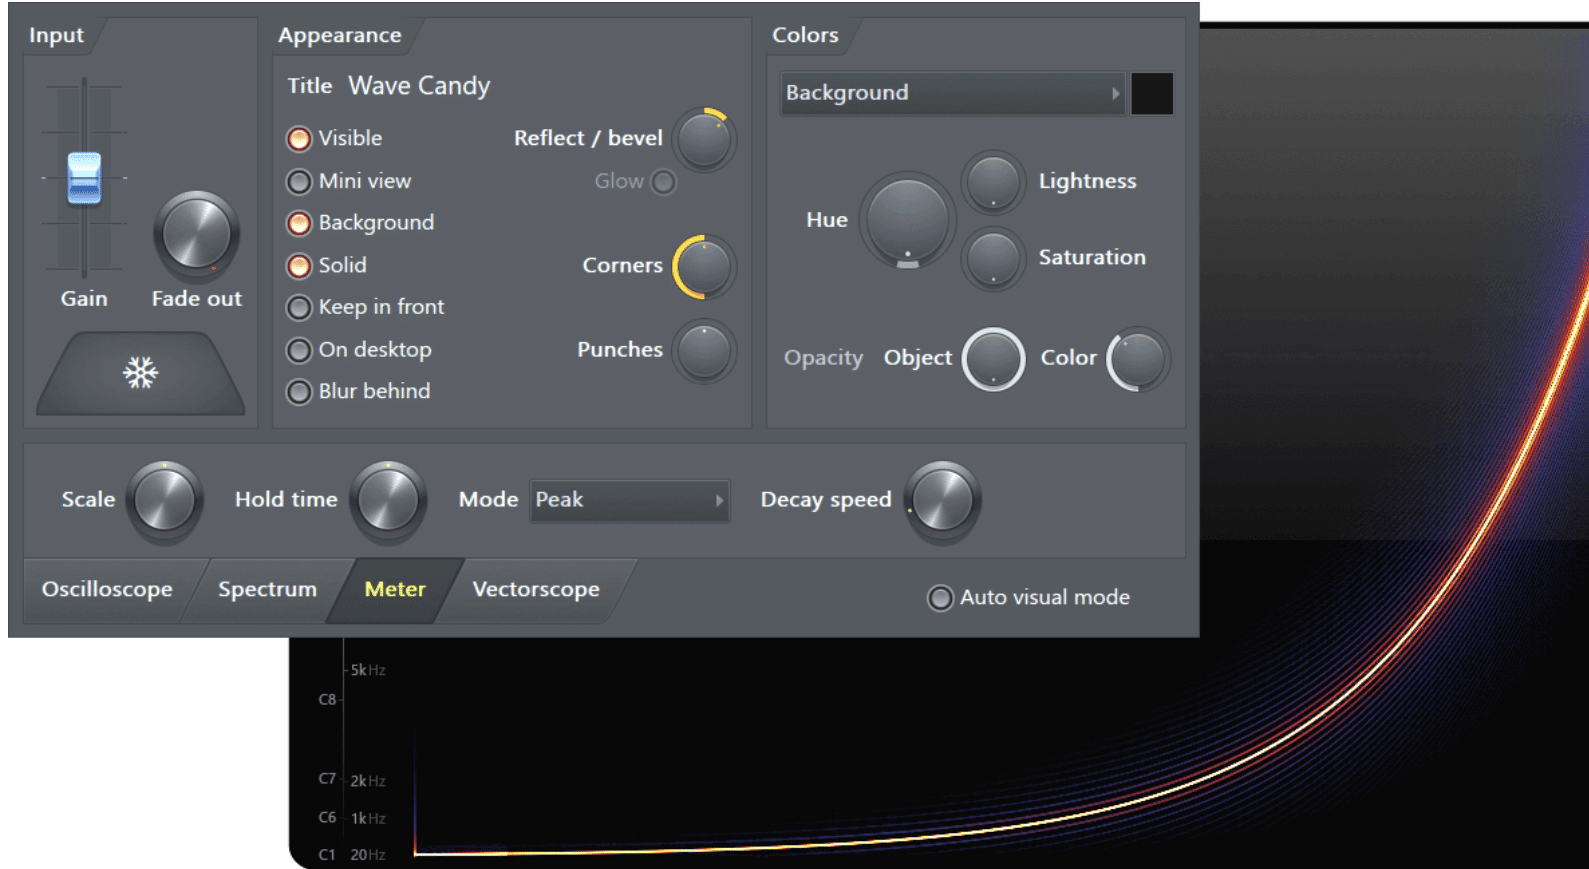
Wave Candy is a versatile and visually stunning audio analysis tool that comes with FL Studio.
It can display a waveform, a spectrum, or a vectorscope, and it offers a variety of options for customization.
To use Wave Candy, add it as an effect on the channel you want to analyze.
You can then select the type of analysis you want to perform from the Wave Candy interface.
Using Wave Candy can give you a visual understanding of your audio, helping you make more professional decisions when mixing and mastering.
For example, you might use the spectrum analyzer to identify frequency imbalances in your mix, or you might use the waveform display to check for clipping.
3. Using Maximus as a Limiter on Your Master
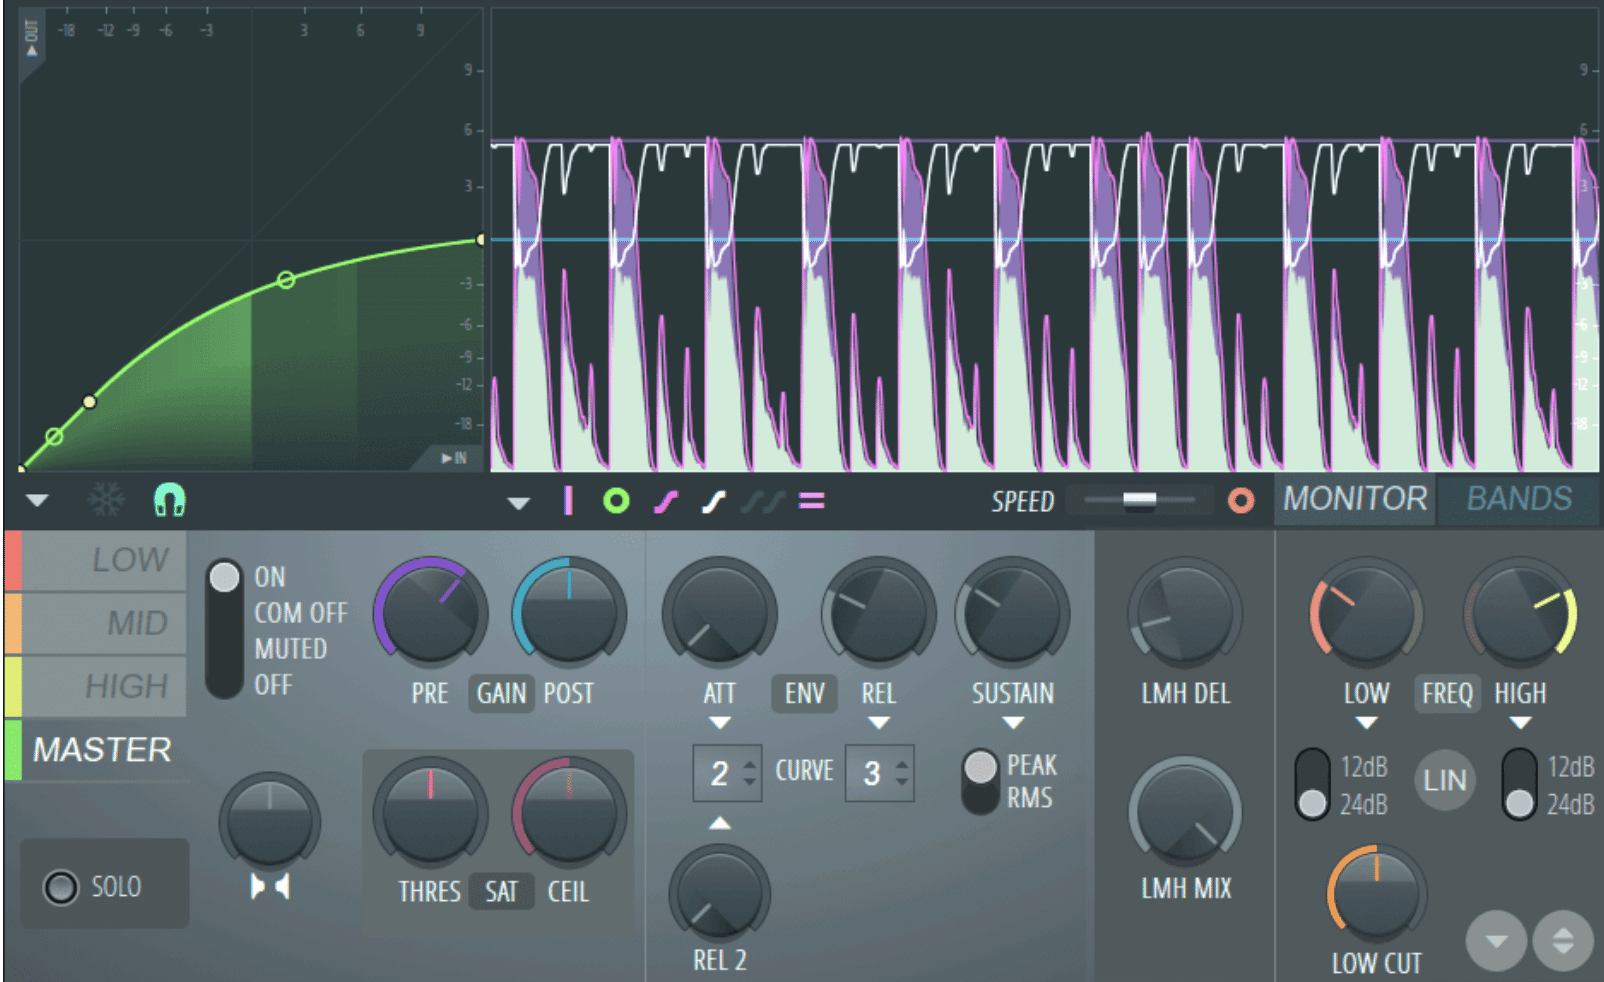
Maximus is a powerful multiband compressor and limiter that comes with FL Studio.
It’s particularly useful on the master channel, where it can help control the dynamics of your mix and prevent clipping.
It also has a stereo imaging tool built-in, in addition to many other epic features (oftentimes overlooked).
To use Maximus as a limiter, add it as the last effect on your master channel, which you can program to do, by default, every time you open/start a new session.
In the Maximus interface, select the “Master” band and set the compression curve/knee.
NOTE: The knee determines the “slope” of the compression curve and the way in which it’s applied.
Then, adjust the post-gain until the peaks of your mix are just hitting the threshold.
Using Maximus as a limiter can help ensure that your mix is loud and impactful, without distorting or clipping.
It’s an essential step in the mastering process, and it’s a key tool for any FL Studio user.
4. Using Fruity Peak Controller For Side-chain Compression Type Effects
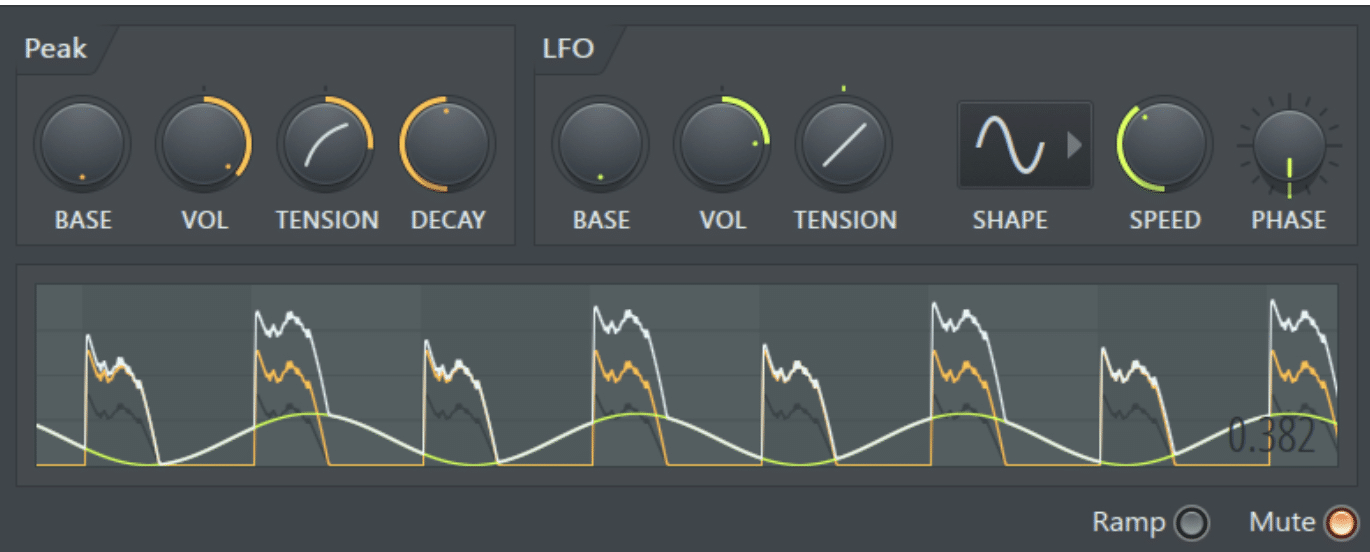
Fruity Peak Controller is a versatile plugin in FL Studio that can be used to create sidechain compression effects, often referred to as “pumping.”
This effect, prominent in genres like EDM, house music, and hip hop, involves the reduction of an instrument’s volume whenever another instrument, typically a kick drum, plays.
To start, add Fruity Peak Controller to the mixer track that contains the instrument you want to be affected by the sidechain (often a bassline or pad).
Within the Fruity Peak Controller window, you’ll see a set of controls.
The most important for sidechain effects are ‘Base’, ‘Vol’, and ‘Tension’.
- The ‘Base’ level 一 Sets the resting volume level
- ‘Vol’ 一 Adjusts the amount of volume reduction
- ‘Tension’ 一 Controls how quickly the volume recovers
NOTE: A good starting point is to set the ‘Base’ to 50%, ‘Vol’ to -50%, and then adjust the ‘Tension’ to taste.
Next, you need to link the Fruity Peak Controller to the volume control of the track you want to ‘pump’.
Simply right-click on the channel volume fader, select ‘Link to controller’, and in the ‘Internal controller’ dropdown, select ‘Peak ctrl ([your track’s name here]) – Peak’.
Now, every time the kick drum (or any other percussive instrument) hits, the volume of the linked instrument will decrease, creating that pumping effect!
5. Creating Complex Chord Progressions In FL Studio Using the Built-In Chords (“Stamps”)
Creating complex chord progressions in FL Studio can seem like a daunting task, especially if you’re not well-versed in music theory.
Side note, if you want a refresher course on everything music theory, we’ve got you covered.
However, FL Studio’s Piano Roll has a built-in feature, affectionately known as “Stamps,” that can simplify this process.
First, let’s dive into the Piano Roll window, where you’ll be creating your chord progressions.
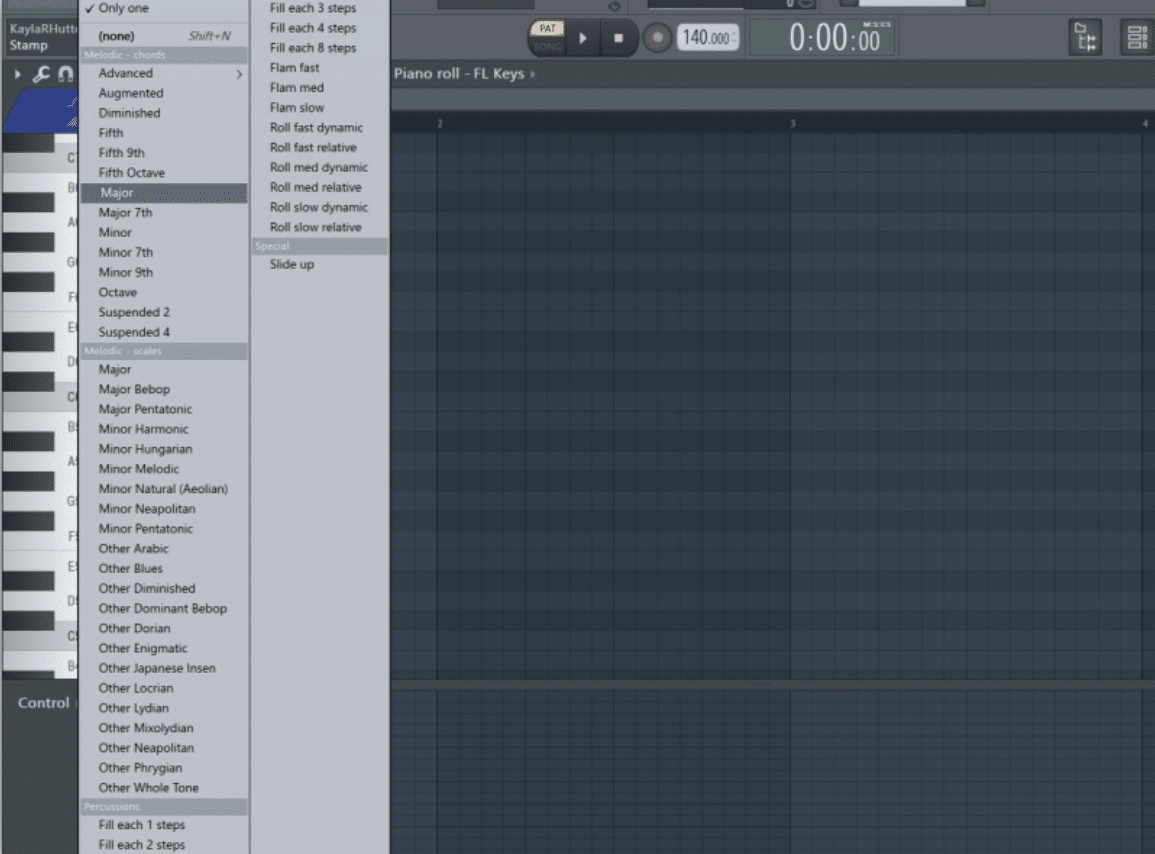
To access the stamps, click on the little arrow on the top left corner of the Piano Roll window, and then hover over the ‘Chord’ option.
A list of chord types will appear, ranging from simple major and minor triads to more complex 7th, 9th, suspended chords (plus various other chord types).
Now, let’s say you want to create a chord progression in the key of C major.
Start by choosing a ‘Major’ chord from the stamps list. Click on the C note in the Piano Roll, and voila! You’ve got a C major chord.
To add complexity, let’s use a different stamp for the next chord. Select the ‘Major 7th’ stamp and click on the G note.
Now you have a G major 7th chord, adding some musical sophistication to your progression.
Continue this process, experimenting with different stamps and root notes, to create your chord progression.
NOTE: If you’re ever unsure about what chords belong in a particular key, FL Studio has a handy ‘Scale’ stamp that can guide you.
How To Use FL Studio: Final Thoughts
Well, there you have it.
We’ve taken an extensive journey through FL Studio, explored its essential features and functions, and divulged expert tips & tricks to help you learn how to use FL Studio.
All these concepts, techniques, and tools are yours to incorporate in your music production journey.
To aid your journey, you should download these professional quality, proven to work, and easy to customize free templates.
This unique collection of templates is designed specifically for FL Studio and offers endless learning opportunities.
They’re actually modeled off of billboard-charting tracks, so you know they’re official.
By reverse engineering these templates, you can study not only the art of production but also the specifics of how operations are performed in FL Studio specifically.
Remember, the path of music production is an ever-evolving one.
So keep experimenting, keep learning, and above all, keep making unique music for the world.
Until next time…


Leave a Reply
You must belogged in to post a comment.